Go Back
To create these tasty bars, gather these key ingredients: - 24 Oreo cookies, crushed - 1/2 cup unsalted butter, melted - 2 cups cream cheese, softened - 1 cup powdered sugar - 1 teaspoon peppermint extract - 1 cup semi-sweet chocolate chips - 1 teaspoon coconut oil (or vegetable oil) - 1/4 cup crushed peppermint candies (for topping) These ingredients blend to form a rich, creamy, and crunchy treat. You can switch some ingredients based on your taste. Here are a few ideas: - Use gluten-free Oreos for a gluten-free option. - Swap cream cheese with a dairy-free version for vegan bars. - Try white chocolate chips instead of semi-sweet chocolate for a sweeter taste. - Replace peppermint extract with vanilla extract for a different flavor. Toppings add fun and flair to your bars. Consider these options: - Drizzle extra melted chocolate over the top for a fancy look. - Use mini marshmallows or chocolate sprinkles for extra sweetness. - Garnish with small peppermint sticks for a festive touch. These toppings make your dessert even more appealing and tasty. To start, grab a mixing bowl. Add 24 crushed Oreo cookies and 1/2 cup of melted unsalted butter. Mix until every crumb is coated. This mix forms the base of your bars. Next, take a 9x9 inch square pan. Press the Oreo mixture firmly into the bottom. Make sure it is even. Refrigerate this base for about 15 minutes. This helps it set well. Now, in a separate bowl, beat 2 cups of softened cream cheese. Use a hand mixer for the best results. Mix until smooth. Gradually add 1 cup of powdered sugar and 1 teaspoon of peppermint extract. Keep beating until everything is well combined. This cream cheese layer gives the bars a rich flavor. Next, take a microwave-safe bowl. Combine 1 cup of semi-sweet chocolate chips with 1 teaspoon of coconut oil. Microwave this mix in 30-second intervals. Stir in between to avoid burning. Once melted and smooth, pour the chocolate over the cream cheese layer. Use a spatula to spread it evenly. Finally, sprinkle 1/4 cup of crushed peppermint candies on top of the chocolate. Press them down gently so they stick. Now, refrigerate the bars for at least 3 hours. This makes them firm enough to cut. Once set, lift the bars from the pan. Cut them into squares or rectangles. Enjoy your delicious creation! When mixing, always start with the right tools. A large bowl helps combine ingredients well. Use a sturdy spatula to mix the Oreo crumbs and melted butter. This mix should stick together. For melting chocolate, a microwave works best. Heat it in short bursts of 30 seconds. Stir in between to avoid burning. This keeps the chocolate nice and smooth. For a smooth cream cheese layer, make sure your cream cheese is very soft. Let it sit at room temperature for about 30 minutes. Use a hand mixer to beat it until creamy. Add the powdered sugar slowly. This helps combine the sugar well without lumps. Always scrape down the bowl to mix evenly. To make these bars even better, try adding some fun touches. You can mix in mini chocolate chips for extra texture. A pinch of sea salt can enhance the chocolate flavor. If you like a stronger mint taste, add a bit more peppermint extract. For a festive look, sprinkle some crushed nuts or colored sprinkles on top. {{image_2}} You can make a vegan version of these bars. Start with vegan Oreo cookies. Use coconut oil instead of butter. For the cream cheese, pick a dairy-free option. Many brands offer tasty vegan cream cheese now. Use powdered sugar as usual. The rest of the steps remain the same. You get a rich and creamy treat without any dairy. Feel free to swap out the Oreo cookies. Try chocolate sandwich cookies for a richer taste. Vanilla cookies can give a lighter flavor. If you want crunch, use graham crackers. Each type of cookie brings its own fun twist. The key is to keep the base firm and tasty. Peppermint is great, but you can change it up. Use vanilla extract for a classic touch. Almond extract gives a nutty flavor that many enjoy. You could even try orange or lemon for a zesty kick. Each change offers a new taste experience. Just remember to keep the amount the same for balance. To keep your No-Bake Chocolate Peppermint Oreo Bars fresh, store them in an airtight container. This prevents moisture and keeps them tasty. You can layer parchment paper between bars to avoid sticking. Make sure to refrigerate them right after cutting. This keeps the bars firm and ready to enjoy. These delicious bars can last in the fridge for about a week. Over time, they may lose some texture but will still taste great. Always check for any signs of spoilage before indulging. If you see any changes in color or smell, it’s best to toss them out. If you want to keep them longer, freezing is a great option. Wrap each bar in plastic wrap, then place them in a freezer-safe bag. They can stay in the freezer for up to three months. When you're ready to enjoy, let them thaw in the fridge overnight for the best taste and texture. Yes, you can use regular cream cheese. However, it is best to soften it first. Softening helps the cream cheese mix well with the sugar. You can soften it by leaving it out at room temperature for about 30 minutes or microwaving it for 10-15 seconds. If you lack peppermint extract, you can use mint extract as a substitute. Mint extract gives a similar flavor. You can also use crushed peppermint candies in the cream cheese mixture for a more intense taste. Adjust the amount to your liking. To make these bars gluten-free, use gluten-free Oreo cookies. Many brands offer gluten-free options that taste great. Check the labels to ensure they meet your needs. The other ingredients are naturally gluten-free. You can use other types of chocolate. Dark chocolate adds a rich flavor, while milk chocolate offers sweetness. White chocolate is another option, but it will change the flavor profile. Melt and pour the chocolate as you would with semi-sweet chocolate. In this blog post, we covered the essential ingredients for no-bake chocolate peppermint Oreo bars, along with optional ones. I shared step-by-step instructions, tips, and variations. You can customize this treat to fit your taste and needs. Remember to store them properly for the best flavor. Whether you make them vegan or play with flavors, these bars will impress. Enjoy making and sharing these fun, easy treats!

No-Bake Chocolate Peppermint Oreo Bars

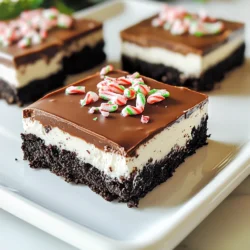
Indulge in the festive delight of No-Bake Chocolate Peppermint Oreo Bars! These easy-to-make treats combine the rich flavors of Oreo cookies, cream cheese, and chocolate, topped with a refreshing crunch of peppermint candies. Perfect for holiday parties or a sweet snack any time. Check out the full recipe for step-by-step instructions and tips for presentation! Don't miss out—click through to create your own delicious batch today! #NoBakeDesserts #PeppermintTreats #OreoDesserts #HolidayRecipes

Ingredients
  

24 Oreo cookies, crushed

1/2 cup unsalted butter, melted

2 cups cream cheese, softened

1 cup powdered sugar

1 teaspoon peppermint extract

1 cup semi-sweet chocolate chips

1 teaspoon coconut oil (or vegetable oil)

1/4 cup crushed peppermint candies (for topping)

Instructions
 

In a mixing bowl, combine the crushed Oreo cookies and melted butter. Mix until all crumbs are evenly coated.

    Press the Oreo mixture firmly into the bottom of a 9x9 inch square pan to form a base layer. Refrigerate for about 15 minutes to set.

      In a separate bowl, beat the softened cream cheese with a hand mixer until smooth. Gradually add in the powdered sugar and peppermint extract, mixing until fully combined.

        Spread the cream cheese mixture evenly over the chilled Oreo crust. Use a spatula to smooth the top for an even layer.

          In a microwave-safe bowl, combine the semi-sweet chocolate chips and coconut oil. Microwave in 30-second intervals, stirring in between, until the chocolate is completely melted and smooth.

            Pour the melted chocolate over the cream cheese layer, spreading it evenly with a spatula.

              Sprinkle the crushed peppermint candies on top of the chocolate layer. Gently press them down to ensure they adhere.

                Refrigerate the bars for at least 3 hours or until they are firm enough to cut into squares.

                  Once set, lift the bars out of the pan and cut them into squares or rectangles.

                    Prep Time: 20 mins | Total Time: 3 hrs 20 mins | Servings: 12-16

                      - Presentation Tips: Arrange the bars on a festive platter and drizzle additional melted chocolate or crushed peppermint around the edges for a decorative touch. Optionally, garnish each bar with a small peppermint stick for added flair.