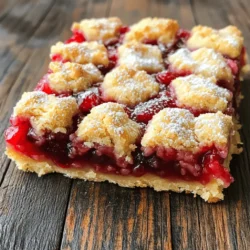
Go Back
To make cherry pie bars, you need some basic items. Here’s what you’ll need: - 2 cups all-purpose flour - 1 cup granulated sugar - ½ cup unsalted butter, melted - 1 large egg - 1 teaspoon vanilla extract - 1 teaspoon baking powder - ¼ teaspoon salt - 2 cups fresh or frozen cherries, pitted and halved - 1 tablespoon lemon juice - 1 tablespoon cornstarch - ½ teaspoon almond extract - Powdered sugar for dusting (optional) These ingredients blend together to create a rich, sweet treat. You can also add items for a twist on the classic flavor. Consider these options: - Cinnamon or nutmeg for warmth - A splash of almond or orange juice for zest - Chopped nuts for crunch - Other fruits like blueberries or raspberries These choices let you make the bars your own. Experiment and see what you like best! Having the right tools will make your baking process easier. Here’s what I recommend: - An 8x8-inch baking pan - Parchment paper for easy removal - Mixing bowls for dry and wet ingredients - A whisk for mixing - A spatula for spreading the cherry filling Using these tools will help you create perfect cherry pie bars every time. Check out the Full Recipe for a step-by-step guide! Start by gathering all your ingredients. You need flour, sugar, butter, and cherries. I prefer fresh cherries, but frozen work well too. 1. Preheat your oven to 350°F (175°C). 2. Grease an 8x8-inch pan. Line it with parchment paper, leaving some hanging over the sides. 3. In a big bowl, whisk together flour, sugar, baking powder, and salt. 4. In another bowl, mix melted butter, egg, and vanilla. Stir until smooth. 5. Combine the wet and dry mixes. You will get a crumbly dough. 6. Press two-thirds of this dough into the bottom of your pan. This is your base. Now, it’s time for the cherries. 1. In a new bowl, mix the pitted cherries, lemon juice, cornstarch, and almond extract. 2. Spread this cherry mix evenly over the crust in your pan. 3. Crumble the rest of the dough over the cherries as a topping. 4. Bake in the oven for 35-40 minutes. The top should be golden brown, and the filling should bubble. After baking, let your bars cool for about 15 minutes in the pan. 1. Use the parchment paper to lift the bars out. 2. Allow them to cool completely on a wire rack. 3. Slice into bars and dust with powdered sugar if you like. Enjoy your cherry pie bars! For more detailed steps, refer to the Full Recipe. To make the best cherry pie bars, follow these steps. Use a good mix of sweet and tart cherries. This gives your bars great flavor. Always measure your ingredients carefully. Too much flour can make the bars dry. Use fresh cherries when you can. If using frozen, thaw and drain them well first. This keeps the bars from getting soggy. Remember to preheat your oven to 350°F. This helps the bars bake evenly. Press the dough into the pan firmly for a good base. One common mistake is overmixing the dough. This can make your bars tough. Mix until just combined for the best texture. Another mistake is not checking the cherries. If they are too watery, your filling will be runny. Always coat them with cornstarch for thickening. Don’t skip the cooling step either. Let them cool for at least 15 minutes before cutting. Chilling them helps the bars hold their shape. Fresh cherries are often the best choice for flavor and texture. They add a bright taste to your bars. When buying, look for firm, plump cherries. If fresh is not an option, frozen can work well. Just make sure to thaw them first. Drain any excess juice to avoid a soggy crust. You can use the Full Recipe to guide you through the process of using both types of cherries. Enjoy your cooking! {{image_2}} You can change up the flavor of your cherry pie bars easily. Try adding a splash of orange juice for a bright twist. You can also mix in some chopped nuts like almonds or walnuts for crunch. For a fun twist, swap out cherries for blueberries or peaches. Each fruit gives a new taste! If you need gluten-free bars, use a gluten-free flour blend. It works well and keeps the taste great. For a vegan version, replace the egg with a flax egg. Mix one tablespoon of ground flaxseed with three tablespoons of water. Let it sit for five minutes to thicken. You can also use vegan butter instead of regular butter. Serve your cherry pie bars warm with a scoop of vanilla ice cream. It melts and mixes with the cherry filling, creating a yummy dessert. You can also top them with whipped cream or a dusting of powdered sugar. For a fun twist, drizzle chocolate sauce on top. This adds a rich flavor to the sweet cherries. For the full recipe, check out the Cherry Bliss Pie Bars section above! To keep your cherry pie bars fresh, let them cool completely. Once cool, cover them tightly with plastic wrap or foil. You can also place them in an airtight container. Stored this way, they will last for about three days at room temperature. If you want them to last longer, put them in the fridge. They will stay good for about a week if chilled. Freezing cherry pie bars is a great way to save some for later. First, let the bars cool down fully. Then, cut them into squares. Wrap each square in plastic wrap tightly. After that, put them in a freezer-safe bag or container. Make sure to label the bag with the date. These bars can last up to three months in the freezer. When you're ready to enjoy them again, just take out what you need. Reheating cherry pie bars is simple. If they are at room temperature, you can heat them in the microwave for about 10-15 seconds. If they are cold from the fridge, heat them for about 20-30 seconds. You can also reheat them in an oven. Preheat the oven to 350°F (175°C). Place the bars on a baking sheet and warm them for about 5-10 minutes. This will help restore their nice texture. For the full recipe, check out Cherry Bliss Pie Bars! The best cherries for Cherry Pie Bars are sweet or tart cherries. I recommend using Bing cherries for their sweetness. You can also use sour cherries, which add a nice tang. Always choose fresh cherries if you can. If not, frozen cherries work well too. Just make sure they are pitted and halved before using. Yes, you can make Cherry Pie Bars in advance. They taste great after a day in the fridge. Just bake them and let them cool completely. Then, store them in an airtight container. They can last up to five days in the fridge. This makes them perfect for parties or gatherings. You’ll know the Cherry Pie Bars are done when the top is golden brown. You should see the cherry filling bubbling around the edges. This usually takes about 35-40 minutes at 350°F. If you insert a toothpick into the crust, it should come out clean. You can find pre-made Cherry Pie Bars at many bakeries. Some grocery stores may also carry them. Look in the dessert section for ready-made options. If you want a homemade taste, I always recommend trying the Full Recipe. It’s simple and delicious! In this article, we explored how to make delicious cherry pie bars. We looked at the key ingredients and essential tools needed for success. I shared step-by-step instructions for preparation and baking, with tips to perfect your bars. You learned about flavor variations to make them your own and how to store leftovers. Finally, I addressed common questions about cherries and baking. Remember, with a few simple steps, you can enjoy these tasty treats anytime! Happy baking!

Cherry Pie Bars

Indulge in the delightful taste of Cherry Bliss Pie Bars with this easy recipe! Combining sweet cherries and a buttery crust, these bars are perfect for any dessert lover. With simple ingredients and straightforward instructions, you can create a delicious treat that will impress your friends and family. Don’t miss out on this sweet sensation—click through to explore the recipe and host your own Cherry Bliss tasting today!

Ingredients
  

2 cups all-purpose flour

1 cup granulated sugar

½ cup unsalted butter, melted

1 large egg

1 teaspoon vanilla extract

1 teaspoon baking powder

¼ teaspoon salt

2 cups fresh or frozen cherries, pitted and halved

1 tablespoon lemon juice

1 tablespoon cornstarch

½ teaspoon almond extract

Powdered sugar for dusting (optional)

Instructions
 

Preheat your oven to 350°F (175°C). Grease and line an 8x8-inch baking pan with parchment paper, leaving some paper overhanging for easy removal later.

    In a large mixing bowl, whisk together the flour, granulated sugar, baking powder, and salt.

      In a separate bowl, combine the melted butter, egg, and vanilla extract. Mix well until smooth.

        Pour the wet ingredients into the dry ingredients and mix until a crumbly dough forms. Press two-thirds of this mixture into the bottom of the prepared baking pan to create a solid base.

          In another bowl, combine the cherries, lemon juice, cornstarch, and almond extract. Gently mix until the cherries are coated.

            Spread the cherry mixture evenly over the crust in the baking pan.

              Crumble the remaining dough over the cherries to create a topping.

                Bake in the preheated oven for 35-40 minutes, or until the top is golden brown and the cherry filling is bubbling.

                  Remove from the oven and let cool in the pan for about 15 minutes before lifting out using the parchment paper overhang.

                    Allow to cool completely on a wire rack before slicing into bars. Dust with powdered sugar if desired.

                      Prep Time: 25 minutes | Total Time: 1 hour | Servings: 12 bars