Looking for a quick and healthy snack? Vanilla chia pudding cups are the answer! They are easy to make and full of good nutrients. In this guide, I’ll show you how to whip up these delicious cups using simple ingredients. From mixing the base to choosing toppings, I’ll cover everything you need to know. Get ready for a tasty treat that’s great for any time of the day!
Ingredients
Chia Seeds
Chia seeds are the star of this recipe. They absorb liquid and swell up, creating a thick, creamy texture. For this recipe, we use 1/2 cup of chia seeds. These tiny seeds pack a big nutritional punch. They are full of fiber, protein, and healthy fats. They also help keep you full longer.
Liquid Base Options
The liquid base is key to the pudding. I use 2 cups of almond milk, but you can choose any milk you like. Dairy milk, coconut milk, or oat milk work great too. Each type of milk adds its own flavor. Feel free to mix it up based on what you have at home.
Sweeteners and Flavorings
To sweeten the pudding, I add 1/4 cup of maple syrup. Honey is a good option too. You can adjust the sweetness based on your taste. For flavor, I use 1 teaspoon of pure vanilla extract. This gives the pudding its lovely vanilla taste. You can also add a pinch of salt (1/4 teaspoon) to enhance all the flavors.
Toppings Suggestions
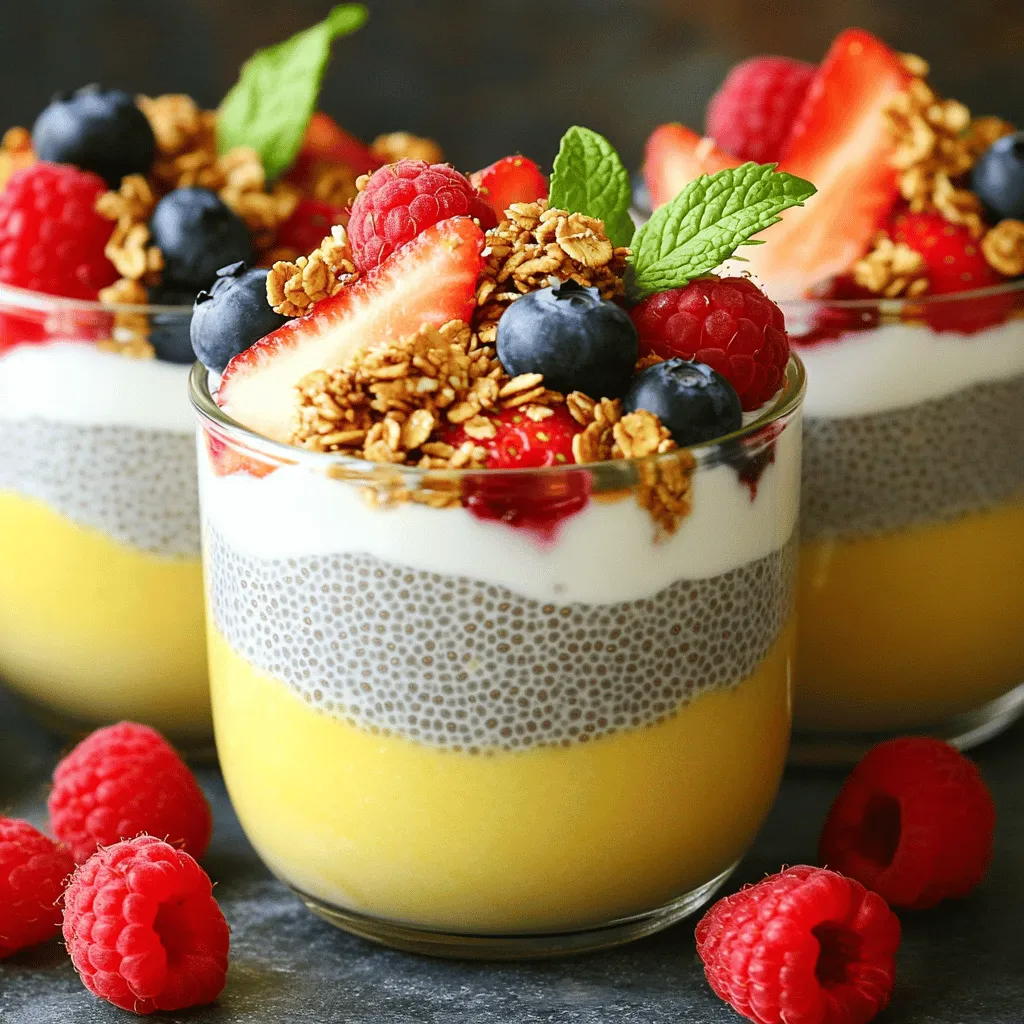
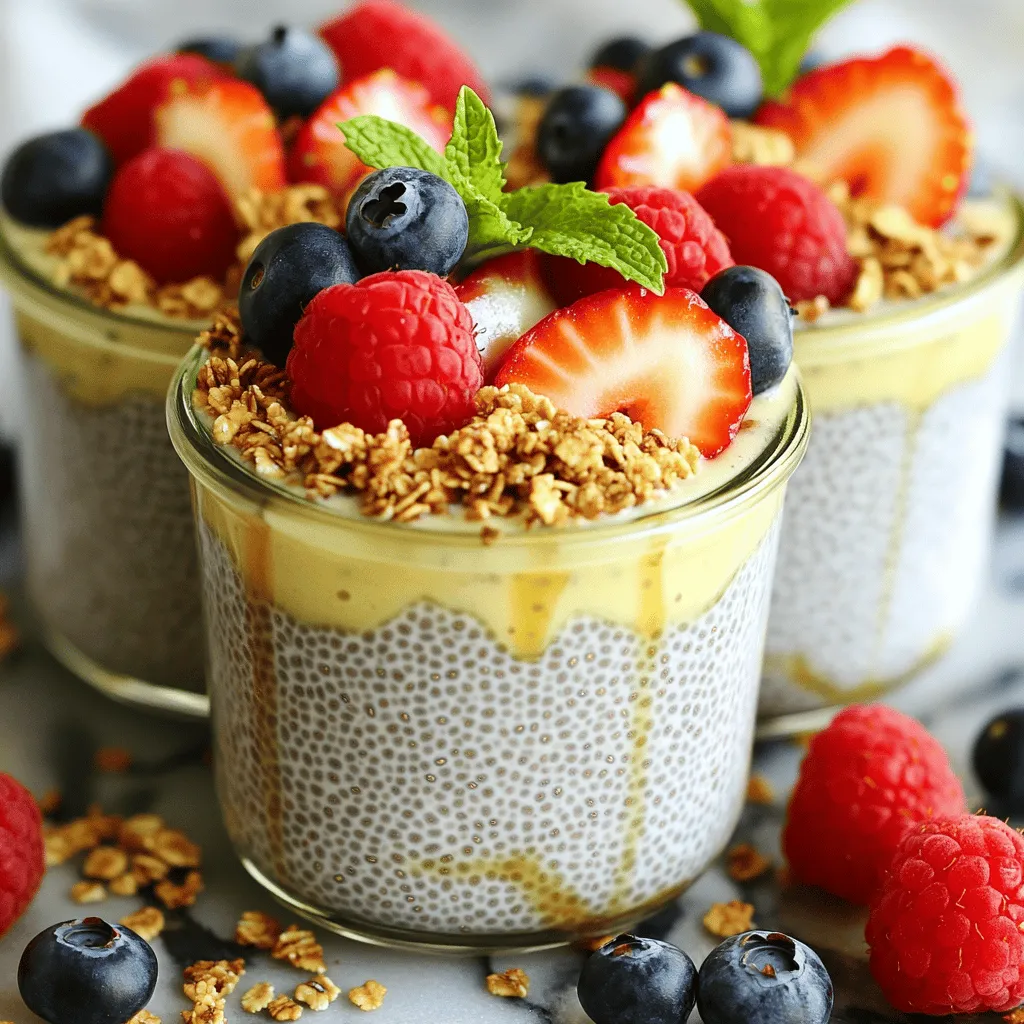
Toppings make this pudding even better. Fresh berries are my favorite choice. You can use strawberries, blueberries, or raspberries. They add color and freshness. For crunch, add granola or nuts. This gives a nice texture. You can even drizzle a little extra maple syrup on top if you like it sweeter. Serve in clear cups to show off those beautiful layers!
Step-by-Step Instructions
Mixing the Base Ingredients
Start by grabbing a medium bowl. Pour in 2 cups of almond milk. You can use any milk you like. Next, add 1/4 cup of maple syrup for sweetness. If you prefer honey, that works too. Then, add 1 teaspoon of pure vanilla extract. This gives the pudding its lovely flavor. Finally, sprinkle in 1/4 teaspoon of salt. Whisk everything together until it’s well mixed.
Adding and Distributing Chia Seeds
Now, it’s time for the chia seeds. Gradually add 1/2 cup of chia seeds into the bowl. Whisk continuously as you add them. This step prevents clumping, which can make your pudding lumpy. Once the seeds are in, let the mixture sit for 5 minutes. This allows the seeds to absorb some liquid. After 5 minutes, whisk it again to ensure the chia seeds are evenly spread.
Refrigeration Time and Consistency Check
Cover the bowl with plastic wrap. Place it in the refrigerator for at least 4 hours. You can also leave it overnight for a thicker pudding. After the chilling time, take it out and stir it well. This helps make the pudding creamy and smooth. If it’s too thick, you can add a splash of milk to loosen it up.
Serving Suggestions
Spoon the chia pudding into individual cups. I love using glass jars for a pretty look. Top each cup with fresh berries like strawberries, blueberries, or raspberries. This adds color and freshness. For extra crunch, sprinkle some granola or nuts on top. If you want more sweetness, drizzle a little maple syrup on your pudding. Enjoy your delicious and healthy snack!
Tips & Tricks
Achieving Creamy Texture
To get a smooth texture, mix well from the start. After you whisk the almond milk, syrup, vanilla, and salt, add the chia seeds slowly. This step helps avoid lumps. Let the mix sit for five minutes before whisking again. This gives the seeds time to soak up some liquid. After chilling, stir the pudding again for a creamy finish.
Layering for Visual Appeal
When serving, use clear cups or jars. This way, you can show off the beautiful layers. Start with a layer of pudding, then add some berries. Repeat the layers until your cups are full. A sprig of mint on top adds a nice touch. It makes the cups look fresh and inviting.
Sweetness Adjustment Recommendations
Not everyone likes the same level of sweetness. You can adjust the maple syrup or honey to fit your taste. If you want it sweeter, add a little more syrup. If you prefer less sweetness, cut back a bit. Tasting the mix before chilling helps find the perfect balance.
Tools for Easy Preparation
You don’t need fancy tools for this recipe. A medium bowl and a whisk are all you need. A measuring cup helps with the liquids, and a spoon is great for serving. If you want, use jars to serve the pudding. They make for easy storage too.
Variations
Flavor Infusions (e.g., Matcha, Cocoa)
You can easily change the taste of vanilla chia pudding. Adding matcha or cocoa gives it a fun twist. For matcha, stir in one to two teaspoons with the milk. It adds a green color and a nice earthy flavor. For cocoa, mix in one to two tablespoons. This will make it chocolatey and rich. Both options are simple and add unique flavors to your snack.
Dairy-Free and Nut-Free Options
If you want a dairy-free option, almond milk works well. But you can also use oat milk or coconut milk. These choices keep the pudding creamy without dairy. If you need a nut-free version, stick to coconut milk or soy milk. Both keep the pudding smooth and tasty while being safe for those with nut allergies.
Seasonal Fruit Toppings
Toppings make chia pudding even better. Fresh berries like strawberries and blueberries are great choices. You can also use raspberries or blackberries. For a tropical twist, add diced mango or pineapple. In the fall, try sliced apples or pears with a sprinkle of cinnamon. Seasonal fruits add color and flavor, making your pudding look lovely and taste fresh.
Storage Info
Best Practices for Refrigeration
Store your vanilla chia pudding in the fridge. This keeps it fresh and tasty. Use an airtight container to avoid any odors. Make sure to separate layers if you add toppings. Keep the toppings in their own container until you’re ready to eat. This helps maintain their crunch.
Shelf Life and Reheating Tips
Chia pudding lasts about 4 to 5 days in the fridge. If you want to enjoy it later, don’t freeze it. Freezing changes the texture. Simply eat it cold. If it seems too thick, stir in a little almond milk to loosen it up. You can also add fresh toppings when you serve.
Containers for Storage
Pick containers that are glass or BPA-free plastic. Glass jars work well. They show off the pretty layers. Plus, glass keeps flavors better. If you plan to take pudding on the go, use a leak-proof container. This keeps your bag clean and your snack safe.
FAQs
What is the best milk for chia pudding?
The best milk for chia pudding is almond milk. It has a light taste. You can also use coconut milk for more creaminess. Other options include oat milk or soy milk. Choose what you like best. Each milk gives a unique flavor.
Can I use different sweeteners?
Yes, you can use different sweeteners. Maple syrup is my favorite. Honey works well too. You can try agave syrup or stevia. Adjust the amount based on your taste. Just remember, some sweeteners are stronger than others.
How long does chia pudding last in the refrigerator?
Chia pudding lasts about 5 days in the fridge. Store it in a sealed container. Keep it fresh and tasty. If you notice any change in smell or texture, throw it away. Always check before eating.
Is chia pudding suitable for meal prep?
Chia pudding is great for meal prep! It’s easy to make and store. You can prepare it in advance for busy days. Just divide it into cups and chill. It’s a healthy snack ready to grab.
In this article, we explored making chia pudding. We covered ingredients like chia seeds, liquid bases, sweeteners, and toppings. Next, we highlighted easy step-by-step instructions for preparation and ways to ensure a creamy texture. I also shared variations and storage tips to keep your pudding fresh.
Chia pudding is fun and versatile. You can customize it to match your taste. Enjoy creating your unique version at home!