Are you ready to impress your friends with a dessert that feels fancy but is simple to make? Vanilla Bean Crème Brûlée is the perfect blend of rich flavors and smooth textures. In this guide, I’ll walk you through each step, sharing essential tips and tricks to help you create a flawless masterpiece. Whether you’re a novice or a pro, this treat will delight your taste buds and elevate your dessert game!
Why I Love This Recipe
- Decadent Flavor: This crème brûlée has a rich and creamy texture, with the luxurious taste of vanilla bean that elevates it above ordinary desserts.
- Impressive Presentation: The beautiful caramelized sugar crust adds an elegant touch, making it a showstopper for dinner parties or special occasions.
- Customizable: You can easily infuse different flavors or add toppings to personalize each serving, making it versatile for any palate.
- Simple Yet Sophisticated: Despite its fancy reputation, the recipe is straightforward and can be made at home, allowing anyone to impress their guests.
Ingredients
Essential Ingredients for Vanilla Bean Crème Brûlée
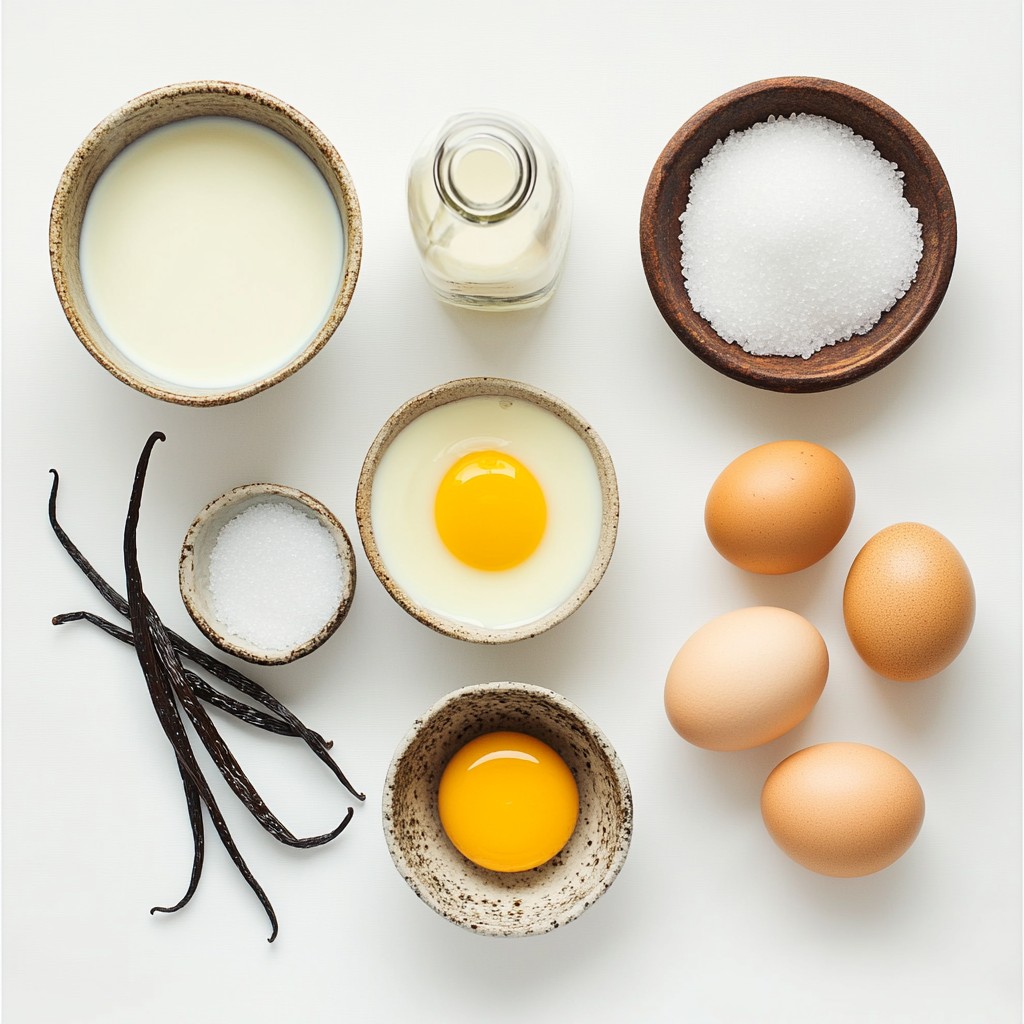
- 2 cups heavy cream
- 1 cup whole milk
- 1 vanilla bean, split and seeds scraped
- 1/2 cup granulated sugar, divided
- 5 large egg yolks
- 1/4 teaspoon salt
- 1/2 teaspoon pure vanilla extract (optional)
- 4 tablespoons turbinado sugar (for caramelizing)
To make a perfect vanilla bean crème brûlée, you need a few key ingredients. Each plays an important role in creating that rich, creamy texture.
First, heavy cream is a must. It gives the brûlée its rich flavor. Whole milk adds a bit of lightness to balance the cream. The star of this dessert is the vanilla bean. Using a fresh vanilla bean brings a lovely aroma and taste that makes this treat special.
Next, granulated sugar sweetens the custard. It also helps form that nice sugar crust on top. The egg yolks provide the silky texture. They create a smooth custard that melts in your mouth. A pinch of salt enhances all the flavors.
If you want a stronger vanilla taste, you can add a little pure vanilla extract. It’s not needed but can boost the flavor. Finally, you need turbinado sugar to caramelize the top. This sugar creates the satisfying hard crust.
Gather these ingredients, and you are ready to whip up a delightful dessert.
Step-by-Step Instructions
Preparing the Infused Cream
1. Preheat the oven and heat the cream: Start by preheating your oven to 325°F (160°C). This step ensures your custard cooks evenly.
2. Allowing the vanilla to steep: In a medium saucepan, mix 2 cups of heavy cream, 1 cup of whole milk, and the split vanilla bean with its seeds. Heat this mixture over medium heat until it simmers, then remove it from the heat. Let it steep for about 15 minutes. This step releases the rich flavor of the vanilla bean into the cream.
Mixing the Custard Base
1. Whisking egg yolks and sugar: In another bowl, whisk together 5 egg yolks, 1/4 cup of granulated sugar, and a pinch of salt. You want the mixture to become pale and a bit thick.
2. Combining the mixtures: After steeping, remove the vanilla bean from the cream. Slowly pour the warm cream into the egg mixture while whisking. This helps to temper the eggs, keeping them from scrambling. If you like, add 1/2 teaspoon of pure vanilla extract for extra flavor.
Baking and Cooling
1. Pouring custard into ramekins: Strain the mixture through a fine-mesh sieve to remove any clumps. Then, divide the custard into 6 to 8 ramekins, depending on size.
2. Baking in a water bath: Place the ramekins in a baking dish. Fill the dish with boiling water until it reaches halfway up the sides of the ramekins. This water bath helps the custard cook gently.
3. Cooling and chilling the custard: Carefully bake the dish in the oven for 30-35 minutes. The edges should be set, but the center can still jiggle a bit. Once done, let the ramekins cool at room temperature for about 30 minutes. Cover them with plastic wrap and chill in the fridge for at least 4 hours, or overnight if you can wait.
Caramelizing the Sugar
1. Techniques for achieving the perfect crust: When you are ready to serve, sprinkle about 1/2 tablespoon of turbinado sugar on each custard. Use a kitchen torch to melt the sugar until it turns golden brown and forms a hard crust. If you don't have a torch, use the broiler method. Place the ramekins on a baking sheet and broil for 2-4 minutes, checking closely to avoid burning.
2. Serving suggestions: After caramelizing, let the brûlée sit for 2 minutes. This lets the sugar harden. Now it is ready to serve. Enjoy the satisfying crack as you dig in!
Tips & Tricks
Achieving the Perfect Texture
To get the best texture, you must temper the eggs. This means slowly adding hot cream to the egg yolks. Doing this keeps the eggs from cooking too fast. If you skip this step, your crème brûlée may turn into scrambled eggs.
After mixing, strain the mixture through a fine-mesh sieve. This step removes any clumps. It also helps ensure a smooth and creamy custard. A smooth texture makes every bite enjoyable.
Caramelization Techniques
You can use a kitchen torch or a broiler to caramelize the sugar. A kitchen torch gives you more control. You can melt the sugar evenly and avoid burning it.
If you use the broiler, watch closely. Place the ramekins on a baking sheet and broil for 2-4 minutes. If you leave them too long, they can burn. If the sugar does not melt, it may not be fine enough. Use turbinado sugar for the best results.
Ideal Storage Practices
Store your crème brûlée in the fridge. It can last up to 3 days. Always cover it to keep it fresh. Before serving, check for signs of spoilage. If it smells sour or has a strange texture, throw it away. Enjoy your crème brûlée while it's fresh!
Pro Tips
- Use Fresh Ingredients: Always opt for fresh vanilla beans for the best flavor. The aroma and taste far surpass that of vanilla extract.
- Temperature Matters: Make sure the cream mixture is not boiling when you combine it with the egg yolks to avoid scrambling.
- Water Bath Technique: Ensure the water bath reaches halfway up the sides of the ramekins for even cooking and to prevent the custard from cracking.
- Perfect Caramelization: When caramelizing the sugar, move the torch in a circular motion to ensure even melting and avoid burning any spots.
Variations
Flavor Variations
You can easily change up the flavor of your crème brûlée. Here are a few ideas:
- Extracts: Try adding almond, orange, or peppermint extract. Use just a drop or two for a fun twist.
- Infusions: Add herbs like lavender or rosemary. You can also use spices like cinnamon or nutmeg. Just remember to steep them in your cream.
These simple changes can make your crème brûlée unique and exciting.
Dietary Adjustments
If you need to make your crème brûlée fit your diet, don’t worry! Here are some easy swaps:
- Dairy-free: Use coconut milk or almond milk instead of cream and whole milk. These can give a great taste, too.
- Sugar substitutes: Use honey, agave syrup, or stevia instead of granulated sugar. This can cut down on calories while still keeping it sweet.
These adjustments let everyone enjoy this tasty treat!
Storage Info
Best Practices for Storing Crème Brûlée
- Refrigeration tips: Always store crème brûlée in the fridge. Cover each ramekin with plastic wrap to keep moisture out. This helps keep the custard fresh and tasty. Serve within a few days for the best flavor and texture.
- Freezing recommendations: Freezing crème brûlée is not ideal. The texture can change when thawed. If you must freeze, wrap ramekins tightly in plastic wrap and then foil. Thaw in the fridge before serving.
How Long Does Crème Brûlée Last?
- Shelf life in the fridge: Crème brûlée lasts about 3 to 5 days in the fridge. After that, the quality may decline.
- Signs that it’s no longer good: Check for any off smells or changes in texture. If you see water pooling on top or a strange film, it's best to discard it. Always trust your senses when it comes to food safety.
FAQs
Common Questions About Vanilla Bean Crème Brûlée
What can I use instead of a vanilla bean? You can use vanilla extract as a substitute. Use 1 tablespoon for each vanilla bean. The flavor will be milder, but it still works well.
Can I make this recipe ahead of time? Yes, you can prepare it a day in advance. Just chill the custards overnight. Caramelize the sugar just before serving for the best texture.
Why is my crème brûlée watery? If it’s watery, it might be undercooked. Ensure it sets well in the oven. A water bath helps cook it evenly.
How do I know when crème brûlée is fully baked? Look for slight jiggle in the center. The edges should be firm. It will continue to set as it cools.
Troubleshooting Tips
Fixing a grainy texture If your custard is grainy, it may have cooked too fast. Make sure to heat the cream gently and stir the egg yolks slowly.
Adjusting sweetness to preference If you want more sweetness, add a bit more sugar to the custard mix. Taste it before baking to adjust as needed.
In this blog post, we covered how to make Vanilla Bean Crème Brûlée. We discussed the key ingredients like heavy cream and vanilla bean. I shared step-by-step instructions for preparing the custard and caramelizing the sugar. You learned tips for texture and storage, along with flavor variations. Crème brûlée is fun and rewarding to make at home. With practice, you will impress yourself and others. Enjoy experimenting with this classic dessert and savor each creamy bite.