Ready to impress at your next gathering? Vanilla Bean Crème Brûlée is the perfect dessert! With a rich, creamy base and that iconic crunchy top, it’s a true crowd-pleaser. In this guide, I’ll walk you through every step, ensuring you achieve that dream-like texture. Plus, I’ll share tips, tricks, and variations to make it uniquely yours. Let’s turn simple ingredients into a divine dessert delight!
Why I Love This Recipe
- Decadent Flavor: The rich combination of heavy cream and vanilla creates a luxurious flavor that melts in your mouth.
- Elegant Presentation: The caramelized sugar top adds a stunning contrast to the creamy custard, making it perfect for special occasions.
- Customizable: You can easily infuse different flavors like chocolate or citrus for a unique twist on the classic recipe.
- Impressive Yet Simple: Despite its elegant appearance, this crème brûlée is surprisingly easy to make, perfect for both novice and experienced cooks.
Ingredients
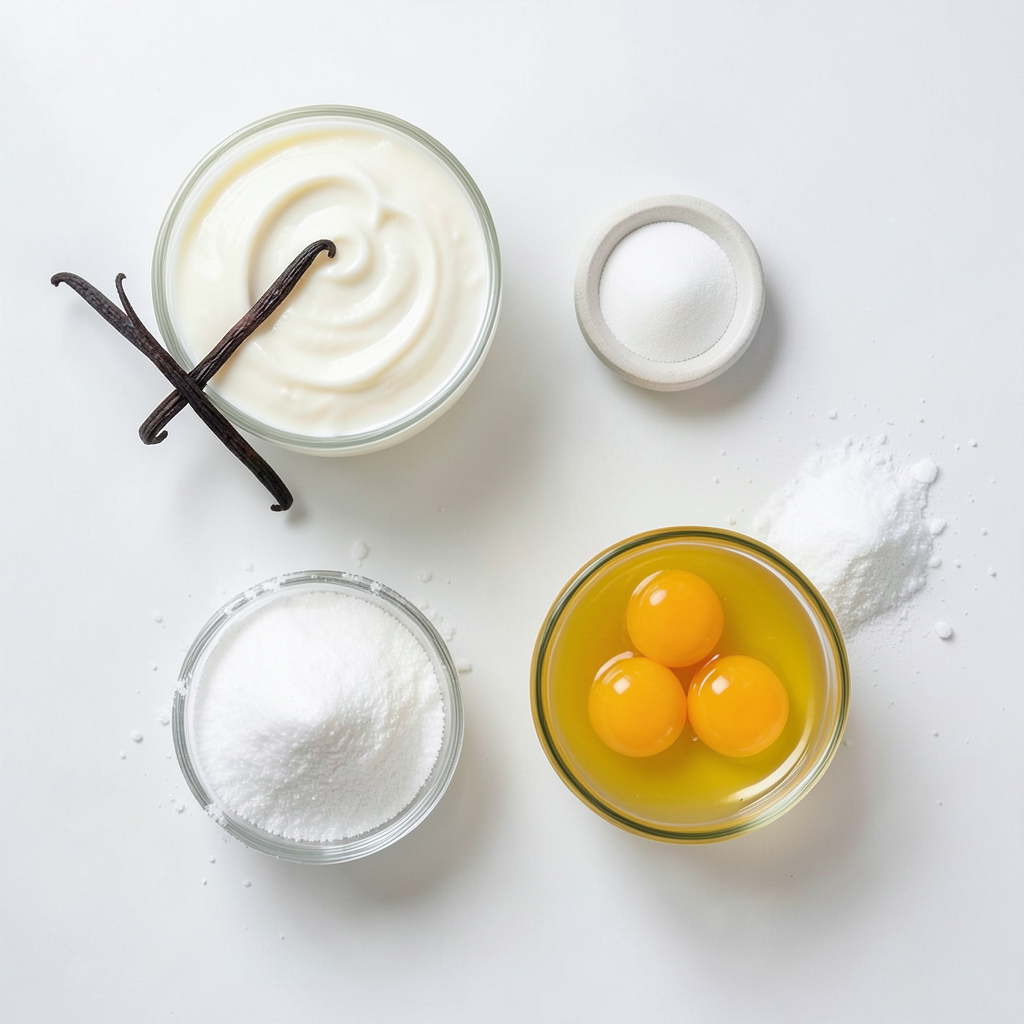
The ingredients for vanilla bean crème brûlée are simple yet essential. Each one plays a vital role in creating that creamy, dreamy dessert you crave. Here’s what you need:
- 2 cups heavy cream
- 1 vanilla bean (or 2 teaspoons pure vanilla extract)
- 5 large egg yolks
- 1/2 cup granulated sugar (plus extra for caramelizing)
- A pinch of salt
Heavy cream gives the dessert its rich texture. You can use a vanilla bean for a stronger flavor. If you don’t have one, pure vanilla extract works too. The egg yolks help create a smooth custard. Granulated sugar sweetens the mix and caramelizes on top. Lastly, a pinch of salt balances the sweetness.
Make sure your ingredients are fresh. Fresh vanilla and good cream make a big difference. You can find vanilla beans at specialty stores or online. When you combine all these components, you create magic. Each bite of this dessert will melt in your mouth and leave you wanting more.
Step-by-Step Instructions
Preheat and Prepare
1. Preheat your oven to 325°F (160°C). This step is key to a smooth bake.
2. In a medium saucepan, heat 2 cups of heavy cream over medium heat. If you use a vanilla bean, split it down the middle. Scrape the seeds into the cream and add the pod. Bring the cream to a gentle simmer. Remove it from the heat and let it steep for about 15 minutes. Then, take out the vanilla pod. If you choose vanilla extract, add it later.
Mixing the Base
1. In a mixing bowl, whisk together 5 large egg yolks, 1/2 cup of granulated sugar, and a pinch of salt. Keep whisking until it looks light and creamy.
2. Slowly pour the warm cream into the egg mixture while whisking. This process is called tempering. It keeps the eggs from cooking too fast. If you use vanilla extract, whisk it in now.
Baking the Custard
1. Strain the mixture through a fine-mesh sieve into another bowl. This removes any clumps.
2. Pour the custard into ramekins, filling them about 3/4 full. You can make 4-6 servings based on ramekin size.
3. Place the ramekins in a baking dish. Fill the dish with hot water until it reaches halfway up the sides of the ramekins. This water bath helps the custard bake evenly.
4. Bake for 30-35 minutes. Check if they are set but still slightly jiggly in the center.
5. Carefully remove the ramekins from the water bath. Let them cool completely at room temperature. Then, refrigerate for at least 2 hours or up to overnight before serving.
Tips & Tricks
Achieving the Perfect Texture
Getting the texture just right for your crème brûlée is key. First, keep an eye on your temperature. Use low heat when warming the cream. This helps prevent burning. Next, mix the egg yolks and sugar gently. Over-mixing can trap air, which leads to a less smooth custard.
Avoid overcooking in the oven. You want the centers to be set but still a bit jiggly. This means they will firm up as they cool. If you bake them too long, your dessert may turn rubbery. Trust me, patience pays off here!
Caramelizing Sugar
The sugar topping gives crème brûlée its signature crack. Using a kitchen torch makes this easy. Hold the torch a few inches above the sugar. Move it in circles to melt the sugar evenly. Watch closely so it doesn’t burn.
If you don’t have a torch, don’t worry! You can place the ramekins under a broiler. Set your oven to high and keep the door slightly open. This allows you to watch the sugar closely until it melts. Both methods will give you a beautiful caramel layer on top.
Pro Tips
- Use Fresh Vanilla: For the best flavor, opt for a fresh vanilla bean instead of extract. The seeds add a beautiful speckled appearance and rich aroma to your crème brûlée.
- Chill Properly: Allow the custards to chill in the refrigerator for at least 2 hours. This helps them set properly and enhances the flavors.
- Perfectly Caramelized Sugar: When caramelizing the sugar, move the torch in a circular motion to ensure even melting and avoid burning the sugar.
- Serve with Style: Garnish your crème brûlée with fresh berries or a sprig of mint for an elegant touch and added freshness to each bite.
Variations
Flavor Substitutions
You can change the flavor of your crème brûlée easily. Try using different extracts, like almond or coconut. A bit of citrus zest adds a fresh twist. Lemon or orange zest brightens the dish. You can also mix in chocolate. Melt dark, milk, or white chocolate and stir it into the cream. For a fruity flavor, use fruit purees. Raspberry or mango purees give a fun color and taste.
Dietary Modifications
Making this dessert for special diets is simple. For gluten-free options, you are in luck! All the key ingredients are naturally gluten-free. For those who need a dairy-free treat, use coconut cream or almond milk instead of heavy cream. These alternatives still give a rich texture. Be sure to choose a dairy-free cream with a similar fat content for the best results.
Storage Info
Proper Storage Techniques
After making your vanilla bean crème brûlée, refrigerate it before serving. Chill it for at least two hours. This step helps the custard firm up and enhances its flavor. If you keep it covered in the fridge, it will stay fresh.
Crème brûlée lasts in the refrigerator for up to three days. Just remember to add the sugar topping right before you serve. This keeps the sugar crisp and delicious.
Freezing Tips
Can you freeze crème brûlée? I do not recommend it. Freezing changes the texture. The creamy custard can become grainy once thawed.
If you must freeze it, make sure to cover it tightly. Use plastic wrap and then foil to prevent freezer burn. When it’s time to enjoy, defrost it slowly in the fridge overnight. This way, it will be less likely to lose its creamy goodness.
FAQs
What is the difference between crème brûlée and other custards?
Crème brûlée stands out for its rich, creamy texture. It has a smooth base and a crunchy top. Other custards, like flan, have a softer texture and no crunchy layer. Crème brûlée uses a water bath for gentle cooking. This helps it set evenly. Most other custards do not require this step.
Can I make crème brûlée ahead of time?
Yes, you can make crème brûlée in advance. Prepare it a day ahead and chill it in the fridge. This allows the flavors to blend and the texture to improve. When ready to serve, just caramelize the sugar on top. This gives you a fresh, warm crust while the base stays cold.
Why is my crème brûlée not setting?
If your crème brûlée does not set, check the oven temperature. It should be at 325°F (160°C). If it is too hot, the custard can cook too fast. Also, ensure you use enough eggs. They help the custard firm up. Finally, check the baking time. It may need a little longer in the oven.
You’ve learned how to make crème brûlée, from the ingredients to the final touches. Each step matters, from mixing the right ingredients to baking. Remember, getting the texture perfect is key. Use your favorite flavors to make it unique. Store it wisely to enjoy later. If you follow these tips, you will succeed. Enjoy crafting your own delicious crème brûlée!