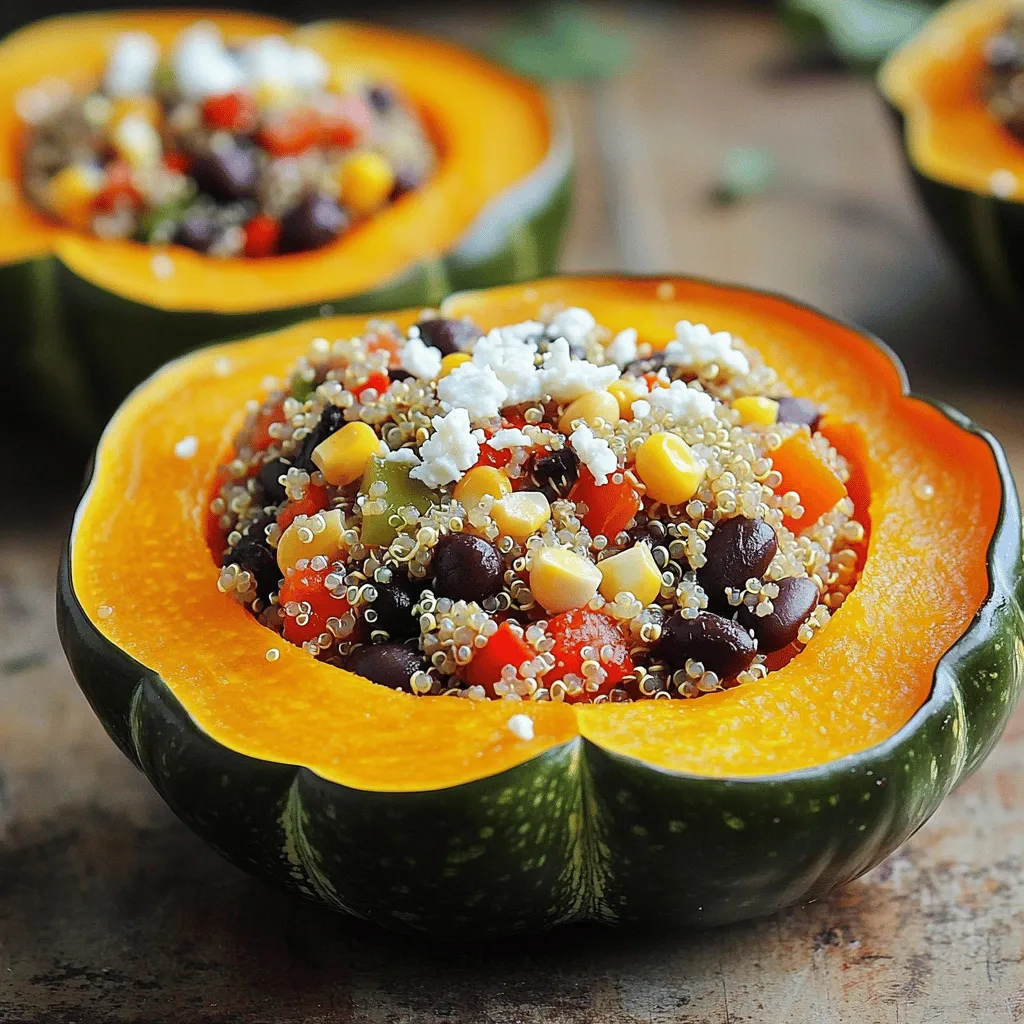
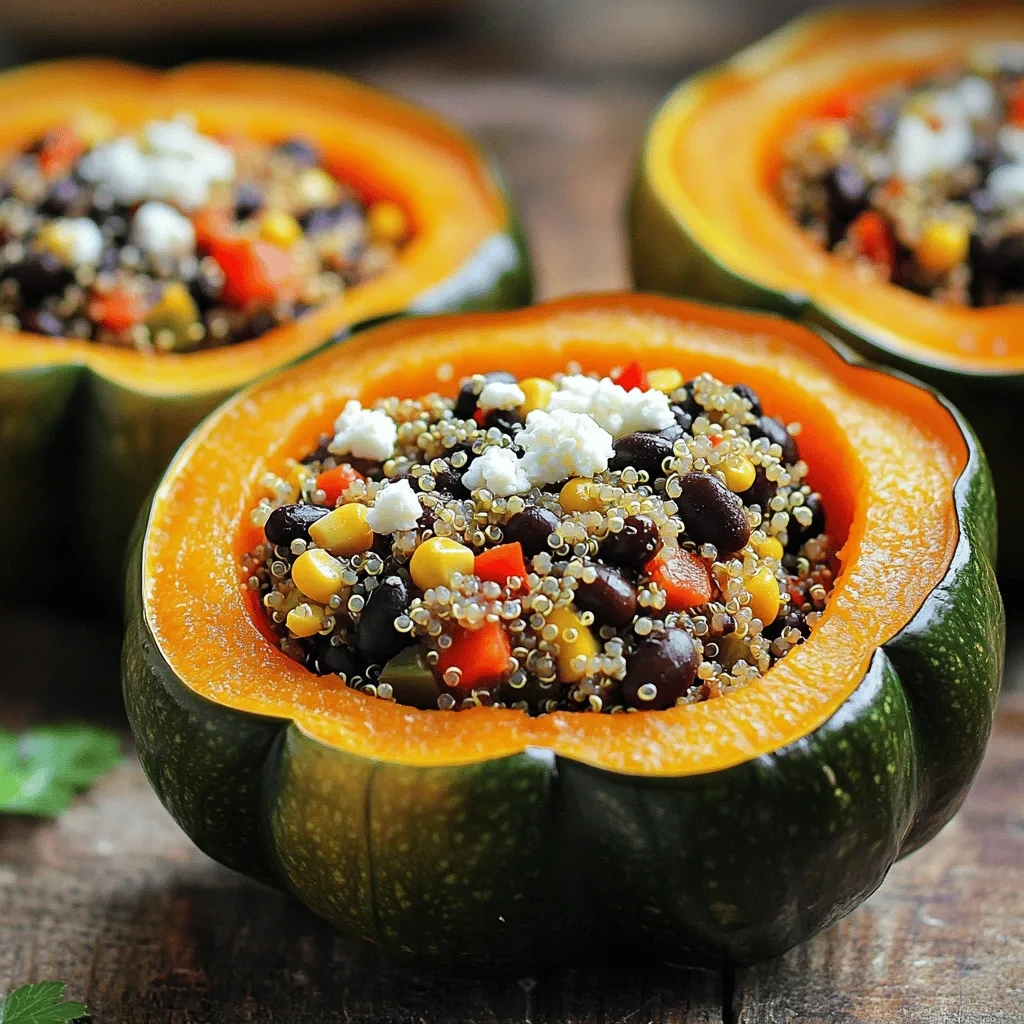
Stuffed acorn squash is not just delicious—it’s a feast for your health too! In this blog post, I’ll guide you through a fantastic recipe that combines simple ingredients like quinoa, black beans, and vibrant veggies. Whether you’re a seasoned chef or just starting, this dish’s bold flavors and nourishing qualities will make it a new favorite. Let’s dive into how to create your own tasty, nutritious stuffed acorn squash!
Ingredients
In this stuffed acorn squash recipe, you will need the following ingredients:
– 2 medium acorn squashes
– 1 cup quinoa, rinsed
– 2 cups vegetable broth
– 1 small onion, finely chopped
– 2 cloves garlic, minced
– 1 red bell pepper, diced
– 1 cup black beans, drained and rinsed
– 1 teaspoon cumin
– 1 teaspoon smoked paprika
– ½ teaspoon cinnamon
– Salt and pepper to taste
– ½ cup corn kernels (fresh or frozen)
– ¼ cup chopped fresh parsley
– ½ cup feta cheese, crumbled (optional)
– Olive oil for drizzling
These ingredients work together to create a flavorful and nutritious dish. The acorn squash brings a sweet and nutty taste, while the quinoa adds protein and texture. The black beans provide fiber, making this dish satisfying.
The spices, like cumin and smoked paprika, give depth to the flavor. Fresh parsley adds a bright touch, and feta cheese can enhance the taste, if you like.
For the full recipe, check out the [Full Recipe]. Each bite of this stuffed acorn squash is a delight!
Step-by-Step Instructions
Preparation of Acorn Squash
– Preheat oven to 400°F (200°C).
– Cut the acorn squashes in half and remove the seeds.
– Brush the insides with olive oil, then sprinkle with salt and pepper.
Roasting the squashes adds sweetness and flavor. I like to place them cut-side down on a baking sheet lined with parchment paper. This helps keep them tender as they cook. Roast them for about 30 to 35 minutes. You want them soft and easy to scoop.
Cooking Quinoa and Filling
– Boil vegetable broth, add quinoa, and cook until liquid is absorbed.
– Sauté onions and garlic in olive oil until translucent.
– Mix in bell pepper, corn, and spices.
While the squash roasts, it’s time to prepare the filling. Bring vegetable broth to a boil and add quinoa. Lower the heat, cover, and let it simmer for about 15 minutes. Fluff it with a fork when done. In a skillet, heat some olive oil and sauté chopped onion and garlic. They should be soft and fragrant. Then, add diced bell pepper and corn. Cook for about five more minutes.
Final Assembly and Baking
– Fill the roasted squash halves with the quinoa mixture.
– Return to the oven for an additional 10 minutes.
– Tips for ensuring perfect roasting include checking for tenderness with a fork.
Once your squash is ready, flip each half cut-side up. Stuff them with the quinoa mix, packing it in well. Return them to the oven for another 10 minutes. This melds the flavors together beautifully. Enjoy the aroma wafting from your kitchen!
For more details on the full process, check the Full Recipe.
Tips & Tricks
Cooking Tips for Stuffed Acorn Squash
– Best practices for roasting squash: Start with fresh acorn squash. Cut them in half and scoop out the seeds. Brush the insides with olive oil. This helps them roast well. Roast them cut-side down at 400°F (200°C). This keeps them moist and helps them cook evenly.
– Optimal quinoa cooking techniques: Rinse your quinoa before cooking. This removes the bitter coating. Boil vegetable broth and add the rinsed quinoa. Cover and simmer for about 15 minutes. Fluff it with a fork when it’s done. This makes the quinoa light and fluffy.
– How to enhance flavors with spices: Use spices like cumin, smoked paprika, and cinnamon. These spices add warmth and depth. Add them when cooking your filling. This allows the flavors to meld beautifully. Don’t forget salt and pepper for balance.
Serving Suggestions
– Ideal side dishes for stuffed squash: Serve your stuffed acorn squash with a fresh salad. A simple green salad or roasted veggies works well. You can also pair it with a grain like brown rice or farro.
– Serving in bowls vs. plates: I recommend serving the stuffed squash in bowls. This keeps the filling secure. Plus, it makes for a cozy presentation. Plates can work too, but bowls are more fun!
– Garnish for added appeal: Add a sprinkle of fresh parsley on top. This adds color and freshness. You can also drizzle a bit of olive oil for shine. If you like cheese, crumbled feta works great too. It adds a nice tang to each bite.
For the full recipe, check out the detailed instructions above. Enjoy your cooking!
Variations
Dietary Alternatives
Stuffed acorn squash is a great dish for everyone. You can make it vegan by skipping the feta cheese. Use nutritional yeast instead for a cheesy flavor. For gluten-free options, quinoa is a safe choice. It adds protein and texture without gluten. If you want low-carb variations, replace quinoa with cauliflower rice. This keeps your meal light but still full of flavor.
Flavor Enhancements
To make your stuffed acorn squash even better, try adding spices. A pinch of chili powder can add heat. You might also like to mix in some fresh herbs like basil or thyme. Changing the filling can also add variety. Try using lentils or chickpeas for a different taste. For a crunchy topping, sprinkle some nuts or seeds before baking. Pumpkin seeds or walnuts work great and add extra nutrition.
These simple changes can turn a classic dish into something new. You can explore different flavors with each meal. For the full recipe, check out the Harvest Delight Stuffed Acorn Squash.
Storage Info
Storing Leftovers
To keep your stuffed acorn squash fresh, follow these steps:
– Refrigerating: Place leftovers in an airtight container. This keeps moisture in and prevents drying out. Consume within 3-5 days for the best taste.
– Freezing: You can freeze stuffed acorn squash. Wrap each half in plastic wrap, then place in a freezer bag. This way, it stays fresh for up to 3 months.
– Reheating: To reheat, use an oven set to 350°F (175°C). Bake for 20-25 minutes. This method helps maintain flavor and texture, unlike microwaving.
Meal Prep Ideas
Preparing meals ahead saves time and effort. Here are my go-to meal prep tips:
– Making Ahead: You can make stuffed acorn squash a few days in advance. Cook them as per the recipe, and store in the fridge.
– Perfect Pairings: Pair with a green salad or roasted veggies. They balance flavors and add nutrition to your meals.
– Storage Containers: Use glass containers for storing. They are reusable and keep food fresh longer, making them a smart choice for meal prep.
For the full recipe, check out the complete guide on making Harvest Delight Stuffed Acorn Squash!
FAQs
Common Questions about Stuffed Acorn Squash
How to know when the acorn squash is done?
You can tell the acorn squash is done when it feels soft. A fork should easily pierce the skin. Usually, this takes about 30–35 minutes in the oven. Always check for fork-tenderness as the best test.
Can I use other types of squash?
Yes, you can use other squashes like butternut or pumpkin. Each squash brings a different flavor, but they all work well with the stuffing.
What can I substitute for quinoa?
You can use rice or couscous as a substitute for quinoa. Both options will absorb the flavors well and provide a nice texture.
How long does this dish last in the fridge?
Stuffed acorn squash lasts about 3 to 5 days in the fridge. Store it in an airtight container to keep it fresh and tasty.
Serving and Cooking Insights
Can stuffed acorn squash be reheated?
Yes, you can reheat stuffed acorn squash. Just place it in the oven or microwave until warm. This dish stays delicious even after reheating.
Is it possible to prepare stuffed squash in an air fryer?
Absolutely! You can cook stuffed squash in an air fryer. It cuts down on time and keeps the squash nice and tender.
What to do if my squash is too hard to cut?
If the squash is hard to cut, microwave it for a few minutes. This softens it a bit, making it easier to slice. Always be careful with the knife!
For the full recipe, check out the Harvest Delight Stuffed Acorn Squash. Enjoy cooking!
In this article, we explored how to make delicious stuffed acorn squash. We covered the key ingredients, step-by-step instructions, cooking tips, and various serving ideas. We also looked at dietary adaptations and storage methods to keep leftovers fresh. Stuffed acorn squash is tasty and versatile, which makes it great for everyone. I hope you are excited to try this dish and share it with friends and family. Enjoy your cooking!
![In this stuffed acorn squash recipe, you will need the following ingredients: - 2 medium acorn squashes - 1 cup quinoa, rinsed - 2 cups vegetable broth - 1 small onion, finely chopped - 2 cloves garlic, minced - 1 red bell pepper, diced - 1 cup black beans, drained and rinsed - 1 teaspoon cumin - 1 teaspoon smoked paprika - ½ teaspoon cinnamon - Salt and pepper to taste - ½ cup corn kernels (fresh or frozen) - ¼ cup chopped fresh parsley - ½ cup feta cheese, crumbled (optional) - Olive oil for drizzling These ingredients work together to create a flavorful and nutritious dish. The acorn squash brings a sweet and nutty taste, while the quinoa adds protein and texture. The black beans provide fiber, making this dish satisfying. The spices, like cumin and smoked paprika, give depth to the flavor. Fresh parsley adds a bright touch, and feta cheese can enhance the taste, if you like. For the full recipe, check out the [Full Recipe]. Each bite of this stuffed acorn squash is a delight! - Preheat oven to 400°F (200°C). - Cut the acorn squashes in half and remove the seeds. - Brush the insides with olive oil, then sprinkle with salt and pepper. Roasting the squashes adds sweetness and flavor. I like to place them cut-side down on a baking sheet lined with parchment paper. This helps keep them tender as they cook. Roast them for about 30 to 35 minutes. You want them soft and easy to scoop. - Boil vegetable broth, add quinoa, and cook until liquid is absorbed. - Sauté onions and garlic in olive oil until translucent. - Mix in bell pepper, corn, and spices. While the squash roasts, it's time to prepare the filling. Bring vegetable broth to a boil and add quinoa. Lower the heat, cover, and let it simmer for about 15 minutes. Fluff it with a fork when done. In a skillet, heat some olive oil and sauté chopped onion and garlic. They should be soft and fragrant. Then, add diced bell pepper and corn. Cook for about five more minutes. - Fill the roasted squash halves with the quinoa mixture. - Return to the oven for an additional 10 minutes. - Tips for ensuring perfect roasting include checking for tenderness with a fork. Once your squash is ready, flip each half cut-side up. Stuff them with the quinoa mix, packing it in well. Return them to the oven for another 10 minutes. This melds the flavors together beautifully. Enjoy the aroma wafting from your kitchen! For more details on the full process, check the Full Recipe. - Best practices for roasting squash: Start with fresh acorn squash. Cut them in half and scoop out the seeds. Brush the insides with olive oil. This helps them roast well. Roast them cut-side down at 400°F (200°C). This keeps them moist and helps them cook evenly. - Optimal quinoa cooking techniques: Rinse your quinoa before cooking. This removes the bitter coating. Boil vegetable broth and add the rinsed quinoa. Cover and simmer for about 15 minutes. Fluff it with a fork when it's done. This makes the quinoa light and fluffy. - How to enhance flavors with spices: Use spices like cumin, smoked paprika, and cinnamon. These spices add warmth and depth. Add them when cooking your filling. This allows the flavors to meld beautifully. Don't forget salt and pepper for balance. - Ideal side dishes for stuffed squash: Serve your stuffed acorn squash with a fresh salad. A simple green salad or roasted veggies works well. You can also pair it with a grain like brown rice or farro. - Serving in bowls vs. plates: I recommend serving the stuffed squash in bowls. This keeps the filling secure. Plus, it makes for a cozy presentation. Plates can work too, but bowls are more fun! - Garnish for added appeal: Add a sprinkle of fresh parsley on top. This adds color and freshness. You can also drizzle a bit of olive oil for shine. If you like cheese, crumbled feta works great too. It adds a nice tang to each bite. For the full recipe, check out the detailed instructions above. Enjoy your cooking! {{image_2}} Stuffed acorn squash is a great dish for everyone. You can make it vegan by skipping the feta cheese. Use nutritional yeast instead for a cheesy flavor. For gluten-free options, quinoa is a safe choice. It adds protein and texture without gluten. If you want low-carb variations, replace quinoa with cauliflower rice. This keeps your meal light but still full of flavor. To make your stuffed acorn squash even better, try adding spices. A pinch of chili powder can add heat. You might also like to mix in some fresh herbs like basil or thyme. Changing the filling can also add variety. Try using lentils or chickpeas for a different taste. For a crunchy topping, sprinkle some nuts or seeds before baking. Pumpkin seeds or walnuts work great and add extra nutrition. These simple changes can turn a classic dish into something new. You can explore different flavors with each meal. For the full recipe, check out the Harvest Delight Stuffed Acorn Squash. To keep your stuffed acorn squash fresh, follow these steps: - Refrigerating: Place leftovers in an airtight container. This keeps moisture in and prevents drying out. Consume within 3-5 days for the best taste. - Freezing: You can freeze stuffed acorn squash. Wrap each half in plastic wrap, then place in a freezer bag. This way, it stays fresh for up to 3 months. - Reheating: To reheat, use an oven set to 350°F (175°C). Bake for 20-25 minutes. This method helps maintain flavor and texture, unlike microwaving. Preparing meals ahead saves time and effort. Here are my go-to meal prep tips: - Making Ahead: You can make stuffed acorn squash a few days in advance. Cook them as per the recipe, and store in the fridge. - Perfect Pairings: Pair with a green salad or roasted veggies. They balance flavors and add nutrition to your meals. - Storage Containers: Use glass containers for storing. They are reusable and keep food fresh longer, making them a smart choice for meal prep. For the full recipe, check out the complete guide on making Harvest Delight Stuffed Acorn Squash! How to know when the acorn squash is done? You can tell the acorn squash is done when it feels soft. A fork should easily pierce the skin. Usually, this takes about 30–35 minutes in the oven. Always check for fork-tenderness as the best test. Can I use other types of squash? Yes, you can use other squashes like butternut or pumpkin. Each squash brings a different flavor, but they all work well with the stuffing. What can I substitute for quinoa? You can use rice or couscous as a substitute for quinoa. Both options will absorb the flavors well and provide a nice texture. How long does this dish last in the fridge? Stuffed acorn squash lasts about 3 to 5 days in the fridge. Store it in an airtight container to keep it fresh and tasty. Can stuffed acorn squash be reheated? Yes, you can reheat stuffed acorn squash. Just place it in the oven or microwave until warm. This dish stays delicious even after reheating. Is it possible to prepare stuffed squash in an air fryer? Absolutely! You can cook stuffed squash in an air fryer. It cuts down on time and keeps the squash nice and tender. What to do if my squash is too hard to cut? If the squash is hard to cut, microwave it for a few minutes. This softens it a bit, making it easier to slice. Always be careful with the knife! For the full recipe, check out the Harvest Delight Stuffed Acorn Squash. Enjoy cooking! In this article, we explored how to make delicious stuffed acorn squash. We covered the key ingredients, step-by-step instructions, cooking tips, and various serving ideas. We also looked at dietary adaptations and storage methods to keep leftovers fresh. Stuffed acorn squash is tasty and versatile, which makes it great for everyone. I hope you are excited to try this dish and share it with friends and family. Enjoy your cooking!](https://soyumrecipes.com/wp-content/uploads/2025/06/9d56d637-7d67-4f29-aa5c-1584872395e4-250x250.webp)