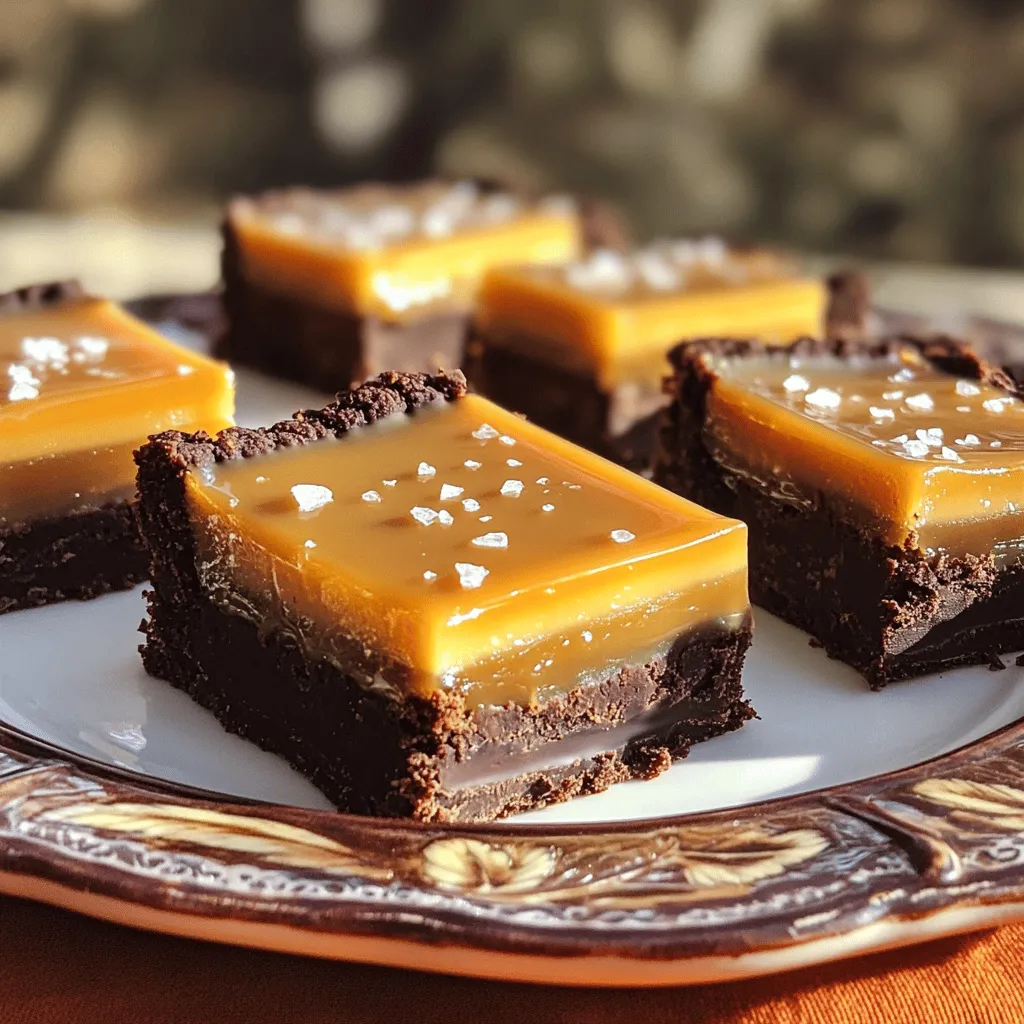
Indulge your sweet tooth with my Salted Caramel Bars! These simple treats combine rich caramel with a buttery crust. You won’t be able to resist their sweet and salty flavor. I’ll guide you through the easy steps, share helpful tips, and even suggest fun variations. Whether you bake for a gathering or just to enjoy at home, these bars will become your new favorite dessert. Let’s get started!
Ingredients
To create these salted caramel bars, you will need several key ingredients. Each one plays a big role in making this dessert a delight.
– 1 cup all-purpose flour
– 1/2 cup unsweetened cocoa powder
– 1/2 cup brown sugar, packed
– 1/4 cup granulated sugar
– 1/2 cup unsalted butter, melted
– 1/4 teaspoon salt
– 1 can (14 oz) sweetened condensed milk
– 1 cup granulated sugar (for caramel)
– 1/4 cup heavy cream
– 1 teaspoon vanilla extract
– 1/2 teaspoon sea salt (for topping)
– 1/4 cup semi-sweet chocolate chips (optional for drizzling)
These ingredients create a rich, sweet, and salty flavor balance. The cocoa powder gives depth, while the sweetened condensed milk adds creaminess. I love how the sea salt enhances the caramel taste.
Gather everything before you start. This way, you will stay organized and focused. Remember, baking is as much about precision as it is about creativity. Make sure to use fresh ingredients for the best flavor.You’ll find step-by-step instructions that will guide you through the process. Enjoy the journey of making these delicious bars!
Step-by-Step Instructions
Preparing the Crust
1. Preheat your oven to 350°F (175°C). Prepare an 8×8 inch baking dish by lining it with parchment paper. Leave some overhang to help you lift the bars out later.
2. In a medium bowl, mix together:
– 1 cup all-purpose flour
– 1/2 cup unsweetened cocoa powder
– 1/2 cup brown sugar, packed
– 1/4 cup granulated sugar
– 1/4 teaspoon salt
3. Pour in 1/2 cup melted unsalted butter. Mix until the mixture feels like wet sand. Press it firmly into the bottom of the pan to form your crust.
4. Bake the crust for 10-12 minutes. It should feel slightly firm but not overbaked. Remove it and let it cool slightly.
Making the Caramel
1. In a saucepan over medium heat, add 1 cup granulated sugar. Cook it slowly while stirring until it melts and turns a nice caramel color. This takes about 5-7 minutes.
2. Carefully add 1/4 cup heavy cream to the melted sugar. It will bubble a lot, so be cautious! Stir until smooth.
3. Next, mix in 1 can (14 oz) sweetened condensed milk and 1 teaspoon vanilla extract. Cook for another 2-3 minutes, stirring well.
4. Pour the warm caramel mixture over the cooled crust. Spread it evenly with a spatula.
Cooling and Serving
1. Let the bars cool to room temperature. After that, place them in the fridge for at least 2 hours. This helps them set up nicely.
2. Once set, lift the bars out of the dish using the parchment paper. Cut them into squares or bars.
3. If you want, melt 1/4 cup semi-sweet chocolate chips and drizzle them over the cut bars for an extra treat. Enjoy your salted caramel bars!
Tips & Tricks
Perfecting the Caramel
To make smooth caramel, stir constantly. This helps prevent burning. Use a heavy-bottomed saucepan. It distributes heat evenly.
Adjust sweetness and saltiness to your taste. Add a little more sugar for sweetness. If you want more salt, sprinkle in a pinch.
For the best results, use a candy thermometer. It helps you track the caramel’s temperature. Aim for 320°F (160°C) for a deep amber color. This gives rich flavor without bitterness.
Serving Suggestions
For gatherings, present your salted caramel bars on a beautiful plate. Dust them with cocoa powder or extra sea salt. This adds a fancy touch.
Pair these bars with coffee or warm milk. They balance the sweetness well. Serve with vanilla ice cream for a delightful treat.
Store leftovers in an airtight container. Keep them at room temperature for up to three days. For longer freshness, refrigerate them.
Variations
Flavor Variations
You can make salted caramel bars even more fun with flavor twists. Adding nuts or seeds gives a nice crunch. Walnuts or pecans work well. You can also try sunflower seeds for a nut-free option. For a fun twist, infuse flavors like coffee or orange zest into your caramel. Just add a teaspoon of instant coffee or a teaspoon of zest while cooking. This will add a unique taste to your bars.
Another way to change these bars is with different chocolate drizzles. You could use white chocolate or dark chocolate. Just melt your choice and drizzle it over the top. This will add color and flavor.
Dietary Adjustments
If you have dietary needs, you can still enjoy these bars. For a gluten-free version, swap all-purpose flour with gluten-free flour. This simple change keeps the taste while meeting your needs.
If you’re vegan, use coconut cream instead of heavy cream. You can also use maple syrup in place of sweetened condensed milk. This will keep it creamy and tasty.
Lastly, always adjust for different dietary preferences. Make sure to check ingredients for allergens. Enjoy making this treat your own!
Storage Info
Best Practices for Storage
To keep your salted caramel bars fresh, choose a good storage container. A sealed airtight container works best. Store the bars at room temperature for short-term use. They will stay fresh for about three days. For longer storage, put them in the fridge. They will last about a week there. Make sure to separate layers with parchment paper to avoid sticking.
Freezing Instructions
You can freeze salted caramel bars for up to three months. To freeze, cut the bars into squares first. Wrap each square in plastic wrap tightly. Then place them in a freezer-safe bag. When you’re ready to eat, take out the number of bars you want. Let them thaw in the fridge overnight for the best texture. Enjoy them cold or let them come to room temperature before serving.
FAQs
Common Questions about Salted Caramel Bars
Can I make salted caramel bars ahead of time?
Yes, you can make salted caramel bars ahead of time. They store well in the fridge. Just let them cool completely before wrapping. You can enjoy them for up to a week.
How do I know when the caramel is done?
You will know the caramel is done when it turns a deep amber color. Stir constantly to prevent burning. This process takes about 5-7 minutes. Be careful when adding cream, as it will bubble up.
What can I substitute for sweetened condensed milk?
You can use coconut milk as a dairy-free option. Another choice is evaporated milk with added sugar. Both will work to give you a creamy texture in your bars.
Troubleshooting Tips
What to do if the caramel seizes up?
If your caramel seizes up, it may have cooled too quickly. You can fix it by adding a little water and heating it gently. Stir until it becomes smooth again.
Issues with crust texture and solutions
If your crust is too crumbly, you might not have used enough butter. Try adding a bit more butter next time. If it’s too hard, reduce the baking time slightly.
Adjusting cooking times for variations in ovens
Ovens can vary greatly. Always keep an eye on your bars as they bake. If your oven runs hot, check them a few minutes earlier. For cooler ovens, you may need to add a few extra minutes.
In this blog post, I shared a simple recipe for salted caramel bars. We covered all the key ingredients and the step-by-step process to prepare them. I offered tips for perfecting the caramel and discussed fun variations to suit your taste. With proper storage info, you can keep them fresh longer. In the end, experimenting with flavors and techniques makes these bars even better. Enjoy creating your delicious treats!