

Latest & Greatest
Chipotle Lime Shrimp Bowl Flavorful and Simple Meal
Looking for a tasty yet simple meal? The Chipotle Lime Shrimp Bowl is perfect for you! Packed with flavor, it’s
Read more…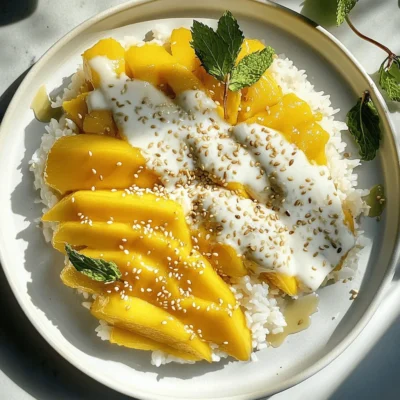
Tropical Mango Sticky Rice Simple and Delicious Recipe
Craving a sweet tropical treat? I’ve got just the thing for you! This Tropical Mango Sticky Rice recipe is simple,
Read more…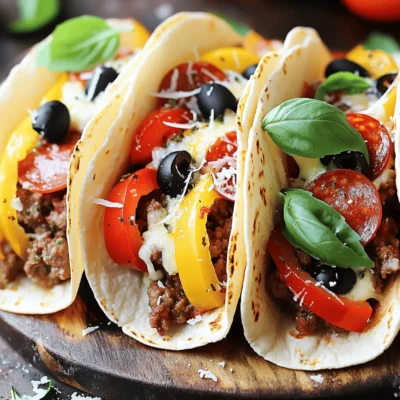
Meat Lovers Pizza Tacos Flavorful and Fun Recipe
Are you ready to take taco night to a whole new level? If you love meat and pizza, you’re in
Read more…
Salted Caramel Bars Irresistible Dessert Delight
Indulge your sweet tooth with my Salted Caramel Bars! These simple treats combine rich caramel with a buttery crust. You
Read more…
Pineapple Cream Cake Delightful and Simple Recipe
Are you ready to treat your taste buds to something special? My Pineapple Cream Cake is not just easy to
Read more…
Moose Munch Caramel Popcorn Delightfully Sweet Treat
Are you ready to indulge in a sweet and crunchy treat? Moose Munch Caramel Popcorn combines fluffy popcorn, rich caramel,
Read more…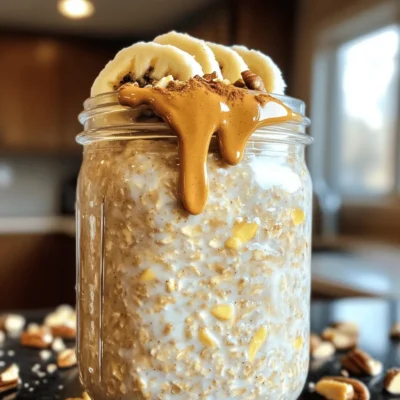
Peanut Butter Banana Overnight Oats Simple Recipe
Are you looking for a quick and tasty breakfast? Peanut Butter Banana Overnight Oats are the answer! These creamy oats
Read more…
Coconut Cream Pie Bars Irresistible and Simple Treat
Looking for a sweet treat that’s simple and oh-so-delicious? Coconut Cream Pie Bars are the answer! With a crunchy crust
Read more…browse recipes


Vegan Animal Fries Delightful and Flavorful Recipe
Are you ready to take your fries to the next level? My Vegan Animal Fries recipe mixes crispy potatoes with all your favorite toppings.…
My Latest Desserts

Maple Pecan Cinnamon Roll Pudding Irresistible Delight
If you’re looking for a dessert that combines rich maple, crunchy pecans, and soft cinnamon rolls, you’re in for a Read Full Recipe-
Caramel Apple Oatmeal Cookies Delightful Fall Treat
Fall is the perfect time for warm, comforting treats, and nothing says cozy quite like Caramel Apple Oatmeal Cookies. These Read Full Recipe -
Pumpkin Spice Icebox Cheesecake Creamy Dream Delight
Are you ready to treat yourself to a slice of heaven? My Pumpkin Spice Icebox Cheesecake Creamy Dream Delight is Read Full Recipe -
Salted Caramel Pretzel Cheesecake Bars Delightful Treat
Indulge your sweet tooth with my Salted Caramel Pretzel Cheesecake Bars! These layers of creamy cheesecake, crunchy pretzel crust, and Read Full Recipe -
Delicious Banana Nutella Swirl Pancakes Recipe
Get ready to whip up a breakfast treat that will rock your morning! My Banana Nutella Swirl Pancakes blend rich Read Full Recipe -
Slow Cooker Caramel Pecan Sticky Buns Irresistible Treat
Are you ready to indulge in a sweet delight? Slow Cooker Caramel Pecan Sticky Buns are the perfect treat for Read Full Recipe


My Latest Drinks
-
Protein Cookies & Cream Milkshake Simple Treat Recipe
If you’re craving a delicious treat that packs a protein punch, look no further! This Protein Cookies & Cream Milkshake Read Full Recipe -
Spiced Pumpkin Lattes Slow Cooker Recipe Delight
Are you ready to warm up your chilly days with a cozy Spiced Pumpkin Latte? I’ve crafted the perfect slow Read Full Recipe -
Peanut Butter Chocolate Protein Shake Tasty Delight
Satisfy your cravings with a Peanut Butter Chocolate Protein Shake! This tasty delight is not only delicious but also healthy. Read Full Recipe -
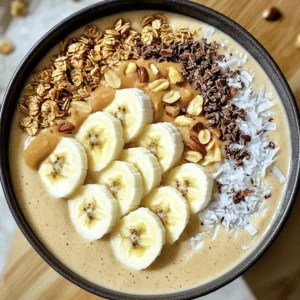
Peanut Butter Banana Smoothie Bowl Simple and Tasty
Looking for a quick, tasty treat? The Peanut Butter Banana Smoothie Bowl is your answer! Packed with ripe bananas and Read Full Recipe -
Pumpkin Cream Cold Brew Copycat Simple and Tasty Recipe
Craving a Pumpkin Cream Cold Brew but want to make it at home? You’re in the right place! I’ll show Read Full Recipe -
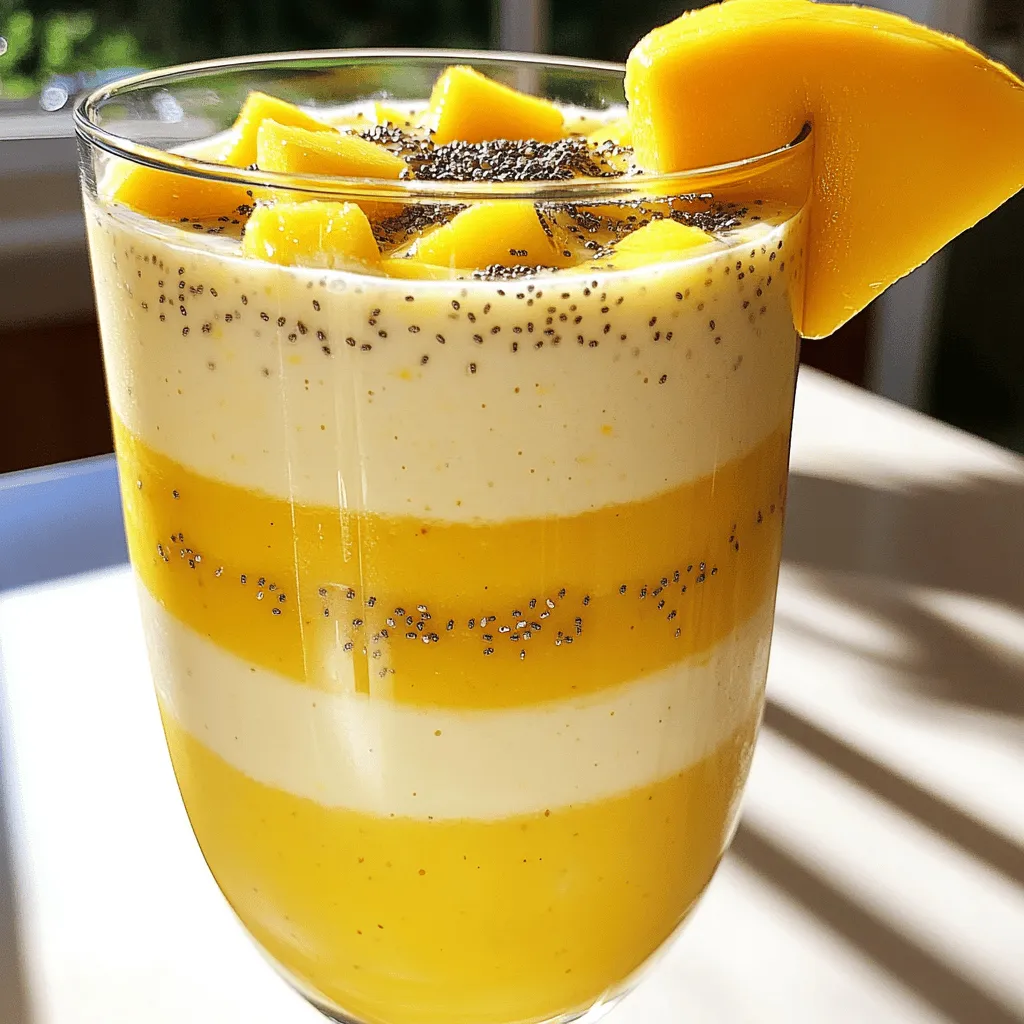
Pineapple Mango Smoothie Refreshing and Nutritious Drink
Looking for a tasty and healthy drink? A Pineapple Mango Smoothie might be just what you need! Packed with fresh Read Full Recipe


hey,
i’m !
I’m so happy you’re here!
I love creating dishes that bring joy to the table. I hope they bring the same joy to yours. Let’s enjoy this flavorful journey together.
![- Chickpeas and seasonings - 1 can (15 oz) chickpeas, drained and rinsed - 2 tablespoons olive oil - 1 teaspoon smoked paprika - 1/2 teaspoon garlic powder - Salt and pepper to taste - Salad base ingredients - 4 cups mixed greens (arugula, spinach, and romaine) - 1 cup cherry tomatoes, halved - 1 cucumber, diced - 1/4 red onion, thinly sliced - 1/4 cup feta cheese, crumbled (optional) - Tahini dressing components - 2 tablespoons tahini - 1 tablespoon lemon juice - 2 tablespoons water (to thin the tahini) - Fresh parsley for garnish This crispy chickpea salad is packed with flavor and health. Each ingredient adds its own charm. You’ll find the chickpeas are not just tasty; they add protein too. The mixed greens offer crunch and freshness. The cherry tomatoes and cucumber give a sweet and crisp bite. Tahini dressing ties everything together. It’s creamy yet light. Adding lemon juice brightens the flavors. Parsley adds a pop of color and freshness. You can find the full recipe at the end of this article. Enjoy crafting this dish that is both delicious and good for you! To prepare chickpeas for baking, start with a can of chickpeas. Drain and rinse them well. This step helps remove excess sodium. Next, spread the chickpeas on a baking sheet. Make sure they are in a single layer. This helps them cook evenly. For seasoning, drizzle two tablespoons of olive oil over the chickpeas. Then, sprinkle one teaspoon of smoked paprika and half a teaspoon of garlic powder. Add salt and pepper to taste. Toss everything together to ensure the chickpeas are well coated. In a large salad bowl, combine the salad base ingredients. Use four cups of mixed greens, such as arugula, spinach, and romaine. Then, add one cup of halved cherry tomatoes, one diced cucumber, and a quarter of a thinly sliced red onion. Mix these fresh veggies for a colorful base. Next, prepare the tahini dressing. In a small bowl, whisk together two tablespoons of tahini, one tablespoon of lemon juice, and two tablespoons of water. Adjust the water to make it drizzle-able. This dressing adds a creamy, nutty flavor to the salad. Once your chickpeas are golden and crispy, let them cool slightly. Then, add them to the salad. Drizzle your tahini dressing over the top and toss gently. If you like, add crumbled feta cheese for extra flavor. For garnishing, sprinkle fresh parsley on top. This adds a pop of color and freshness. Serve this salad right away for the best taste. Enjoy the crunch and flavors in every bite! For the full recipe, check out the details above. To make crispy chickpeas, start by drying them well. Use a kitchen towel to pat them dry after rinsing. This step helps them crisp up nicely. Next, spread them in a single layer on a baking sheet. Drizzle with olive oil and toss with spices like smoked paprika and garlic powder. Bake at 400°F for 25-30 minutes. Shake the pan halfway through for even cooking. If you don’t have an oven, try using an air fryer at 400°F for about 15-20 minutes. This method can also yield great results. You can customize tahini dressing to fit your taste. Add more lemon juice for tanginess or some honey for sweetness. You can mix in garlic or herbs like dill for extra flavor. Other dressings that pair well include balsamic vinaigrette or a simple olive oil and vinegar mix. Experiment with flavors you love to make it your own. Plating your salad can make it more inviting. Start by layering the mixed greens in a large bowl or plate. Then, add the colorful cherry tomatoes and diced cucumber. Scatter the crispy chickpeas on top for a nice crunch. For extra flair, sprinkle feta cheese and fresh parsley. A drizzle of dressing on top adds a beautiful finish. Use a colorful plate to enhance the salad's visual appeal. This makes it more enjoyable to eat. {{image_2}} You can change the salad with fresh, seasonal veggies. Try using sweet corn in summer or roasted squash in fall. These veggies add great flavor and color. You can also swap chickpeas for other legumes like black beans or lentils. Each legume gives a new taste and texture. This salad is easy to make vegan and gluten-free. Simply skip the feta cheese and use gluten-free grains like quinoa. For more protein, add grilled chicken, shrimp, or tofu. These options make the dish heartier and keep you full. Spices can change the whole dish. Consider adding cumin or chili powder for a kick. Fresh herbs like basil or cilantro can brighten the flavors. Don't forget toppings! Nuts or seeds add crunch and fun. You can also sprinkle some lemon zest for extra zing. To store your crispy chickpea salad, I recommend using an airtight container. This helps keep your meal fresh. Place the salad in the fridge right after serving. To keep the chickpeas crispy, avoid adding the dressing until you are ready to eat. Store the dressing separately. You can drizzle it on just before serving for the best taste. Can you freeze crispy chickpeas? Yes, but they may lose some crunch. If you want to freeze them, allow them to cool completely. Spread them on a baking sheet and freeze until solid. Then, transfer them to a freezer bag. You can freeze the salad's base too, but avoid freezing veggies like cucumbers or tomatoes. They can get mushy when thawed. How long will the salad last? The salad will stay fresh in the fridge for about three days. However, the chickpeas may lose their crunch after a day or two. Signs of spoilage to watch for include a sour smell or discoloration of the greens. If you see any mold, throw it away right away. Enjoy your crispy chickpea salad while it’s fresh! You can find the full recipe [Full Recipe]. I recommend using canned chickpeas for ease and flavor. Choose ones that are organic if possible. Look for chickpeas that are firm and free from any dark spots. Rinsing and draining them well improves their texture. If you prefer, you can also use dried chickpeas. Just soak and cook them beforehand for the best results. To add heat, mix in some red pepper flakes or cayenne pepper. You can also use a spicy dressing, like sriracha mixed with tahini. Another option is to add diced jalapeños or hot sauce to the salad. Just remember to balance the heat with the creamy tahini dressing. Yes, you can prep many parts ahead of time. Bake the chickpeas and store them in an airtight container. Chop the veggies and keep them in the fridge. Wait to mix the salad until just before serving. This keeps the chickpeas crunchy and the greens fresh. If you don’t have tahini, try using almond butter or sunflower seed butter. These options provide a similar creaminess. You can also use Greek yogurt for a tangy twist. Just mix it with lemon juice and a bit of water to thin it out. To add more protein, mix in grilled chicken or hard-boiled eggs. Quinoa or farro also work well as hearty grains. Adding nuts or seeds can provide a nice crunch and extra nutrients. You can even double the chickpeas for a protein boost. Check out the Full Recipe for more ideas! This blog post covers how to make a delicious salad using chickpeas. We explored ingredients, including seasonings and the tahini dressing. I shared step-by-step instructions on preparing chickpeas, mixing fresh ingredients, and adding final touches. I also provided tips for crispy chickpeas and dressing variations. Plus, you learned about seasonal ingredients and dietary modifications. Remember to store your salad properly to keep it fresh. With these steps, you can create a tasty salad that fits your taste and needs. Enjoy your culinary adventure!](https://soyumrecipes.com/wp-content/uploads/2025/07/9e0b6a47-2ac7-4201-9559-0136f3c81322-300x300.webp)
![- 2 cans (15 oz each) chickpeas, drained and rinsed - 1 tablespoon olive oil - 2 teaspoons smoked paprika - 1 teaspoon cumin - 1 teaspoon chili powder - 1/2 teaspoon cayenne pepper (adjust to taste) - Salt and pepper to taste - 8 small corn or flour tortillas - 1 avocado, sliced - 1 cup red cabbage, shredded - 1/2 cup cilantro, chopped - 1 lime, cut into wedges - Optional: hot sauce for extra spice In this recipe, chickpeas are the star. They provide a hearty base for your tacos. Olive oil adds moisture and helps the spices stick. Spices like smoked paprika, cumin, and chili powder bring warmth and depth. You can adjust the cayenne pepper based on your heat preference. Tortillas serve as the perfect vessel for your filling. Choose corn or flour based on your taste. Fresh avocado adds creaminess, while shredded red cabbage gives a nice crunch. Cilantro brings a fresh note to each bite. Finally, lime adds brightness. A squeeze of lime elevates the flavors. These tacos are not just tasty; they're also good for you. Each serving has around 350 calories. Chickpeas are packed with protein and fiber. They help keep you full and satisfied. Chickpeas have many health benefits. They aid digestion and support heart health. Their rich nutrient profile includes vitamins and minerals. They are also low in fat, making them a great choice for balanced meals. When topping your tacos, consider your nutrition. Adding more veggies can boost vitamins and minerals. You can also use low-fat or no-fat toppings for a lighter meal. Enjoying a variety of toppings helps balance taste and nutrition. For the full recipe, check the details above. First, drain and rinse the chickpeas. Use a colander and let them sit for a minute. Rinsing helps remove excess sodium and starch. Next, prepare and warm your tortillas. Heat a dry skillet over medium-low heat. Warm the tortillas for about 30 seconds on each side. This makes them soft and easy to fold. In a large skillet, heat the olive oil over medium heat. Add the drained chickpeas to the skillet. Next, sprinkle them with smoked paprika, cumin, chili powder, cayenne pepper, salt, and pepper. Stir well to coat the chickpeas with spices. Sauté them for about 5 to 7 minutes. Stir occasionally until they are heated through and slightly crispy. For a crispy texture, give them space in the pan. If they are crowded, they may steam instead of crisping. Now, it's time to assemble your tacos. Start by layering a generous spoonful of the pan-fried chickpeas into each warm tortilla. Next, top each taco with sliced avocado, shredded red cabbage, and chopped cilantro. For a burst of flavor, serve with lime wedges on the side. You can also drizzle hot sauce on top for extra spice. Enjoy your flavorful and nutritious meal! You can find the full recipe [here]. You can easily change the spice in your tacos. For milder tacos, skip the cayenne pepper. Or, reduce the amount to suit your taste. If you want more heat, try adding a splash of hot sauce. I recommend sriracha or a smoky chipotle sauce. Both add great flavor and spice. Adding fresh herbs makes a big difference. Consider using fresh dill or parsley for a fresh twist. You can also top your tacos with a dollop of yogurt or sour cream. For even more flavor, marinate the chickpeas before cooking. Mix them with olive oil, lemon juice, and spices. Let them sit for 30 minutes for a deeper taste. Use a heavy skillet for sautéing. A cast iron skillet works best. It heats evenly and gives a nice sear. For warming tortillas, a non-stick skillet is great too. Heat them for about 30 seconds on each side. This makes them soft and easy to fold. Check out the Full Recipe for more details on making these tasty tacos! {{image_2}} You can switch chickpeas for other legumes. Black beans or lentils work great. Each option adds a unique taste and texture. Black beans have a rich flavor that pairs well with spices. Lentils are soft and absorb the flavors. Just cook them the same way I do with chickpeas in the recipe. For gluten-free tacos, use corn tortillas. They are tasty and safe for those with gluten issues. If you follow a vegan or vegetarian diet, this recipe is perfect! It has no meat and is full of plant-based protein. You can enjoy these tacos without any worries. You can mix up the spices for different tastes. Southwest spices add warmth and depth, while classic Mexican spices give a fresh vibe. Try using seasonal ingredients. Fresh corn or tomatoes can brighten up your tacos. Add these elements for a fun twist to your meal. Check out the [Full Recipe] for more details on making these flavorful tacos! To keep your spicy chickpea tacos fresh, store them in the fridge. Place the tacos in an airtight container. This method helps prevent them from getting soggy. If you have leftover chickpeas, store them separately. This keeps them crispy. You can use parchment paper between layers to absorb moisture. If you want to save chickpeas for later, freezing works well. First, drain and rinse them. Pat them dry with a paper towel. Spread them in a single layer on a baking sheet. Freeze for a few hours until firm. Transfer them to a freezer bag. When you are ready to use them, thaw in the fridge overnight. Reheat in a skillet over medium heat to keep them crispy. Stored in the fridge, assembled tacos last about 1-2 days. If stored separately, chickpeas can last up to 5 days. Signs of spoilage include an off smell or mold. Always check your food before eating. Following these tips will help you enjoy your spicy chickpea tacos longer. For the full recipe, be sure to check the earlier section. You can use black beans or lentils as a substitute for chickpeas. Both add protein and flavor. If you want a different texture, try using cooked quinoa. Each option will give your tacos a unique twist. Yes, you can prepare the chickpeas in advance. Store them in an airtight container in the fridge. Warm them up before serving. However, I recommend warming the tortillas fresh to keep them soft. Absolutely! These tacos are perfect for meal prep. You can portion out chickpeas and toppings. Just store them separately. When it's time to eat, assemble your tacos quickly. To amp up the heat, add more cayenne pepper or chili powder. You can also use a spicier hot sauce. If you enjoy fresh flavors, consider adding sliced jalapeños or serrano peppers. There are many toppings that can boost flavor! Here are some great options: - Salsa or pico de gallo - Fresh lime juice - Shredded cheese - Sour cream or yogurt - Pickled onions - Fresh herbs like basil or mint These extras can take your spicy chickpea tacos to the next level! For the complete recipe, check out the Full Recipe section. In this blog post, I covered how to make delicious chickpea tacos. We explored the key ingredients, nutritional benefits, and step-by-step instructions. I shared tips for adjusting spice levels and enhancing flavor. You also learned about variations, storage, and answers to common questions. Chickpea tacos are tasty and healthy. They fit many diets and are easy to customize. With these tips, you can enjoy a fun and nutritious meal any night. Happy cooking!](https://soyumrecipes.com/wp-content/uploads/2025/05/7d236083-46b2-47e5-a4b1-706e00c2bee1-300x300.webp)
![- 1 can (15 oz) chickpeas, drained and rinsed - 1/2 cup sun dried tomatoes (packed in oil, drained) - 1/4 cup tahini - 3 tablespoons olive oil - 2 tablespoons lemon juice - 1 garlic clove, minced - 1 teaspoon ground cumin - Salt and pepper, to taste - Water, as needed for consistency The main ingredients create a rich and flavorful base. Chickpeas bring protein and creaminess. Sun dried tomatoes add a sweet and tangy taste. Tahini offers a nutty flavor and smooth texture. Olive oil enhances richness, while lemon juice brightens the dish. Garlic provides depth, and cumin adds warmth. - Extra olive oil for drizzling - Fresh herbs for garnish (e.g., parsley, basil) - Crushed red pepper flakes Garnishes can take your hummus to the next level. A drizzle of olive oil adds a shiny finish. Fresh herbs bring color and freshness. Crushed red pepper flakes add a bit of heat. Feel free to mix and match these garnishes to suit your taste. Don't forget to check the [Full Recipe] for all the steps! - Step 1: In a food processor, combine the drained chickpeas, sun dried tomatoes, tahini, olive oil, lemon juice, minced garlic, and ground cumin. - Step 2: Blend the mixture until it is smooth. Stop to scrape the sides as needed. - Step 3: If the hummus is too thick, add water one tablespoon at a time. Blend again until you reach your desired creamy texture. - Step 4: Season the hummus with salt and pepper to taste. Blend once more to mix well. - Step 5: Transfer the hummus to a serving bowl. Drizzle a bit of olive oil on top for flavor. - Step 6: Chill the hummus for at least 30 minutes. This helps the flavors blend together nicely. For the full recipe, check out the instructions above! To make hummus smooth, use high-quality olive oil. It adds richness and flavor. A good oil can make a big difference. When blending, it’s key to avoid a grainy texture. To do this, ensure all ingredients are well combined. If the hummus doesn’t blend smoothly, add a bit of water. Do this one tablespoon at a time. Keep blending until you achieve that creamy consistency. To boost the flavor, try adding spices like smoked paprika or cayenne pepper. These give your hummus depth and warmth. Roasted garlic can also make a big impact. It offers a sweeter taste compared to raw garlic. Roasting the garlic before adding it brings out its natural sweetness. This small change can elevate your sun dried tomato hummus to a new level. For more tips and a full recipe, check the recipe section. {{image_2}} You can take sun dried tomato hummus to new levels with simple tweaks. Adding fresh herbs, like basil or cilantro, gives the hummus a bright taste. Just chop them fine and mix them in. For a spicy kick, try adding jalapeños or harissa. This adds heat and depth to the flavor. Both options keep your hummus fresh and exciting. If you need gluten-free options, rest easy. Chickpeas are naturally gluten-free, so you’re already set. For a nut-free alternative to tahini, use sunflower seed butter. It blends well and keeps that creamy texture. You can still enjoy this yummy hummus, even with dietary needs. Just remember, these swaps can change the flavor a bit, but they keep it tasty! For the full recipe, check out the details above and get cooking! To keep your sun-dried tomato hummus fresh, store it in an airtight container. This helps keep out air and moisture. Place the container in the fridge. Homemade hummus stays good for about 4 to 7 days in the fridge. Always check for any off smells or changes in texture before eating. If you want to save some for later, you can freeze it. Spoon the hummus into a freezer-safe container. Leave some space at the top because it will expand when frozen. You can freeze it for up to three months. When you're ready to enjoy it, take it out and thaw it in the fridge overnight. If you're in a hurry, you can use the microwave, but do so in short bursts. Stir it well after thawing to make it smooth again. Enjoy your sun-dried tomato hummus anytime! For the full recipe, check the ingredients and steps earlier in this article. Can I use dried sun-dried tomatoes instead of oil-packed? Yes, you can! If you choose dried sun-dried tomatoes, soak them in warm water. This helps soften them before blending. Oil-packed tomatoes add a richer flavor. So, if you have the option, go for oil-packed for the best taste. What can I serve with sun-dried tomato hummus? You can serve sun-dried tomato hummus with many tasty options. Try fresh veggies like carrots and bell peppers. Pita bread or crackers work great too. You can also use it as a spread on sandwiches or wraps. How to make the hummus creamier? To make hummus creamier, use high-quality olive oil. Adding water gradually while blending also helps. If it’s still thick, try adding more tahini. This will enhance the flavor and texture. Health benefits of chickpeas Chickpeas are packed with protein and fiber. They help keep you full and satisfied. They also support heart health and help control blood sugar. This makes them a great choice for a healthy diet. Advantages of tahini and olive oil in the recipe Tahini adds healthy fats and calcium. It gives a creamy texture to the hummus. Olive oil is rich in antioxidants and good for your heart. Together, they make this hummus not just tasty but also nutritious. Top brands to look for When buying pre-made hummus, some great brands include Sabra, Tribe, and Cedar's. These brands offer tasty options that are easy to find in stores. Look for ones with simple ingredients for the best flavor. What to check on labels for quality Always check the ingredient list. Choose hummus with real sun-dried tomatoes and no preservatives. Avoid brands with added sugars or artificial flavors for a healthier choice. Quality ingredients make a big difference in taste. For the full recipe, check out the detailed instructions in the previous section. Creating sun-dried tomato hummus is simple and fun. We covered key ingredients, best storage tips, and ways to enhance flavor. You can add herbs, spices, or even go spicy with jalapeños. Remember, the quality of your olive oil and fresh ingredients matters most. Once you make this hummus, serve it cooled for the best taste. Enjoy your tasty creation, knowing it’s healthy and quick to make. Now, it’s time to dive in and enjoy every bite!](https://soyumrecipes.com/wp-content/uploads/2025/06/3cf2fdba-0142-4a83-a7bf-d21765c57837-300x300.webp)

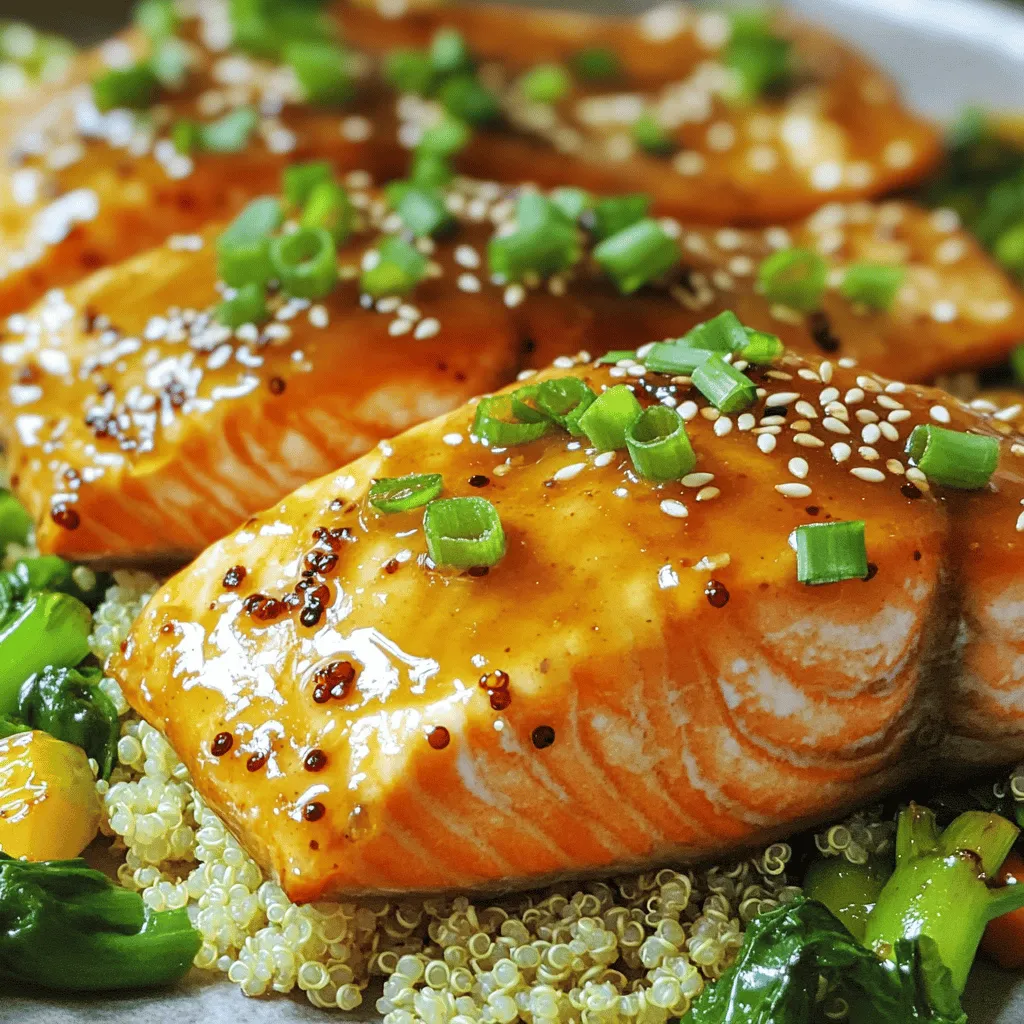
Honey Garlic Glazed Salmon Flavorful Meal for Dinner
Are you ready to impress at dinner time? Honey Garlic Glazed Salmon is a tasty dish packed with flavor! With simple ingredients like honey,…