Latest & Greatest
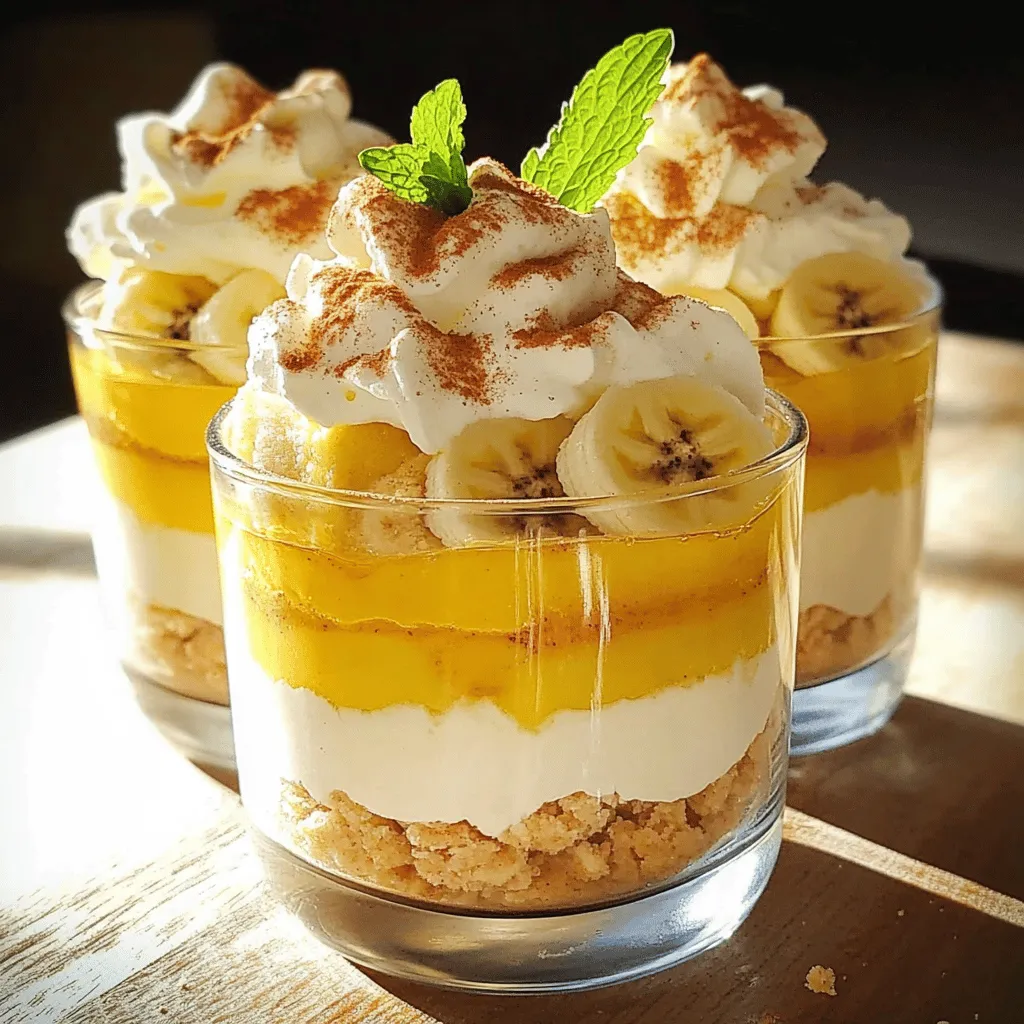
Best Banana Pudding Rich and Creamy Delight Recipe
Are you ready to indulge in the best banana pudding you’ve ever tasted? This rich and creamy delight is perfect
Read more…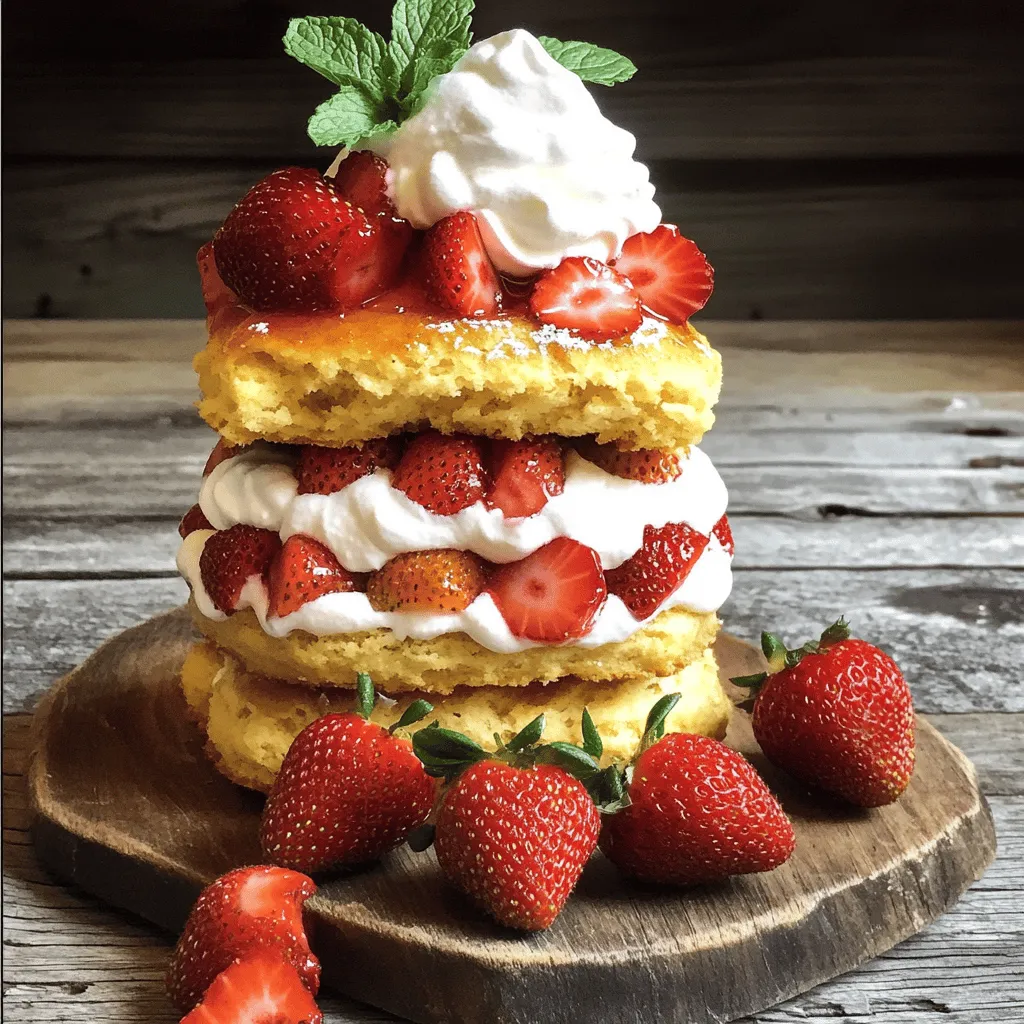
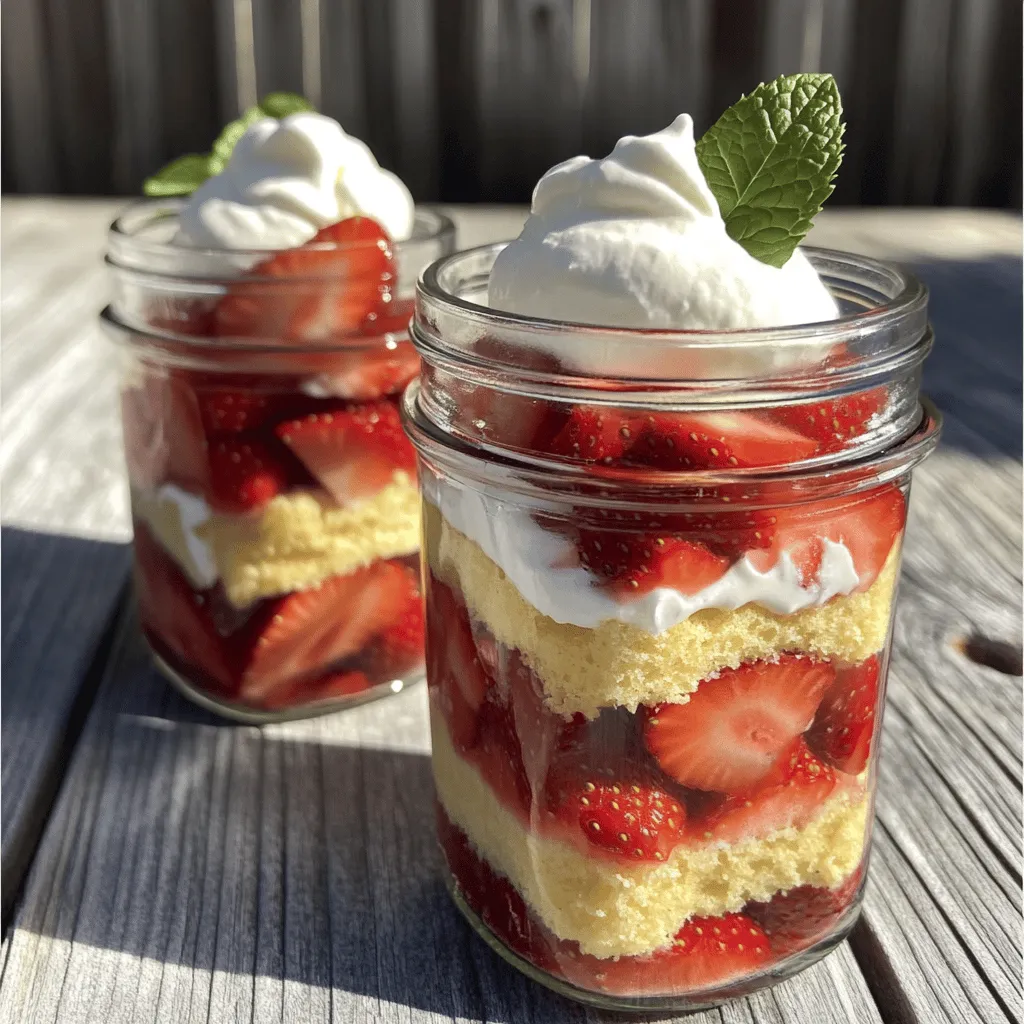
Easy Strawberry Shortcake Simple and Tasty Recipe
If you’re craving a dessert that’s simple and delicious, you’re in the right place! This Easy Strawberry Shortcake recipe will
Read more…
Crockpot Mexican Chicken Flavorful and Easy Meal
Looking for an easy and flavorful meal? You’ll love this Crockpot Mexican Chicken! With tender chicken breasts, zesty tomatoes, and
Read more…
Spring Hash Brown Crust Quiche Savory Breakfast Delight
Are you ready to impress your family with a breakfast dish that looks as good as it tastes? My Spring
Read more…browse recipes

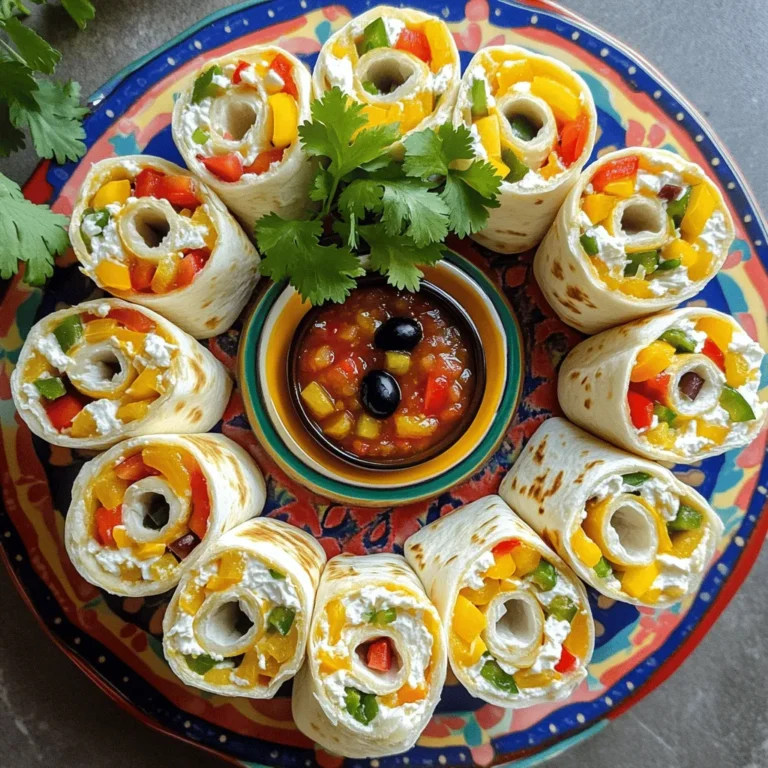
![- 1 ½ cups chocolate cookie crumbs - ½ cup unsalted butter, melted - 2 cups cream cheese, softened - 1 cup powdered sugar - 1 teaspoon vanilla extract - 1 cup heavy whipping cream - ½ cup cocoa powder - ½ cup semi-sweet chocolate chips, melted (for drizzling) - Fresh raspberries or strawberries (for garnish) - Whipped cream for garnish - Additional chocolate shavings - Mint leaves for decoration Gathering the right ingredients is key to making my No-Bake Chocolate Cheesecake. The base starts with chocolate cookie crumbs. You want a rich, sweet taste. Melted unsalted butter binds the crumbs together perfectly. For the filling, you’ll need softened cream cheese. This gives the cheesecake a creamy texture. Powdered sugar adds sweetness, while vanilla extract enhances the flavor. Heavy whipping cream makes the filling light and fluffy. Cocoa powder adds a deep chocolate taste. For the finishing touch, melt semi-sweet chocolate chips to drizzle on top. Fresh raspberries or strawberries add a burst of color and freshness. You can also add whipped cream, chocolate shavings, or mint leaves as optional decorations. These extras make your dessert look even more special. When you have all these ingredients, you’re ready to create a dessert that delights! For the full details, check the Full Recipe. 1. In a medium bowl, combine 1 ½ cups of chocolate cookie crumbs and ½ cup of melted unsalted butter. 2. Mix well until the mixture is crumbly and sticks together. 3. Press this mixture firmly into the bottom of a 9-inch springform pan. Ensure it's even. 4. Place the pan in the refrigerator to set while you prepare the filling. 1. In a large mixing bowl, beat 2 cups of softened cream cheese with an electric mixer until it's smooth and creamy. 2. Gradually add in 1 cup of powdered sugar and 1 teaspoon of vanilla extract. Mix until everything is well combined. 3. In another bowl, whip 1 cup of heavy whipping cream until soft peaks form. This means it should hold its shape but still be soft. 4. Gently fold the whipped cream into the cream cheese mixture. Be careful not to deflate the cream. 1. Sift in ½ cup of cocoa powder into the mixture and fold carefully until fully combined. 2. Pour the cheesecake filling over the chilled crust. Use a spatula to smooth the top. 3. Cover the cheesecake with plastic wrap and refrigerate it for at least 4 hours, or overnight for best results. For a sweet treat, drizzle melted semi-sweet chocolate chips over the top when serving. You can garnish it with fresh raspberries or strawberries for a pop of color. For the complete process, check the Full Recipe. - Use cream cheese that is at room temperature. This makes it easy to mix and helps avoid lumps. - When you whip the cream, do it gently. Fold it into the cream cheese mixture slowly. This keeps the filling light and fluffy. - Chill the cheesecake for at least four hours. Letting it sit overnight brings out the best flavor. - Do not over-mix the filling. This can make your cheesecake dense instead of creamy. - Be sure to set the crust well. If not, it might crumble when you slice it. - Avoid using warm ingredients. They can ruin the texture and flavor of your cheesecake. These tips and tricks will help you make a perfect no-bake chocolate cheesecake that everyone will love! {{image_2}} You can switch up the flavor of your no-bake chocolate cheesecake in fun ways. Here are some great ideas: - Adding peppermint extract for a peppermint twist: Just a teaspoon of peppermint extract can give your cheesecake a fresh, cool flavor. Mix it in with your cream cheese. It adds a festive touch, especially during the holidays. - Swapping cocoa powder for chocolate hazelnut spread: If you love hazelnut, use chocolate hazelnut spread instead of cocoa powder. This change will add a rich, nutty taste. Just mix it in with your cream cheese for a delicious twist. - Incorporating espresso powder for a coffee flavor: For coffee lovers, add a tablespoon of espresso powder to your filling. It deepens the chocolate taste and gives a nice coffee kick. Making this cheesecake fit different diets is easy. Here are some options: - Gluten-free cookie options: You can use gluten-free cookies for the crust. Look for cookies made from almond or coconut flour. They work well and taste great. - Vegan substitutes for cream cheese and whipped cream: To make a vegan version, swap cream cheese with cashew cream or coconut yogurt. Use coconut cream instead of heavy cream for the whipped part. - Sugar-free alternatives for health-conscious dessert lovers: For sugar-free options, use a sugar substitute in place of powdered sugar. This way, you can enjoy a sweet treat without the extra sugar. These variations let you customize your cheesecake to your taste and dietary needs. For the full recipe, check out the [Full Recipe]. To keep your no-bake chocolate cheesecake fresh, store it in the fridge. Place it in an airtight container. This helps keep out moisture and odors. You can enjoy it for up to five days this way. If you don't have a container, cover it tightly with plastic wrap. Make sure it seals well to avoid drying out the cheesecake. If you want to save some for later, freezing works great! First, wrap the cheesecake tightly in plastic wrap. Then, place it in a freezer-safe bag or container. This will help prevent freezer burn. You can freeze it for up to three months. When you are ready to eat it, thaw the cheesecake in the fridge overnight. This keeps its creamy texture. Enjoy it cold or let it sit at room temperature for a bit before serving. For the complete process, check the Full Recipe. Yes, you can make this cheesecake a day or two ahead. Just store it in the fridge. Cover it well with plastic wrap to keep it fresh. This dessert tastes even better after chilling. If your cheesecake does not set, it may be due to a few reasons. You might not have chilled it long enough. Another reason could be using warm ingredients. Make sure your filling is cold when you pour it into the crust. Absolutely! You can swap chocolate cookies for other types. Try vanilla wafers or graham crackers for a different flavor. You can even use gluten-free cookies to suit your needs. Each option adds a unique twist to the cheesecake. If you want a dairy-free option, use coconut cream or almond milk whipped cream. Silken tofu blended until smooth can also work well. These choices keep your cheesecake creamy without heavy cream. This chocolate cheesecake recipe combines rich flavors and simple steps. You start with a tasty chocolate crust and a creamy filling that melts in your mouth. You learned helpful tips to avoid common mistakes and enjoyed variations to make this dessert your own. Remember to chill your cheesecake for the best taste! Whether you share it at a gathering or savor it alone, this dessert promises to delight. Enjoy making it and impress your friends with your baking skills!](https://soyumrecipes.com/wp-content/uploads/2025/05/f9b9b791-af5e-45e4-8097-d9cfedcece85.webp)
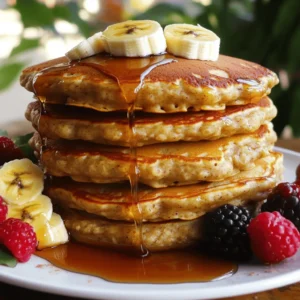
No-Bake Chocolate Cheesecake Simple Dessert Delight
Are you craving a rich and creamy dessert that’s easy to make? Look no further! This No-Bake Chocolate Cheesecake is a simple delight that…
My Latest Desserts
-
Strawberry Shortcake Cake Jars Simple and Delicious Treat
Are you ready to create a delightful treat that’s simple and fun? Strawberry Shortcake Cake Jars combine sweet strawberries, fluffy Read Full Recipe -

Mini Pineapple Upside Down Cheesecakes Delightful Treat
Are you ready to indulge in a sweet treat that’s both fun and delicious? Mini Pineapple Upside Down Cheesecakes combine Read Full Recipe -
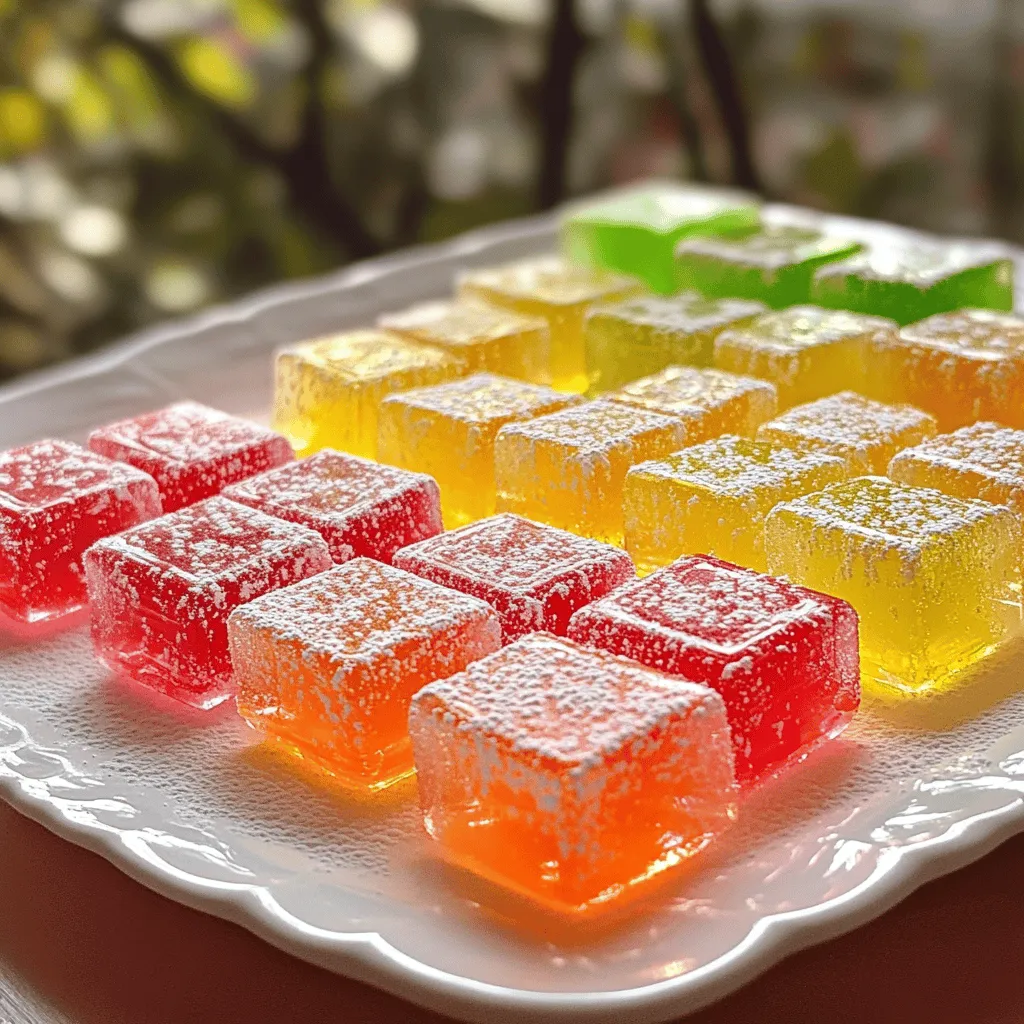
Hard Candy Without Corn Syrup Easy and Tasty Recipe
Are you tired of hard candies packed with corn syrup? You’re not alone! In my latest post, I’ll share a Read Full Recipe -
Peanut Butter Fluff Delightful and Easy Recipe
Are you ready to whip up something delicious and simple? Peanut Butter Fluff is the perfect treat that combines rich Read Full Recipe -
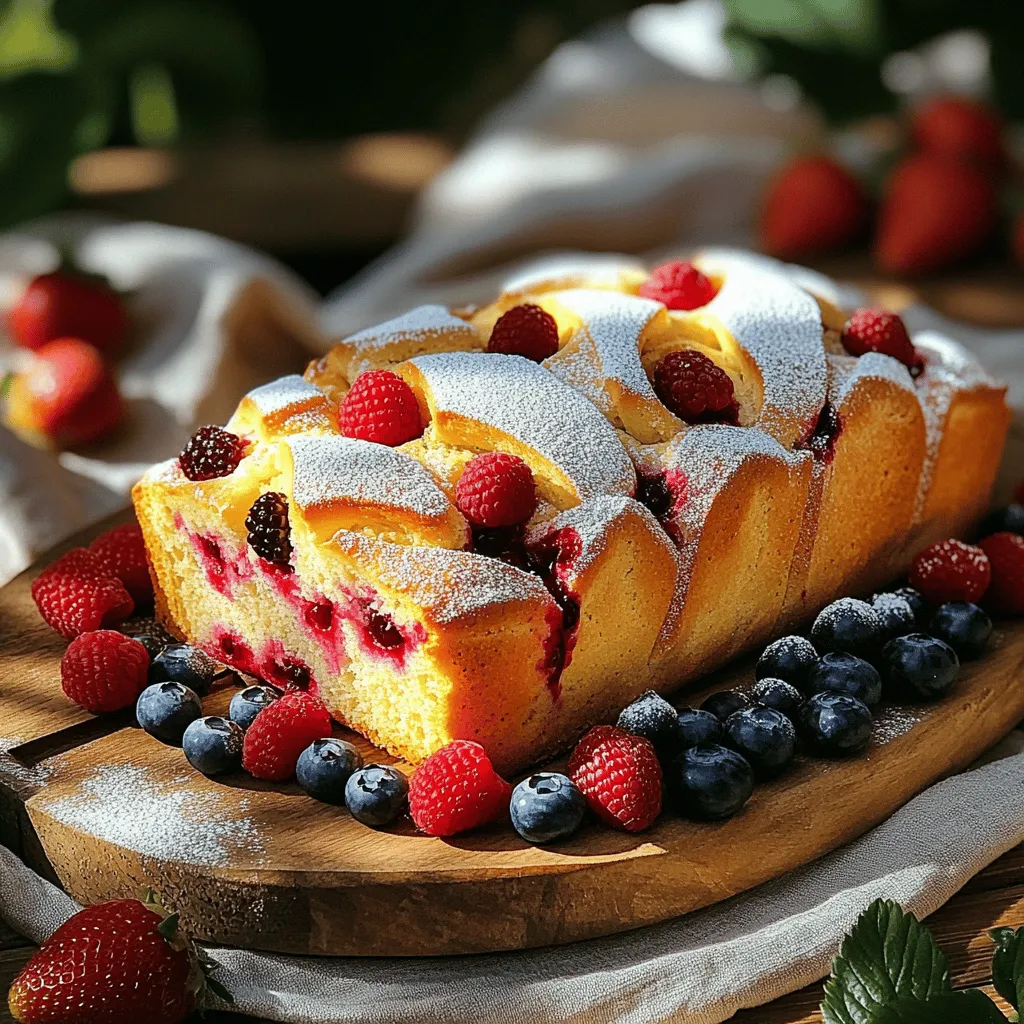
Sweet Berry Loaf Delight Simple and Fresh Recipe
Are you ready to bake a delicious Sweet Berry Loaf? This simple recipe bursts with the fresh taste of mixed Read Full Recipe -
Boston Cream Bars Irresistible and Easy Delight
If you crave a sweet treat that’s simple yet impressive, look no further! Boston Cream Bars deliver all the classic Read Full Recipe -
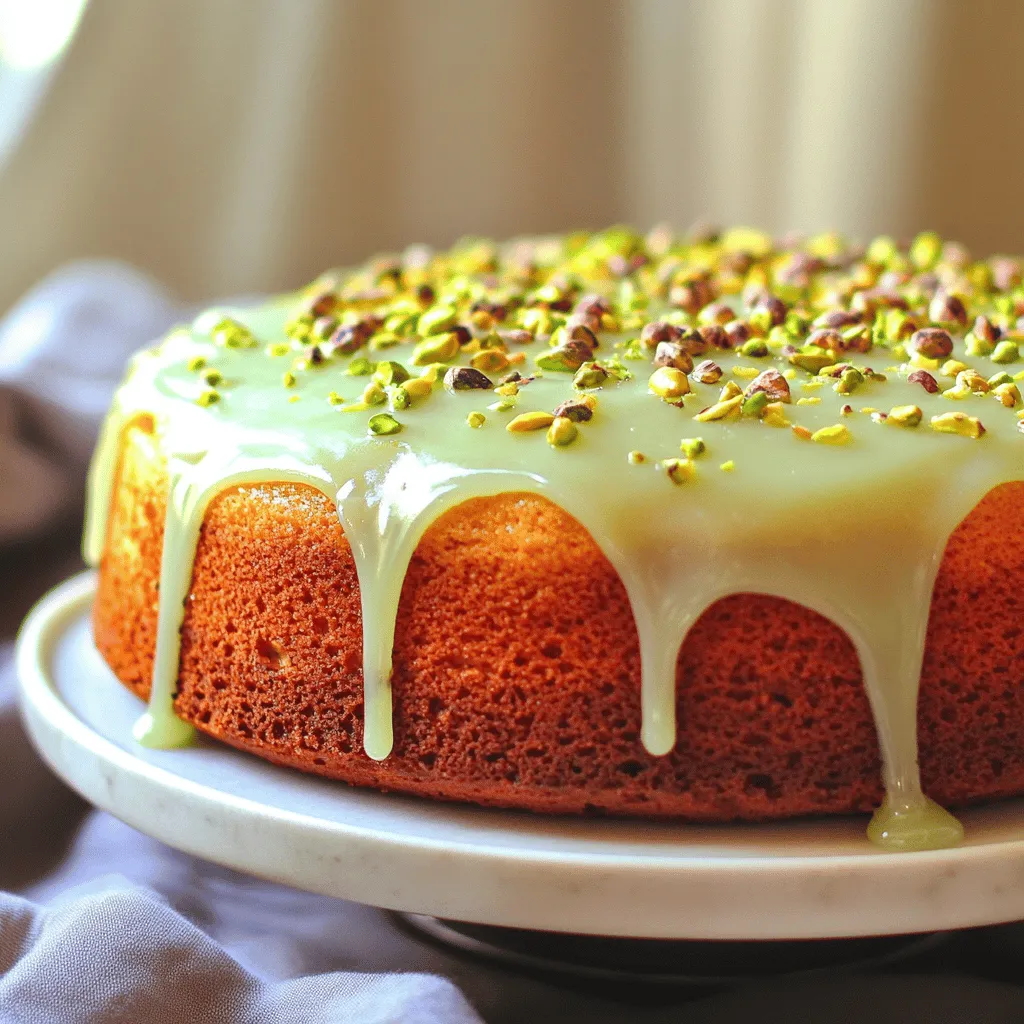
Delightful Pistachio Cake Simple and Tasty Recipe
Craving a unique dessert that’s simple yet delicious? Look no further! This Delightful Pistachio Cake recipe combines rich flavors with Read Full Recipe -

No-Bake Mini Lemon Cheesecakes Delightful Easy Treat
Looking for a simple dessert that packs a citrusy punch? These No-Bake Mini Lemon Cheesecakes are your answer! With a Read Full Recipe -
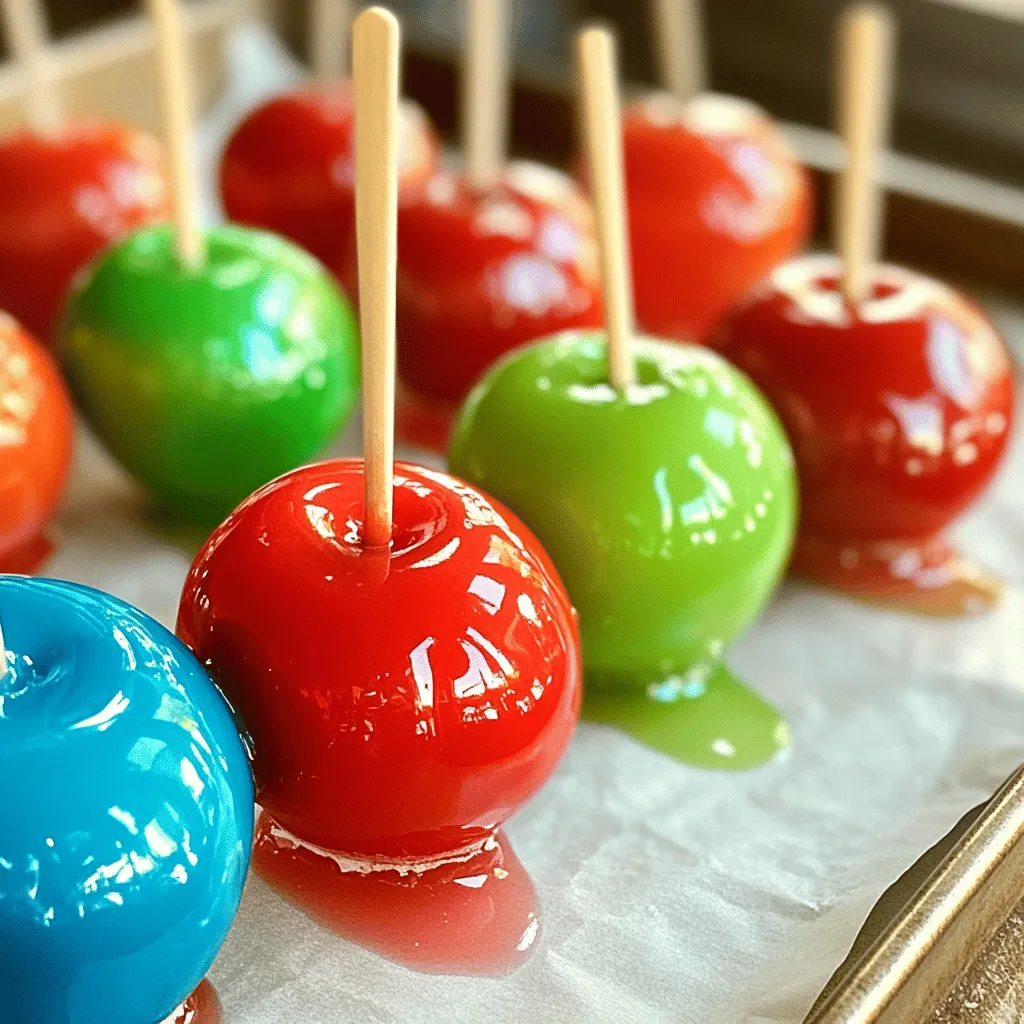
Jolly Rancher Candy Apples Delightful and Fun Treat
Are you looking for a fun, tasty treat? Jolly Rancher Candy Apples are the perfect mix of sweet and sour Read Full Recipe -
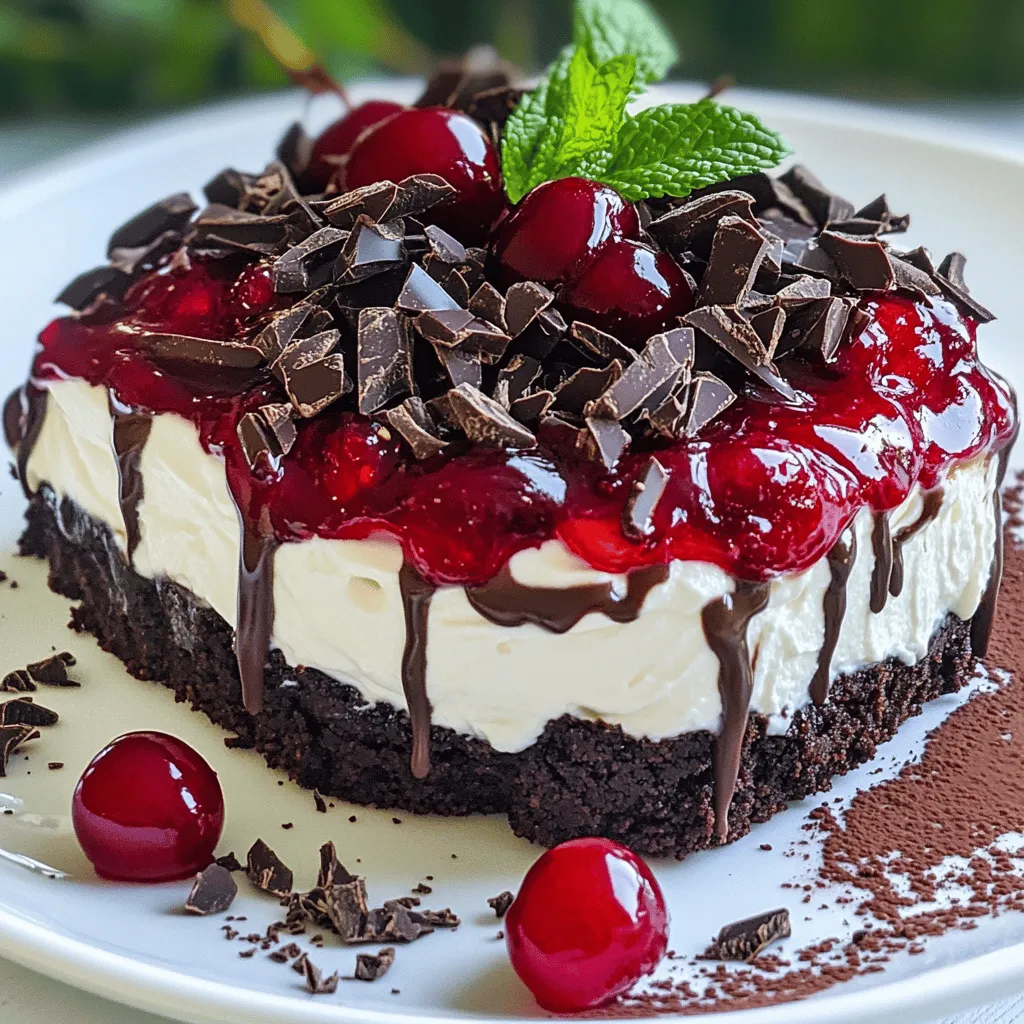
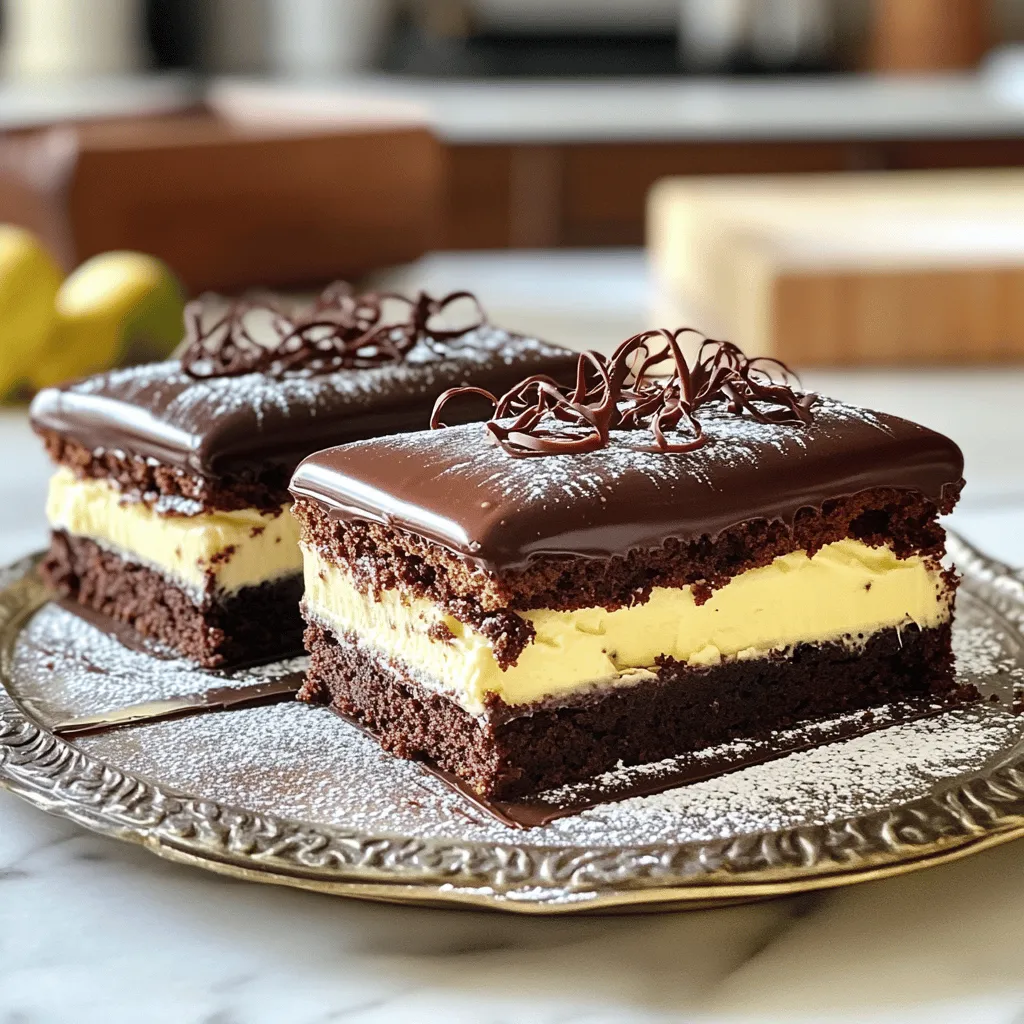
Black Forest No-Bake Cheesecake Delightful Creamy Treat
Are you ready to indulge in a sweet treat that’s both easy to make and oh-so-delicious? This Black Forest No-Bake Read Full Recipe
My Latest Recipes

hey,
i’m !
I’m so happy you’re here!
I love creating dishes that bring joy to the table. I hope they bring the same joy to yours. Let’s enjoy this flavorful journey together.
 to help you create this classic dish. {{image_2}} Traditional Aglio e Olio is simple and uses just three main ingredients: spaghetti, garlic, and olive oil. This dish shines because of its bold garlic flavor. You can keep it classic, or add a twist. Adding vegetables like spinach or cherry tomatoes can boost the dish’s nutrition and color. Spinach wilts nicely, while cherry tomatoes add a sweet burst. Both make your plate more appealing and exciting. Want to make your meal heartier? Incorporating shrimp or chicken gives a protein boost. Shrimp cooks quickly and adds a nice seafood touch. Chicken can be grilled or sautéed, offering a satisfying bite. If you prefer a plant-based option, try chickpeas. They add protein and a creamy texture. This variation makes the dish filling and satisfying for everyone. If you need gluten-free options, worry not! You can use gluten-free pasta made from rice or quinoa. These options cook well and taste great. Ensure your sauces and extra ingredients are also gluten-free. Always check labels on olive oil and spices to avoid hidden gluten. With these swaps, you can enjoy Aglio e Olio without compromise. For a full recipe, check the [Full Recipe] section. After enjoying your spaghetti, let any leftovers cool down. Place the spaghetti in an airtight container. Store it in the refrigerator for up to three days. When you want to reheat, add a splash of water or olive oil to keep it moist. Heat it gently on the stove or in the microwave until warm. This way, it stays tasty and does not dry out. If you want to save spaghetti for later, freezing is a great option. First, let the spaghetti cool completely. Then, portion it into freezer bags. Squeeze out the air before sealing. This helps prevent freezer burn and keeps the flavor intact. You can freeze it for up to three months. When ready to eat, thaw it overnight in the fridge before reheating. You can get creative with leftover spaghetti. Use it in a stir-fry with veggies and protein. Another fun idea is to turn it into a cold pasta salad. Just toss the spaghetti with some olive oil, fresh veggies, and your favorite dressing. This way, you enjoy a new dish and reduce waste. For the full recipe, check out Spaghetti Aglio e Olio with a Twist. To make Spaghetti Aglio e Olio, you need simple ingredients and easy steps. Here’s what you’ll need: - 400g spaghetti - 6 cloves garlic, thinly sliced - 1/2 cup extra-virgin olive oil - 1 teaspoon red pepper flakes - 1/4 cup fresh parsley, chopped - Zest and juice of 1 lemon - Salt, to taste - Grated Parmesan cheese (optional for serving) Start by boiling salted water. Cook the spaghetti until it’s al dente. Save some pasta water, then drain the spaghetti. Next, heat the olive oil in a skillet. Add the sliced garlic and red pepper flakes. Cook until the garlic is golden, about 2-3 minutes. Be careful not to burn it. Then, toss the drained spaghetti into the skillet. Mix well with the garlic oil. If it looks dry, add the reserved pasta water a little at a time. Finally, stir in the lemon zest, lemon juice, and chopped parsley. Add salt to taste. Serve with grated Parmesan if you like. This dish is quick and full of flavor! Spaghetti Aglio e Olio comes from Naples, Italy. It started as a simple dish for poor workers. They had few ingredients: garlic, oil, and spaghetti. Over time, it gained fame for its taste and ease. Now, it is loved worldwide. The dish shows how simple items can create great flavors. It reflects Italian cooking's heart—using fresh, quality ingredients. Yes, you can prep Spaghetti Aglio e Olio ahead of time. Cook the spaghetti and garlic oil but do not mix them. Store them separately in the fridge. To store, use an airtight container. For the garlic oil, let it cool first before sealing it. When ready to eat, reheat the garlic oil. Then, toss in the spaghetti with lemon zest and parsley. This way, you keep the flavors fresh and vibrant! Spaghetti Aglio e Olio is simple, tasty, and uses just a few good ingredients. We discussed key components, cooking steps, and great storage tips. With fresh garlic and olive oil, you create a dish that shines with flavor. Remember, you can customize it with veggies, proteins, or spices. Enjoy the process, get creative, and impress your family and friends. Cooking can be fun, and this recipe is a great way to start.](https://soyumrecipes.com/wp-content/uploads/2025/04/9905d5c3-d4c6-44ad-91ef-c518e27228b2-300x300.webp)


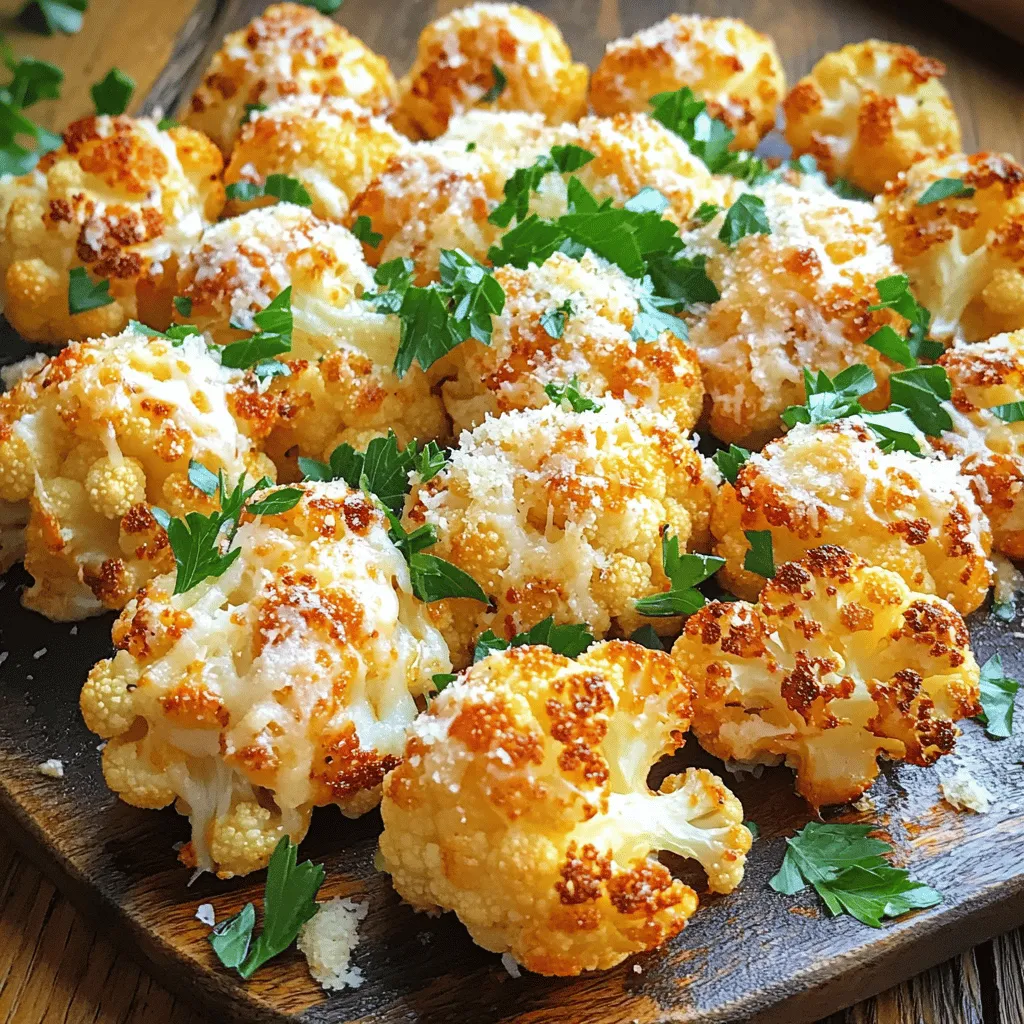
Garlic Parmesan Roasted Cauliflower Flavorful Dish
Looking for a tasty side dish that impresses but stays easy? Garlic Parmesan Roasted Cauliflower is your answer! This dish combines simple ingredients to…