

Latest & Greatest

Street Corn Chicken Rice Bowl Flavorful and Easy Meal
Are you ready to spice up your weeknight dinner? The Street Corn Chicken Rice Bowl is not only packed with
Read more…
Lemon Chicken Romano Flavorful and Simple Recipe
Looking for a quick and tasty meal? Lemon Chicken Romano is packed with flavor and easy to make! This dish
Read more…
Oreo Ritz Muddy Buddies Delicious and Easy Treat
If you’re craving a quick and tasty treat, you’ve found the right recipe! Oreo Ritz Muddy Buddies are here to
Read more…browse recipes


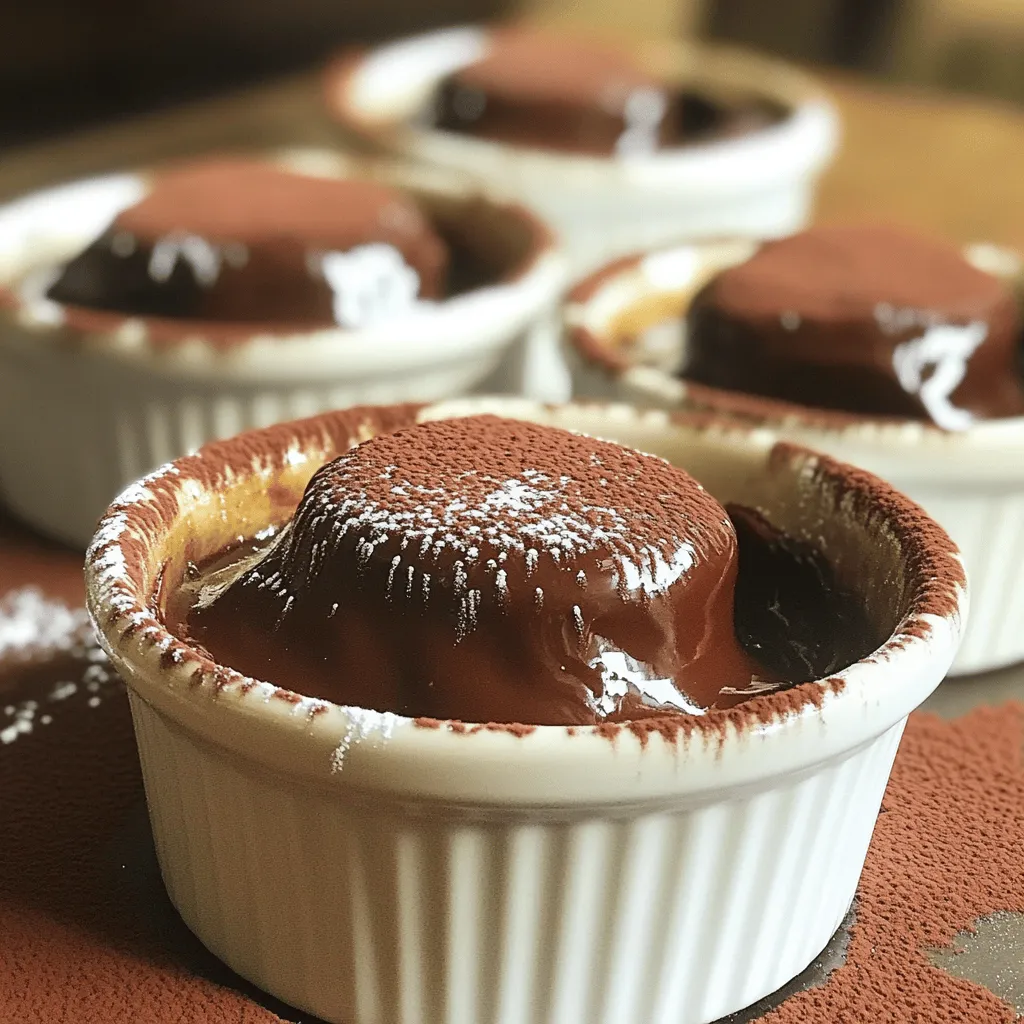
Chocolate Lava Cake Delightful Dessert Recipe
Indulging in a rich Chocolate Lava Cake is a delight you won’t forget. Picture a warm, gooey center that flows like molten chocolate when…
My Latest Desserts

Matcha White Chocolate Cookies Delightful Treat Recipe
Are you ready to bake something extraordinary? Matcha White Chocolate Cookies combine the earthy taste of matcha with sweet, creamy Read Full Recipe-
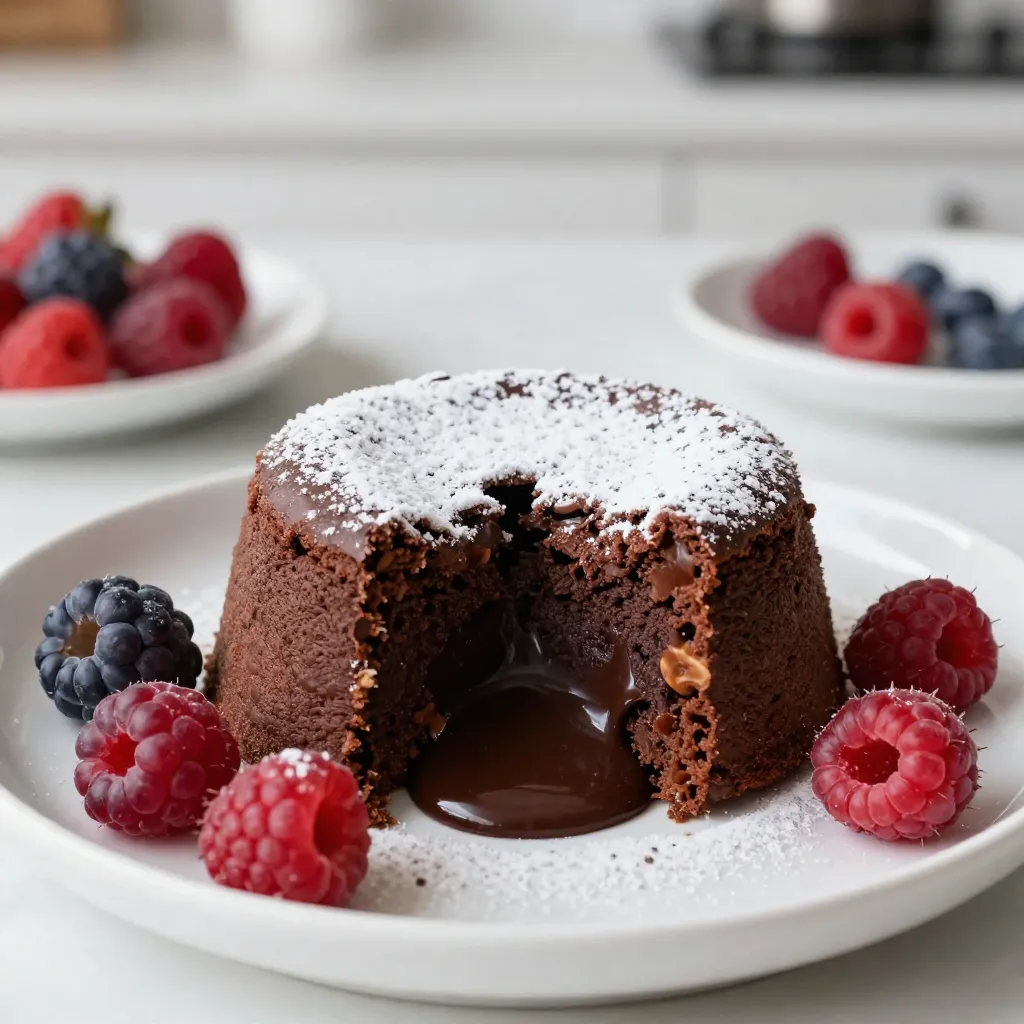
Chocolate Hazelnut Lava Cake Irresistible Dessert Delight
Get ready to treat yourself! This Chocolate Hazelnut Lava Cake is an irresistible dessert delight that melts in your mouth. Read Full Recipe 
Chocolate Peanut Butter Mug Cake Delightful Treat
Craving a sweet fix that’s quick and easy? You’re in for a treat! This Chocolate Peanut Butter Mug Cake is Read Full Recipe-
Lemon Raspberry Cheesecake Bars Delightful and Easy
If you’re craving a sweet, tangy treat that’s both easy to make and delicious, you’ll love these Lemon Raspberry Cheesecake Read Full Recipe -
Strawberry Shortcake Trifle Delightful and Easy Recipe
Are you ready to impress your friends with a show-stopping dessert? This Strawberry Shortcake Trifle is not only delightful but Read Full Recipe -
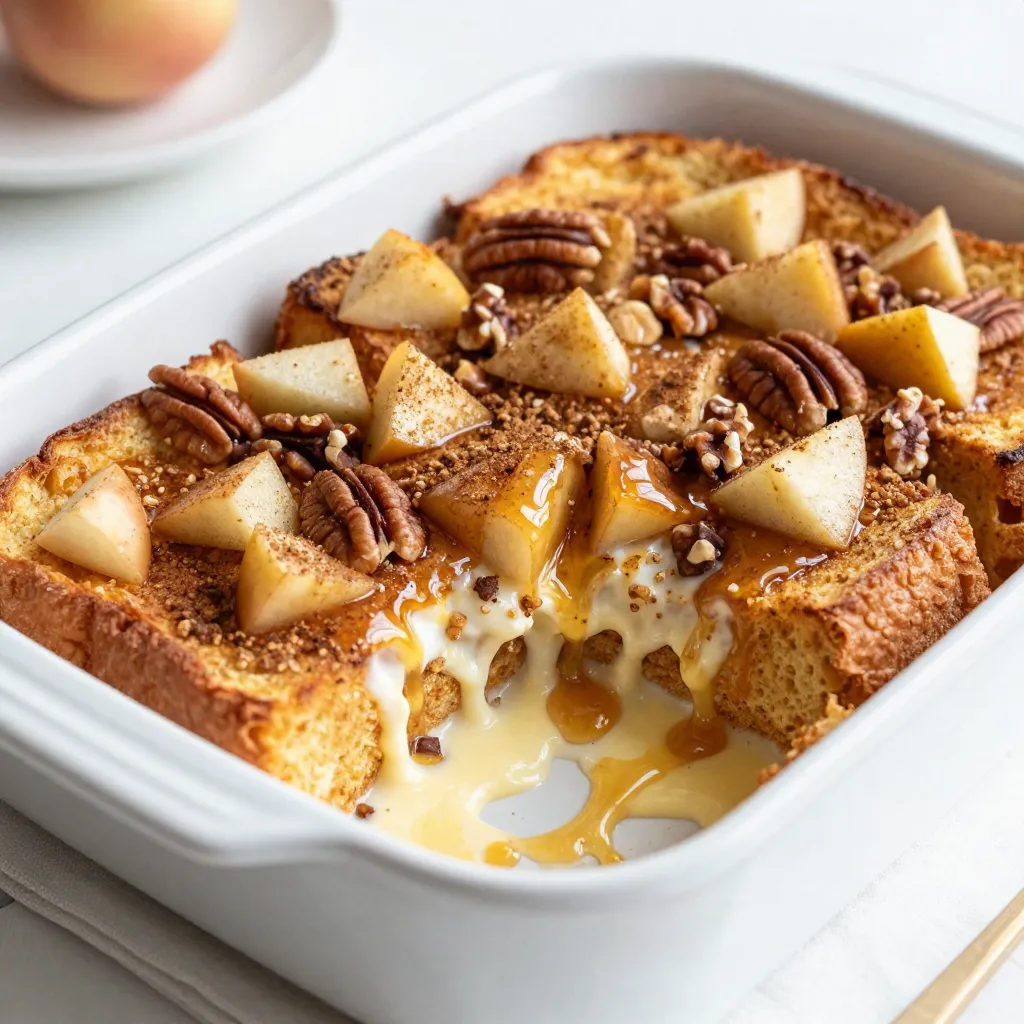
Savory Apple Cinnamon French Toast Bake Delight
If you crave a cozy breakfast that wraps you in warmth, my Savory Apple Cinnamon French Toast Bake is just Read Full Recipe


My Latest Drinks
-
Pumpkin Cream Cold Brew Copycat Simple and Tasty Recipe
Love the flavors of fall? You can bring that cozy vibe home with my Pumpkin Cream Cold Brew Copycat recipe! Read Full Recipe -
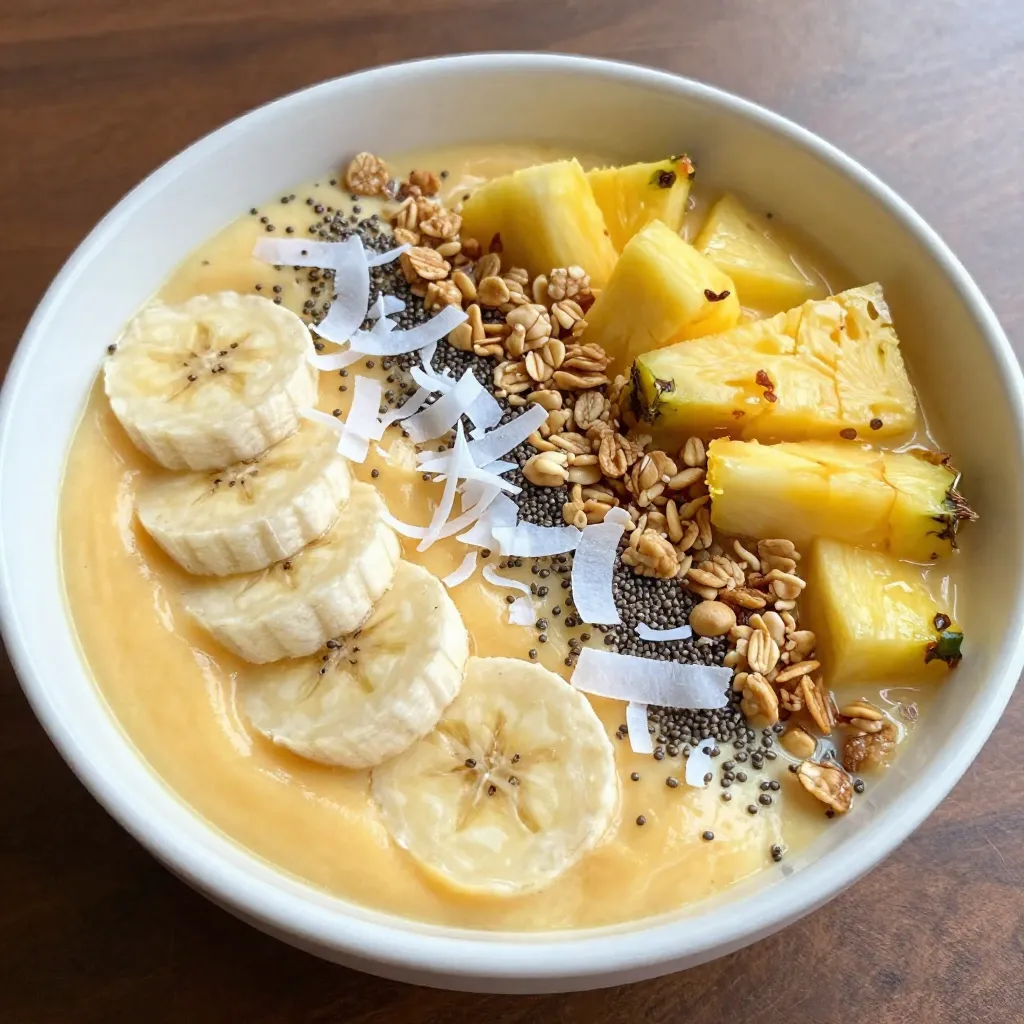
Coconut Pineapple Smoothie Bowl Energizing and Easy Recipe
Looking for a quick and tasty way to kickstart your day? This Coconut Pineapple Smoothie Bowl is the answer! Packed Read Full Recipe -
Spiced Apple Cider Punch Festive and Flavorful Drink
Warm up your gatherings with my Spiced Apple Cider Punch! This festive drink bursts with cozy flavors, perfect for chilly Read Full Recipe -
Copycat Starbucks Eggnog Latte Simple and Tasty Recipe
Craving a warm, festive drink without leaving home? You can whip up a Copycat Starbucks Eggnog Latte that’s simple and Read Full Recipe -
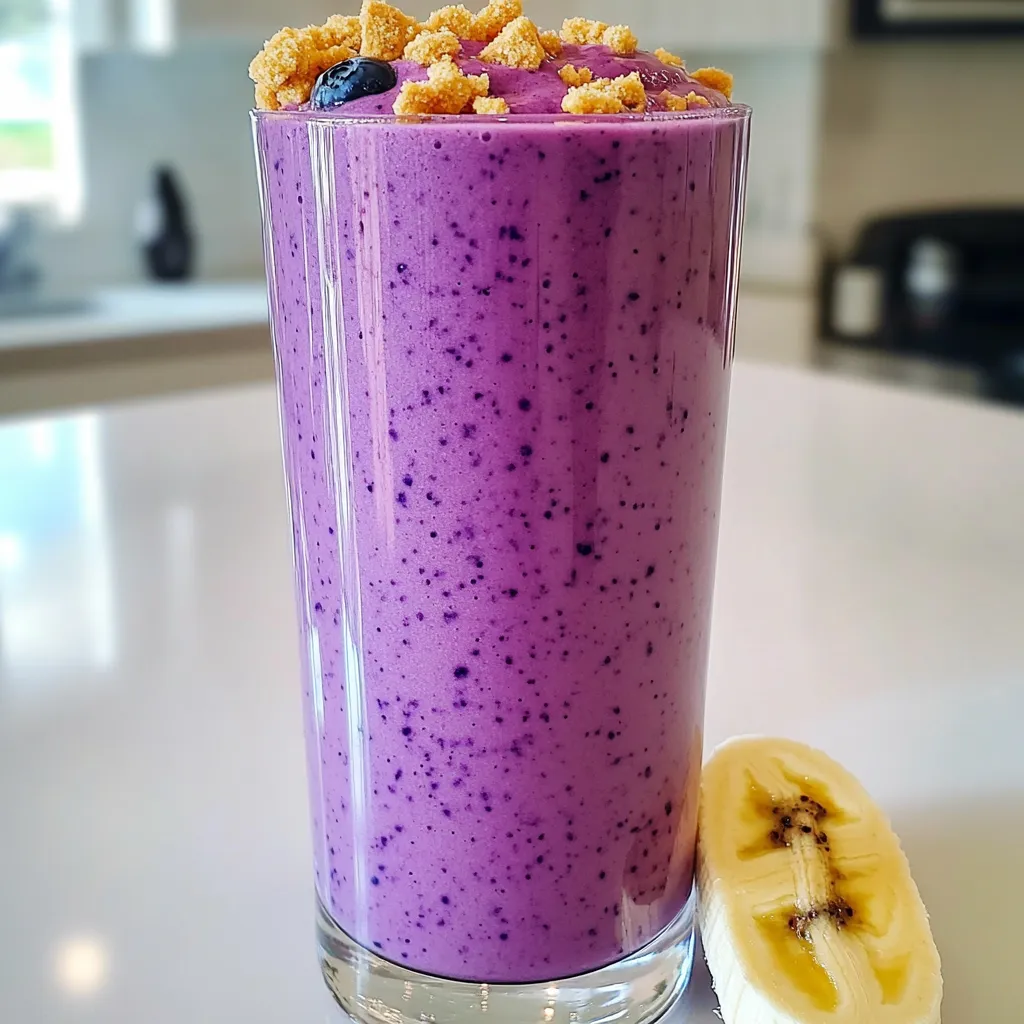
Blueberry Cheesecake Smoothie Protein Delight
Are you ready to treat yourself to a delicious and healthy drink? The Blueberry Cheesecake Smoothie Protein Delight packs all Read Full Recipe -
Warm Cranberry Ginger Mocktail Spritzer Recipe Delight
Welcome to my cozy kitchen! Today, I’m excited to share a delightful warm cranberry ginger mocktail spritzer that brightens up Read Full Recipe


hey,
i’m !
I’m so happy you’re here!
I love creating dishes that bring joy to the table. I hope they bring the same joy to yours. Let’s enjoy this flavorful journey together.


![- 1 package (16 oz) frozen pierogi (choose your favorite filling) - 1 medium onion, diced - 2 cups shredded potatoes (fresh or frozen) Crockpot Pierogi Casserole is simple and tasty. The main ingredients make this dish special. You start with frozen pierogi. They save time and are easy to use. Choose your favorite filling, like cheese or potato. Next, you have shredded potatoes. They add creaminess and texture. Then, you have onion. Dicing the onion gives a nice flavor. You can also add garlic to boost the taste. - Alternative cheeses - Broth options (chicken or vegetable) - Vegetable substitutes You can make this casserole your own with optional ingredients. Try different cheeses, like mozzarella or gouda. Each cheese brings a new flavor. You can also choose chicken or vegetable broth. The broth adds moisture and makes the dish richer. If you want to add veggies, consider mushrooms or spinach. These add color and nutrients. - 1 teaspoon garlic powder - 1 teaspoon onion powder - Salt and pepper to taste - Fresh chives, chopped (for garnish) Seasoning is key to great flavor. Use garlic powder and onion powder for depth. Salt and pepper help balance the taste. Finally, fresh chives add a pop of color and flavor. They make your dish look nice and taste fresh. For the full recipe, check out the detailed steps to create this easy comfort food. To start, heat olive oil in a skillet over medium heat. Add the diced onion and sauté until it turns soft and clear, about 5-7 minutes. This step boosts the flavor of your casserole. Next, grab your crockpot. Layer half of the frozen pierogi at the bottom. Then, sprinkle half of the shredded potatoes evenly over the pierogi. Follow this with half of the sautéed onions, half of the sour cream, and half of the shredded cheese. Repeat this layering with the rest of the pierogi, potatoes, onions, sour cream, and cheese. Now it’s time to cook! You can set the crockpot on low for 6-8 hours or on high for 3-4 hours. Both settings work well. You want the potatoes to be tender and the cheese to be melted and bubbly. To check doneness, insert a fork into the layers; it should slide in easily. Once the cooking time is up, gently stir the casserole. This mixes the layers and makes each bite tasty. For serving, use bowls straight from the crockpot. Garnish with fresh chives for color and flavor. Pair with a crisp salad for a delightful meal. Enjoy your comforting Crockpot Pierogi Casserole! For the full recipe, check out the [Full Recipe]. To get the best texture in your crockpot pierogi casserole, start by choosing the right type of pierogi. I recommend using frozen pierogi with hearty fillings like potato and cheese. These will hold up well during cooking. If you decide to use fresh pierogi, reduce the cooking time to ensure they don’t turn mushy. For cooking times, set your crockpot on low for 6-8 hours or high for 3-4 hours. This will let the flavors blend and keep the pierogi tender. To make your casserole burst with flavor, incorporate spices and herbs. Simple additions like thyme or dill can elevate your dish. You can also sprinkle some paprika on top for an extra kick. Pair your casserole with a fresh salad or steamed veggies. These sides balance the richness of the casserole. Cheese is a game-changer in this dish. You can use sharp cheddar for a strong flavor. Monterey Jack or mozzarella can also work well if you prefer a milder taste. For a cheesy topping, mix some cheese with breadcrumbs and sprinkle it on top during the last 30 minutes of cooking. This adds a delicious crunch. For the full recipe, you can follow the steps laid out earlier. Enjoy your cooking! {{image_2}} You can easily change this casserole to fit your needs. For a vegetarian version, swap the pierogi filling. Use cheese and potato pierogi or try spinach and cheese for a fresh taste. You can also add sautéed mushrooms for more depth. If you're gluten-free, choose gluten-free pierogi. Many brands offer this option now. You can also make your own if you feel adventurous. Just replace regular flour with a gluten-free blend, and enjoy the same great taste. Pierogi come in many styles, depending on their region. You might explore flavors from Poland, Ukraine, or even the U.S. Each area has its own favorite fillings and spices. For instance, try adding sauerkraut for a tangy twist, or mix in some smoked sausage for a hearty version. You can also use local ingredients to enhance the dish. If you live near a farm, grab fresh herbs or seasonal vegetables. This not only boosts flavor but also gives your casserole a unique touch. Serving this casserole can be fun and creative. You can dish it up right from the crockpot, keeping it warm and inviting. For a nice touch, serve it in bowls and sprinkle fresh chives on top. This adds color and flavor. Pair your casserole with a crisp salad or some roasted veggies. A cold drink, like sparkling water or cider, can also complement the meal nicely. You’ll find that these pairings enhance the comfort food experience! For the full recipe, check out the [Full Recipe]. To store leftovers, let the casserole cool completely. Transfer it into an airtight container. Glass or plastic containers work well. Make sure to seal it tightly to keep out air. You can keep it in the fridge for up to three days. To reheat the casserole, use the microwave or the oven. In the microwave, heat in short bursts. Stir the casserole every minute to warm it evenly. In the oven, place it in a covered dish at 350°F for about 20 minutes. This keeps the flavors and texture nice. If it's dry, add a splash of broth. You can freeze leftovers for later use. First, cool the casserole and then cut it into portions. Wrap each portion tightly in plastic wrap. Place the wrapped portions in a freezer-safe bag or container. It can last up to three months in the freezer. To thaw, move it to the fridge for a few hours or overnight. Reheat as mentioned above. Enjoy your delicious meal again without fuss! For the Full Recipe, check out the earlier section. How long can I refrigerate leftovers? You can refrigerate leftovers for up to four days. Just store them in an airtight container. This keeps them fresh and safe to eat. Can I use fresh pierogi instead of frozen? Yes, you can use fresh pierogi! Fresh pierogi will add a nice texture. Just adjust the cooking time slightly since they may need less time than frozen ones. What to do if the casserole is too dry? If your casserole seems dry, add more broth. You can also stir in a little sour cream. This will help moisten it and add flavor. Can I cook this on a stovetop if I don’t have a crockpot? Yes, you can cook it on the stovetop! Just layer the ingredients in a large pot. Cook on low heat, covered, for about 30-45 minutes. Stir occasionally to avoid sticking. What can I substitute for sour cream? You can use Greek yogurt as a great sour cream substitute. It will give a similar tangy taste. You can also try cream cheese or a plant-based yogurt. How to make it dairy-free? To make this dish dairy-free, use dairy-free cheese and yogurt. Look for options made from nuts or soy. You can also omit cheese altogether for a lighter dish. This blog post covered how to create a delicious pierogi casserole. We talked about key ingredients like frozen pierogi, shredded potatoes, and savory onions. You learned step-by-step instructions for prep and cooking, plus tips for enhancing texture and flavor. I also shared various recipe variations and storage tips. As you try this dish, remember to experiment with ingredients and seasonings. Make it your own, and enjoy each bite with family and friends.](https://soyumrecipes.com/wp-content/uploads/2025/05/1d318fa8-d1cf-484d-8525-00dc5f46a3f4-300x300.webp)
No-Bake Chocolate Pumpkin Cookies Easy and Quick Treat
Looking for a quick and easy treat? These No-Bake Chocolate Pumpkin Cookies are your answer! With just seven main ingredients, you can whip up…