


Latest & Greatest

Sriracha Honey Glazed Salmon Flavorful and Simple Dish
Looking to impress with a delicious meal? Try my Sriracha Honey Glazed Salmon! This simple dish combines sweet and spicy
Read more…
Spicy Korean Chicken Bowls Easy and Tasty Meal
Are you ready to spice up your dinner routine? These Spicy Korean Chicken Bowls are not only easy to make
Read more…
Everything Bagel Cucumber Bites Delightful Appetizer
Looking for a tasty and easy appetizer? You’ve come to the right spot! These Everything Bagel Cucumber Bites are fresh,
Read more…
Chocolate Chip Banana Bread Tasty and Simple Recipe
Are you craving something sweet and easy to bake? My Chocolate Chip Banana Bread recipe is your answer! With just
Read more…
Honey Mustard Chicken Salad Fresh and Flavorful Meal
Looking for a fresh and tasty meal? Try my Honey Mustard Chicken Salad! This salad combines tender chicken, crisp greens,
Read more…
Easy Chicken Enchilada Casserole Simple and Tasty Meal
Looking for a quick and tasty dinner? This Easy Chicken Enchilada Casserole checks all the boxes. With tender chicken, savory
Read more…
Crispy Parmesan Crusted Chicken Tasty Dinner Delight
If you’re craving a dinner that’s both crispy and flavorful, look no further! Crispy Parmesan Crusted Chicken is your answer.
Read more…
Tasty Avocado Toast with Poached Egg Delight
Looking for a delicious breakfast or brunch idea? Let me introduce you to Tasty Avocado Toast with Poached Egg Delight!
Read more…browse recipes


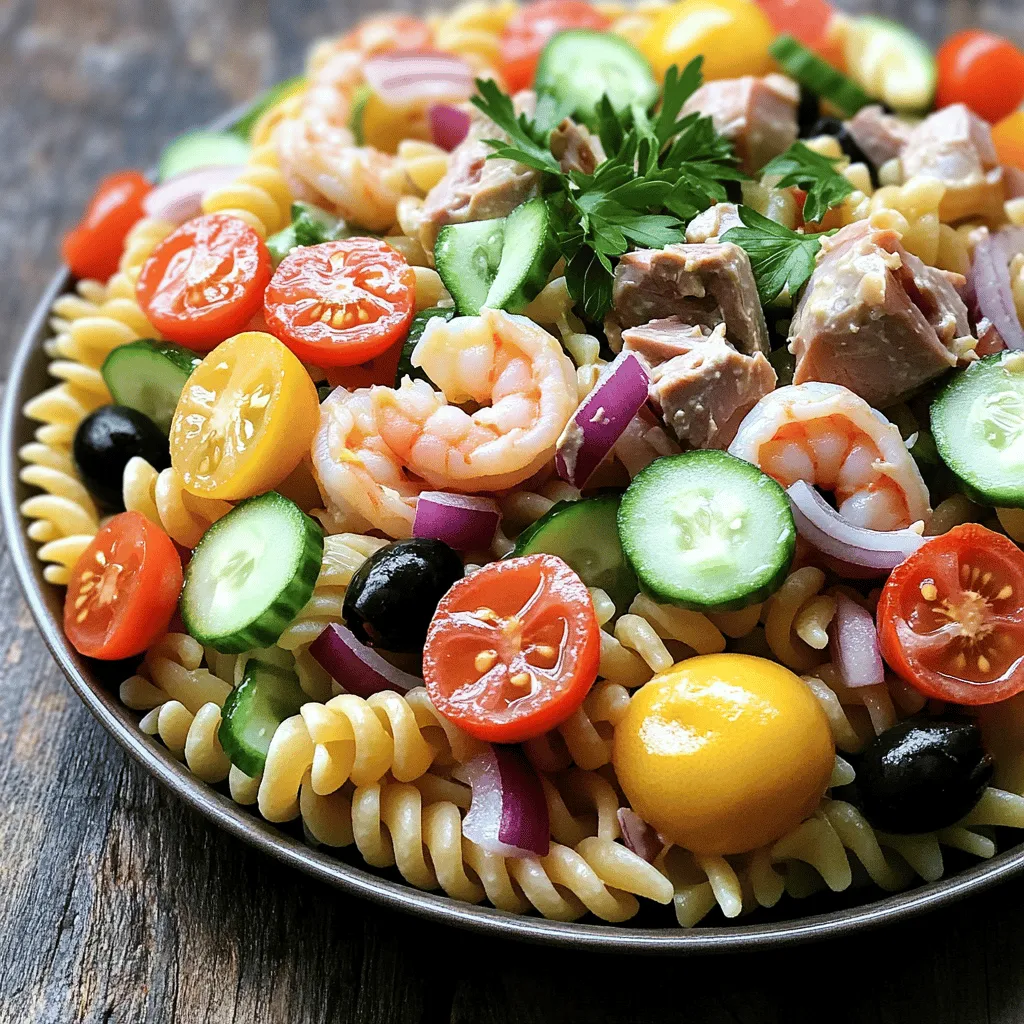
Flavorful Seafood Pasta Salad Quick and Easy Recipe
Looking for a delightful dish that’s quick and easy? This flavorful Seafood Pasta Salad is just what you need! Packed with tasty seafood, fresh…
My Latest Desserts
-
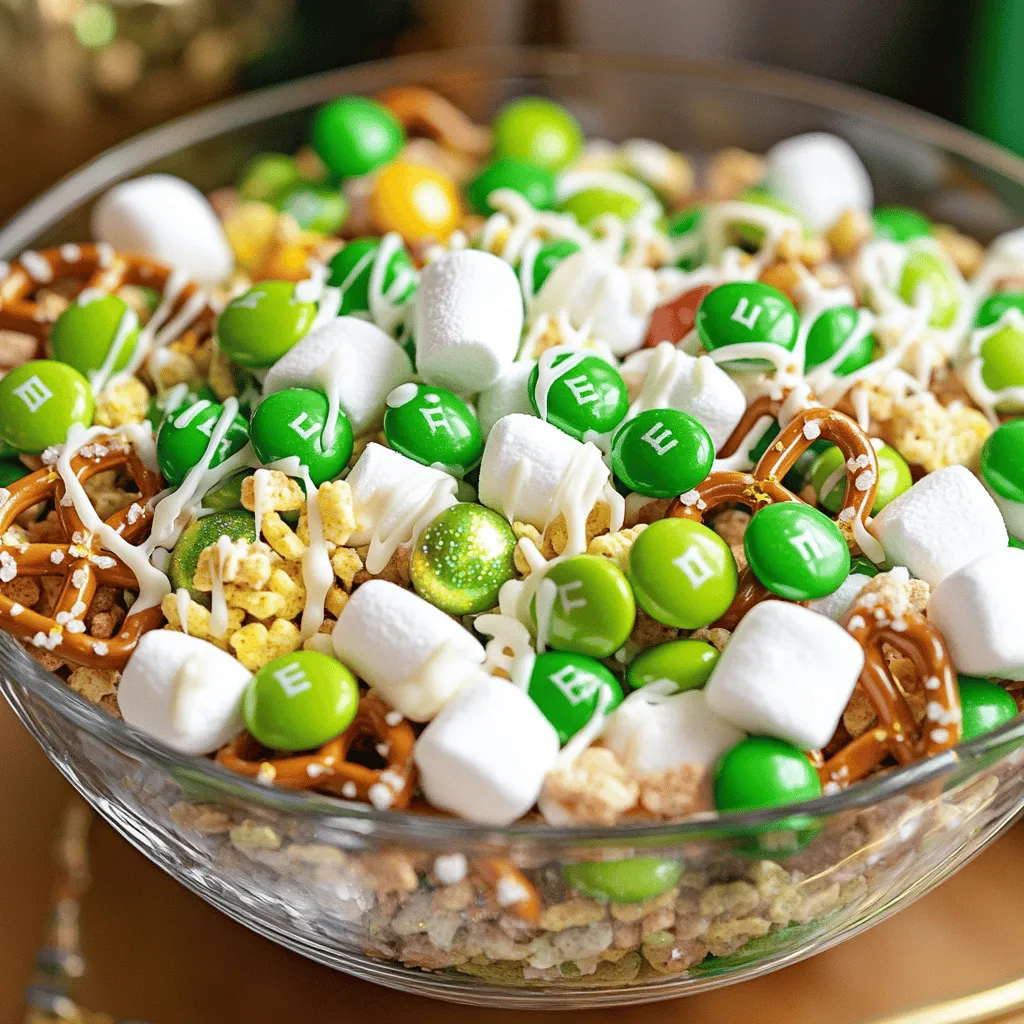
Lucky Charms St. Patrick Snack Mix Festive Treat
Get ready to sprinkle some magic into your snack time with my Lucky Charms St. Patrick Snack Mix! This festive Read Full Recipe -
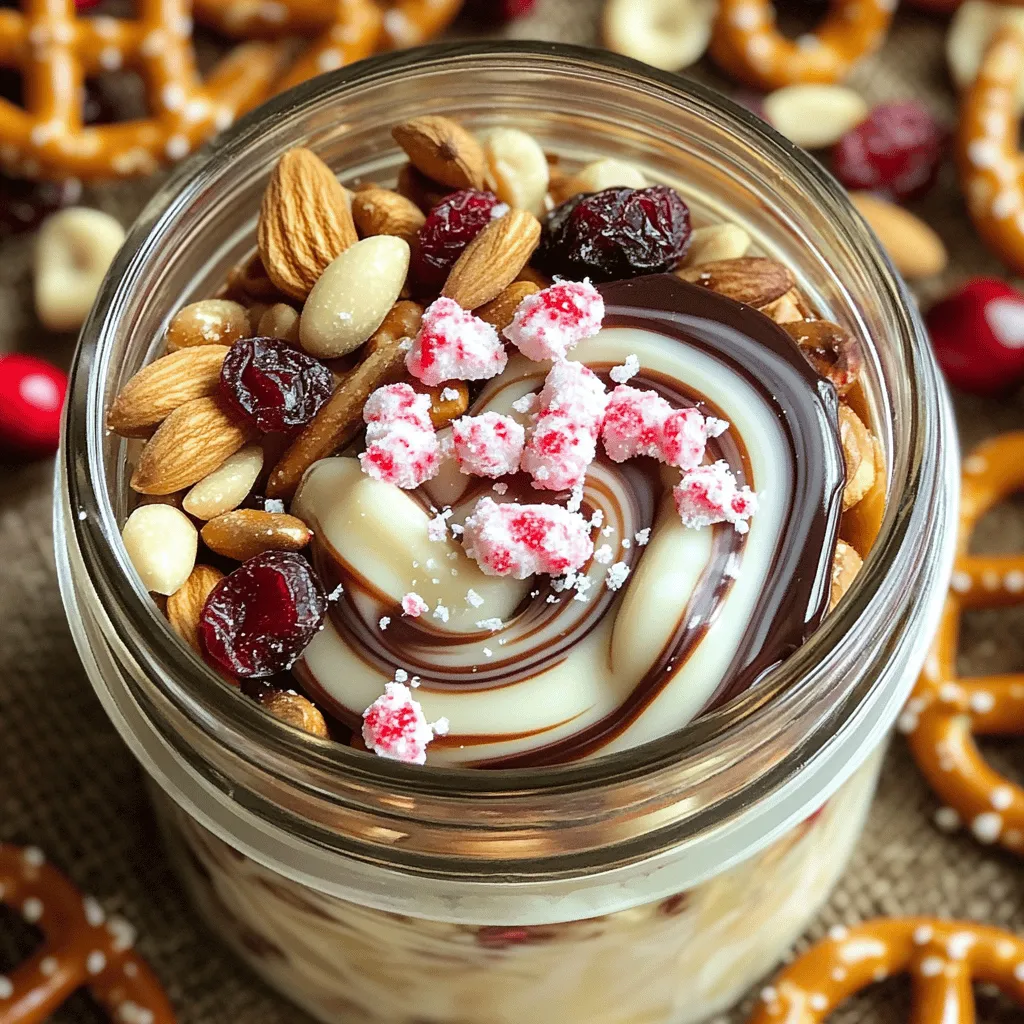
Peppermint Bark Trail Mix Festive and Tasty Treat
Get ready to elevate your holiday snacking with Peppermint Bark Trail Mix! This treat combines the rich taste of dark Read Full Recipe -
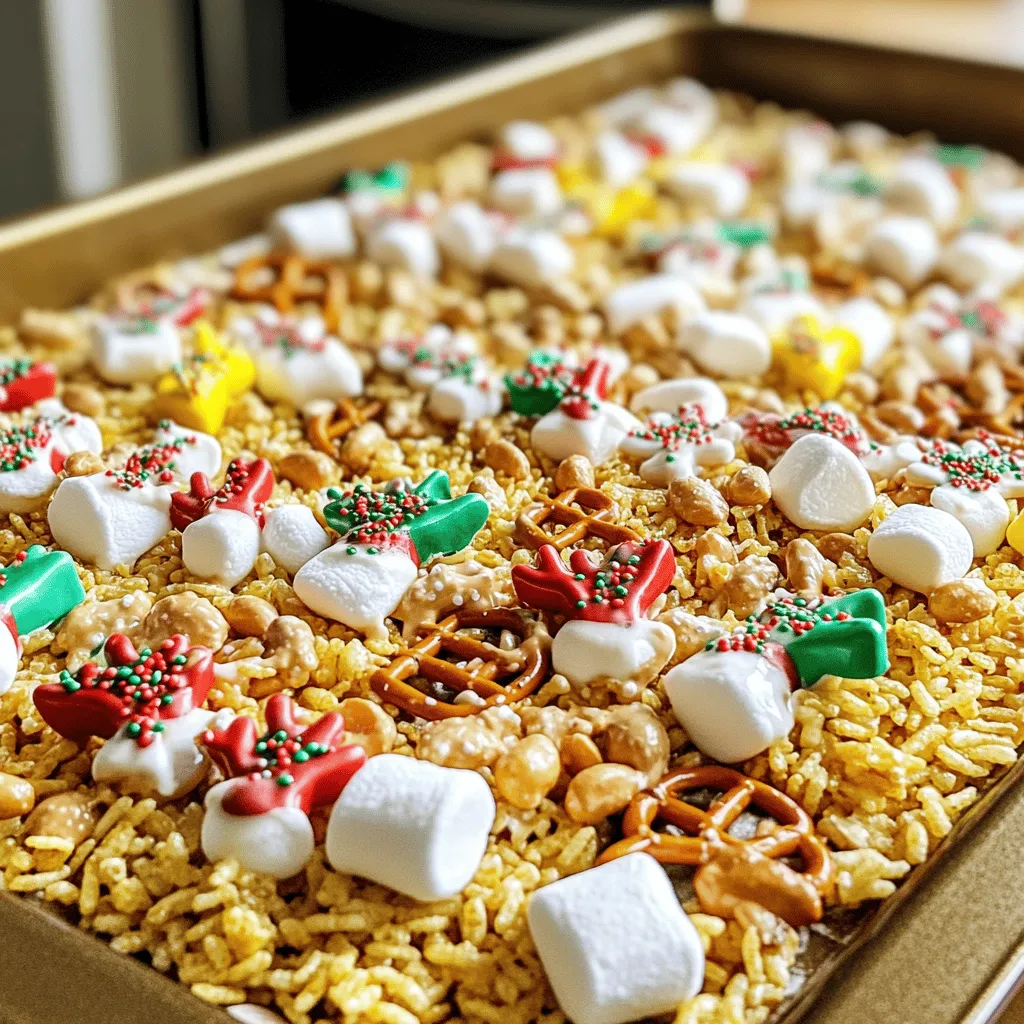
Reindeer Chow Christmas Snack Mix Festive Delight
Get ready to spread holiday cheer with my Reindeer Chow Christmas Snack Mix! This fun and easy treat combines sweet Read Full Recipe -

Gingerbread House Snack Mix Festive Holiday Treat
Are you ready to add some holiday cheer to your snack time? This Gingerbread House Snack Mix is the perfect Read Full Recipe -

Caramel Pecan Sticky Buns Sweet and Gooey Treat
Are you ready to treat yourself to the ultimate indulgence? Caramel Pecan Sticky Buns are sweet, gooey, and packed with Read Full Recipe -

Pumpkin Spice French Toast Casserole Easy and Tasty
Looking for a cozy fall breakfast that’s easy and delicious? You’ll love my Pumpkin Spice French Toast Casserole! This dish Read Full Recipe -

Fluffy Pumpkin Pancakes Perfectly Delicious Breakfast
Start your morning with a treat you won’t forget: fluffy pumpkin pancakes! They bring fall flavors to your breakfast table Read Full Recipe -

Brown Butter Banana Chocolate Chip Muffins Delight
Are you craving a warm, cozy treat? Look no further than these Brown Butter Banana Chocolate Chip Muffins! This recipe Read Full Recipe -

Chewy Salted Caramel Pretzel Brownies Delightful Treat
Are you ready to indulge in a treat that combines sweet, salty, and chewy goodness? These Chewy Salted Caramel Pretzel Read Full Recipe -

Fluffy Pumpkin Pancakes Easy and Delicious Recipe
Looking to spice up your breakfast with something special? You’re in for a treat! These fluffy pumpkin pancakes are not Read Full Recipe
My Latest Recipes

hey,
i’m !
I’m so happy you’re here!
I love creating dishes that bring joy to the table. I hope they bring the same joy to yours. Let’s enjoy this flavorful journey together.


![- 200g pasta (penne or fusilli) - 1 block (200g) feta cheese - 2 cups cherry tomatoes, halved - 1/4 cup extra-virgin olive oil - 4 cloves garlic, minced - 1 teaspoon dried oregano - 1/2 teaspoon red pepper flakes (optional) - Salt and black pepper to taste - Fresh basil leaves for garnish - Grated Parmesan cheese for serving (optional) - You can use any pasta you like, such as spaghetti or rotini. - For a dairy-free option, try using a plant-based feta cheese. - Feel free to add seasonal veggies like zucchini or spinach for more flavor. Using different ingredients can change the taste and make this dish your own. 1. Preheat the oven and prep the baking dish Start by setting your oven to 400°F (200°C). This ensures even baking for your meal. Grab a large baking dish. This is where you will mix all your ingredients. 2. Prepare the cherry tomatoes and garlic mixture Take 2 cups of cherry tomatoes and cut them in half. Place the halved tomatoes in the baking dish. Next, mince 4 cloves of garlic. Add the garlic to the tomatoes. Drizzle 1/4 cup of extra-virgin olive oil over the mix. Season it with salt and black pepper. Add 1 teaspoon of dried oregano and, if you like heat, 1/2 teaspoon of red pepper flakes. Mix everything gently to coat the tomatoes and garlic. 1. Baking time and temperatures explained Place a block of feta cheese in the center of the tomato mix. Bake this dish for 25-30 minutes. You want the tomatoes to burst, and the feta should turn golden and soft. Keep an eye on it, as oven times may vary. 2. How to identify when the dish is ready After 25 minutes, check your dish. The tomatoes should be soft and juicy. The feta should look melted and slightly browned. This is the perfect time to take it out. 1. Mixing the baked ingredients with pasta While the feta and tomatoes are baking, cook 200g of pasta in a pot of salted boiling water. Follow the package instructions for the best texture. Once cooked, drain the pasta. After taking the baking dish out of the oven, use a fork to mash the feta into the tomatoes. Mix them well until you get a creamy sauce. Add the drained pasta to the dish. Toss everything together, ensuring the pasta is well coated. 2. Adjusting seasonings before serving Taste your dish. If it needs more flavor, add extra salt, black pepper, or red pepper flakes. Serve hot, and finish with fresh basil leaves on top. You can also sprinkle grated Parmesan cheese if you wish. Enjoy this simple and tasty weeknight meal! For a full guide on this recipe, check out the Full Recipe. To make perfect pasta, cook it until it's al dente. This means it should be firm yet tender. Follow the package instructions for time. Remember to salt the water; it adds flavor. After draining, toss the pasta with a bit of olive oil to prevent sticking. Roasting tomatoes is easy. Preheat the oven to 400°F (200°C). Place halved cherry tomatoes in a baking dish. Drizzle them with olive oil and season with salt. Bake until they burst and soften. This brings out their natural sweetness and flavor. Choose high-quality feta cheese for the best taste. Look for feta made from sheep's milk or a blend. Avoid pre-crumbled feta; it lacks the creamy texture. A block of feta melts nicely with the tomatoes, creating a rich sauce. Olive oil is key to this dish. Use extra-virgin olive oil for its fruity flavor. It enhances both the feta and tomatoes. A good oil can elevate the entire meal. Don't skimp; it makes a big difference. Baked Feta Pasta pairs well with a simple green salad. This adds freshness and crunch. Garlic bread is another great side. It soaks up the tasty sauce and complements the dish. For plating, use a large bowl. Spoon the pasta into the center. Garnish with fresh basil and a sprinkle of Parmesan cheese. This makes the dish look even more inviting. {{image_2}} You can make Baked Feta Pasta even more tasty. Adding spices or fresh herbs can change the flavor. I love using fresh basil or thyme. You can also try adding a pinch of garlic powder or onion powder for extra taste. Want to boost protein? You can add chicken or shrimp. Cook the protein separately, then mix it in with the pasta. This makes the meal hearty and filling. If you want a vegan version, swap out the feta cheese. There are great dairy-free feta options made from nuts. You can also skip the cheese entirely. Just add more veggies and spices to keep it flavorful. For gluten-free pasta, use pasta made from rice or quinoa. These options work well and taste great. You won’t miss the regular pasta at all. Seasonal vegetables can change the dish's vibe. In summer, add zucchini or bell peppers. In fall, use butternut squash or spinach. Just toss in what you find fresh at the market. Adjusting flavors based on what you have is also fun. If you have lemon, add a squeeze for brightness. If you find fresh cherry tomatoes, use those instead of canned. Always feel free to mix it up! For the full recipe, check out [Full Recipe]. To keep your Baked Feta Pasta fresh, store it in an airtight container. Let the dish cool before sealing it. Place it in the fridge within two hours of cooking. This helps keep bacteria away. Eat the leftovers within three to four days for the best taste. When reheating, you want to keep that creamy texture. The oven works best for this. Preheat your oven to 350°F (175°C). Place the pasta in a baking dish and cover it with foil. Heat for about 15-20 minutes. If you’re short on time, you can use the microwave. Place a portion in a microwave-safe bowl. Heat for one to two minutes, stirring halfway. This method is quick but may dry out the pasta a bit. Always check that it's hot before serving. Enjoy your delicious Baked Feta Pasta over again! How do I store leftovers of Baked Feta Pasta? To store leftovers, put them in an airtight container. Keep the pasta in the fridge. It will stay fresh for up to three days. When you want to eat it, just reheat it. Can I use crumbled feta instead of a block? Yes, you can use crumbled feta. It will melt nicely. Just be sure to adjust the baking time. Crumbled feta may cook faster than a block. What’s the best way to serve Baked Feta Pasta? Serve Baked Feta Pasta hot, straight from the oven. Add fresh basil on top for color and taste. A sprinkle of grated Parmesan can also enhance the dish. How long does Baked Feta Pasta take to make? Baked Feta Pasta takes about 40 minutes total. This includes 10 minutes of prep time and 25-30 minutes of baking. Can I make Baked Feta Pasta ahead of time? You can prep the dish ahead of time. Mix the tomatoes, garlic, and feta in a baking dish. Cover it and store it in the fridge. Bake it when you’re ready to eat. Is Baked Feta Pasta suitable for meal prep? Yes, it is great for meal prep! You can make a big batch and divide it into portions. It reheats well and tastes great later. Baked Feta Pasta combines simple ingredients into a delicious dish. We covered essential items, clever swaps, and easy steps for preparation. You learned about tips for perfect cooking and creative variations. I hope you feel ready to try this recipe in your kitchen. Cooking can be fun and simple. Enjoy the flavors, and don’t forget to share your results!](https://soyumrecipes.com/wp-content/uploads/2025/06/d9ad6c35-3df6-49db-8309-8a9e2e0becd3-300x300.webp)

Crockpot Pierogi Casserole Easy Comfort Food Delight
Looking for a cozy dish that warms the heart? Try my Crockpot Pierogi Casserole! This easy recipe combines frozen pierogi with creamy layers of…
![- 1 package (16 oz) frozen pierogi (choose your favorite filling) - 1 medium onion, diced - 2 cups shredded potatoes (fresh or frozen) Crockpot Pierogi Casserole is simple and tasty. The main ingredients make this dish special. You start with frozen pierogi. They save time and are easy to use. Choose your favorite filling, like cheese or potato. Next, you have shredded potatoes. They add creaminess and texture. Then, you have onion. Dicing the onion gives a nice flavor. You can also add garlic to boost the taste. - Alternative cheeses - Broth options (chicken or vegetable) - Vegetable substitutes You can make this casserole your own with optional ingredients. Try different cheeses, like mozzarella or gouda. Each cheese brings a new flavor. You can also choose chicken or vegetable broth. The broth adds moisture and makes the dish richer. If you want to add veggies, consider mushrooms or spinach. These add color and nutrients. - 1 teaspoon garlic powder - 1 teaspoon onion powder - Salt and pepper to taste - Fresh chives, chopped (for garnish) Seasoning is key to great flavor. Use garlic powder and onion powder for depth. Salt and pepper help balance the taste. Finally, fresh chives add a pop of color and flavor. They make your dish look nice and taste fresh. For the full recipe, check out the detailed steps to create this easy comfort food. To start, heat olive oil in a skillet over medium heat. Add the diced onion and sauté until it turns soft and clear, about 5-7 minutes. This step boosts the flavor of your casserole. Next, grab your crockpot. Layer half of the frozen pierogi at the bottom. Then, sprinkle half of the shredded potatoes evenly over the pierogi. Follow this with half of the sautéed onions, half of the sour cream, and half of the shredded cheese. Repeat this layering with the rest of the pierogi, potatoes, onions, sour cream, and cheese. Now it’s time to cook! You can set the crockpot on low for 6-8 hours or on high for 3-4 hours. Both settings work well. You want the potatoes to be tender and the cheese to be melted and bubbly. To check doneness, insert a fork into the layers; it should slide in easily. Once the cooking time is up, gently stir the casserole. This mixes the layers and makes each bite tasty. For serving, use bowls straight from the crockpot. Garnish with fresh chives for color and flavor. Pair with a crisp salad for a delightful meal. Enjoy your comforting Crockpot Pierogi Casserole! For the full recipe, check out the [Full Recipe]. To get the best texture in your crockpot pierogi casserole, start by choosing the right type of pierogi. I recommend using frozen pierogi with hearty fillings like potato and cheese. These will hold up well during cooking. If you decide to use fresh pierogi, reduce the cooking time to ensure they don’t turn mushy. For cooking times, set your crockpot on low for 6-8 hours or high for 3-4 hours. This will let the flavors blend and keep the pierogi tender. To make your casserole burst with flavor, incorporate spices and herbs. Simple additions like thyme or dill can elevate your dish. You can also sprinkle some paprika on top for an extra kick. Pair your casserole with a fresh salad or steamed veggies. These sides balance the richness of the casserole. Cheese is a game-changer in this dish. You can use sharp cheddar for a strong flavor. Monterey Jack or mozzarella can also work well if you prefer a milder taste. For a cheesy topping, mix some cheese with breadcrumbs and sprinkle it on top during the last 30 minutes of cooking. This adds a delicious crunch. For the full recipe, you can follow the steps laid out earlier. Enjoy your cooking! {{image_2}} You can easily change this casserole to fit your needs. For a vegetarian version, swap the pierogi filling. Use cheese and potato pierogi or try spinach and cheese for a fresh taste. You can also add sautéed mushrooms for more depth. If you're gluten-free, choose gluten-free pierogi. Many brands offer this option now. You can also make your own if you feel adventurous. Just replace regular flour with a gluten-free blend, and enjoy the same great taste. Pierogi come in many styles, depending on their region. You might explore flavors from Poland, Ukraine, or even the U.S. Each area has its own favorite fillings and spices. For instance, try adding sauerkraut for a tangy twist, or mix in some smoked sausage for a hearty version. You can also use local ingredients to enhance the dish. If you live near a farm, grab fresh herbs or seasonal vegetables. This not only boosts flavor but also gives your casserole a unique touch. Serving this casserole can be fun and creative. You can dish it up right from the crockpot, keeping it warm and inviting. For a nice touch, serve it in bowls and sprinkle fresh chives on top. This adds color and flavor. Pair your casserole with a crisp salad or some roasted veggies. A cold drink, like sparkling water or cider, can also complement the meal nicely. You’ll find that these pairings enhance the comfort food experience! For the full recipe, check out the [Full Recipe]. To store leftovers, let the casserole cool completely. Transfer it into an airtight container. Glass or plastic containers work well. Make sure to seal it tightly to keep out air. You can keep it in the fridge for up to three days. To reheat the casserole, use the microwave or the oven. In the microwave, heat in short bursts. Stir the casserole every minute to warm it evenly. In the oven, place it in a covered dish at 350°F for about 20 minutes. This keeps the flavors and texture nice. If it's dry, add a splash of broth. You can freeze leftovers for later use. First, cool the casserole and then cut it into portions. Wrap each portion tightly in plastic wrap. Place the wrapped portions in a freezer-safe bag or container. It can last up to three months in the freezer. To thaw, move it to the fridge for a few hours or overnight. Reheat as mentioned above. Enjoy your delicious meal again without fuss! For the Full Recipe, check out the earlier section. How long can I refrigerate leftovers? You can refrigerate leftovers for up to four days. Just store them in an airtight container. This keeps them fresh and safe to eat. Can I use fresh pierogi instead of frozen? Yes, you can use fresh pierogi! Fresh pierogi will add a nice texture. Just adjust the cooking time slightly since they may need less time than frozen ones. What to do if the casserole is too dry? If your casserole seems dry, add more broth. You can also stir in a little sour cream. This will help moisten it and add flavor. Can I cook this on a stovetop if I don’t have a crockpot? Yes, you can cook it on the stovetop! Just layer the ingredients in a large pot. Cook on low heat, covered, for about 30-45 minutes. Stir occasionally to avoid sticking. What can I substitute for sour cream? You can use Greek yogurt as a great sour cream substitute. It will give a similar tangy taste. You can also try cream cheese or a plant-based yogurt. How to make it dairy-free? To make this dish dairy-free, use dairy-free cheese and yogurt. Look for options made from nuts or soy. You can also omit cheese altogether for a lighter dish. This blog post covered how to create a delicious pierogi casserole. We talked about key ingredients like frozen pierogi, shredded potatoes, and savory onions. You learned step-by-step instructions for prep and cooking, plus tips for enhancing texture and flavor. I also shared various recipe variations and storage tips. As you try this dish, remember to experiment with ingredients and seasonings. Make it your own, and enjoy each bite with family and friends.](https://soyumrecipes.com/wp-content/uploads/2025/05/1d318fa8-d1cf-484d-8525-00dc5f46a3f4.webp)
