
Latest & Greatest
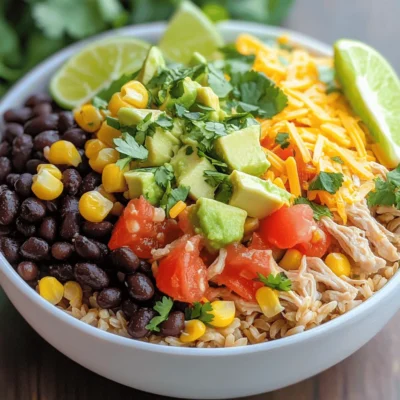
Easy Chicken Burrito Bowls Quick and Tasty Meal
Craving a quick and tasty meal that impresses? Easy Chicken Burrito Bowls fit the bill! With fresh ingredients and bold
Read more…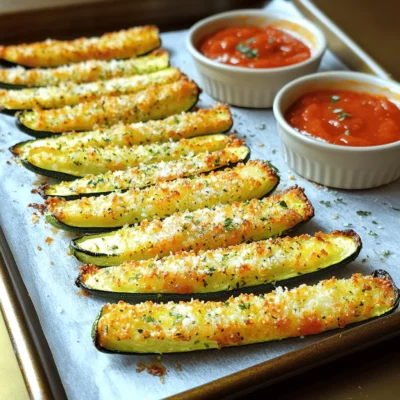
Baked Parmesan Zucchini Fries Crispy and Flavorful Snack
Looking for a crispy and flavorful snack? Baked Parmesan Zucchini Fries are the perfect answer! These tasty bites are easy
Read more…
Chocolate Chip Banana Bread Simple and Moist Recipe
Ready to bake something special? This Chocolate Chip Banana Bread is simple and moist, making it the perfect treat for
Read more…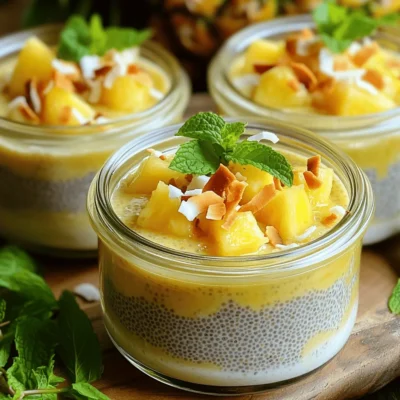
Pineapple Coconut Chia Pudding Simple and Tasty Treat
Are you ready to enjoy a refreshing treat that’s easy to make? Pineapple Coconut Chia Pudding is the perfect blend
Read more…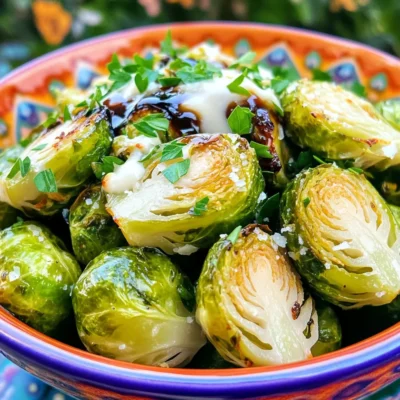
Garlic Roasted Brussels Sprouts Easy Flavorful Side
Are you ready to transform Brussels sprouts into a mouthwatering side dish? My Garlic Roasted Brussels Sprouts recipe is easy
Read more…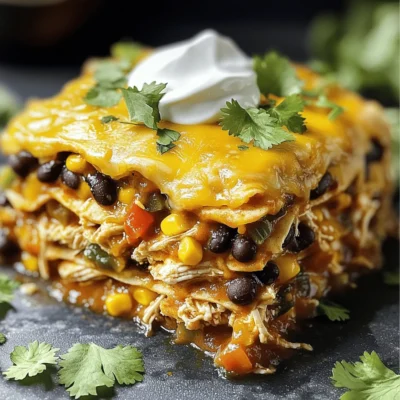
Chicken Enchilada Casserole Easy Family Dinner Idea
Looking for an easy family dinner? You’re in the right place! My Chicken Enchilada Casserole is a tasty, simple dish
Read more…
Caramel Apple Nachos Tasty and Fun Dessert Idea
Looking for a fun and tasty dessert? Caramel Apple Nachos are just the thing! This sweet treat mixes fresh apples,
Read more…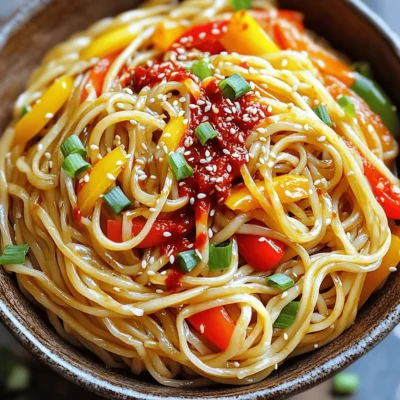
Chili Garlic Noodles Flavorful and Easy Meal Recipe
Are you ready to spice up your dinner? Chili Garlic Noodles are a quick and tasty meal everyone will love.
Read more…browse recipes


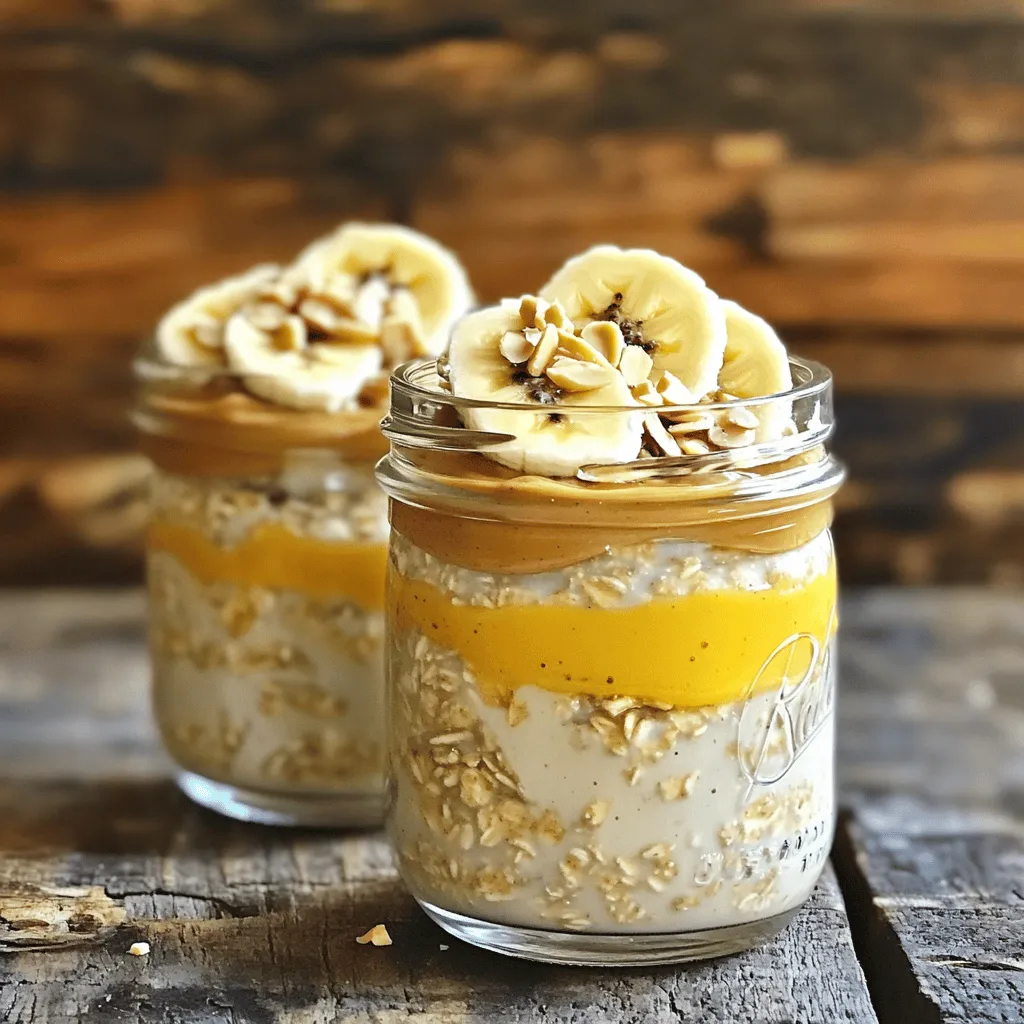
Peanut Butter Banana Overnight Oats Easy Recipe Guide
Start your day right with this quick and tasty Peanut Butter Banana Overnight Oats recipe! In just minutes, you can whip up a delicious…
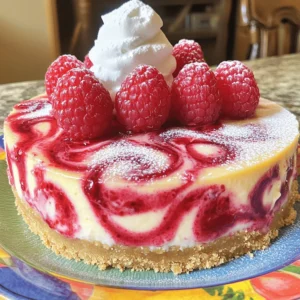
My Latest Desserts
-
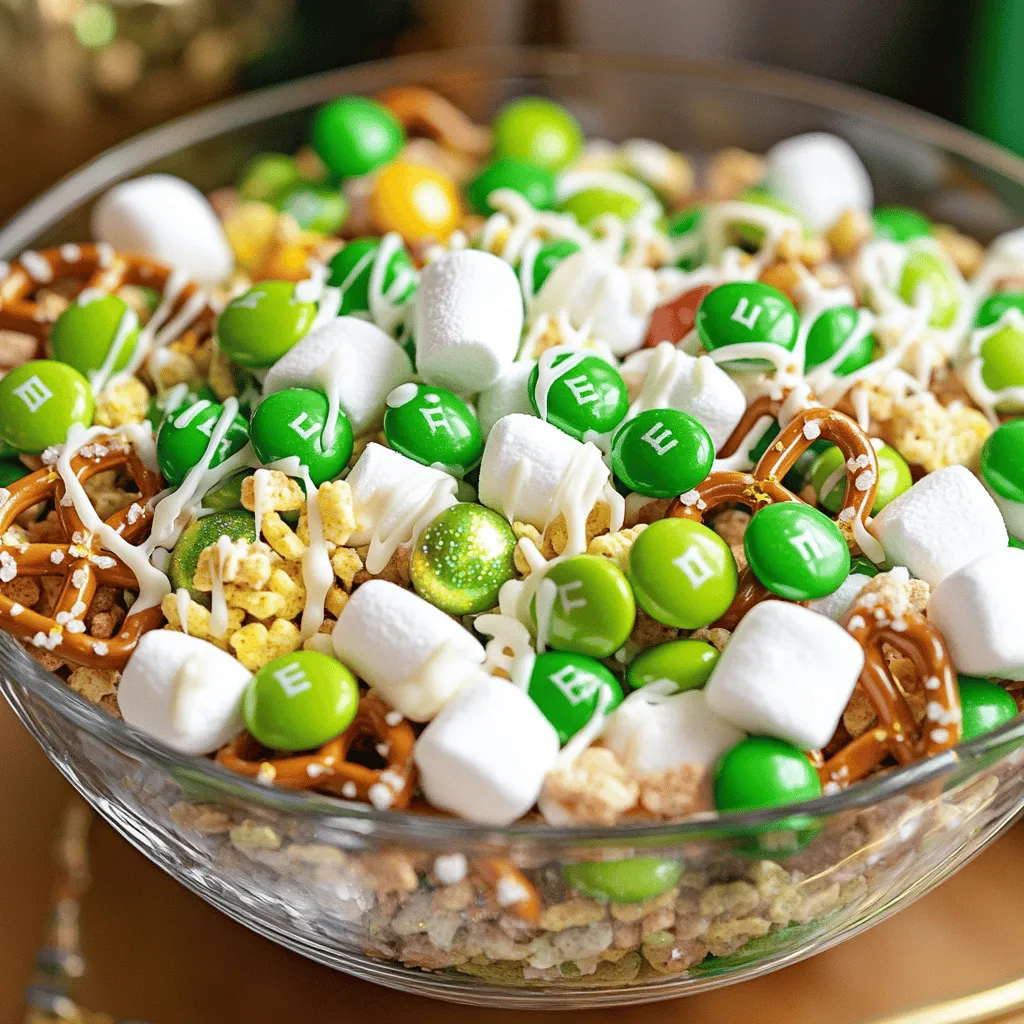
Lucky Charms St. Patrick Snack Mix Festive Treat
Get ready to sprinkle some magic into your snack time with my Lucky Charms St. Patrick Snack Mix! This festive Read Full Recipe -
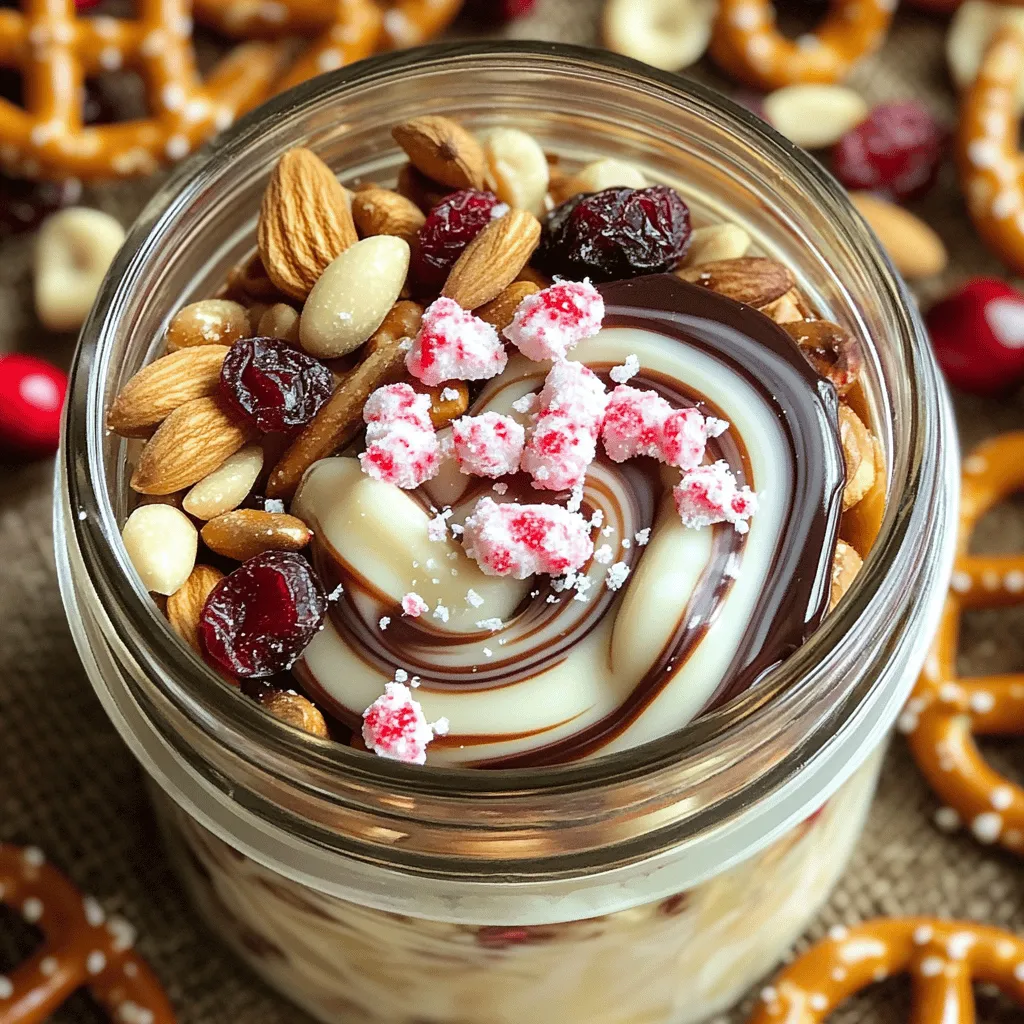
Peppermint Bark Trail Mix Festive and Tasty Treat
Get ready to elevate your holiday snacking with Peppermint Bark Trail Mix! This treat combines the rich taste of dark Read Full Recipe -

Reindeer Chow Christmas Snack Mix Festive Delight
Get ready to spread holiday cheer with my Reindeer Chow Christmas Snack Mix! This fun and easy treat combines sweet Read Full Recipe -

Gingerbread House Snack Mix Festive Holiday Treat
Are you ready to add some holiday cheer to your snack time? This Gingerbread House Snack Mix is the perfect Read Full Recipe -

Caramel Pecan Sticky Buns Sweet and Gooey Treat
Are you ready to treat yourself to the ultimate indulgence? Caramel Pecan Sticky Buns are sweet, gooey, and packed with Read Full Recipe -

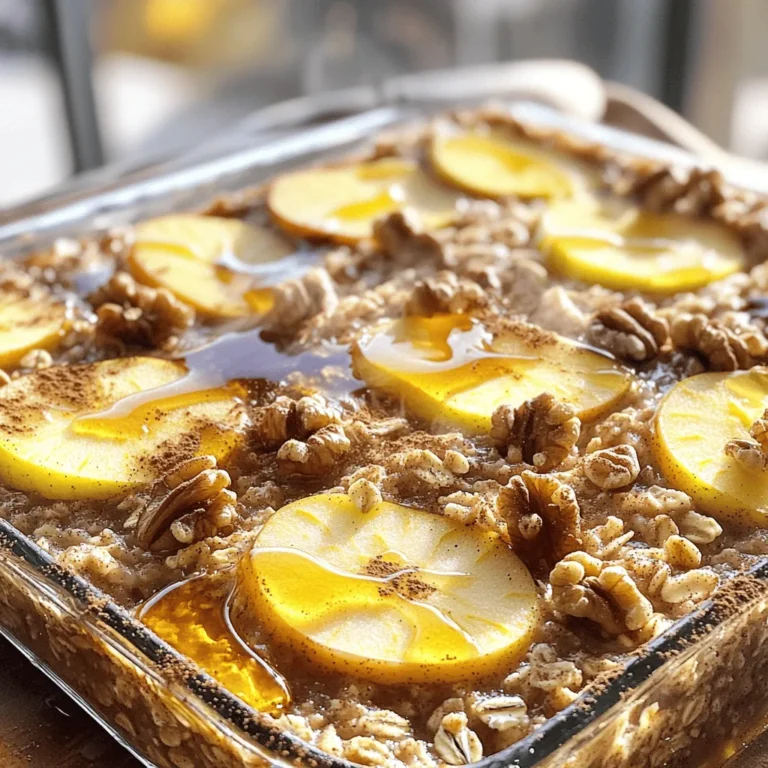
Pumpkin Spice French Toast Casserole Easy and Tasty
Looking for a cozy fall breakfast that’s easy and delicious? You’ll love my Pumpkin Spice French Toast Casserole! This dish Read Full Recipe -

Fluffy Pumpkin Pancakes Perfectly Delicious Breakfast
Start your morning with a treat you won’t forget: fluffy pumpkin pancakes! They bring fall flavors to your breakfast table Read Full Recipe -

Brown Butter Banana Chocolate Chip Muffins Delight
Are you craving a warm, cozy treat? Look no further than these Brown Butter Banana Chocolate Chip Muffins! This recipe Read Full Recipe -

Chewy Salted Caramel Pretzel Brownies Delightful Treat
Are you ready to indulge in a treat that combines sweet, salty, and chewy goodness? These Chewy Salted Caramel Pretzel Read Full Recipe -

Fluffy Pumpkin Pancakes Easy and Delicious Recipe
Looking to spice up your breakfast with something special? You’re in for a treat! These fluffy pumpkin pancakes are not Read Full Recipe
My Latest Recipes

hey,
i’m !
I’m so happy you’re here!
I love creating dishes that bring joy to the table. I hope they bring the same joy to yours. Let’s enjoy this flavorful journey together.
![- 1 can (15 oz) chickpeas - 1 tablespoon olive oil - 1 teaspoon smoked paprika - 1/2 teaspoon cumin - 1/4 teaspoon cayenne pepper - Salt and pepper to taste Spicy chickpeas bring bold flavor to your tacos. I love using canned chickpeas for ease. You can drain and rinse them to cut some sodium. Olive oil adds a nice richness. Smoked paprika gives a deep, warm flavor. Cumin adds earthy notes, while cayenne brings heat. Adjust the cayenne to fit your spice level. Salt and pepper finish the seasoning. - 1 avocado, sliced - 1 cup red cabbage, shredded - 1/2 cup cherry tomatoes, halved - Fresh cilantro, for garnish - 1 lime, cut into wedges Toppings make your tacos pop! Avocado adds creaminess, which balances the spice. Red cabbage gives a nice crunch and color. Cherry tomatoes add sweetness. Fresh cilantro provides a burst of freshness. Lime wedges add zesty flair that brightens the dish. These toppings elevate your tacos to a new level. - 4 small corn tortillas - 4 small flour tortillas Tortillas are the base of your tacos. Corn tortillas are gluten-free and add a nice texture. Flour tortillas are soft and chewy. Choose what you prefer. Warm them up before adding your filling. This makes them pliable and easy to fold. Enjoy the taco experience with your favorite tortilla! You can find the full recipe to guide you through making these tasty tacos. To start, you need to toss the chickpeas with spices. In a medium bowl, combine the drained chickpeas with olive oil, smoked paprika, cumin, cayenne pepper, salt, and pepper. Mix well until the chickpeas are fully coated. This step adds great flavor. Next, cook the chickpeas until crispy. Heat a non-stick skillet over medium heat. Add the seasoned chickpeas and sauté for about 5 to 7 minutes. Stir occasionally. You want them to be crispy and slightly golden. This texture makes the tacos even more enjoyable. Now, let's warm the tortillas. Use another skillet for this. Place the tortillas on the skillet for about 30 seconds on each side. You want them to be warm and pliable. This keeps them soft and easy to fold. To keep the tortillas pliable, stack them in a clean kitchen towel. This helps them stay warm while you finish the tacos. A warm tortilla makes a big difference in taste and texture. When it's time to assemble the tacos, layer the ingredients for the best flavor. Start with some sautéed chickpeas in the center of each tortilla. This is the main filling. Next, top the chickpeas with sliced avocado, shredded red cabbage, and halved cherry tomatoes. These toppings add color and crunch. Drizzle a spoonful of Greek yogurt on top for creaminess. Finally, garnish with fresh cilantro. This adds a nice touch. For perfect taco assembly, make sure to not overfill each tortilla. This helps prevent spills and keeps everything together. Serve with lime wedges on the side for an extra zesty flavor. Enjoy your flavorful spicy chickpea tacos! For the full recipe, check out the details above. To make your chickpeas crispy, follow these steps: - Draining and Rinsing: Start by draining and rinsing your canned chickpeas. This step removes excess salt and helps them crisp better. - Pat Dry: After rinsing, pat the chickpeas dry with a paper towel. Removing moisture is key to crispiness. - Oil and Spices: Toss the chickpeas in olive oil and spices evenly. Use smoked paprika, cumin, and cayenne for a great flavor. - Heat Control: Sauté the chickpeas over medium heat. Stir them occasionally for an even cook. Aim for 5-7 minutes until golden. - Spice Levels: To adjust spice levels, add more or less cayenne pepper. Taste as you cook, and find your sweet spot. Pair your spicy chickpea tacos with these sides for a complete meal: - Fresh Salad: A simple green salad with lime dressing complements the tacos well. - Rice or Quinoa: Serve with fluffy rice or quinoa for a filling side dish. - Guacamole: A bowl of guacamole adds creaminess and flavor. For extra toppings, consider: - Feta Cheese: Crumbled feta adds a salty kick. - Pickled Onions: These give a nice tangy crunch. - Hot Sauce: Drizzle your favorite hot sauce for an extra kick. To save time on busy days, prep your ingredients ahead: - Chickpeas: You can sauté the chickpeas a day before. Store them in an airtight container in the fridge. - Toppings: Chop your veggies and store them separately. Keep the avocado whole until serving to prevent browning. - Tortillas: Warm them just before serving. This keeps them soft and pliable. For reheating leftovers: - Chickpeas: Reheat in a pan over low heat to maintain their crispiness. - Tortillas: Quickly warm them on a skillet to restore their softness. - Avoid Microwaving: Microwaving can make tortillas hard and chewy. Opt for the skillet instead. For the full recipe, check the details above and enjoy your delicious tacos! {{image_2}} For a vegan twist, skip the Greek yogurt. Use a plant-based yogurt made from almond or coconut instead. This swap keeps your tacos creamy and delicious. You can also try mashed avocado or cashew cream for a rich taste. Add more plant-based toppings to boost flavor. Consider using pickled onions for tanginess. Fresh jalapeños can add heat. You can mix in corn for sweetness, or use black beans for added protein. These options keep your tacos vibrant and tasty. If you need gluten-free options, choose corn tortillas. They are naturally gluten-free and perfect for these tacos. You can also find gluten-free flour tortillas at many stores. They work great for wrapping the chickpeas and toppings. Pair your tacos with gluten-free side dishes. A fresh salad with lime dressing complements the spices well. You can also serve them with quinoa or brown rice for a filling meal. These sides keep your meal balanced and satisfying. Want to switch up the flavors? Try different spices! Instead of smoked paprika, use chili powder for a smoky kick. You can also add garlic powder or onion powder for depth. These small changes can make a big impact on taste. Experiment with sauces too. A spicy salsa or a tangy chimichurri can elevate your tacos. Try a drizzle of tahini sauce for a nutty flavor. You can also make a creamy avocado sauce for a fresh touch. These options let you get creative and personalize your dish. For the complete recipe, check out the [Full Recipe]. To keep your spicy chickpea tacos fresh, store the chickpeas and toppings separately. Place the cooked chickpeas in an airtight container. For toppings like avocado and cabbage, use smaller containers. This keeps them crisp. Store in the fridge for up to three days. If you stack them, the tortillas may get soggy. You can freeze the chickpeas for later use. Spread the cooled chickpeas on a baking sheet. Freeze them for about an hour, then transfer to a freezer bag. For tortillas, wrap them tightly in plastic wrap before freezing. When you’re ready to eat, thaw the chickpeas overnight in the fridge. Reheat them on a skillet over medium heat. Warm the tortillas for about 30 seconds on each side. Always keep your food at safe temperatures. Keep the fridge below 40°F (4°C) and the freezer at 0°F (-18°C). Watch for signs of spoilage, like off smells or changes in color. If the chickpeas look or smell strange, it’s best to throw them out. Following these guidelines ensures your spicy chickpea tacos stay tasty and safe to eat. For the full recipe, check out the recipe section above. Yes, you can make spicy chickpea tacos ahead of time. Prepare the chickpeas and toppings in advance. Store cooked chickpeas in an airtight container in the fridge. They stay fresh for up to three days. You can also prep your toppings, like sliced avocado and shredded cabbage. Just keep them separate until you're ready to eat. This way, your tacos will stay crunchy and fresh. Yes, you can use dried chickpeas. Start by soaking them overnight in water. The next day, drain and rinse the chickpeas. Then, cook them in a pot of boiling water for about 1 to 1.5 hours. You want them to be tender but not mushy. Once cooked, drain and rinse again. Now, follow the recipe as usual. This gives you a great base for the tacos. You can try several sauces for these tacos. A tahini sauce adds a nice creaminess. You can also use a zesty lime crema or a tangy salsa verde. If you want a kick, drizzle on some hot sauce or sriracha. Each option enhances the flavor of the tacos and makes them even more enjoyable. The spice level can be adjusted to your taste. The recipe uses cayenne pepper for heat. You can add less if you prefer a milder taco. If you want more spice, add more cayenne or fresh jalapeños. Remember, you can always start low and add more heat as needed. This way, you can find the perfect balance for your palate. These tacos pair well with many sides. A fresh salad with lime dressing is a great choice. You might also enjoy corn on the cob or a side of guacamole. Another idea is to serve them with rice or quinoa for a filling meal. Each side complements the flavors of the tacos and makes for a full dining experience. Spicy chickpea tacos are simple and fun to make. We covered the key ingredients, from chickpeas to fresh toppings. I shared step-by-step instructions and useful tips to ensure crispness and flavor. You can even explore variations to suit your taste. For added delight, try different spices or sauces. Always remember to store leftovers properly for future meals. These tacos are not just tasty; they’re also easy to prep. Enjoy crafting delightful meals that bring joy to your table!](https://soyumrecipes.com/wp-content/uploads/2025/05/e28704a9-5ca8-402f-bb76-d3f1099774ca-300x300.webp)
Coconut Lime Chicken Flavorful and Easy Recipe Guide
If you’re craving a burst of tropical flavor, this Coconut Lime Chicken recipe is for you! With simple ingredients and easy steps, you’ll impress…
![For a tasty Coconut Lime Chicken, you need just a few main ingredients. Here’s what you will need: - 4 boneless, skinless chicken breasts - 1 can (13.5 oz) coconut milk - 2 limes (juice and zest) - 2 tablespoons honey - 3 cloves garlic, minced - 1 tablespoon fresh ginger, grated - 1 teaspoon ground cumin - 1 teaspoon paprika - Salt and pepper to taste - Fresh cilantro for garnish The chicken breasts are the star here. They should be fresh and plump for the best results. The coconut milk adds richness, while lime gives a bright, tangy flavor. Honey balances the taste and keeps the chicken moist. Garlic and ginger add depth, making every bite special. You can switch things up with some optional ingredients. Here are a few ideas: - Different herbs: Try fresh basil or mint for a twist. These can enhance the dish and add a unique taste. - Spice adjustments: If you like heat, add a pinch of cayenne. For a smoky flavor, think about using smoked paprika. Feel free to get creative! Mixing and matching flavors can make your Coconut Lime Chicken even more exciting. For the full recipe, check out the complete guide. To start, mix the marinade essentials in a large bowl. Combine the coconut milk, lime juice, lime zest, honey, minced garlic, grated ginger, cumin, paprika, salt, and pepper. Whisk these ingredients until they blend well. This mix gives the chicken its rich flavor. For maximum flavor absorption, let the chicken sit in the marinade. Cover it and refrigerate for at least 1 hour. If you have time, let it marinate for up to 4 hours. This extra time allows the chicken to soak up all the tasty flavors. Next, it's time to cook the chicken. Preheat your grill or skillet over medium-high heat. After removing the chicken from the marinade, let the excess drip off. You can save the marinade to use later. If you grill the chicken, cook it for about 6-7 minutes on each side. Aim for an internal temperature of 165°F (75°C) to ensure it's fully cooked. If you prefer a skillet, you can use the same cooking time. The key is to achieve a nice golden brown on both sides. Once the chicken is cooked, take it off the grill and let it rest for a few minutes. This resting period helps keep the chicken juicy. After resting, slice the chicken into pieces. Finally, drizzle the thickened marinade over the chicken slices. This adds more flavor and makes the dish look appealing. Garnish with fresh cilantro for a burst of color. Enjoy your delicious Coconut Lime Chicken! For the complete recipe, check out the [Full Recipe]. Over-marinating tips: Marinating chicken can add great flavor. However, too much time in the marinade can make the chicken mushy. I suggest marinating for 1 to 4 hours. If you go over 4 hours, the texture may change. Trust me, less is more when it comes to marinating. Cooking temperature misconceptions: Many cooks think higher heat means faster cooking. This is not true. Cooking chicken on medium heat helps it cook evenly. Aim for 165°F (75°C) inside. A meat thermometer is your best friend here. Once you reach this temperature, the chicken is safe to eat. Suggested side dishes: Coconut lime chicken pairs well with rice or a fresh salad. Fluffy rice soaks up the sauce. A crisp salad adds texture and freshness. You can even add mango or avocado for a tropical twist. Cooking tips for juiciness: To keep your chicken juicy, let it rest after cooking. This helps the juices settle back in. Slicing too soon can cause the juices to run out. After resting, drizzle the reduced marinade over the chicken for extra flavor. This step makes a big difference! You can find the full recipe [here](#). {{image_2}} You can swap chicken for other proteins. Shrimp works great with the same marinade. Just marinate for 30 minutes. Grill or sauté shrimp for about 3-4 minutes per side. Tofu is another tasty choice. Use firm tofu, and press it to remove extra moisture. Cut it into cubes, marinate, and grill or pan-fry until golden. These options keep the dish fresh and fun. If you need gluten-free options, this recipe is already safe. Just check your honey and spices to ensure they are gluten-free. For dairy-free, the coconut milk provides a rich base. You can also use almond or soy milk if you prefer. These swaps help everyone enjoy this meal without worry. Want to add more tropical flair? Try adding pineapple or mango chunks to the marinade. These fruits add sweetness and a nice bite. You can also toss in some chopped jalapeños for heat. Fresh herbs like mint or basil can give the dish an extra layer of flavor. Get creative and make this Coconut Lime Chicken your own! For the full recipe, check out the details above. After enjoying your Coconut Lime Chicken, store any leftovers in the fridge. Use an airtight container. This keeps the chicken fresh for up to three days. For best taste, chill the chicken within two hours of cooking. Ensure it cools down a bit before sealing it. If you want to store it longer, freeze the chicken. Wrap it tightly in plastic wrap, then place it in a freezer bag. It can last up to three months in the freezer. Reheating chicken can be tricky. You want it warm but not dry. To keep the moisture, use the microwave. Place the chicken on a microwave-safe plate. Cover it with a damp paper towel. Heat it in short bursts, checking often. This helps steam the chicken. Another great option is the oven. Preheat it to 350°F (175°C). Place the chicken in a baking dish. Add a splash of coconut milk or broth to the dish. Cover it with foil. Bake for about 15 minutes or until heated through. This method helps the chicken stay juicy and flavorful. For quick reheating, you can also use a skillet. Heat it over medium heat. Add a bit of oil or butter to the pan. Cook the chicken for just a few minutes on each side. This method gives a nice crisp to the outside while keeping the inside moist. By following these tips, you can enjoy your Coconut Lime Chicken even on day two! Yes, you can marinate the chicken overnight. This gives the chicken more flavor. If you choose to marinate longer, it can become very tender. Just be careful not to overdo it. The acid from the lime juice can change the chicken's texture if left too long. A good rule is to marinate for 12 hours at most. You have many tasty options for sides. Here are some ideas: - Fluffy rice or quinoa - Steamed vegetables like broccoli or green beans - A fresh salad with mixed greens - Grilled corn on the cob - Tropical fruits like mango or pineapple - Light beverages like coconut water or a lime soda These sides make a colorful plate and add more flavor. To check if the chicken is cooked, use a meat thermometer. The safe internal temperature is 165°F (75°C). Insert the thermometer into the thickest part of the chicken. If you don’t have one, cut the chicken in the middle. The meat should be white with no pink. Juices should run clear, too. Let the chicken rest for a few minutes after cooking. This keeps it juicy. For more tips, see the Full Recipe. Coconut Lime Chicken is a tasty dish that you can easily make. We discussed main and optional ingredients, plus tips for flavor. I shared step-by-step instructions, cooking methods, and how to avoid common mistakes. We also explored variations for dietary needs and discussed storage tips. Remember, this dish is flexible; feel free to experiment with flavors and sides. Enjoying a delicious, homemade meal is rewarding. Don’t hesitate to try this recipe and make it your own!](https://soyumrecipes.com/wp-content/uploads/2025/04/2448a00c-65be-41b1-b275-319157058407.webp)
