


Latest & Greatest

Hamburger Potato Casserole Crockpot Simple and Hearty
Are you looking for a simple and hearty meal that can please the whole family? Look no further! This Hamburger
Read more…
Vegan Garlic Noodles Flavorful and Easy Recipe
If you crave a quick and tasty meal, my Vegan Garlic Noodles recipe is a must-try! Packed with flavor and
Read more…
Ham and Cheese Sliders Flavorful and Easy Recipe
Are you ready to impress your family and friends with a quick and tasty treat? My Ham and Cheese Sliders
Read more…
Savory One Pan Tortellini with Sausage Recipe
If you’re ready to whip up a dish that’s quick, tasty, and satisfying, look no further than my Savory One
Read more…
Creamy Tomato Soup Pure Comfort in a Bowl
If you’re searching for a recipe that warms your heart, creamy tomato soup is it! This comforting dish combines fresh
Read more…
Cookies and Cream Cookies Irresistible Treat Recipe
If you love cookies and cream, you’ll adore my Cookies and Cream Cookies recipe! These soft, chewy treats blend rich
Read more…
Amish Apple Fritter Bread Delightful and Easy Treat
If you’re craving a warm and sweet treat that’s simple to make, look no further. Amish Apple Fritter Bread is
Read more…
Tomato Ricotta Pasta Flavorful and Simple Recipe
Are you ready to dive into a dish that’s both tasty and simple? Tomato Ricotta Pasta is your go-to recipe
Read more…browse recipes


. To get the best texture, use a box grater. Grate zucchinis and potatoes on the large holes. This keeps them chunky and flavorful. After grating, place them in a clean kitchen towel. Twist the towel to squeeze out extra moisture. This step is key. Too much moisture makes the tots soggy. For crispy tater tots, follow these tips: - Use oil: Lightly brush the tops with olive oil. This helps them get golden. - Don't crowd the pan: Space them out on the baking sheet. This allows hot air to circulate. - Flip halfway: Turn the tots halfway through baking. This helps both sides crisp up. Pair your Herby Zucchini Tater Tots with tasty dips. Here are some ideas: - Tzatziki: This yogurt dip adds a fresh taste. - Ketchup: A classic choice for a sweet touch. - Ranch dressing: Creamy and herb-filled, it’s a crowd favorite. Try serving them with a side salad for a light meal. You can find the full recipe above to get started! {{image_2}} To make these tater tots gluten-free, switch the all-purpose flour. Use almond flour or coconut flour instead. Both options work well and keep the texture nice. You can enjoy the same crispy bites without gluten. Just replace in equal amounts and mix as usual. For a vegan version, skip the egg and cheese. Use a flaxseed egg instead. Mix one tablespoon of flaxseed meal with three tablespoons of water. Let it sit for five minutes to thicken. Choose a plant-based cheese that melts well. This keeps your tater tots tasty and vegan-friendly. Herbs can change the taste of your tater tots. Try adding fresh basil or dill for a new twist. You can also use thyme or oregano for an earthy flavor. Mix and match herbs to find your favorite. This small change adds lots of flavor to each bite. For the full recipe, check the instructions above. After you enjoy your Herby Zucchini Tater Tots, store any leftovers in an airtight container. Make sure they cool down first. Place a paper towel at the bottom of the container. This helps absorb excess moisture and keeps them crispy. Store them in the fridge for up to three days. To reheat your tater tots, the oven is best for crispiness. Preheat your oven to 375°F (190°C). Spread the tater tots on a baking sheet. Bake for about 10-15 minutes, flipping them halfway through. This will make them nice and crispy again. You can also use an air fryer. Set it to 350°F (175°C) and cook for 5-7 minutes. If you want to freeze your tater tots, let them cool completely first. Place them in a single layer on a baking sheet. Freeze for about 1-2 hours. Once they are firm, transfer them to a freezer-safe bag. Label the bag with the date. You can freeze them for up to three months. When you're ready to eat, bake them straight from the freezer. No need to thaw! Check the Full Recipe for more tips. Yes, you can use frozen zucchini. However, fresh zucchini gives the best taste. If you use frozen, thaw and drain it well. This keeps your tater tots from being soggy. Soggy tater tots won't crisp up nicely in the oven. To make tater tots without cheese, leave it out entirely. You can add extra seasoning instead. Try adding a bit more garlic powder or herbs. This will keep the flavor strong and delicious. You might also use a vegan cheese substitute if you prefer. Herby Zucchini Tater Tots pair well with many sides. Here are a few ideas: - Fresh salad with greens and a light dressing. - A bowl of creamy tzatziki for dipping. - Grilled vegetables for a colorful plate. - Spicy ketchup for a kick. These sides make the meal fun and tasty. Feel free to mix and match! For the complete recipe, check out the Full Recipe link. In this blog post, we explored the tasty world of Herby Zucchini Tater Tots. We covered essential and optional ingredients, along with their nutrition. I gave you clear, easy instructions on how to make them. I also shared tips for perfect texture and fun variations. Plus, I detailed how to store and reheat your leftovers for later. Enjoy these tater tots as a snack or side dish. Try out your own flavors and enjoy a tasty twist on a classic!](https://soyumrecipes.com/wp-content/uploads/2025/07/a56f9819-5022-4ffa-afb6-0266a224cfa8.webp)
Herby Zucchini Tater Tots Crispy and Delicious Snack
Craving a tasty snack that’s both crispy and healthy? You’ll love these Herby Zucchini Tater Tots! They are simple to make and packed with…
My Latest Desserts

Strawberry Lemonade Cupcakes Fresh and Flavorful Treat
Craving a sweet, tangy treat? Dive into the world of Strawberry Lemonade Cupcakes! These delightful cupcakes blend fresh strawberries and Read Full Recipe-
Salted Caramel Apple Dip Creamy and Delicious Treat
If you’re looking for a tasty treat that combines sweet and salty, you’re in for a delight! This Salted Caramel Read Full Recipe -
No-Bake Oreo Cheesecake Cups Delightful Easy Treat
Craving a sweet, creamy treat that’s easy to make? These No-Bake Oreo Cheesecake Cups are perfect for you! With just Read Full Recipe -
Key Lime Pie Bars Simple and Tangy Dessert Treat
Are you ready to enjoy a treat that’s both simple and zesty? Key Lime Pie Bars combine the tart zing Read Full Recipe -
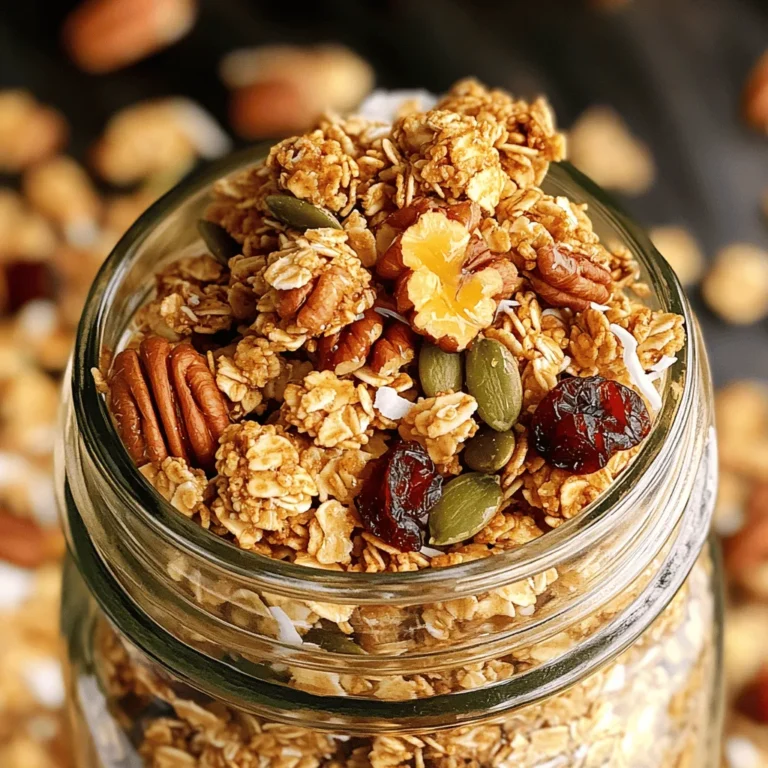
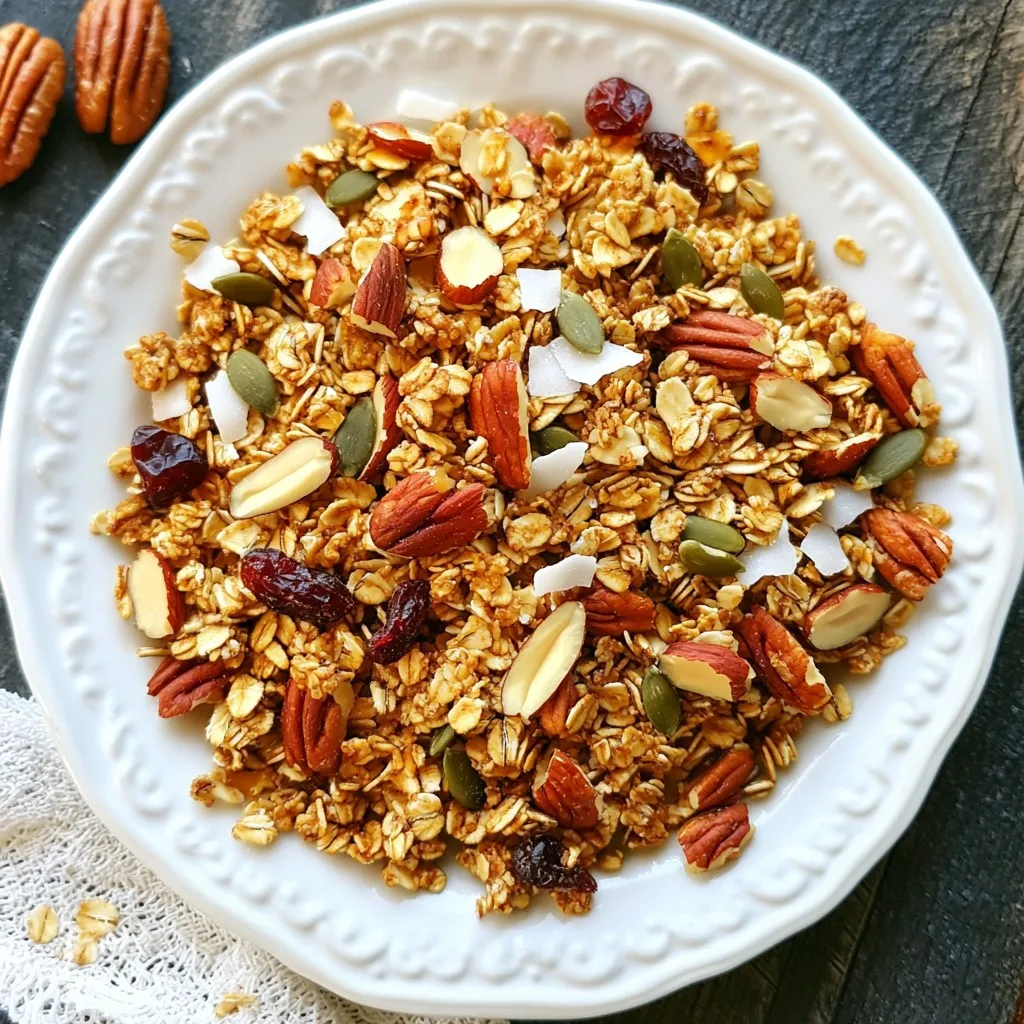
Maple Pecan Granola Crunchy and Nutritious Snack
Looking for a tasty and healthy snack? You’ve found it! My Maple Pecan Granola is crunchy, packed with flavor, and Read Full Recipe -
Strawberry Shortcake Trifle Delightful and Simple Treat
Get ready to impress your family and friends with a Strawberry Shortcake Trifle that’s both delightful and simple. This layered Read Full Recipe


My Latest Drinks
-
Spiced Apple Cider Punch Festive and Flavorful Drink
Warm up your gatherings with my Spiced Apple Cider Punch! This festive drink bursts with cozy flavors, perfect for chilly Read Full Recipe -
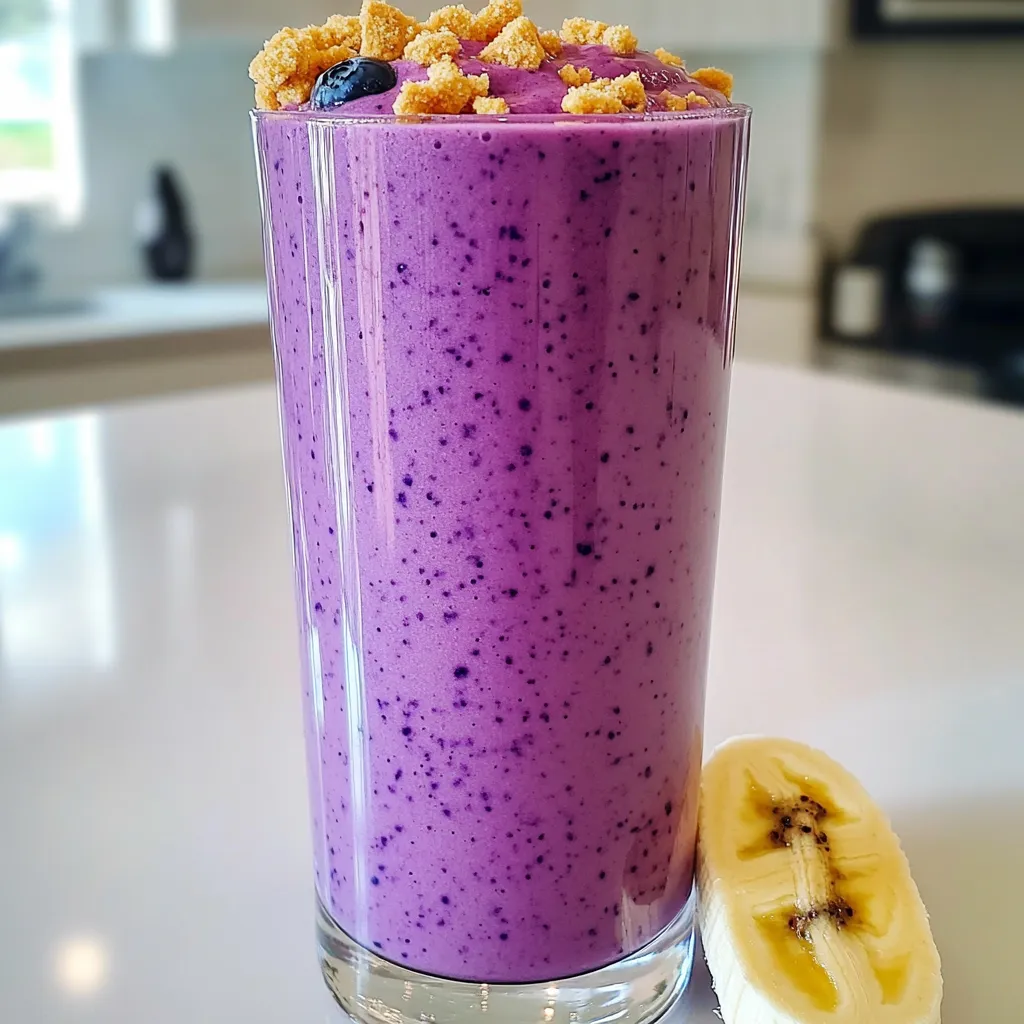
Blueberry Cheesecake Smoothie Protein Delight
Are you ready to treat yourself to a delicious and healthy drink? The Blueberry Cheesecake Smoothie Protein Delight packs all Read Full Recipe -
Warm Cranberry Ginger Mocktail Spritzer Recipe Delight
Welcome to my cozy kitchen! Today, I’m excited to share a delightful warm cranberry ginger mocktail spritzer that brightens up Read Full Recipe -
Spiced Apple Cider Chai Bold and Flavorful Drink Recipe
Looking for a cozy drink this season? Try my Spiced Apple Cider Chai! This bold, flavorful beverage combines warm apple Read Full Recipe -
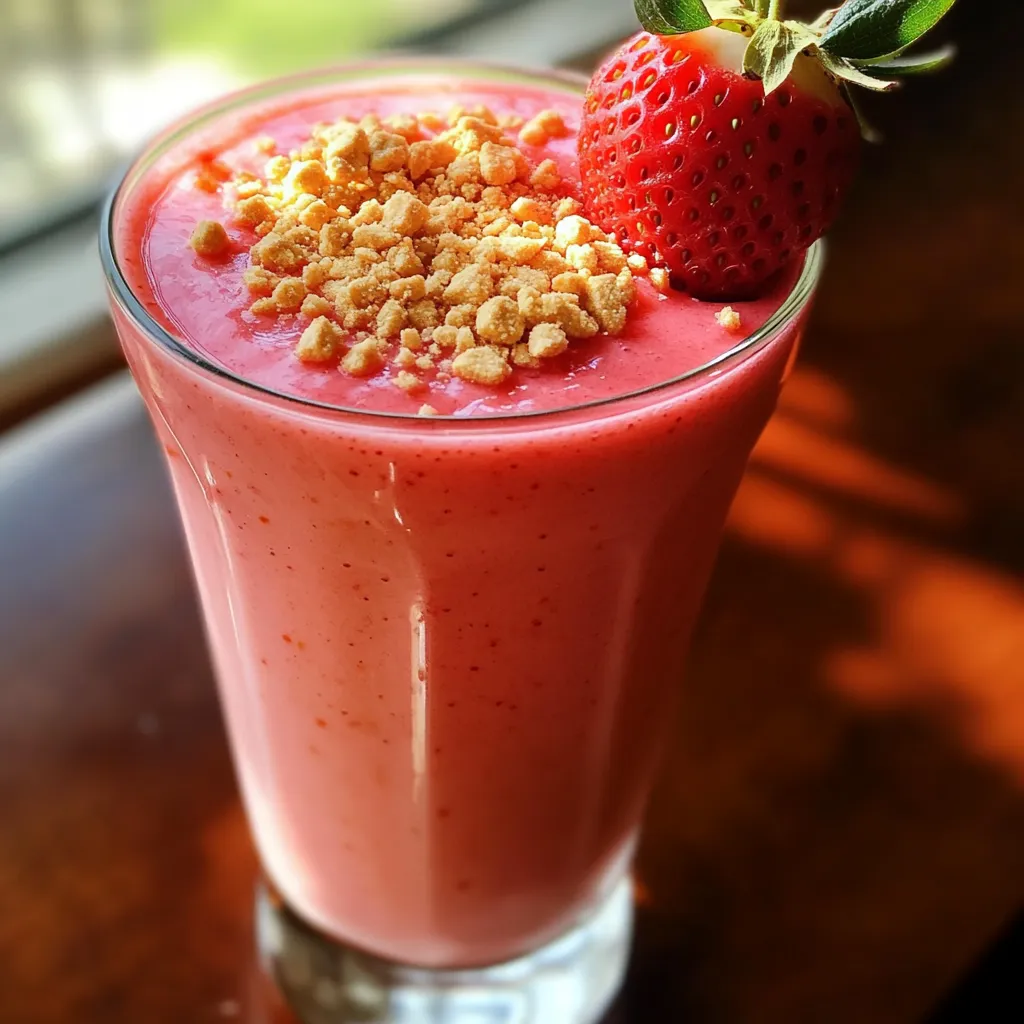
Strawberry Cheesecake Smoothie Tasty and Easy Recipe
Are you ready for a treat that’s both tasty and easy? This Strawberry Cheesecake Smoothie blends the rich flavors of Read Full Recipe -
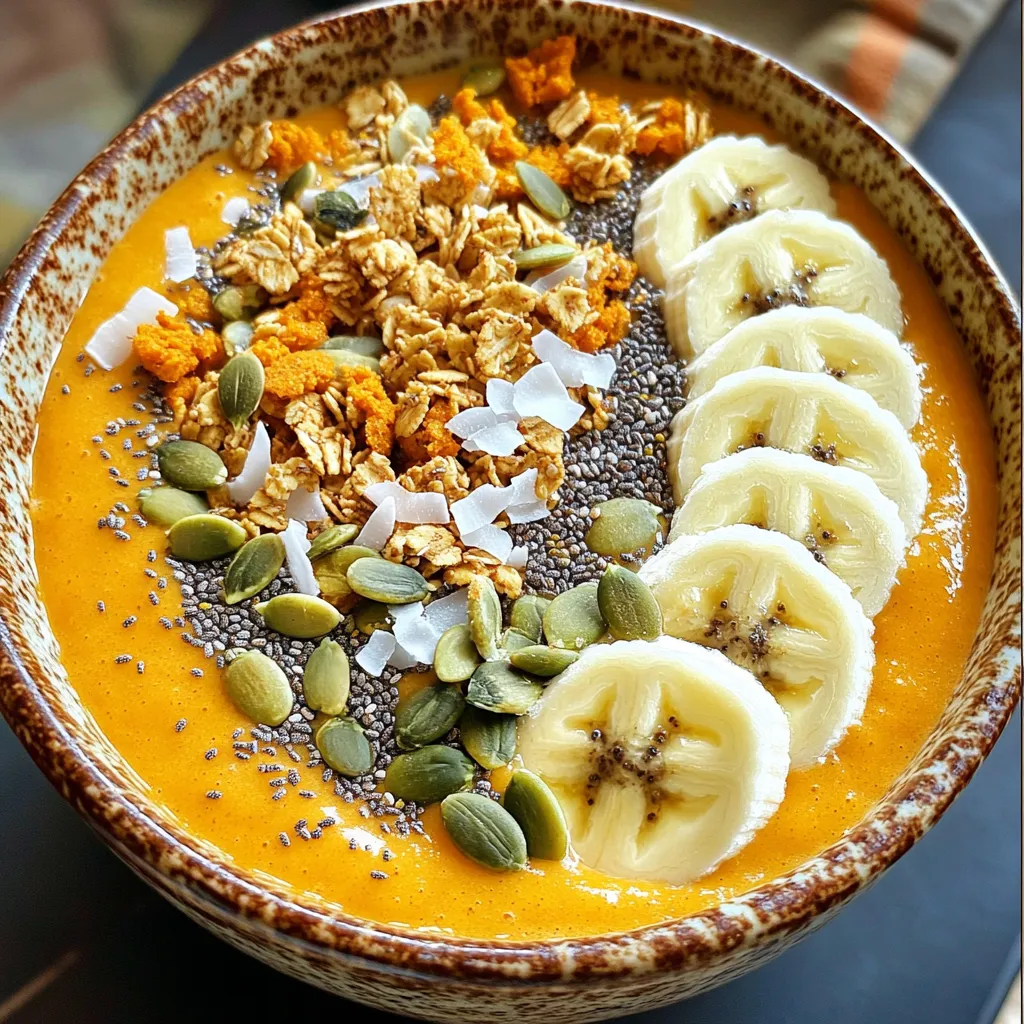
Pumpkin Spice Smoothie Bowl Protein Packed Delight
Are you ready to dive into the cozy world of pumpkin spice? This Pumpkin Spice Smoothie Bowl is not only Read Full Recipe


hey,
i’m !
I’m so happy you’re here!
I love creating dishes that bring joy to the table. I hope they bring the same joy to yours. Let’s enjoy this flavorful journey together.


![- 1 lb ground beef (or ground turkey) - 1/2 cup breadcrumbs - 1/4 cup grated Parmesan cheese - 1 large egg - 3 cloves garlic, minced - 1 tbsp fresh ginger, grated - 1 tsp salt - 1/2 tsp black pepper - 1/2 tsp red pepper flakes (adjust for heat preference) - 1/4 cup honey - 1/4 cup soy sauce (low sodium) - 1 tbsp apple cider vinegar - 1 tsp sesame oil - 2 green onions, chopped (for garnish) - Sesame seeds (for garnish) - Additional spices (cumin, paprika) - Fresh herbs (cilantro, parsley) To make Spicy Honey Garlic Meatballs, gather all the ingredients listed above. The ground beef or turkey serves as the base. I love using fresh ginger and garlic for a punch of flavor. Feel free to adjust the red pepper flakes based on your heat preference. If you want to add more depth, consider the optional spices and fresh herbs. You can find the complete recipe in the [Full Recipe]. This will help you create the perfect meatballs. Each ingredient plays a role in building layers of taste. Enjoy the process and get ready for a delicious meal! - Preheat oven to 400°F (200°C). - In a large bowl, combine: - 1 lb ground beef (or ground turkey) - 1/2 cup breadcrumbs - 1/4 cup grated Parmesan cheese - 1 large egg - 3 cloves garlic, minced - 1 tbsp fresh ginger, grated - 1 tsp salt - 1/2 tsp black pepper - 1/2 tsp red pepper flakes Mix these ingredients until just combined. Do not overmix. This keeps the meatballs tender. - Shape the mixture into meatballs, about 1 inch wide. - Place the meatballs on a baking sheet lined with parchment paper. - Bake for 20-25 minutes. The meatballs should be cooked through and golden brown. - While the meatballs bake, make the sauce. - In a saucepan, combine: - 1/4 cup honey - 1/4 cup soy sauce (low sodium) - 1 tbsp apple cider vinegar - 1 tsp sesame oil - Heat the mixture over medium heat. Stir until well blended and slightly thickened, about 5 minutes. This sauce adds a sweet and spicy kick to your meatballs. Once your meatballs are done, coat them in the sauce. They will be sticky and delicious. You can find the Full Recipe for more details. To make great meatballs, mix the ingredients well but don't overwork the meat. This keeps them tender. I like to use an ice cream scoop. It helps form even-sized meatballs that cook at the same rate. You can adjust the red pepper flakes. This lets you control how spicy your meatballs are. Adding fresh herbs, like parsley or cilantro, brightens the flavor and adds freshness. Serve these meatballs over rice or noodles. This makes a complete and satisfying meal. You can also pair them with a side of vegetables or a salad for balance. For the full recipe, check out the details above. {{image_2}} You can use ground chicken or pork instead of beef. This change offers a lighter flavor. Ground chicken gives a mild taste that blends well with the honey garlic sauce. Pork adds richness and a juicy texture. Both options are great for those looking to switch things up. Feel free to explore different sauces. Teriyaki adds a sweet and savory twist. Barbecue sauce gives a smoky flavor. You can even mix sauces for more depth. The key is to find what you enjoy most. The sweet honey in the recipe blends well with various sauces, enhancing the meatballs. Want a meatless option? Use plant-based meat substitutes or lentils. These choices can mimic the texture of meat. Lentils are packed with protein and fiber. They also absorb flavors well, making them tasty. Try adding herbs or spices to boost the flavor even more. You can follow the same steps in the Full Recipe to keep it simple. To keep your meatballs fresh, place them in an airtight container. This helps prevent moisture loss and keeps them tasty. Store them in the fridge right after they cool down. They will stay good for about three to four days. If you want to save meatballs for later, freezing is a great option. First, let the meatballs cool completely. Then, place them in a single layer on a baking sheet. Freeze them for about one hour. Once frozen, transfer them to a freezer bag. Make sure to squeeze out the air. For reheating, you can bake them at 350°F (175°C) until warm, or heat them in the microwave. In the fridge, meatballs last about three to four days. In the freezer, they can keep well for up to three months. Just remember to label your bags with the date, so you know how long they have been stored. Enjoy your spicy honey garlic meatballs anytime! For the full recipe, check the section above. You can use crushed crackers or oats instead of breadcrumbs. Both options work well. Crushed crackers add a nice crunch. Oats can make the meatballs heartier. You might even mix them for fun! Yes, you can make these meatballs ahead of time. Prepare the meatballs and bake them as usual. Let them cool, then store in the fridge. You can reheat them in the oven or microwave when you are ready to serve. They taste great even after a day or two! Serve these meatballs warm with rice or noodles. You can also place them on a platter with toothpicks. Top with sesame seeds and green onions for a pretty look. They are great for parties or family meals! Check the internal temperature with a meat thermometer. It should reach 160°F (70°C) for beef or turkey. You can also cut one open to check. The meat should be brown inside, and the juices should run clear. Make sure to avoid any pink! These spicy honey garlic meatballs are easy and flavorful. You learned what ingredients you need and how to make them step by step. I shared tips for making perfect meatballs and keeping them fresh. You can even try different meats and sauces. Experimenting adds fun and taste. Enjoying these meatballs with rice or veggies makes a great meal. No matter how you make them, they will be a hit at your table. Happy cooking!](https://soyumrecipes.com/wp-content/uploads/2025/07/1a3bed7f-b742-4c77-a16e-1626b8076bd2-300x300.webp)

Crescent Cheese Danishes Delightful and Easy Recipe
If you crave a sweet treat that’s quick and easy, you’re in the right place. I’m excited to share my Crescent Cheese Danishes recipe.…