


Latest & Greatest
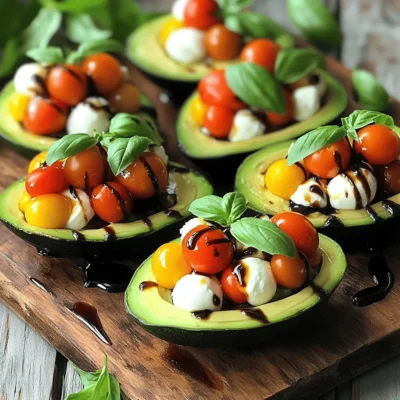
Caprese Stuffed Avocados Fresh and Flavorful Delight
Welcome to a fresh twist on a classic treat! Today, I’ll show you how to make Caprese Stuffed Avocados. This
Read more…
Rainbow Fruit Skewers Colorful and Healthy Treats
Looking for a fun and healthy treat? Rainbow fruit skewers are the perfect choice! Bursting with color and flavor, they
Read more…
Chickpea Shawarma Bowl Flavorful and Healthy Meal
Are you ready to spice up your meal routine with a Chickpea Shawarma Bowl? This dish combines hearty chickpeas, vibrant
Read more…
Mango Chicken Salad Fresh and Flavorful Delight
Are you ready for a fresh and tasty meal? My Mango Chicken Salad is just what you need! Packed with
Read more…
Lemon Garlic Roasted Chicken Simple Flavorful Dish
Looking for a simple, flavorful dish that impresses? Try my Lemon Garlic Roasted Chicken! This recipe combines juicy chicken with
Read more…
BBQ Chicken Flatbread Tasty and Quick Recipe
Looking for a quick and tasty meal that everyone will love? This BBQ Chicken Flatbread recipe is perfect for you!
Read more…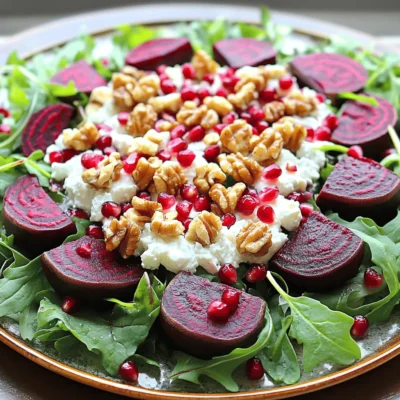
Roasted Beet Goat Cheese Salad Flavorful Fresh Dish
If you’re ready for a tasty and fresh salad, you need to try a Roasted Beet Goat Cheese Salad. This
Read more…
Loaded Sweet Potato Skins Flavorful and Nutritious Treat
Are you ready to elevate your snack game? Loaded Sweet Potato Skins are the perfect blend of flavor and nutrition.
Read more…browse recipes


S’mores Dessert Nachos Tasty and Fun Treat Idea
Get ready for a treat like no other with my S’mores Dessert Nachos! This fun dessert combines crispy tortillas, melty chocolate, and gooey marshmallows…
My Latest Desserts
-

Caramel Pecan Sticky Buns Sweet and Gooey Treat
Are you ready to treat yourself to the ultimate indulgence? Caramel Pecan Sticky Buns are sweet, gooey, and packed with Read Full Recipe -

Pumpkin Spice French Toast Casserole Easy and Tasty
Looking for a cozy fall breakfast that’s easy and delicious? You’ll love my Pumpkin Spice French Toast Casserole! This dish Read Full Recipe -

Fluffy Pumpkin Pancakes Perfectly Delicious Breakfast
Start your morning with a treat you won’t forget: fluffy pumpkin pancakes! They bring fall flavors to your breakfast table Read Full Recipe -

Brown Butter Banana Chocolate Chip Muffins Delight
Are you craving a warm, cozy treat? Look no further than these Brown Butter Banana Chocolate Chip Muffins! This recipe Read Full Recipe -

Chewy Salted Caramel Pretzel Brownies Delightful Treat
Are you ready to indulge in a treat that combines sweet, salty, and chewy goodness? These Chewy Salted Caramel Pretzel Read Full Recipe -

Fluffy Pumpkin Pancakes Easy and Delicious Recipe
Looking to spice up your breakfast with something special? You’re in for a treat! These fluffy pumpkin pancakes are not Read Full Recipe -

Brown Butter Banana Chocolate Chip Muffins Delight
Welcome to the delicious world of Brown Butter Banana Chocolate Chip Muffins! You’re about to discover a simple recipe that Read Full Recipe -

Caramel Apple Pie Dip Delightfully Sweet Treat
Get ready to dive into a sweet treat that’s perfect for any occasion: Caramel Apple Pie Dip! If you love Read Full Recipe -

Chewy Salted Caramel Pretzel Brownies Delight
Get ready to indulge in a sweet and salty treat that you won’t forget! My Chewy Salted Caramel Pretzel Brownies Read Full Recipe -

Cherry Almond Overnight French Toast Easy Morning Dish
Looking for a quick and delicious breakfast? Cherry Almond Overnight French Toast could be your new favorite dish! This easy Read Full Recipe
My Latest Recipes

hey,
i’m !
I’m so happy you’re here!
I love creating dishes that bring joy to the table. I hope they bring the same joy to yours. Let’s enjoy this flavorful journey together.
![Here is what you need to make savory avocado toast with feta and tomatoes: - 2 ripe avocados - 1 cup cherry tomatoes, halved - 1/2 cup crumbled feta cheese - 1 tablespoon olive oil - 1 tablespoon balsamic vinegar - 1 teaspoon dried oregano - Salt and pepper to taste - 4 slices of whole-grain bread - Fresh basil leaves for garnish (optional) Using fresh ingredients makes the most difference in flavor. Choose ripe avocados for a creamy texture. The tomatoes should be bright and juicy, adding a pop of color. Feta cheese brings saltiness and a tangy bite that balances the creamy avocado. Whole-grain bread adds a nutty flavor and a nice crunch. Gathering these ingredients will set you up for success in making a delicious and visually appealing dish. I recommend using high-quality olive oil and balsamic vinegar for the best taste. If you want to add a personal touch, consider fresh herbs like basil or cilantro for garnish. For the full recipe, follow these simple steps to create a meal that is both satisfying and nourishing. To start, I toast whole-grain bread for this recipe. Use a toaster or a grill. Aim for a golden brown color. This creates a nice, crispy base for the toppings. For the perfect crispness, keep an eye on the bread. Don't let it burn! You want it crunchy but not too dark. Next, we make the avocado spread. I take two ripe avocados and cut them in half. Scoop out the green flesh into a bowl. Use a fork to mash it up until it's creamy. Be gentle; you want a smooth texture. To enhance the flavor, add a pinch of salt and pepper. I also mix in half of the dried oregano. This adds a lovely taste to the spread. Now it's time to assemble the toast! Start by spreading a generous layer of the avocado mixture on each slice of toast. Make sure to cover it well. Then, layer the cherry tomatoes on top. I like to ensure an even distribution for color and taste. Finally, sprinkle crumbled feta cheese over the tomatoes. This adds a nice contrast to the creamy avocado and juicy tomatoes. If you want, garnish with fresh basil leaves for extra flavor. For the full recipe, check out the [Full Recipe]. Enjoy your savory avocado toast with feta and tomatoes! To make your avocado toast truly shine, use the right seasonings. Start with salt and pepper; they elevate the taste. A dash of lemon juice adds brightness and helps prevent browning. Mix in some crushed red pepper for a subtle kick. Balancing flavors is key too. Creamy avocado pairs well with tangy feta and sweet cherry tomatoes. Aim for a mix that excites your taste buds. Garnishing your toast makes it more appealing. Fresh basil leaves add color and aroma. You can place whole leaves on top or chop them for a sprinkle. For a striking plate, use colorful cherry tomatoes. Arrange them in a circle or scatter them evenly. Use a drizzle of balsamic reduction for a gourmet touch. This not only enhances the look but adds flavor too. A few common mistakes can ruin your toast. First, don’t over-mash your avocado. Leave some small chunks for texture. Using the wrong tomatoes can also affect taste. Choose ripe cherry tomatoes for sweetness. Avoid bland or mealy tomatoes; they won’t provide the flavor you want. With these tips, your avocado toast will be a delicious hit! {{image_2}} You can easily change the flavors in your avocado toast. Adding spices or herbs can bring a new twist. I like to sprinkle chili flakes for some heat. Fresh cilantro also adds a bright taste. If you want to switch up the cheese, consider using goat cheese instead of feta. It has a creamy texture that pairs well with the other ingredients. For those who need gluten-free options, try gluten-free bread. There are many brands available that taste great. If you're looking for vegan substitutes, you can use a plant-based feta. It mimics the texture and flavor of traditional feta well. This way, you can enjoy the dish without dairy. Using seasonal vegetables can freshen up your toast. Try adding sliced radishes in the spring or roasted squash in the fall. You can also adapt this recipe for holidays or events. For a festive touch, add pomegranate seeds during winter celebrations. They add color and a burst of flavor. For the complete details and steps, check the Full Recipe. To keep your avocado toast fresh, store it in an airtight container. This helps prevent the bread from getting soggy. If you have leftover avocado spread, cover it tightly with plastic wrap. This reduces air exposure and slows browning. For the cherry tomatoes, keep them in a separate container. This keeps their flavor intact. When you want to enjoy leftover toast, use a toaster or an oven. A toaster brings back that crispy texture. Preheat your oven to 350°F (175°C) for about 5 to 10 minutes. This method keeps the toast from becoming rubbery. Avoid the microwave, as it often makes bread chewy. The avocado spread lasts about 1 to 2 days in the fridge. However, it's best when fresh. Whole-grain bread can stay fresh for about a week. Check for mold or a stale smell; these are signs of spoilage. Cherry tomatoes can last up to a week in the fridge. If they become mushy or change color, it's time to toss them. Always trust your senses! Enjoying fresh ingredients makes a big difference in taste. For the full recipe, check the section above! Yes, you can prepare some parts in advance. You can mash the avocados and store them. Keep the mashed avocado in an airtight container. Add a splash of lemon juice to stop browning. You can also mix the cherry tomatoes with oil and vinegar a few hours early. Toast the bread just before serving for the best taste. Whole-grain bread is my top pick. It adds a nice crunch and flavor. You can also use sourdough or rye bread. These types hold the toppings well without getting soggy. Choose a bread you love for the best experience. You can add extras to make it special. Try a sprinkle of chili flakes for heat. A drizzle of honey balances the flavors nicely. You can also serve it with a side of poached eggs for protein. Fresh herbs, like cilantro or chives, add a nice touch, too. This blog post provided a clear guide to making delicious avocado toast. You learned the key ingredients, step-by-step instructions, and tips for great flavor. We covered variations and storage ideas to keep your toast fresh. Remember, using the right ingredients and techniques makes all the difference. Try your unique twist on this dish and enjoy! Your perfect avocado toast awaits, and with these tips, you can impress anyone who joins you for a meal. Happy cooking!](https://soyumrecipes.com/wp-content/uploads/2025/05/5fa585de-35f9-462b-a0f6-65e4b65fc8b5-300x300.webp)
![- 4 salmon fillets - 1 cup teriyaki sauce (store-bought or homemade) - 1 tablespoon sesame oil - 2 cups broccoli florets - 1 cup snap peas - 1 red bell pepper, sliced - 2 green onions, chopped - 1 tablespoon sesame seeds - Cooked jasmine rice (for serving) When I cook this dish, I love using fresh ingredients. They make the meal taste amazing. Salmon fillets are the star, providing a rich flavor. Teriyaki sauce gives a sweet and savory touch. Sesame oil adds a nice nuttiness that ties everything together. For the veggies, I choose broccoli florets, snap peas, and red bell pepper. They add color and crunch. Green onions and sesame seeds are perfect garnishes, bringing a pop of taste. - Alternatives for Salmon: If you want to switch things up, you can use chicken or tofu. Both options will soak up the teriyaki sauce well. - Homemade vs. Store-Bought Teriyaki Sauce: I often use store-bought sauce for ease. But, homemade sauce is fun to make and can taste fresher. Just mix soy sauce, honey, garlic, and ginger. - Other Vegetable Options: Feel free to swap in your favorite veggies. Zucchini, carrots, or bell pepper can work great. The key is to use what you love. For the full recipe, check out [Full Recipe]. Enjoy making this dish! First, preheat your oven to 400°F (200°C). This temperature cooks the salmon perfectly. While the oven heats, grab a large rimmed baking sheet. Line it with parchment paper. This makes cleanup a breeze and keeps food from sticking. Now, let’s get to the fun part! Take the salmon fillets and place them on one side of the baking sheet. In a bowl, mix the teriyaki sauce with sesame oil. Brush this sauce on each salmon fillet. Make sure to coat them well for great flavor. Next, let’s prepare the veggies. In another bowl, toss the broccoli, snap peas, and sliced red bell pepper. Use the remaining teriyaki sauce to coat the vegetables evenly. Once mixed, spread the veggies on the baking sheet next to the salmon. Make sure they are not crowded. This helps them cook evenly. It’s time to bake! Slide the baking sheet into your preheated oven. Bake for about 12 to 15 minutes. The salmon is done when it flakes easily with a fork. The vegetables should be tender but still crisp. Keep an eye on your meal as it cooks. You want to see that beautiful caramelization on the salmon. When it looks ready, carefully take the sheet pan out of the oven. Let it rest for a few minutes. Drizzle the reserved teriyaki sauce over everything for added flavor. For the final touch, sprinkle chopped green onions and sesame seeds on top. This adds a nice crunch and a pop of color. Enjoy your colorful and tasty sheet pan teriyaki salmon! For the complete recipe, check out the Full Recipe link above. - Ensuring Moist Salmon To keep your salmon moist, avoid overcooking. Bake at 400°F for 12-15 minutes. The salmon should flake easily when done. Brush it with teriyaki sauce before baking to seal in flavor and moisture. - Keeping Vegetables Crisp For crisp vegetables, spread them evenly on the baking sheet. Don't overcrowd them. Baking at high heat helps keep their texture. Check for doneness; they should be tender but still have a crunch. - Pairing with Jasmine Rice Serve your teriyaki salmon over a bed of jasmine rice. The rice absorbs the sauce and adds a nice base to the dish. Cook the rice according to package instructions for the best results. - Garnishing Ideas Garnish with chopped green onions and sesame seeds. This adds color and a fresh touch. You can also add a slice of lime for a zesty kick. - Adding Spices For extra flavor, consider adding spices such as garlic powder or ginger. A pinch of red pepper flakes can add a nice heat. Mix them into the teriyaki sauce for an easy boost. - Using Fresh Herbs Fresh herbs like cilantro or basil can brighten the dish. Chop and sprinkle them on top just before serving. This adds freshness and elevates the overall flavor. For the Full Recipe, check out the detailed steps and ingredients. {{image_2}} You can easily swap salmon for chicken. Use chicken breasts or thighs. The cooking time may change. Bake chicken for about 20-25 minutes. Check if it reaches 165°F (75°C) for safety. For vegan options, use tofu instead of salmon. Firm tofu works best. Press it to remove extra water, then marinate it in teriyaki sauce. Bake the tofu for about 20 minutes. This gives you a delicious, plant-based meal. Want some heat? Add red pepper flakes to your teriyaki sauce. You can also mix in fresh ginger for an extra kick. This sweet and spicy twist makes the dish exciting. If you want more sauce ideas, try hoisin or sweet chili sauce. These can add depth to your meal. You can also make a garlic-soy sauce blend for a savory option. In spring, use asparagus and snap peas. These bright vegetables add color and flavor. They cook quickly and pair well with teriyaki. In fall, consider adding butternut squash and Brussels sprouts. These heartier vegetables bring warmth to your dish. Just chop them into bite-sized pieces and bake as usual. For the Full Recipe, check the main article. To store your leftover teriyaki salmon, use airtight containers. Glass or plastic containers work well. Make sure they are clean and dry before adding food. Cool the dish to room temperature before sealing. Place the salmon and vegetables in the container together for best flavor. - Recommended Containers: Glass or BPA-free plastic containers. - Best Practices for Refrigeration: Store in the fridge for up to three days. You can reheat your salmon in the oven or microwave. Each method has its perks. The oven keeps the salmon moist and adds a little crispness. The microwave is quicker but may make the salmon soggy. - Oven vs. Microwave Reheating: Preheat the oven to 350°F (175°C). Place salmon on a baking sheet. Heat for about 10 minutes. For the microwave, place salmon in a microwave-safe dish. Heat for 1-2 minutes, checking often. - Tips for Maintaining Texture: Cover the salmon with a damp paper towel in the microwave to keep it moist. If you want to save some salmon for later, freezing works great. This dish freezes well if you store it properly. - How to Freeze the Dish: Allow the salmon and veggies to cool completely. Then, wrap them tightly in plastic wrap or place them in freezer bags. Squeeze out as much air as possible. Label the bags with the date. - Thawing and Cooking Tips: To thaw, place the bag in the fridge overnight. For cooking, reheat from frozen in the oven at 350°F (175°C) for 20-25 minutes, or until warmed through. For the full recipe, check the details above! Bake teriyaki salmon for 12-15 minutes at 400°F (200°C). The salmon is done when it flakes easily with a fork. Timing may vary based on thickness. Always check the center for doneness. This quick cooking makes it easy to enjoy a delicious meal on busy nights. Yes, you can use frozen salmon. Just adjust your cooking time. Bake it for about 15-20 minutes instead of 12-15 minutes. If possible, thaw the salmon in the fridge overnight for best results. If you're in a hurry, you can cook it from frozen. Just remember to check if it’s fully cooked before serving. Pair teriyaki salmon with jasmine rice for a complete meal. The rice soaks up the delicious sauce. You can also serve it with steamed vegetables, like broccoli and snap peas. A light salad or pickled veggies also works well. These sides add color and nutrition to your plate. This blog post covered how to make delicious teriyaki salmon with fresh veggies. You learned about essential ingredients, including salmon, teriyaki sauce, and different vegetables. I shared step-by-step baking instructions to ensure perfect results. You also found tips for enhancing flavor and storing leftovers. In conclusion, making teriyaki salmon is simple and rewarding. With easy swaps and variations, anyone can enjoy this tasty dish. Let your creativity shine in the kitchen!](https://soyumrecipes.com/wp-content/uploads/2025/07/70966695-aebb-463a-a906-2e7ae5f0c3d3-300x300.webp)
![To make this dish, you'll need the following main ingredients: - 1 lb (450 g) boneless, skinless chicken thighs - 3 tablespoons honey - 3 tablespoons soy sauce - 4 cloves garlic, minced - 1 tablespoon fresh ginger, grated - 1-2 teaspoons red chili flakes (adjust to taste) - 2 tablespoons olive oil - Salt and pepper to taste These ingredients create a perfect blend of sweet and spicy flavors. The chicken thighs are juicy and tender, while the honey adds a rich sweetness. The soy sauce gives umami depth, and garlic and ginger bring a fresh kick. Enhance your dish with these garnishes and sides: - 2 green onions, sliced (for garnish) - Sesame seeds (for garnish) You can also serve the chicken with rice or stir-fried vegetables. These sides soak up the tasty glaze and balance the dish well. If you need alternatives, consider these options: - Chicken Breasts: Use these for a leaner cut. - Maple Syrup: Swap this for honey if needed. - Coconut Aminos: A great soy sauce alternative if you want a gluten-free option. These substitutions will still keep your dish delicious and flavorful. Using different ingredients allows you to customize your meal to your liking. For the full recipe, check out the details above. To start, you will need to mix the marinade. Grab a medium bowl and add the honey, soy sauce, minced garlic, grated ginger, and red chili flakes. This mix gives the chicken a sweet and spicy kick. Don't forget to add a pinch of salt and pepper. Next, take the chicken thighs and place them in the bowl. Make sure they are well coated in the marinade. Cover the bowl and put it in the fridge. Let it sit for at least 30 minutes. If you have more time, let it marinate for up to 2 hours for a richer flavor. Now it’s time to cook. Heat 2 tablespoons of olive oil in a large skillet over medium-high heat. Once the oil is hot, take the chicken out of the marinade. Set aside the marinade for later. Place the chicken in the skillet. Sear the chicken for about 4-5 minutes on each side. Look for a golden brown color and ensure it is cooked through. This step gives the chicken a nice crust and locks in the flavors. When the chicken is cooked, reduce the heat to medium. Pour the reserved marinade into the skillet. Let it simmer for about 5 minutes. Stir occasionally until it thickens a bit and glazes the chicken. This glaze adds a sticky, sweet finish to the dish. Once done, remove the skillet from heat. Transfer the chicken to a cutting board and let it rest for a few minutes. Slice the chicken and drizzle any remaining glaze over the slices. For the final touch, plate it up and sprinkle with sliced green onions and sesame seeds. Your Spicy Honey Garlic Chicken is now ready to enjoy! For more details, check out the Full Recipe. To marinate chicken well, mix honey, soy sauce, minced garlic, and ginger in a bowl. Add red chili flakes for heat. Use salt and pepper to taste. Make sure to coat the chicken thighs evenly. Cover and refrigerate for at least 30 minutes. If time allows, marinate up to 2 hours for even deeper flavor. The longer you marinate, the more the flavors soak in. For a thick and shiny glaze, reserve some of the marinade. Sear the chicken first, then pour in the reserved marinade. Let it simmer on medium heat. Stir occasionally for about 5 minutes. This helps it reduce and thicken. You want it to coat the chicken nicely. If you want a thicker glaze, you can simmer a bit longer. Just watch it so it doesn’t burn. Serve Spicy Honey Garlic Chicken over rice or quinoa. It pairs well with steamed veggies like broccoli or snap peas. You can also add a fresh salad for crunch. For a fun twist, try it in a wrap with crunchy veggies. Don’t forget to sprinkle sliced green onions and sesame seeds on top for a burst of flavor. For a complete meal, add a side of garlic bread or a light soup. Explore these ideas to make your meal even more enjoyable! {{image_2}} You can add vegetables to your spicy honey garlic chicken to make it a full meal. Try bell peppers, broccoli, or snap peas. Cut them into bite-sized pieces. Add them to the skillet when you sear the chicken. They will cook quickly and soak up the tasty sauce. You can also serve the chicken over a bed of steamed rice with veggies on the side. Adjusting spice levels is easy with this recipe. If you want more heat, add more red chili flakes. If you prefer it milder, cut back on the flakes. You can also use fresh chili peppers for a different flavor. Experiment with different amounts until you find what you like best. Remember, you can always add more spice later if needed! You can cook spicy honey garlic chicken in many ways. Grilling gives it a smoky flavor. Just marinate the chicken as usual, then grill over medium heat for about 6-7 minutes per side. Baking is another option. Preheat your oven to 400°F (200°C). Place the marinated chicken on a baking sheet and cook for 20-25 minutes. Check the internal temperature to ensure it’s safe to eat. Each method will give you a unique taste and texture. For the full recipe, refer to the earlier section. To store leftover Spicy Honey Garlic Chicken, place it in an airtight container. Make sure the chicken cools down first. You can keep it in the fridge for up to 3 days. If you want to keep it longer, freezing is a great option. Just remember to separate the chicken pieces to avoid sticking. When reheating your chicken, use a skillet for the best results. Heat it over medium heat. Add a splash of water or broth to keep it moist. You can also cover the skillet to trap steam. This method helps keep the chicken tender and juicy. If you prefer the microwave, use a low power setting. Heat in short bursts to avoid drying it out. For freezing, wrap each piece of chicken in plastic wrap. Then, place it in a freezer bag. Remove as much air as possible before sealing. You can freeze it for up to 3 months. When ready to eat, thaw overnight in the fridge. Reheat it as described above for a tasty meal any time! Enjoy your delicious Spicy Honey Garlic Chicken from the [Full Recipe]. You can use maple syrup or agave nectar instead of honey. Both options add sweetness. They also blend well in the marinade. If you want a different taste, try brown sugar. Just mix it with a little water to make it liquid. Yes, you can make this dish ahead of time. Marinate the chicken earlier in the day or even the night before. This allows the flavors to deepen. Cook the chicken and store it in the fridge. It stays tasty for up to three days. Serve Spicy Honey Garlic Chicken with rice or quinoa. They soak up the sauce well. Steamed broccoli or green beans add color and crunch. A fresh salad also pairs nicely. You can keep it simple or get creative with sides. For more ideas, check the Full Recipe. This article has covered how to make Spicy Honey Garlic Chicken. We looked at the ingredients, cooking steps, and storage tips. You can tweak recipes with different veggies or spice levels. My final thoughts: this dish is fun to make and tastes great. It’s perfect for any meal. Remember, with practice, you can make it even better each time. Enjoy putting your twist on this tasty dish!](https://soyumrecipes.com/wp-content/uploads/2025/05/77260175-e580-4752-97bb-ec1c53043b98-300x300.webp)

Classic Chicken Noodle Soup Comforting and Hearty Meal
There’s nothing quite like a warm bowl of Classic Chicken Noodle Soup to soothe the soul. As the chill of the season sets in,…