
Latest & Greatest
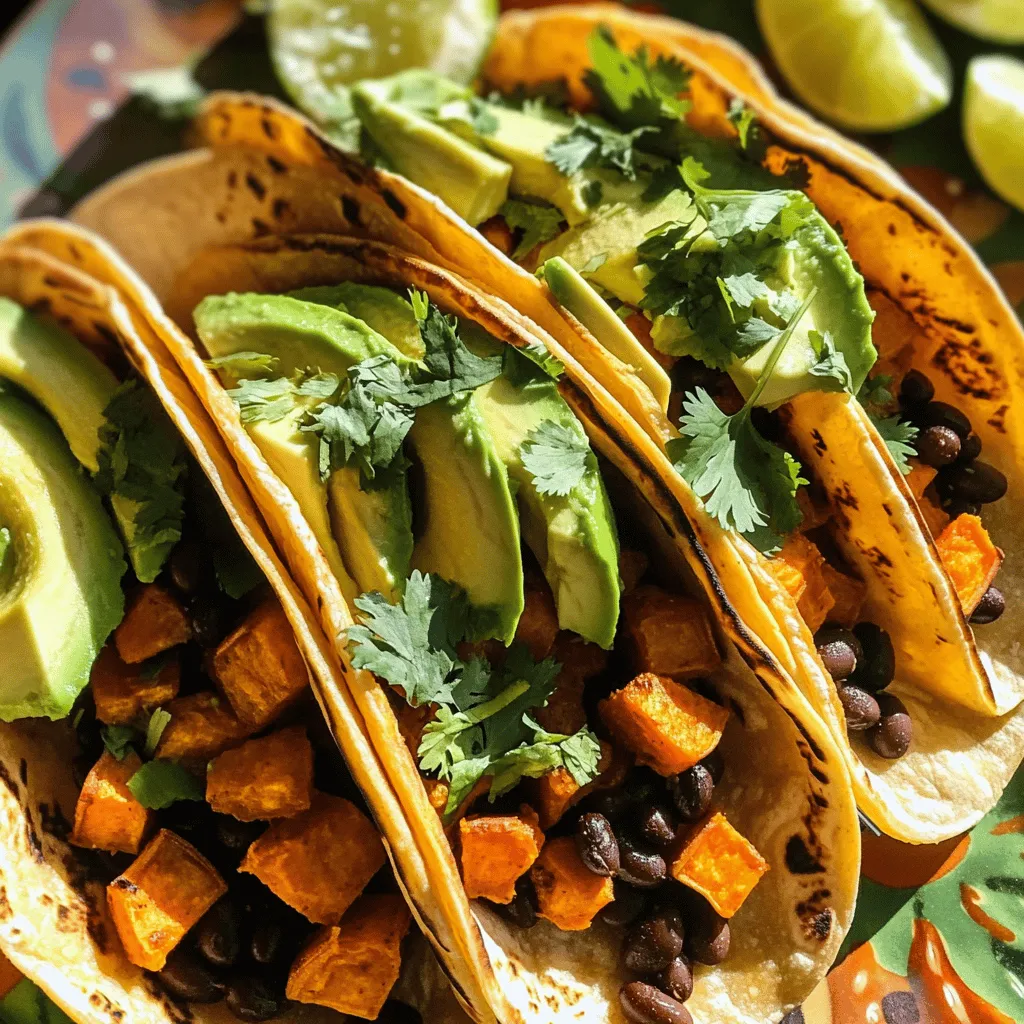
Savory Sweet Potato and Black Bean Tacos Recipe
Are you ready to spice up your dinner routine? I’m excited to share my Savory Sweet Potato and Black Bean
Read more…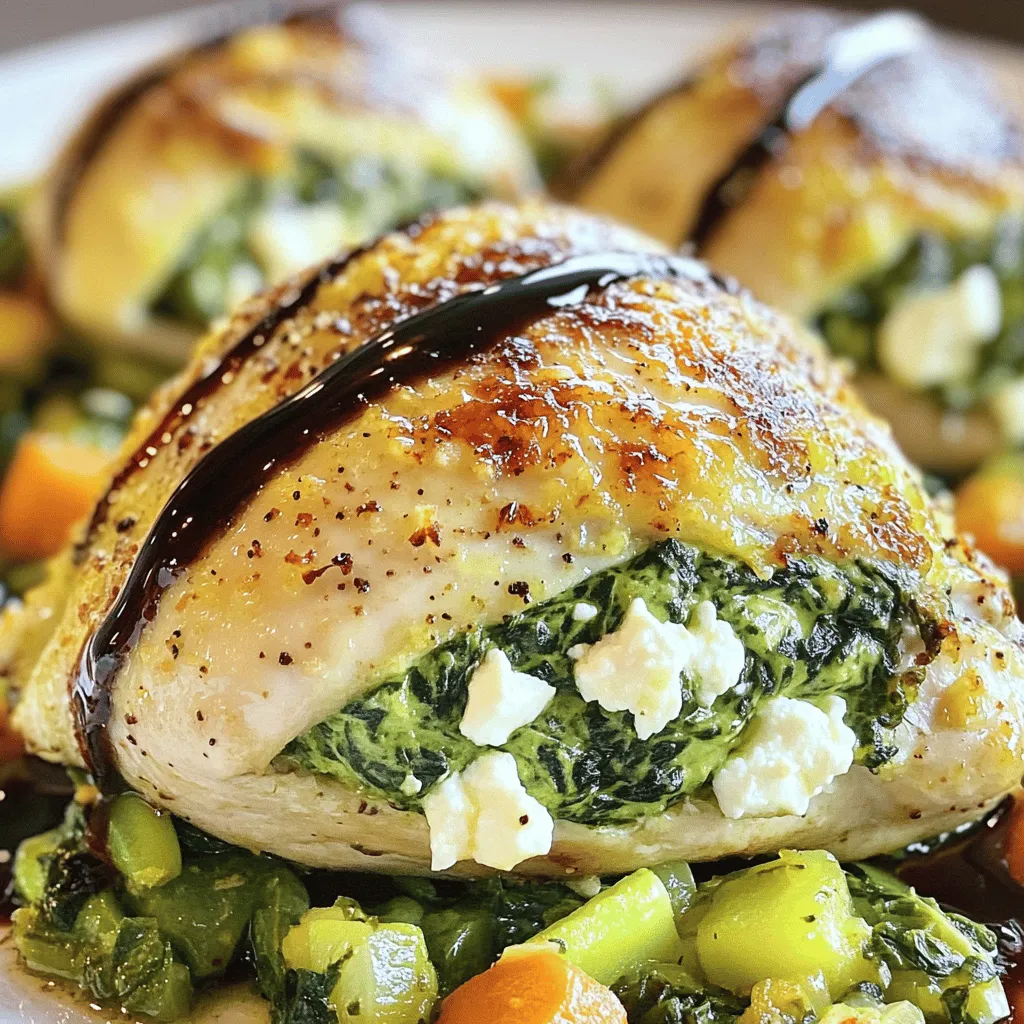
Spinach and Feta Stuffed Chicken Flavorful Weeknight Meal
Looking for a quick and tasty dinner idea? Spinach and Feta Stuffed Chicken is the answer. This flavorful weeknight meal
Read more…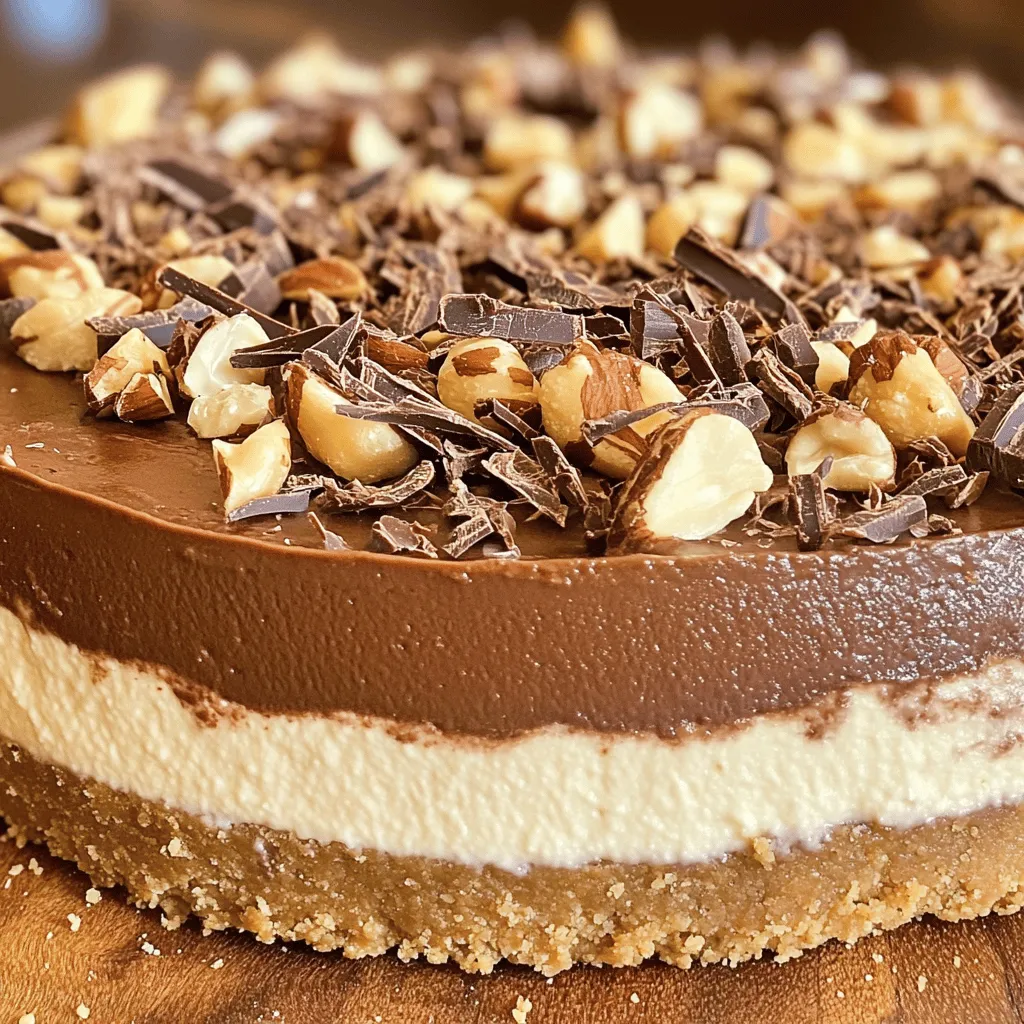
No-Bake Nutella Cheesecake Delightful and Easy Dessert
Craving something sweet and creamy that’s also easy to make? Look no further! This No-Bake Nutella Cheesecake is a true
Read more…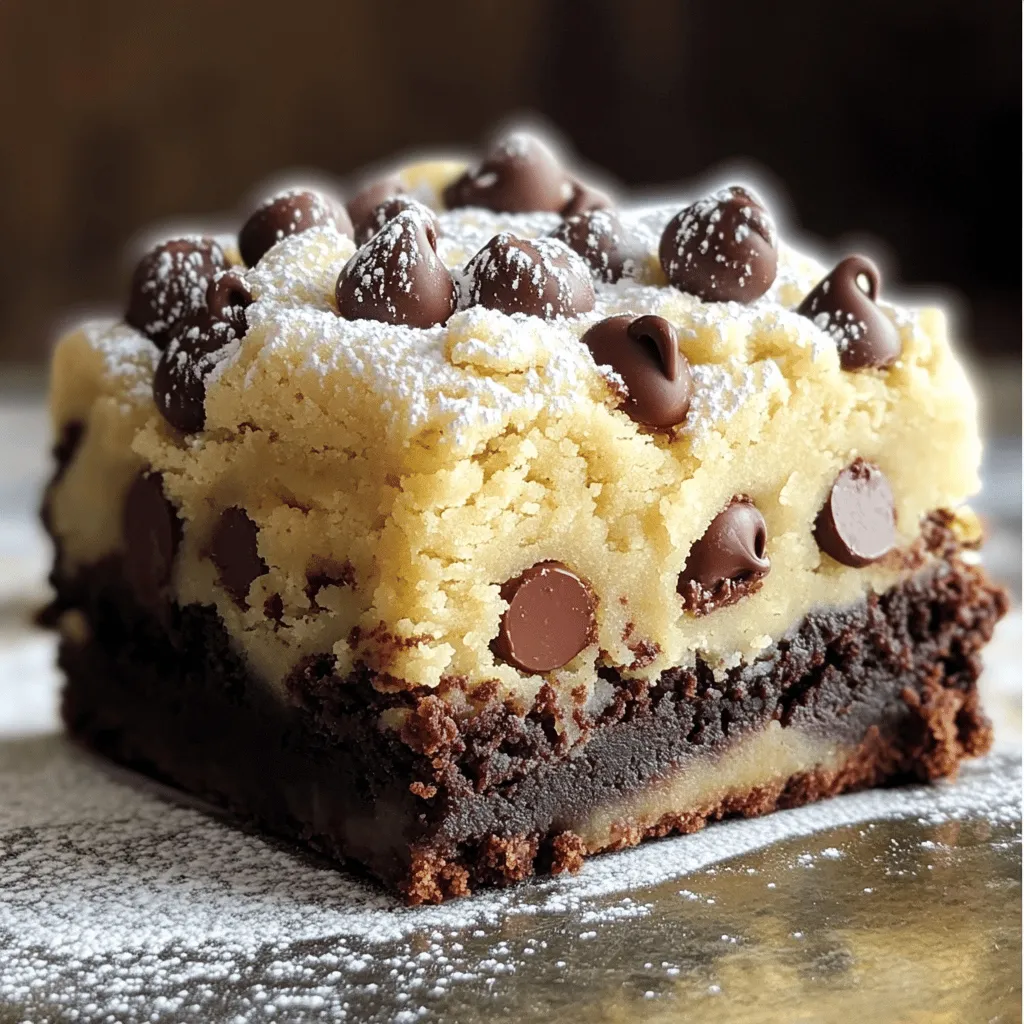
Chocolate Chip Cookie Dough Brownies Irresistible Treat
Get ready for a delicious treat that combines two favorites: brownies and cookie dough! In this post, I’ll show you
Read more…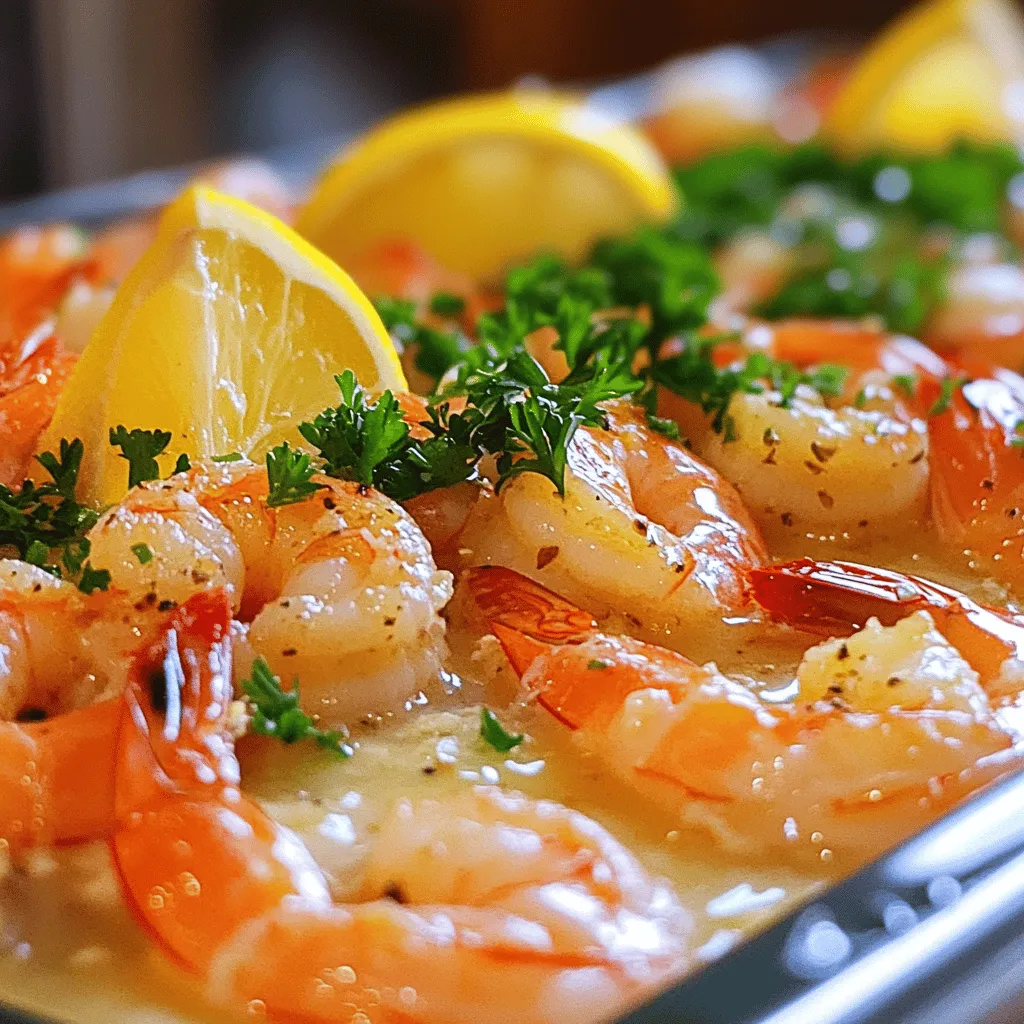
Flavorful 5-Ingredient Garlic Butter Shrimp Recipe
Craving a quick, delicious meal? You’re in luck! My 5-Ingredient Garlic Butter Shrimp Recipe is simple yet bursting with flavor.
Read more…
Vegan Chickpea Curry Flavorful and Easy Meal Idea
Are you ready to spice up your dinner routine? This Vegan Chickpea Curry is not just flavorful; it’s also simple
Read more…
Glazed Lemon Sugar Cookies Delightful and Simple Treat
If you’re craving a sweet treat that’s simple yet bursting with flavor, look no further! These Glazed Lemon Sugar Cookies
Read more…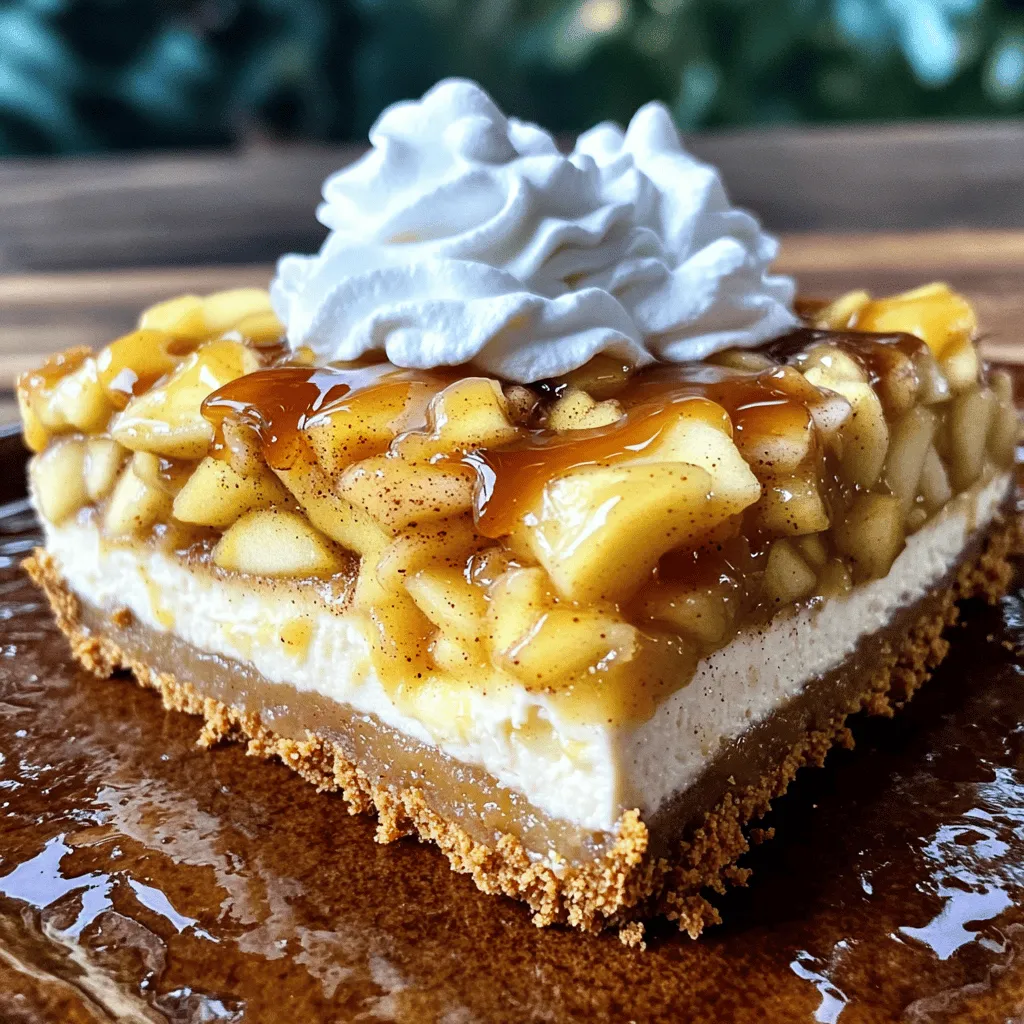
Apple Pie Stuffed Cheesecake Irresistible Desserts
If you love desserts that combine flavors, you’re in for a treat! My Apple Pie Stuffed Cheesecake takes two classics
Read more…browse recipes


![- 4 medium apples (Granny Smith or Fuji), cored and sliced - 1 cup brown sugar - 1/2 cup unsalted butter - 1/4 cup heavy cream - 1 teaspoon vanilla extract - 1/2 teaspoon sea salt - 1 cup chopped nuts (walnuts or pecans) for garnish - 1/2 teaspoon cinnamon (optional) To make caramel apple dip, you need simple ingredients. Start with fresh apples. I love using Granny Smith or Fuji apples. They give a nice tartness that pairs well with sweet caramel. You’ll need brown sugar and unsalted butter for a rich base. Heavy cream adds creaminess, while vanilla extract brings in a lovely flavor. Sea salt balances the sweetness, and chopped nuts add a nice crunch. - Alternative fruits for dipping: Try using pears or bananas for a twist. - Vegan substitutes: Use coconut oil instead of butter. Almond milk can replace heavy cream. - Different types of nuts or toppings: Experiment with almonds or chocolate sprinkles for more fun. These variations keep your dip exciting and cater to different tastes. Enjoy experimenting with what you have at home! You can find the full recipe in the earlier section. First, we need to make the caramel sauce. Start by melting the butter in a medium saucepan over medium heat. Watch it closely as it begins to foam. Once melted, add the brown sugar. Stir it well until the mixture is thick and smooth. Next, carefully pour in the heavy cream while stirring. This step is key to preventing lumps. Continue to stir as the mixture comes to a gentle simmer. Reduce the heat to low, and let it bubble for about five minutes. Keep stirring occasionally. This will help the sauce thicken nicely. Once it thickens, take it off the heat. Stir in the vanilla extract and sea salt. If you want a little warmth, add cinnamon now. Let the caramel cool for about ten minutes. It will continue to thicken as it cools. Now, let’s put it all together. While the caramel cools, slice the apples and arrange them on a serving platter. I prefer Granny Smith or Fuji apples for their crispness and flavor. Once the caramel sauce has cooled, pour it over the apple slices. Make sure to cover them evenly with the sauce. For a finishing touch, sprinkle chopped nuts on top. Walnuts or pecans work great for texture and flavor. For an extra special look, you can drizzle more caramel over the platter. This adds a nice touch and makes it more inviting. Enjoy your delicious caramel apple dip! For the complete recipe, see the [Full Recipe]. To get smooth caramel, watch for key signs. The mixture should bubble gently, not boil too hard. Look for a rich golden color. If your caramel turns grainy, it can be fixed. Heat it slowly while stirring. Add a splash of water to bring it back to life. Serve caramel apple dip in a big bowl. Use small forks or skewers for easy dipping. For a fun twist, add chocolate chips or colorful sprinkles on the side. Your guests can customize their dip! Arrange the apple slices in a circle around the dip bowl. You can drizzle some extra caramel over the apples for a beautiful look. To finish, sprinkle chopped nuts on top. This adds flavor and crunch! {{image_2}} You can change your caramel apple dip with fun flavors. Try adding spices like nutmeg or ginger. These spices give the dip a warm and cozy taste. It’s a nice twist for chilly days. Another great option is to create a chocolate caramel apple dip. Just mix melted chocolate with your caramel sauce. The rich chocolate adds a sweet touch that kids love. You can drizzle it over the apples for a fun look. Make your caramel apple dip fit the season. For a fall-inspired treat, use pumpkin spice. It gives a nice autumn flavor that pairs well with apples. You can even add some chopped pecans for crunch. During the holidays, think about adding peppermint or nutmeg. These flavors bring a festive touch to your dip. Just a little sprinkle of peppermint on top can make it feel like a holiday party. Not in the mood for apples? No problem! You can use other dippers too. Cookies or pretzels work great with caramel. They add a nice salty flavor that balances the sweetness. You can also try finger foods like marshmallows or biscotti. Marshmallows are fun and chewy. Biscotti adds a nice crunch. Both give you different textures, making your dip even more enjoyable. For the full recipe of this delightful caramel apple dip, check out the [Full Recipe]. To keep your caramel apple dip fresh, use a tight container. A glass or plastic container with a lid works best. Make sure it seals well to prevent air from getting in. Before storing, let the dip cool to room temperature. This step helps avoid condensation inside the container. In the fridge, caramel apple dip lasts about 5 to 7 days. Store it in the fridge right after your party. If you want to freeze it, pour the dip into a freezer-safe container. It can last up to 3 months in the freezer. Just remember to let it cool before freezing. To reheat your caramel sauce, warm it slowly on the stove. Use low heat to keep the texture smooth. Stir it often to avoid burning. If you prefer it cold, just take it out of the fridge and serve. It tastes great either way. If you want to serve it warm, check that it is not too hot before pouring it over the apples. For the complete recipe, visit the Full Recipe section. To make caramel apple dip from scratch, follow these steps: 1. Melt 1/2 cup of unsalted butter in a saucepan over medium heat. 2. Stir in 1 cup of brown sugar until blended. 3. Gradually add 1/4 cup of heavy cream while stirring. 4. Simmer the mix for about 5 minutes until it thickens. 5. Stir in 1 teaspoon of vanilla extract and 1/2 teaspoon of sea salt. 6. Let it cool for 10 minutes before serving. This simple process creates a rich, creamy dip. You can find the full recipe above for all details. Yes, you can use store-bought caramel. Look for brands like Kraft or Merckens. These caramels melt well and taste great. They save time if you prefer quick prep over making it from scratch. The best apples for this dip include: - Granny Smith: Tart and crisp, they balance the sweet caramel. - Fuji: Sweet and firm, they add a nice crunch. These apples hold up well and provide a great flavor contrast to the dip. Yes, caramel apple dip is gluten-free. The ingredients, like brown sugar and butter, do not contain gluten. Always check labels to ensure no gluten is present in pre-made products. This makes it a safe treat for those with gluten sensitivities. Caramel apple dip is a simple, fun treat made with fresh apples and rich caramel. You can customize it with different fruits and nuts for a unique twist. Remember to simmer the sauce just right for the best texture. Use your creativity in serving and presenting this tasty dish. It's perfect for gatherings and easy to store for later. Enjoy experimenting with flavors and enjoy each delicious bite. This dip is sure to impress everyone!](https://soyumrecipes.com/wp-content/uploads/2025/04/50e0a20d-fdb1-4424-8a1f-4f1c66c0c85d.webp)
Caramel Apple Dip Simple and Sweet Party Treat
Looking for the perfect sweet treat for your next party? I promise this Caramel Apple Dip will wow your guests! With its simple ingredients…
My Latest Desserts

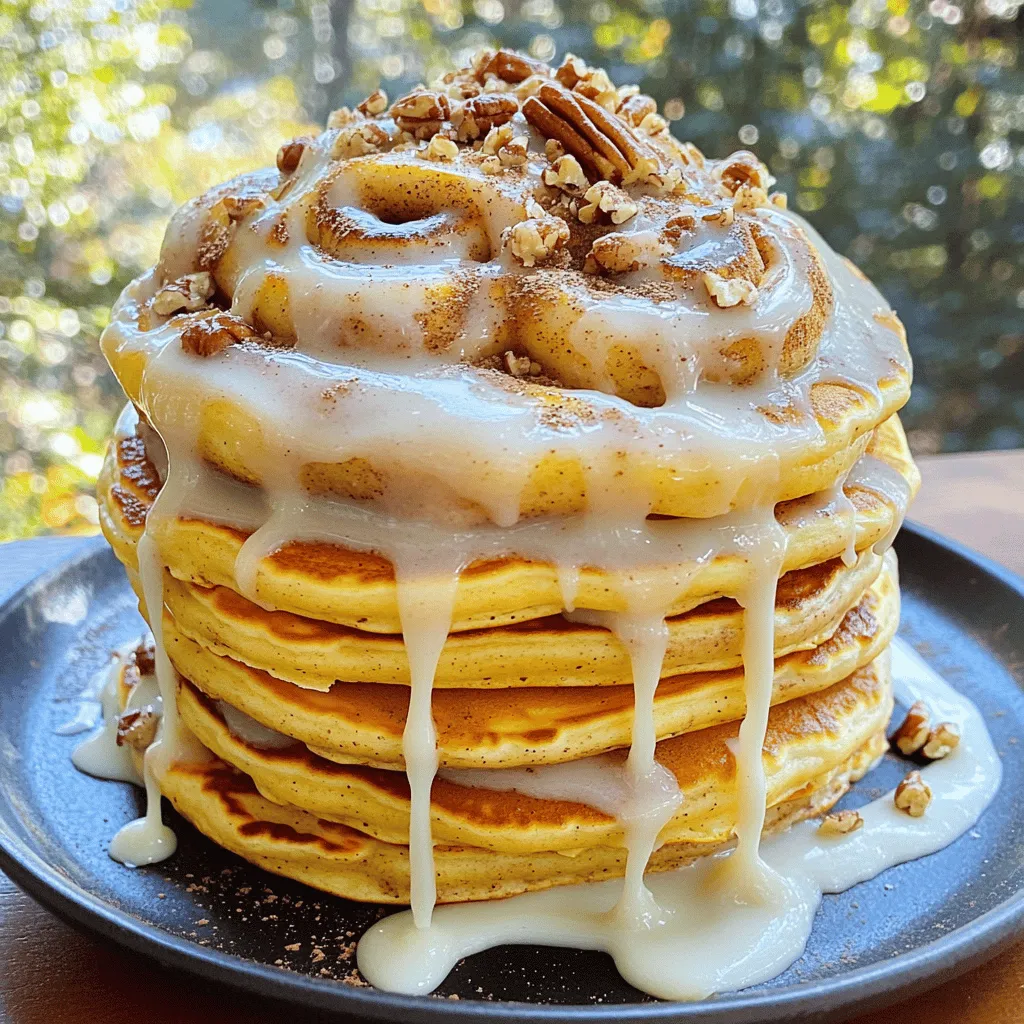
Cinnamon Roll Pancakes Delightful and Easy Recipe
Get ready for a sweet treat that will brighten your morning: Cinnamon Roll Pancakes! This easy recipe combines the soft, Read Full Recipe-
Caramel Apple Hand Pies Irresistible Dessert Recipe
Are you ready for a dessert that combines sweet, tart, and buttery goodness? My Caramel Apple Hand Pies are the Read Full Recipe -
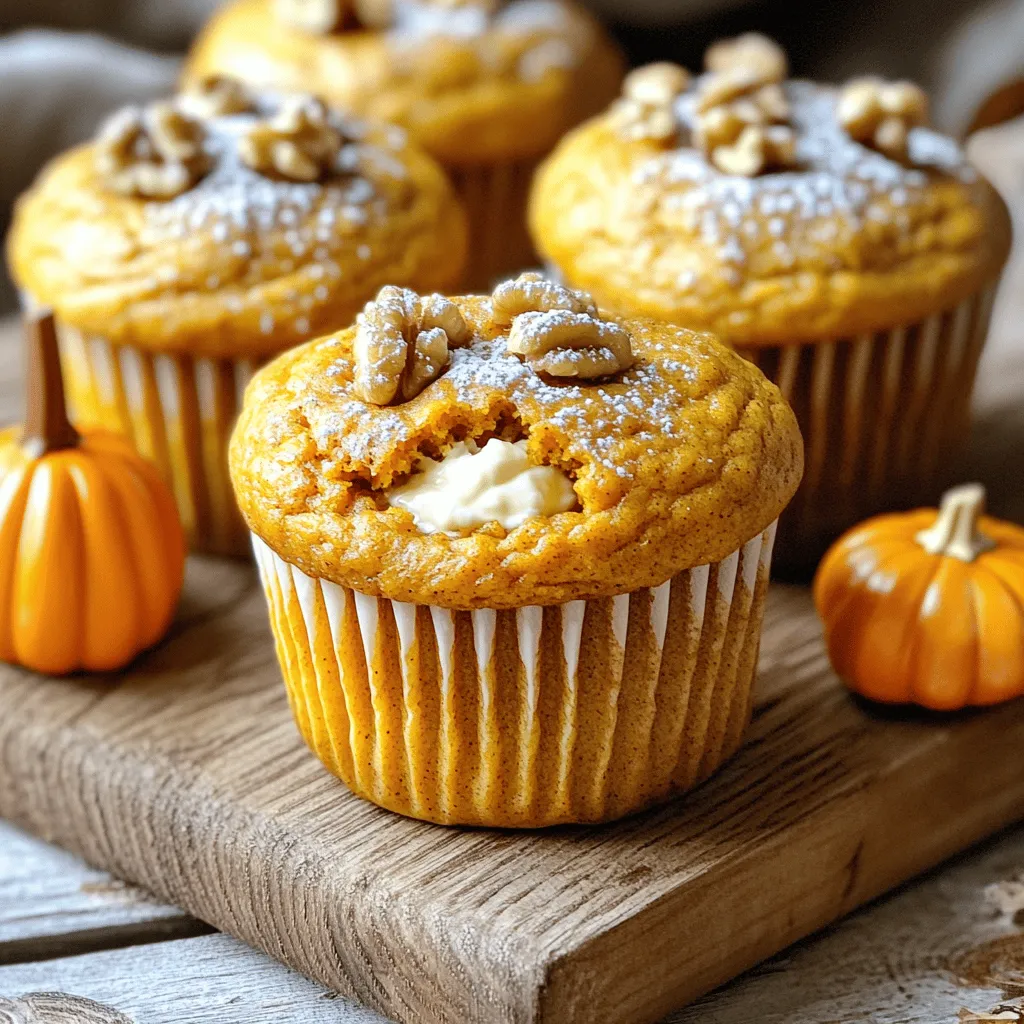
Pumpkin Cream Cheese Muffins Irresistible Recipe
If you love the cozy flavors of fall, you’ll adore these Pumpkin Cream Cheese Muffins! This recipe combines warm spices Read Full Recipe -
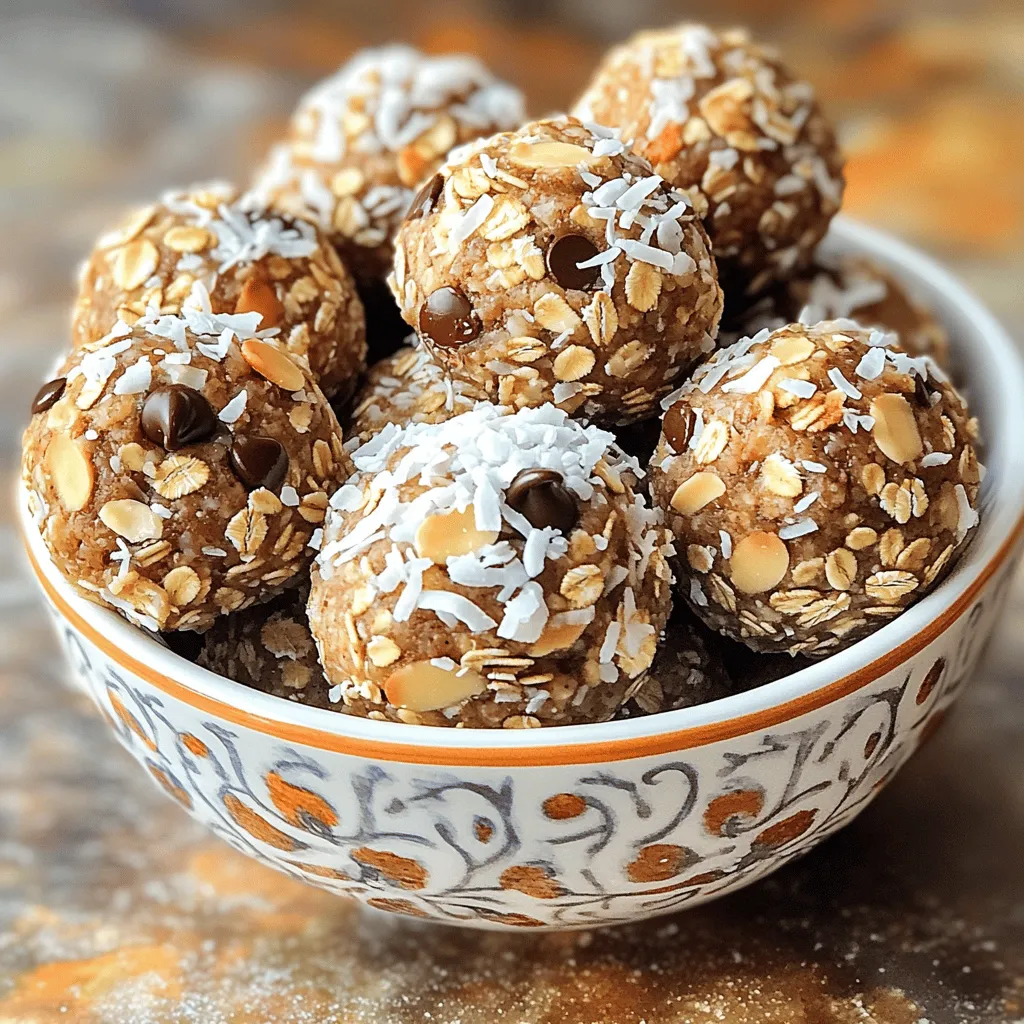
No Bake Almond Joy Energy Bites Healthy Snack Recipe
Looking for a quick, healthy snack? You’ve come to the right place! These No Bake Almond Joy Energy Bites are Read Full Recipe -
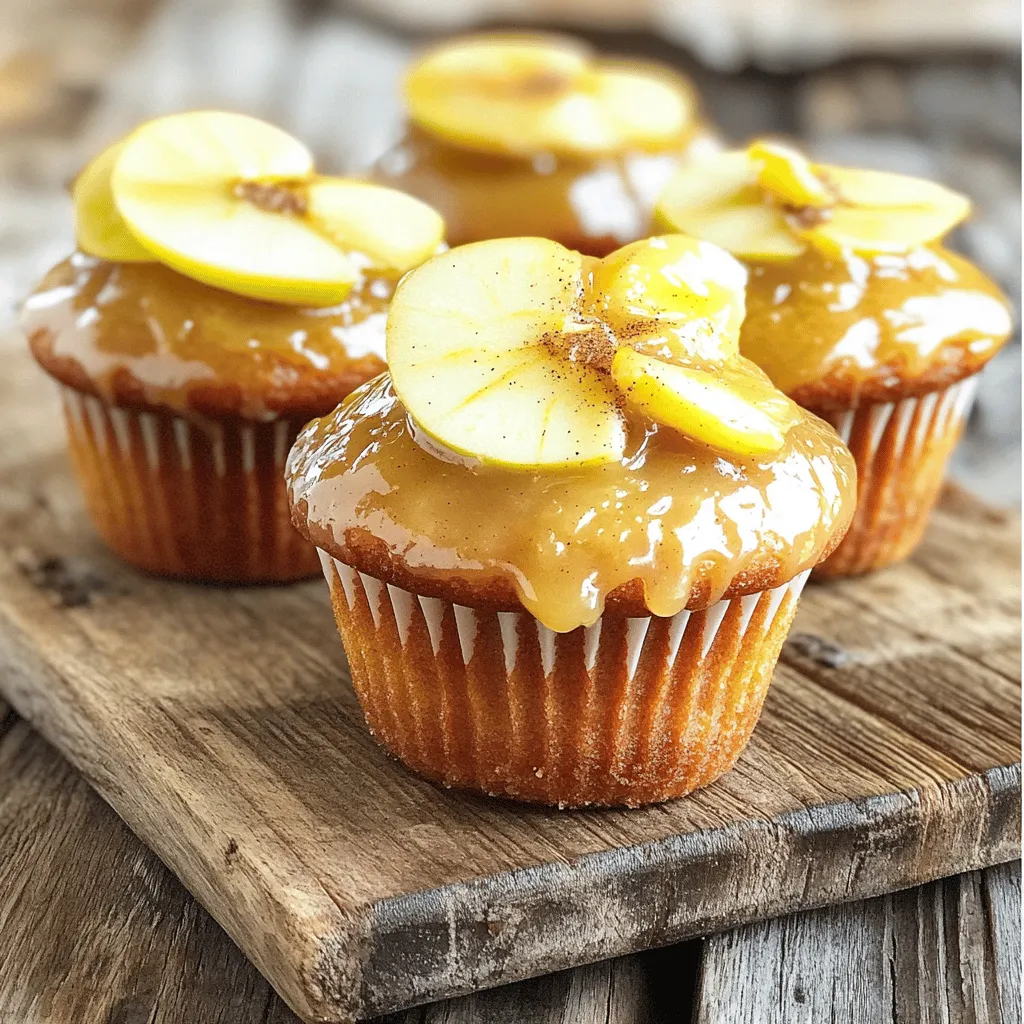
Apple Cider Glazed Donut Muffins Delightful Treat
Get ready to indulge in the cozy flavors of fall with my Apple Cider Glazed Donut Muffins. These muffins blend Read Full Recipe -
Chocolate Cottage Cheese Pudding Cups Delightful Treat
If you’re craving a sweet treat that won’t derail your health goals, you’ve got to try Chocolate Cottage Cheese Pudding Read Full Recipe


My Latest Drinks
-
Protein Cookies & Cream Milkshake Simple Treat Recipe
If you’re craving a delicious treat that packs a protein punch, look no further! This Protein Cookies & Cream Milkshake Read Full Recipe -
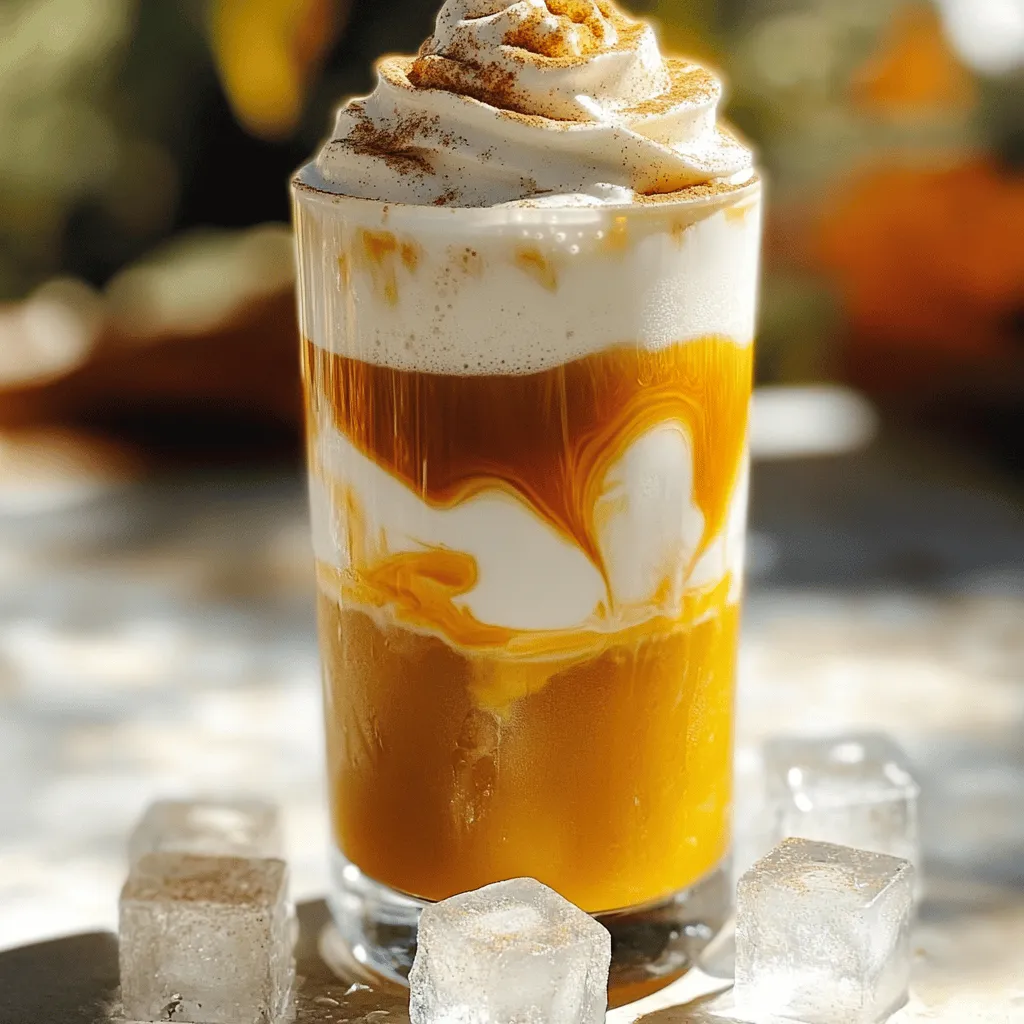
Spiced Pumpkin Lattes Slow Cooker Recipe Delight
Are you ready to warm up your chilly days with a cozy Spiced Pumpkin Latte? I’ve crafted the perfect slow Read Full Recipe -
Peanut Butter Chocolate Protein Shake Tasty Delight
Satisfy your cravings with a Peanut Butter Chocolate Protein Shake! This tasty delight is not only delicious but also healthy. Read Full Recipe -
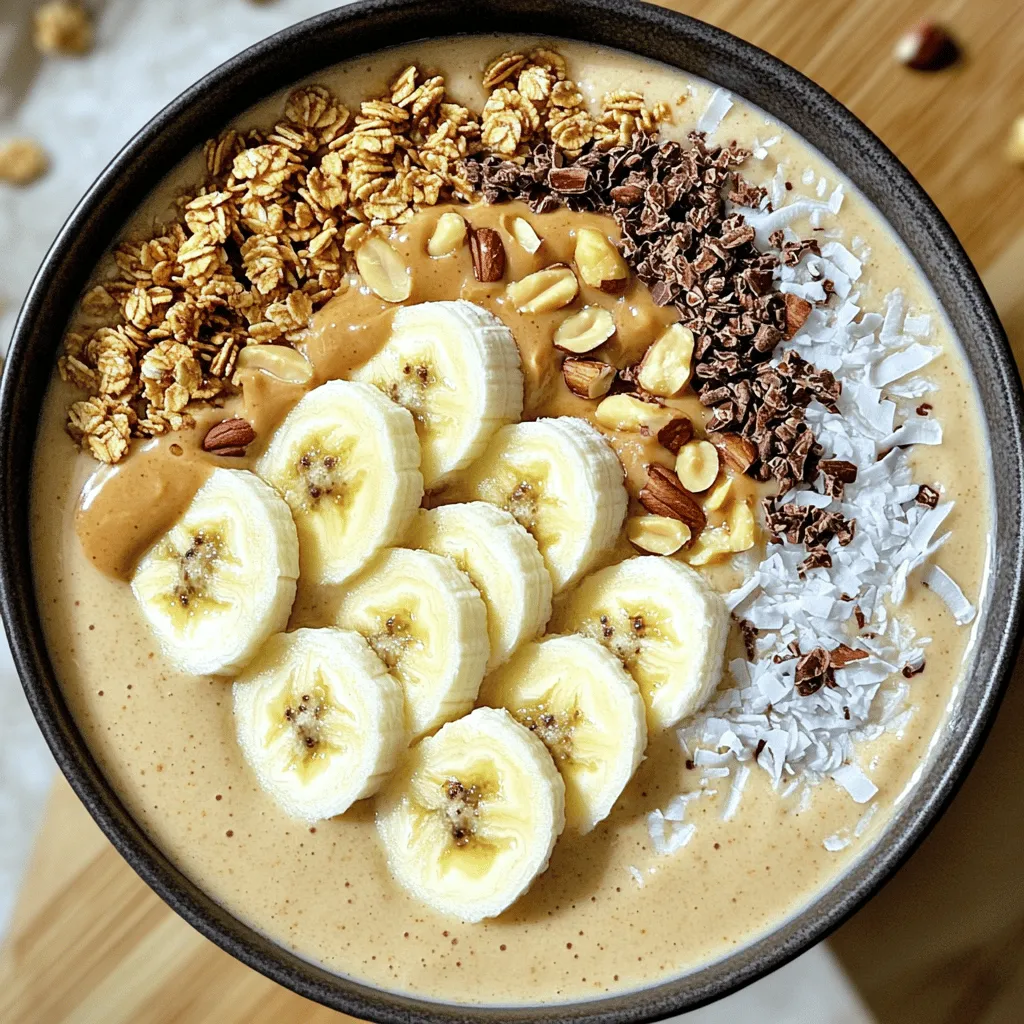
Peanut Butter Banana Smoothie Bowl Simple and Tasty
Looking for a quick, tasty treat? The Peanut Butter Banana Smoothie Bowl is your answer! Packed with ripe bananas and Read Full Recipe -
Pumpkin Cream Cold Brew Copycat Simple and Tasty Recipe
Craving a Pumpkin Cream Cold Brew but want to make it at home? You’re in the right place! I’ll show Read Full Recipe -
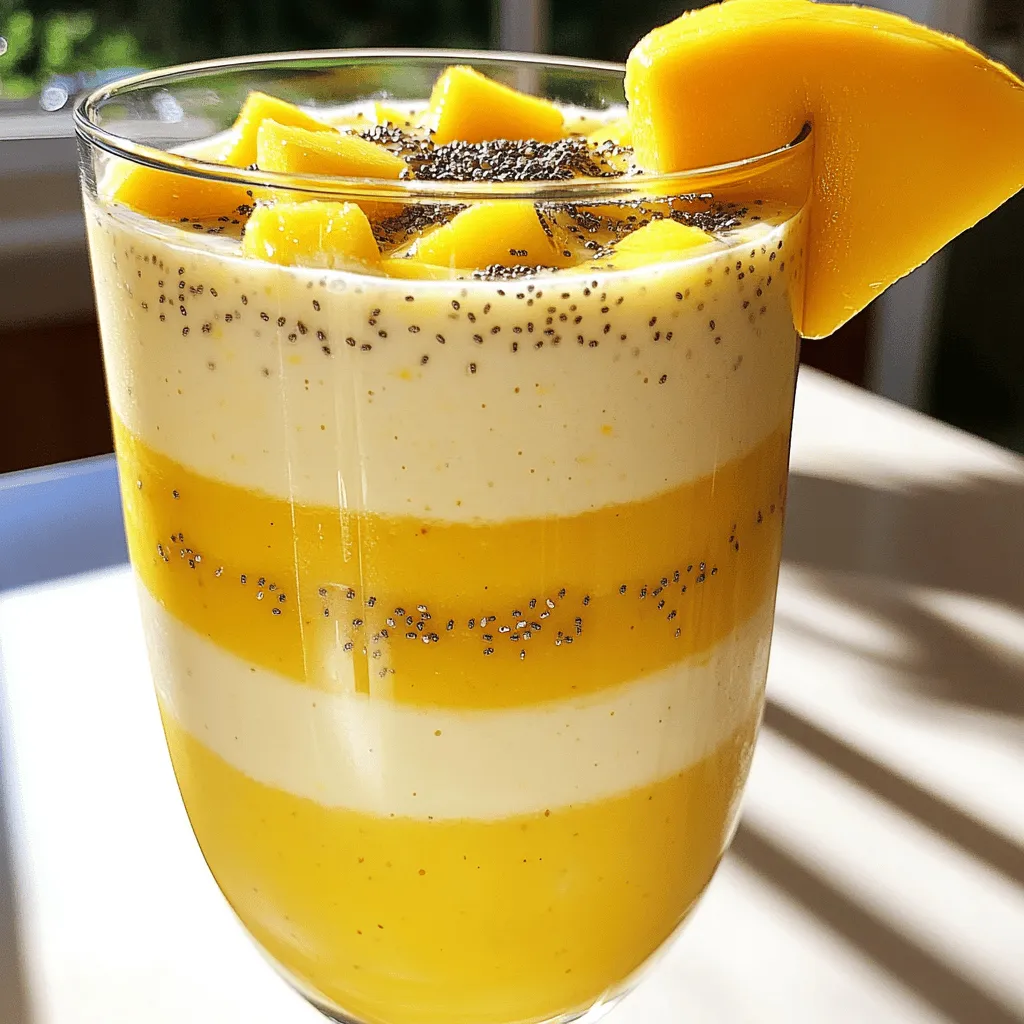
Pineapple Mango Smoothie Refreshing and Nutritious Drink
Looking for a tasty and healthy drink? A Pineapple Mango Smoothie might be just what you need! Packed with fresh Read Full Recipe


hey,
i’m !
I’m so happy you’re here!
I love creating dishes that bring joy to the table. I hope they bring the same joy to yours. Let’s enjoy this flavorful journey together.


![- 2 pounds baby potatoes, halved - 4 tablespoons olive oil - 6 cloves garlic, minced - 2 teaspoons dried rosemary - 2 teaspoons dried thyme - 1 teaspoon smoked paprika - Salt and pepper to taste - Fresh parsley, chopped - Presentation tips for serving The base of this dish starts with baby potatoes. They are small and tender, perfect for roasting. Halving them helps them cook evenly and adds crunch. Olive oil gives rich flavor and helps the potatoes crisp up in the oven. Garlic adds a punch of taste that you can't resist. For the spices, I use dried rosemary and dried thyme. These herbs bring a warm, earthy taste. Smoked paprika adds a slight smokiness that really enhances the dish. Salt and pepper balance all the flavors. Make sure to taste as you go! Garnishing with fresh parsley not only looks great but adds a fresh touch. When serving, I like to use a rustic bowl. It makes the dish feel warm and inviting. You can also add a sprig of parsley on top. If you want a dip, try lemon aioli for a zesty kick. For the full recipe, check out the detailed instructions to make this easy and delicious dish! - Preheat the oven to 425°F (220°C). - In a large bowl, mix the halved baby potatoes with minced garlic, olive oil, dried rosemary, dried thyme, smoked paprika, salt, and pepper. Toss until the potatoes are well-coated. This helps to bring out all the flavors. - Spread the seasoned potatoes on a baking sheet. Make sure they are in a single layer. This is key for even cooking. - Roast in the preheated oven for 25-30 minutes. Toss the potatoes halfway through to ensure they brown evenly. You want them golden and crispy on the outside, and tender inside. - Once the potatoes are done, take them out of the oven. Adjust the salt and pepper if needed. This is your chance to tweak the flavor. - Transfer the roasted potatoes to a serving dish. Garnish with fresh chopped parsley for a pop of color. This adds freshness and makes the dish look great. For the complete recipe, check the [Full Recipe]. Enjoy this crunchy and flavorful dish! To get crispy potatoes, start with good quality baby potatoes. Cut them in half for even cooking. Make sure to soak them in cold water for 30 minutes. This helps remove excess starch, leading to a crunchier finish. When you roast, place them on a baking sheet in a single layer. This is key. If you overcrowd the sheet, steam forms, and your potatoes won't get crispy. For extra flavor, consider adding fresh herbs like basil or oregano. You can also try spices like chili powder or cumin for a twist. Olive oil is the best choice for roasting potatoes. It has a rich flavor that enhances the herbs. You can also use avocado oil for a higher smoke point, which is great for roasting at high heat. Watch out for overcooking or undercooking your potatoes. Overcooked potatoes can become mushy, while undercooked ones stay hard inside. Aim for that golden brown color on the outside. Another mistake is not cutting the potatoes evenly. This leads to uneven cooking. Always ensure they are similar in size. For the best results, toss them halfway through roasting. This helps them cook evenly. For the full recipe, check out the link to create your own garlic herb roasted potatoes! {{image_2}} You can get creative with garlic herb roasted potatoes. For a Mediterranean twist, add olives and feta cheese. This mix brings a salty, tangy flavor that pairs well with the herbs. You can also try a spicy version. Just sprinkle some chili flakes into your mix. This adds a nice kick and makes the dish pop. If you want to cook these potatoes faster, try an air fryer. Set it to 400°F (200°C) and cook for about 15-20 minutes. Shake the basket halfway through for even cooking. You can also grill the potatoes for a smoky taste. Just place them in a grill basket and cook over medium heat for about 20 minutes. This adds a fun outdoor flavor. This recipe is easy to adapt for different diets. You can keep it vegan and gluten-free by sticking to the original ingredients. If you want a lower-fat option, use less oil or try a cooking spray. These changes still keep the flavor while making the dish lighter. For the full recipe, check out the link provided. To keep your garlic herb roasted potatoes fresh, store them in an airtight container. Make sure they cool down before sealing. This helps prevent sogginess. In the fridge, they last about 3 to 5 days. Use them in salads or as a side dish for quick meals. You can reheat roasted potatoes in the microwave or oven. If you choose the microwave, heat them for one to two minutes. However, the oven gives better results. Preheat the oven to 400°F (200°C) and spread the potatoes on a baking sheet. Bake for about 10 to 15 minutes. This method keeps them crispy. To ensure the best texture, toss them halfway through reheating. Yes, you can freeze garlic herb roasted potatoes! First, let them cool completely. Then, place them in a freezer bag and remove as much air as possible. They can last up to three months in the freezer. When ready to eat, thaw them in the fridge overnight. Then, reheat using the oven to bring back their crunch. To achieve crispy garlic herb roasted potatoes, choose the right oil and oven settings. Use a good amount of olive oil. This helps the potatoes brown nicely. Preheat your oven to 425°F (220°C). A hot oven gives the best results. Spread the potatoes in a single layer. Crowding the pan traps steam and makes them soggy. Toss the potatoes halfway through cooking. This ensures they crisp evenly. Yes, you can use other types of potatoes. Yukon Gold and red potatoes work well. They have a creamy texture and hold up during roasting. Fingerling potatoes are also great for their unique shape. Each type brings its own flavor and texture. Experiment with what you have on hand to find your favorite. These potatoes pair well with many dishes. Try serving them with roast chicken or grilled steak. They also go nicely with salmon or a hearty veggie dish. For sides, consider a fresh green salad or steamed vegetables. This balance adds color and nutrition to your meal. You can find the full recipe for garlic herb roasted potatoes [here](#). This link provides all the details for your cooking adventure. Garlic herb roasted potatoes are easy to make and taste amazing. You need baby potatoes, garlic, olive oil, and simple seasonings for great flavor. We covered the steps to roast them perfectly, along with tips and variations to try. Don't forget to store and reheat them well to keep that crispy texture. With all these ideas, you can enjoy delicious potatoes any time! Get creative and make this dish your own. Enjoy your cooking!](https://soyumrecipes.com/wp-content/uploads/2025/06/a8932d50-39cd-4cf5-aa81-b86a19229047-300x300.webp)
![To make mini lemon tarts, gather these simple ingredients: - 1 cup all-purpose flour - 1/4 cup powdered sugar - 1/2 cup unsalted butter, softened - 1/4 teaspoon salt - 1 large egg yolk - 1/4 cup granulated sugar - 2 large eggs - 1/2 cup fresh lemon juice (about 3 lemons) - 1 tablespoon lemon zest - 1/4 teaspoon baking powder - Fresh mint leaves (for garnish) - Whipped cream (optional, for serving) You can swap some ingredients if needed. For the all-purpose flour, use a gluten-free blend. Instead of unsalted butter, you can use coconut oil. If you want a lower sugar option, try a sugar substitute in the filling. For a richer flavor, you can use brown sugar instead of granulated sugar. Always adjust the amount to taste. Garnishing your mini lemon tarts makes them pop! Fresh mint leaves add a nice touch, both in flavor and look. You can also top them with whipped cream for added creaminess. Try adding some crushed berries or a sprinkle of powdered sugar for a sweet finish. These little touches make your tarts even more inviting. For the full recipe, check out the complete instructions above. To start, preheat your oven to 350°F (175°C). Next, grab a mini muffin tin and grease it with cooking spray or butter. In a bowl, mix together 1 cup of all-purpose flour, 1/4 cup of powdered sugar, and 1/4 teaspoon of salt. Then, add in 1/2 cup of softened unsalted butter. Mix until the blend looks like coarse crumbs. Stir in 1 large egg yolk until the dough holds together. If it's too crumbly, add a teaspoon of cold water. Now, press the dough into the bottom and sides of each cavity in the mini muffin tin. Make sure to prick the bottoms with a fork. This helps keep the shells from puffing up. Bake the tart shells for 12-15 minutes until they turn lightly golden. Once done, let them cool in the tin for about 10 minutes before moving them to a wire rack. In a separate mixing bowl, whisk together 1/4 cup of granulated sugar, 2 large eggs, 1/2 cup of fresh lemon juice (that’s about 3 lemons), 1 tablespoon of lemon zest, and 1/4 teaspoon of baking powder. Mix until all the ingredients blend well. The filling should be smooth and bright. Pour the lemon filling into each tart shell, filling them about three-quarters full. Be careful not to overfill, as the filling may spill while baking. Now, return the tarts to the oven and bake for another 15-20 minutes. You’ll know they are done when the filling feels set and slightly firm to the touch. After baking, remove the tarts and let them cool completely. When ready to serve, garnish with fresh mint leaves and a dollop of whipped cream if you like. These mini lemon tarts are a delight and easy to make! For the full recipe, check out the details above. To avoid soggy bottoms in your mini lemon tarts, you should pre-bake the crust. This step helps set the dough before adding the filling. Pricking the bottoms with a fork also helps. It allows steam to escape. Bake the shells until they are lightly golden for the best results. For a filling that sets well, use fresh lemon juice and eggs. These two ingredients create a nice balance of tartness and richness. Make sure to whisk the mixture until smooth to prevent lumps. Pour the filling gently into the shells, filling them three-quarters full. This gives the filling room to rise slightly while baking. After baking, let the tarts cool in the tin for about 10 minutes. This helps them hold their shape. Then, transfer them to a wire rack to cool completely. Serve them chilled or at room temperature. Garnish with fresh mint leaves and whipped cream for a tasty touch. You can find the Full Recipe for more detailed instructions. {{image_2}} You can switch up the flavor of your mini tarts. Use lime or orange instead of lemon. Lime gives a tangy twist, while orange adds a sweet zest. To make lime tarts, use fresh lime juice and zest in the filling. For orange tarts, do the same with orange juice and zest. The method stays the same, and you will have new flavors to enjoy! If you need a gluten-free option, it's easy to adapt. Use gluten-free flour instead of all-purpose flour. There are many good brands available. The taste will be just as good, and your guests won't even notice! Follow the same steps in the recipe. You can still have a delicious dessert that everyone can enjoy. For an extra special treat, add a meringue topping. Make meringue with egg whites and sugar. Whip the egg whites until stiff peaks form. Spread the meringue on top of your cooled tarts. Then, use a kitchen torch to lightly brown the meringue. This adds a nice look and a sweet finish. Your mini lemon tarts will taste amazing with this added layer! For the full recipe, check out the details above. To keep your mini lemon tarts fresh, place them in an airtight container. Make sure they are completely cool before sealing. This helps keep the crust crisp and the filling smooth. You can store them in the fridge for up to three days. If you want to enjoy them later, freezing is a great option. You can freeze mini lemon tarts for longer storage. First, let them cool completely. Then, wrap each tart in plastic wrap. Place the wrapped tarts in a freezer-safe container or bag. They can last up to three months in the freezer. When you're ready to eat them, thaw them in the fridge overnight before serving. Mini lemon tarts stay fresh for about three days in the fridge. If you freeze them, they can last for three months. To reheat, place them in a preheated oven at 350°F (175°C) for about 10 minutes. This warms the filling and helps restore some crispness to the crust. Enjoy your tarts warm for the best taste! For the full recipe, check out [Full Recipe]. Yes, you can make these tarts ahead of time. I recommend baking the tart shells and filling them the day before. Store the baked shells in an airtight container. Keep the filling in the fridge. When you are ready to serve, just pour the filling into the shells. Bake them again to warm up the filling. Serve these mini lemon tarts chilled or at room temperature. A little whipped cream on top adds a nice touch. Fresh mint leaves make a great garnish too. You can also serve them with a slice of lemon for a pop of color. You can find pre-made mini lemon tarts at many grocery stores. Look in the dessert section or the bakery. Some bakeries also sell them fresh. Check online for local shops that might carry them. If you want a quick treat, this is an easy option! For the complete recipe, check out the Full Recipe section. You learned about the ingredients, tips, and steps to make mini lemon tarts. We explored variations for different tastes and how to store them. Remember, making these tarts is fun and rewarding. Use fresh ingredients for the best flavor. Try the meringue topping for a special touch. I hope you feel ready to bake! Enjoy sharing your tasty mini lemon tarts with friends and family.](https://soyumrecipes.com/wp-content/uploads/2025/06/c51d5b15-a933-48c7-8d93-1b29baa16f07-300x300.webp)
Homemade Garlic Parmesan Wings Simple and Delicious Meal
Craving a flavor-packed meal that’s easy to whip up? Look no further! Homemade Garlic Parmesan Wings are not only simple to make, but they’re…