
Latest & Greatest
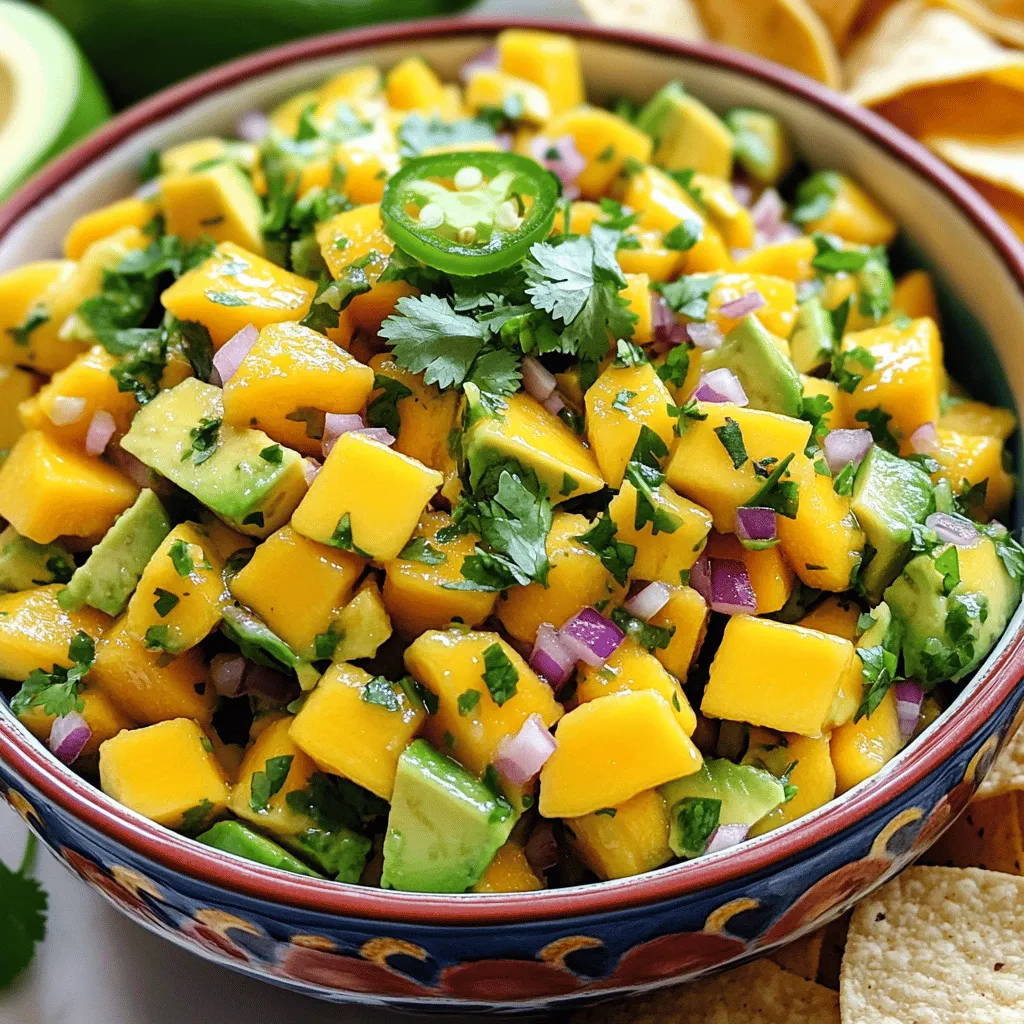
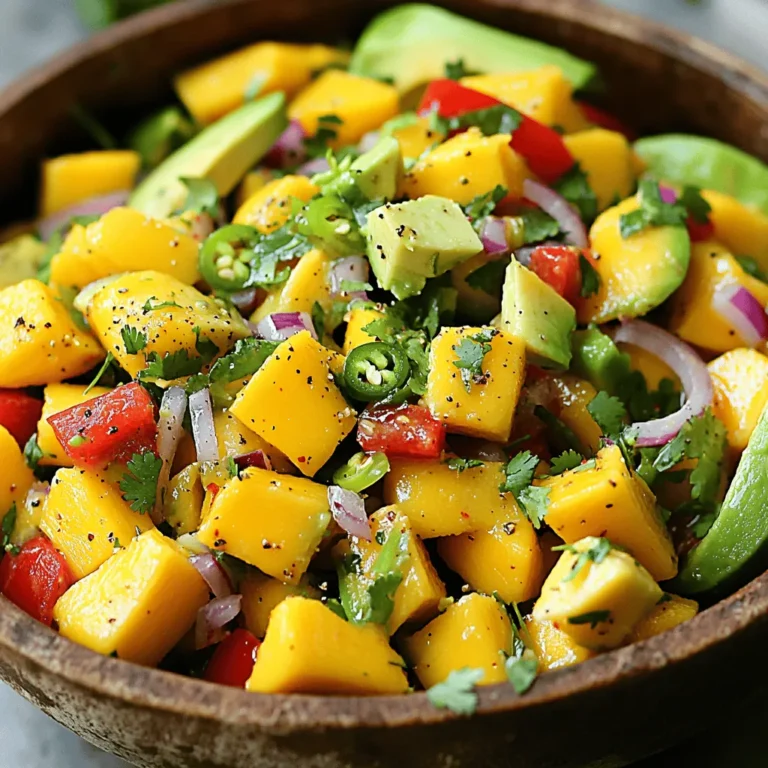
Mango Avocado Salsa Fresh and Flavorful Recipe
Looking for a fresh and easy way to spice up your meals? This Mango Avocado Salsa recipe bursts with flavor
Read more…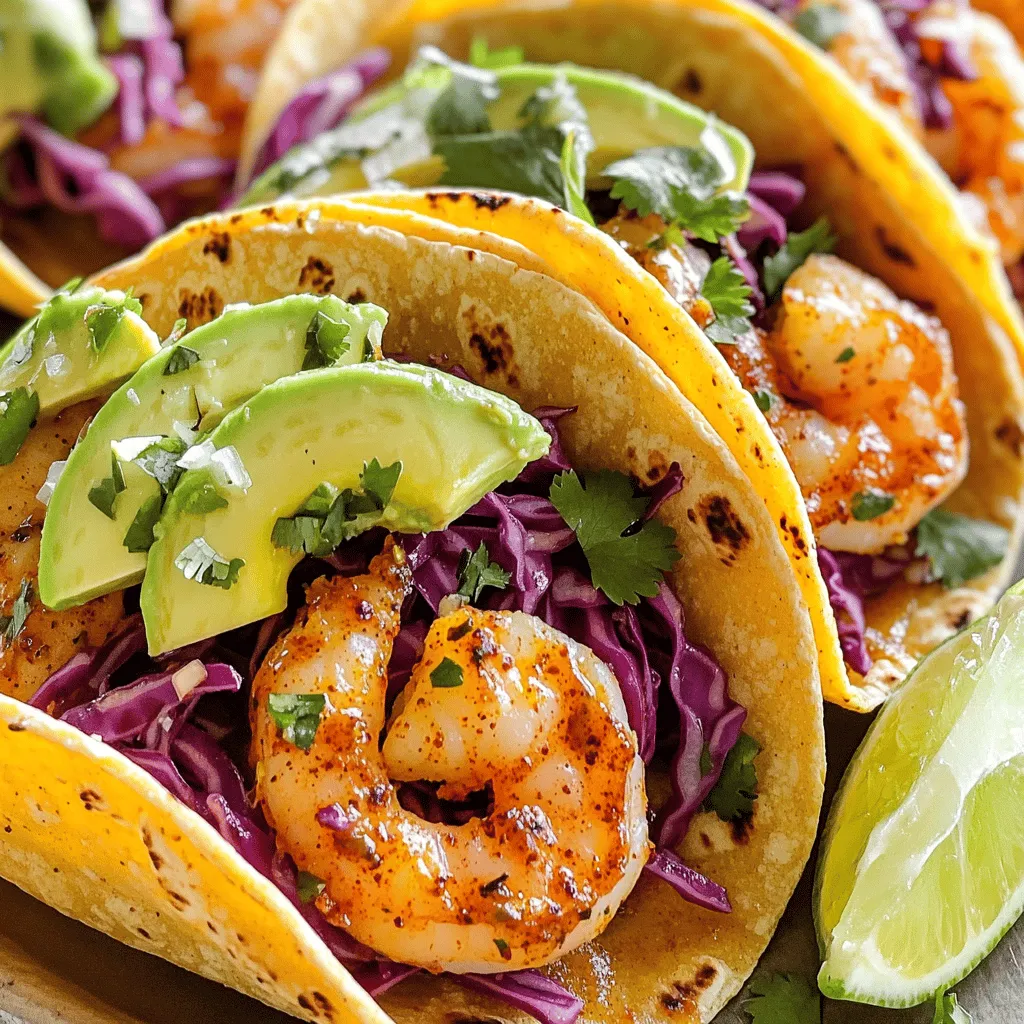
Spicy Garlic Shrimp Tacos Flavorful and Easy Meal
Craving a meal that packs a punch? Spicy Garlic Shrimp Tacos bring bold flavor with ease. They are quick to
Read more…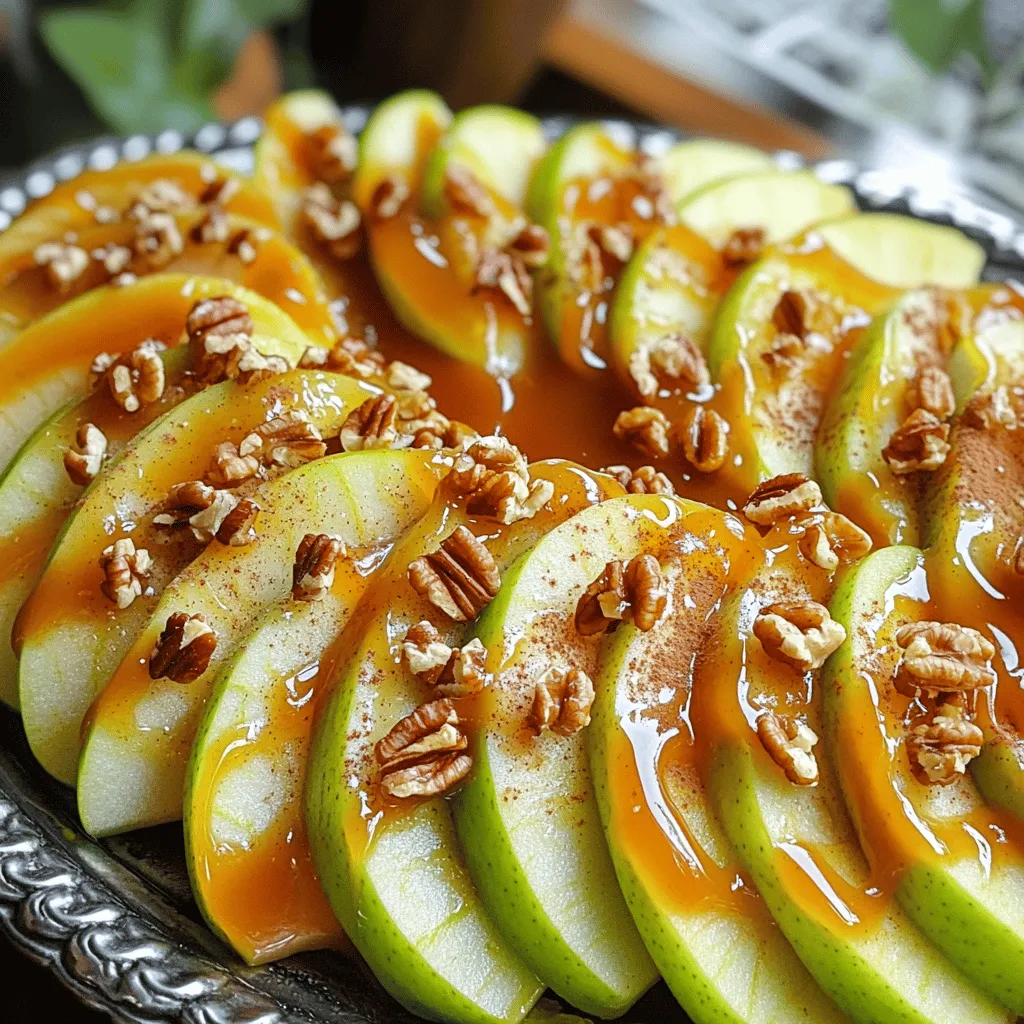
Caramel Apple Dip Simple and Sweet Party Treat
Looking for the perfect sweet treat for your next party? I promise this Caramel Apple Dip will wow your guests!
Read more…
Chocolate Avocado Mousse Rich and Creamy Dessert Recipe
If you love rich desserts but want something healthier, Chocolate Avocado Mousse is for you! This creamy treat uses ripe
Read more…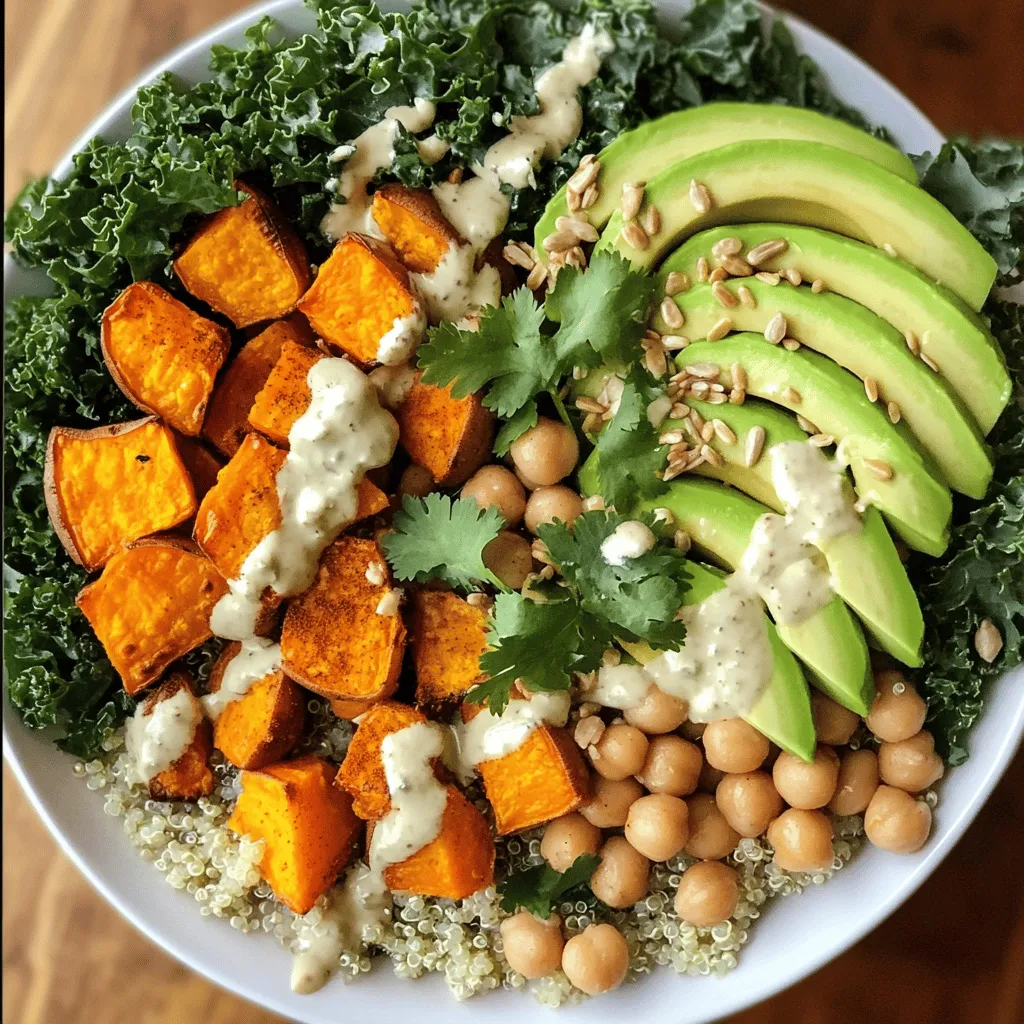
Vegan Buddha Bowl Flavorful and Nutritious Meal
Are you ready to dive into a bowl of goodness? A Vegan Buddha Bowl is not just a meal; it’s
Read more…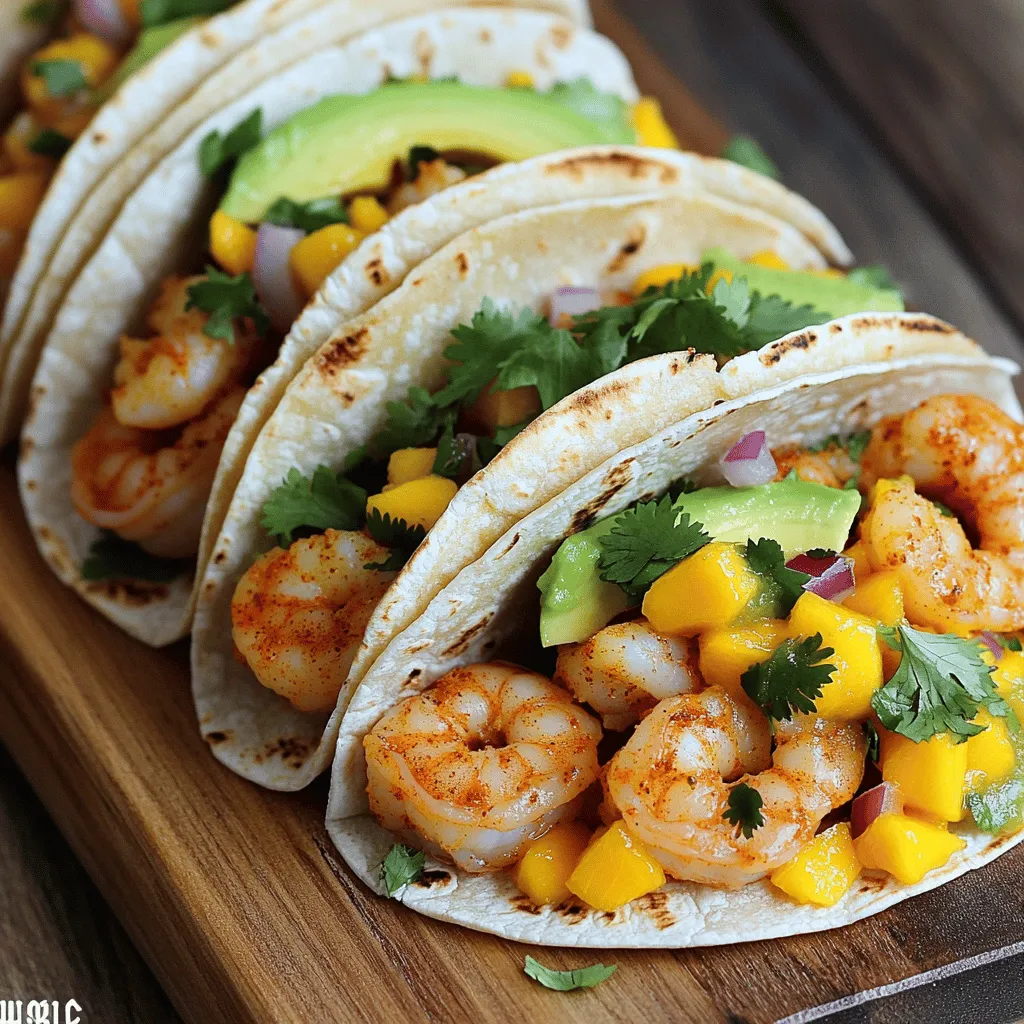
Spicy Shrimp Tacos with Mango Salsa Delight
If you crave a burst of flavor, you’ll love my Spicy Shrimp Tacos with Mango Salsa Delight. These tacos combine
Read more…
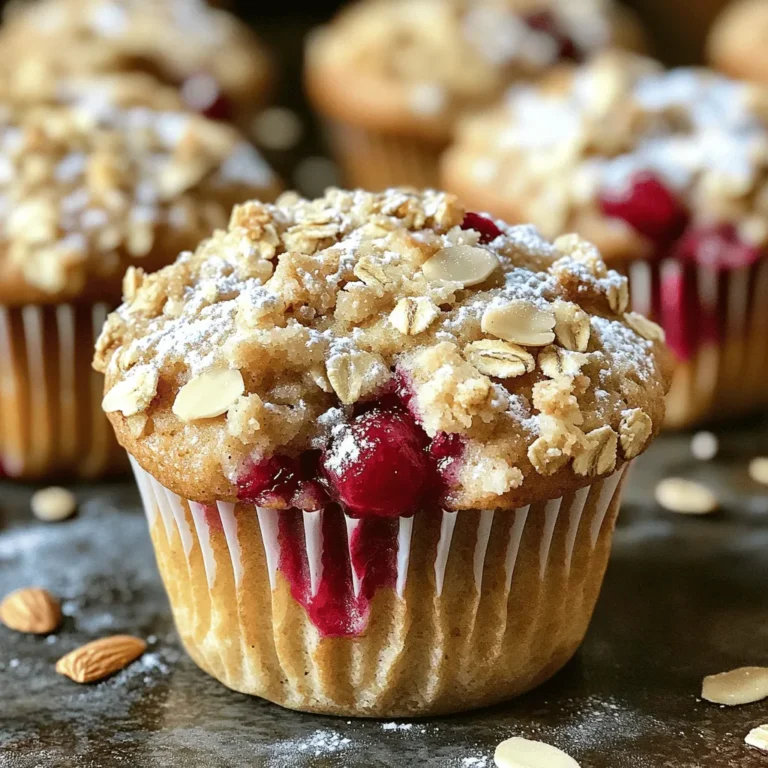
Lemon Blueberry Muffins Delightful and Easy Recipe
Looking for a sweet and zesty treat? You’ve come to the right place! I’ll show you how to make delicious
Read more…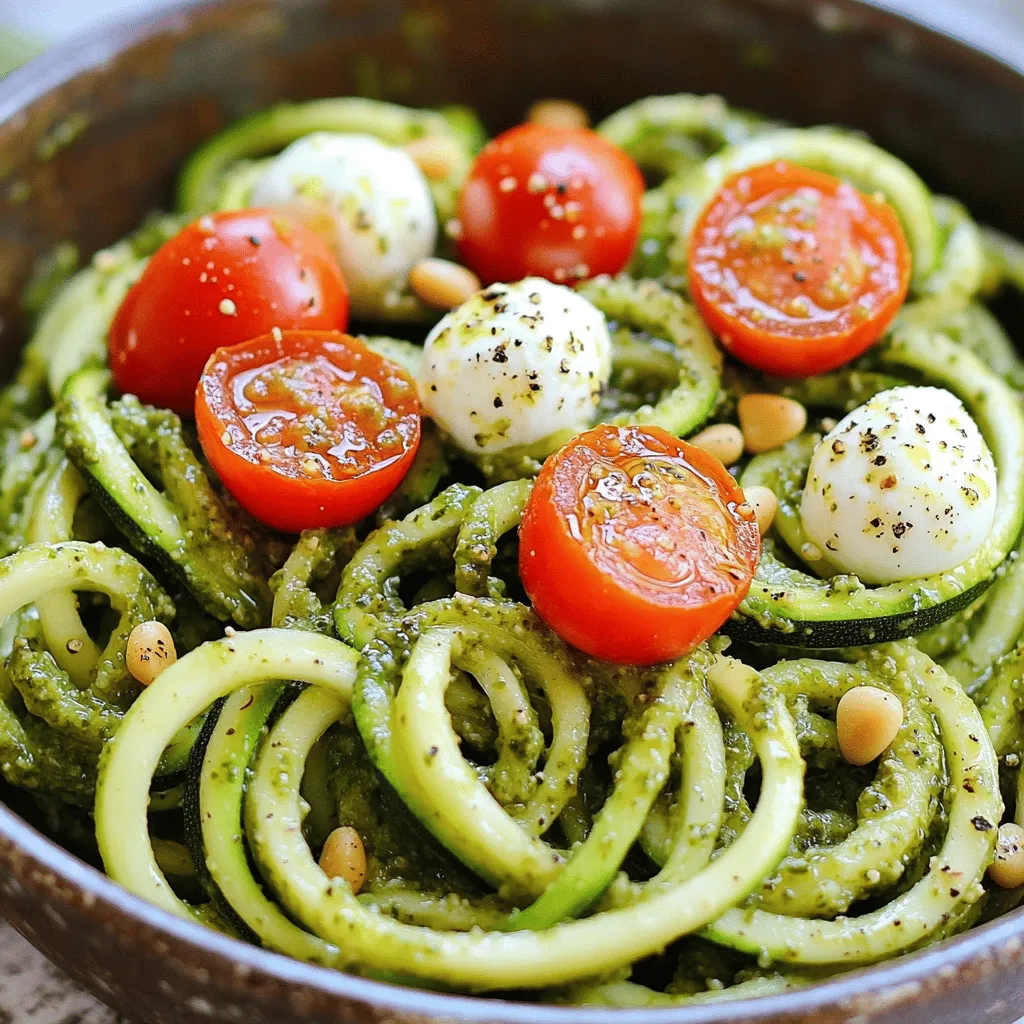
Zucchini Noodles with Pesto Flavorful and Fresh Dish
Looking for a fresh, flavorful dish that’s easy to whip up? Zucchini noodles with pesto are your answer! With just
Read more…browse recipes


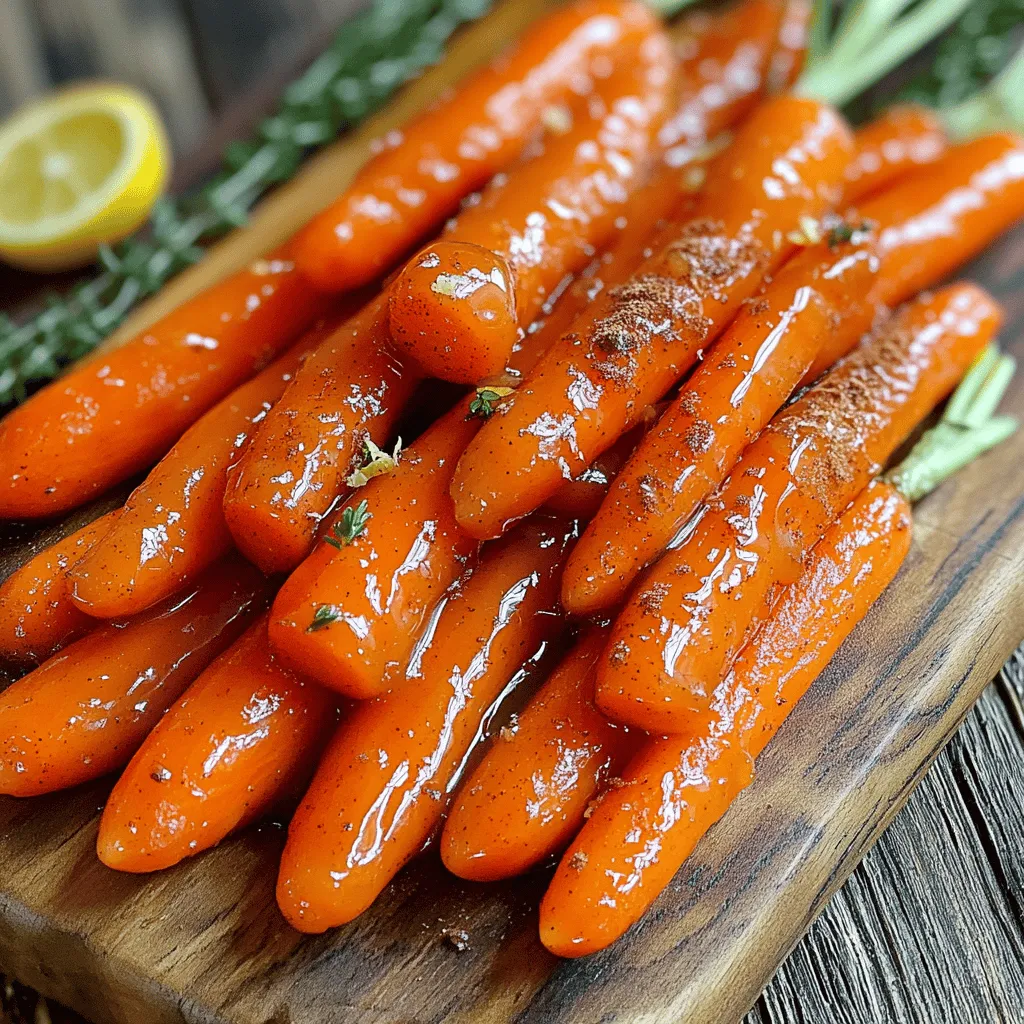
Maple Glazed Carrots Flavorful Side Dish Recipe
Looking for a side dish that wows? Maple glazed carrots are colorful, tasty, and super easy to make. This simple recipe brings out the…
My Latest Desserts

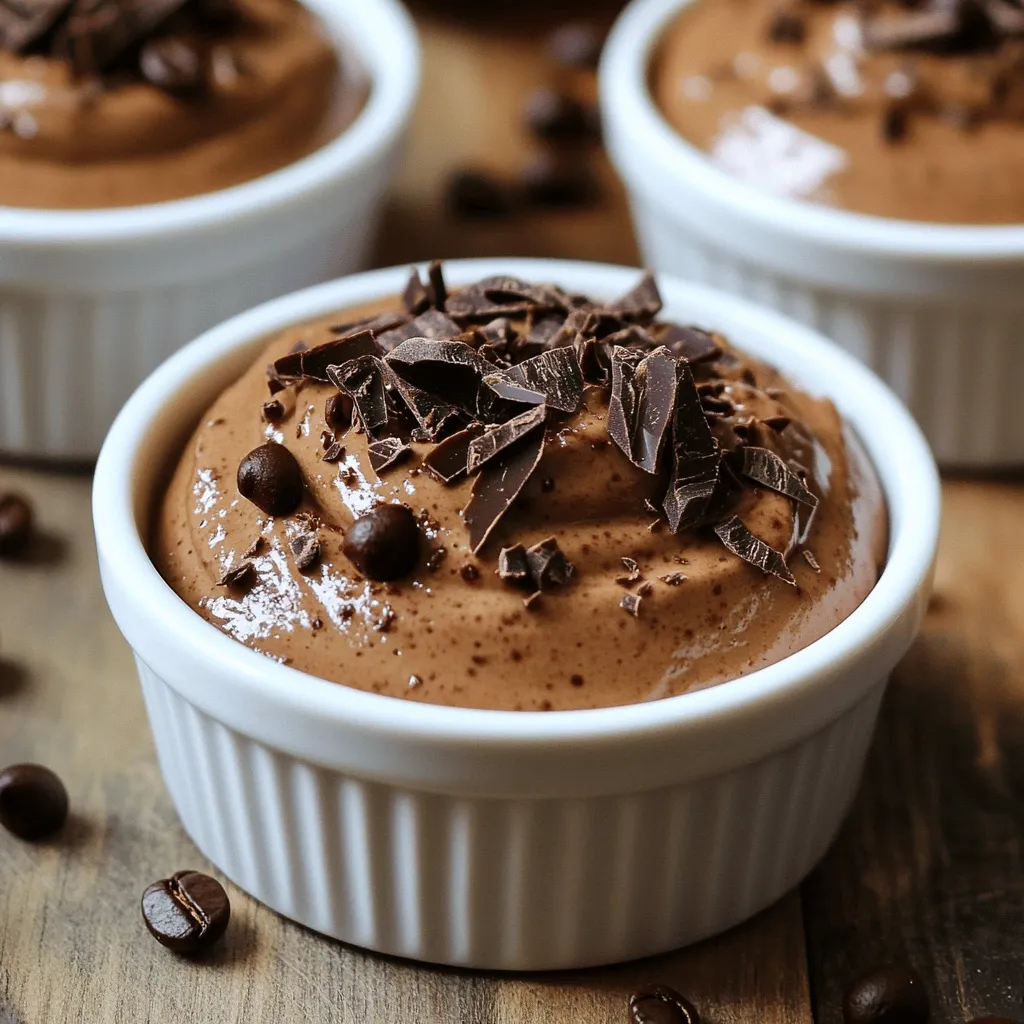
Mocha Greek Yogurt Mousse Protein Rich Dessert Delight
If you’re craving a dessert that’s both delicious and packed with protein, look no further! My Mocha Greek Yogurt Mousse Read Full Recipe-
Chocolate Espresso Brownies Bakery Delicious Treat
Welcome to the world of Chocolate Espresso Brownies! If you love rich, chocolatey treats with a coffee kick, you’re in Read Full Recipe -
No-Bake White Chocolate Cranberry Bark Delightful Treat
Have you ever craved a sweet treat that’s simple and delicious? I’ve got just the thing for you: No-Bake White Read Full Recipe -
No-Bake Cranberry Cheesecake Cups Delicious Dessert Treat
Craving a treat that’s easy to make and full of flavor? You’ll love my No-Bake Cranberry Cheesecake Cups! They combine Read Full Recipe -
Pumpkin Spice Oatmeal Cream Pies Irresistible Treat
Get ready to delight your taste buds with Pumpkin Spice Oatmeal Cream Pies! This easy recipe combines soft oatmeal cookies Read Full Recipe -
Warm Apple Cinnamon Pecan Scones Irresistible Delight
If you crave a warm and cozy treat, I have just the recipe for you! These Warm Apple Cinnamon Pecan Read Full Recipe


My Latest Drinks
-
Spiced Pumpkin Lattes Slow Cooker Recipe Delight
Are you ready to warm up your chilly days with a cozy Spiced Pumpkin Latte? I’ve crafted the perfect slow Read Full Recipe -
Peanut Butter Chocolate Protein Shake Tasty Delight
Satisfy your cravings with a Peanut Butter Chocolate Protein Shake! This tasty delight is not only delicious but also healthy. Read Full Recipe -
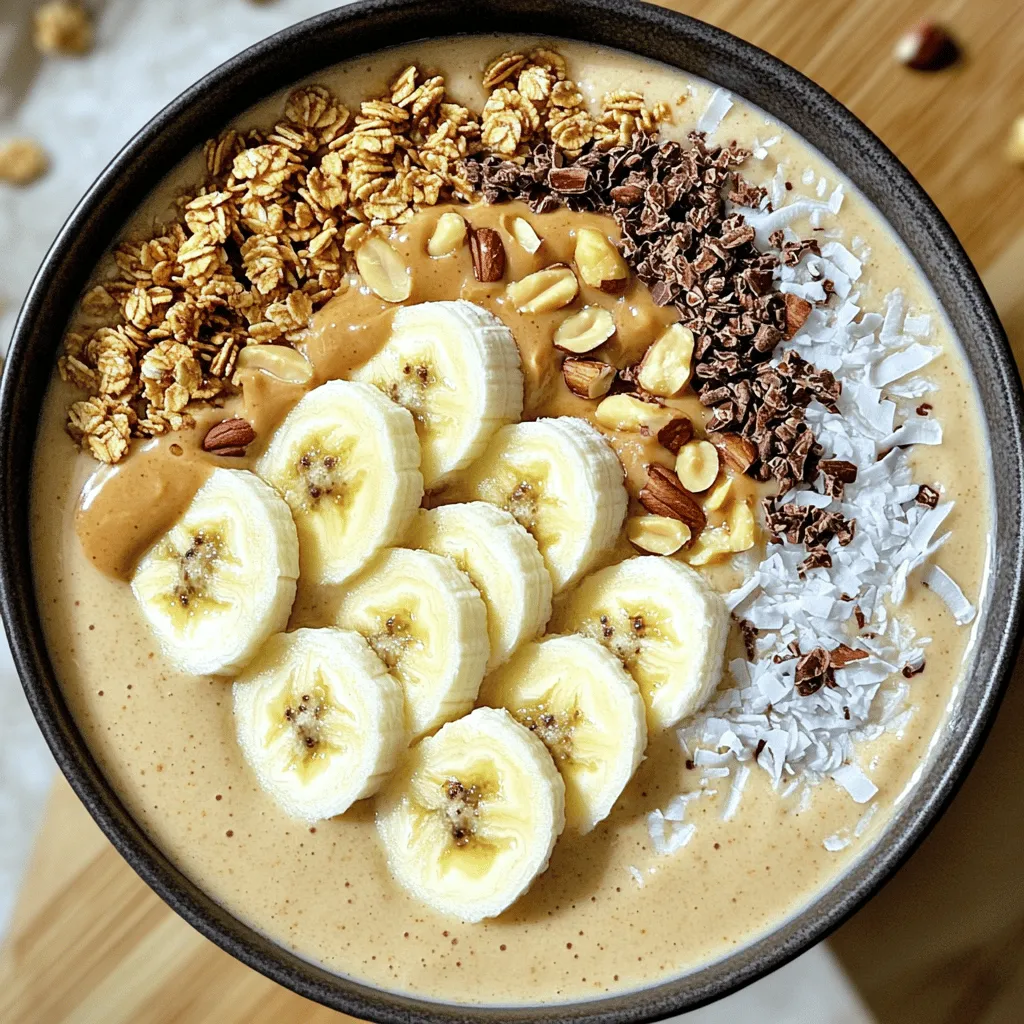
Peanut Butter Banana Smoothie Bowl Simple and Tasty
Looking for a quick, tasty treat? The Peanut Butter Banana Smoothie Bowl is your answer! Packed with ripe bananas and Read Full Recipe -
Pumpkin Cream Cold Brew Copycat Simple and Tasty Recipe
Craving a Pumpkin Cream Cold Brew but want to make it at home? You’re in the right place! I’ll show Read Full Recipe -
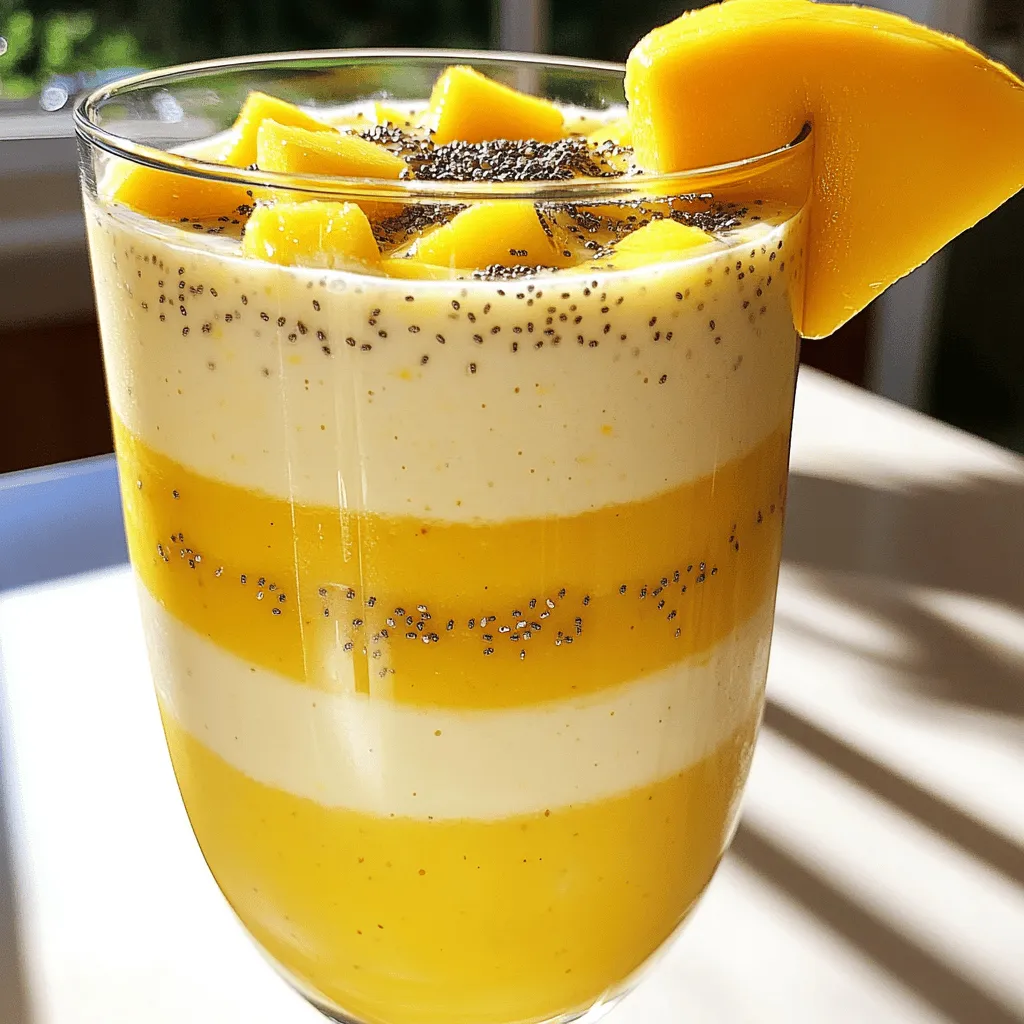
Pineapple Mango Smoothie Refreshing and Nutritious Drink
Looking for a tasty and healthy drink? A Pineapple Mango Smoothie might be just what you need! Packed with fresh Read Full Recipe -
Pumpkin Spice Protein Shake Nutritional Power Boost
Are you craving a delicious way to boost your nutrition? Look no further than this Pumpkin Spice Protein Shake! Packed Read Full Recipe


hey,
i’m !
I’m so happy you’re here!
I love creating dishes that bring joy to the table. I hope they bring the same joy to yours. Let’s enjoy this flavorful journey together.
![- 2 pounds baby potatoes, halved - 4 tablespoons olive oil - 6 cloves garlic, minced - 2 teaspoons dried rosemary - 2 teaspoons dried thyme - 1 teaspoon smoked paprika - Salt and pepper to taste - Fresh parsley, chopped - Presentation tips for serving The base of this dish starts with baby potatoes. They are small and tender, perfect for roasting. Halving them helps them cook evenly and adds crunch. Olive oil gives rich flavor and helps the potatoes crisp up in the oven. Garlic adds a punch of taste that you can't resist. For the spices, I use dried rosemary and dried thyme. These herbs bring a warm, earthy taste. Smoked paprika adds a slight smokiness that really enhances the dish. Salt and pepper balance all the flavors. Make sure to taste as you go! Garnishing with fresh parsley not only looks great but adds a fresh touch. When serving, I like to use a rustic bowl. It makes the dish feel warm and inviting. You can also add a sprig of parsley on top. If you want a dip, try lemon aioli for a zesty kick. For the full recipe, check out the detailed instructions to make this easy and delicious dish! - Preheat the oven to 425°F (220°C). - In a large bowl, mix the halved baby potatoes with minced garlic, olive oil, dried rosemary, dried thyme, smoked paprika, salt, and pepper. Toss until the potatoes are well-coated. This helps to bring out all the flavors. - Spread the seasoned potatoes on a baking sheet. Make sure they are in a single layer. This is key for even cooking. - Roast in the preheated oven for 25-30 minutes. Toss the potatoes halfway through to ensure they brown evenly. You want them golden and crispy on the outside, and tender inside. - Once the potatoes are done, take them out of the oven. Adjust the salt and pepper if needed. This is your chance to tweak the flavor. - Transfer the roasted potatoes to a serving dish. Garnish with fresh chopped parsley for a pop of color. This adds freshness and makes the dish look great. For the complete recipe, check the [Full Recipe]. Enjoy this crunchy and flavorful dish! To get crispy potatoes, start with good quality baby potatoes. Cut them in half for even cooking. Make sure to soak them in cold water for 30 minutes. This helps remove excess starch, leading to a crunchier finish. When you roast, place them on a baking sheet in a single layer. This is key. If you overcrowd the sheet, steam forms, and your potatoes won't get crispy. For extra flavor, consider adding fresh herbs like basil or oregano. You can also try spices like chili powder or cumin for a twist. Olive oil is the best choice for roasting potatoes. It has a rich flavor that enhances the herbs. You can also use avocado oil for a higher smoke point, which is great for roasting at high heat. Watch out for overcooking or undercooking your potatoes. Overcooked potatoes can become mushy, while undercooked ones stay hard inside. Aim for that golden brown color on the outside. Another mistake is not cutting the potatoes evenly. This leads to uneven cooking. Always ensure they are similar in size. For the best results, toss them halfway through roasting. This helps them cook evenly. For the full recipe, check out the link to create your own garlic herb roasted potatoes! {{image_2}} You can get creative with garlic herb roasted potatoes. For a Mediterranean twist, add olives and feta cheese. This mix brings a salty, tangy flavor that pairs well with the herbs. You can also try a spicy version. Just sprinkle some chili flakes into your mix. This adds a nice kick and makes the dish pop. If you want to cook these potatoes faster, try an air fryer. Set it to 400°F (200°C) and cook for about 15-20 minutes. Shake the basket halfway through for even cooking. You can also grill the potatoes for a smoky taste. Just place them in a grill basket and cook over medium heat for about 20 minutes. This adds a fun outdoor flavor. This recipe is easy to adapt for different diets. You can keep it vegan and gluten-free by sticking to the original ingredients. If you want a lower-fat option, use less oil or try a cooking spray. These changes still keep the flavor while making the dish lighter. For the full recipe, check out the link provided. To keep your garlic herb roasted potatoes fresh, store them in an airtight container. Make sure they cool down before sealing. This helps prevent sogginess. In the fridge, they last about 3 to 5 days. Use them in salads or as a side dish for quick meals. You can reheat roasted potatoes in the microwave or oven. If you choose the microwave, heat them for one to two minutes. However, the oven gives better results. Preheat the oven to 400°F (200°C) and spread the potatoes on a baking sheet. Bake for about 10 to 15 minutes. This method keeps them crispy. To ensure the best texture, toss them halfway through reheating. Yes, you can freeze garlic herb roasted potatoes! First, let them cool completely. Then, place them in a freezer bag and remove as much air as possible. They can last up to three months in the freezer. When ready to eat, thaw them in the fridge overnight. Then, reheat using the oven to bring back their crunch. To achieve crispy garlic herb roasted potatoes, choose the right oil and oven settings. Use a good amount of olive oil. This helps the potatoes brown nicely. Preheat your oven to 425°F (220°C). A hot oven gives the best results. Spread the potatoes in a single layer. Crowding the pan traps steam and makes them soggy. Toss the potatoes halfway through cooking. This ensures they crisp evenly. Yes, you can use other types of potatoes. Yukon Gold and red potatoes work well. They have a creamy texture and hold up during roasting. Fingerling potatoes are also great for their unique shape. Each type brings its own flavor and texture. Experiment with what you have on hand to find your favorite. These potatoes pair well with many dishes. Try serving them with roast chicken or grilled steak. They also go nicely with salmon or a hearty veggie dish. For sides, consider a fresh green salad or steamed vegetables. This balance adds color and nutrition to your meal. You can find the full recipe for garlic herb roasted potatoes [here](#). This link provides all the details for your cooking adventure. Garlic herb roasted potatoes are easy to make and taste amazing. You need baby potatoes, garlic, olive oil, and simple seasonings for great flavor. We covered the steps to roast them perfectly, along with tips and variations to try. Don't forget to store and reheat them well to keep that crispy texture. With all these ideas, you can enjoy delicious potatoes any time! Get creative and make this dish your own. Enjoy your cooking!](https://soyumrecipes.com/wp-content/uploads/2025/06/a8932d50-39cd-4cf5-aa81-b86a19229047-300x300.webp)
![To make garlic roasted broccoli, gather these simple ingredients: - Fresh broccoli florets - Minced garlic - Olive oil - Red pepper flakes - Lemon zest - Salt and pepper - Parmesan cheese (optional) - Balsamic vinegar These ingredients create a bright and savory dish that brings out the best in broccoli. The fresh florets give it a nice crunch. The minced garlic adds a bold flavor that you will love. Olive oil helps everything roast evenly. Red pepper flakes add a touch of heat, making it exciting. Lemon zest brightens the dish with its fresh taste. Salt and pepper are key for balance. If you want a creamy touch, sprinkle some Parmesan cheese on top. Finally, a drizzle of balsamic vinegar adds a sweet finish. For the full recipe, check out the detailed steps in the next section. First, set your oven to 425°F (220°C). This high heat helps the broccoli get crispy. Next, grab a baking sheet and line it with parchment paper. This makes cleaning easy later. In a large mixing bowl, add the broccoli florets and minced garlic. Stir them gently. Now drizzle the olive oil over the mix. Make sure every piece gets coated. Sprinkle red pepper flakes, lemon zest, salt, and pepper on top. Toss everything together well. Each piece should be well-seasoned for the best flavor. Spread the broccoli mixture evenly on the baking sheet. Don't overcrowd the pan. Roast in your preheated oven for 20-25 minutes. Halfway through, give it a quick toss. This helps it cook evenly. You'll know it's done when the broccoli is tender and the tips look crispy. Enjoy this delicious dish! For the full recipe, check out the complete guide. To get the best roast, spread the broccoli evenly on the baking sheet. This helps each piece cook well. If they are too close, some will steam instead of roast. Check for doneness by looking for a nice brown color on the tips. Broccoli should feel tender but not mushy. You can boost the flavor by adding other spices or herbs. Try red onion or smoked paprika for a twist. A drizzle of balsamic vinegar after roasting adds a sweet tang. It pairs well with the garlic and lemon zest. Garlic roasted broccoli goes great with chicken or fish. It adds color and flavor to any plate. For a nice touch, sprinkle some extra Parmesan on top before serving. You can also add lemon wedges for extra zest. For the complete recipe, check out the [Full Recipe]. {{image_2}} To make this dish vegan, you can leave out the Parmesan cheese. Instead, try adding sunflower seeds. They bring a nice crunch and extra nutrients. Sunflower seeds also add a nutty flavor that pairs well with garlic. If you love spice, increase the red pepper flakes. You can also use different hot sauces for a kick. A drizzle of sriracha or chili oil can elevate the heat. Adjust the spice level to match your taste buds. You can add nuts like almonds or walnuts to this dish. They provide a great crunch and healthy fats. Almonds are rich in vitamin E, while walnuts offer omega-3 fatty acids. Both nuts enhance the flavor and nutrition of the dish. For more details, check the Full Recipe to see how to prepare these variations. To store leftover garlic roasted broccoli, let it cool first. Place it in an air-tight container. This keeps the broccoli fresh for up to three days. To maintain the flavor, avoid adding any sauces until you’re ready to eat. When reheating, try using the oven or a skillet. This helps keep the broccoli crispy. You can freeze garlic roasted broccoli to enjoy later. First, let it cool completely. Then, spread the broccoli on a baking sheet. Freeze it for about an hour. After that, transfer it to a zip-top bag. Press out the air and seal it tight. You can freeze it for up to three months. To reheat, you can bake it from frozen at 400°F (200°C) for about 15-20 minutes. For storage, use air-tight containers for the best results. They keep moisture out and help prevent freezer burn. Zip-top bags are great for freezing. They take up less room and are easy to label. Always label your containers with the date. This way, you know when to use them. To make garlic roasted broccoli crispy, you need to follow a few easy tips: - Use fresh broccoli florets. Freshness helps with texture. - Cut the florets into similar sizes. This helps them cook evenly. - Spread the broccoli in a single layer on your baking sheet. Crowding will steam the broccoli instead of roasting it. - Don't skip the tossing step halfway through cooking. This ensures even browning. - Roast at a high temperature, around 425°F (220°C). High heat makes the edges crispy while keeping the insides tender. Yes, you can prepare garlic roasted broccoli ahead of time: - Store leftovers in an airtight container in the fridge. They stay fresh for up to three days. - If you want to reheat, use an oven. This helps keep the broccoli crispy. Heat at 350°F (175°C) for about 10 minutes. You can also use a microwave. Just know it may not stay crispy. Garlic roasted broccoli goes well with many dishes: - Pair it with grilled chicken or fish for a balanced meal. - It also complements pasta dishes nicely. Try it with a light lemon sauce. - For a vegetarian option, serve it alongside quinoa or couscous. - You can also use it as a side for a hearty steak or pork chop. It adds color and flavor to your plate. Try out the [Full Recipe] for garlic roasted broccoli and enjoy this simple and tasty side dish! Roasting garlic broccoli is easy and fun with the right ingredients and steps. From fresh broccoli to Parmesan cheese, each item adds flavor. Remember to preheat your oven and check for doneness during roasting. You can even change the recipe to suit your taste. Store leftovers well to enjoy later. Try the tips provided for the best results. By following these steps, you’ll have a tasty, healthy dish ready for any meal. Enjoy making your garlic roasted broccoli!](https://soyumrecipes.com/wp-content/uploads/2025/06/5011cbf3-a3be-448f-8aa5-7dcd0c316ac4-300x300.webp)


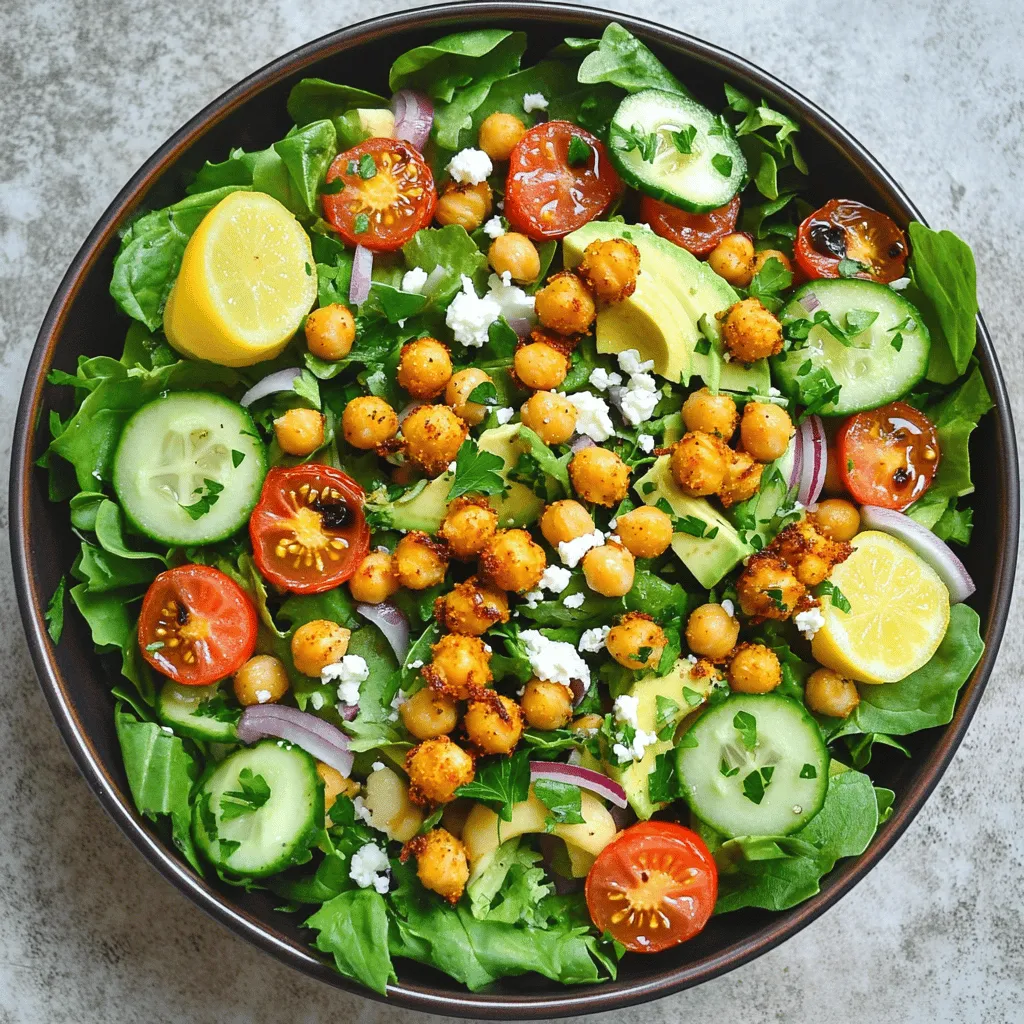
Crispy Chickpea Salad Fresh and Flavorful Delight
Looking for a salad that’s both crispy and satisfying? You’ve come to the right place! This Crispy Chickpea Salad combines fresh veggies with crunchy…