Latest & Greatest

Loaded Baked Potato Soup (Slow Cooker) Creamy Delight
Craving a warm, creamy bowl of comfort? Let me introduce you to Loaded Baked Potato Soup (Slow Cooker) Creamy Delight!
Read more…
Air Fryer Honey Garlic Tofu Easy and Flavorful Delight
Are you ready to make a delicious meal with just a few steps? Today, I’m sharing my easy recipe for
Read more…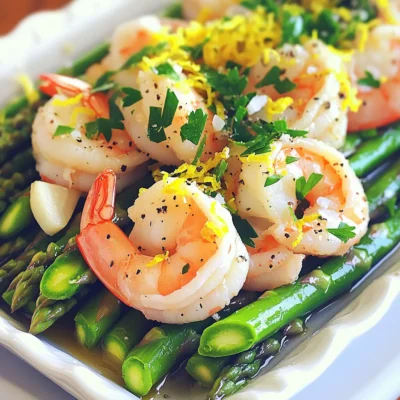
Lemon Pepper Shrimp & Asparagus Sheet-Pan Delight
Looking for a quick and tasty meal? Try my Lemon Pepper Shrimp & Asparagus Sheet-Pan Delight! This dish combines juicy
Read more…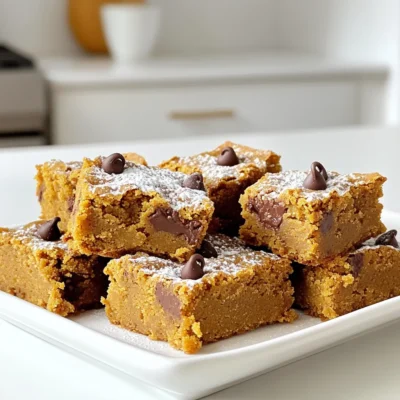
Brown Butter Pumpkin Blondies Easy Fall Treat
Fall is here, and it’s time to indulge in warm, cozy flavors! Say hello to my Brown Butter Pumpkin Blondies—a
Read more…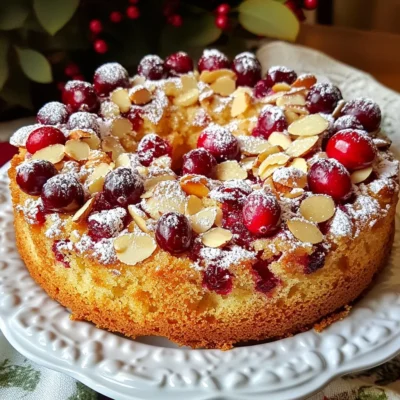
Cranberry Almond Coffee Cake Simple and Tasty Treat
Do you crave a simple and tasty treat that brightens your mornings? Look no further! This Cranberry Almond Coffee Cake
Read more…
Bakery-Style Pumpkin Chocolate Chip Muffins Delight
Get ready to bake the best pumpkin chocolate chip muffins ever! These bakery-style treats are soft, fluffy, and packed with
Read more…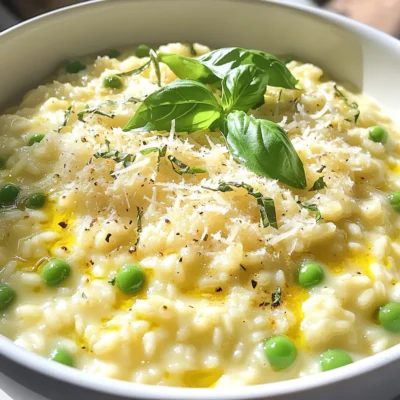
One-Pot Creamy Parmesan Risotto with Peas Delight
Welcome to the world of one-pot cooking with my Creamy Parmesan Risotto with Peas! This dish is comfort food made
Read more…
Warm Cranberry Ginger Mocktail Spritzer Recipe Delight
Welcome to my cozy kitchen! Today, I’m excited to share a delightful warm cranberry ginger mocktail spritzer that brightens up
Read more…browse recipes


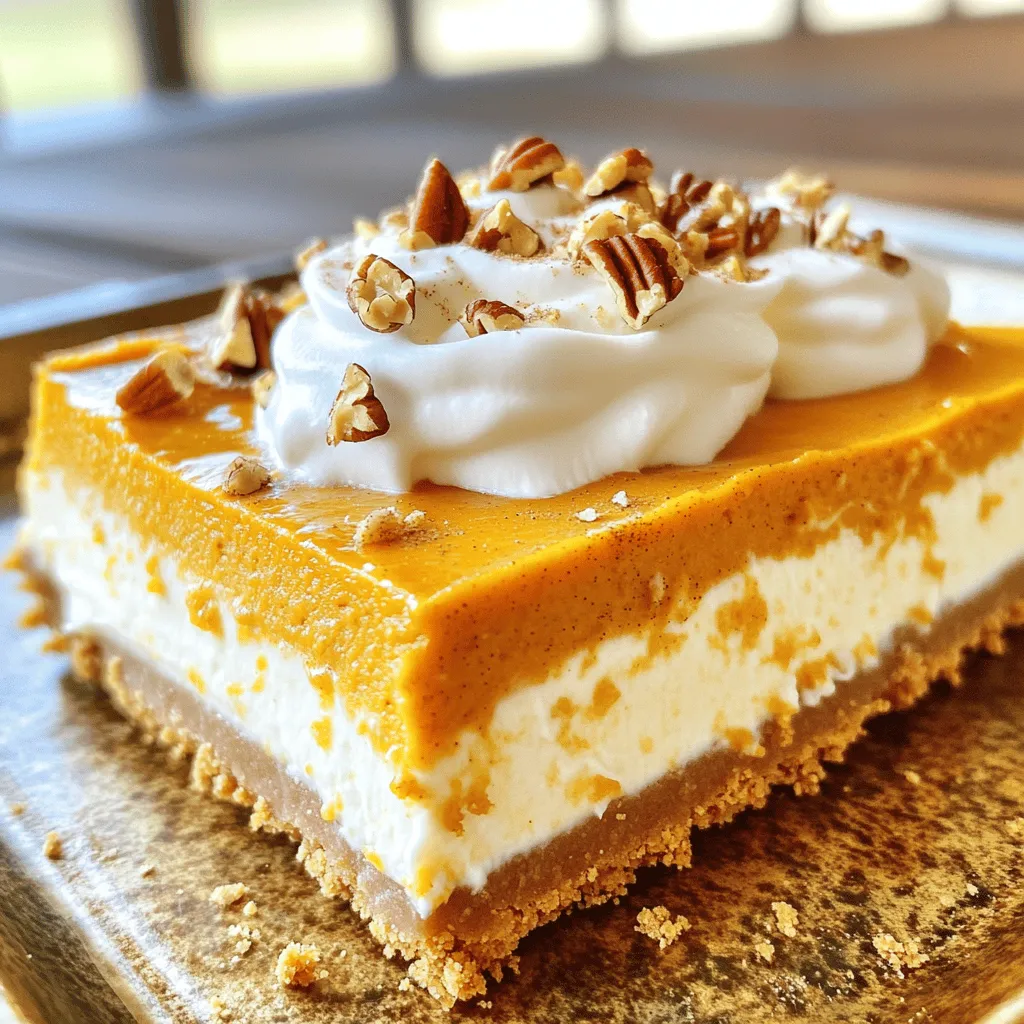
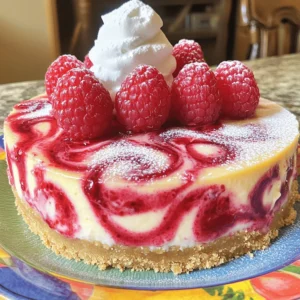
Pumpkin Spice Icebox Cheesecake Creamy Dream Delight
Are you ready to treat yourself to a slice of heaven? My Pumpkin Spice Icebox Cheesecake Creamy Dream Delight is the perfect fall dessert!…
My Latest Desserts

Strawberry Lemonade Cupcakes Fresh and Flavorful Treat
Craving a sweet, tangy treat? Dive into the world of Strawberry Lemonade Cupcakes! These delightful cupcakes blend fresh strawberries and Read Full Recipe-
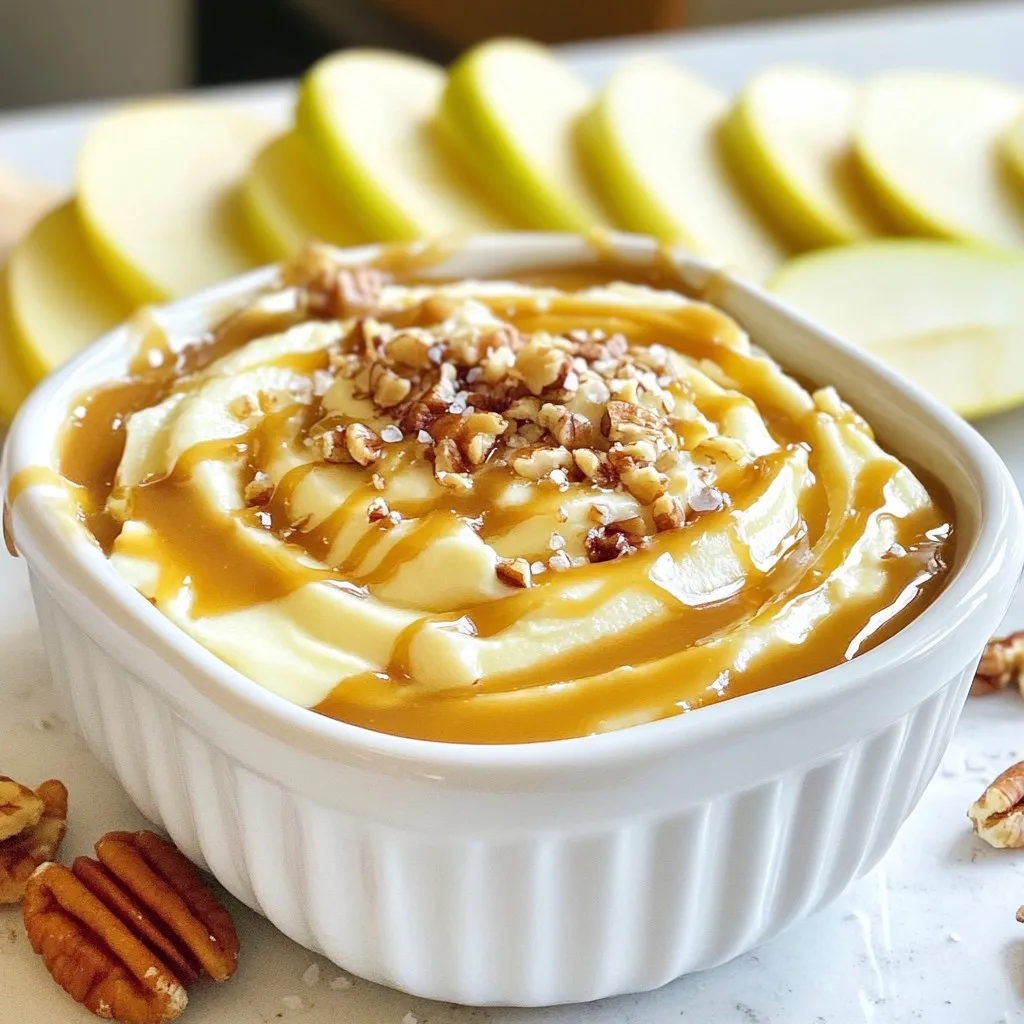
Salted Caramel Apple Dip Creamy and Delicious Treat
If you’re looking for a tasty treat that combines sweet and salty, you’re in for a delight! This Salted Caramel Read Full Recipe -
No-Bake Oreo Cheesecake Cups Delightful Easy Treat
Craving a sweet, creamy treat that’s easy to make? These No-Bake Oreo Cheesecake Cups are perfect for you! With just Read Full Recipe -
Key Lime Pie Bars Simple and Tangy Dessert Treat
Are you ready to enjoy a treat that’s both simple and zesty? Key Lime Pie Bars combine the tart zing Read Full Recipe -
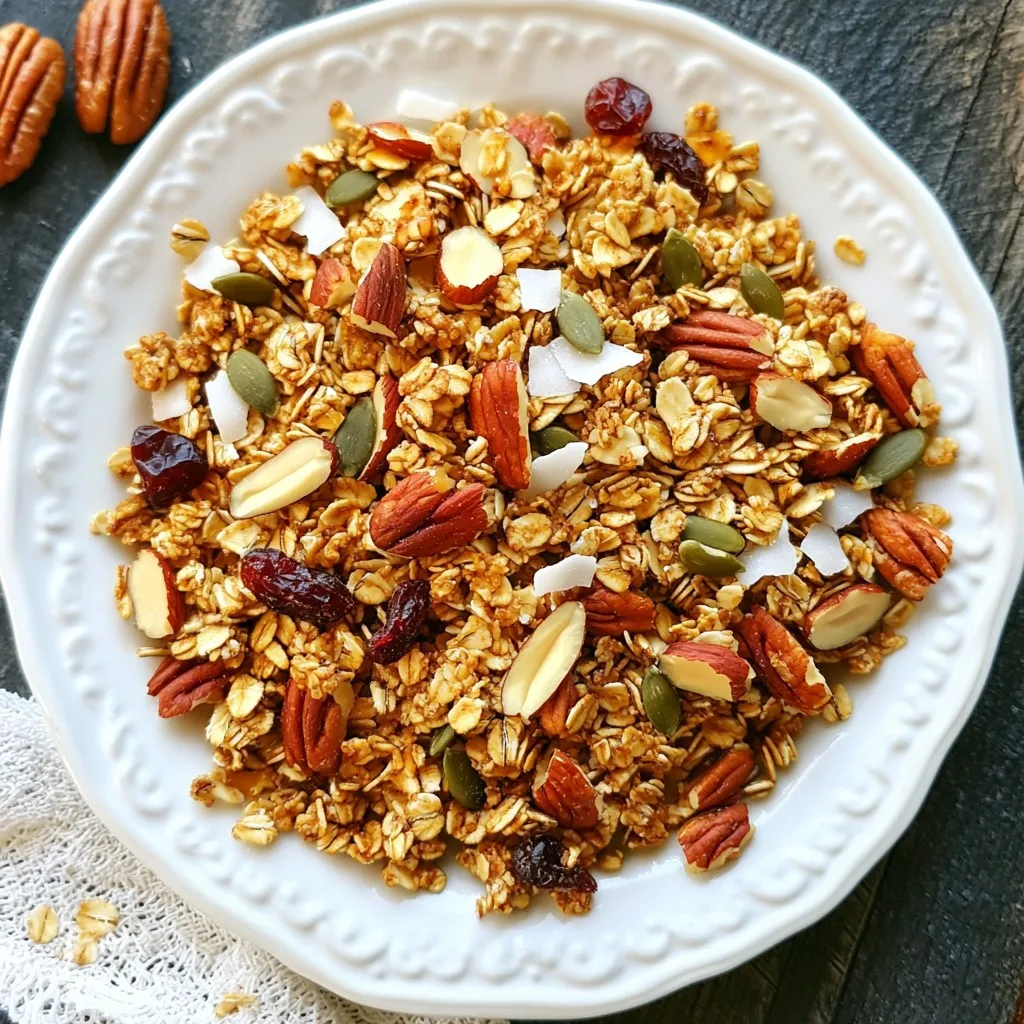
Maple Pecan Granola Crunchy and Nutritious Snack
Looking for a tasty and healthy snack? You’ve found it! My Maple Pecan Granola is crunchy, packed with flavor, and Read Full Recipe -
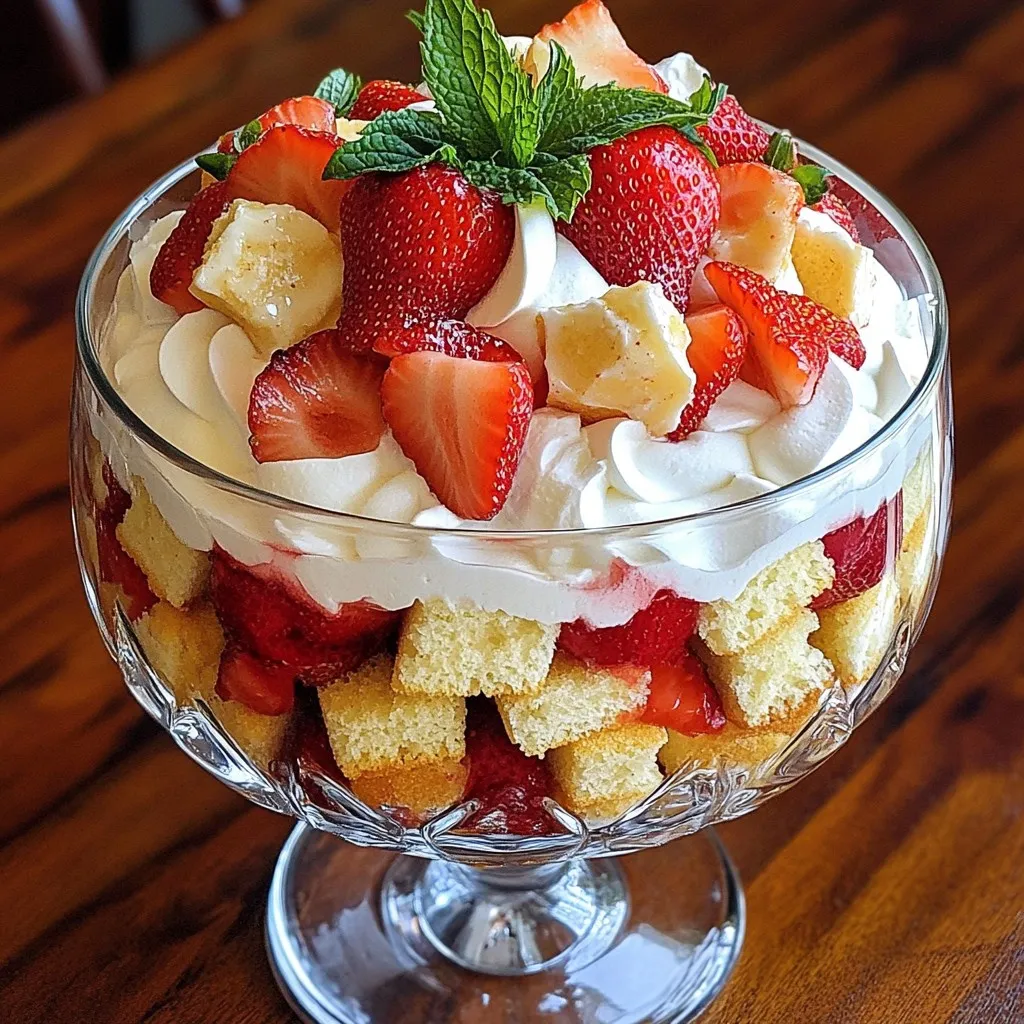
Strawberry Shortcake Trifle Delightful and Simple Treat
Get ready to impress your family and friends with a Strawberry Shortcake Trifle that’s both delightful and simple. This layered Read Full Recipe


My Latest Drinks
-
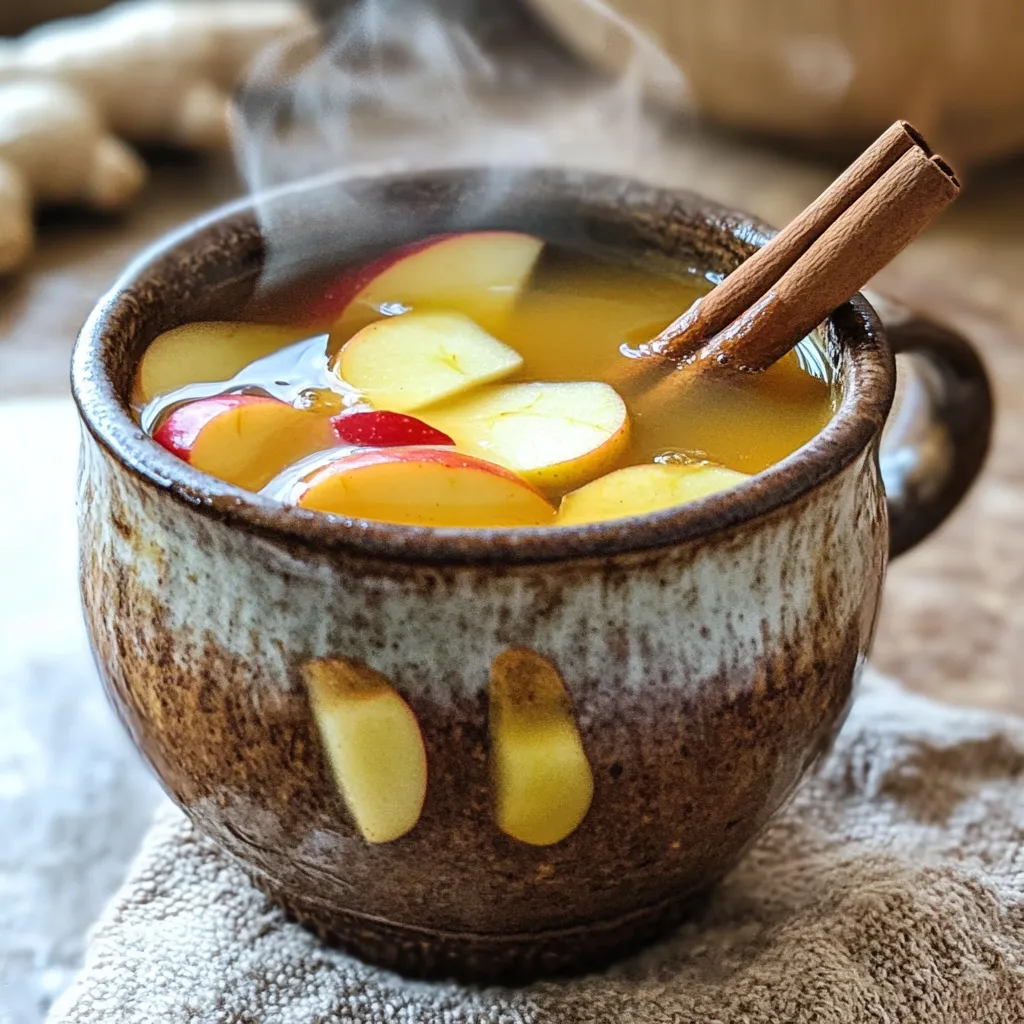
Spiced Apple Cider Punch Festive and Flavorful Drink
Warm up your gatherings with my Spiced Apple Cider Punch! This festive drink bursts with cozy flavors, perfect for chilly Read Full Recipe -
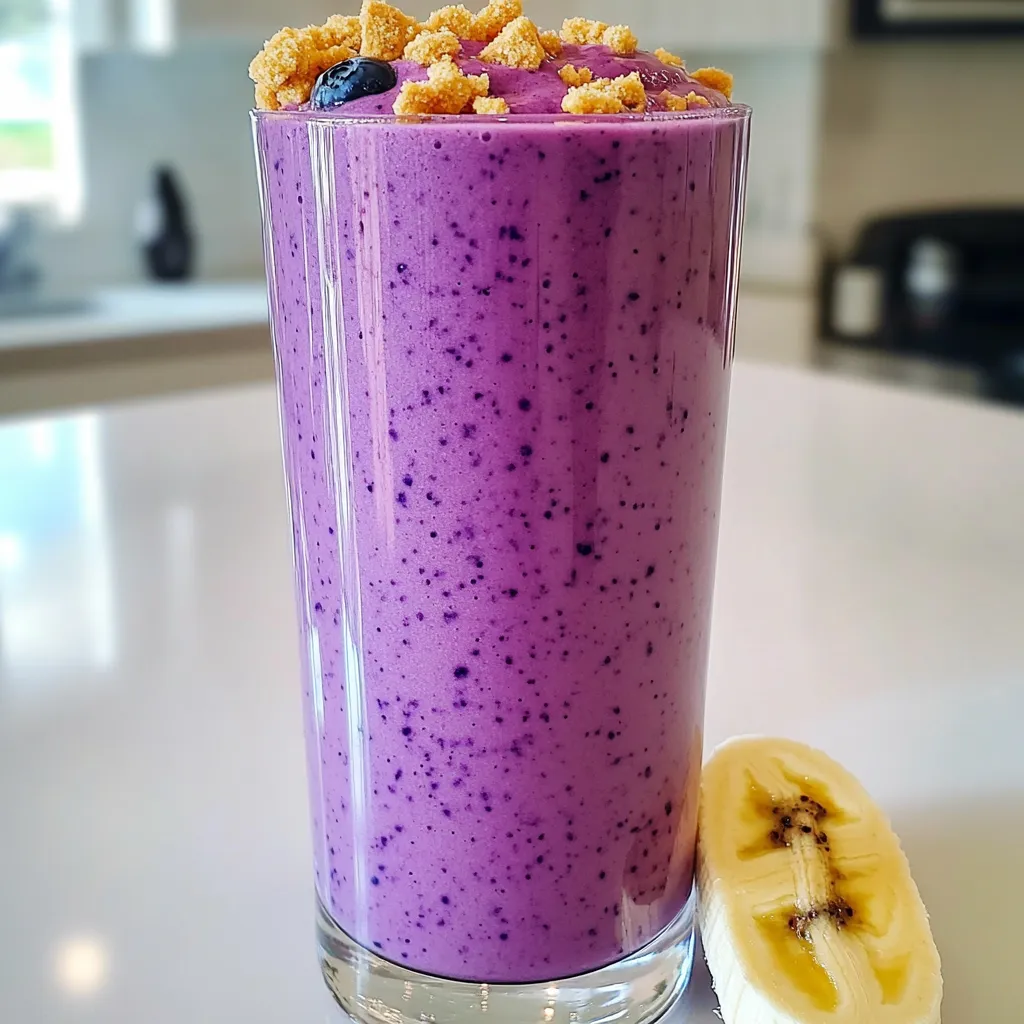
Blueberry Cheesecake Smoothie Protein Delight
Are you ready to treat yourself to a delicious and healthy drink? The Blueberry Cheesecake Smoothie Protein Delight packs all Read Full Recipe -
Warm Cranberry Ginger Mocktail Spritzer Recipe Delight
Welcome to my cozy kitchen! Today, I’m excited to share a delightful warm cranberry ginger mocktail spritzer that brightens up Read Full Recipe -
Spiced Apple Cider Chai Bold and Flavorful Drink Recipe
Looking for a cozy drink this season? Try my Spiced Apple Cider Chai! This bold, flavorful beverage combines warm apple Read Full Recipe -
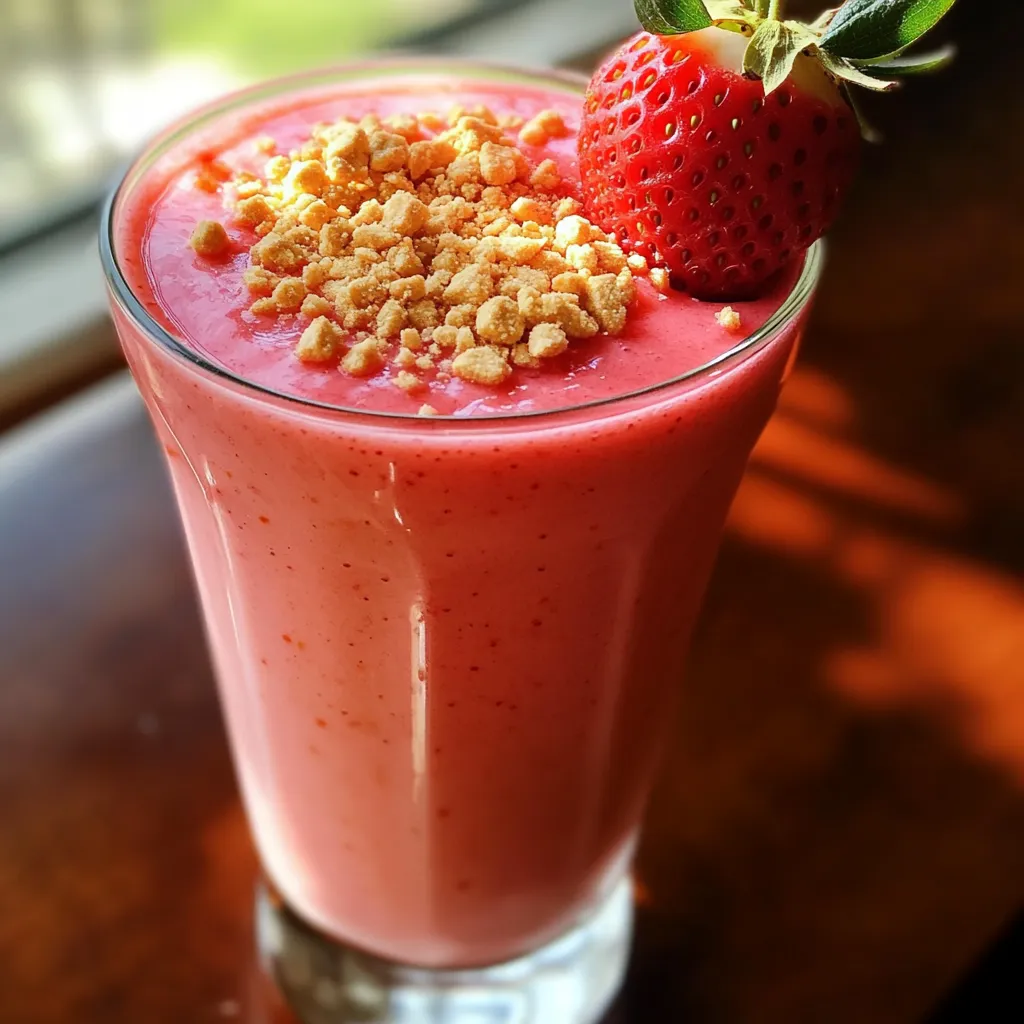
Strawberry Cheesecake Smoothie Tasty and Easy Recipe
Are you ready for a treat that’s both tasty and easy? This Strawberry Cheesecake Smoothie blends the rich flavors of Read Full Recipe -
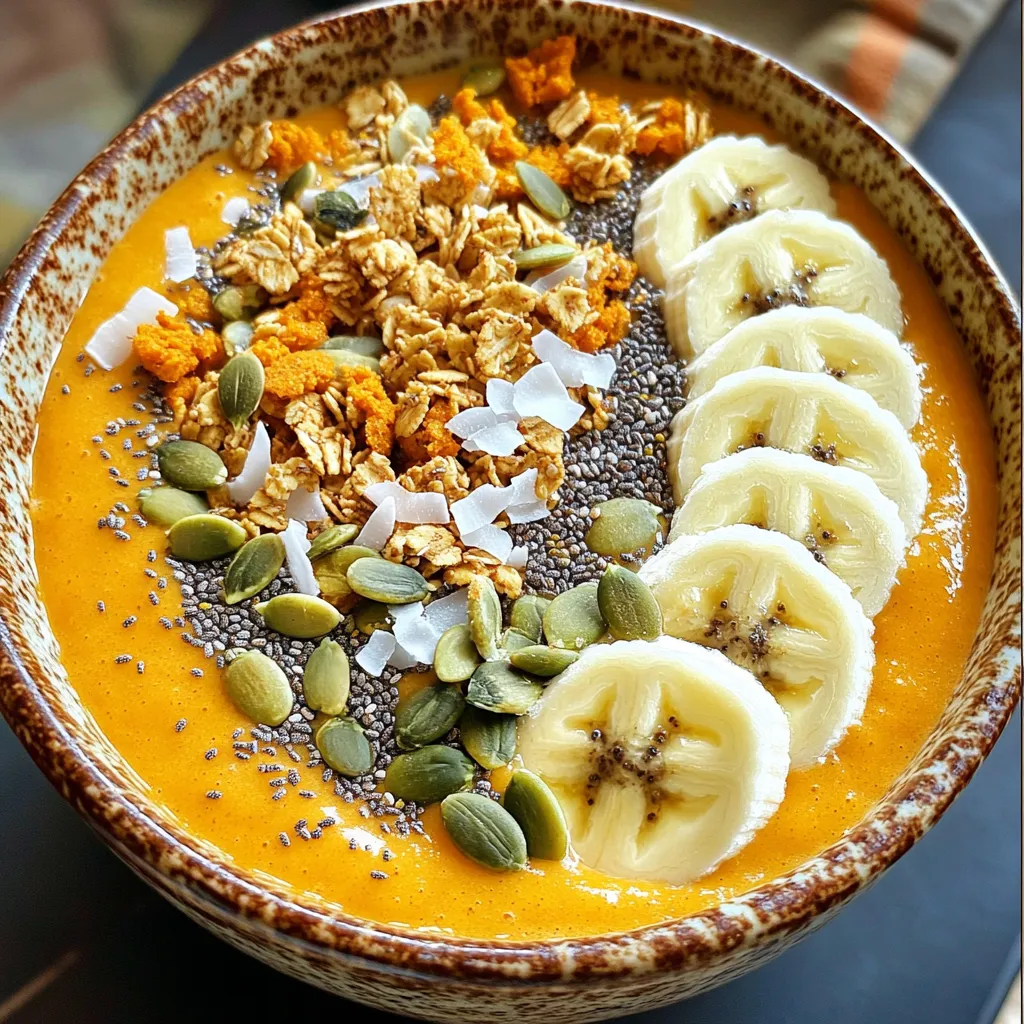
Pumpkin Spice Smoothie Bowl Protein Packed Delight
Are you ready to dive into the cozy world of pumpkin spice? This Pumpkin Spice Smoothie Bowl is not only Read Full Recipe


hey,
i’m !
I’m so happy you’re here!
I love creating dishes that bring joy to the table. I hope they bring the same joy to yours. Let’s enjoy this flavorful journey together.
. Roasting baby carrots with garlic and herbs is simple and tasty. We reviewed key ingredients and their health benefits. Then, I shared steps to prepare and roast them perfectly. Use the tips to avoid common mistakes and explore fun variations. Store leftovers properly and reheat to keep their taste. Enjoy these flavorful carrots with various dishes, and don’t forget to try the vegan options. I hope this guide helps you create delicious meals with ease.](https://soyumrecipes.com/wp-content/uploads/2025/07/70f214f9-b8ca-45c8-bfa4-d6b627b55a98-300x300.webp)

![- 1 large head of broccoli, cut into florets - 4 cloves of garlic, minced - 3 tablespoons olive oil - 1 teaspoon lemon juice - 1/2 cup grated Parmesan cheese - 1/2 teaspoon red pepper flakes (optional) - Salt and pepper to taste - Fresh parsley, chopped (for garnish) Roasted Garlic Parmesan Broccoli is both tasty and healthy. A serving has about 150 calories. It has 10 grams of fat, 6 grams of carbs, and 6 grams of protein. Broccoli is full of vitamins. It helps boost your immune system and is good for your heart. Garlic adds flavor and may lower blood pressure. Using fresh ingredients makes this dish even better. The garlic gives a rich taste, while the Parmesan adds creaminess. This dish is not only delicious but also a smart choice for your meals. For the full recipe, check out [Full Recipe]. 1. Preheat your oven to 425°F (220°C). This high heat helps make the broccoli crisp. 2. Prepare the broccoli by cutting a large head into florets. You want bite-sized pieces. 3. Mince four cloves of garlic. This adds a strong, tasty flavor. 4. Mix the broccoli and garlic in a large bowl. Add three tablespoons of olive oil, one teaspoon of lemon juice, and salt and pepper to taste. Toss well until the broccoli is coated. 1. Arrange the broccoli on a baking sheet. Spread it out in a single layer. This helps it roast evenly. 2. Roast in the oven for 15-20 minutes. You should see the edges crisp and the broccoli tender. Keep an eye on it to avoid burning. 1. Add the Parmesan cheese right after removing the baking sheet from the oven. Use half a cup of grated cheese. 2. Return it to the oven for another 2-3 minutes. You want the cheese to melt and turn golden. 3. Garnish with fresh parsley before serving. This adds color and a fresh taste. For the full recipe, check the earlier sections for precise measurements and tips. To get crispy broccoli, use a hot oven. Set it to 425°F (220°C). Spread the florets evenly on the baking sheet. Don’t crowd them; give them space to breathe. This helps them roast well and become crispy. Keep an eye on the time. Roasting should take about 15-20 minutes. Watch for browning at the edges. This shows they are done. Overcooking can make them mushy, so check often. Want to kick up the flavor? Try adding smoked paprika or garlic powder. Both add depth without too much fuss. If you prefer heat, mix in more red pepper flakes. For a milder taste, skip the flakes and focus on lemon zest. A squeeze of fresh lemon juice can brighten the dish, too. You can even add a pinch of herbs like thyme or oregano for extra flavor. Make your dish look as good as it tastes. Use a large white plate or bowl to serve. The bright green broccoli pops against the white background. Arrange the broccoli in a circular pattern for a nice look. Sprinkle a bit of extra Parmesan on top for flair. To elevate the dish, serve it with grilled chicken or fish. A side of rice or quinoa pairs well too. This makes it a complete meal that looks great on any table. {{image_2}} To make this dish vegan, skip the Parmesan cheese. Instead, try nutritional yeast. It gives a cheesy taste without dairy. If you want more creaminess, use cashew cheese. It blends well and adds richness. You can swap broccoli for other veggies like cauliflower or Brussels sprouts. Just cut them to similar sizes. For extra crunch, add nuts or seeds. Almonds or sunflower seeds work great here. They add texture and flavor. If you want a quicker method, sauté the broccoli on the stovetop. Heat olive oil in a pan and cook for about 5-7 minutes. Stir often until tender. You can also grill the broccoli for a smoky flavor. Just toss it on the grill for about 10 minutes. Enjoy the outdoors and the tasty result! To keep Roasted Garlic Parmesan Broccoli fresh, store leftovers right away. Let it cool to room temperature first. Place it in an airtight container. This helps keep moisture in and prevents drying out. Glass or plastic containers work well. Make sure they seal tightly. When you want to eat leftovers, reheating is key. The oven is the best method. Preheat your oven to 350°F (175°C). Place the broccoli on a baking sheet. Heat for about 10 minutes. This helps keep the texture nice. You can also use the microwave. Just heat for 1-2 minutes. Stir halfway to avoid hot spots. Can you freeze Roasted Garlic Parmesan Broccoli? Yes, you can! To freeze, first cool the broccoli completely. Place it in freezer bags, removing as much air as possible. Seal well and label them. When you want to eat it, thaw in the fridge overnight. To reheat, use the oven for the best taste. Enjoy your flavorful dish later! For the complete recipe, check the Full Recipe. How long to roast broccoli for best results? Roast broccoli at 425°F (220°C) for 15-20 minutes. This timing gives it a tender bite and crispy edges. Keep an eye on it. Broccoli can go from perfect to overcooked fast. Can I use frozen broccoli instead of fresh? Yes, you can use frozen broccoli. Just remember, frozen broccoli cooks faster. Adjust your roasting time to about 10-15 minutes. Make sure to thaw it first, so it cooks evenly. Is broccoli healthy to eat every day? Broccoli is very healthy. It is low in calories and packed with vitamins. Eating it daily can support your immune system and provide fiber. What are the benefits of garlic in cooking? Garlic is more than just tasty. It has health benefits too! Garlic can boost your immune system and lower blood pressure. Plus, it adds depth to many dishes, making them more flavorful. What to serve with Roasted Garlic Parmesan Broccoli? This dish pairs well with chicken, fish, or pasta. You can also serve it with grains like quinoa or rice. The flavors complement many proteins. Can children enjoy this dish as well? Absolutely! Kids usually love cheesy foods. The roasted garlic gives a mild flavor that works well for young taste buds. It’s a great way to get them to eat their veggies! Roasting garlic Parmesan broccoli is easy and tasty. You've learned about the main ingredients, like fresh broccoli and garlic, and how to prepare and roast them. We covered tips to get perfect crispiness and ways to enhance flavors. You can even swap ingredients or try different cooking methods. Remember, this dish is not only delicious but also packed with health benefits. Enjoy it fresh or store leftovers for another meal. Try it with your favorite foods, and share it with family. Happy cooking!](https://soyumrecipes.com/wp-content/uploads/2025/06/13623940-8d1c-46c5-8ce1-f540d093ddc1-300x300.webp)
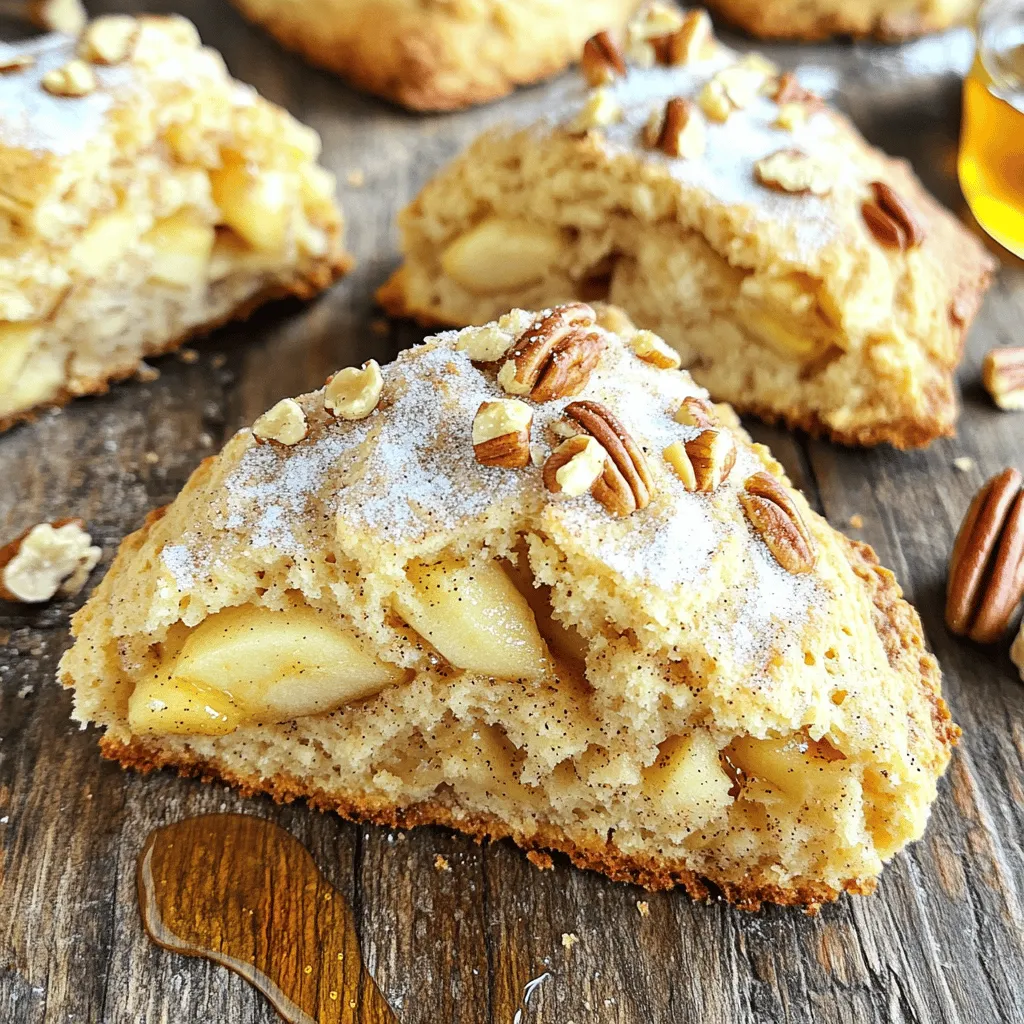
Warm Apple Cinnamon Pecan Scones Irresistible Delight
If you crave a warm and cozy treat, I have just the recipe for you! These Warm Apple Cinnamon Pecan Scones are the perfect…