No Knead Dutch Oven Bread Simple and Delicious Recipe

WANT TO SAVE THIS RECIPE?

Do you want fresh, homemade bread without the hassle of kneading? I have an easy, no-knead recipe that packs a big flavor punch. In this guide, I’ll take you through simple steps to create delicious Dutch oven bread. With just a few ingredients, you can enjoy crusty, warm bread that impresses everyone. Let’s get started on your baking journey today, and transform your kitchen into a bread lover’s paradise!

Why I Love This Recipe

  1. No Kneading Required: This recipe allows you to enjoy homemade bread without the labor of kneading, making it incredibly accessible for everyone.
  2. Long Fermentation: The slow rising process develops deep flavors and a beautiful texture, resulting in artisan-quality bread with minimal effort.
  3. Customizable: You can easily add your favorite seeds or sweeteners to make the bread your own, catering to your personal taste.
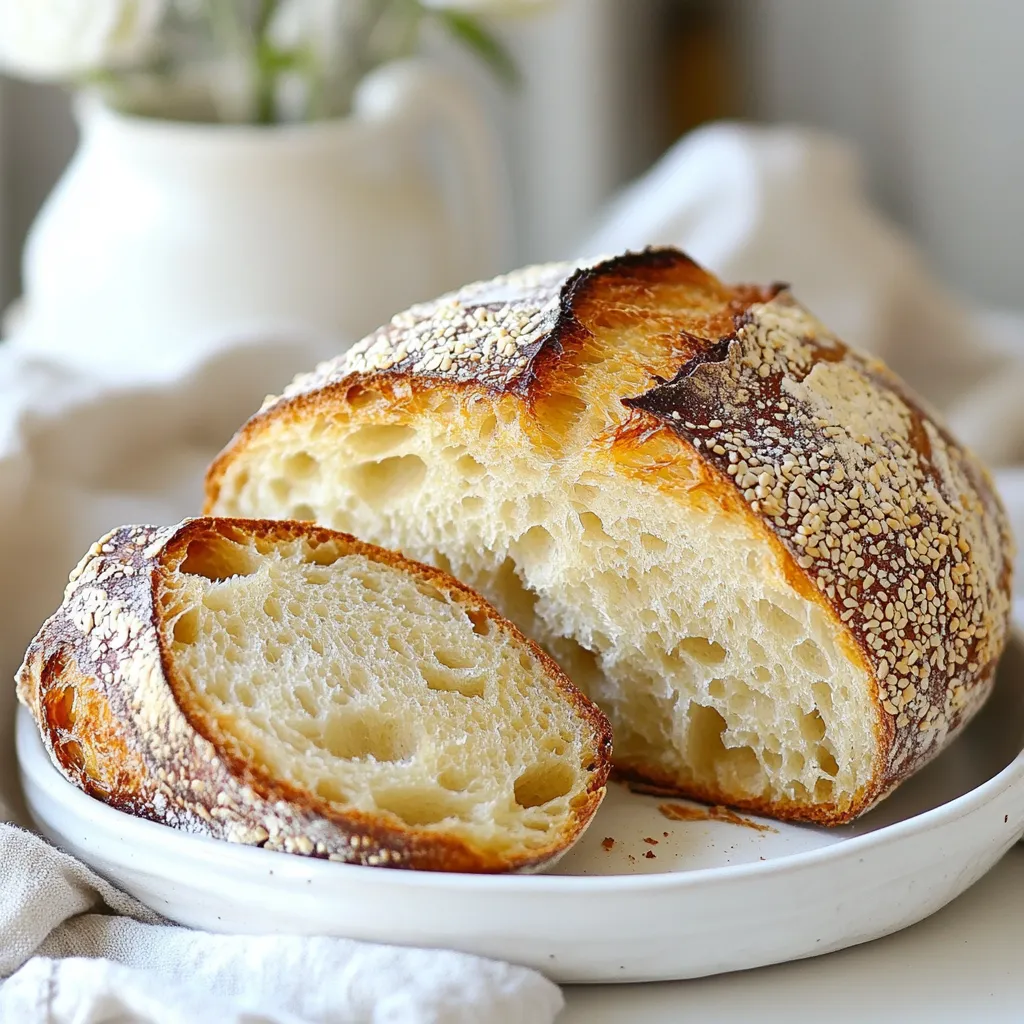
  4. Perfect Crust: Baking in a Dutch oven creates a steamy environment, resulting in a crust that is perfectly golden and crusty.

Ingredients

List of Required Ingredients

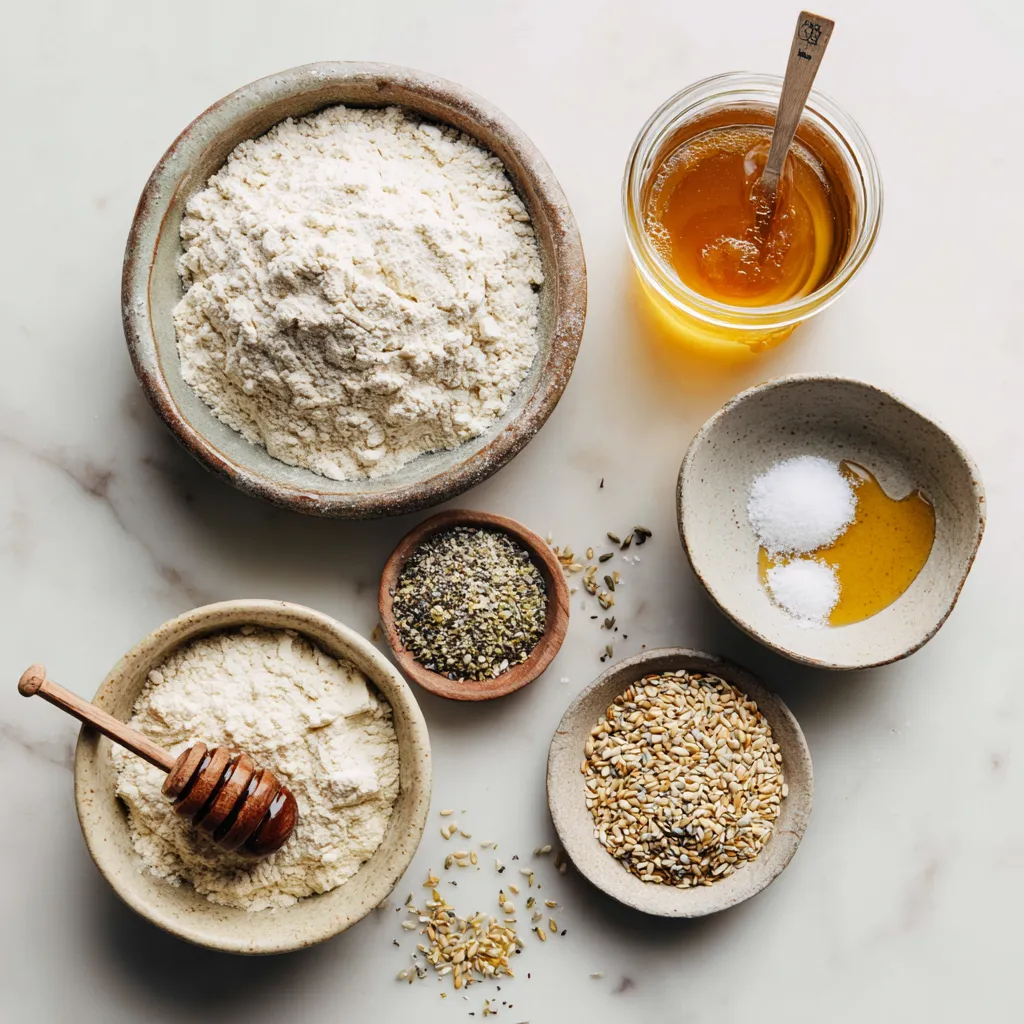
– 3 cups all-purpose flour

– 1 ½ teaspoons salt

– ½ teaspoon instant yeast

– 1 ½ cups warm water (about 110°F or 43°C)

– Optional: 1 tablespoon honey or sugar for slight sweetness

– Optional: ¼ cup seeds (like sesame or sunflower) for added texture

To make great no-knead bread, you need a few key ingredients. Each ingredient plays a role.

Flour is the backbone of your bread. All-purpose flour gives it structure and chew.

Salt adds flavor and controls yeast activity. It also helps to strengthen the dough.

Instant yeast is a fast-acting yeast. It helps the dough rise without waiting too long.

Warm water activates the yeast. Make sure it’s not too hot or cold.

You can add honey or sugar for a touch of sweetness. It works well with savory or sweet breads.

Seeds like sesame or sunflower can give your bread a nice crunch.

Tips for Selecting High-Quality Ingredients

When choosing flour, look for unbleached all-purpose flour. It has a better flavor. Always check the expiration date on your yeast. Fresh yeast helps the dough rise well.

Use clean, filtered water for the best results. This affects the dough’s taste.

If you choose seeds, go for whole seeds. They add great texture and flavor.

These choices make your no-knead bread taste even better. Enjoy the process of selecting and using these ingredients!

Step-by-Step Instructions

Detailed Instructions for Making the Dough

1. Start by gathering your ingredients. You need 3 cups of all-purpose flour, 1 ½ teaspoons of salt, and ½ teaspoon of instant yeast.

2. In a large bowl, combine the flour, salt, and yeast. Stir them together until they mix well.

3. Next, pour in 1 ½ cups of warm water. The water should be about 110°F or 43°C.

4. Use a wooden spoon or spatula to mix the water with the dry ingredients. You want a shaggy dough, so don’t overmix.

5. If you like a hint of sweetness, add 1 tablespoon of honey or sugar to the dough now.

6. For added texture, fold in ¼ cup of seeds like sesame or sunflower at this stage.

Rising and Shaping the Dough

1. Cover the bowl with plastic wrap or a clean kitchen towel. Let it sit at room temperature for 12 to 18 hours.

2. During this time, the dough will bubble and rise. This is a sign that it’s ready.

3. After rising, lightly flour a clean surface. Turn the sticky dough out onto it.

4. Use floured hands to gently shape the dough into a ball. Be careful not to deflate it too much.

5. Let the dough rest for about 30 minutes while your Dutch oven heats up.

Preheating and Baking

1. Preheat your oven to 450°F (232°C). Place the Dutch oven (with the lid on) inside to heat up for 30 minutes.

2. Once it’s hot, carefully remove the Dutch oven. Lift the lid, watching out for steam.

3. Quickly transfer the shaped dough into the pot. If you want easier removal, line the pot with parchment paper.

4. Cover the Dutch oven with the lid and bake for 30 minutes.

5. After 30 minutes, remove the lid and bake for an extra 15 to 20 minutes. You want the bread to turn golden and crusty.

6. Once baked, carefully take the bread out of the Dutch oven. Let it cool on a wire rack for at least an hour before slicing.

Tips & Tricks

Common Baking Mistakes to Avoid

Overmixing the dough

Mixing your dough too much can harm the bread. You want a shaggy texture, not a smooth one. Mix just until all the flour is wet. This helps keep air in, making the bread light and fluffy.

Incorrect rising conditions

The right temperature for rising is crucial. Your dough needs warmth, around 70°F to 80°F. If your kitchen is too cold, the bread may not rise well. Find a warm spot, like near an oven or on a sunny counter.

Achieving the Perfect Crust

Tips on steam and temperature control

Steam helps form a nice crust. When you bake in a Dutch oven, the lid traps steam. This creates a crisp crust. Keep the lid on for the first 30 minutes. Then, remove it to brown the top.

Using parchment paper vs. directly placing dough in the pot

Using parchment paper can make it easy to lift the bread out. It also helps prevent sticking. If you do not use it, be sure to lightly flour the pot before placing the dough inside.

Perfecting Texture and Flavor

Experimenting with add-ins

Add-ins can change the bread’s flavor and texture. Try seeds like sesame or sunflower for crunch. Herbs can add a fresh taste. Just remember to keep the dough’s balance.

Adjustments for different flour types

You can use whole wheat or bread flour. Each type changes the texture. Whole wheat makes it denser. Bread flour can create a chewier crust. Adjust water as needed for different flours.

Pro Tips

  1. Use a Kitchen Scale: For the most accurate measurements, consider weighing your flour instead of using cups. 1 cup of all-purpose flour typically weighs about 120 grams.
  2. Longer Rise for Enhanced Flavor: If you have the time, allowing the dough to rise for up to 24 hours will develop a richer flavor and a more complex texture.
  3. Experiment with Flours: While all-purpose flour works great, try mixing in whole wheat flour or bread flour for a different texture and flavor profile.
  4. Cooling Is Key: Resist the temptation to slice the bread right out of the oven. Let it cool completely on a wire rack to ensure a better crumb structure.

Variations

Flavorful Additions

You can make your no-knead bread even better. Adding herbs and spices can boost the taste. Here are some ideas:

Rosemary: A classic choice that adds a piney flavor.

Thyme: This herb gives a warm, earthy taste.

Garlic powder: A little can bring a bold punch.

Dried basil: Adds a sweet, aromatic touch.

Seeds and nuts can also add a nice crunch. You might try:

Sunflower seeds: These add a nutty flavor and texture.

Sesame seeds: Great for a slight nutty taste and visual appeal.

Chopped walnuts: They give a rich, hearty bite.

Mix and match these ingredients to craft your unique bread!

Alternative Sugars and Sweeteners

You can sweeten your bread with different options. Honey and sugar both work well, but they change the taste.

Honey: This adds a floral note, making the bread a bit richer.

Sugar: A classic choice that gives a neutral sweetness.

If you want natural sweeteners, consider:

Maple syrup: This brings a deep, warm flavor.

Agave nectar: A lighter, milder option that dissolves easily.

Using these sweeteners can change how the bread tastes, so don’t be shy to experiment!

Gluten-Free Options

For those who need gluten-free bread, you have choices. Using different flours can help. Here are some good options:

Almond flour: This flour is high in protein and low in carbs.

Coconut flour: A great choice that adds fiber and a slight sweetness.

Gluten-free all-purpose flour: This can often replace regular flour one-to-one.

When using these flours, adjust the yeast. Gluten-free flours need less yeast. Start with ¼ teaspoon and see how it rises.

No matter your choice, these variations can help you create a new favorite bread!

Storage Info

Best Storage Practices

To keep your no-knead bread fresh, store it in a cool, dry place. Use a bread box or a paper bag. Avoid plastic bags, as they trap moisture and can make the crust soggy. If you want to keep it longer, wrap it in foil or wax paper. This helps maintain the crust while keeping the bread soft inside.

Freezing Your No Knead Bread

To freeze your bread, let it cool completely first. Wrap it tightly in plastic wrap, then in foil. This double wrap prevents freezer burn. You can freeze it for up to three months. When you want to eat it, take it out and thaw it at room temperature. For a warm loaf, reheat it in the oven for about 10-15 minutes at 350°F (175°C).

Shelf Life and Usage Tips

No-knead bread stays fresh for about four days at room temperature. After that, it may start to dry out. If you have leftovers, make croutons or bread crumbs. You can also use it for French toast or sandwiches. Don’t waste a single slice!

FAQs

What is no-knead bread?

No-knead bread is a simple way to make bread without kneading. This method uses time to develop the dough’s texture. You mix flour, salt, yeast, and water and let it sit. It can rise for 12 to 18 hours. This long rise gives it great flavor and chewiness. The crust becomes crispy, and the inside stays soft. You’ll love how easy it is!

Can I use active dry yeast instead of instant yeast?

Yes, you can use active dry yeast. However, it needs a little more time to rise. You should dissolve it in warm water first. This helps activate the yeast. Use the same amount as instant yeast. Just be patient; the bread will still turn out great!

How do I know when the bread is done baking?

The bread is done when it is golden brown. It should have a hard crust. Tap the bottom of the loaf; it should sound hollow. If you have a thermometer, check the inside. It should read about 200°F (93°C). This means the bread is baked through and ready to eat.

Can I bake this bread in other types of pots?

Yes, you can use other pots to bake this bread. Any heavy, oven-safe pot works well. You can use a cast-iron skillet or a ceramic dish. Just make sure it has a lid. If your pot does not have a lid, you can cover it with aluminum foil. This keeps the steam in and helps the bread rise.

You now know how to make no-knead bread. We discussed the key ingredients, step-by-step instructions, and helpful tips. Remember to use high-quality ingredients for the best results. Avoid common mistakes like overmixing the dough. Feel free to experiment with flavors and textures. Store your bread properly to keep it fresh longer. With these simple steps, you can create delicious bread at home. Get started and enjoy every bite. Happy bakin

- 3 cups all-purpose flour - 1 ½ teaspoons salt - ½ teaspoon instant yeast - 1 ½ cups warm water (about 110°F or 43°C) - Optional: 1 tablespoon honey or sugar for slight sweetness - Optional: ¼ cup seeds (like sesame or sunflower) for added texture To make great no-knead bread, you need a few key ingredients. Each ingredient plays a role. Flour is the backbone of your bread. All-purpose flour gives it structure and chew. Salt adds flavor and controls yeast activity. It also helps to strengthen the dough. Instant yeast is a fast-acting yeast. It helps the dough rise without waiting too long. Warm water activates the yeast. Make sure it's not too hot or cold. You can add honey or sugar for a touch of sweetness. It works well with savory or sweet breads. Seeds like sesame or sunflower can give your bread a nice crunch. When choosing flour, look for unbleached all-purpose flour. It has a better flavor. Always check the expiration date on your yeast. Fresh yeast helps the dough rise well. Use clean, filtered water for the best results. This affects the dough's taste. If you choose seeds, go for whole seeds. They add great texture and flavor. These choices make your no-knead bread taste even better. Enjoy the process of selecting and using these ingredients! {{ingredient_image_1}} 1. Start by gathering your ingredients. You need 3 cups of all-purpose flour, 1 ½ teaspoons of salt, and ½ teaspoon of instant yeast. 2. In a large bowl, combine the flour, salt, and yeast. Stir them together until they mix well. 3. Next, pour in 1 ½ cups of warm water. The water should be about 110°F or 43°C. 4. Use a wooden spoon or spatula to mix the water with the dry ingredients. You want a shaggy dough, so don’t overmix. 5. If you like a hint of sweetness, add 1 tablespoon of honey or sugar to the dough now. 6. For added texture, fold in ¼ cup of seeds like sesame or sunflower at this stage. 1. Cover the bowl with plastic wrap or a clean kitchen towel. Let it sit at room temperature for 12 to 18 hours. 2. During this time, the dough will bubble and rise. This is a sign that it's ready. 3. After rising, lightly flour a clean surface. Turn the sticky dough out onto it. 4. Use floured hands to gently shape the dough into a ball. Be careful not to deflate it too much. 5. Let the dough rest for about 30 minutes while your Dutch oven heats up. 1. Preheat your oven to 450°F (232°C). Place the Dutch oven (with the lid on) inside to heat up for 30 minutes. 2. Once it’s hot, carefully remove the Dutch oven. Lift the lid, watching out for steam. 3. Quickly transfer the shaped dough into the pot. If you want easier removal, line the pot with parchment paper. 4. Cover the Dutch oven with the lid and bake for 30 minutes. 5. After 30 minutes, remove the lid and bake for an extra 15 to 20 minutes. You want the bread to turn golden and crusty. 6. Once baked, carefully take the bread out of the Dutch oven. Let it cool on a wire rack for at least an hour before slicing. Overmixing the dough Mixing your dough too much can harm the bread. You want a shaggy texture, not a smooth one. Mix just until all the flour is wet. This helps keep air in, making the bread light and fluffy. Incorrect rising conditions The right temperature for rising is crucial. Your dough needs warmth, around 70°F to 80°F. If your kitchen is too cold, the bread may not rise well. Find a warm spot, like near an oven or on a sunny counter. Tips on steam and temperature control Steam helps form a nice crust. When you bake in a Dutch oven, the lid traps steam. This creates a crisp crust. Keep the lid on for the first 30 minutes. Then, remove it to brown the top. Using parchment paper vs. directly placing dough in the pot Using parchment paper can make it easy to lift the bread out. It also helps prevent sticking. If you do not use it, be sure to lightly flour the pot before placing the dough inside. Experimenting with add-ins Add-ins can change the bread’s flavor and texture. Try seeds like sesame or sunflower for crunch. Herbs can add a fresh taste. Just remember to keep the dough’s balance. Adjustments for different flour types You can use whole wheat or bread flour. Each type changes the texture. Whole wheat makes it denser. Bread flour can create a chewier crust. Adjust water as needed for different flours. Pro Tips Use a Kitchen Scale: For the most accurate measurements, consider weighing your flour instead of using cups. 1 cup of all-purpose flour typically weighs about 120 grams. Longer Rise for Enhanced Flavor: If you have the time, allowing the dough to rise for up to 24 hours will develop a richer flavor and a more complex texture. Experiment with Flours: While all-purpose flour works great, try mixing in whole wheat flour or bread flour for a different texture and flavor profile. Cooling Is Key: Resist the temptation to slice the bread right out of the oven. Let it cool completely on a wire rack to ensure a better crumb structure. {{image_2}} You can make your no-knead bread even better. Adding herbs and spices can boost the taste. Here are some ideas: - Rosemary: A classic choice that adds a piney flavor. - Thyme: This herb gives a warm, earthy taste. - Garlic powder: A little can bring a bold punch. - Dried basil: Adds a sweet, aromatic touch. Seeds and nuts can also add a nice crunch. You might try: - Sunflower seeds: These add a nutty flavor and texture. - Sesame seeds: Great for a slight nutty taste and visual appeal. - Chopped walnuts: They give a rich, hearty bite. Mix and match these ingredients to craft your unique bread! You can sweeten your bread with different options. Honey and sugar both work well, but they change the taste. - Honey: This adds a floral note, making the bread a bit richer. - Sugar: A classic choice that gives a neutral sweetness. If you want natural sweeteners, consider: - Maple syrup: This brings a deep, warm flavor. - Agave nectar: A lighter, milder option that dissolves easily. Using these sweeteners can change how the bread tastes, so don't be shy to experiment! For those who need gluten-free bread, you have choices. Using different flours can help. Here are some good options: - Almond flour: This flour is high in protein and low in carbs. - Coconut flour: A great choice that adds fiber and a slight sweetness. - Gluten-free all-purpose flour: This can often replace regular flour one-to-one. When using these flours, adjust the yeast. Gluten-free flours need less yeast. Start with ¼ teaspoon and see how it rises. No matter your choice, these variations can help you create a new favorite bread! To keep your no-knead bread fresh, store it in a cool, dry place. Use a bread box or a paper bag. Avoid plastic bags, as they trap moisture and can make the crust soggy. If you want to keep it longer, wrap it in foil or wax paper. This helps maintain the crust while keeping the bread soft inside. To freeze your bread, let it cool completely first. Wrap it tightly in plastic wrap, then in foil. This double wrap prevents freezer burn. You can freeze it for up to three months. When you want to eat it, take it out and thaw it at room temperature. For a warm loaf, reheat it in the oven for about 10-15 minutes at 350°F (175°C). No-knead bread stays fresh for about four days at room temperature. After that, it may start to dry out. If you have leftovers, make croutons or bread crumbs. You can also use it for French toast or sandwiches. Don't waste a single slice! No-knead bread is a simple way to make bread without kneading. This method uses time to develop the dough's texture. You mix flour, salt, yeast, and water and let it sit. It can rise for 12 to 18 hours. This long rise gives it great flavor and chewiness. The crust becomes crispy, and the inside stays soft. You’ll love how easy it is! Yes, you can use active dry yeast. However, it needs a little more time to rise. You should dissolve it in warm water first. This helps activate the yeast. Use the same amount as instant yeast. Just be patient; the bread will still turn out great! The bread is done when it is golden brown. It should have a hard crust. Tap the bottom of the loaf; it should sound hollow. If you have a thermometer, check the inside. It should read about 200°F (93°C). This means the bread is baked through and ready to eat. Yes, you can use other pots to bake this bread. Any heavy, oven-safe pot works well. You can use a cast-iron skillet or a ceramic dish. Just make sure it has a lid. If your pot does not have a lid, you can cover it with aluminum foil. This keeps the steam in and helps the bread rise. You now know how to make no-knead bread. We discussed the key ingredients, step-by-step instructions, and helpful tips. Remember to use high-quality ingredients for the best results. Avoid common mistakes like overmixing the dough. Feel free to experiment with flavors and textures. Store your bread properly to keep it fresh longer. With these simple steps, you can create delicious bread at home. Get started and enjoy every bite. Happy baking!

Simple Artisan No Knead Bread

A delicious and easy no-knead bread recipe that requires minimal effort and time.
Prep Time 15 minutes
Cook Time 45 minutes
Total Time 13 hours 30 minutes
Course Bread
Cuisine American
Servings 12
Calories 100 kcal

Ingredients
  

  • 3 cups all-purpose flour
  • 1.5 teaspoons salt
  • 0.5 teaspoon instant yeast
  • 1.5 cups warm water (about 110°F or 43°C)
  • 1 tablespoon honey or sugar (optional)
  • 0.25 cup seeds (like sesame or sunflower) (optional)

Instructions
 

  • In a large mixing bowl, combine the flour, salt, and instant yeast. Stir until evenly mixed. If using, add honey or sugar at this point.
  • Pour in the warm water and mix with a wooden spoon or spatula until a shaggy dough forms. Make sure all the flour is incorporated, but do not overmix.
  • If you’re using seeds, fold them into the dough now. Cover the bowl with plastic wrap or a clean kitchen towel and let it sit at room temperature for 12 to 18 hours. The dough should bubble and rise significantly during this time.
  • After the rising time, preheat your oven to 450°F (232°C) and place your Dutch oven (with the lid on) in the oven to heat up for 30 minutes.
  • Lightly flour a clean work surface. Using a spatula, turn the dough out onto the floured surface. It will be sticky and loose; this is normal. Use floured hands to gently shape it into a ball, being mindful not to deflate it too much.
  • Once shaped, allow the dough to rest for about 30 minutes while your Dutch oven finishes heating.
  • Carefully remove the hot Dutch oven from the oven. Lift the lid (watch out for the steam!) and quickly transfer your dough to the pot. You can line the pot with parchment paper for easier removal if desired.
  • Cover the Dutch oven with the lid and bake for 30 minutes. After this time, remove the lid and bake for an additional 15-20 minutes until the bread is golden and crusty.
  • Once done, carefully remove the bread from the Dutch oven and let it cool on a wire rack for at least an hour before slicing.

Notes

For added sweetness, honey or sugar can be included. Seeds can be added for texture.
Keyword artisan, bread, no knead

WANT TO SAVE THIS RECIPE?

Leave a Comment

Recipe Rating