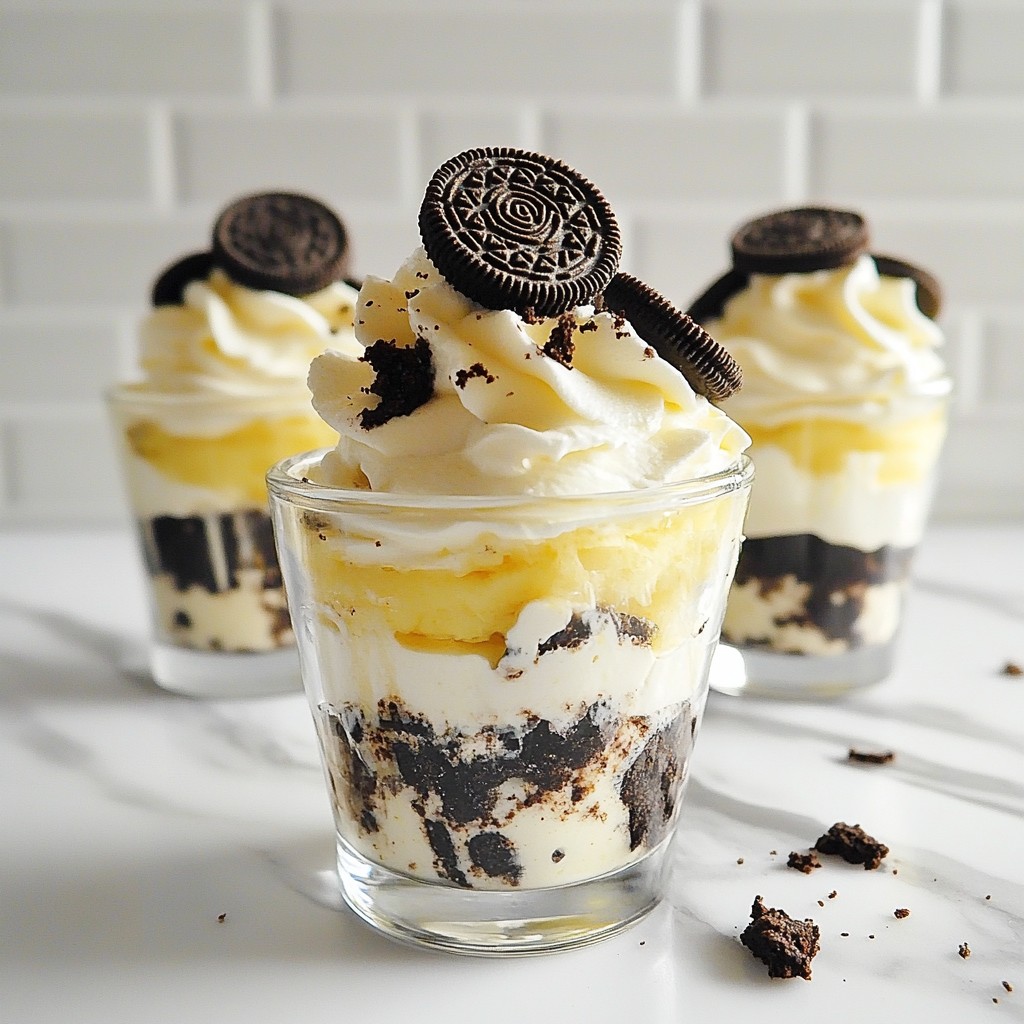
Looking for a quick and tasty dessert? No-Bake Oreo Cheesecake Cups are the answer! With just a few simple steps, you can whip up a sweet treat that's creamy and crunchy. Whether you're hosting a party or just need a snack, these cups are perfect for everyone. Join me as I show you how to make this easy recipe that will impress your friends and family. Let’s dig in!
Why I Love This Recipe
- Deliciously Indulgent: This recipe combines the rich flavors of cream cheese and Oreos, creating a dessert that's utterly irresistible.
- No-Bake Convenience: No need for an oven! These cheesecake cups are quick to make and perfect for warm weather gatherings.
- Easy to Customize: Feel free to mix in your favorite toppings or add different flavors for a unique twist!
- Perfect Portion Control: Individual cups ensure everyone gets their own serving, making them great for parties and gatherings.
Ingredients
Required Ingredients for No-Bake Oreo Cheesecake Cups
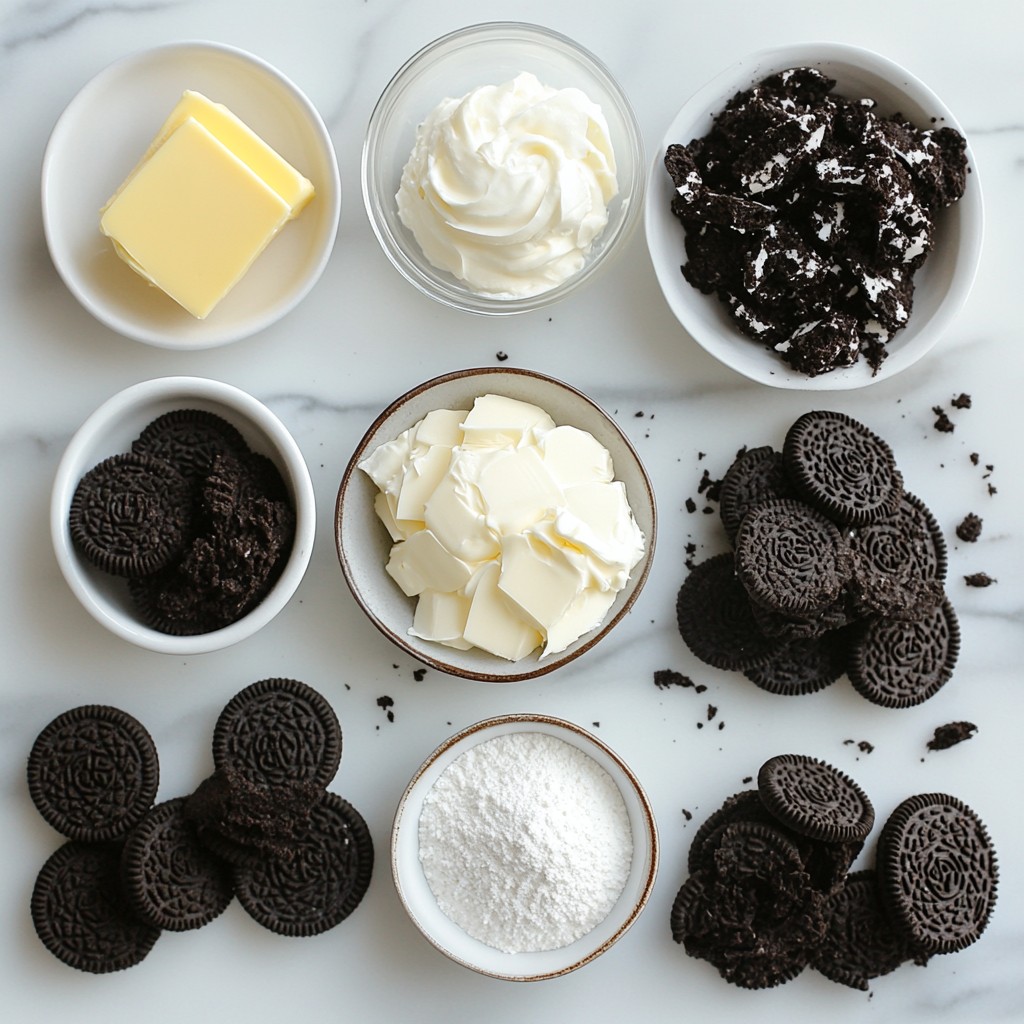
To make these tasty no-bake Oreo cheesecake cups, gather the following ingredients:
- 16 Oreo cookies, crushed
- 2 tablespoons unsalted butter, melted
- 8 ounces cream cheese, softened
- 1 cup powdered sugar
- 1 teaspoon vanilla extract
- 1 cup heavy whipping cream
- 6 Oreo cookies, chopped (for filling)
- Extra crushed Oreos for topping
These ingredients create a rich and creamy dessert. The crushed Oreos make a great base, while the cream cheese and whipped cream give it a smooth texture.
Possible Ingredient Substitutions
You can swap some ingredients if you need to. Use gluten-free Oreos for a gluten-free treat. If you don’t have cream cheese, try using mascarpone cheese. For a lighter version, consider using Greek yogurt instead. You can also use a sugar substitute if you want a lower-sugar option.
Tools and Equipment Needed
To prepare these cheesecake cups, you will need a few simple tools:
- Mixing bowls
- Electric mixer
- Measuring cups and spoons
- Serving cups or jars
- A spatula for mixing
These tools help you create the cheesecake easily. Make sure your bowls are large enough for mixing everything well. The electric mixer will help you beat the cream cheese until smooth.
Step-by-Step Instructions
Preparation of the Oreo Crust
To start, take 16 Oreo cookies and crush them. I like using a food processor for this. You want them fine, like sand. Then, melt 2 tablespoons of unsalted butter in the microwave. Pour the melted butter over the crushed cookies. Mix it well until it looks like wet sand.
Next, divide this mixture into serving cups. Press it down firmly to form a solid base. Make sure it’s even in each cup for a great bite.
Making the Cheesecake Filling
Now, grab 8 ounces of softened cream cheese. Place it in a large bowl and beat it with an electric mixer. Mix until it’s smooth and creamy. This step is key for good texture.
Gradually add in 1 cup of powdered sugar and 1 teaspoon of vanilla extract. Keep mixing until everything is well combined. In another bowl, whip 1 cup of heavy whipping cream until stiff peaks form. This makes the filling fluffy.
Gently fold the whipped cream into the cream cheese mix. Be careful not to deflate it. Finally, stir in 6 chopped Oreo cookies. This adds crunch and flavor to your filling.
Assembling the Cheesecake Cups
Spoon the cheesecake filling over the Oreo crust in each cup. Fill them almost to the top but leave a little space. This helps with the topping later.
After filling, refrigerate the cheesecake cups for at least 4 hours. This wait helps the flavors blend and the filling to set. Once they are ready, sprinkle some extra crushed Oreos on top for garnish. Serve chilled for the best taste.
Tips & Tricks
Best Practices for Mixing
Mixing is key to a great cheesecake. Start with room-temperature cream cheese. This helps it blend smoothly. Use an electric mixer for the best results. Beat the cream cheese until it's creamy and lump-free. When adding powdered sugar, do it slowly. This helps avoid a sugary cloud. When you whip the heavy cream, watch for stiff peaks. This makes your filling light and fluffy. Finally, gently fold the whipped cream into the cheese mix. Be careful not to deflate it.
Chilling Times and Texture Tips
Chilling is vital for the right texture. After you fill the cups, refrigerate them for at least 4 hours. This helps the cheesecake set well. If you want a firmer texture, chill them overnight. The longer they chill, the better the taste. If you find your filling too soft, try adding more whipped cream next time. This can help with the texture.
Presentation Tips for Serving
Presentation makes your dessert shine. Use clear cups to show the layers. It adds a nice touch to your table. For an extra wow factor, place a whole Oreo on top of each cup. You can also sprinkle crushed Oreos on top. It looks great and adds crunch. Serve the cups on a decorative platter. This makes your dessert look even more inviting.
Pro Tips
- Use Room Temperature Cream Cheese: Ensuring your cream cheese is at room temperature allows for a smoother and creamier filling, preventing lumps.
- Chill for Best Results: Allowing the cheesecake cups to chill for at least 4 hours helps them set properly, enhancing the flavors and texture.
- Experiment with Flavors: Add a splash of almond extract or a dash of espresso powder to the cheesecake filling for a unique twist on the classic flavor.
- Garnish Creatively: Consider using whipped cream, mini chocolate chips, or different types of crushed cookies for an appealing presentation.
Variations
Flavor Variations to Try
You can change the flavor of these cheesecake cups easily. Try using different cookies like chocolate mint or peanut butter. You can also mix in some fruit, like crushed strawberries or raspberries. This adds a fresh taste to your dessert. If you want a chocolate lover’s dream, add cocoa powder to the cream cheese mix. These simple swaps can make your dessert unique.
Dietary Substitutions (Dairy-Free, Vegan Options)
If you need a dairy-free or vegan treat, you can still enjoy these cups. Use dairy-free cream cheese made from nuts or soy. Instead of heavy cream, use coconut cream for a rich texture. You can find dairy-free whipped toppings in stores too. Look for vegan cookies to replace the Oreos. These swaps let everyone indulge in this tasty treat.
Different Toppings and Garnishes
Toppings can enhance your cheesecake cups. For a crunchy touch, sprinkle crushed nuts or more Oreos on top. Fresh fruit like berries or banana slices can add color and flavor. You can even drizzle chocolate or caramel sauce for a sweet finish. A dollop of whipped cream on top makes it feel extra special. These garnishes make your dessert look great and taste even better.
Storage Info
How to Store Leftover Cheesecake Cups
To store leftover cheesecake cups, cover them with plastic wrap. You can also use a lid if your cups have one. Keep them in the fridge for up to three days. Make sure they stay chilled. This will help keep the flavors fresh.
Freezing Instructions for Long-Term Storage
If you want to keep the cups longer, freezing is a great option. First, let the cups sit in the fridge for a few hours. Once they are firm, wrap each cup in foil or plastic wrap. Place them in a freezer-safe bag. They can stay in the freezer for up to three months. When ready to eat, thaw them in the fridge overnight.
Best Containers for Storing
For the best storage, use airtight containers. Glass or plastic containers work well. If you use cups, ensure they fit tightly in the container. This will keep air out and protect the cheesecake. Also, avoid stacking the cups to prevent any spills or mess.
FAQs
Can I use a different type of cookie for the crust?
Yes, you can use other cookies for the crust. Some great options are chocolate cookies or graham crackers. Each cookie gives a unique taste and texture. Just crush them well and mix with butter, just like with Oreos. This way, you can create your own flavor twist!
How long do No-Bake Oreo Cheesecake Cups last in the fridge?
No-Bake Oreo Cheesecake Cups last about 4 to 5 days in the fridge. Be sure to cover them well to keep them fresh. Use plastic wrap or a lid to protect them from odors. This keeps your dessert tasting great for every bite!
Can I make these cheesecake cups ahead of time?
Absolutely! You can make these cheesecake cups a day or two ahead of time. Just store them in the fridge until you’re ready to serve. This makes them perfect for parties or special events. Plus, they taste even better after chilling!
You now know how to make No-Bake Oreo Cheesecake Cups. We covered the ingredients, tools, and step-by-step instructions. I shared tips for mixing and chilling for the best taste and texture. You can explore fun variations to fit your needs and preferences. Lastly, I explained how to store leftovers for later enjoyment. Enjoy making these treats! They are easy to whip up and sure to please everyone.