No-Bake Mini Lemon Cheesecakes Delightful Easy Treat

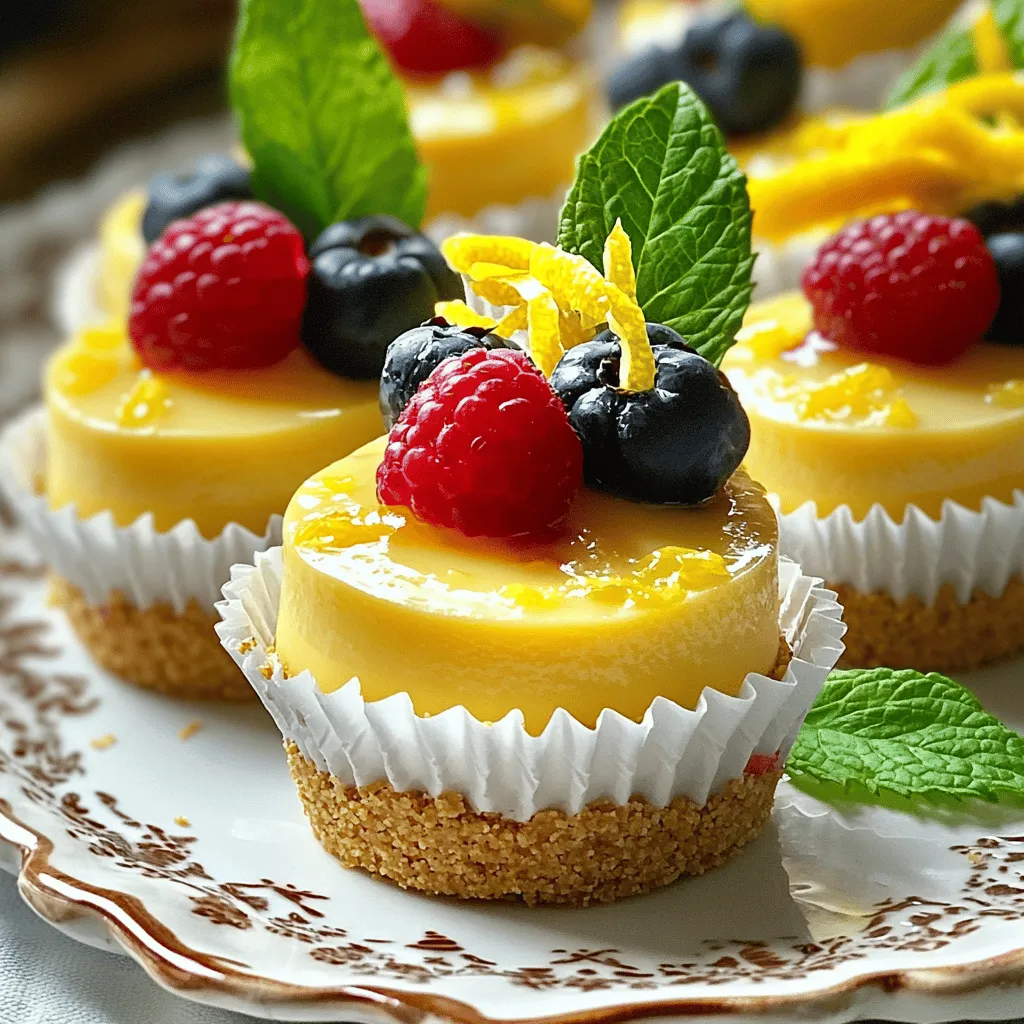
Looking for a simple dessert that packs a citrusy punch? These No-Bake Mini Lemon Cheesecakes are your answer! With a creamy filling and a crunchy graham cracker crust, they are easy to make and perfect for any occasion. I’ll guide you through each step, ensuring your treats turn out just right. Get ready to impress your friends and family with this delightful recipe that requires no baking at all!

Ingredients

To make your no-bake mini lemon cheesecakes, you need a few simple ingredients. Each one plays a key role in creating the perfect balance of flavors and textures.

List of Ingredients

– 1 cup graham cracker crumbs

– 1/4 cup unsalted butter, melted

– 2 cups cream cheese, softened

– 1 cup powdered sugar

– 1/4 cup fresh lemon juice

– Zest of 1 lemon

– 1 teaspoon vanilla extract

– 1 cup heavy whipping cream

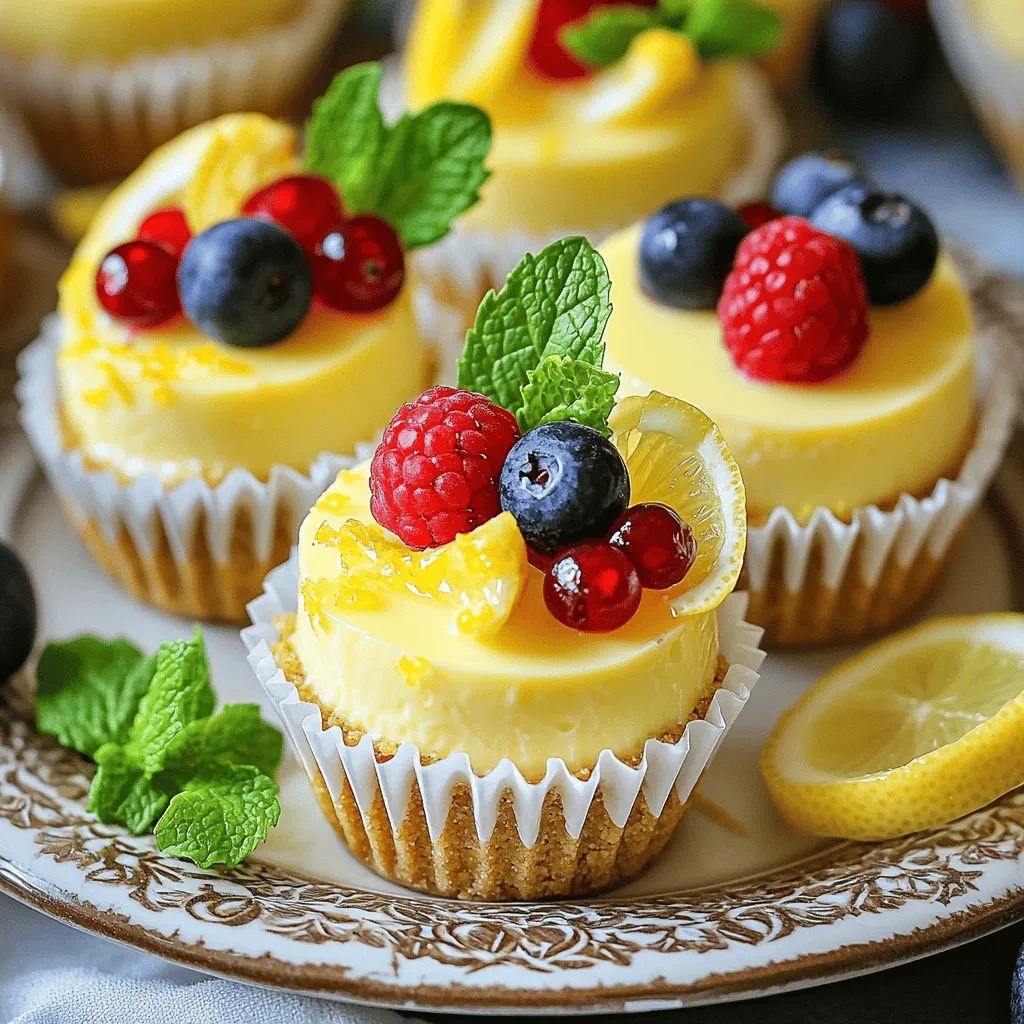
– Fresh berries and mint leaves for garnish (optional)

Gather these ingredients first to set yourself up for success. The graham cracker crumbs form the base, giving a crunchy texture. The cream cheese adds that creamy richness we all love. The lemon juice and zest bring a bright, fresh flavor that wakes up your taste buds. Lastly, the whipped cream adds lightness to the cheesecake filling.

Feel free to customize your toppings! Fresh berries and mint leaves look great and add a burst of flavor. For the full recipe, you can refer to the [Full Recipe].

Step-by-Step Instructions

Prepare the Crust

To start, mix the graham cracker crumbs and melted butter in a bowl. This blend should look like wet sand. Next, grab a muffin tin and line it with cupcake liners. Distribute the crumb mixture evenly into each liner. Press down firmly to form a nice, solid crust. This step is key for a great base.

Make the Cheesecake Filling

In a new bowl, beat the cream cheese until it is smooth and creamy. This will take just a few minutes. Then, add the powdered sugar, fresh lemon juice, lemon zest, and vanilla extract. Mix everything together until it is fully combined and smooth. The lemon will give it a bright flavor.

Combine Ingredients

Now, take another bowl and whip the heavy cream until stiff peaks form. This means it should hold its shape well. Gently fold the whipped cream into the cream cheese mixture. Do this carefully to keep the light, fluffy texture. This makes the filling airy and delicious.

Assemble and Refrigerate

Spoon the creamy filling into each muffin liner on top of the crust. Smooth the tops with a spatula to make them look nice. Finally, place the mini cheesecakes in the fridge for at least 4 hours to set. They need this time to become firm and tasty. When ready, you can garnish them with fresh berries and mint leaves if you like. Enjoy your delightful treat!

For the complete recipe, check the [Full Recipe].

Tips & Tricks

Achieving the Perfect Texture

Using room temperature ingredients is key for smooth filling. Cold cream cheese can clump. Let it sit out for 30 minutes before mixing. This step helps blend it easily with sugar and lemon juice.

Whipping cream should reach the right consistency. You want stiff peaks, which means it stands tall when lifted with a spoon. Over-whipping can make it grainy. Stop mixing as soon as you see those peaks.

Presentation Suggestions

Serve your mini cheesecakes on a decorative platter. A colorful display makes them look special. You can drizzle lemon curd on top for an extra burst of flavor. This adds a nice shine and a tangy twist.

Fresh berries and mint leaves also enhance the look. Arrange them creatively around the cheesecakes. The contrast of colors makes your treat even more inviting.

Common Mistakes to Avoid

One common mistake is overmixing the filling. This can make the texture too airy and less creamy. Mix just until everything is combined for the best result.

Not pressing the crust firmly enough is another issue. A loose crust can crumble when you serve it. Use the back of a spoon to press down hard and form a solid base.

Variations

Flavor Options

You can easily change the flavor of these mini cheesecakes. One fun way is to add fruit purees. You can use berries, mango, or even passion fruit. Just swap out some lemon juice for the fruit puree. This gives each cheesecake a unique taste.

If you want a twist on the classic, try lime or orange instead of lemon. Both options add a fresh zing. The creamy filling pairs well with these flavors. You can mix and match to find your favorite!

Healthier Alternatives

Want to make your cheesecake a bit healthier? Try using Greek yogurt instead of cream cheese. Greek yogurt gives a nice tang and cuts down on fat. You can also use sweeteners like honey or agave syrup. These add sweetness without refined sugar. Just adjust the amount to taste.

Dietary Adjustments

If you need gluten-free options, you can easily make a crust from ground nuts. Almond or pecan flour works great. Just mix it with a little melted butter.

For a vegan version, use coconut cream in place of cream cheese. You can also use maple syrup as a sweetener. This will keep the cheesecake creamy and delicious while making it plant-based. Each of these variations keeps the spirit of a classic cheesecake while catering to different diets.

Feel free to explore these options and create your own version. You can find the Full Recipe to guide your new creations.

Storage Info

Best Practices for Storage

To keep your mini lemon cheesecakes fresh, store them in the fridge. Use an airtight container to prevent them from absorbing other smells. They will stay fresh for about 4 to 5 days. If you plan to enjoy them later, freezing is a great option.

Freezing Instructions

To freeze your mini cheesecakes, follow these steps:

– Wrap each cheesecake in plastic wrap tightly.

– Place them in a freezer-safe bag or container.

– Label the bag with the date. They can last up to 2 months in the freezer.

When you want to enjoy them, remove the cheesecakes from the freezer. Place them in the fridge overnight to thaw.

Signs of Spoilage

Check for signs that your cheesecakes have gone bad. Look for:

– An off smell or sour odor.

– A change in color or texture.

– Mold on the surface.

If you notice any of these signs, it is best to throw the cheesecakes away. Always trust your senses when it comes to food safety.

FAQs

How long do No-Bake Mini Lemon Cheesecakes last?

No-Bake Mini Lemon Cheesecakes last about 4 to 5 days in the refrigerator. Store them in an airtight container to keep them fresh. If you want to keep them longer, you can freeze them. They stay good in the freezer for about 2 months. Just remember to wrap them well to avoid freezer burn.

Can I make these cheesecakes ahead of time?

Yes, you can make these cheesecakes ahead of time. I recommend preparing them the day before you plan to serve them. This way, they have plenty of time to set in the fridge. Plus, it will save you time on the day of your event, letting you enjoy your guests more.

What can I use if I don’t have heavy whipping cream?

If you don’t have heavy whipping cream, you can use a few alternatives. You can use whole milk mixed with butter. Mix ¾ cup of whole milk with ¼ cup of melted butter. Another option is to use coconut cream. It adds a nice flavor and works well in this recipe.

How can I make the crust stick better?

To make the crust stick better, use more butter in your graham cracker mixture. A good rule is to use about ½ cup of melted butter for every cup of crumbs. Press the mixture firmly into the muffin liners. This will help the crust hold together when serving. You can also chill the crust for about 15 minutes before adding the filling, which helps it set better.

You now have a simple recipe for no-bake mini lemon cheesecakes. We covered key ingredients, step-by-step instructions, and tips for the best texture. Remember to use fresh ingredients for great taste. Feel free to experiment with flavors and make it your own. Store them properly in the fridge or freezer to enjoy later. These treats are perfect for any occasion. Enjoy making and sharing your mini cheesecakes!

To make your no-bake mini lemon cheesecakes, you need a few simple ingredients. Each one plays a key role in creating the perfect balance of flavors and textures. - 1 cup graham cracker crumbs - 1/4 cup unsalted butter, melted - 2 cups cream cheese, softened - 1 cup powdered sugar - 1/4 cup fresh lemon juice - Zest of 1 lemon - 1 teaspoon vanilla extract - 1 cup heavy whipping cream - Fresh berries and mint leaves for garnish (optional) Gather these ingredients first to set yourself up for success. The graham cracker crumbs form the base, giving a crunchy texture. The cream cheese adds that creamy richness we all love. The lemon juice and zest bring a bright, fresh flavor that wakes up your taste buds. Lastly, the whipped cream adds lightness to the cheesecake filling. Feel free to customize your toppings! Fresh berries and mint leaves look great and add a burst of flavor. For the full recipe, you can refer to the [Full Recipe]. To start, mix the graham cracker crumbs and melted butter in a bowl. This blend should look like wet sand. Next, grab a muffin tin and line it with cupcake liners. Distribute the crumb mixture evenly into each liner. Press down firmly to form a nice, solid crust. This step is key for a great base. In a new bowl, beat the cream cheese until it is smooth and creamy. This will take just a few minutes. Then, add the powdered sugar, fresh lemon juice, lemon zest, and vanilla extract. Mix everything together until it is fully combined and smooth. The lemon will give it a bright flavor. Now, take another bowl and whip the heavy cream until stiff peaks form. This means it should hold its shape well. Gently fold the whipped cream into the cream cheese mixture. Do this carefully to keep the light, fluffy texture. This makes the filling airy and delicious. Spoon the creamy filling into each muffin liner on top of the crust. Smooth the tops with a spatula to make them look nice. Finally, place the mini cheesecakes in the fridge for at least 4 hours to set. They need this time to become firm and tasty. When ready, you can garnish them with fresh berries and mint leaves if you like. Enjoy your delightful treat! For the complete recipe, check the [Full Recipe]. Using room temperature ingredients is key for smooth filling. Cold cream cheese can clump. Let it sit out for 30 minutes before mixing. This step helps blend it easily with sugar and lemon juice. Whipping cream should reach the right consistency. You want stiff peaks, which means it stands tall when lifted with a spoon. Over-whipping can make it grainy. Stop mixing as soon as you see those peaks. Serve your mini cheesecakes on a decorative platter. A colorful display makes them look special. You can drizzle lemon curd on top for an extra burst of flavor. This adds a nice shine and a tangy twist. Fresh berries and mint leaves also enhance the look. Arrange them creatively around the cheesecakes. The contrast of colors makes your treat even more inviting. One common mistake is overmixing the filling. This can make the texture too airy and less creamy. Mix just until everything is combined for the best result. Not pressing the crust firmly enough is another issue. A loose crust can crumble when you serve it. Use the back of a spoon to press down hard and form a solid base. {{image_2}} You can easily change the flavor of these mini cheesecakes. One fun way is to add fruit purees. You can use berries, mango, or even passion fruit. Just swap out some lemon juice for the fruit puree. This gives each cheesecake a unique taste. If you want a twist on the classic, try lime or orange instead of lemon. Both options add a fresh zing. The creamy filling pairs well with these flavors. You can mix and match to find your favorite! Want to make your cheesecake a bit healthier? Try using Greek yogurt instead of cream cheese. Greek yogurt gives a nice tang and cuts down on fat. You can also use sweeteners like honey or agave syrup. These add sweetness without refined sugar. Just adjust the amount to taste. If you need gluten-free options, you can easily make a crust from ground nuts. Almond or pecan flour works great. Just mix it with a little melted butter. For a vegan version, use coconut cream in place of cream cheese. You can also use maple syrup as a sweetener. This will keep the cheesecake creamy and delicious while making it plant-based. Each of these variations keeps the spirit of a classic cheesecake while catering to different diets. Feel free to explore these options and create your own version. You can find the Full Recipe to guide your new creations. To keep your mini lemon cheesecakes fresh, store them in the fridge. Use an airtight container to prevent them from absorbing other smells. They will stay fresh for about 4 to 5 days. If you plan to enjoy them later, freezing is a great option. To freeze your mini cheesecakes, follow these steps: - Wrap each cheesecake in plastic wrap tightly. - Place them in a freezer-safe bag or container. - Label the bag with the date. They can last up to 2 months in the freezer. When you want to enjoy them, remove the cheesecakes from the freezer. Place them in the fridge overnight to thaw. Check for signs that your cheesecakes have gone bad. Look for: - An off smell or sour odor. - A change in color or texture. - Mold on the surface. If you notice any of these signs, it is best to throw the cheesecakes away. Always trust your senses when it comes to food safety. No-Bake Mini Lemon Cheesecakes last about 4 to 5 days in the refrigerator. Store them in an airtight container to keep them fresh. If you want to keep them longer, you can freeze them. They stay good in the freezer for about 2 months. Just remember to wrap them well to avoid freezer burn. Yes, you can make these cheesecakes ahead of time. I recommend preparing them the day before you plan to serve them. This way, they have plenty of time to set in the fridge. Plus, it will save you time on the day of your event, letting you enjoy your guests more. If you don’t have heavy whipping cream, you can use a few alternatives. You can use whole milk mixed with butter. Mix ¾ cup of whole milk with ¼ cup of melted butter. Another option is to use coconut cream. It adds a nice flavor and works well in this recipe. To make the crust stick better, use more butter in your graham cracker mixture. A good rule is to use about ½ cup of melted butter for every cup of crumbs. Press the mixture firmly into the muffin liners. This will help the crust hold together when serving. You can also chill the crust for about 15 minutes before adding the filling, which helps it set better. You now have a simple recipe for no-bake mini lemon cheesecakes. We covered key ingredients, step-by-step instructions, and tips for the best texture. Remember to use fresh ingredients for great taste. Feel free to experiment with flavors and make it your own. Store them properly in the fridge or freezer to enjoy later. These treats are perfect for any occasion. Enjoy making and sharing your mini cheesecakes!

No-Bake Mini Lemon Cheesecakes

Indulge in these delightful No-Bake Mini Lemon Cheesecakes that are perfect for every occasion! This easy recipe combines creamy lemon filling with a buttery graham cracker crust, creating a refreshing dessert that's sure to impress. Ready in just 20 minutes of prep, these treats will cool in your fridge until set. Click through to explore the full recipe and bring a burst of lemony goodness to your table!

Ingredients
  

1 cup graham cracker crumbs

1/4 cup unsalted butter, melted

2 cups cream cheese, softened

1 cup powdered sugar

1/4 cup fresh lemon juice

Zest of 1 lemon

1 teaspoon vanilla extract

1 cup heavy whipping cream

Fresh berries and mint leaves for garnish (optional)

Instructions
 

In a mixing bowl, combine the graham cracker crumbs and melted butter. Mix until the crumbs are evenly coated.

    Line a muffin tin with cupcake liners and evenly distribute the graham cracker mixture into each liner. Press down firmly to form a crust base.

      In a separate bowl, beat the softened cream cheese with an electric mixer until smooth.

        Gradually add the powdered sugar, lemon juice, lemon zest, and vanilla extract, mixing until fully incorporated.

          In another bowl, whip the heavy whipping cream until stiff peaks form.

            Gently fold the whipped cream into the cream cheese mixture until well combined, being careful not to deflate the whipped cream.

              Spoon the lemon cheesecake filling into each muffin liner on top of the crust, smoothing the tops with a spatula.

                Refrigerate the mini cheesecakes for at least 4 hours or until set.

                  Once set, remove from the muffin tin and garnish with fresh berries and mint leaves if desired before serving.

                    Prep Time: 20 minutes | Total Time: 4 hours 20 minutes | Servings: 12

                      - Presentation Tips: Serve the cheesecakes on a decorative platter, and consider drizzling with a bit of lemon curd or serving with a side of whipped cream for extra flair.

                        Leave a Comment

                        Recipe Rating