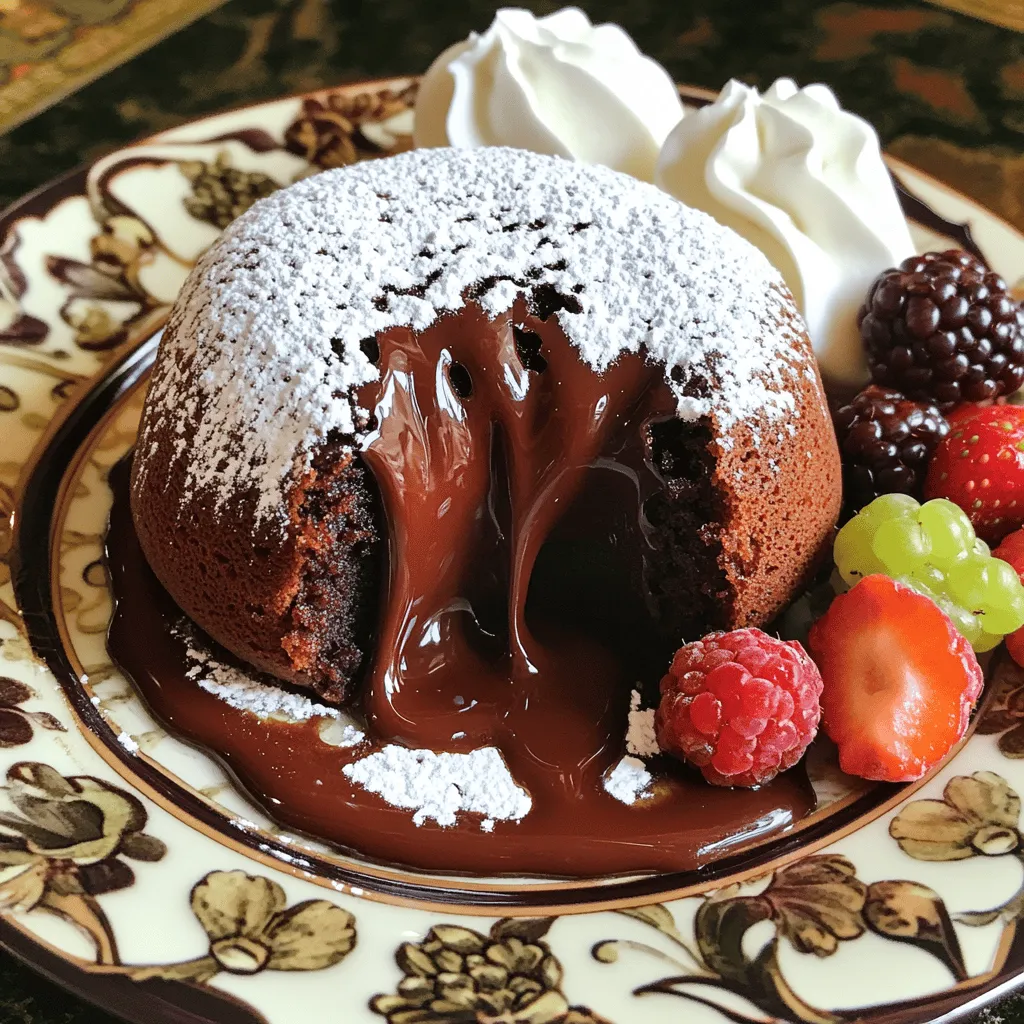
Get ready to wow your taste buds with my easy and delightful Chocolate Lava Cake recipe! This isn’t just any dessert; it’s a warm, gooey treat that oozes rich chocolate with every bite. Whether you’re a beginner or a seasoned baker, I’ll guide you through simple steps and tips to perfect this indulgent cake. Let’s dive into making a dessert that will leave everyone craving more!
Ingredients
List of Required Ingredients
To make your chocolate lava cake, gather these key ingredients:
– ½ cup unsalted butter (plus extra for greasing)
– 1 cup semi-sweet chocolate chips
– 2 large eggs
– 2 large egg yolks
– ½ cup granulated sugar
– ¼ cup all-purpose flour
– ¼ teaspoon salt
– 1 teaspoon vanilla extract
– Powdered sugar (for dusting)
These ingredients work together to create a rich, gooey center that everyone loves.
Optional Add-Ins
You can make your lava cake even better with these optional add-ins:
– Fresh berries for a fruity touch
– Whipped cream to add creaminess
– A pinch of sea salt to enhance flavor
These add-ins elevate the dessert and make it even more special.
Substitutions for Dietary Preferences
If you have dietary needs, here are some easy swaps:
– Use dairy-free butter and chocolate chips for a vegan option.
– Substitute gluten-free flour for a gluten-free version.
– Replace granulated sugar with coconut sugar for a lower glycemic option.
These substitutions let you enjoy chocolate lava cake no matter your diet.
Step-by-Step Instructions
Preparation of the Ramekins
Start by preheating your oven to 425°F (220°C). Grease four ramekins with butter. Dust them lightly with flour to stop the cakes from sticking. This step is very important for a smooth release.
Melting Chocolate and Butter
In a microwave-safe bowl, add the butter and chocolate chips. Heat this mix in 30-second bursts. Stir after each burst until it is smooth and melted. Let it cool for a few minutes. This keeps the chocolate from cooking the eggs when mixed.
Combining Wet and Dry Ingredients
In a separate bowl, whisk together the eggs, egg yolks, and sugar. Do this for about 2-3 minutes until it looks pale and frothy. Now, pour the melted chocolate into the egg mixture. Mix until well blended. Next, gently fold in the flour, salt, and vanilla. Be careful not to overmix—just combine until you see no dry flour.
Baking the Lava Cakes
Evenly fill the prepared ramekins with the batter, about ¾ full. Place them on a baking sheet for easy handling. Bake the cakes for 12-14 minutes. You want the edges firm and the center soft. Watch them closely to avoid overbaking.
Plating and Serving
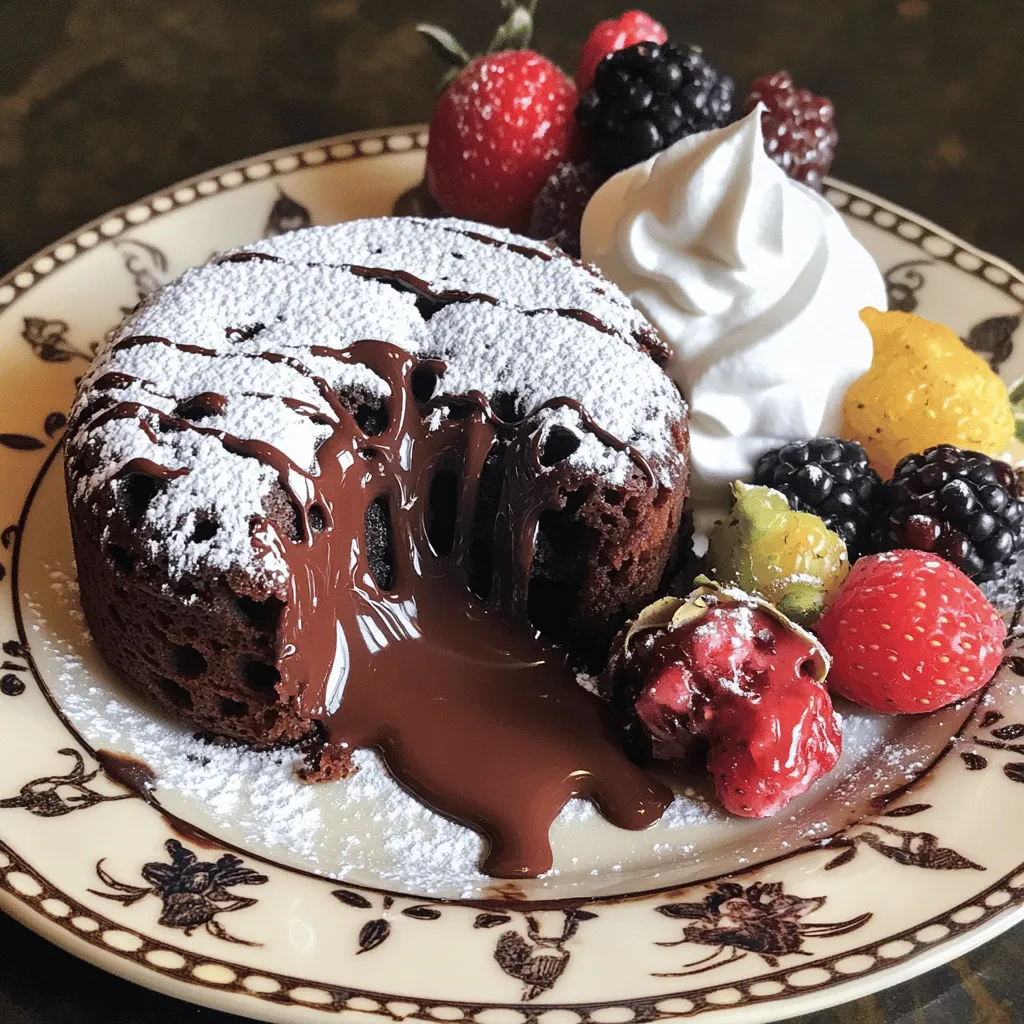
Once done, take them out and let them cool for 1 minute. Run a knife around the edges of the cakes. Invert each ramekin onto a plate and tap gently to release. Dust with powdered sugar for a nice touch. You can also add fresh berries and whipped cream for a delightful finish. Enjoy your delicious creation!
Tips & Tricks
Achieving the Perfect Lava Center
To get that gooey center, timing is key. Bake your cakes for about 12 to 14 minutes. The edges should be set, but the middle must remain soft. You can also check the cakes by gently shaking the ramekins. If the center jiggles, you’re good to go!
Common Mistakes to Avoid
Avoid overmixing your batter. This can make the cake dense instead of light. Also, do not skip greasing the ramekins. This helps the cakes come out easily. Lastly, don’t open the oven door too soon. This can cause the cakes to sink.
Enhancing Flavor and Texture
For added flavor, consider mixing in a teaspoon of espresso powder. It deepens the chocolate taste. You can also use dark chocolate instead of semi-sweet for a richer flavor. To enhance texture, serve the cakes warm with fresh berries or a scoop of vanilla ice cream. These additions elevate your dessert and create a beautiful plate.Enjoy making this sweet treat!
Variations
Flavor Variations
You can switch up flavors in your chocolate lava cake. Try adding espresso for a rich coffee kick. Mix in raspberry puree for a fruity twist. You can also use orange zest for a bright citrus note. Each flavor adds its own magic to the dessert.
Alternative Cooking Methods
You can bake your lava cake in unique ways. An air fryer works well and cuts down baking time. Just set it to 350°F (175°C) for about 8-10 minutes. You can also use a muffin tin for smaller portions. Just adjust the baking time to about 10-12 minutes. Both methods yield delicious results.
Serving Suggestions
Serving is key for this dessert. I love pairing it with a scoop of vanilla ice cream. The warm cake and cold ice cream create a delightful contrast. You can also top it with fresh berries and whipped cream for extra flair. For a fancy touch, drizzle chocolate sauce on the plate. This adds elegance and extra chocolatey goodness.
Storage Info
How to Store Leftover Cakes
To keep your leftover chocolate lava cakes fresh, let them cool first. Once cool, place them in an airtight container. Store them in the fridge for up to three days. This way, you can enjoy them later without losing flavor.
Reheating Instructions
When you’re ready to eat your leftover cake, preheat your oven to 350°F (175°C). Place the ramekin with the cake inside for about 10-12 minutes. This warms the cake and keeps that gooey center. You can also use a microwave. Heat it for about 30 seconds. Check to ensure it is warm but not overcooked.
Best Practices for Freezing
If you want to freeze your cakes, first cool them completely. Wrap each ramekin tightly in plastic wrap. Then, place them in a freezer-safe bag or container. They will last up to three months in the freezer. To bake from frozen, add a few extra minutes to the baking time. Enjoy your chocolate lava cake anytime!
FAQs
Can I make Chocolate Lava Cake ahead of time?
Yes, you can prepare the batter ahead of time. Just fill your ramekins and cover them. Store them in the fridge for up to a day. Bake them right before you want to serve. This makes it easy for parties or special meals.
What if my lava cake doesn’t ooze?
If your cake does not ooze, it may have baked too long. The centers need to remain soft and gooey. Check your oven’s temperature with an oven thermometer. Also, make sure to follow the baking time closely. That way, you can achieve the perfect melting center.
How to tell when the cakes are done baking?
Look for firm edges and a soft center. The tops should not jiggle too much. A good rule is to bake for 12 to 14 minutes. If the edges are set and the center is still a bit wobbly, they are ready to come out.
What can I serve with Chocolate Lava Cake?
You can serve it with fresh berries or a dollop of whipped cream. Ice cream is also a great choice. A drizzle of chocolate sauce adds a nice touch too. These pairings enhance the rich chocolate flavor and add fun textures.
Is it possible to make a gluten-free version?
Yes, you can easily make this cake gluten-free! Just replace the all-purpose flour with a gluten-free blend. Most blends work well in baking. This way, you can enjoy the delicious flavor without the gluten.
In this post, we covered everything you need for chocolate lava cake. We listed the key ingredients and optional add-ins, along with substitutions for special diets. I guided you through easy steps to prepare, bake, and serve the cakes while sharing tips to avoid mistakes. You learned delicious variations and how to store leftovers too.
Now, you’re ready to impress with your lava cakes. Enjoy the rich taste and fun surprises inside each one!