Looking for a fresh, tasty dish that’s easy to make? Try my Greek Orzo Salad with Dill! Packed with vibrant veggies and zesty flavors, this salad is a perfect side or light meal. With just a few simple ingredients, you'll create a dish that impresses everyone. Let me guide you through the steps, tips, and tasty variations that will make this salad a favorite at your table. Ready to dive in?
Why I Love This Recipe
- Fresh and Flavorful: This salad is packed with fresh ingredients that burst with flavor, making it a refreshing choice for any meal.
- Quick and Easy: With just 15 minutes of prep time, this dish comes together quickly, perfect for busy weekdays or last-minute gatherings.
- Versatile: This orzo salad is great as a side dish, a light lunch, or even a main course, allowing for endless serving possibilities.
- Healthy Ingredients: Loaded with vegetables and healthy fats, this salad is not only delicious but also nutritious, making it a guilt-free option.
Ingredients
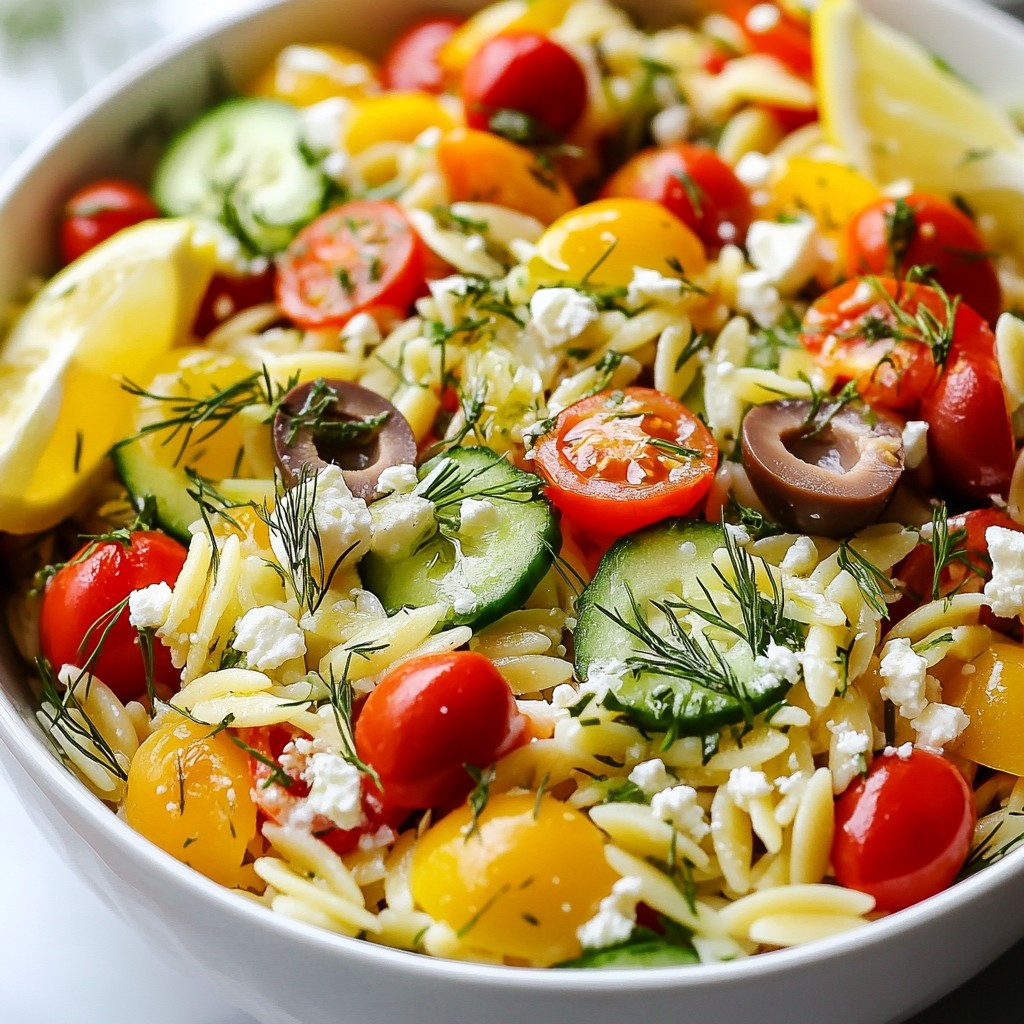
Complete Ingredient List
To make a tasty Greek Orzo Salad with Dill, you need these ingredients:
- 1 cup orzo pasta
- 1 cup cherry tomatoes, halved
- 1 cucumber, diced
- 1/2 red onion, finely chopped
- 1/2 cup Kalamata olives, pitted and halved
- 1/2 cup feta cheese, crumbled
- 1/4 cup fresh dill, chopped
- 1/4 cup olive oil
- 2 tablespoons lemon juice
- Salt and pepper to taste
Fresh vs. Dried Ingredients
Using fresh ingredients makes a big difference in flavor. Fresh vegetables like cucumber and tomatoes offer crunch and brightness. Fresh dill adds a vibrant taste that dried herbs can't match. If you only have dried dill, you can use it, but cut the amount in half. Fresh is always best for this salad.
Suggested Substitutions
Feel free to mix things up! If you don't have orzo, you can use small pasta like couscous. For a different cheese, try goat cheese instead of feta. If you want more crunch, add bell peppers or radishes. For a twist, swap Kalamata olives with green olives. These changes can still keep your salad fresh and tasty!

Step-by-Step Instructions
Cooking the Orzo Pasta
To start, boil water in a pot. Add a pinch of salt to the water. Once the water is boiling, add 1 cup of orzo pasta. Cook it according to the package instructions, usually around 8-10 minutes. Stir the pasta occasionally to prevent sticking. When the orzo is tender, drain it in a colander. Rinse the pasta under cold water to cool it down. This also stops the cooking process. Set the orzo aside while you prepare the other ingredients.
Preparing the Vegetables
Next, grab a large mixing bowl. In this bowl, add 1 cup of halved cherry tomatoes. Then, add a diced cucumber. Chop half a red onion finely and add that too. Don't forget to include 1/2 cup of Kalamata olives, pitted and halved. Mixing these fresh veggies gives the salad a vibrant flavor and color. You will enjoy the crunch from the cucumber and the sweetness from the tomatoes.
Combining All Ingredients
Now it’s time to bring everything together. Add the cooled orzo pasta to the bowl with the vegetables. In a small bowl, whisk together 1/4 cup of olive oil and 2 tablespoons of lemon juice. Add salt and pepper to taste. Pour this dressing over the orzo salad. Gently fold in 1/2 cup of crumbled feta cheese and 1/4 cup of chopped fresh dill. This step ensures all the flavors mix well. Let the salad sit for at least 15 minutes before serving. This waiting time helps the flavors meld beautifully.
Tips & Tricks
Enhancing Flavor Profiles
To boost the taste of your Greek orzo salad, use fresh herbs. Fresh dill adds a bright, earthy note. You can also try mint or parsley for a twist. A squeeze of lemon juice brings a nice zing. I like to add some lemon zest for extra flavor. If you want heat, a pinch of red pepper flakes works well. Always taste and adjust the seasoning to your liking.
Making Ahead of Time
You can make this salad ahead of time. It tastes even better after the flavors blend. Prepare the salad and dress it, but wait to add the feta until just before serving. This keeps it fresh and prevents it from getting soggy. Store it in an airtight container in the fridge for up to three days. Just give it a good stir before serving.
Common Mistakes to Avoid
One common mistake is overcooking the orzo. Cook it al dente for the best texture. Rinse it with cold water right after cooking. This stops the cooking process and keeps it firm. Another mistake is not seasoning the salad enough. Don’t forget salt and pepper to enhance all the flavors. Lastly, avoid adding too much dressing. Start with a little, then add more if needed.
Pro Tips
- Use Fresh Ingredients: Fresh vegetables and herbs will enhance the flavor and texture of your salad, making it more vibrant and appealing.
- Chill Before Serving: Allow the salad to chill in the refrigerator for at least 15 minutes before serving. This helps the flavors meld together beautifully.
- Customize Your Salad: Feel free to add other ingredients like bell peppers, artichokes, or grilled chicken to make the salad your own.
- Store Properly: If you have leftovers, store the salad in an airtight container in the refrigerator for up to 2 days, but be aware that the orzo may absorb some dressing over time.
Variations
Protein Additions (e.g., chicken, shrimp)
You can easily add protein to your Greek Orzo Salad. Grilled chicken or shrimp works well. For chicken, use grilled breast, sliced thin. For shrimp, sauté in a pan with a little olive oil. Both options boost flavor and make the salad heartier. You can also use chickpeas for a nice twist. They add protein without meat.
Vegetarian/Vegan Adaptations
Making a vegetarian or vegan version is simple. Just skip the feta cheese. Instead, use avocado for creaminess. You can also add more veggies like bell peppers or carrots. These swaps keep the dish fresh and tasty. For a vegan dressing, try tahini mixed with lemon juice. It adds depth without dairy.
Seasonal Ingredient Swaps
Seasonal swaps keep your salad exciting. In summer, add fresh corn or zucchini. In fall, try roasted butternut squash. These ingredients add flavor and nutrition. You can also switch up the herbs. In spring, fresh basil works great. In winter, use parsley for a different taste. These changes keep each bite unique and fresh.
Storage Info
Best Storage Practices
To keep your Greek Orzo Salad fresh, store it in an airtight container. This helps to keep out air and moisture. You can use glass or plastic containers. Make sure to seal it well. This will help maintain the flavors and textures of the salad.
Refrigeration Guidelines
Store your salad in the fridge if you want to keep it longer. It lasts about 3 to 5 days when properly stored. If you notice any signs of spoilage, like a bad smell or discoloration, throw it away. Always check your salad before eating.
How to Reheat or Serve Cold
You can enjoy this salad cold right from the fridge. If you prefer it warm, gently heat it on low. Add a splash of olive oil or lemon juice to keep it moist. Remember, don’t overheat it, or the veggies may get mushy. Serve it chilled for a refreshing taste!
FAQs
Can I make Greek Orzo Salad ahead of time?
Yes, you can make Greek Orzo Salad ahead of time. This salad tastes even better after the flavors mix. Prepare it a few hours before serving or the night before. Just keep it in the fridge. When ready to serve, stir it gently. If it looks dry, add a splash of olive oil.
What kind of olives are best for this recipe?
Kalamata olives are the best choice for Greek Orzo Salad. They add a rich and briny flavor. Their dark color also makes the salad more appealing. If you prefer a milder taste, you can use green olives. Both choices will make your salad tasty.
How do I make this salad gluten-free?
To make Greek Orzo Salad gluten-free, use gluten-free orzo pasta. Many brands offer this option now. You can also replace orzo with quinoa or rice. Both options keep the salad light and fresh. Just cook them according to package directions before mixing them in.
This article covered key points for making a Greek Orzo Salad. We explored ingredients, cooking steps, and tips for best results. You learned about fresh versus dried ingredients and smart substitutions. We discussed flavor enhancements and how to store your salad properly.
In the end, creating this dish can bring joy and fresh tastes to your table. Don't hesitate to try different variations based on your preferences. Enjoy your cooking journey!