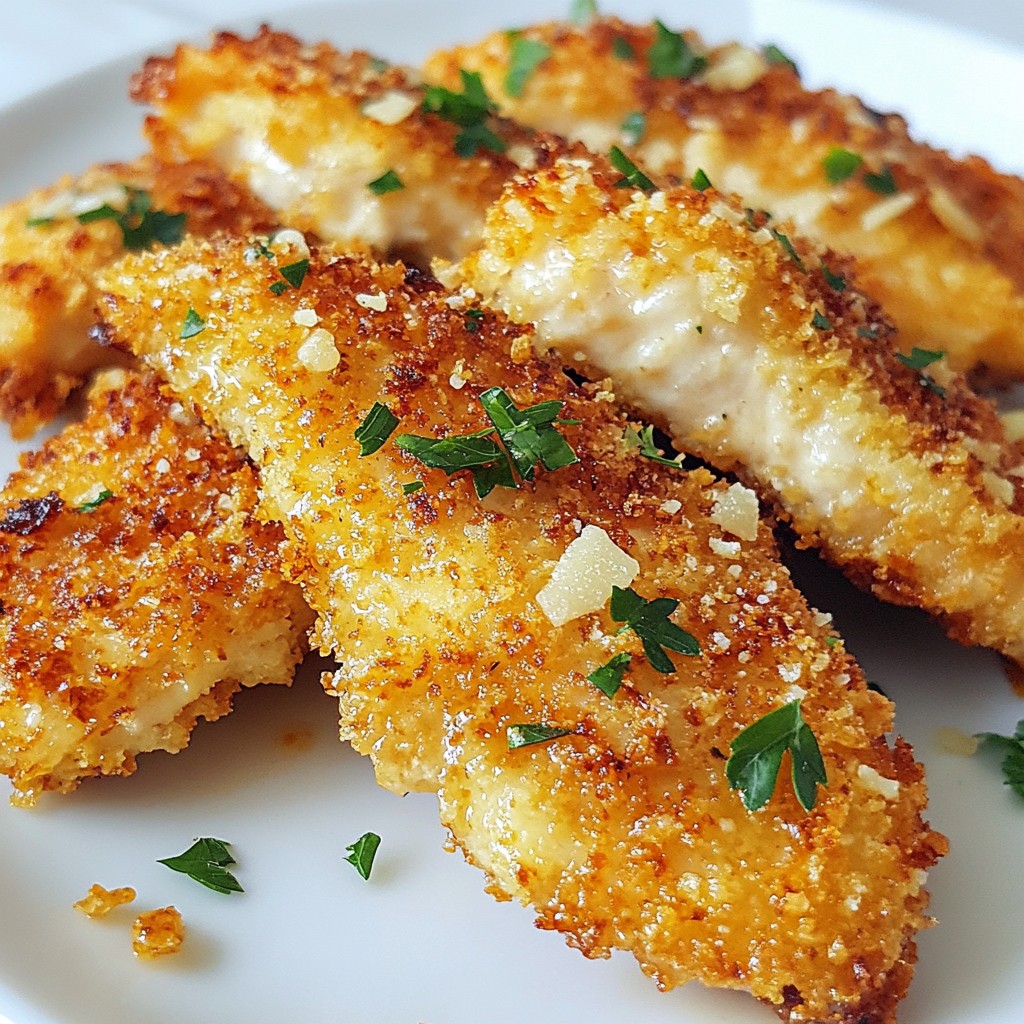
Are you ready to indulge in a crispy delight? These Garlic Parmesan Chicken Tenders are your new favorite dish! With just a few simple ingredients, you can create juicy, flavorful tenders that everyone will love. I’ll share essential tips and step-by-step instructions to ensure your chicken is perfectly golden every time. Whether you’re planning a family dinner or a game night, this recipe will impress. Let’s get cooking!
Why I Love This Recipe
- Crispy Texture: The panko breadcrumbs create an irresistible crunch that elevates the chicken tenders to a whole new level.
- Flavorful Garlic: The addition of fresh garlic adds a bold, savory flavor that perfectly complements the chicken and Parmesan.
- Quick Preparation: This recipe is quick to prepare, making it an ideal choice for busy weeknights or last-minute gatherings.
- Versatile Dish: These chicken tenders can be served as an appetizer, main course, or even in a salad, making them a versatile addition to any meal.
Ingredients
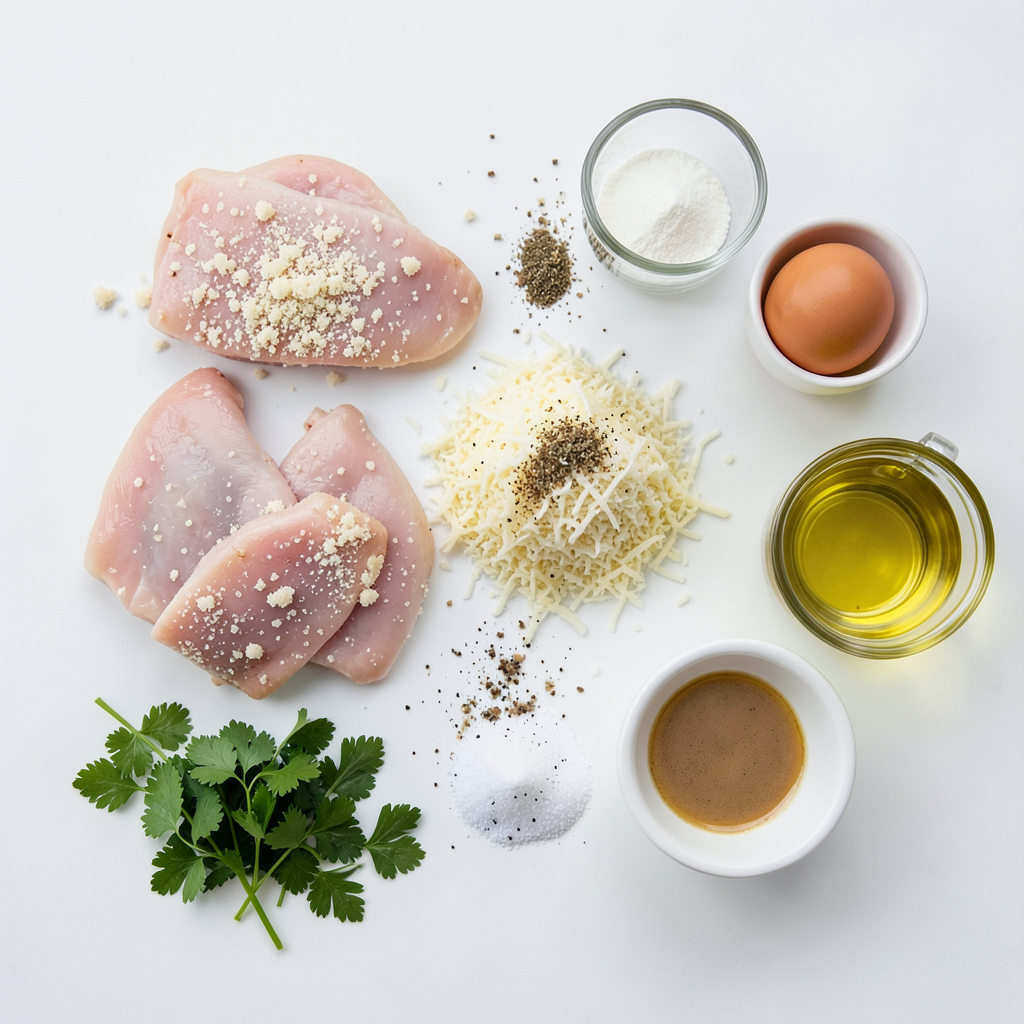
List of Ingredients
- 1 pound chicken tenders
- 1 cup breadcrumbs (preferably panko for extra crunch)
- 1/2 cup grated Parmesan cheese
- 4 cloves garlic, minced
- 1 teaspoon Italian seasoning
- 1/2 teaspoon salt
- 1/4 teaspoon black pepper
- 2 large eggs
- 1 tablespoon olive oil
- Fresh parsley, chopped (for garnish)
Ingredient Tips
Choosing the right breadcrumbs Panko breadcrumbs give your chicken tenders a great crunch. They are lighter and crispier than regular breadcrumbs. If you can, choose panko for the best texture.
Fresh versus dried herbs I love using fresh herbs when I can. They add more flavor than dried ones. But if you only have dried Italian seasoning, that works too. Just use a little less.
Chicken tender selection Look for chicken tenders that are firm and pink. Avoid any that look slimy or have dark spots. Fresh tenders make all the difference in taste.
These ingredients come together to create a tasty and crispy delight. You will love the rich garlic and cheese flavor.
Step-by-Step Instructions
Preparation Steps
- Preheat your oven to 400°F (200°C). This high heat makes the chicken crispy.
- Line a baking sheet with parchment paper. This helps with easy cleanup and prevents sticking.
Coating the Chicken
- In a large bowl, mix the breadcrumbs, grated Parmesan cheese, minced garlic, Italian seasoning, salt, and black pepper. Stir until blended.
- In another bowl, whisk the eggs. Make sure they are well combined and frothy.
Baking the Chicken
- Take each chicken tender and dip it into the egg mixture. Let any extra egg drip off.
- Next, coat the tender in the breadcrumb mixture. Press down so that the crumbs stick well.
- Place the coated tenders on the prepared baking sheet. Drizzle olive oil on top. This will help them brown nicely.
Cooking Time
- Bake the chicken for 15-20 minutes. Check that the internal temperature reaches 165°F. The coating should be golden brown and crispy.
Tips & Tricks
How to Achieve Extra Crispiness
To make your chicken tenders super crispy, use panko breadcrumbs. Panko is lighter and crunchier than regular breadcrumbs. It gives your tenders a great texture. You can find panko at most grocery stores.
Oil application is key for crispiness, too. Drizzle olive oil over the coated tenders before baking. This helps them brown and crisp up nicely in the oven. You can also spray them lightly with cooking spray for even more crunch.
Flavor Enhancements
To boost flavor, add spices or herbs to your breadcrumb mixture. Consider using paprika for a smoky taste, or chili powder for a kick. Fresh herbs like thyme or rosemary can elevate your dish. Mix them in with the breadcrumbs for a new twist.
Marinating chicken tenders can also enhance flavor. A simple marinade of olive oil, garlic, and lemon juice works wonders. Let the tenders soak for about 30 minutes before coating. This adds moisture and depth to your meal.
Serving Suggestions
Pair your garlic Parmesan chicken tenders with sides that complement them well. A fresh salad or roasted vegetables are great choices. They add color and balance to your plate.
Dipping sauces can take your meal to the next level. Try a creamy ranch or zesty marinara. Honey mustard also makes for a sweet and tangy dip. Having a variety of sauces keeps things fun and exciting!
Pro Tips
- Use Fresh Garlic: Freshly minced garlic enhances the flavor significantly compared to garlic powder. Aim for the freshest cloves for the best taste.
- Let the Coating Set: After coating the chicken tenders, let them sit for about 10 minutes before baking. This helps the coating adhere better during baking.
- Experiment with Seasonings: Feel free to add your favorite herbs or spices to the breadcrumb mixture, such as paprika or cayenne pepper, for an extra kick.
- Serve with Dipping Sauce: Pair these chicken tenders with a delicious dipping sauce like ranch or marinara for an added burst of flavor.
Variations
Gluten-Free Alternatives
You can make these chicken tenders gluten-free by using gluten-free breadcrumbs. They provide a great crunch, just like regular breadcrumbs. Look for brands that use rice flour or almond flour. You can also coat the chicken in crushed nuts or cornmeal for a different texture. Both options keep the taste delicious while making them safe for gluten-sensitive folks.
Flavor Variations
For a spicy twist, try making spicy garlic Parmesan chicken tenders. Add cayenne pepper or red pepper flakes to the breadcrumb mix. This gives a nice kick without losing the garlic flavor. If you love a fresh taste, make lemon garlic Parmesan tenders. Just add lemon zest to the breadcrumb mix and squeeze fresh lemon juice over the cooked chicken. It brightens the dish and adds a zing.
Cooking Methods
You can cook these chicken tenders in several ways. Air frying gives you a crispy texture with less oil. Set your air fryer to 400°F and cook for about 10-12 minutes. Baking is also great. It’s simple and needs just 15-20 minutes in the oven. If you want to grill, preheat your grill to medium heat. Grill the tenders for about 5-7 minutes on each side. Grilling adds a smoky flavor and is perfect for sunny days.
Storage Info
How to Store Leftovers
To keep your Garlic Parmesan Chicken Tenders fresh, place them in the fridge. Use an airtight container for best results. This helps lock in moisture and flavor. You can store them for up to three days. If you need to keep them longer, freezing is a good option.
Reheating Tips
When you reheat the chicken tenders, aim for the oven. Preheat it to 350°F (175°C). Place the tenders on a baking sheet. Heat for about 10-15 minutes. This keeps them crispy. Avoid the microwave if you can. It often makes food soggy.
Freezing Instructions
To freeze your chicken tenders, let them cool first. Then, wrap each tender in plastic wrap. Place them in a freezer bag or container. This helps prevent freezer burn. You can freeze them for up to three months. When ready to eat, thaw them overnight in the fridge. Reheat as mentioned above for the best texture.
FAQs
Can I use chicken breasts instead of chicken tenders?
Yes, you can use chicken breasts. Just cut them into strips. Chicken tenders are more tender and cook faster. So, if you use breasts, adjust the cooking time to avoid dryness.
What can I substitute for Parmesan cheese?
You can use Pecorino Romano or nutritional yeast. Both add a nice flavor twist. If you want a dairy-free option, nutritional yeast works well in many dishes.
How do I know when the chicken tenders are cooked through?
Check the internal temperature with a meat thermometer. It should read 165°F (74°C). If you don’t have a thermometer, cut one open. The meat should be white and juices should run clear.
Can I make Garlic Parmesan Chicken Tenders in advance?
Yes, you can prep them ahead. Coat the tenders and place them in the fridge for up to 24 hours. Bake them right before serving for a fresh taste.
This blog post shares a simple method for making Garlic Parmesan Chicken Tenders. We covered ingredients, step-by-step instructions, and tips for extra crispiness. You learned about variations and how to store and reheat leftovers.
With these details, you can create a dish that impresses. Remember, cooking is fun! Experiment with flavors and enjoy your meal. Shift your cooking game by using fresh ingredients and following these tips. Happy cooking!