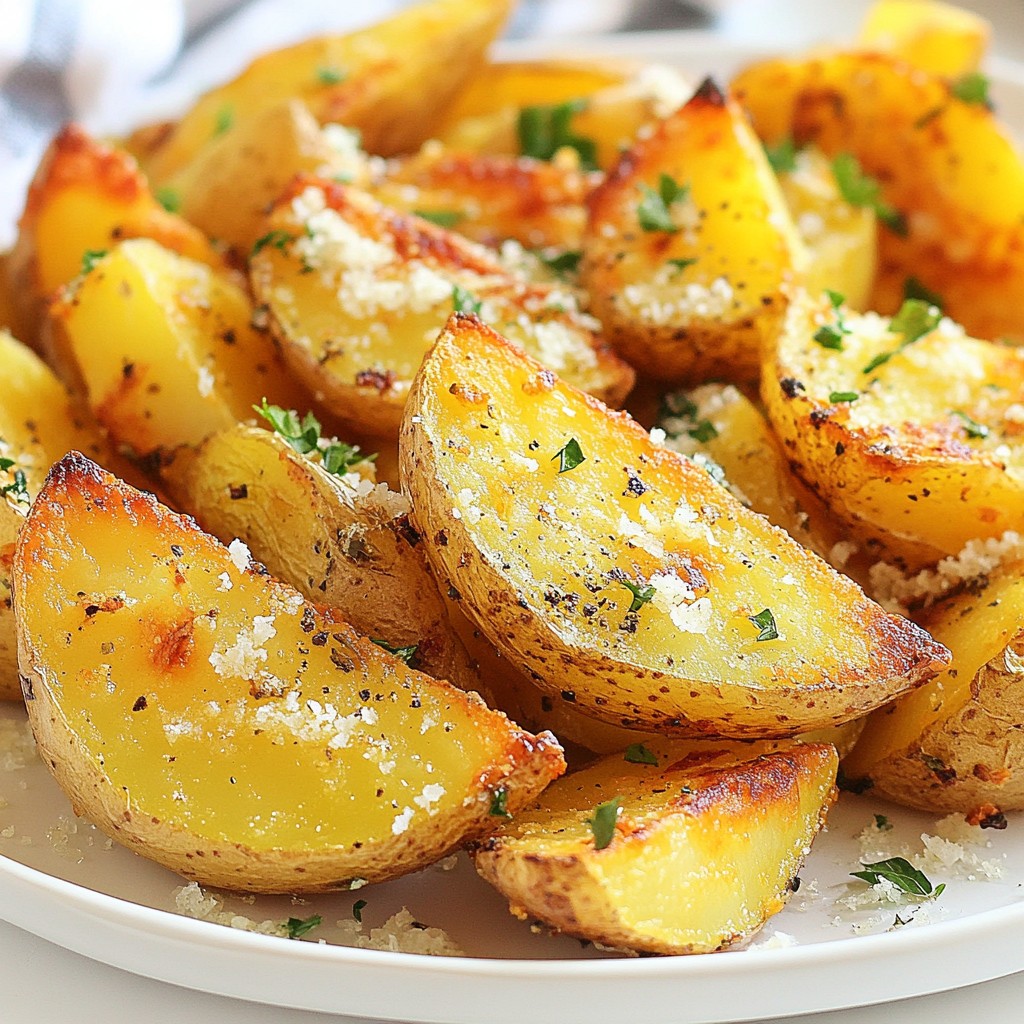
If you crave a side dish that's crispy, flavorful, and simple, you're in the right place! My Crispy Garlic Potato Wedges are perfect for any meal. With just a few easy steps, you’ll have delicious golden wedges that everyone loves. Let’s dive into the tasty details. Get ready to turn your meal up a notch with this easy recipe!
Why I Love This Recipe
- Easy to Make: This recipe requires minimal ingredients and straightforward steps, perfect for any home cook.
- Crispy Perfection: The high oven temperature ensures that these potato wedges turn out perfectly crispy every time.
- Flavor Packed: The combination of garlic, paprika, and oregano brings a delightful flavor that elevates simple potatoes.
- Customizable: You can easily tweak the spices or add your favorite toppings like cheese or herbs for a personal touch.
Ingredients
List of Ingredients with Measurements
To make crispy garlic potato wedges, you will need:
- 4 large Russet potatoes
- 4 tablespoons olive oil
- 4 cloves garlic, minced
- 1 teaspoon paprika
- 1 teaspoon dried oregano
- 1 teaspoon salt
- ½ teaspoon black pepper
- Fresh parsley, chopped (for garnish)
- Grated Parmesan cheese (optional, for an extra touch)
Recommended Potato Variants
While Russet potatoes are great, you can try other types too.
- Yukon Gold potatoes give a buttery taste.
- Red potatoes are waxy and hold their shape well.
- Sweet potatoes add a sweet twist.
Each variant will change the flavor and texture slightly. Feel free to experiment with what you have on hand.
Optional Ingredients for Extra Flavor
You can amp up the taste of your wedges with a few extras.
- Add a pinch of cayenne for some heat.
- Try rosemary or thyme for a fresh herb flavor.
- Toss in some onion powder for depth.
Mix and match these options to create your perfect crispy garlic potato wedges!

Step-by-Step Instructions
Prepping the Potatoes
Start with the potatoes. I like to use large Russet potatoes for their texture. First, wash and scrub them well. This step helps remove dirt. Next, cut each potato into wedges. Try to make them even in size. This ensures they bake evenly.
Making the Garlic Oil Mixture
Now, let’s create the garlic oil mixture. In a large bowl, add 4 tablespoons of olive oil. Then, mince 4 cloves of garlic and add them in. Sprinkle in 1 teaspoon of paprika, 1 teaspoon of dried oregano, 1 teaspoon of salt, and ½ teaspoon of black pepper. Mix everything together well. You want a nice, seasoned oil that coats the potatoes perfectly.
Baking for Perfect Crispiness
It’s time to bake! Preheat your oven to 425°F (220°C). Line a baking sheet with parchment paper. This helps prevent the wedges from sticking. Add the potato wedges to the bowl with the garlic oil mixture. Toss them until they are well coated. Spread the wedges in a single layer on the baking sheet. Make sure they aren’t crowded. Bake for 30-35 minutes. Flip them halfway through for even browning. When they turn golden brown and crispy, they are ready! Let them cool slightly, then add a sprinkle of fresh parsley or Parmesan cheese if you like. Enjoy them hot with your favorite dipping sauce!
Tips & Tricks
How to Achieve Ultra-Crispy Wedges
To get crispy garlic potato wedges, follow a few key steps. First, cut your potatoes evenly. This helps them cook at the same rate. Soak the wedges in water for about 30 minutes. This removes excess starch. After soaking, dry them well using a clean kitchen towel. Next, coat the wedges in the garlic oil mixture. Ensure they are fully covered. Space them out on the baking sheet. This helps hot air circulate, making them crispier. Flip the wedges halfway through baking for even browning.
Choosing the Right Baking Sheet
Choose a thick, sturdy baking sheet for the best results. A thin sheet can warp in the oven, causing uneven cooking. Make sure to line it with parchment paper. This prevents sticking and makes cleanup easy. Avoid overcrowding the wedges on the sheet. If you have too many, use two sheets. This way, each wedge gets enough heat to become crispy.
Recommended Dipping Sauces
Dipping sauces can take your crispy garlic potato wedges to the next level. Ketchup is a classic choice and always a hit. Garlic aioli adds a creamy touch and pairs well with the garlic flavor. You can also try ranch dressing for a cool contrast. For a spicy kick, mix sriracha with mayonnaise. Each sauce brings a unique taste that complements the crispy wedges beautifully.
Pro Tips
- Cut Evenly: Ensure all potato wedges are cut to a uniform size to promote even cooking and crispiness.
- Soak for Extra Crispiness: Soak the potato wedges in cold water for 30 minutes before baking to remove excess starch, which helps them become crispier.
- Season Generously: Don’t be shy with the seasoning; evenly coat the wedges in the garlic oil mixture for maximum flavor.
- Use a Cooling Rack: For extra crispiness, place the baked wedges on a cooling rack instead of directly on the baking sheet after baking.
Variations
Spicy Garlic Potato Wedges
To add some heat, mix cayenne pepper into the garlic oil. Start with a pinch and adjust to your taste. This spice kicks up the flavor and gives a nice zing. You can also sprinkle chili flakes on top before baking. The heat pairs well with the garlic flavor.
Herb-Infused Potato Wedges
For a fresh twist, try adding herbs. Mix rosemary, thyme, or basil into the garlic oil. These herbs bring a wonderful aroma and taste to the wedges. You can even use fresh herbs for a stronger flavor. Toss in a tablespoon or two to make your wedges more fragrant.
Vegan and Gluten-Free Alternatives
Making these wedges vegan is easy! Simply skip the Parmesan cheese or use a plant-based version. Most ingredients already fit a gluten-free diet. Just ensure the garlic oil and spices are gluten-free. These options keep the wedges tasty and suitable for everyone.
Storage Info
How to Store Leftovers
To store leftover crispy garlic potato wedges, let them cool first. Place them in an airtight container. Keep them in the fridge for up to three days. If you want them to last longer, consider freezing.
Reheating Tips for Maintaining Crispiness
When you reheat the wedges, use an oven or an air fryer. Preheat your oven to 400°F (200°C). Spread the wedges on a baking sheet. Heat them for about 10-15 minutes. This method helps keep them crispy. Avoid using a microwave, as it can make them soggy.
Freezing Instructions
To freeze the potato wedges, place them on a baking sheet in a single layer. Freeze them for about an hour until solid. Then transfer them to a zip-top bag or a freezer-safe container. They can stay fresh for up to three months. When you’re ready to eat, bake them straight from the freezer. Adjust the baking time as needed.
FAQs
Can I use other types of potatoes?
Yes, you can use other potatoes. Yukon Gold and Red potatoes work well. Each type offers a different taste and texture. Russet potatoes are great for crispy wedges, but others can also shine. Experiment and find what you like best!
How can I make these wedges healthier?
To make the wedges healthier, reduce the olive oil to two tablespoons. You can also skip the cheese or use a lighter option. Adding more herbs can enhance the flavor without added calories. Pair these wedges with a fresh salad for a balanced meal.
What are some good alternatives to garlic?
If you want a garlic alternative, try onion powder or shallots. For a unique twist, use smoked paprika or chili powder. These options add flavor without the garlic. Choose what fits your taste best!
How long do the potato wedges stay fresh?
Once cooked, the potato wedges stay fresh for about three days in the fridge. Store them in an airtight container to keep them crispy longer. Reheat them in the oven for best results.
In this post, we explored how to create tasty potato wedges from start to finish. We covered ingredients, prep, baking methods, and tips for crispy perfection. Remember, you can customize flavors with spices or herbs. There are also many ways to store and reheat leftovers. With these insights, you can make delicious wedges anytime. Enjoy experimenting with your new skills!