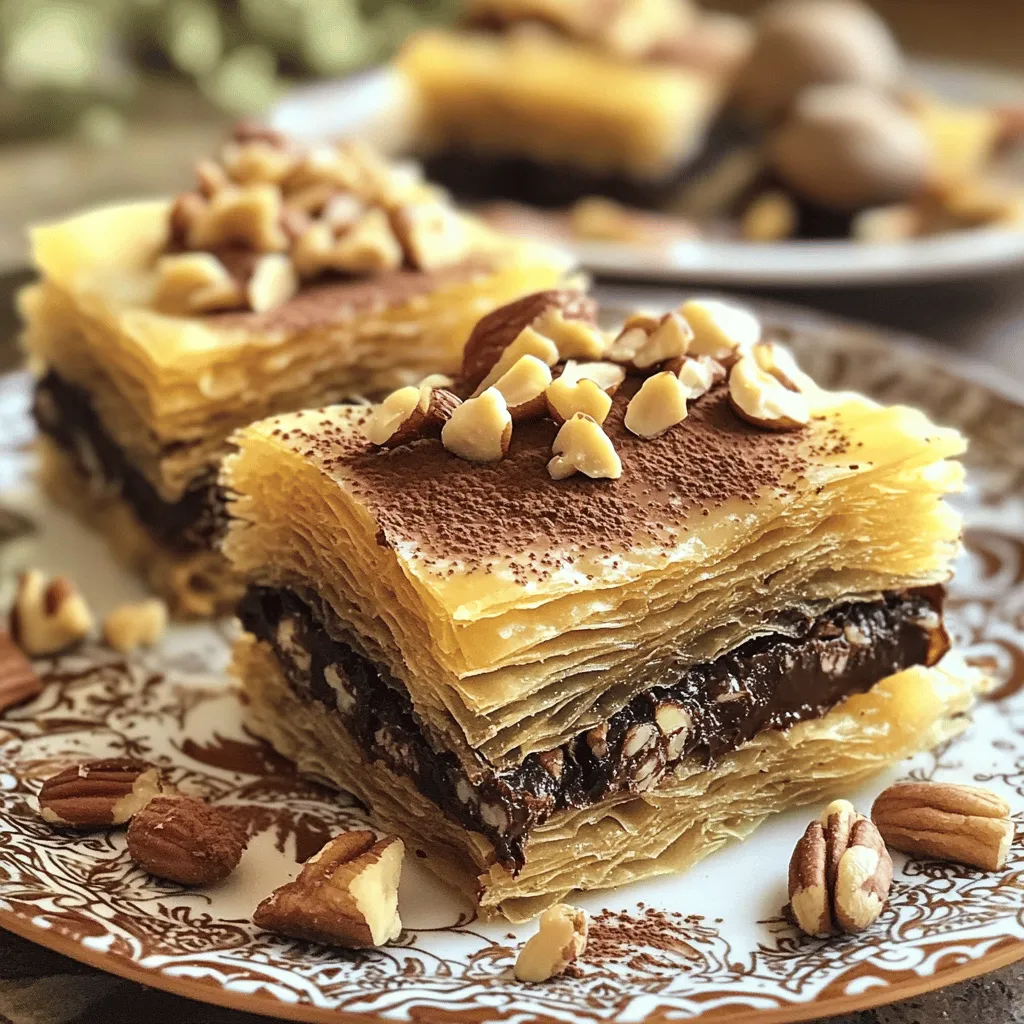
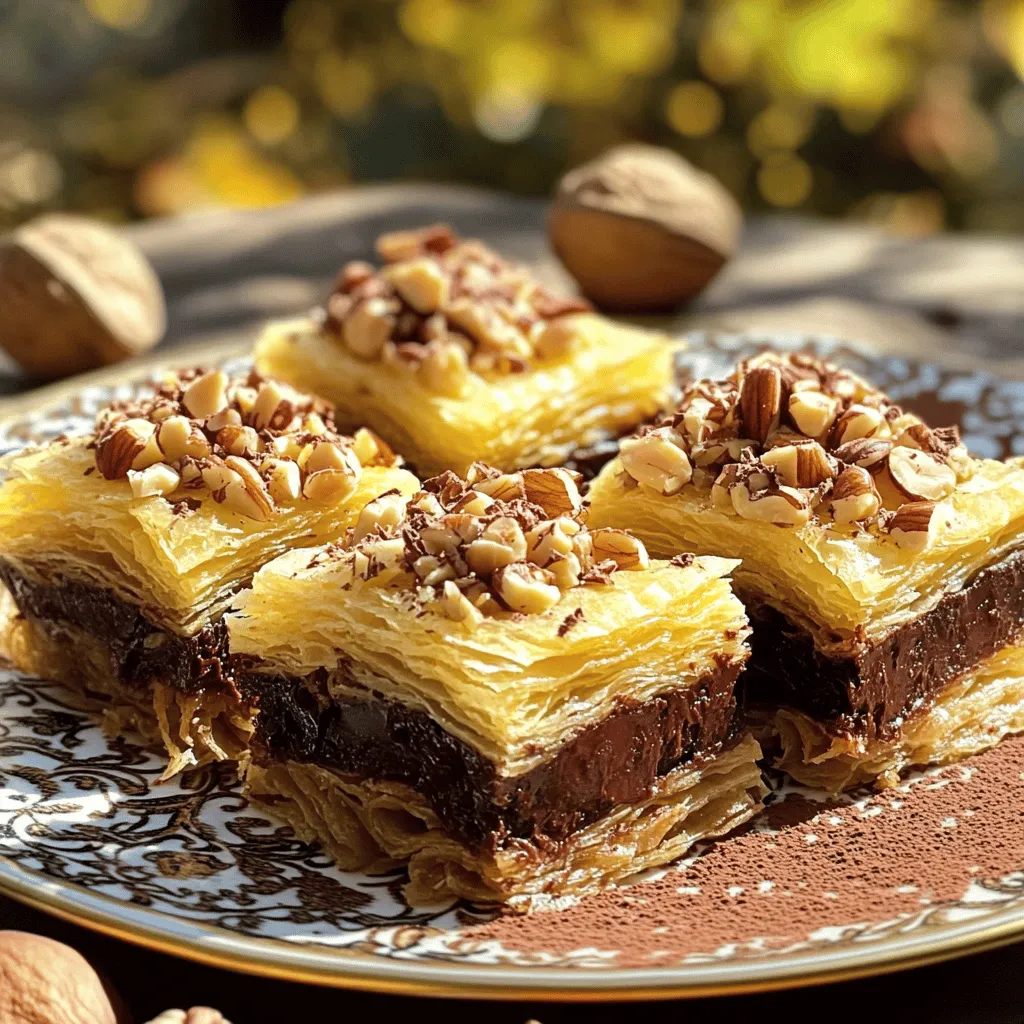
Are you ready to dive into a delicious world of dessert? Chocolate Kataifi Bars are a sweet delight that’s hard to resist. This treat combines crispy kataifi pastry and rich chocolate filling, making it a perfect dessert for any occasion. Whether you’re a baking pro or just starting, I will guide you step-by-step to create these mouthwatering bars. Get ready to impress your family and friends with this irresistible sweet treat!They mix crispy kataifi pastry with rich chocolate. This recipe is simple and quick to follow. You will love how they look and taste.
Detailed Ingredient List
Here’s what you need:
– 200g kataifi pastry
– 100g unsalted butter, melted
– 200g dark chocolate, chopped
– 150g sweetened condensed milk
– 50g chopped nuts (walnuts or pistachios)
– 1 teaspoon vanilla extract
– A pinch of salt
– 1 tablespoon sugar (optional, for extra sweetness)
Each ingredient plays a key role in flavor and texture. The kataifi gives a light crunch. The chocolate adds a rich, creamy taste. Nuts provide a nice bite.
Substitutions and Alternatives
If you don’t have kataifi, try phyllo dough. It gives a similar texture. You can swap dark chocolate with milk chocolate for a sweeter taste. For nuts, choose almonds or skip them for a nut-free option. You can use coconut milk instead of sweetened condensed milk for a dairy-free treat. These changes keep the bars tasty and fun!
Step-by-Step Instructions
Preparation of Kataifi Pastry
To start making your Chocolate Kataifi Bars, you first need to prepare the kataifi pastry. If your kataifi isn’t already shredded, take a bowl and break it apart. This helps create those lovely strands. Next, pour the melted unsalted butter over the shredded kataifi. Use your hands to toss the pastry until it is well-coated. This step is key for flavor and texture.
Now, take half of the buttered kataifi and press it firmly into the bottom of an 8×8 inch baking pan. Make sure it’s even. Bake this layer in a preheated oven at 180°C (350°F) for about 15 minutes, or until it turns golden brown. This gives your bars a nice base.
Making the Chocolate Filling
While your kataifi bakes, it’s time to make the chocolate filling. In a saucepan, combine chopped dark chocolate, sweetened condensed milk, a pinch of salt, and vanilla extract. Place the saucepan over low heat. Stir gently as the chocolate melts. This should take just a few minutes. Once smooth, remove the pan from the heat. Add the chopped nuts, mixing them in well.
Final Assembly and Baking Instructions
Now, pour the melted chocolate mixture over the baked kataifi layer in your pan. Use a spatula to spread the chocolate evenly. Next, take the remaining kataifi and sprinkle it over the chocolate layer. Press it down gently to create an even top layer. If you want, add a sprinkle of sugar for extra sweetness and crunch.
Return the pan to the oven and bake for another 20-25 minutes, until the top is golden and crispy. After baking, let your bars cool in the pan for about 30 minutes. Use the parchment overhang to lift the bars out and slice them into squares or rectangles. For a delightful finish, serve your Chocolate Kataifi Bars on a nice plate, perhaps dusted with cocoa or powdered sugar. Enjoy!
Tips & Tricks
Perfecting Texture and Flavor
For the best texture, make sure to bake the kataifi until golden. This step gives a nice crunch. Use high-quality dark chocolate for a rich, deep flavor. The balance of chocolate and sweetened condensed milk is key. Do not skip the pinch of salt; it enhances the chocolate. If you like nuts, chop them finely. This helps them mix well into the chocolate filling. For a softer bar, reduce the baking time slightly. Keep an eye on the bars as they bake.
Serving and Presentation Ideas
Presentation makes a big difference. You can serve the bars on a nice plate. A dusting of cocoa powder or powdered sugar adds charm. Garnish with whole nuts on top for a rustic look. You can also pair these bars with a scoop of vanilla ice cream. This adds creaminess and complements the chocolate flavor. Consider using small dessert cups for serving. This way, guests can grab a bar without mess.
Common Mistakes to Avoid
One common mistake is over-baking the kataifi. This can make it too hard. Aim for a golden color, not dark brown. Another mistake is not letting the bars cool completely before slicing. This can lead to messy cuts. If the chocolate mixture is too hot, it can melt the kataifi below. Be careful when pouring it over the kataifi layer. Lastly, do not forget to line the baking pan with parchment paper. This step helps with easy removal of the bars later. Follow these tips for a perfect treat every time!
Variations
Nut-Free Options
If you want to make nut-free chocolate kataifi bars, just skip the nuts. The bars will still taste great! You can add a bit of crunch by using seeds. Try sunflower seeds or pumpkin seeds instead. They will add texture without the nut allergy risk.
Different Chocolate Choices
You can switch up the chocolate for these bars. Use milk chocolate for a sweeter taste. Dark chocolate gives a rich flavor, while white chocolate adds a creamy touch. You can even mix different chocolates for a fun twist. Just remember, the type of chocolate affects the sweetness and taste of your bars.
Flavor Add-Ins (like fruits or spices)
To make your bars unique, think about adding flavors. Dried fruits like raisins or cranberries can add sweetness. You could also use spices like cinnamon or cardamom for a warm flavor. Another fun option is to mix in some coffee or espresso powder. This will enhance the chocolate taste and give a kick.
Storage Info
Best Practices for Storing Bars
To keep your Chocolate Kataifi Bars fresh, store them in an airtight container. This helps maintain their texture and flavor. Place a layer of parchment paper between layers to prevent sticking. Keep the container in a cool, dry place. You can also store them in the fridge for extra freshness. However, be aware that cold storage can affect the crunchiness of the kataifi.
Freezing Chocolate Kataifi Bars
Yes, you can freeze these bars! After cutting them, wrap each piece tightly in plastic wrap. Then, place the wrapped bars in a freezer-safe container or bag. They can last up to three months in the freezer without losing flavor. When you’re ready to enjoy them, simply remove from the freezer and let them thaw in the fridge overnight.
Reheating Tips
If your bars lose their crispiness, you can restore it easily. Preheat your oven to 180°C (350°F). Place the bars on a baking sheet and warm them for about 10 minutes. This process revives that lovely crunch. Enjoy your bars warm for a delightful treat!
FAQs
What other desserts can I make with kataifi pastry?
You can make many tasty desserts with kataifi pastry. Try these ideas:
– Baklava: This classic uses layers of kataifi, nuts, and honey syrup.
– Kataifi Nest: Shape the pastry into nests, fill with cream, and top with fruit.
– Kataifi Cheesecake: Use kataifi as a crust for a creamy cheesecake.
– Kataifi Pudding: Layer kataifi with custard or pudding for a fun treat.
These options let you play with textures and flavors, just like in chocolate kataifi bars.
Can I make chocolate kataifi bars ahead of time?
Yes, you can make chocolate kataifi bars ahead of time. They stay fresh for a few days. Here’s what to do:
– Prepare: Make the bars as directed and let them cool completely.
– Store: Wrap them tightly in plastic wrap or foil. This keeps them moist.
– Refrigerate: Place them in the fridge to keep them fresh longer.
If you want to serve them warm, you can reheat them in the oven for a few minutes.
Where can I find chocolate kataifi bars to purchase?
You might find chocolate kataifi bars at local bakeries or specialty shops. Look for these places:
– Middle Eastern Markets: They often have kataifi-based sweets.
– Online Stores: Check websites that specialize in international foods.
– Gourmet Bakeries: Some bakeries make unique desserts with kataifi.
If you can’t find them, making your own is fun and rewarding.
In this article, we explored how to make delicious chocolate kataifi bars. We covered the key ingredients, detailed step-by-step instructions, and helpful tips to perfect your dish. You can try fun variations to suit your taste, and I shared best practices for storing your bars. Remember, practice makes perfect in the kitchen. With simple steps and a few tricks, you can create a dessert everyone will enjoy. Don’t hesitate to experiment with ingredients and flavors to make this treat your own. Enjoy your baking!