Craving a tasty snack that’s quick and simple? You’re in the right place! My Cheesy Garlic Breadsticks are packed with flavor and perfect for any occasion. Whether you want to impress guests or treat yourself, these breadsticks deliver every time. In this post, I’ll guide you through easy steps to make them, including fresh tips to enhance your results. Let’s get started and make some delicious magic in your kitchen!
Ingredients
List of Ingredients
To make cheesy garlic breadsticks, gather these tasty ingredients:
– 2 cups all-purpose flour
– 1 tablespoon instant yeast
– 1 teaspoon sugar
– 1 teaspoon salt
– ¾ cup warm water (about 110°F)
– 2 tablespoons olive oil
– 3 cloves garlic, minced
– 1 cup shredded mozzarella cheese
– ½ cup grated Parmesan cheese
– 2 tablespoons chopped fresh parsley
– 1 teaspoon Italian seasoning
– ¼ teaspoon red pepper flakes (optional)
Special Equipment Needed
You will need a few tools for this recipe:
– A large mixing bowl
– A floured surface for kneading
– A parchment-lined baking sheet
– A damp cloth for covering the dough
– A small bowl for mixing garlic oil
Tips for Fresh Ingredients
Using fresh ingredients makes a big difference. Here are some tips:
– Choose high-quality olive oil for rich flavor.
– Use fresh garlic, as it has a stronger taste.
– Grab fresh parsley from the market or your garden.
– Check cheese expiration dates; fresh cheese melts better.
These tips help you create the best cheesy garlic breadsticks.Enjoy cooking!
Step-by-Step Instructions
Preparation Steps
1. In a large bowl, mix 2 cups of flour, 1 tablespoon of instant yeast, 1 teaspoon of sugar, and 1 teaspoon of salt. Stir it well.
2. In another bowl, combine ¾ cup of warm water (about 110°F) and 2 tablespoons of olive oil. Slowly add this to the dry mix. Stir until a dough forms.
3. Knead the dough on a floured surface for 5-7 minutes. It should feel smooth and elastic.
4. Place the dough in a greased bowl. Cover it with a damp cloth and let it rise for about 30 minutes. It should double in size.
Baking Instructions
5. Preheat your oven to 425°F (220°C).
6. After the dough rises, punch it down to remove air. Roll it out on a floured surface into a rectangle, about ½ inch thick.
7. Move the rolled dough to a parchment-lined baking sheet.
8. In a small bowl, mix 3 cloves of minced garlic with 2 tablespoons of olive oil. Brush this garlic oil over the dough, leaving a small edge.
9. Sprinkle 1 cup of shredded mozzarella cheese and ½ cup of grated Parmesan cheese evenly over the top.
10. In another bowl, mix 2 tablespoons of chopped parsley, 1 teaspoon of Italian seasoning, and ¼ teaspoon of red pepper flakes (if you like heat). Sprinkle this mix over the cheese.
11. Bake in the oven for 15-20 minutes. Look for a golden, bubbly surface.
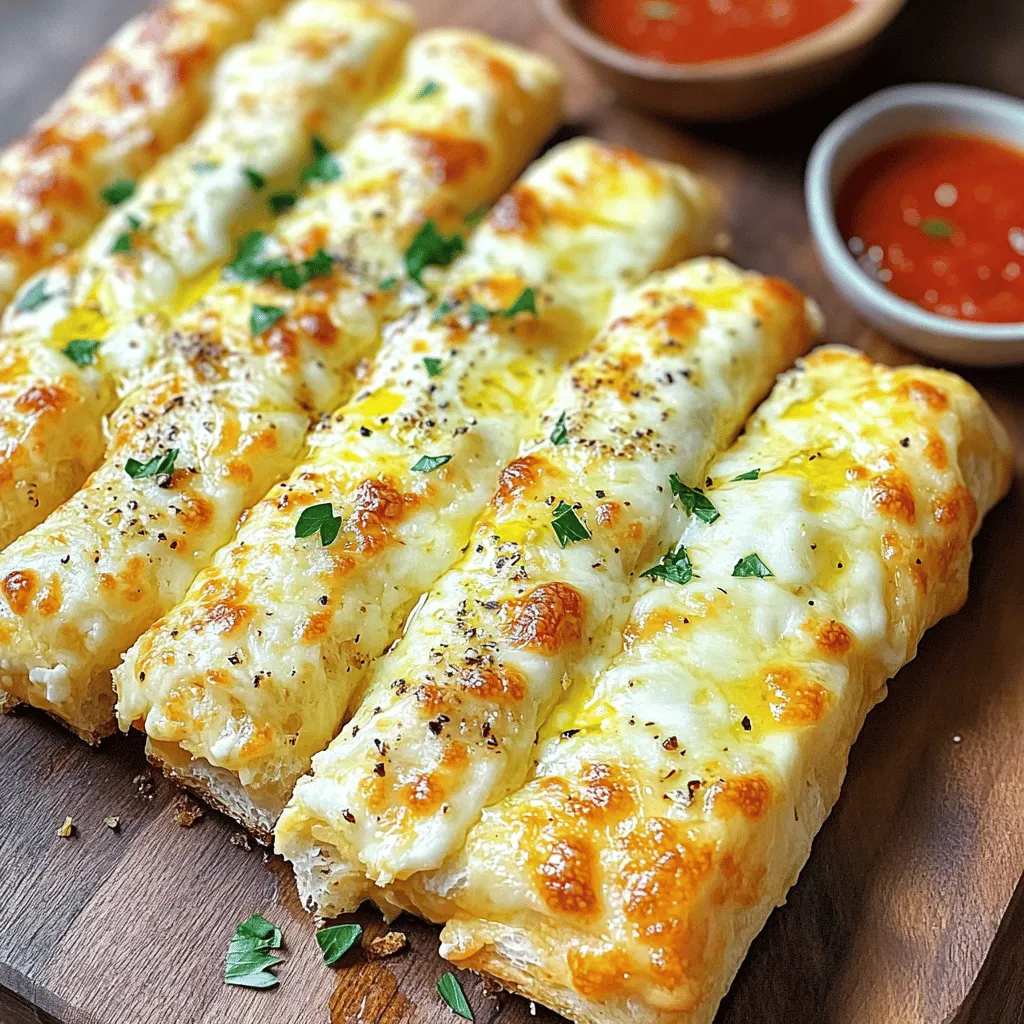
Cooling and Serving Recommendations
12. Once baked, remove the breadsticks from the oven and let them cool slightly.
13. Cut the breadsticks into strips and serve them warm.
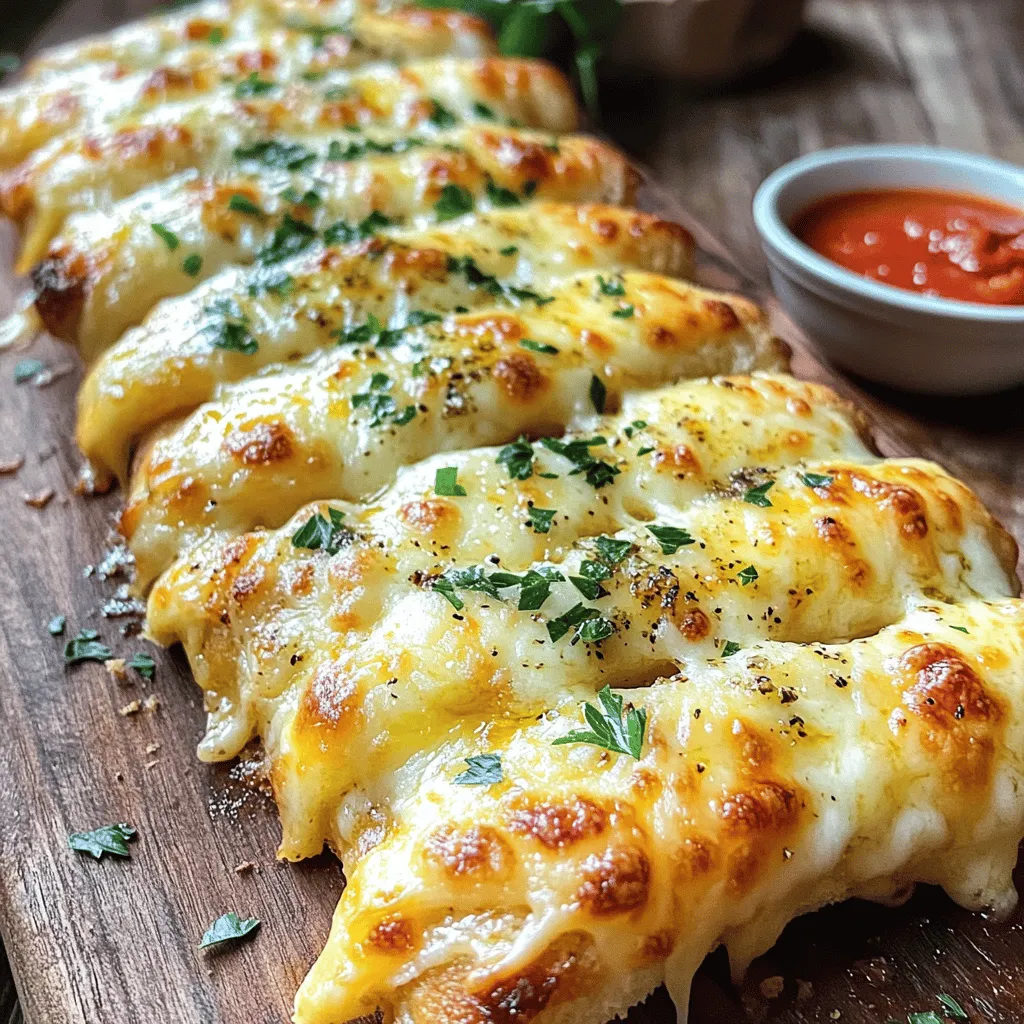
14. For a nice touch, serve on a wooden board with extra parsley and a small bowl of marinara sauce for dipping.
This simple and fun recipe will surely delight everyone at your table. Enjoy your cheesy garlic breadsticks!
Tips & Tricks
Achieving the Perfect Texture
To get soft and chewy breadsticks, you need to knead the dough well. Kneading helps develop gluten. This gives the breadsticks their structure. Aim for about 5-7 minutes of kneading. The dough should feel smooth and elastic. If it feels sticky, add a little flour. But don’t add too much or the breadsticks will be dry.
Flavor Enhancement Strategies
To boost the flavor, use fresh garlic. Fresh garlic gives a strong, rich taste. You can also mix in herbs like oregano and basil. Adding a pinch of red pepper flakes can add a nice kick. For a cheesy touch, don’t skimp on the mozzarella and Parmesan. Mixing them well ensures every bite is delicious.
Common Mistakes to Avoid
One big mistake is not letting the dough rise enough. If you skip this step, the breadsticks won’t be fluffy. Another issue is brushing on too much garlic oil. This can make the breadsticks greasy. Make sure to leave a border when you spread the oil. Lastly, watch the baking time closely. Overbaking can lead to hard breadsticks.
Variations
Cheese Alternatives
You can switch up the cheese in your cheesy garlic breadsticks. Try using provolone for a sharper taste. Cheddar adds a rich flavor, while gouda gives a nice smokiness. For a lighter option, consider feta or ricotta. Mixing cheeses can also provide a unique flavor blend. Aim for about 1 to 1.5 cups of cheese to keep it cheesy but not too heavy.
Flavor Twists (Herbs & Spices)
Herbs and spices can bring your breadsticks to life. Fresh basil or oregano can add a classic Italian touch. Try rosemary for a more earthy flavor. If you like heat, sprinkle some chili powder or use spicy herbs. You can also add garlic powder to elevate the garlic taste. Experiment with these options to create your own perfect blend.
Serving Suggestions (Dips and Sides)
Pair your cheesy garlic breadsticks with tasty sides. Marinara sauce is a classic dip, offering a tangy contrast. You can also serve them with ranch dressing for a creamy alternative. For a healthier choice, try hummus or tzatziki sauce. Serve alongside a fresh salad or a warm soup for a complete meal. These options will surely impress your guests!
Storage Info
How to Store Leftovers
After you enjoy your cheesy garlic breadsticks, let them cool. Place them in an airtight container. You can also wrap them in plastic wrap. Store the container in the fridge. They will stay fresh for about three days.
Reheating Guidelines
To reheat your breadsticks, use an oven for best results. Preheat it to 350°F (175°C). Place the breadsticks on a baking sheet. Heat them for about 10 minutes. You can also use a microwave. Just warm them for about 30 seconds.
Freezing Instructions for Homemade Breadsticks
If you want to save some for later, freezing works great. First, let the breadsticks cool completely. Wrap each one in plastic wrap. Then, place them in a freezer bag. They can last for up to three months. When ready, simply thaw and reheat. You’ll enjoy the same delicious taste!
FAQs
How long do homemade cheesy garlic breadsticks last?
Homemade cheesy garlic breadsticks stay fresh for about 2-3 days at room temperature. To keep them longer, store them in an airtight container. You can also wrap them in plastic wrap. If you want to keep them for weeks, freeze them. They freeze well and last up to 3 months. Just make sure to let them cool before freezing.
Can I make these breadsticks without yeast?
Yes, you can make cheesy garlic breadsticks without yeast. Instead, use baking powder as a leavening agent. This will give you a quicker rise and a denser texture. Combine the dry ingredients as usual and add the wet ingredients. The dough will be ready in no time. Just remember, the flavor will be a bit different, but still tasty!
What can I pair with cheesy garlic breadsticks?
Cheesy garlic breadsticks pair well with many dishes.
In this article, I covered how to make cheesy garlic breadsticks. We explored ingredients, special tools, and how to keep them fresh. I shared step-by-step instructions for preparation, baking, and serving. I also provided tips for texture and flavor, plus common mistakes to avoid. Variations, storage tips, and FAQs helped round out the guide.
These breadsticks can be a tasty treat for your meals. Experiment with flavors and save any leftovers. Enjoy making them your own!