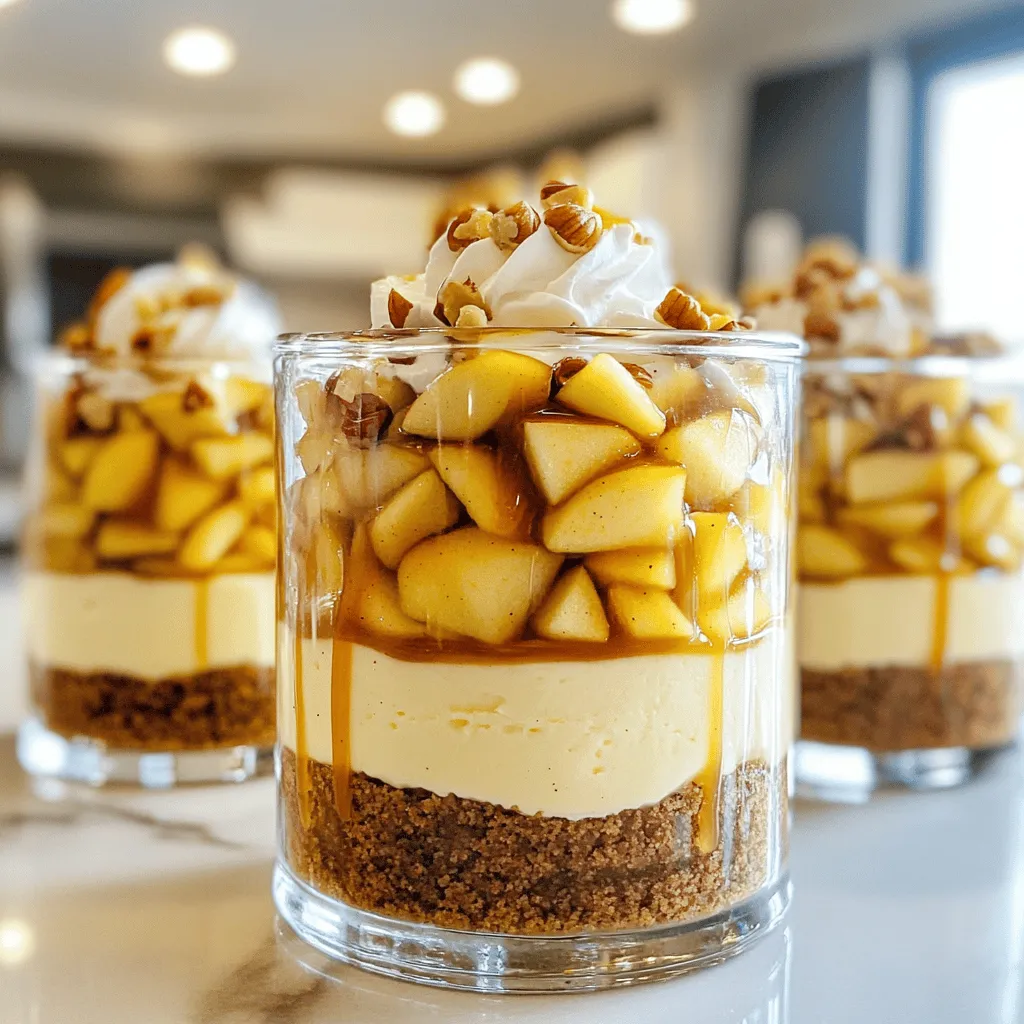
Looking for a dessert that combines rich creaminess with a burst of fall flavor? You’ve found it! Caramel Apple Cheesecake Cups are an easy treat that will leave your taste buds dancing. In this post, I’ll share how to make these delicious layers step by step. Whether you want to impress guests or indulge yourself, this dessert is sure to please. Let’s dive in and create some irresistible sweetness together!
Ingredients
List of Ingredients for Caramel Apple Cheesecake Cups
To make these delicious cheesecake cups, gather the following ingredients:
– 2 large apples, peeled and diced
– 1 tablespoon lemon juice
– 1 teaspoon ground cinnamon
– 1 cup graham cracker crumbs
– 3 tablespoons brown sugar
– 4 tablespoons unsalted butter, melted
– 8 ounces cream cheese, softened
– 1/2 cup powdered sugar
– 1 teaspoon vanilla extract
– 1 cup heavy whipping cream
– 1/2 cup caramel sauce (store-bought or homemade)
– Extra caramel sauce for drizzling
– Chopped nuts (optional, for garnish)
Substitutions for Common Ingredients
You can switch out some ingredients if needed. Here are some easy swaps:
– For apples, use pears for a different taste.
– Lemon juice can be replaced with vinegar for a similar effect.
– Use gluten-free graham crackers if you want a gluten-free crust.
– Cream cheese can be swapped with Greek yogurt for a lighter mix.
– Heavy cream can be replaced with coconut cream for a dairy-free option.
Optional Garnishes and Additions
To make your cheesecake cups even better, try these garnishes:
– Drizzle extra caramel sauce on top for a sweet touch.
– Add chopped nuts like walnuts or pecans for crunch.
– Top with a dollop of whipped cream for added creaminess.
– Place a few apple slices on top for a fresh look.
– Sprinkle a bit of extra cinnamon for a warm flavor boost.
Feel free to mix and match these ideas to make the dessert your own!
Step-by-Step Instructions
Preparing the Apples: Lemons and Cinnamon
To start, you need to prepare the apples. Take two large apples and peel them. Then, dice them into small pieces. Place the diced apples in a medium bowl. Add one tablespoon of lemon juice and one teaspoon of ground cinnamon. Toss the apples to coat them well. Let them sit for a few minutes. This step enhances the apple flavor and keeps them fresh.
Making the Graham Cracker Crust
Next, let’s make the crust. In a separate bowl, combine one cup of graham cracker crumbs with three tablespoons of brown sugar. Add four tablespoons of melted unsalted butter to the mix. Stir until it combines well. The mixture should look like wet sand. This will form a tasty base for your dessert cups.
Assembling the Dessert Cups: Layering Technique
Now, it’s time to assemble the cups. Grab small dessert cups or jars. Spoon the graham cracker mixture evenly into the bottom of each cup. Press it gently to form a solid crust layer. Make sure it is evenly distributed. This will hold all the delicious layers together.
Preparing the Cream Cheese Filling and Whipped Cream
For the filling, beat eight ounces of softened cream cheese in a mixing bowl. Add half a cup of powdered sugar and one teaspoon of vanilla extract. Mix until it is smooth and creamy. In another bowl, whip one cup of heavy cream until it forms stiff peaks. Carefully fold the whipped cream into the cream cheese mixture. This makes your filling light and fluffy.
Final Assembly and Chilling Instructions
Now, let’s finish the cups. Spoon a layer of the cream cheese mixture over the crust in each cup. Next, add a layer of your cinnamon apples. Repeat this process until you reach the top of the cup. Finally, drizzle half a cup of caramel sauce over the top layer of apples. If you like, add chopped nuts for extra crunch. Cover the cups and refrigerate for at least one hour. This helps the flavors blend and the layers set.
Tips & Tricks
How to Achieve the Creamiest Cheesecake Filling
To get a creamy cheesecake filling, start with room temperature cream cheese. This helps it mix well and become smooth. You can blend it with powdered sugar and vanilla extract until it is fully combined. Next, whip the heavy cream until you see stiff peaks. Gently fold it into the cream cheese mix. This step adds air and keeps your filling light.
Tips for Perfectly Layered Cups
Layering is key for these cups. Begin with the graham cracker crust at the bottom. Press it down lightly to form a solid base. Then, add the cheesecake filling. Use a spoon to create an even layer. After that, spoon on the cinnamon apples. Repeat these layers until the cups are full. Finish with a drizzle of caramel sauce on top. For a nice look, use a piping bag for the filling.
Common Mistakes to Avoid
Avoid using cold cream cheese. It can lead to lumps in your filling. Don’t skip chilling the cups before serving. This step helps the flavors blend and the cups set. Also, be careful when folding in the whipped cream. Do it gently to keep the light texture. Lastly, don’t rush the layering. Take your time to make each layer neat and visible.

Variations
Gluten-Free Version: Crust Alternatives
If you need a gluten-free crust, I have great ideas! Use almond flour or gluten-free graham crackers. Both options work well. You can also try crushed oats mixed with melted butter. This will give you a nice base without gluten.
Flavor Variations: Adding Nuts or Different Fruits
You can easily change the flavor of your cheesecake cups. Adding chopped nuts like walnuts or pecans gives a nice crunch. Just sprinkle them on top or mix them in with the apples. You can also swap the apples for pears or peaches. Both fruits pair nicely with the cream cheese filling.
Alternative Toppings Ideas: Beyond Caramel
While caramel is delicious, you can try other toppings too. A drizzle of chocolate sauce adds a rich flavor. You could also use a berry compote for a fruity twist. Fresh whipped cream or a sprinkle of cinnamon completes the dessert nicely.
Storage Info
How to Store Leftovers
To keep your leftover caramel apple cheesecake cups fresh, cover them tightly. You can use plastic wrap or a lid. Make sure they are in the fridge. They will stay good for up to three days. If you want to keep them longer, consider freezing.
Freezing Instructions for Cheesecake Cups
To freeze these delicious cups, first chill them as directed. Then, wrap each cup in plastic wrap. Place them in an airtight container or a freezer bag. They can last in the freezer for up to three months. When you’re ready to eat, let them thaw in the fridge overnight.
Best Practices for Serving After Refrigeration
After taking the cheesecake cups out of the fridge, they may need a little time to warm up. Let them sit at room temperature for about 10 to 15 minutes. This helps the flavors shine through. Just before serving, add a drizzle of extra caramel sauce on top for that sweet touch. If you like, garnish with chopped nuts or fresh apple slices. Enjoy these treats while they are fresh!
FAQs
Can I make these cheesecake cups ahead of time?
Yes, you can! These cheesecake cups are great for meal prep. You can prepare them a day in advance. Just store them in the fridge until you’re ready to serve. This allows the flavors to blend nicely.
What can I substitute for heavy cream?
You can use half-and-half or whole milk if you need a lighter option. For a dairy-free choice, try coconut cream. Note that the texture may change slightly, but they will still taste great.
How long do they last in the fridge?
These cheesecake cups will last up to three days in the fridge. Make sure to cover them well. This keeps them fresh and tasty for longer.
Can I use different fruits for this recipe?
Absolutely! You can use pears, peaches, or berries. Just adjust the spices for each fruit. This way, you can create new flavors every time.
Caramel Apple Cheesecake Cups are fun and easy to make. We covered the key ingredients, useful substitutions, and tasty garnishes to enhance your dessert. I shared step-by-step instructions to create these delightful cups, along with tips for a creamy filling and perfect layers. You can also explore variations for gluten-free or different flavors. Remember to store leftovers properly for the best taste. By following this guide, you can impress your friends with a delicious treat. Enjoy making and sharing these delightful cheesecake cups!