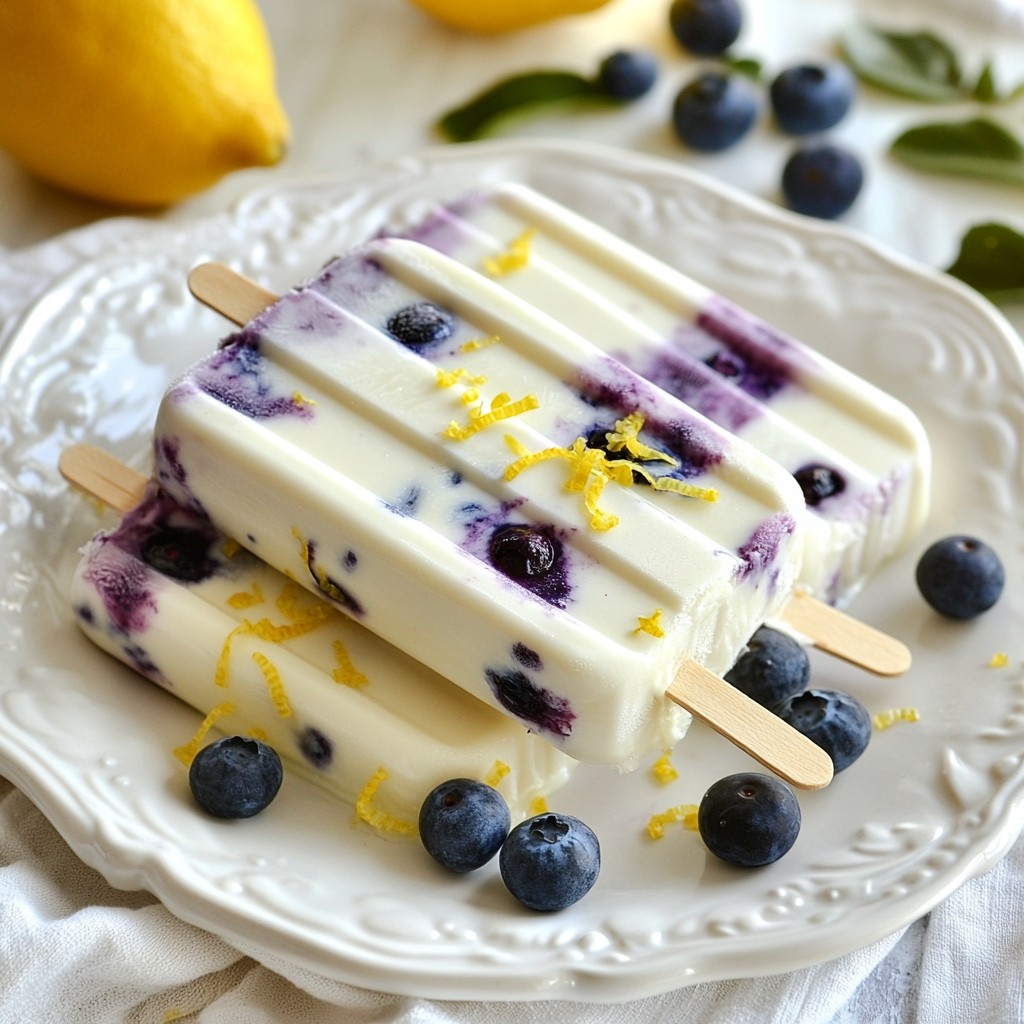
Looking for a cool treat that bursts with flavor? You’ll love these Blueberry Lemon Greek Yogurt Popsicles! They’re creamy, refreshing, and perfect for hot days. This simple recipe uses fresh blueberries, creamy yogurt, and zesty lemon to create a tasty snack you can enjoy anytime. Let’s dive into the easy steps to make these delicious popsicles and get ready to impress your taste buds!
Why I Love This Recipe
- Refreshing Taste: The combination of tangy lemon and sweet blueberries creates a perfect balance that is incredibly refreshing on a warm day.
- Healthy Ingredients: Made with Greek yogurt and fresh fruit, these popsicles are a nutritious treat that you can feel good about enjoying.
- Easy to Make: This recipe requires minimal effort and only a few ingredients, making it a breeze to whip up a batch.
- Customizable: You can easily adjust the sweetness or swap out the fruit for your favorite berries, making it a versatile dessert option.
Ingredients
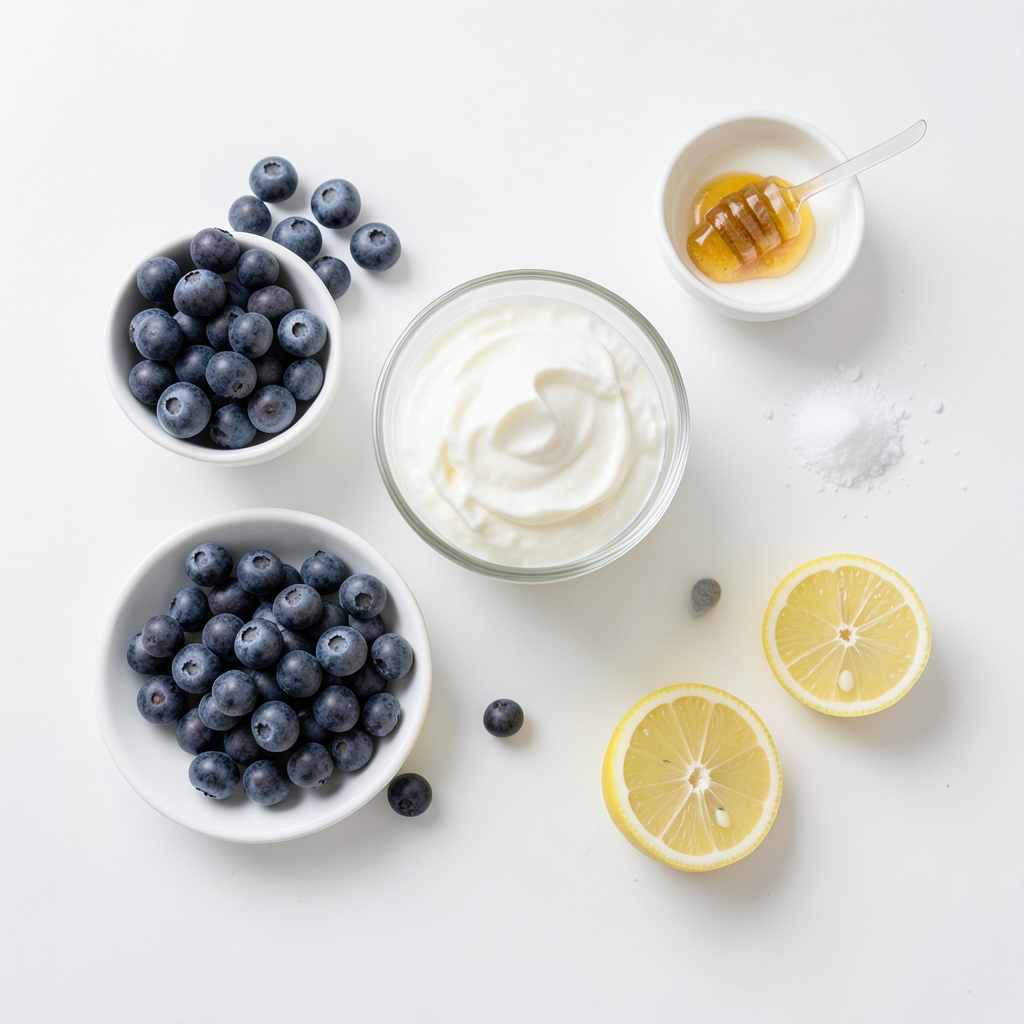
Fresh Blueberries
Fresh blueberries are the star of these popsicles. They add a sweet and tangy flavor. When choosing blueberries, look for firm and plump ones. Make sure they are deep blue in color. Rinse them gently under cool water to remove any dirt. You need 1 cup for this recipe.
Greek Yogurt Options
Greek yogurt gives the popsicles a creamy texture. You can use plain or vanilla yogurt. Plain yogurt has less sugar, while vanilla adds sweetness. Both options work well. Choose low-fat or full-fat based on your taste. You will need 1 cup of Greek yogurt.
Sweeteners and Milk Choices
For sweetness, use honey or maple syrup. Both options melt well in the yogurt mix. Adjust the amount to fit your taste. You can start with 1/4 cup. For milk, I suggest coconut milk for a richer flavor. You can also use almond, soy, or regular cow’s milk. You need 1/2 cup of milk in this recipe.
Step-by-Step Instructions
Preparing the Blueberries
To start, you need fresh blueberries. Place one cup in a small saucepan. Add a splash of water. Set the heat to medium. Cook for about five minutes. The blueberries will soften and release their juices. Use a fork to mash them slightly. This step helps create a nice texture. Once done, take them off the heat and let them cool.
Mixing the Yogurt Base
Next, grab a mixing bowl. Add one cup of Greek yogurt. You can choose plain or vanilla yogurt. Pour in half a cup of coconut milk. If you prefer, you can use any milk you like. Next, add a quarter cup of honey or maple syrup. This will sweeten the mix, so adjust to your taste. Add the zest of one lemon and two tablespoons of fresh lemon juice. Don’t forget a pinch of salt! Whisk it all together until smooth and creamy. Taste it and adjust the sweetness if needed.
Layering the Popsicles
Now it’s time to layer the popsicles! Grab your popsicle molds. Start with a spoonful of the yogurt mixture in each mold. Then, add a layer of the cooked blueberry mix. If you want, use a skewer or toothpick to swirl the two together for a marbled look. Repeat this process until the molds are full. Make sure to finish with a yogurt layer on top. Once done, insert sticks into each mold and place them in the freezer. Freeze for at least four to six hours or until fully set. Enjoy this refreshing treat on a hot day!
Tips & Tricks
Adjusting Sweetness
You can control the sweetness of your popsicles. Start with the honey or maple syrup. I recommend using 1/4 cup for a balanced taste. After mixing, always taste the yogurt base. If you want it sweeter, add a bit more syrup. You can also use less sweetener if you prefer a tart flavor. Remember, the blueberries add natural sweetness too.
Achieving the Perfect Swirl
Swirling the blueberry mixture with the yogurt gives a lovely look. To do this, add layers of yogurt and blueberry in the molds. Use a skewer or toothpick to create swirls. Don’t overdo it! A few gentle turns make a nice marbled effect. This way, you get both flavors in every bite.
Quick Freezing Techniques
Freezing your popsicles quickly helps them set well. To speed up the freezing, place the molds in the coldest part of your freezer. Make sure they are level to avoid spills. If you want to eat them faster, freeze for 2-3 hours, then move to a regular spot in the freezer. Just remember to freeze for at least 4-6 hours for the best results. Enjoy your refreshing treat!
Pro Tips
- Fresh Blueberries: Opt for ripe, fresh blueberries for the best flavor. Frozen blueberries can also work, but may result in a slightly different texture.
- Adjusting Sweetness: Always taste the yogurt mixture before freezing. Depending on your preference and the tartness of the blueberries, you can add more honey or maple syrup.
- Swirling Technique: For a beautiful marbled effect, use a skewer or toothpick to gently swirl the blueberry and yogurt mixtures without fully combining them.
- Easy Unmolding: If you're having trouble removing the popsicles, run warm water over the outside of the molds for a few seconds to loosen them up.
Variations
Substitute Fruits
You can swap out blueberries for other fruits. Raspberries, strawberries, or blackberries work well. Each fruit brings its own taste and color. You can even mix fruits for a fun twist. Try using a mix of strawberries and mango for a tropical vibe. Just remember to adjust the sweetness to match the fruit you choose.
Dairy-Free Options
If you want a dairy-free treat, use coconut yogurt instead of Greek yogurt. It gives a creamy texture and keeps the flavor bright. You can also use almond milk or oat milk instead of coconut milk. These options make the popsicles light and refreshing. They taste great and are good for those with dairy allergies.
Flavor Enhancements
You can add some extra flavors to the mix. A dash of vanilla extract works wonders. It adds depth and warmth to the popsicles. You can also toss in a few mint leaves for a fresh twist. Experiment with different herbs or spices, like a hint of cinnamon or ginger. Each addition creates a unique taste experience that keeps you coming back for more.
Storage Info
Freezing and Storing Leftovers
After making your Blueberry Lemon Greek Yogurt Popsicles, you might have some leftover popsicles. To store them, pack them tightly in your freezer. You can wrap each popsicle in plastic wrap or place them in a zip-top bag. This way, they stay fresh and icy. Make sure to remove as much air as possible to avoid freezer burn.
Best Storage Containers
For the best storage, use hard plastic containers or silicone molds. These materials keep the popsicles from getting crushed. If you have popsicle bags, they work well too. Just ensure they seal tightly to keep the popsicles safe from air and moisture. Label your containers with the date, so you know when you made them.
Shelf Life of Popsicles
These popsicles can last in the freezer for up to two months. They stay tasty and refreshing during this time. However, for the best flavor, aim to enjoy them within the first month. Over time, the texture may change, but they will still be safe to eat. If you notice ice crystals forming, it's time to eat them up.
FAQs
How do I make these popsicles dairy-free?
To make these popsicles dairy-free, swap Greek yogurt with a dairy-free yogurt. You can find coconut, almond, or cashew yogurt at most stores. Use a non-dairy milk like almond or oat milk in place of coconut milk. This keeps the flavor bright and fresh without dairy.
Can I use frozen blueberries instead of fresh?
Yes, you can use frozen blueberries. They work well in this recipe. Just remember to thaw them slightly before cooking. This helps them release their juices and flavor. The final popsicle will still taste great and be just as colorful!
What other flavors pair well with blueberry and lemon?
Blueberry and lemon pair well with many flavors. Try adding mint for a fresh twist. Vanilla compliments the sweet blueberries nicely. You can also mix in some ginger for a zesty kick. Each option will offer a new taste experience in your popsicles!
We explored how to make delicious blueberry popsicles using fresh ingredients and step-by-step methods. You learned about choosing the right yogurt, sweeteners, and milk. We discussed tips for adjusting sweetness and freezing techniques. You can even try different fruits or dairy-free options. Remember to store your popsicles well for the best taste. Enjoy your tasty creations and share them with friends! Making popsicles can be fun and satisfying.