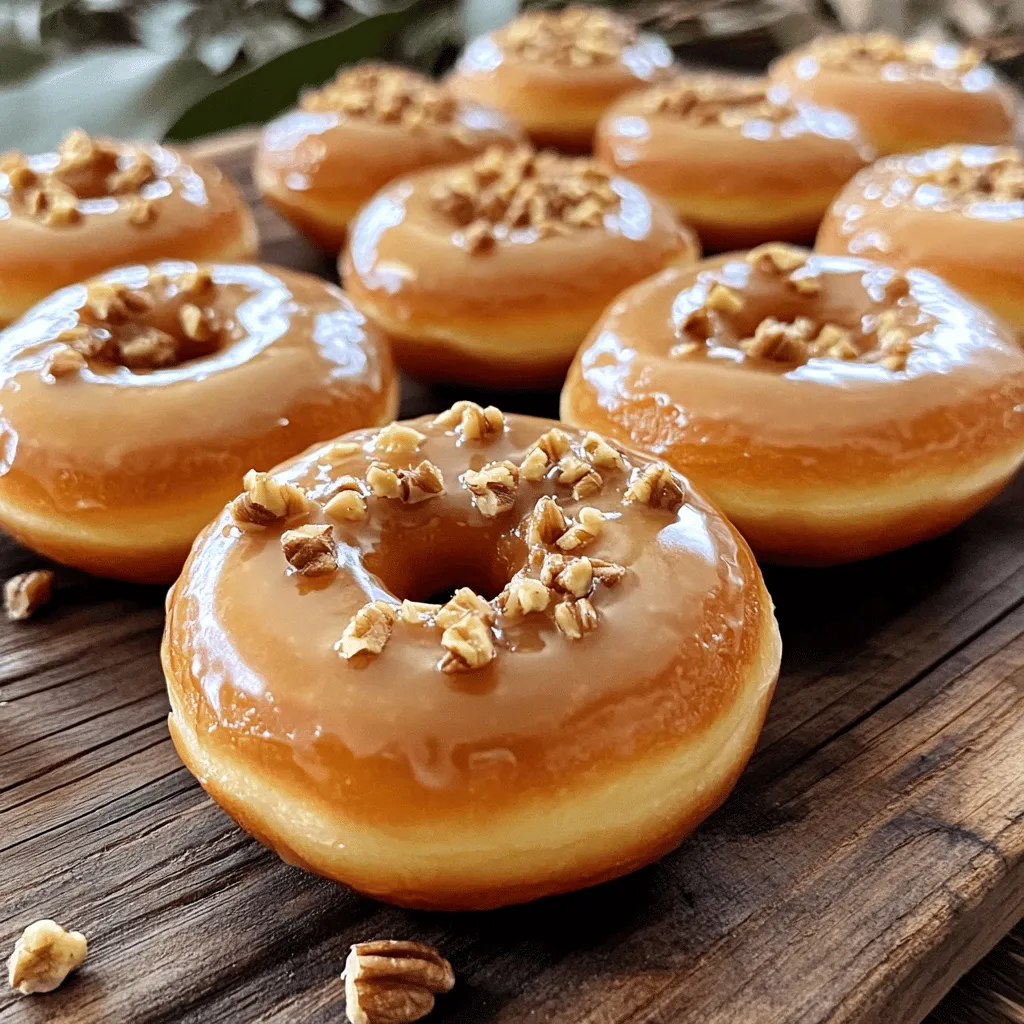
Imagine biting into a warm, soft, maple-glazed donut just like the ones from your favorite bakery. In this post, I’ll show you how to make these delicious treats at home with simple ingredients and easy steps. Whether you’re a seasoned baker or a beginner, you’ll learn how to create a perfect batter, a smooth glaze, and even some tasty toppings. Let’s dive in and get you donut-making magic underway!
Ingredients
Key Ingredients for Bakery-Style Maple Glazed Donuts
– 2 cups all-purpose flour
– 1/2 cup granulated sugar
– 2 teaspoons baking powder
– 1/2 teaspoon baking soda
– 1/2 teaspoon salt
– 1/2 teaspoon ground cinnamon
– 1/4 teaspoon ground nutmeg
– 1/2 cup whole milk, room temperature
– 1/4 cup unsalted butter, melted
– 2 large eggs
– 1 teaspoon vanilla extract
– 1/2 cup maple syrup (for glaze)
– 1 cup powdered sugar (for glaze)
To make bakery-style donuts, you need strong base ingredients. All-purpose flour gives donuts structure. Sugar sweetens and helps them rise. Baking powder and baking soda are key leavening agents. Salt balances flavors, while cinnamon and nutmeg add warmth and spice.
Dairy and eggs add moisture and richness. Whole milk makes the donuts soft. Unsalted butter adds flavor and a lovely texture. Eggs bind the mix, creating that perfect donut feel. Finally, vanilla extract enhances the taste.
For the glaze, you will need maple syrup and powdered sugar. The syrup gives a sweet maple flavor, while the powdered sugar creates a smooth, shiny finish.
Optional Toppings
– Chopped walnuts or pecans
– Other nut variations or sprinkles
You can make your donuts even better with toppings. Chopped walnuts or pecans add a crunchy texture. They also bring a nutty taste that pairs well with maple. You can also use sprinkles for a fun twist. These toppings let you personalize your donuts and make them special.
Step-by-Step Instructions
Prepping the Donut Batter
Start by preheating your oven to 350°F (175°C). Grease your donut pan well with non-stick spray. This step helps the donuts pop out easily later. In a large bowl, mix together the dry ingredients:
– 2 cups all-purpose flour
– 1/2 cup granulated sugar
– 2 teaspoons baking powder
– 1/2 teaspoon baking soda
– 1/2 teaspoon salt
– 1/2 teaspoon ground cinnamon
– 1/4 teaspoon ground nutmeg
Whisk these together until they are well blended. In a separate bowl, whisk the wet ingredients until smooth:
– 1/2 cup whole milk, room temperature
– 1/4 cup unsalted butter, melted
– 2 large eggs
– 1 teaspoon vanilla extract
This keeps your batter light and fluffy.
Mixing and Filling
Now, gently combine the dry and wet mixtures. Pour the wet ingredients into the dry ingredients. Stir carefully until just combined. It’s okay if there are a few lumps. Overmixing can make the donuts tough.
To fill the donut tin, take a piping bag or a ziplock bag with a corner snipped off. Pipe the batter into each cavity until they are about three-quarters full. This gives them room to rise.
Baking and Cooling
Place the filled donut pan in the oven. Bake for 10-12 minutes. Check for doneness by pressing lightly on a donut. If it bounces back, they are ready. Remove the pan from the oven and let the donuts cool in the pan for about 5 minutes. After that, transfer them to a wire rack to cool completely. This helps keep them from getting soggy.
Making the Maple Glaze
While the donuts cool, prepare the maple glaze. In a medium bowl, whisk together:
– 1/2 cup maple syrup
– 1 cup powdered sugar
Mix until smooth and lump-free. This glaze adds a sweet finish to your donuts. To glaze them, dip the tops of each donut into the glaze. Let the excess drip off. If you want a crunchy topping, sprinkle chopped walnuts or pecans on top right after glazing. Allow the glaze to set for a few minutes before serving. Enjoy your delicious donuts!
Tips & Tricks
Achieving the Perfect Donut Texture
To make great donuts, you must not overmix the batter. Mixing too much can make the donuts tough. You want a light and fluffy texture. When you mix, stop as soon as the wet and dry ingredients come together. It’s okay if there are a few lumps.
You can tell your donuts are baked perfectly when they spring back after a light press. They should not feel wet or doughy. A golden-brown color on the edges is another good sign.
Glazing Techniques
Dipping donuts in glaze can be tricky. First, let the donuts cool completely. If they are warm, the glaze will slide off. When you dip, swirl the donut in the glaze. Let the extra glaze drip off before placing it on a cooling rack.
You can add toppings while the glaze is still wet. This is the best time to sprinkle chopped walnuts or pecans. They will stick much better this way.
Common Mistakes to Avoid
One common mistake is not measuring ingredients correctly. Always use the right tools, like a kitchen scale or measuring cups. Another error is not preheating the oven. A hot oven helps the donuts rise well.
If you have leftover batter, don’t let it sit out too long. It’s best to bake it right away. Donuts made from old batter may not taste great.
If you have questions, feel free to ask! I’m here to help you make the best bakery-style maple glazed donuts.

Variations
Flavor Variations
You can play with flavors to make unique donuts. Try chocolate maple glazed donuts. Just add cocoa powder to the dry mix. It gives a rich taste. You can also try pumpkin spice maple donuts. Add pumpkin puree and spices like ginger and cloves. These changes bring new life to your donuts.
Dietary Substitutions
You can make these donuts fit your needs. For gluten-free options, use a gluten-free flour blend. Make sure it has xanthan gum for structure. For vegan alternatives, swap eggs with flaxseed meal mixed with water. Use almond or oat milk instead of whole milk. Melt coconut oil in place of butter. These swaps keep your donuts tasty and enjoyable.
Seasonal Themes
Donuts can fit any holiday. For Halloween, add orange and black sprinkles. You can use chocolate glaze for a spooky look. For Christmas, try topping them with crushed candy canes or a sprinkle of cinnamon. These touches make your donuts special for each holiday.
Storage Info
How to Store Donuts
To keep your donuts fresh, store them in a cool, dry place. Use an airtight container to prevent them from drying out. You can also place a paper towel in the container to absorb moisture. This keeps the donuts fluffy and soft. If you have leftover glazed donuts, they can lose their shine. Store them in a single layer to avoid sticking.
Freezing Options
Freezing is a great way to extend the life of your donuts. First, let them cool completely. Then, wrap each donut in plastic wrap. Place them in a freezer-safe bag or container. This keeps them fresh for up to three months. When you’re ready to enjoy, remove a donut from the freezer. Let it thaw at room temperature for about 30 minutes. If you want them warm, pop them in the microwave for 10-15 seconds. Enjoy your delicious maple glazed donuts anytime!
FAQs
How long do bakery-style donuts last?
Bakery-style donuts taste best when fresh. They can last about two days at room temperature. Store them in an airtight container to keep them soft. If you want to keep them longer, place them in the fridge. They can stay fresh for about a week there. However, the glaze may lose its shine.
Can I make the batter ahead of time?
Yes, you can make the batter ahead of time. Mix the dry and wet ingredients separately. Store the wet mix in the fridge for up to a day. When ready to bake, just combine the two mixtures and fill your donut pan. This way, you can enjoy fresh donuts in a short time.
What can I use instead of maple syrup for the glaze?
You have several options for the glaze. Honey can give a nice sweetness. Agave syrup is another great choice. If you want a different flavor, try using chocolate or vanilla extract. Each option can create a unique taste for your donuts.
You learned how to make bakery-style maple glazed donuts, from ingredients to storage. The key is to focus on texture and avoid common mistakes. Variations add fun to your baking, like pumpkin spice or gluten-free options. Proper storage helps keep your donuts fresh. Now, it’s time to gather your supplies and try this recipe. Enjoy the process, and savor your delicious homemade treats!