Skip to content
DisclaimerTerms Of UseGDPR PolicyCookie Policy

So Yum Recipes

  • Home
  • Drinks
  • Appetizers
  • Dinner
  • Dessert
  • About
  • Contact
  • Privacy Policy
DisclaimerTerms Of UseGDPR PolicyCookie Policy

Chloe

- 1 cup strawberries, hulled and halved - 1 cup orange segments - 1 cup pineapple chunks - 1 cup green grapes, halved - 1 cup blueberries - 1 banana, sliced - Optional: 1 tablespoon honey - Fresh mint leaves for garnish Rainbow Fruit Skewers are all about using bright, fresh fruits. Each fruit brings its own flavor and color, making the skewers fun to eat. You can mix and match fruits, but I love this classic combo. Here’s why each fruit shines: - Strawberries add a sweet and juicy bite. They are a great start. - Oranges bring a zesty taste and bright color. They are full of vitamin C. - Pineapples offer a tropical twist and a sweet tang. They balance the flavors well. - Green grapes are crunchy and refreshing. Halving them makes them easy to eat. - Blueberries add a deep color and burst of sweetness. They are packed with antioxidants. - Bananas are soft and creamy, rounding out the skewers perfectly. You can drizzle honey on top for extra sweetness, but it’s optional. Fresh mint leaves add a nice touch and make it look pretty. You can switch things up with other fruits. Here are some ideas: - Mango for a sweet and tropical flavor. - Kiwi adds a tart kick and vibrant color. - Raspberries for a tangy bite and extra color. To boost nutrition, try adding: - Chia seeds for fiber and omega-3s. - Yogurt for a creamy dip and extra protein. Explore these options to make your Rainbow Fruit Skewers even more exciting! You can find the full recipe at the beginning. Start by washing your fruits under cold water. This step removes dirt and germs. For strawberries, remove the green tops and cut them in half. Peel the banana and slice it into rounds. Cut the pineapple into bite-sized chunks. Halve the grapes and separate the orange segments. To select ripe fruit, look for bright colors. Strawberries should be red, oranges should be firm, and bananas should have a few brown spots. Smell the fruit; ripe fruit often has a sweet scent. Choose fruits that feel heavy for their size, as this often means they are juicy. Grab your wooden or metal skewers. Start by threading a piece of fruit onto the skewer. I like to follow a pattern for a fun look. Begin with a strawberry, then add an orange segment. Next, place a chunk of pineapple, followed by a green grape, a blueberry, and finish with a banana slice. Repeat this pattern, filling each skewer. You can mix the order if you prefer. Just make sure to alternate colors for a vibrant display. This keeps the skewers colorful and exciting. Once the skewers are ready, you can drizzle honey over them for extra sweetness. This step is optional but adds a nice touch. For a fresh aroma, garnish the skewers with mint leaves. They add color and a pop of flavor. When serving, arrange the skewers on a platter. They look amazing at parties or gatherings. You can keep them in the fridge until it’s time to eat. Enjoy your Rainbow Fruit Skewers! For the full recipe, refer back to the ingredients section. When picking fruits, it's best to choose seasonal ones. Seasonal fruits taste better and cost less. For example, strawberries shine in spring, while oranges are best in winter. Visit local markets to find fresh, ripe options. Now, should you go organic? Organic fruits often have fewer chemicals. They can be safer for kids and better for the planet. However, if organic isn't available, don't worry. Just wash your fruits well before using them. This helps remove dirt and pesticides. Serving Rainbow Fruit Skewers can be fun! Use colorful platters to make your skewers pop. A bright, round plate can add flair. You can also arrange your skewers in a jar for a cute look. To make your skewers even prettier, add garnishes. Fresh mint leaves give a nice green touch. You can also sprinkle some edible flowers on top. This adds a fun vibe and makes your treat look fancy. For more tips on making these skewers, check out the Full Recipe. {{image_2}} You can mix up the fruits on your skewers. Think of using mango or kiwi for a fun twist. These fruits add sweet and tart flavors. You can also choose different berries. Strawberries, blueberries, and raspberries work nicely together. This gives you a colorful and tasty mix. When you select exotic fruits, look for ripe ones. Ripe mangoes should feel slightly soft. Kiwi should have a smooth skin. You can also try dragon fruit for its unique look. Mixing fruits gives you a chance to explore new tastes. Creating theme-based skewers can make your treats even more fun. For holidays, use colors that match the season. For example, red and green fruits for Christmas, or bright pastels for Easter. You can also shape fruits for a fun look. Use cookie cutters to create stars or hearts from watermelon or pineapple. Kids love fun shapes and colors. You can let them help with the skewers. This makes it a fun family activity. Get creative with your themes and enjoy the smiles on their faces. For the full recipe, check out the Rainbow Fruit Skewers . To keep your rainbow fruit skewers fresh, always refrigerate them. Place the skewers in a tight container. Cover the top with plastic wrap to keep air out. This helps the fruit stay crisp and juicy. To avoid soggy skewers, do not add honey until serving. If you plan to store them for a while, separate the fruits. This way, each fruit keeps its texture and taste. You can make fruit skewers ahead of time. Prepare the fruits a day before. Store them in the fridge in separate containers. This saves you time on party day. If you have a gathering, assemble the skewers just before serving. This keeps them looking fresh. You can also let friends help with skewering. It makes for a fun activity! For the full recipe of rainbow fruit skewers, check the earlier instructions. Enjoy your colorful and healthy treats! Yes, you can use frozen fruits. Frozen fruits save time and can be just as tasty. They often retain their nutrients. However, keep in mind that they might lose some texture when thawed. Fresh fruits have a crunch and bright flavor. If you want a fun twist, mix both types. This choice adds variety to your skewers. Fruit skewers can last in the fridge for about 2 to 3 days. To keep them fresh, store them in an airtight container. This helps prevent them from drying out. If you notice the fruits getting soft or brown, it’s best to eat them soon. Fresh fruit always tastes best! You can enjoy many sauces with fruit skewers. Creamy yogurt is a great choice. It pairs well with sweet fruits. Chocolate sauce is another popular option. Kids love it, and it adds a fun touch. You might also try honey or a mix of fruit dips. These options make your skewers even more exciting! Absolutely! To make these skewers vegan, skip the honey. Instead, use maple syrup or agave nectar for sweetness. You can also add a drizzle of dairy-free yogurt for creaminess. These swaps keep the flavors bright and fun. You will still enjoy a tasty treat without any animal products. Check out the Full Recipe for more ideas! This blog post shared how to create tasty and colorful fruit skewers. You learned about the best fruits to use and how to cut and thread them. We also discussed making your skewers stand out with fun ideas and ways to store them fresh. In wrapping up, these skewers are fun and easy for everyone. You can mix fruit or pick a theme. Enjoy making these treats at home for gatherings or snacks!

Rainbow Fruit Skewers Colorful and Healthy Treats

Looking for a fun and healthy treat? Rainbow fruit skewers are the perfect choice! Bursting with color and flavor, they

- 1 can (15 oz) chickpeas, drained and rinsed - 2 tablespoons olive oil - 1 tablespoon ground cumin - 1 tablespoon ground coriander - 1 teaspoon smoked paprika - 1 cup cooked quinoa or brown rice - 1 cup cherry tomatoes, halved - 1 cucumber, diced - 1/2 red onion, finely chopped - 1 cup fresh parsley, chopped - 1/2 cup tahini - Juice of 1 lemon - Water as needed for tahini sauce The chickpeas are the star of this dish. They give flavor and protein. I love how easy it is to make them tasty. You simply rinse and drain the chickpeas. Toss them in olive oil and spices. I often use cumin and coriander for warmth. Smoked paprika adds a nice depth. Next, you can prepare your base. I prefer quinoa or brown rice. Both add a nutty flavor. They also give a nice texture. Then, you can add fresh veggies. Cherry tomatoes and cucumbers bring crunch. Red onion adds a bit of zing. Fresh parsley gives a bright touch. Finally, the tahini sauce ties it all together. Just mix tahini with lemon juice. Thin it out with water if needed. This sauce is creamy and rich. It enhances every bite. You can find the full recipe in the article. Enjoy making your Chickpea Shawarma Bowl! - Preheat your oven to 400°F (200°C). - Gather all ingredients for easy access. - In a bowl, mix the rinsed chickpeas with olive oil, cumin, coriander, smoked paprika, turmeric, cayenne pepper, salt, and pepper. Toss well to coat the chickpeas evenly. - Spread the chickpeas on a baking sheet in a single layer. - Roast them in the oven for 20-25 minutes. Stir halfway for even cooking. - While the chickpeas roast, make the tahini sauce. - In a small bowl, whisk tahini, lemon juice, and enough water for a smooth sauce. Add salt to taste. - In bowls, layer cooked quinoa or brown rice as the base. - Top with roasted chickpeas, cherry tomatoes, cucumber, red onion, and parsley. - Drizzle the tahini sauce generously over the top. - Serve with warm, toasted pita bread on the side if you like. For the full recipe, check out the details above. Enjoy your healthy meal! To make your chickpeas shine, focus on spices. You can adjust the cayenne pepper to change the heat. For a milder bowl, use less cayenne. If you like spice, add a bit more. Spice blends can really enhance the flavor. Roasting time is key for texture. Roast the chickpeas for 20 to 25 minutes at 400°F (200°C). Check them halfway through. They should be crispy and golden brown. Keep an eye on them to avoid burning. Getting the tahini sauce right is easy. Start with tahini and lemon juice. Add water slowly until it reaches your desired thickness. You want it smooth and drizzle-able. Adding salt will enhance the taste, so don't skip it. You can create flavor variations for the tahini sauce. Try adding garlic for a punch. A bit of maple syrup can add sweetness. Experiment with herbs like parsley or cilantro for a fresh twist. The way you arrange your bowl matters. Start with the quinoa or rice at the base. Next, add the roasted chickpeas. Then layer on the cherry tomatoes, cucumbers, and onions. This creates a colorful display. Garnishing can take your bowl to the next level. Sprinkle fresh parsley on top for color. A drizzle of tahini sauce adds both flavor and beauty. A few slices of lemon can brighten the dish visually. For the full recipe, check the earlier section! {{image_2}} You can add grilled chicken or tofu for extra protein. Grilled chicken pairs well with the spices. Tofu is a great choice for a vegan option. Marinate tofu for even more flavor. Both options boost the meal's nutrition and taste. Incorporate roasted or sautéed vegetables for more color and flavor. Bell peppers, zucchini, or spinach are great choices. You can also add seasonal vegetables like asparagus in spring or squash in fall. This keeps your meal fresh and exciting. Substituting quinoa for rice makes this dish gluten-free. Quinoa has a nice texture and is full of protein. You can also try gluten-free grains like millet or farro. For low-carb options, use lettuce wraps instead of pita bread. This keeps the meal light and refreshing. You can keep leftover Chickpea Shawarma Bowl in the fridge. Use an airtight container to store it. This helps keep the flavors fresh and prevents spills. Enjoy leftovers within three days for the best taste. When reheating, use a microwave or stovetop. Heat only what you will eat to maintain quality. You can freeze chickpeas and tahini sauce separately. This keeps them fresh for longer. Place the chickpeas in a freezer-safe bag. Squeeze out the air before sealing. For tahini sauce, store it in a jar and leave some space at the top. If you want to freeze assembled bowls, do so without toppings like cucumbers and tomatoes. They are best fresh. Chickpeas can last about three to four days in the fridge. The tahini sauce also lasts about a week. If you freeze them, they can last up to three months. Always check for signs of spoilage. If you see mold or smell something off, it’s best to toss it. Enjoy your Chickpea Shawarma Bowl fresh for the best flavor! A Chickpea Shawarma Bowl is a tasty and healthy meal. It features roasted chickpeas, spices, and fresh veggies. You start with a base of cooked quinoa or brown rice. Then, you add roasted chickpeas seasoned with cumin, coriander, and paprika. Top it off with cherry tomatoes, cucumber, red onion, and parsley. Finally, drizzle a creamy tahini sauce on top for extra flavor. This dish is colorful and packed with nutrition. Yes, you can make parts of this Chickpea Shawarma Bowl ahead of time. Roast the chickpeas and prepare the tahini sauce in advance. Store them in airtight containers in the fridge. The roasted chickpeas stay crispy for days. You can also cook the quinoa or rice ahead of time. Just reheat everything when you're ready to eat. This recipe is perfect for meal prep. You can prepare all the ingredients in bulk. Roast a large batch of chickpeas and cook extra grains. Portion them into containers for easy lunches or dinners. You can mix and match the veggies for variety. This way, you enjoy a fresh meal without spending too much time cooking each day. You can easily adapt this dish for different diets. For a vegan option, this recipe is already vegan-friendly. To make it gluten-free, use quinoa instead of rice. If you have nut allergies, check your tahini for any nut content. You can swap tahini with sunflower seed butter for a nut-free version. Feel free to add or remove veggies to suit your taste and needs. A Chickpea Shawarma Bowl is a simple, tasty dish. We explored the main ingredients, like chickpeas and spices, to create this meal. I shared steps on preparing, cooking, and serving. You can customize it with proteins and veggies that you like. Remember to store leftovers properly so nothing goes to waste. Whether you want a quick meal or to impress guests, this bowl is a winner. Enjoy making it your way!

Chickpea Shawarma Bowl Flavorful and Healthy Meal

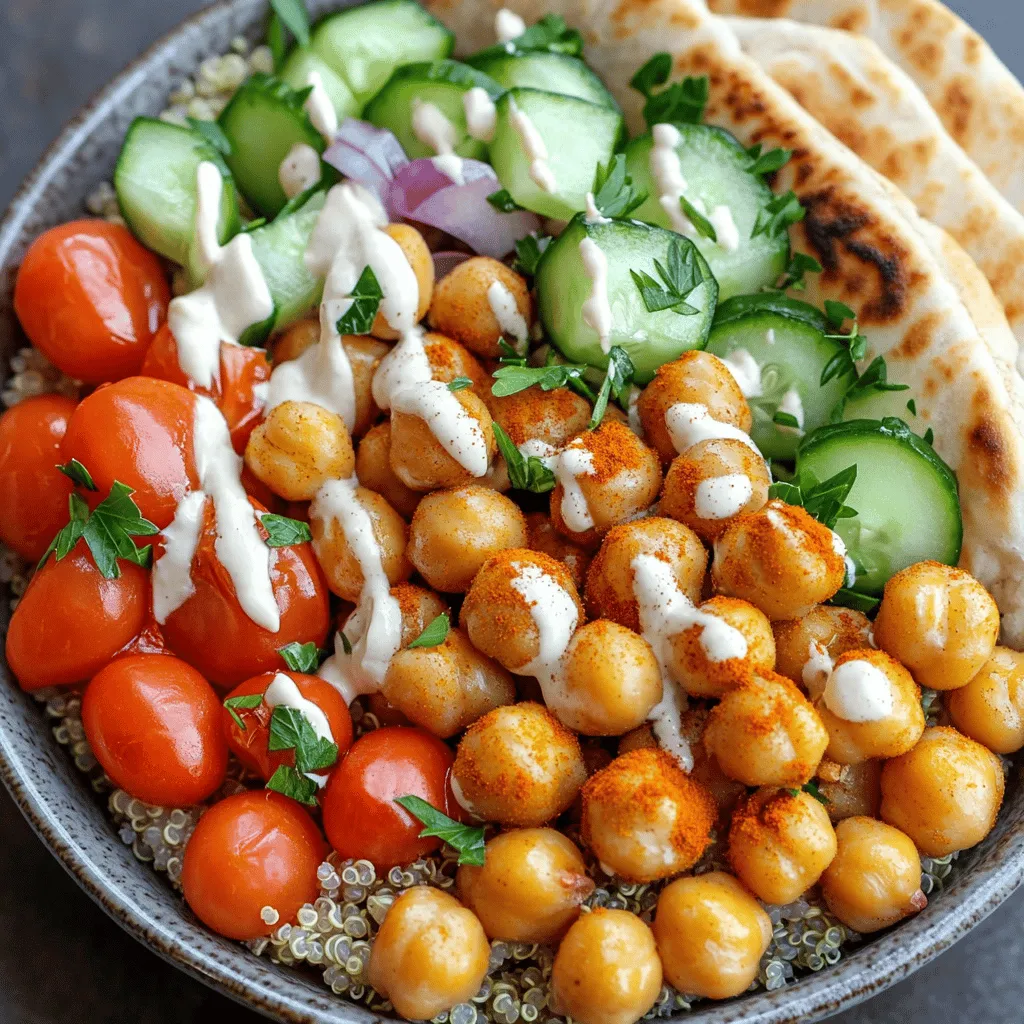
Are you ready to spice up your meal routine with a Chickpea Shawarma Bowl? This dish combines hearty chickpeas, vibrant

Mango chicken salad is a fresh and vibrant dish. It brings together simple, tasty ingredients. This recipe takes only 15 minutes to prep. You can enjoy it as a light meal or a side dish. For this salad, you need: - 2 cups cooked chicken breast, shredded - 1 ripe mango, diced - 1 red bell pepper, diced - 1/2 cucumber, diced - 1/4 cup red onion, finely chopped - 1/4 cup cilantro, chopped - 1/4 cup Greek yogurt - 2 tablespoons lime juice - 1 tablespoon honey - Salt and pepper to taste These ingredients create a colorful mix. The chicken adds protein, while mango brings sweetness. The red bell pepper and cucumber add crunch. The yogurt dressing ties everything together with creaminess. You can customize your salad with these add-ins: - 1/4 teaspoon cumin for a warm flavor - Avocado, for extra creaminess - Chopped nuts, like almonds or cashews, for crunch - Other fruits, like pineapple or strawberries, for added sweetness These options allow you to play with tastes and textures. Don't be afraid to try your own twists! For more details on making this dish, check the full recipe. Start by gathering your ingredients. You need cooked chicken, ripe mango, red bell pepper, cucumber, red onion, and cilantro. Dice the mango, bell pepper, and cucumber into small pieces. Finely chop the red onion and cilantro. Shred the chicken breast if it isn't already. This step takes about 10 minutes and sets you up for a vibrant salad. In a large mixing bowl, combine the shredded chicken, diced mango, bell pepper, cucumber, red onion, and cilantro. Use a spatula to mix gently. Be careful not to mash the mango. You want it to stay chunky for the best texture. This mixture brings bright colors and fresh flavors together. In a small bowl, whisk together Greek yogurt, lime juice, honey, salt, and pepper. If you like, add cumin for an extra kick. The dressing should be smooth and creamy. Pour the dressing over your salad mix. Gently toss the salad until everything is well coated. Taste it and adjust the seasoning if needed. If you can, chill the salad in the fridge for 30 minutes. It helps the flavors meld together beautifully. This process creates a fresh and flavorful mango chicken salad that will impress anyone! For the full recipe, check out the detailed instructions above. To pick the best mango, look for a ripe one. A ripe mango feels slightly soft when you squeeze it. It should have a sweet smell near the stem. The skin color varies, so focus on feel and smell. If you find green mangoes, they may not be ripe enough. Choose ones that are mostly yellow or red. You can also let them ripen at room temperature for a few days. Seasoning is key to making your mango chicken salad pop. Use fresh lime juice for a bright taste. Honey adds a touch of sweetness, balancing the flavors. A pinch of salt and pepper elevates the taste. If you like spice, consider adding cumin. This spice gives depth to the dish. Always taste as you go to adjust the flavors based on your preference. When serving this salad, presentation matters. Use a large bowl for gatherings or individual plates for a personal touch. Garnish with extra cilantro leaves for color. Add slices of fresh mango on the side for a vibrant look. This salad pairs well with tortilla chips or crusty bread. It also makes a great topping for tacos or a filling for wraps. Enjoy your Mango Chicken Salad fresh, and let the flavors shine! {{image_2}} You can add more tropical fruits to make your salad even better. Try diced pineapple for a sweet touch. Kiwi adds a fun color and tang. Papaya gives a creamy texture. Each fruit adds unique flavors to the mix. If you want a different protein, think about using shrimp or grilled tofu. Both options taste great with mango. You can also use canned tuna if you want something quick. These choices keep the salad fresh and exciting. To make this salad vegan, skip the chicken and yogurt. Use chickpeas or black beans instead. They add protein and fiber. For the dressing, mix avocado with lime juice for creaminess. This way, the salad stays tasty and healthy. To keep your mango chicken salad fresh, place it in an airtight container. Make sure to seal it well to prevent air from getting in. Store it in the fridge. It’s best if you eat it within three days. The salad may lose its crunch if stored too long. Freezing mango chicken salad is not ideal. The texture of the mango and chicken changes when frozen. If you must freeze it, leave out the mango and dressing. You can mix them in later. To freeze, use a freezer-safe container and label it with the date. Meal prep makes life easier! Start by cooking extra chicken. Cut your veggies and mango ahead of time. Store them separately in the fridge. When you're ready to eat, mix everything together. This keeps your salad fresh and tasty. Enjoy your mango chicken salad whenever you like with these tips! For the full recipe, check the earlier section. Yes, you can use canned chicken. It saves time and effort. Just drain and shred it. Canned chicken works well in salads. It can still taste good with the right seasoning. However, fresh cooked chicken gives a better texture. Many dressings complement mango chicken salad. A simple vinaigrette works well. You can mix olive oil and vinegar for a light option. A spicy yogurt dressing adds a nice kick. Try a honey mustard dressing for a sweet touch. Each dressing alters the taste in a fun way. Mango chicken salad lasts about three days in the fridge. Store it in an airtight container. Make sure to keep it cool. The flavors blend over time, making it tasty. Just check for freshness before eating. If it looks or smells off, don’t eat it. You now have all the tools to make a tasty mango chicken salad. We reviewed essential ingredients, step-by-step instructions, and helpful tips. Remember, you can customize it with add-ins and variations. Store leftovers properly for later enjoyment. Whether you like it with chicken or prefer plant-based options, the choice is yours. This recipe offers flexibility to fit your taste. Enjoy your mango chicken salad creation and share it with friends!

Mango Chicken Salad Fresh and Flavorful Delight

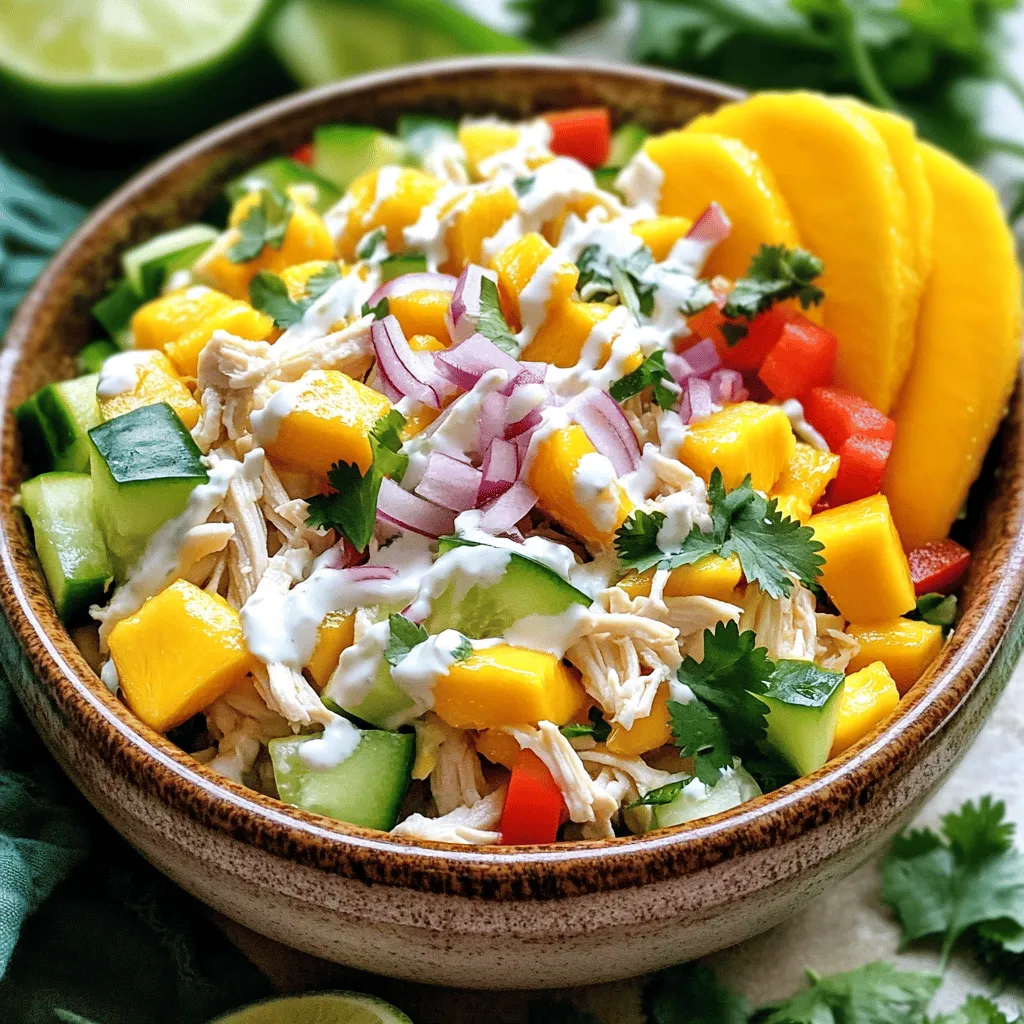
Are you ready for a fresh and tasty meal? My Mango Chicken Salad is just what you need! Packed with

- Whole chicken (4-5 lbs) - Olive oil - Garlic - Lemon The heart of this dish is the whole chicken. A 4-5 pound bird works best. The olive oil adds richness. Garlic gives a strong flavor. Fresh lemons add brightness and zest. - Fresh thyme - Fresh rosemary - Salt - Pepper Fresh herbs make a big difference. Thyme and rosemary bring earthy notes. Use salt and pepper to enhance all flavors. These simple seasonings balance the dish perfectly. - Onion - Potatoes Adding onion and potatoes makes the meal complete. The onion adds sweetness as it roasts. The potatoes soak up all the tasty juices. They turn crispy and golden, adding texture to your plate. For the complete recipe, check out the Full Recipe for more details. First, preheat your oven to 425°F (220°C). This hot temperature helps the chicken cook evenly. While the oven heats, make the marinade. In a small bowl, mix olive oil, minced garlic, lemon juice, thyme, rosemary, salt, and pepper. This mix brings out great flavor. Next, pat the chicken dry with paper towels. This step is key for crispy skin. Place the chicken in a large roasting pan. Now, rub the marinade all over the chicken. Make sure to get it under the skin. This helps the flavors soak in. Once the chicken is coated, it’s time to stuff it. Place quartered onion and lemon slices inside the chicken's cavity. This adds more taste as it cooks. After stuffing, arrange chopped potatoes around the chicken. Drizzle them with olive oil, salt, and pepper. This makes everything tasty. Put the chicken in the preheated oven. Roast it for about 1 hour and 15 minutes. Check that the internal temperature reaches 165°F (74°C). The skin should be golden brown and crispy. After roasting, let the chicken rest for 10-15 minutes. This helps the juices settle. Finally, serve it on a platter, with roasted potatoes beside it. For a nice touch, add fresh parsley for color. For the full recipe, check the details above. To make the chicken extra tasty, you want the marinade under the skin. Start by gently lifting the skin with your fingers. Be careful not to tear it. Use a spoon or your hand to spread the marinade underneath. This helps the flavors soak in as it cooks. The skin keeps the meat juicy while adding a nice crunch. For perfect browning and crispy skin, make sure your oven is hot. Preheat it to 425°F (220°C) before putting the chicken in. Also, pat the chicken dry with paper towels. This removes moisture and helps it brown better. If you want even crispier skin, baste the chicken with its juices halfway through cooking. This adds flavor and keeps it moist. When it's time to serve, presentation matters. Use a large platter for the chicken. Arrange the crispy potatoes around it. For a pop of color, add lemon wedges and fresh herbs on top. This not only looks great but also makes your meal feel special. Serve it with a side salad for a complete dish. Check out the Full Recipe for more tips on making this meal shine! {{image_2}} You can spice up your Lemon Garlic Roasted Chicken by using different herbs. Try basil or oregano instead of thyme. These herbs can give your chicken a fresh twist. Parsley works well too, adding a nice green touch. Mix and match your favorite herbs for a unique flavor. Adding vegetables to the roasting pan can enhance your dish. Carrots and bell peppers make great options. They soak up the chicken's juices and add sweetness. You can also use zucchini or asparagus for a fresh vibe. Just chop them into similar sizes so they cook evenly with the chicken. If you want a change, try cooking your chicken in a slow cooker or on the grill. The slow cooker keeps the meat juicy and tender. Just add your marinade and veggies, then let it cook. Grilling adds a smoky flavor and crispy skin. You’ll want to keep an eye on it to avoid drying out the meat. Each method offers a new way to enjoy this tasty dish. For the full recipe, check out the details above. To store leftover Lemon Garlic Roasted Chicken, first let it cool. Place the chicken in an airtight container. Make sure to cover it tightly. You can keep it in the fridge for up to four days. If you have leftover potatoes, store them in a separate container. This keeps them fresh and tasty. Freezing roasted chicken is simple. Wrap the cooled chicken well in plastic wrap. Then, place it in a freezer bag. Remove as much air as you can. This helps avoid freezer burn. You can freeze it for up to three months. For best results, cut the chicken into pieces before freezing. This makes it easier to defrost later. When you’re ready to enjoy your chicken again, reheating is key. The best way is to use an oven. Preheat the oven to 350°F (175°C). Place the chicken in a baking dish and cover it with foil. This helps keep it moist. Heat for about 20 to 25 minutes. If you want crispy skin, remove the foil for the last five minutes. Enjoy your flavorful meal once more! For detailed steps, check the Full Recipe. To ensure your chicken is cooked, check the internal temperature. Use a meat thermometer and aim for 165°F (74°C). This is the safe temperature for chicken. Look for a few visual signs too. The skin should be golden brown and crispy. If the juices run clear when you cut into the chicken, it's done. If they are pink, it needs more time. Yes, you can use chicken pieces! Adjust the cooking time to about 30 to 45 minutes. Chicken breasts cook faster than thighs or legs. Use the same marinade for flavor. Make sure to check the internal temperature of each piece. The same 165°F (74°C) rule applies here. Lemon Garlic Roasted Chicken goes well with many sides. Here are some great options: - Roasted vegetables like carrots and Brussels sprouts - A fresh green salad with a light vinaigrette - Creamy mashed potatoes or garlic mashed potatoes - Quinoa or rice pilaf for a healthy touch These sides enhance the meal and bring out the flavors of the chicken. You can find the full recipe to create this delicious dish! This blog post outlined how to make a delicious Lemon Garlic Roasted Chicken. We covered the main ingredients, like chicken, olive oil, and herbs. I shared step-by-step instructions, tips for better flavor, and ways to store leftovers. You can also explore variations and adjustments to suit your taste. Cooking can be fun and rewarding. With practice, you'll master this dish and impress your family and friends. Enjoy your cooking journey!

Lemon Garlic Roasted Chicken Simple Flavorful Dish

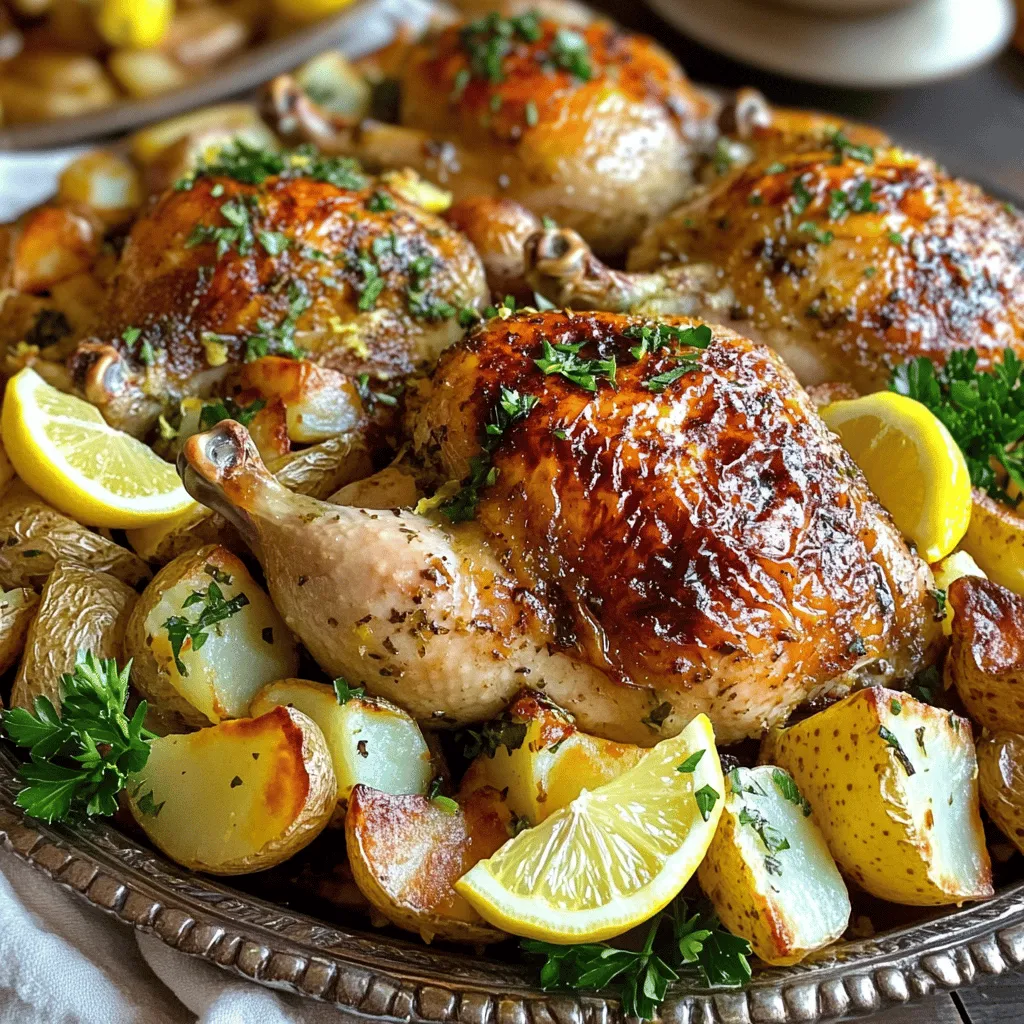
Looking for a simple, flavorful dish that impresses? Try my Lemon Garlic Roasted Chicken! This recipe combines juicy chicken with

- Flatbreads (store-bought or homemade) - Shredded cooked chicken breast - BBQ sauce selection - Shredded mozzarella cheese - Red onion slices - Corn kernels - Fresh cilantro for garnish - Olive oil - Salt and pepper For this BBQ Chicken Flatbread, you need a few simple ingredients. Start with flatbreads. You can buy them or make your own. I love homemade flatbreads for their fresh taste. Next, you need shredded cooked chicken breast. Use leftover chicken or a rotisserie chicken for quick prep. Choose your favorite BBQ sauce. The flavor of the sauce makes a big difference. You can find many brands, so pick one you love. Mozzarella cheese adds creaminess. Shredding it yourself gives you better meltability. Red onion adds a nice crunch and flavor. Slice it thin so it cooks well. Corn kernels bring sweetness. You can use fresh corn or canned corn, depending on what's available. Fresh cilantro is a must for garnish. It adds color and freshness. A drizzle of olive oil helps the flatbreads crisp up in the oven. Finally, don't forget salt and pepper for seasoning. All these ingredients come together to create a tasty meal. Check the [Full Recipe] for more details. - Preheating the oven Start by preheating your oven to 400°F (200°C). This ensures even cooking and a perfect crust. - Mixing chicken with BBQ sauce In a bowl, combine 1 cup of shredded chicken with 1/2 cup of your favorite BBQ sauce. Stir until the chicken is fully coated. - Preparing flatbreads with olive oil Take 2 flatbreads and place them on a baking sheet. Drizzle 1 tablespoon of olive oil on each flatbread. Spread the oil evenly using a brush or the back of a spoon. This step adds flavor and helps the flatbreads crisp up. - Distributing BBQ chicken mixture Evenly distribute the BBQ chicken mixture over the flatbreads. Leave a small border around the edges for a nice crust. - Adding toppings: cheese, onion, corn Sprinkle 1 cup of shredded mozzarella cheese over the chicken. Next, add 1/2 thinly sliced red onion and 1/2 cup of corn kernels on top for extra flavor. - Seasoning the flatbreads Season the flatbreads with salt and pepper to your taste. This small step can make a big difference. - Proper baking time and temperature Place the baking sheet in the preheated oven. Bake the flatbreads for 10-12 minutes. This will melt the cheese and crisp the edges. - Signs that the flatbread is ready Look for the cheese to be melted and bubbly. The edges should be golden brown. This tells you that your flatbreads are ready. - How to slice and present the flatbreads Once out of the oven, let the flatbreads cool slightly. Use a sharp knife to slice them into wedges. Arrange them on a wooden cutting board for a rustic look. - Pairing options (sides or dips) Serve your BBQ chicken flatbread with a small bowl of extra BBQ sauce for dipping. You can also add a fresh salad or crunchy veggies on the side to complete the meal. Enjoy! To make sure your BBQ chicken flatbread cooks evenly, spread the toppings in a thin layer. This allows the heat to reach all parts of the flatbread. If you want extra flavor, mix in some diced jalapeños or smoked paprika with the chicken. These will add a nice kick! For spices, I recommend garlic powder and onion powder. They deepen the taste of the chicken. If you want to change up the recipe, try using ranch dressing instead of BBQ sauce. It gives a creamy twist that many people love! For serving, place the flatbreads on a wooden cutting board. This makes it look rustic and inviting. Add fresh cilantro on top for color. You can also serve a small bowl of BBQ sauce on the side for dipping. This will make your dish even more appealing! {{image_2}} You can change toppings to make your BBQ chicken flatbread unique. Try adding veggies like: - Bell peppers - Mushrooms These add color and flavor. You can also switch up the cheese. Instead of mozzarella, use: - Cheddar - Feta These cheeses give a new taste. Feta adds a salty kick, while cheddar adds richness. If you want to try something new, think about homemade BBQ sauce. Making your own lets you control the flavors. You can mix ingredients like honey, ketchup, and spices. Alternatively, look for unique specialty BBQ sauces. Some may have fruity or spicy notes that can enhance your dish. Flatbreads are versatile. You can choose different types based on your needs. For those who want gluten-free options, look for gluten-free flatbreads at stores. They work well and taste great. If you prefer something healthier, try whole wheat flatbreads. They add extra fiber compared to traditional flatbreads. Each type can change the taste and feel of your meal, so pick what you like best. To keep your BBQ chicken flatbread fresh, store leftovers in an airtight container. It’s best to refrigerate them within two hours of baking. When reheating, place the flatbread in the oven at 350°F (175°C) for about 10 minutes. This method keeps the crust crispy and warm. Avoid using the microwave, as it can make the flatbread soggy. If you want to meal prep, freezing is a great option. Wrap each flatbread tightly in plastic wrap, then place it in a freezer bag. You can freeze flatbreads for up to three months. When you’re ready to eat, thaw them in the fridge overnight. Reheat in the oven at 350°F (175°C) for 10-12 minutes until heated through. The ingredients in your BBQ chicken flatbread have different shelf lives. Cooked chicken lasts about 3-4 days in the fridge. The flatbreads can stay fresh for a week. BBQ sauce can last for months if stored properly. Look out for signs of spoilage, like a bad smell or mold on any ingredient. Always trust your senses when it comes to food safety. How do I make homemade flatbread? To make homemade flatbread, you need flour, water, salt, and a little oil. Mix these ingredients to form a dough. Knead it until smooth. Then, roll the dough into flat circles. Cook them in a hot skillet for a few minutes on each side until they puff up. Can I use raw chicken for this recipe? No, using raw chicken is not safe. Always cook your chicken first before adding it to the flatbread. Cooked chicken keeps the dish safe and tasty. What sauces pair well with BBQ chicken flatbread? Besides BBQ sauce, try ranch dressing or honey mustard. These sauces offer great flavor and balance the BBQ chicken. Hot sauce can also add a fun kick! How many calories are in BBQ chicken flatbread? Each serving of BBQ chicken flatbread has around 300 to 400 calories. This depends on the toppings and portion size you choose. Are there healthy alternatives for this recipe? Yes! Use whole wheat flatbreads for more fiber. You can also add more veggies like peppers and spinach to boost nutrition. Swap regular cheese for a low-fat option too. Can this recipe be made vegan? Yes, make it vegan by using plant-based chicken. Replace cheese with vegan cheese or skip it altogether. Use a vegan BBQ sauce to keep it tasty. How can I make this dish spicier? Add sliced jalapeños or a sprinkle of red pepper flakes. You can also mix some hot sauce into the BBQ sauce for extra heat. Adjust the spice to your liking! BBQ chicken flatbreads are simple to make and delicious. We covered the key ingredients, step-by-step prep, and how to serve them. I shared tips to enhance flavor and variations to customize your dish. Remember, these flatbreads can suit any taste or dietary need. Enjoy the process and feel free to experiment with toppings. Your creativity will lead to tasty results every time. Dive in and share your unique creations with others!

BBQ Chicken Flatbread Tasty and Quick Recipe

Looking for a quick and tasty meal that everyone will love? This BBQ Chicken Flatbread recipe is perfect for you!

- 3 medium-sized beets - 4 cups mixed greens (arugula, spinach, and frisée) - 1/2 cup goat cheese, crumbled - 1/4 cup walnuts, toasted and chopped - 1/4 cup pomegranate seeds - 2 tablespoons balsamic vinegar - 2 tablespoons olive oil - 1 tablespoon honey - Salt and black pepper to taste Gathering fresh ingredients makes cooking fun and tasty. Here are the items you need to make a roasted beet goat cheese salad. Start with three medium-sized beets. They are the star of this dish. Next, you need four cups of mixed greens. Arugula, spinach, and frisée mix well together. For creaminess, use half a cup of crumbled goat cheese. It adds a nice tang. You will also need a quarter cup of walnuts, toasted and chopped. They give a great crunch. For a pop of color and sweetness, add a quarter cup of pomegranate seeds. For the dressing, gather two tablespoons each of balsamic vinegar and olive oil. Honey adds a sweet touch, so you’ll need one tablespoon. Finally, season with salt and black pepper to taste. - Baking sheet - Aluminum foil - Salad bowl - Whisk You’ll need a few tools to make this salad come together. First, grab a baking sheet to roast the beets. Aluminum foil helps keep the moisture in while they cook. Use a salad bowl to mix all the fresh ingredients. A whisk is perfect for blending the dressing smoothly. With these items, you're ready to create a colorful and flavorful salad! Check the full recipe for detailed steps. - Preheat oven to 400°F (200°C). - Wrap each beet in aluminum foil. Place them on a baking sheet. Roast beets for 45-60 minutes. They are done when a fork easily pierces them. This roasting process brings out their sweet flavor and makes them tender. - Once the beets cool, peel off the skins. They should slip off easily. Slice the beets into wedges. - In a large salad bowl, mix the greens, beet wedges, goat cheese, walnuts, and pomegranate seeds. This mix creates a beautiful color and texture. - In a small bowl, whisk together balsamic vinegar, olive oil, honey, salt, and black pepper. This dressing ties all the flavors together. - Drizzle the dressing over the assembled salad. Toss gently to mix everything well. Taste and adjust seasoning if needed. For the complete cooking process, check the Full Recipe. Enjoy your fresh and tasty Roasted Beet Goat Cheese Salad! To know when your beets are done, pierce them with a fork. If it slides in easily, they are ready. This usually takes about 45 to 60 minutes at 400°F (200°C). If your beets are still hard, give them more time. Check them every 10 minutes until they soften. If you notice that your beets are undercooked, don’t worry. Just put them back in the oven, wrapped in foil. Roasting longer at the same temperature will help. You can check them again after another 15 minutes. To make your salad even better, adjust the seasoning. Adding more salt or pepper can really lift the taste. You might also try adding a pinch of garlic powder or a squeeze of lemon juice for brightness. Consider adding fresh herbs like basil or mint for a fresh twist. You can also mix in thinly sliced red onion or avocado for extra flavor. Nuts like pecans or almonds can add crunch, too. These small changes will make your roasted beet goat cheese salad shine even more. For the full recipe, check out the Roasted Beet & Goat Cheese Delight. {{image_2}} You can switch up the mixed greens in this salad. If you prefer spinach, it adds a nice tender touch. Baby kale also works well, bringing a hearty flavor. Try using arugula for a peppery kick. Even romaine can add a nice crunch. Mixing different greens gives your salad more texture and taste. To make this salad heartier, add proteins like grilled chicken or chickpeas. They bring great texture and flavor. You can also try shrimp or tofu for a fresh twist. Nuts like pecans or almonds can add crunch. For cheese, feta or blue cheese can create a unique taste. Don't shy away from experimenting with different combinations to find your favorite mix. For the full recipe, check out the Roasted Beet & Goat Cheese Delight. To keep your Roasted Beet Goat Cheese Salad fresh, store it in an airtight container. Place the salad in the fridge right after serving. This helps maintain the flavors and crunch. Use the salad within three days for the best taste. If you have leftover dressing, store it separately. This keeps the greens from wilting too soon. You can enjoy the dressing for up to a week. Typically, salads are best served fresh and cold. However, if you prefer warm beets, gently reheat them in the microwave. Place the beets in a bowl and heat for about 30 seconds. Stir, then heat for another 30 seconds if needed. Avoid reheating the greens or dressing. Instead, add the warm beets to a fresh salad mix for a cozy twist. You can still enjoy that delightful flavor with fresh greens and toppings. Roasted beets can last about 3 to 5 days in the fridge. Store them in an airtight container. This keeps them fresh and tasty for your salads. I recommend using them within a few days for the best flavor. Yes, you can make this salad ahead of time. Just keep the dressing separate until you are ready to serve. This helps keep the greens fresh and crisp. You can store the salad in the fridge for up to a day. The best way to peel roasted beets is simple. After roasting, let them cool slightly. Then, use your hands or a paper towel to rub off the skins. They should come off easily. Just be careful, as the juice can stain your hands. This salad is not vegan because of the goat cheese. To make it vegan, you can skip the cheese or use a vegan cheese substitute. You can also add extra nuts or seeds for protein and flavor. Yes, you can substitute goat cheese with another cheese. Feta or blue cheese works well. If you prefer a milder taste, try cream cheese or ricotta. Each option adds a unique flavor to the salad. For the full recipe, check out the details above! This salad combines bold flavors and vibrant colors. We started with roasted beets, then mixed in fresh greens, crunchy walnuts, and tangy goat cheese. The dressing adds a sweet and tart kick. Remember, you can swap ingredients to suit your taste. This recipe is easy to prepare and great for leftovers. Enjoy a tasty and healthy meal. Your palette will thank you!

Roasted Beet Goat Cheese Salad Flavorful Fresh Dish

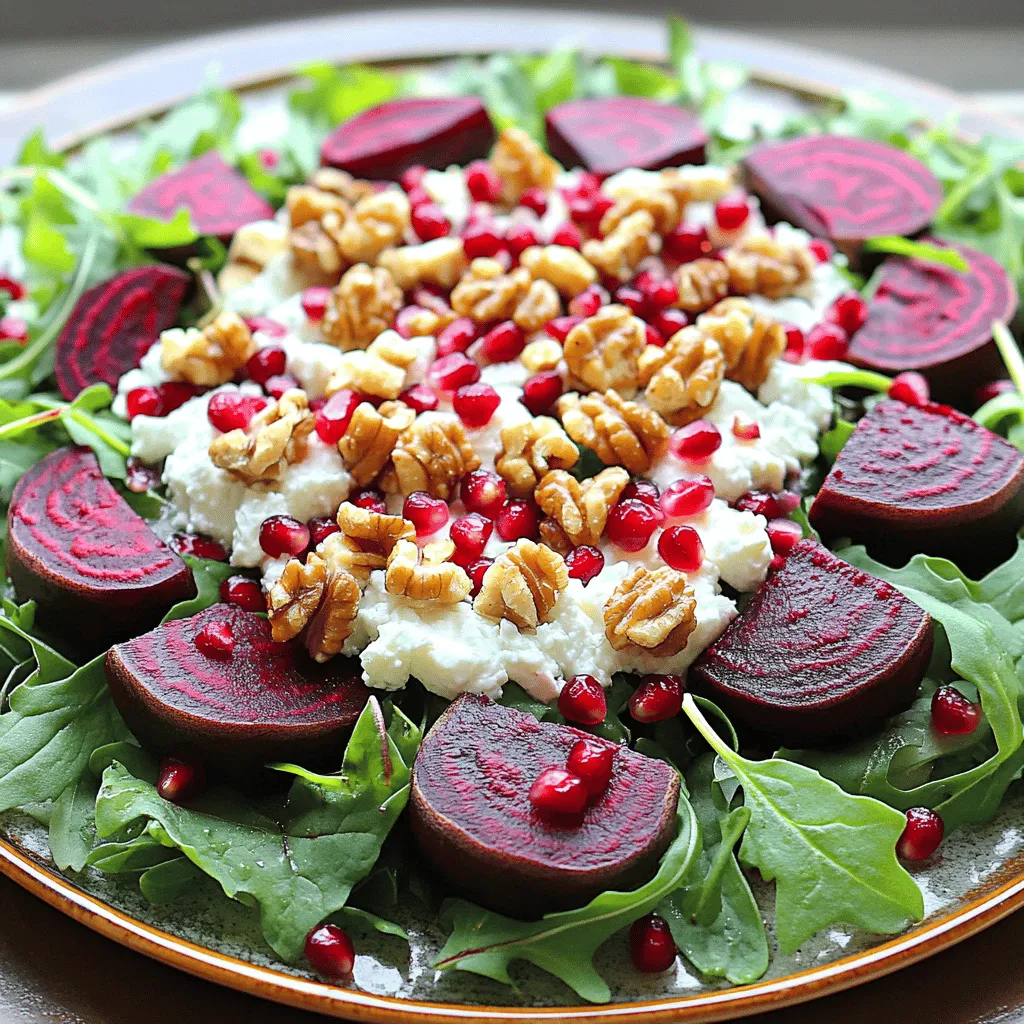
If you’re ready for a tasty and fresh salad, you need to try a Roasted Beet Goat Cheese Salad. This

- 2 large sweet potatoes - 1 cup black beans, drained and rinsed - 1 cup corn kernels (frozen or fresh) - 1 cup cherry tomatoes, halved - 1 avocado, diced - 1/2 cup Greek yogurt (or sour cream) - 1/2 cup shredded cheddar cheese - 2 green onions, chopped - 1 teaspoon chili powder - Salt and pepper to taste - Olive oil for drizzling When making loaded sweet potato skins, I love to start with the right ingredients. Sweet potatoes are key because they are sweet and creamy. They also pack a lot of vitamins. I use black beans for protein and fiber. Corn adds a nice crunch and sweet flavor. Cherry tomatoes bring freshness, while avocado gives creaminess. Greek yogurt or sour cream makes each bite luscious. For seasoning, I use chili powder for a bit of heat. Salt and pepper enhance all the flavors. A drizzle of olive oil helps everything roast nicely. You can find the full recipe with all these ingredients listed, so you won’t miss a step. When you gather these ingredients, you set the stage for a tasty dish that is also good for you. - Preheat your oven to 400°F (200°C). - Wash the sweet potatoes well. Poke a few holes in each potato with a fork. Place them on a baking sheet. Drizzle with olive oil and sprinkle with salt. - Roast the sweet potatoes for about 45-60 minutes. Check if they are tender by piercing with a fork. They should feel soft inside. - In a bowl, mix black beans, corn, cherry tomatoes, and chili powder. Add half of the chopped green onions. Season with salt and pepper to taste. - Cut each sweet potato in half lengthwise. Scoop out some flesh, leaving about a 1/4-inch border. Stuff each half with the bean mixture. Top with shredded cheddar cheese. - Return the stuffed sweet potato skins to the oven. Bake for an extra 10-15 minutes until the cheese melts and bubbles. - Remove from the oven. Let them cool for a few minutes. Top with diced avocado, a dollop of Greek yogurt, and the remaining green onions. For the full recipe, you can refer to the section above. Enjoy your tasty Loaded Sweet Potato Skins! How can you tell when sweet potatoes are cooked? Look for a fork to slide in easily. If they feel soft, they are ready. This usually takes about 45 to 60 minutes. After baking, let them rest for a few minutes. This step helps the flavors settle and makes them easier to handle. How should you serve loaded sweet potato skins? Arrange them on a large platter for a beautiful display. Add extra cherry tomatoes and fresh cilantro on top for color. Serve them warm for the best taste. What can you use as garnishes? You can sprinkle more green onions or a dash of chili powder. A squeeze of lime juice also adds a nice touch. What can you use if you have dietary needs? Black beans can be swapped with lentils for a different flavor. If you want a vegan option, use dairy-free cheese instead of cheddar. What other toppings can you add? Try adding diced bell peppers or chopped spinach. You can also top with salsa or a dollop of guacamole for extra zest. For the full recipe, check out the Loaded Sweet Potato Skins section. {{image_2}} For a zesty kick, try spicy loaded sweet potato skins. Add sliced jalapeños to the filling. The heat from the jalapeños pairs well with the sweet potatoes. You can also make a Tex-Mex style version. Top your skins with guacamole and salsa. The creamy avocado and fresh salsa add great flavor and texture. You can easily adapt this recipe for dietary needs. For a vegetarian option, keep the black beans and skip any meat. If you're vegan, swap Greek yogurt for a plant-based yogurt. You can also make it gluten-free. Simply check labels on all ingredients to ensure they meet gluten-free standards. Seasonal ingredients can elevate your loaded sweet potato skins. In spring, add fresh asparagus or peas for a pop of green. In the fall, mix in roasted squash or cranberries for a festive touch. You can even create themed variations for holidays. For Halloween, add black beans and orange cheese for a spooky look! To keep your loaded sweet potato skins fresh, store them in an airtight container. Place them in the fridge right after they cool down. They will stay good for about three to four days. If you want to enjoy them later, freezing is a great option. Wrap each skin in plastic wrap, then put them in a freezer-safe bag. They can last up to three months in the freezer. When you're ready to eat them, let them thaw overnight in the fridge. To reheat, preheat your oven to 350°F (175°C). Place the skins on a baking sheet and cover with foil. Heat for about 15-20 minutes or until warmed through. This method helps keep them crispy. You can keep loaded sweet potato skins in the fridge for four days. If they smell bad or look slimy, it's time to toss them. Always check for mold or off colors. If you see any, don’t eat them. Proper storage helps maintain their flavor and texture, so follow these tips for the best experience! Yes, you can prepare these sweet potato skins in advance. Start by cooking the sweet potatoes as the recipe states. After roasting, let them cool and scoop out the flesh. You can store the empty skins in the fridge for up to two days. When you are ready to serve, prepare the filling and stuff the skins. Bake them just before serving for the best taste. You can enjoy these sweet potato skins with various sides and drinks. Here are some suggestions: - A fresh green salad - Grilled chicken or shrimp - Spicy salsa or guacamole - A cold beer or sparkling water - A zesty lemonade These options will balance the flavors and make your meal exciting. You can easily make these sweet potato skins more nutritious. Here are some tips: - Use non-fat Greek yogurt instead of sour cream for fewer calories. - Add more veggies like spinach or bell peppers to the filling. - Choose low-fat cheese to cut down on fat content. - Serve with a side of fresh fruit for added vitamins. These changes keep the dish tasty while boosting nutrition. People often ask about the best ways to enjoy loaded sweet potato skins. Here are a few common queries: - Can I use other types of potatoes? Yes, you can use regular potatoes, but sweet potatoes add more flavor and nutrients. - Can I freeze them? You can freeze stuffed skins before baking. Just wrap them tightly and bake from frozen, adding extra time. - Are they good for meal prep? Absolutely! They are great for meal prep and can be stored for quick meals. These tips help you get the most out of your loaded sweet potato skins. For the full recipe, check the main section! This blog post gave you a tasty guide to loaded sweet potato skins. We covered the main ingredients, helpful tips, and variations to keep meals exciting. You learned how to make them your own with substitutions and seasonal twists. With simple steps for preparation and storage, you can enjoy these dishes any time. Remember, cooking is all about fun and creativity. Enjoy your cooking adventures and make these delicious skins a regular treat!

Loaded Sweet Potato Skins Flavorful and Nutritious Treat

Are you ready to elevate your snack game? Loaded Sweet Potato Skins are the perfect blend of flavor and nutrition.

- 4 large bell peppers (any color) - 1 cup quinoa, rinsed - 2 cups vegetable broth - 1 cup black beans, drained and rinsed - 1 cup corn kernels (fresh, frozen, or canned) - 1 teaspoon cumin - 1 teaspoon chili powder - ½ teaspoon garlic powder - Salt and pepper to taste - 1 cup shredded cheddar cheese (or a vegan alternative) When choosing bell peppers, pick ones that feel firm and look vibrant. You can use red, yellow, or green peppers. Each has a unique taste, making the dish even more fun. Quinoa is a great base here. It adds texture and protein. Rinsing it helps remove any bitter taste. Black beans add fiber and nutrients. They also bring a nice creaminess to the mix. Feel free to use canned corn for ease. Fresh or frozen corn works well too. The spices are key! Cumin, chili powder, and garlic powder create warmth and flavor. - Fresh cilantro, chopped - Other garnishing ideas: avocado, sour cream, or lime wedges Adding fresh cilantro gives a burst of flavor. You can also try avocado slices or a dollop of sour cream. Lime wedges add a zesty touch. These garnishes make the dish look pretty too. - Baking dish - Medium saucepan - Mixing bowl - Measuring cups and spoons You don’t need fancy tools for this recipe. A simple baking dish works great for the peppers. A medium saucepan is perfect for cooking the quinoa. A mixing bowl helps combine all the tasty filling. Measuring cups and spoons ensure you use just the right amount of each ingredient. For the full recipe, you can refer to the details provided earlier. This dish is not only easy to make but also a healthy delight! To start, preheat your oven to 375°F (190°C). This step is key for a great bake. Next, take your bell peppers and cut the tops off. Remove the seeds and membranes inside. This makes them ready for stuffing. Place the peppers upright in a baking dish. Now, let's cook the quinoa. In a medium saucepan, bring 2 cups of vegetable broth to a boil. Then, add 1 cup of rinsed quinoa. Cover the pot, lower the heat, and let it simmer for about 15 minutes. You want the liquid to absorb, leaving you with fluffy quinoa. Once the quinoa is cooked, it's time to create the filling. In a large mixing bowl, combine the cooked quinoa, 1 cup of drained black beans, and 1 cup of corn. These ingredients add great flavor and texture. Next, season the mixture with 1 teaspoon of cumin, 1 teaspoon of chili powder, ½ teaspoon of garlic powder, and salt and pepper to taste. Mix everything well. This blend will give your peppers a tasty kick. Now, let's stuff those bell peppers! Generously fill each pepper with the quinoa mixture. Press down gently to pack it in well. This ensures each bite is full of flavor. After stuffing, sprinkle 1 cup of shredded cheddar cheese evenly on top of the peppers. If you prefer a vegan option, use a dairy-free cheese instead. Cover the baking dish with foil and bake in the preheated oven for 25 minutes. After that time, remove the foil and bake for another 10 minutes. You want the cheese to melt and bubble nicely. Once done, let the peppers rest for a few minutes before serving. Enjoy your healthy delight! For the complete recipe, check the [Full Recipe]. - How to avoid mushy peppers To keep your peppers firm, pre-bake them for 10 minutes before stuffing. This helps them hold their shape. Also, make sure you don’t overcook them in the oven. - Ensuring the quinoa is fluffy Rinse the quinoa well before cooking. This removes the bitter coating. Use a 2:1 ratio of broth to quinoa. Once it cooks, let it sit covered for 5 minutes. Then fluff with a fork. - Best cheeses for stuffed peppers Cheddar melts perfectly and adds a nice flavor. Other great choices are Monterey Jack or mozzarella. They make the dish creamy and delicious. - Vegan alternatives For a vegan option, use cashew cheese or a store-bought vegan cheese. Nutritional yeast also gives a cheesy flavor without dairy. - Instant Pot method You can cook stuffed peppers in an Instant Pot. Place a cup of water in the pot. Set the peppers on a trivet. Cook for 6 minutes on high pressure. Quick release afterwards. - Grilling stuffed peppers Grilling gives a smoky flavor. Cut the peppers in half and remove seeds. Stuff them and wrap in foil. Grill for about 20 minutes until tender. This method adds a nice char. {{image_2}} You can change the filling of stuffed peppers to suit your taste. If you like meat, ground beef or turkey works well. Simply cook the meat before mixing it into your filling. For a vegetarian or vegan option, try using lentils or chickpeas. They add protein and flavor. You can also mix in diced vegetables like zucchini or mushrooms. This way, you can make a healthy meal that everyone loves. Enhancing the flavor of your stuffed peppers is easy. You can add spices like paprika or cayenne for a kick. Just a pinch can make a big difference. Also, think about adding different vegetables. Chopped onions, garlic, or spinach can boost the taste and nutrition. Experiment with herbs like basil or oregano for fresh notes. These little changes can make your dish stand out. When serving stuffed peppers, think about the sides. A fresh salad pairs nicely, adding crunch and color. You can also serve rice or quinoa on the side. Both complement the flavors well. For plating, place the peppers upright on a colorful plate. Drizzle some sauce or yogurt on top for a beautiful finish. This makes your meal look as good as it tastes. For the full recipe, check out the main article. To keep your stuffed bell peppers fresh, store them properly. First, let the peppers cool completely at room temperature. Then, wrap them tightly with plastic wrap or place them in an airtight container. This helps prevent air from getting in and keeps them fresh. You can refrigerate stuffed bell peppers for up to four days. If you want to keep them longer, freezing is a great option. Before freezing, wrap each pepper in plastic wrap and then place them in a freezer-safe bag. Make sure to remove as much air as possible to avoid freezer burn. You can freeze them for up to three months. When it's time to enjoy your stuffed bell peppers again, reheating is easy. The best method is to use an oven. Preheat your oven to 350°F (175°C). Place the peppers in a baking dish and cover them with foil to keep moisture in. Heat for about 20 minutes or until warmed through. If you’re in a hurry, you can use a microwave. Place the peppers on a microwave-safe plate. Cover them with a damp paper towel and heat for 2-3 minutes. Check to see if they are hot enough. To keep the peppers from becoming soggy, avoid using too much water in the dish. Cooked stuffed peppers can last in the fridge for about four days. If frozen, they can last for up to three months. Always check for signs of spoilage before eating. If you see mold or an off smell, it’s best to discard them. Freshness is key to enjoying your tasty meal! Can I make stuffed peppers ahead of time? Yes, you can prepare stuffed peppers ahead. Make the filling and stuff the peppers. Store them in the fridge for up to 24 hours before baking. This saves time on busy nights. Just pop them in the oven when you’re ready to eat. What's the best way to cut bell peppers for stuffing? To cut bell peppers for stuffing, slice off the top. Remove the seeds and membranes. Keep the pepper upright for easy stuffing. This method helps the peppers hold their shape while baking. Calories and macro breakdown of the recipe Each stuffed pepper has about 300 calories. You get roughly 12 grams of protein and 45 grams of carbs. This meal is filling and nutritious, making it a great choice for lunch or dinner. Nutritional benefits of stuffed bell peppers Stuffed bell peppers are rich in vitamins A and C. They also provide fiber and protein. Quinoa adds complete protein, making this dish a healthy option. The beans and corn boost the fiber content, too. Can I use rice instead of quinoa? Yes, you can use rice instead of quinoa. Just cook it as directed before mixing it with the other filling ingredients. This change will still taste great, but quinoa adds more protein. Alternatives for black beans and corn You can swap black beans for kidney beans or pinto beans. If you don't have corn, try using diced tomatoes or peas. Each option gives a different flavor, but all will work well in your peppers. Stuffed bell peppers are simple and delicious. You learned key ingredients, tools, and steps to make them. We explored tips for perfect cooking, cheese choices, and ways to vary flavors. Lastly, we discussed storage and reheating methods. These peppers can fit any meal or preference. With a few changes, you can make them your own. Enjoy the process and share with others! The joy of cooking and eating is what matters most.

Easy Stuffed Bell Peppers Tasty and Healthy Delight

If you’re searching for a healthy and tasty meal, you’ll love these easy stuffed bell peppers. I’ll show you how

- 8 oz whole wheat spaghetti or rice noodles - 1 cup shredded purple cabbage - 1 cup shredded carrots - 1 bell pepper, julienned - 1 cucumber, julienned - 3 green onions, chopped - 1/2 cup edamame (shelled) - 1/4 cup sesame seeds For this salad, I love using whole wheat spaghetti or rice noodles. They give the dish a nice texture. You can choose either based on your preference. The colorful mix of vegetables adds freshness and crunch. Shredded cabbage and carrots are great for color and flavor. Bell peppers and cucumbers bring a crisp bite. Green onions add a hint of sharpness, while edamame offers a nutty taste and protein boost. Don’t forget the sesame seeds! They add a lovely crunch on top. - 1/4 cup sesame oil - 2 tablespoons soy sauce - 1 tablespoon rice vinegar - 1 tablespoon honey or maple syrup - 1 teaspoon grated fresh ginger - 1 garlic clove, minced - Salt and pepper to taste The dressing is key to this dish. Sesame oil gives it a rich, nutty flavor. Soy sauce adds depth and saltiness. Rice vinegar brings a bit of tang, while honey or maple syrup adds sweetness. Fresh ginger and garlic kick up the flavor profile. I use salt and pepper to round it out. Feel free to adjust the sweetness or saltiness to your taste. You can find the full recipe [here](#). Start by boiling water in a large pot. Add a pinch of salt for flavor. When the water boils, add your whole wheat spaghetti or rice noodles. Cook them until they are al dente, which usually takes about 8-10 minutes. Al dente means the noodles are firm but not hard. After cooking, drain the noodles and rinse them under cold water. This helps cool them down and stops the cooking process. While your noodles cook, wash and chop your vegetables. Use a sharp knife for clean cuts. You’ll need to shred the purple cabbage and carrots. Julienne the bell pepper and cucumber into thin strips. Chop the green onions. In a large bowl, combine all these vegetables. Toss them together well. Mixing ensures every bite is full of flavor. In a separate bowl, gather your dressing ingredients. Whisk together the sesame oil, soy sauce, rice vinegar, honey or maple syrup, grated ginger, and minced garlic. Add a pinch of salt and pepper. Whisk until everything is blended smoothly. Taste it and adjust the flavors if needed. You can add more honey for sweetness or more soy sauce for saltiness. Once your noodles are cool, add them to the bowl with the chopped vegetables. Pour the dressing over the top. Gently fold the noodles into the mix. Make sure everything gets coated evenly with the dressing. This step is key for a tasty salad. Next, take a small dry skillet and heat it over medium heat. Add the sesame seeds to the skillet. Toast them for about 2-3 minutes. Stir often to prevent burning. When they turn golden brown, they are done. Remove from heat and set aside. To serve, transfer the salad to a large platter or individual bowls. Sprinkle the toasted sesame seeds on top for a nice crunch. For extra color, you can add more chopped green onions or fresh cilantro. Serve it cold or at room temperature for the best taste. Check the [Full Recipe] for more tips. You can adjust this recipe for different diets. For a gluten-free option, swap whole wheat spaghetti with rice noodles. This keeps the dish tasty and safe for those with gluten issues. If you want a vegan dish, use maple syrup instead of honey for sweetness. You can also add more spices if you like stronger flavors. A pinch of red pepper flakes can give it a nice kick. If you want more depth, try adding a splash of lime juice. Storing leftovers properly keeps the salad fresh. Place it in an airtight container in the fridge. It lasts about three days. To keep the noodles from getting mushy, store the dressing separately. When you’re ready to eat, mix the dressing in just before serving. This helps maintain the texture and flavor. If you have leftover sesame seeds, store them in a cool, dark place. They stay fresh longer that way. This recipe serves four, but you can adjust it easily. If you're cooking for a larger group, just double the ingredients. You can also make it for meal prep. Serve it with grilled chicken or shrimp for a full meal. For a light lunch, pair it with fresh spring rolls. This adds variety and makes for a colorful plate. You can mix and match sides to keep it exciting! Check out the Full Recipe for more ideas on how to serve this dish. {{image_2}} You can change up the vegetables in your Asian sesame noodle salad. Try adding bell peppers for a sweet crunch or snap peas for a fresh snap. These options add color and texture. Different noodle types also change the feel of the dish. Rice noodles are light and chewy. Whole wheat spaghetti gives a heartier bite. Experiment to see what you like best! Want to make your dish heartier? Add proteins like grilled chicken, tofu, or shrimp. Each choice brings unique flavors and makes the salad more filling. For a spicy kick, try adding chili paste or sriracha. This adds heat and depth to the dressing. Adjust the amount based on your spice level. Using seasonal produce can elevate the freshness of your salad. In summer, use ripe tomatoes and cucumbers. For winter, try adding roasted butternut squash or shredded Brussels sprouts. These ingredients not only taste great but also keep the dish exciting year-round. Seasonal choices highlight the best flavors of each time of year. To keep your Asian sesame noodle salad fresh, use airtight containers. Glass or BPA-free plastic works best. This salad stays good in the fridge for up to three days. Make sure to seal it tightly to avoid extra moisture. You can freeze this salad, but it’s best to do it without the dressing. Place the cooled noodles and veggies in a freezer-safe bag. Remove as much air as possible. When you’re ready to eat, thaw it in the fridge overnight. Add the dressing after thawing for the best taste. If you prefer warm noodles, heat a portion in a pan on low heat. Add a splash of water to keep it moist. Stir gently to warm it without losing crunch. Enjoy your salad while it’s still fresh and vibrant! For the full recipe, check out the complete guide. You can use peanut oil or olive oil. Both oils have a nice taste. For a nutty flavor, try toasted sesame oil. It has a richer taste than regular sesame oil. To keep the dressing authentic, stick to Asian flavors. Use soy sauce and rice vinegar, as they blend well. This salad stays fresh for about three days in the fridge. Store it in an airtight container. Watch for signs of spoilage. If your salad smells sour or the veggies look wilted, it's time to toss it. Yes, you can prepare this salad a day in advance. Just keep the dressing separate until serving. This keeps the noodles and veggies crisp. Aim to make it no more than a day early for the best taste. Absolutely! Use rice noodles or gluten-free pasta to make it gluten-free. For the dressing, check your soy sauce. Use a gluten-free option, like tamari, to avoid gluten. These changes keep the flavor while making it safe for everyone. You can add grilled chicken, shrimp, or tofu for protein. Cook the chicken or shrimp until fully done. For tofu, press it first, then pan-fry until crispy. Each protein adds flavor and makes the salad more filling. This blog post covered the key steps for making a delicious Asian Sesame Noodle Salad. We explored the main ingredients, like whole wheat spaghetti and fresh veggies, and crafted a tasty dressing. You learned how to cook noodles perfectly and combine everything for great flavor. Remember, adjusting ingredients lets you fit your diet and taste. Store leftovers properly to keep them fresh. Enjoy experimenting with seasonal produce for variety. This salad is not just a meal; it’s a canvas for your creativity. Happy cooking!

Savory Asian Sesame Noodle Salad Fresh and Tasty Dish

Are you ready to dive into a fresh and flavorful dish that’s perfect for any meal? This Asian Sesame Noodle

- 2 boneless, skinless chicken breasts (cut into strips) - 8 oz fettuccine pasta - 1 tablespoon Cajun seasoning - 2 tablespoons olive oil - 1 green bell pepper (sliced) - 1 red bell pepper (sliced) - 1 medium onion (thinly sliced) - 3 cloves garlic (minced) - 1 cup cherry tomatoes (halved) - 1 cup heavy cream - 1 cup shredded Parmesan cheese - Salt and pepper to taste - Fresh parsley (chopped, for garnish) Cajun Chicken Pasta is a lively dish that bursts with flavor. Each ingredient plays a key role. The chicken, seasoned with Cajun spices, gives a nice kick. Fettuccine is perfect for soaking up the creamy sauce. For veggies, I love using colorful bell peppers and onions. They add crunch and sweetness. Garlic and cherry tomatoes boost the flavor even more. Heavy cream makes the sauce rich and smooth. Parmesan cheese adds depth. A sprinkle of fresh parsley brightens the dish. This combination creates a delightfully tasty meal. You can find the Full Recipe below to guide you through every step! - Bring salted water to a boil in a large pot. - Add the fettuccine and cook according to package instructions. - Drain the pasta and set it aside. - Toss chicken strips with Cajun seasoning until well-coated. - Heat a skillet over medium-high heat and add olive oil. - Cook the chicken for about 5-7 minutes until browned and cooked through. - In the same skillet, add sliced bell peppers and onion. - Sauté until the vegetables are softened, about 4-5 minutes. - Stir in minced garlic and halved cherry tomatoes for added flavor. - Reduce the heat to medium-low. - Stir in the heavy cream, warming it through. - Gradually add Parmesan cheese, stirring until it melts into the sauce. - Toss the cooked fettuccine and chicken into the sauce. - Mix everything together until the pasta and chicken are well-coated. - Season the dish with salt and pepper to taste. - Garnish with chopped fresh parsley before serving. For the full recipe, check out the details above. Enjoy this flavorful and simple delight! To make Cajun chicken pasta your own, you can adjust the Cajun seasoning. If you like it spicy, add more seasoning. If you prefer it milder, use less. This dish is all about your taste. Balancing creaminess with spice is key. Heavy cream makes the dish rich, but you can add more spices to keep the flavor strong. Start with a little cream and taste as you go. Cooking chicken evenly is important for the best results. I recommend using a hot skillet. This helps the chicken cook fast and brown nicely. Always cut your chicken into strips for even cooking. To prevent pasta from sticking, add a little olive oil to the boiling water. Stir the pasta every few minutes while it cooks. Drain it well, and you won’t have any clumps. Garnish your Cajun chicken pasta with fresh parsley. It adds color and a fresh taste. You can also sprinkle some extra Parmesan cheese on top. For serving, use a wide bowl to show off the pasta and chicken. A colorful plate makes the dish pop. Consider adding lemon wedges on the side for a zesty touch. For the full recipe, check out the complete guide for making this delightful dish. {{image_2}} You can swap the chicken for shrimp or sausage. Shrimp cooks fast and adds a sweet taste. Just cook it until it turns pink. Sausage brings a smoky flavor that pairs well. Choose spicy or mild sausage, depending on your taste. Both options keep the dish exciting and tasty. For a meatless take, use mushrooms and tofu. Mushrooms give a rich, umami flavor. They cook down nicely and add texture. Tofu is great for protein and absorbs flavor well. Press the tofu to remove extra water. Cut it into cubes, season, and sauté until golden. This version is just as satisfying and delicious. You don’t have to stick with fettuccine. Try penne, linguine, or whole wheat pasta. Penne holds sauce well in its tubes. Linguine is a flat noodle that works nicely too. Whole wheat pasta adds a nutty flavor and is healthier. Each type brings a unique twist to your dish. Check out the Full Recipe for more guidance! To keep your Cajun Chicken Pasta fresh, store it in the fridge. Use an airtight container. This helps prevent moisture loss and keeps the flavors intact. Make sure to store it within two hours of cooking. It can last about three to four days in the fridge. When reheating, I recommend using a skillet. Add a splash of water or cream to keep it moist. Heat it on low, stirring often. This method helps maintain the dish's creamy texture. Avoid using the microwave, as it can dry out the pasta. If you want to freeze it, let it cool completely. Place it in a freezer-safe container, leaving some space for expansion. It can last up to three months in the freezer. To defrost, place it in the fridge overnight. Reheat it gently on the stove, adding a little cream or water for moisture. Enjoy your meal later with great taste! You can use several options instead of heavy cream. Here are some good alternatives: - Half-and-half: This creates a creamy texture with less fat. - Greek yogurt: This adds a tangy flavor and thick texture. - Coconut milk: This gives a rich taste with a hint of sweetness. - Silken tofu: Blend it for a smooth, creamy option. These substitutes can help you make a lighter sauce without losing flavor. Cajun Chicken Pasta has a medium heat level. The spice comes from Cajun seasoning. This seasoning blends spices like paprika, cayenne, and black pepper. You can adjust the heat by using less seasoning or adding more cream. If you enjoy heat, feel free to add extra spices or hot sauce. Yes, you can prep this dish in advance. Here are some tips: - Cook the chicken and pasta: You can cook these ahead and store them in the fridge. - Make the sauce: Prepare the sauce and store it separately. This keeps the pasta from getting soggy. - Combine before serving: Just toss everything together when you are ready to eat. This way, you save time and still enjoy a delicious meal. For the complete recipe, refer to the Full Recipe. In this blog post, we covered the key ingredients for Cajun Chicken Pasta, from chicken and pasta to spices and cream. I took you step-by-step through cooking the dish, offering tips for flavor and presentation. Different variations, like using shrimp or going vegetarian, give you options. Lastly, we discussed storage and reheating. Cooking this dish can be simple and fun. I hope you try it and enjoy every bite!

Cajun Chicken Pasta Flavorful and Simple Delight

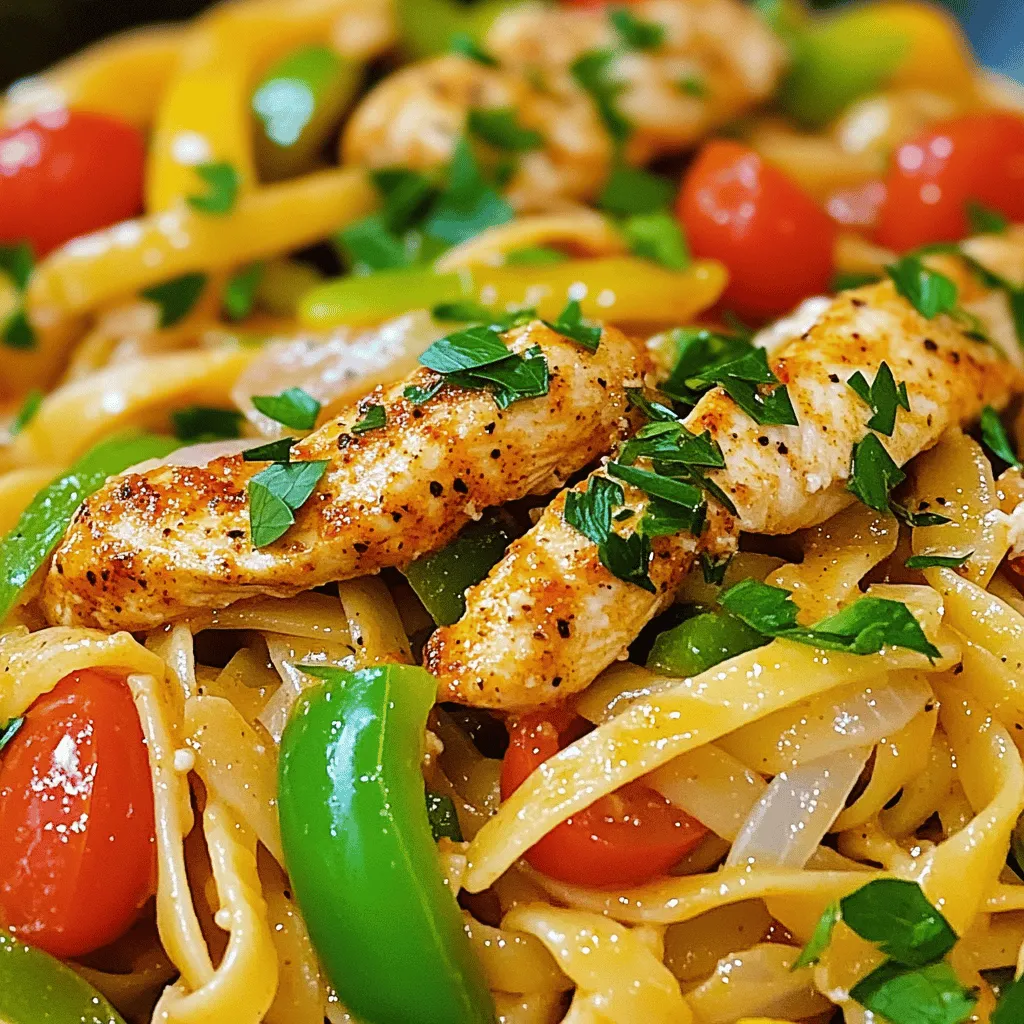
Are you ready for a dish that’s packed with flavor and easy to make? Cajun Chicken Pasta is the perfect

Older posts
Newer posts
← Previous Page1 … Page7 Page8 Page9 … Page68 Next →

dsad

© 2025 So Yum Recipes • Built with GeneratePress

Our Policies

  • Copyright Policy
  • Cookie Policy
  • GDPR Policy
  • Privacy Policy
  • Disclaimer
  • Terms Of Use

More Information

  • Home
  • About
  • Contact
  • Appetizers
  • Dessert
  • Dinner
  • Drinks
©2025, So Yum Recipes About Back To Top