Skip to content
DisclaimerTerms Of UseGDPR PolicyCookie Policy

So Yum Recipes

  • Home
  • Drinks
  • Appetizers
  • Dinner
  • Dessert
  • About
  • Contact
  • Privacy Policy
DisclaimerTerms Of UseGDPR PolicyCookie Policy

Chloe

To make these easy chicken enchiladas, gather the following ingredients: - 2 cups cooked chicken, shredded - 1 cup black beans, drained and rinsed - 1 cup corn kernels (fresh, frozen, or canned) - 1 cup shredded cheddar cheese - 1 teaspoon ground cumin - 1 teaspoon chili powder - ¼ teaspoon garlic powder - Salt and pepper to taste - 8 small flour tortillas - 1 cup enchilada sauce (store-bought or homemade) - Fresh cilantro, for garnish - Sour cream, for serving (optional) To prepare these enchiladas, you will need: - A large mixing bowl - A 9x13 inch baking dish - Aluminum foil - A spatula - A measuring cup and spoons - A knife and cutting board You can enhance your enchiladas with these tasty toppings: - Fresh avocado slices - Lime wedges - Additional cheese for extra gooeyness - Sliced jalapeños for heat - Chopped green onions for a fresh crunch Using these ingredients and tools, you can create a delicious dish that is simple and full of flavor. If you're interested in the full recipe, just refer to the previous section. Enjoy crafting your enchiladas! Start by preheating your oven to 375°F (190°C). This step is vital for getting those enchiladas nice and hot. While the oven heats, grab a large mixing bowl. In this bowl, combine 2 cups of shredded cooked chicken, 1 cup of drained black beans, and 1 cup of corn. Add half of the cheese, 1 teaspoon of cumin, 1 teaspoon of chili powder, and ¼ teaspoon of garlic powder. Don't forget to sprinkle in some salt and pepper to taste. Mix everything well until it is all combined. This filling is packed with flavor and makes the enchiladas so tasty. Now, let’s make the enchiladas! Take a flour tortilla and lay it flat. Scoop a generous amount of the chicken filling into the center. Roll the tortilla tightly, then place it seam-side down in a greased 9x13 inch baking dish. Repeat this with the other tortillas and filling until your dish is full. You want to ensure each tortilla is tightly rolled to hold all that delicious filling. Once you have all the enchiladas in the dish, it’s time to add the sauce. Pour 1 cup of enchilada sauce evenly over the rolled tortillas. Make sure each one is covered. Then, sprinkle the remaining cheddar cheese on top. Cover the dish with aluminum foil and place it in the oven. Bake for 20 minutes, then remove the foil. Bake for another 10 to 15 minutes until the cheese is bubbly and slightly golden. This final step gives you that perfect cheesy crust. To make your enchiladas shine, use fresh ingredients. Shredded chicken should be juicy and flavorful. Mix black beans and corn for added texture. When assembling, don't overfill the tortillas. A good roll keeps the filling inside. Make sure to cover your enchiladas with sauce. This keeps them moist while baking. A sprinkle of cheese on top gives a nice, golden finish. Bake until bubbly for the best result. One common mistake is using too much filling. This makes rolling hard and can cause spills. Another mistake is not using enough sauce. If the enchiladas dry out, they won't taste great. Don't skip the resting time after baking. Letting them cool helps the flavors blend. Lastly, avoid using old tortillas. Fresh tortillas keep the enchiladas soft and tasty. Serve your enchiladas on a colorful platter. A sprinkle of fresh cilantro adds a nice touch. Pair them with avocado slices and lime wedges. This adds freshness and flavor. You can also serve sour cream on the side for a creamy contrast. For drinks, a light beer or iced tea works well. For the full recipe, check the detailed steps above. {{image_2}} You can easily make chicken enchiladas vegetarian. Just swap the chicken for veggies. Use black beans, bell peppers, and zucchini. You can also add some sautéed onions and mushrooms for extra flavor. This mix gives you a hearty filling that everyone can enjoy. If you like heat, add a spicy salsa. Mix diced jalapeños or hot sauce into the filling. You can also pour spicy salsa over the top before baking. This adds a nice kick and makes your enchiladas extra tasty. Adjust the heat to fit your taste. Cheese brings creamy goodness to your enchiladas. While cheddar is a classic choice, you can try others. Monterey Jack melts beautifully and adds a mild flavor. For a sharp taste, use pepper jack cheese. Feel free to mix cheeses for a unique twist. Each type changes the flavor, making every batch special. For complete details on making these delicious enchiladas, check the Full Recipe. After enjoying your enchiladas, you can store leftovers easily. Place them in an airtight container. Make sure to let them cool first. This keeps the flavors fresh. Store the container in the fridge. The enchiladas will stay good for about three to four days. If you want to keep them longer, freezing is a better option. When you’re ready to eat your leftovers, reheating is simple. Preheat your oven to 350°F (175°C). Place the enchiladas in an oven-safe dish. Cover them with foil to keep them moist. Heat for about 20 minutes. If you want them extra cheesy, add more cheese on top before reheating. You can also microwave them. Just heat in short bursts. Check often to avoid overcooking. Freezing enchiladas is a great way to save them for later. Wrap each enchilada tightly in plastic wrap. Then, place them in a freezer-safe bag. Make sure to remove as much air as possible. Label the bag with the date. They will stay fresh for up to three months. When you're ready to eat, thaw them in the fridge overnight before reheating. This way, they taste almost like fresh! Yes, you can use chicken thighs. Thighs add more flavor and moisture. They can keep the enchiladas juicy. Just cook them the same way as the breasts. Shred the thighs and mix with the other filling ingredients. To make gluten-free enchiladas, swap the flour tortillas for corn tortillas. Corn tortillas work well and add a nice texture. Check the enchilada sauce too. Ensure it is gluten-free. Many store-bought sauces are safe, but always read the label. If you lack enchilada sauce, you can use salsa. Salsa gives a fresh taste. Just pour it over the rolled enchiladas, like the sauce. You can also mix tomato sauce with spices. Add cumin, chili powder, and garlic powder for flavor. For a richer sauce, try mixing sour cream with salsa. This will create a creamy and tasty addition. For the full recipe, check out the details above. This article covered the key steps to make delicious enchiladas. We explored the ingredients, kitchen tools, and assembly process. I shared tips to avoid common mistakes and provided variation ideas for different tastes. Making enchiladas can be fun and easy. Enjoy creating different flavors and feeding loved ones. Remember to store leftovers properly to enjoy them later. With this guide, you are now ready to impress your friends and family.

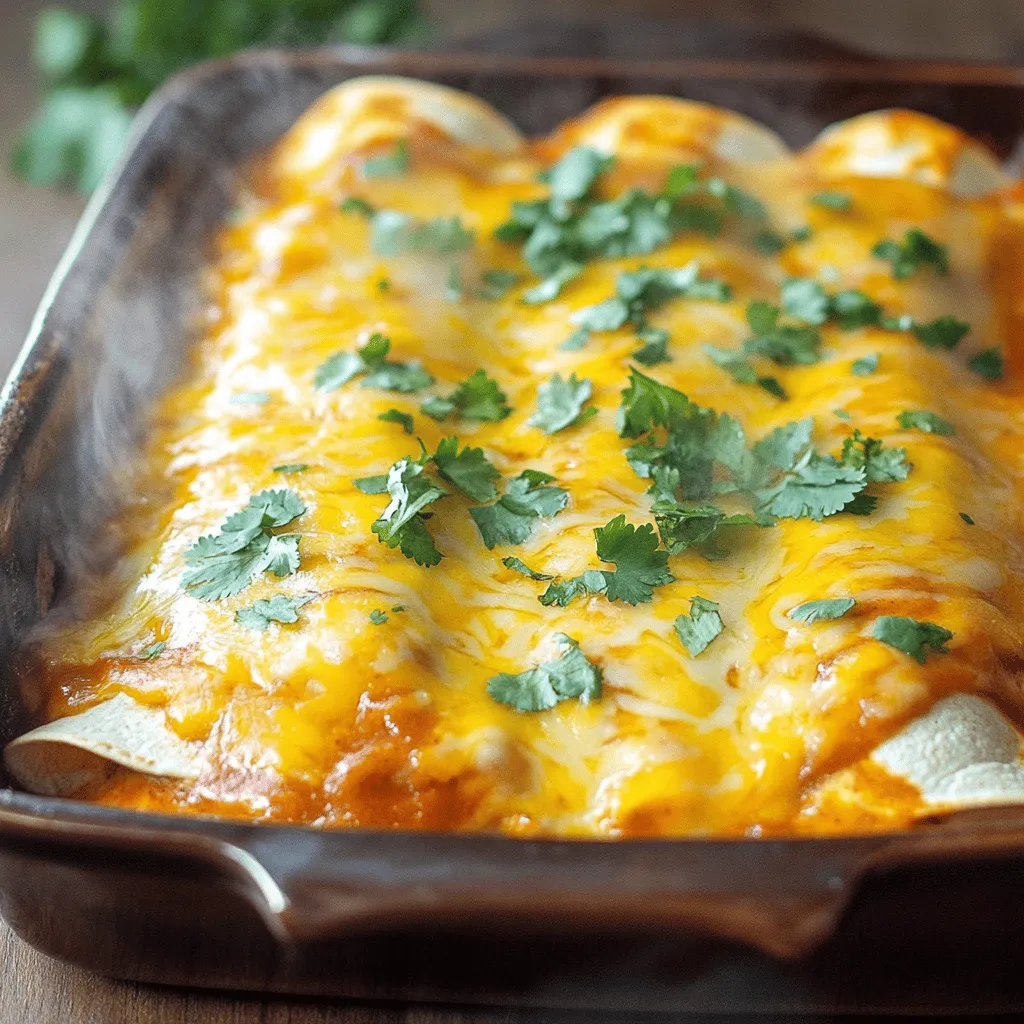
Easy Chicken Enchiladas Simple and Tasty Recipe

If you’re craving a quick and tasty meal, look no further! My Easy Chicken Enchiladas recipe is simple to follow

To make the best creamy spinach artichoke dip, you need simple, fresh ingredients. Here’s what you will need: - 2 cups fresh spinach, chopped - 1 can (14 oz) artichoke hearts, drained and chopped - 1 cup cream cheese, softened - 1/2 cup sour cream - 1/2 cup mayonnaise - 1 cup shredded mozzarella cheese - 1/4 cup grated Parmesan cheese - 2 cloves garlic, minced - 1/2 teaspoon red pepper flakes (optional) - Salt and pepper to taste - Tortilla chips or sliced baguette, for serving These ingredients blend together to create a rich and creamy dip. Fresh spinach adds a pop of color and flavor. Artichoke hearts bring a unique taste that pairs well with cheese. Cream cheese, sour cream, and mayonnaise create the perfect base. Mozzarella and Parmesan give it a cheesy goodness that everyone loves. When you gather these ingredients, make sure they are fresh. Fresh spinach makes a big difference. You can also adjust the amount of red pepper flakes based on your spice level. This creamy spinach artichoke dip is perfect for parties or cozy nights in. You can find the full recipe to guide you through the cooking process. 1. Preheat the oven to 350°F (175°C). This step is key for even baking. 2. Mix cream cheese, sour cream, and mayonnaise in a large bowl. Stir until it is smooth and creamy. This forms the dip's rich base. 3. Incorporate spinach, artichokes, and seasonings. Add the chopped spinach, drained artichoke hearts, minced garlic, and any spices. Mix until all ingredients blend well. 1. Transfer to a baking dish. Spoon the mixture into an oven-safe dish and spread it evenly. This helps it bake evenly. 2. Bake until bubbly and golden. Place in the oven for 25-30 minutes. The dip is ready when it is bubbly and has a golden top. 1. Cool briefly before serving. Let the dip sit for a few minutes after baking. This makes it easier to scoop without burning your mouth. 2. Recommended dippers include tortilla chips or slices of fresh baguette. These both work great for scooping up all that creamy goodness. For the complete recipe, check out the Full Recipe section. Enjoy every bite of this delicious dip! To make your creamy spinach artichoke dip even better, adjust the seasoning. Taste the dip before baking. Add more salt, pepper, or red pepper flakes as needed. These small tweaks make a big difference. You can also add extra cheeses for more richness. Try cream cheese with some sharp cheddar or Gruyère. Mixing cheese adds depth to the flavor. Your guests will notice the difference. The best oven setting for this dip is 350°F (175°C). This heat ensures even cooking. It helps the dip become bubbly and golden without burning. Keep an eye on it as it bakes. Using room temperature ingredients is key. Softened cream cheese blends well with other ingredients. This ensures a smooth and creamy dip. Cold ingredients can make mixing hard and affect the dip's texture. Garnishing your dip makes it look fancy. A sprinkle of fresh parsley adds color. Extra grated Parmesan on top enhances the visual appeal too. Consider using creative serving dishes. A rustic cast-iron skillet or a colorful bowl can impress your guests. Serve with tortilla chips or a sliced baguette for a delightful experience. Remember, we eat with our eyes first! {{image_2}} You can easily make this dip healthier. Swap Greek yogurt for sour cream. This change adds protein and cuts fat. You can also reduce the cheese amounts. Try using less mozzarella and Parmesan. Your dip will still taste great but be lighter. Want to change the dip's taste? Add sun-dried tomatoes or jalapeños. These ingredients bring a new twist. You can also play with the cheese blend. Mixing different cheeses can create fun flavors. Get creative and see what you like best. If you need gluten-free options, use gluten-free chips or veggies for dipping. This way, everyone can enjoy the dip. For those who want a vegan version, swap cream cheese and mayonnaise with cashew cream or coconut yogurt. These options keep the dip rich and creamy without dairy. Enjoy trying these variations! For the full recipe, check out [Full Recipe]. To keep your creamy spinach artichoke dip fresh, store it in airtight containers. Glass or plastic containers work well. Make sure the lid seals tightly. This helps keep moisture in and prevents odors from other foods. Place the dip in the fridge right after serving. When it's time to enjoy leftovers, reheating is key. The best way to reheat this dip is in the oven. Preheat your oven to 350°F (175°C). Transfer the dip to an oven-safe dish. Heat for about 15-20 minutes. This method keeps the dip creamy and warm. If you prefer the microwave, use a low power setting. Stir the dip every 30 seconds to keep it smooth. If you want to store the dip for longer, freezing works great. First, let the dip cool completely. Then, place it in a freezer-safe container. Leave some space at the top for expansion. Seal tightly and label it with the date. When you want to enjoy it again, thaw the dip overnight in the fridge. To reheat, follow the same steps as before, and enjoy the creamy goodness! For a full recipe, check out the Creamy Spinach Artichoke Dip recipe. Serve creamy spinach artichoke dip warm. This dip tastes best when it’s hot and bubbly. Use a shallow dish to help keep it warm. I like to garnish it with parsley or extra Parmesan. This makes it look nice, too! Pair it with tortilla chips or sliced baguette for dipping. Yes, you can make this dip ahead of time. Prepare the dip and place it in the baking dish. Cover it with plastic wrap and store it in the fridge. You can bake it later when you're ready to serve. The dip will last about 3 to 5 days in the refrigerator. Keep it in a sealed container. If you have leftovers, just reheat it in the oven or microwave before serving. Yes, you can use frozen spinach. Make sure to thaw it first and drain the water. This helps keep the dip from being too watery. Frozen spinach is a great time-saver! You can use many different dippers! Some popular choices include: - Fresh vegetable sticks (like carrots, celery, or bell peppers) - Pita chips - Crackers - Pretzels - Sliced cucumbers These options add crunch and flavor to your party table. Enjoy! This blog post shared a tasty creamy spinach artichoke dip recipe. You learned about the ingredients, preparation steps, and baking process. We discussed tips for flavor and presentation, as well as healthy variations. Storage info helps you keep leftovers fresh. With this dip, you can impress friends and family. Enjoy experimenting with flavors and dippers to make it your own. Dive into this easy recipe and share it at your next gathering!

Creamy Spinach Artichoke Dip Savory and Satisfying

Looking for a dip that’s both creamy and packed with flavor? You’ve come to the right place! My Creamy Spinach

To make tasty savory breakfast muffins, you need some key ingredients. Here’s what you will need: - 1 cup all-purpose flour - 1 cup whole wheat flour - 2 teaspoons baking powder - 1/2 teaspoon baking soda - 1/2 teaspoon salt - 1 teaspoon garlic powder - 1/2 teaspoon black pepper These ingredients help create a strong base for your muffins. The all-purpose and whole wheat flours give the muffins a nice texture. Baking powder and baking soda help them rise. Salt and spices add flavor. Now, let’s talk about the fun stuff—add-ins! They make your muffins special. Here are some ideas: - Cheese options: Shredded cheddar cheese works great. It melts beautifully and adds creaminess. - Protein choices: Cooked ham or bacon brings a savory kick. You can also use sausage if you like. - Vegetables and greens: Finely chopped spinach or kale adds freshness. You can mix in other veggies, too, like bell peppers or zucchini. These add-ins not only enhance flavor but also make your muffins more filling. Feel free to mix and match to fit your taste! For the complete recipe, check the full recipe above. First, you need to preheat your oven to 375°F (190°C). While it warms up, grab a 12-cup muffin tin. Line it with paper liners or grease it with cooking spray. This will help the muffins come out easily. Next, let’s mix the dry ingredients. In a medium bowl, whisk together these items: - 1 cup all-purpose flour - 1 cup whole wheat flour - 2 teaspoons baking powder - 1/2 teaspoon baking soda - 1/2 teaspoon salt - 1 teaspoon garlic powder - 1/2 teaspoon black pepper Make sure they are all blended well. This helps the muffins rise nicely. Now, it’s time to combine the wet ingredients. In a large bowl, beat 3 large eggs. After that, add 1 cup of buttermilk and 1/4 cup of olive oil. Mix them until they are well combined. The wet mix should be smooth and creamy. Now we will fold in the add-ins. Carefully add: - 1/2 cup shredded cheddar cheese - 1/2 cup diced cooked ham or cooked bacon - 1/2 cup finely chopped spinach or kale Use a spatula to mix everything together gently. Be careful not to overmix, or your muffins may turn out tough. Next, divide the batter into the muffin cups. Fill each cup about 3/4 full. This gives the muffins room to rise without spilling over. Finally, bake your muffins in the preheated oven for 18-22 minutes. They are done when the tops are golden brown. To check, insert a toothpick into the center. If it comes out clean, your muffins are ready! Remove the muffins from the oven and let them cool in the tin for a few minutes. Then, transfer them to a wire rack to cool completely. Enjoy these savory delights! For the full recipe, refer back to the ingredients and steps provided. Avoiding overmixing: Mix your batter just enough to combine all ingredients. Overmixing makes muffins tough. You want them fluffy and soft. When you add dry to wet, fold gently. Stop mixing when no dry flour remains. Checking for doneness: Check your muffins by inserting a toothpick into the center. If it comes out clean, they are ready. If it has wet batter, bake a few more minutes. Keep an eye on the time, but trust your toothpick too. Dairy-free options: You can replace buttermilk with almond milk or soy milk. Use a dairy-free cheese for added flavor. This keeps the muffins tasty without dairy. Gluten-free alternatives: For gluten-free muffins, swap all-purpose flour with a gluten-free blend. Make sure it has a binding agent. This way, you keep the texture and flavor similar to the original recipe. Grab the full recipe for more guidance on making these delicious savory breakfast muffins! {{image_2}} You can use many kinds of cheese in your savory breakfast muffins. Feta cheese adds a tangy taste. Goat cheese brings creaminess and richness. Mixing different cheeses can boost flavor. You might try sharp cheddar with creamy mozzarella. Each cheese adds a unique taste and texture. Cheese combinations can change the muffin experience. Using a mix of cheeses can make each bite exciting. Consider adding herbs like thyme or rosemary for extra flavor. You can swap proteins in your muffins easily. Instead of ham, you can use turkey sausage for a lighter option. Chopped cooked bacon adds smoky flavor. Each protein choice changes the muffin's taste and feel. For veggies, think about what's in season. Summer squash or zucchini can keep your muffins fresh. You can also use bell peppers or mushrooms for added flavor. Mixing veggies can create a colorful and tasty muffin. Feel free to play with flavors! Use your favorite proteins and veggies to make it your own. Check the full recipe if you want to dive deeper into these tasty ideas. To keep your savory breakfast muffins fresh, you can store them in two main ways: - Refrigeration tips: Place the muffins in an airtight container. They will last up to a week in the fridge. Make sure they cool completely before storing. This helps prevent sogginess. - Freezing for later use: Freeze the muffins if you want them to last longer. Wrap each muffin in plastic wrap, then place them in a freezer bag. They can stay good for up to three months. To enjoy, just thaw them overnight in the fridge. When you're ready to eat your muffins, reheating them correctly keeps them moist and tasty: - Best methods for keeping muffins moist: Use the oven to reheat for best results. Preheat it to 350°F (175°C). Place the muffins on a baking sheet and cover them with foil. Heat for about 10-15 minutes. This method helps keep them soft. - Quick reheating tips in the microwave or oven: If you're in a hurry, the microwave works too. Heat one muffin for about 20-30 seconds. Check if it’s warm enough. Be careful not to overheat, or it may become dry. These storage and reheating tips help you enjoy your savory breakfast muffins at their best! Can I make these muffins ahead of time? Yes, you can make savory breakfast muffins ahead of time. They store well in the fridge. Just let them cool completely, then place them in an airtight container. They stay fresh for about three days. For longer storage, freeze them. Wrap each muffin tightly in plastic wrap and place in a freezer-safe bag. They last up to three months. When ready to eat, thaw them in the fridge overnight. How do I customize the flavor? You can easily customize these muffins. Change the cheese to suit your taste. Try feta, mozzarella, or pepper jack for a spicy kick. Swap out the meat for sausage or turkey. You can also add spices like paprika or fresh herbs. Add veggies like bell peppers, zucchini, or carrots for more color and nutrition. The options are endless! What are some serving suggestions for savory muffins? Savory muffins are great on their own but pair well with many items. Serve them with a side of fresh fruit for a balanced meal. They also taste good with yogurt or a simple salad. For brunch, offer them with eggs or avocado. You can even slice them in half and toast them with butter. Enjoy them warm for the best taste! For the full recipe, check out the Savory Breakfast Muffins section. In this article, we explored how to make savory breakfast muffins. We discussed essential ingredients, like flours and seasonings, and flavorful add-ins such as cheese and veggies. I provided step-by-step instructions for preparing the batter and baking the muffins. We also shared useful tips and ingredient swaps, plus storage info to keep your muffins fresh. Savory breakfast muffins are easy and fun to make. Get creative with flavors and enjoy them anytime!

Savory Breakfast Muffins Tasty and Easy Recipe

Looking for a delicious start to your day? You’re in the right place! Savory breakfast muffins are quick to make

- 1 lb boneless, skinless chicken thighs - Vegetables: broccoli, bell peppers, carrot - Rice: cooked jasmine rice - Soy sauce or tamari - Honey or maple syrup - Rice vinegar, ginger, garlic, and cornstarch - Sesame seeds and sliced green onions When I make teriyaki chicken bowls, I focus on simple, fresh ingredients. I use boneless skinless chicken thighs for their juicy taste. They cook quickly and stay tender. Next, I add colorful vegetables like broccoli for crunch, bell peppers for sweetness, and carrot for color. For the base, I prefer cooked jasmine rice. It has a lovely aroma and pairs well with the sauce. Now, the magic happens with the teriyaki sauce. I use soy sauce, or tamari for a gluten-free option. I sweeten it with honey or maple syrup. A splash of rice vinegar adds a nice tang. I always include fresh ginger and garlic for depth of flavor. Finally, I mix in cornstarch to thicken the sauce. For a finishing touch, I love to sprinkle sesame seeds and sliced green onions on top. These add flavor and make the dish look beautiful. This recipe is all about balance and taste. For the full recipe, check out the details above. To start, we need to make the teriyaki sauce. In a small saucepan, combine the following ingredients: - 1/4 cup soy sauce - 2 tablespoons honey - 1 tablespoon rice vinegar - 1 teaspoon freshly grated ginger - 1 teaspoon minced garlic Heat it over medium heat. Stir well and bring it to a gentle simmer. This simple mix creates a rich flavor. Next, we thicken the sauce. Stir in 1 teaspoon of cornstarch mixed with 1 tablespoon of water. Keep stirring until the sauce thickens, which takes about 2 minutes. Once done, remove it from heat and set it aside. Now it's time to cook the chicken. In a large skillet, heat 1 tablespoon of olive oil over medium-high heat. While it warms, season 1 pound of boneless, skinless chicken thighs with salt and pepper. Once the oil is hot, add the chicken pieces to the skillet. Cook for about 5-7 minutes. Stir occasionally until the chicken is browned and cooked through. Next, we’ll add some veggies for color and crunch. Add 1 cup of broccoli florets, 1 cup of sliced bell peppers, and 1 carrot sliced into thin rounds to the skillet. Stir-fry these for about 4-5 minutes, until they are tender-crisp. This step adds freshness and a nice texture to your teriyaki chicken bowls. After this, you can combine everything. Pour the teriyaki sauce over the chicken and vegetables. Toss everything together to coat evenly. Cook for another 2-3 minutes to heat the sauce through. Now your teriyaki chicken bowls are ready to serve! For the full recipe, check the details above. To make great teriyaki sauce, you can adjust the sweetness and thickness to your taste. Add more honey for sweetness or less soy sauce for a lighter flavor. If you want it thicker, stir in more cornstarch mixed with water. If you need gluten-free options, use tamari instead of soy sauce. For a low-sugar version, try using maple syrup or a sugar substitute. This way, you can enjoy teriyaki chicken bowls without any worry. To save time, prep your ingredients ahead of cooking. Chop the chicken and veggies earlier in the day. You can even make the teriyaki sauce in advance and store it in the fridge. When cooking, use high heat to give a nice sear to the chicken. Stir-frying the veggies quickly will keep them crisp and colorful. This cuts down the overall cooking time and keeps your meal fresh. For a beautiful presentation, serve your teriyaki chicken bowls in deep dishes. Arrange the rice, chicken, and veggies in sections. This makes the colors pop, and it looks very appetizing. Pair these bowls with side dishes like edamame or a simple cucumber salad. These sides add a refreshing crunch that complements the teriyaki chicken. For extra flair, use chopsticks to serve, giving an authentic touch to your meal. You can find the complete recipe in the Full Recipe section. {{image_2}} You can easily make a vegetarian version of teriyaki bowls. Simply substitute chicken with tofu or tempeh. Both options soak up the teriyaki sauce well. This adds great flavor. You can also create a vegetable-only bowl for a lighter meal. Use a mix of your favorite veggies, like snap peas, mushrooms, or zucchini. This way, you keep the taste and nutrition high. If you want to switch up the rice, try quinoa, brown rice, or cauliflower rice. Quinoa adds extra protein. Cook it by rinsing it first, then boiling it in water for about 15 minutes. Brown rice takes longer, about 45 minutes, so plan ahead. Cauliflower rice cooks very fast. You can sauté it for just a few minutes. Each rice option gives a different taste and texture. To make your teriyaki bowls even better, think about adding spices. A pinch of red pepper flakes can give some heat. You can also marinate the chicken before cooking. Let it soak in the teriyaki sauce for at least 30 minutes. This step makes the flavor much deeper. Don’t hesitate to mix in other sauces, too. A splash of sriracha or hoisin can add a fun twist. You can even experiment with fresh herbs like cilantro for added freshness. Explore the [Full Recipe](#) to see how these variations fit into the overall dish! Store your teriyaki chicken bowls in airtight containers. Glass containers work best. They keep the food fresh and allow you to see what's inside. You can refrigerate them for up to four days. Just ensure they cool down before sealing. To reheat your bowls, use the microwave for quick results. Place the bowl in a microwave-safe dish and cover it with a damp paper towel. This keeps moisture in. Heat in short bursts of one minute, stirring in between. If you want to keep the chicken tender, avoid high heat. You can also reheat them on the stove. Just add a little water to the pan and cover it. This helps steam the chicken back to life. If you want to save your teriyaki chicken bowls for later, freezing is a great option. First, let them cool completely. Then, divide them into portions and place them in freezer bags. Make sure to remove as much air as possible. You can freeze them for up to three months. When you're ready to eat, take a bowl out and let it defrost in the fridge overnight. To reheat, use the microwave or stovetop as mentioned before. This keeps the flavors fresh and tasty. For the full recipe, check out the details above. Enjoy your cooking! If you need a soy sauce substitute, try tamari or coconut aminos. Both give a similar salty flavor. Use the same amount as soy sauce. You can also mix equal parts of water and miso paste for a unique taste. Another option is liquid aminos, which is a soy-free choice. Homemade teriyaki chicken stays fresh in the fridge for about 3 to 4 days. Store it in an airtight container to keep it from drying out. Before eating, check for any off smells or changes in color. If it looks good, reheat it well before serving. You can use many vegetables in teriyaki bowls. Broccoli and bell peppers are classic choices. They add great color and crunch. Carrots bring sweetness and texture. Other great options include snap peas, zucchini, and mushrooms. Feel free to mix and match based on what’s in season or what you have on hand. Teriyaki chicken bowls are simple and delicious. We covered the key ingredients, like chicken, veggies, and rice. I shared how to make the sauce and cook everything to perfection. You can experiment with variations or vegan options too. Remember to store your leftovers properly to enjoy later. With these tips, you can create tasty meals quickly. Enjoy your cooking and share your tasty results!

Teriyaki Chicken Bowls Flavorful and Easy Recipe

Are you ready to create a delicious Teriyaki Chicken Bowl that’s both easy and packed with flavor? You’ll love this

To make Pumpkin Spice Energy Bites, gather these simple ingredients: - 1 cup rolled oats - 1/2 cup pumpkin puree - 1/4 cup honey or maple syrup - 1/4 cup almond butter (or peanut butter) - 1 teaspoon pumpkin pie spice - 1/4 teaspoon cinnamon - 1/4 cup mini chocolate chips (optional) - 1/4 cup chopped nuts (walnuts or pecans) - A pinch of salt These items pack a punch of flavor and nutrition. The oats provide whole grains, while the pumpkin puree adds moisture and a rich taste. Honey or maple syrup sweetens the bites naturally. Almond butter brings healthy fats and creaminess. The spices, pumpkin pie spice and cinnamon, give that warm fall flavor we love. If you want a touch of sweetness, the chocolate chips add a delightful contrast. Chopped nuts bring crunch and extra nutrients. Each ingredient plays a role in making these bites both tasty and healthy. You can find the full recipe online for more details. Enjoy making these energy bites! Making Pumpkin Spice Energy Bites is quick and easy. The whole process takes about 40 minutes. You will need just 10 minutes to prep. Gather all your ingredients first. This way, you will stay organized. Start by mixing the rolled oats and pumpkin puree in a bowl. Add honey or maple syrup next. Pour in the almond butter, too. Stir everything together until it’s smooth and well blended. Then, sprinkle in the pumpkin pie spice and cinnamon. Mix again to spread the spices evenly. If you like, fold in mini chocolate chips and chopped nuts. They add great flavor and crunch! Now comes the fun part! Use your hands to scoop up some of the mixture. Roll it into a small ball, about one inch wide. Place each ball on a parchment-lined baking sheet. Repeat this until you use all the mixture. Once you finish, refrigerate the bites for at least 30 minutes. This helps them hold their shape. After chilling, store them in an airtight container. These bites stay fresh in the fridge for up to a week. For the full recipe, check out the complete guide. To keep your pumpkin spice energy bites fresh, store them in an airtight container. Place them in the fridge for up to a week. If you want to keep them longer, you can freeze them. Just wrap each bite in plastic wrap and then place them in a freezer bag. They can last up to three months in the freezer. When you're ready to enjoy, let them thaw in the fridge or at room temperature. You can easily change the sweetness of your energy bites. If you want them sweeter, add more honey or maple syrup. If you prefer less sweetness, cut back on the sweetener. You can also change the flavor. Try adding more cinnamon or a dash of nutmeg for extra spice. If you want a richer flavor, use dark chocolate chips instead of mini ones. Feel free to get creative with your energy bites. You can add seeds like chia or flaxseeds for more nutrients. Dried fruits like cranberries or raisins can add a nice chewiness. If you want crunch, try using different nuts or even coconut flakes. Mix and match these add-ins to find your favorite combo. This flexibility makes your energy bites fun and unique every time you make them! {{image_2}} You can easily make these energy bites gluten-free. Just use certified gluten-free oats. They work great and taste the same. You can also choose nut butters that are naturally gluten-free. Always check the label to be sure. This way, everyone can enjoy the bites without worry. To make these bites vegan, swap honey for maple syrup. This change keeps them sweet and tasty. Almond butter can be replaced with any nut or seed butter you love. Sunflower seed butter is a great choice. It adds a fun twist and stays nut-free. Feel free to play with the flavors! You can add vanilla extract for a sweet touch. Try adding dried fruits like cranberries or raisins for extra sweetness. If you want a spicy kick, add a dash of ginger or nutmeg. Get creative and make these bites your own! For the full recipe, check out the details above. These pumpkin spice energy bites are great for snacking! They last up to a week in the fridge. Keep them in an airtight container. This helps keep them fresh and tasty. If you want to enjoy them longer, consider freezing them. Use glass or plastic containers with tight lids. This keeps your energy bites safe from air and moisture. You can also use a resealable bag. Just make sure to squeeze out as much air as possible before sealing. You can freeze these energy bites for up to three months. To freeze, place them on a baking sheet first. This stops them from sticking together. After freezing, transfer them to a container. Label the container with the date so you know when to enjoy them! To make Pumpkin Spice Energy Bites, gather your ingredients first. You need rolled oats, pumpkin puree, honey or maple syrup, and almond butter. Mix these in a bowl until smooth. Next, add pumpkin pie spice, cinnamon, and a pinch of salt. Stir well. If you want, fold in mini chocolate chips and chopped nuts. Shape the mixture into small balls, about one inch wide. Place them on a lined baking sheet. Chill for thirty minutes, and enjoy! Yes, you can. If you don’t have almond butter, try peanut butter. Sunflower seed butter is another great option. You can use any nut or seed butter. Just keep the same amount for best results. Each butter adds its own flavor, so choose what you like. Absolutely! These energy bites are packed with good ingredients. Rolled oats give you fiber and energy. Pumpkin puree adds vitamins and minerals. Almond butter provides healthy fats and protein. Honey or maple syrup offers natural sweetness. Overall, they make a great snack that’s both tasty and nutritious. You can get creative with spices! Nutmeg and ginger work well with pumpkin flavors. Try adding a little clove for warmth. If you like heat, a dash of cayenne can spice things up. Mix and match to find your favorite blend. These Pumpkin Spice Energy Bites are easy and fun to make. We covered the best ingredients, step-by-step instructions, and helpful tips. You can store them well and even freeze extras for later. Feel free to get creative with flavors and add-ins. These bites offer healthy energy for your day. Enjoy making them and sharing with others. You’ll love how simple and tasty they are!

Pumpkin Spice Energy Bites Healthy Snack Boost

Looking for a healthy snack that packs a flavor punch? Try these Pumpkin Spice Energy Bites! They are quick to

- 6 small flour tortillas - 1/4 cup granulated sugar - 1 tablespoon ground cinnamon - 1/4 cup unsalted butter, melted - 1/4 teaspoon salt (optional) - 1 teaspoon vanilla extract (optional) To make cinnamon sugar tortilla chips, gather these ingredients first. The tortillas are the base for your chips. I like small flour tortillas because they bake up perfectly crispy. Next, you need granulated sugar and ground cinnamon. These two ingredients create that sweet and spicy flavor we all love. The melted butter adds richness and helps the sugar stick. The optional salt can enhance the sweetness, while vanilla gives a nice depth. Each serving has about 150 calories. The chips also have around 7 grams of fat, 20 grams of carbs, and 1 gram of protein. This snack is not the healthiest option, but it can be enjoyed in moderation. If you want a healthier twist, consider using whole wheat tortillas. You can also cut down on sugar or try a sugar substitute. This way, you can still enjoy the sweet crunch without too many calories. With the right choices, cinnamon sugar tortilla chips can fit into a balanced diet. 1. Preheat your oven to 350°F (175°C). This makes sure the chips bake evenly. 2. Prepare the baking sheet by lining it with parchment paper. This helps with cleanup. 3. Mix the cinnamon sugar blend. In a small bowl, combine 1/4 cup granulated sugar and 1 tablespoon ground cinnamon. Stir them until they blend well. Set this mix aside for later. 1. Brush each tortilla on both sides with 1/4 cup melted butter. If you want, add 1 teaspoon of vanilla extract for extra flavor. 2. Sprinkle the cinnamon sugar on one side of each buttered tortilla. Use a good amount to cover it well. 3. Cut the tortillas into triangles or strips. Aim for 6-8 pieces per tortilla. 4. Place the triangles in a single layer on your baking sheet. Make sure they do not overlap. 5. Bake the chips in your preheated oven for 8-10 minutes. Keep a close watch to avoid burning. They should turn golden brown. 6. Sprinkle more cinnamon sugar on the chips right after you take them out of the oven. If you used salt, add a pinch while they are warm. 7. Let them cool on the baking sheet for a few minutes before serving. - Present the chips in a colorful bowl or on a pretty platter. This makes them look inviting. - Pair with dips like melted chocolate or caramel sauce for a tasty treat. You can also try fruit salsa for a fun twist. To make the best cinnamon sugar tortilla chips, focus on crispiness. Use small flour tortillas. They fry better and get crispier than larger ones. Brush each tortilla with melted butter. This helps the sugar stick and adds flavor. Bake them at 350°F (175°C) for 8-10 minutes. Keep an eye on them to catch golden brown perfection. You can adjust sweetness by changing the sugar amount. If you love cinnamon, add more! Play with the ratio until it’s just right for you. Adding a little vanilla extract to the butter gives a nice touch. Do not overbake your chips! They can turn hard and dry. Watch your oven closely. Every oven is different, so timing may vary. Using the wrong type of tortilla will hurt your chips. Corn tortillas can be too tough. Stick with flour tortillas for a lighter crunch. If you do this, you will enjoy a much better snack. {{image_2}} To make gluten-free cinnamon sugar tortilla chips, choose gluten-free tortillas. Many brands offer great options made from corn or other grains. You can find these in most grocery stores. For adjustments, you can keep the rest of the recipe the same. Just make sure your sugar and cinnamon are also gluten-free. If you want to make these chips vegan, replace the butter with coconut oil or a plant-based spread. Both choices give a nice flavor and help the sugar stick well. You can also use a non-dairy milk for the vanilla extract if you want a milkier taste without dairy. Want to shake things up? Try adding nutmeg or cocoa powder to your cinnamon sugar mix for a new twist. You can also drizzle chocolate or caramel sauce on top after baking. This little touch makes the chips even more special and fun to eat. You can find the full recipe to guide you through these variations and more! If you want to skip making your own chips, many brands offer great options. Popular brands include: - Tortilla Chips Co.: They make a tasty cinnamon sugar version. - Snacks Galore: Known for their crunchy texture and sweet flavor. - Sweet Treats: Offers a unique take with a hint of vanilla. You can find these brands online at sites like Amazon or in local grocery stores. Check the snack aisle for easy access. Making your own chips has its perks. Here are some pros and cons. Homemade: - You control the ingredients. - You can adjust the sweetness and spice levels. - They are fresh out of the oven. Store-Bought: - Quick and convenient. - No prep time needed. - Often more consistent in flavor. When it comes to cost, homemade chips may save you money, especially if you make a big batch. Store-bought options can add up, especially if you buy them often. If you want a quick snack, grab a bag. If you want to impress guests, try the full recipe for homemade cinnamon sugar tortilla chips. To make cinnamon sugar tortilla chips, you need a few basic ingredients. Start with small flour tortillas. You will also need granulated sugar, ground cinnamon, melted butter, and salt and vanilla extract if you like. 1. Preheat your oven to 350°F (175°C) and line a baking sheet with parchment paper. 2. Mix the sugar and cinnamon in a small bowl until well blended. Set this aside. 3. Brush melted butter on both sides of each tortilla. If you want, stir in vanilla to the butter for extra flavor. 4. Sprinkle the sugar mix on one side of each tortilla. 5. Cut each tortilla into triangles or strips, about 6-8 pieces each. 6. Lay the tortilla pieces in a single layer on the baking sheet. 7. Bake for 8-10 minutes until golden brown and crispy. Watch them closely to prevent burning. 8. After baking, sprinkle more cinnamon sugar on the warm chips. 9. Let them cool a bit before serving. This simple process makes a crunchy and sweet snack that everyone will love. For the full recipe, check out the detailed steps above. Yes, you can freeze cinnamon sugar tortilla chips. To freeze, let them cool completely. Then, store them in an airtight container or a freezer bag. - Best practices for freshness: - Place a piece of parchment paper between layers of chips. This prevents them from sticking together. - Label the container with the date, so you remember when you froze them. When you’re ready to eat them, thaw the chips in the fridge overnight. Reheat them in the oven at 350°F (175°C) for about 5 minutes to regain their crispiness. Cinnamon sugar tortilla chips pair great with both sweet and savory dips. Some delicious options are: - Sweet dips: - Melted chocolate or caramel sauce. - Fruit dips like strawberry or cream cheese dip. - Savory dips: - A light yogurt dip with honey and lime. - Spicy salsa or guacamole can create an exciting contrast. To enhance your snacking experience, serve the chips in a colorful bowl or platter. This makes them more inviting for guests. Adding a few fresh fruit slices on the side can also add a nice touch. Cinnamon sugar tortilla chips are easy and fun to make. We covered the simple ingredients and steps. I shared tips for perfecting the chips and avoiding mistakes. You can also explore tasty variations, like gluten-free and vegan options. Store-bought brands offer a quick fix, but homemade chips are often better. Whether you make them or buy them, adding dips enhances the flavor. Enjoy your crispy treat and get creative with flavors!

Cinnamon Sugar Tortilla Chips Irresistible Snack Idea

Ready for a snack that will take your taste buds on a sweet adventure? Cinnamon Sugar Tortilla Chips are the

To make stuffed bell peppers, you need a few key ingredients. Here’s the list: - 4 large bell peppers (any color) - 1 cup cooked quinoa - 1 can (15 oz) black beans, rinsed and drained - 1 cup corn kernels (fresh or frozen) - 1 medium onion, finely chopped - 2 cloves garlic, minced - 1 teaspoon cumin - 1 teaspoon smoked paprika - 1 cup diced tomatoes (canned or fresh) - 1 cup shredded cheese (cheddar or Monterey Jack) - 2 tablespoons fresh cilantro, chopped (optional) - Salt and pepper to taste - 1 tablespoon olive oil - Lime wedges for serving These ingredients blend well together for a tasty meal. You can change this recipe to fit your taste. Here are some optional ingredients you might add: - Ground meat (beef, turkey, or chicken) for extra protein - Diced jalapeños for a spicy kick - Black olives for a briny flavor - Avocado or guacamole for creaminess - Other veggies, like zucchini or spinach Feel free to mix and match! Each stuffed bell pepper packs a nutritious punch. Here’s a rough idea of what you get per serving: - Calories: 350 - Protein: 15g - Carbohydrates: 50g - Fat: 10g - Fiber: 12g These peppers are not just tasty; they are also good for you. Enjoy a filling meal that nourishes your body! For the full recipe, check out the complete guide. First, preheat your oven to 375°F (190°C). Take the bell peppers and cut off the tops. Remove the seeds and membranes inside. I like to brush the outside of each pepper with olive oil. This adds flavor and helps with browning. Place the peppers upright in a baking dish. They should stand tall and proud. Next, heat olive oil in a large skillet over medium heat. Add the chopped onion and minced garlic. Cook for about 3-4 minutes until the onion looks clear. This step builds a tasty base. Then, stir in cumin and smoked paprika. Cook for one more minute to release their flavors. In a bowl, mix cooked quinoa, black beans, corn, diced tomatoes, and half of the cheese. Add the onion and garlic mix, then sprinkle in salt and pepper. Stir everything well to blend. Now, it's time to fill those peppers! Spoon the quinoa mix into each pepper. Press down gently to pack it in. Top each pepper with the remaining cheese. Cover the dish with foil and bake for 25 minutes. After that, remove the foil. Bake for another 10-15 minutes until the peppers are soft and the cheese is melted. Once done, take them out and let them cool for a few minutes. Optionally, garnish with cilantro. Serve warm with lime wedges for a zesty touch. This recipe is both easy and satisfying. Check the Full Recipe for more details. To cook quinoa, rinse it first. This helps remove a bitter coating. Use a ratio of 2 cups of water to 1 cup of quinoa. Bring the water to a boil, then add the quinoa. Reduce the heat and cover the pot. Let it simmer for about 15 minutes. When done, fluff it with a fork. Perfectly cooked quinoa is light and fluffy. It adds great texture to stuffed bell peppers. Cheese makes stuffed peppers even better. I recommend using cheddar or Monterey Jack. These cheeses melt well and give a creamy texture. You can also try pepper jack for a spicy kick. If you want a lighter option, use mozzarella. Feta cheese adds a tangy twist, perfect for a Mediterranean vibe. Experiment with different cheeses for fun flavors. One mistake is overcooking the peppers. They should be tender but not mushy. Another common error is using uncooked quinoa. Always cook it first to ensure it’s ready. Don’t forget to season well. Salt and pepper bring out the flavors. Lastly, avoid underfilling the peppers. Pack them tightly for a satisfying bite. Follow these tips for stuffed bell peppers that wow everyone. {{image_2}} For a tasty vegetarian option, use beans and grains. I love using quinoa and black beans. They bring protein and fiber. You can also add veggies like zucchini, mushrooms, or spinach. Mix in spices like cumin and chili powder for flavor. Top with cheese for a rich finish. This option is satisfying and good for everyone. If you follow a keto diet, you can swap out grains for meat. Ground beef or turkey works well. You can also use cauliflower rice instead of quinoa. This keeps the carbs low. Add cheese and herbs to boost the flavors. This version is hearty and keeps you full longer. You can get creative with your fillings. For meat lovers, ground sausage or chicken adds great taste. Mix in some cooked rice for a classic combo. You can also use lentils for a different twist. The options are endless! Try different spices to match your mood. This way, you can enjoy stuffed bell peppers in many ways. For a full recipe that covers all these variations and more, check out the Full Recipe. To keep your leftover stuffed bell peppers fresh, place them in an airtight container. Make sure to cool them to room temperature first. Store them in the fridge for up to four days. If you want to enjoy them later, consider freezing them. When you're ready to eat, you can reheat your stuffed bell peppers easily. Preheat your oven to 350°F (175°C). Place the peppers in a baking dish, cover with foil, and heat for about 20 minutes. You can also use a microwave for a quicker option. Just place one pepper on a microwave-safe plate and heat for about 2-3 minutes. If you want to freeze your stuffed bell peppers, first let them cool completely. Wrap each pepper tightly in plastic wrap or aluminum foil. Place the wrapped peppers in a freezer bag, and remove as much air as possible. They can last in the freezer for up to three months. When you're ready to eat, thaw them overnight in the fridge before reheating. This method works well, and you can enjoy your vibrant quinoa & black bean stuffed bell peppers at your convenience! Yes, you can make stuffed bell peppers ahead of time. Prepare them up to the baking step. Store them in the fridge for up to 24 hours. When ready to eat, just bake them as the recipe states. You can use rice or couscous instead of quinoa. Both options work well in this recipe. If you want a low-carb choice, try cauliflower rice. Each gives a different taste and texture to the dish. Stuffed bell peppers last about 3 to 5 days in the fridge. Make sure to store them in an airtight container. If you want to keep them longer, consider freezing them. This way, you can enjoy them later without losing flavor. For the full recipe, check the section above. Stuffed bell peppers are versatile, healthy, and fun to make. We covered key ingredients, preparation steps, and cooking tips. You can customize your filling and choose the right cheese. Avoid common mistakes to ensure great results. Whether vegetarian or keto, these meals fit your needs. Store leftovers properly for future meals. With the right prep, you can enjoy this dish anytime. Dive into this tasty treat and make it your own!

Stuffed Bell Peppers Savory and Easy Weeknight Meal

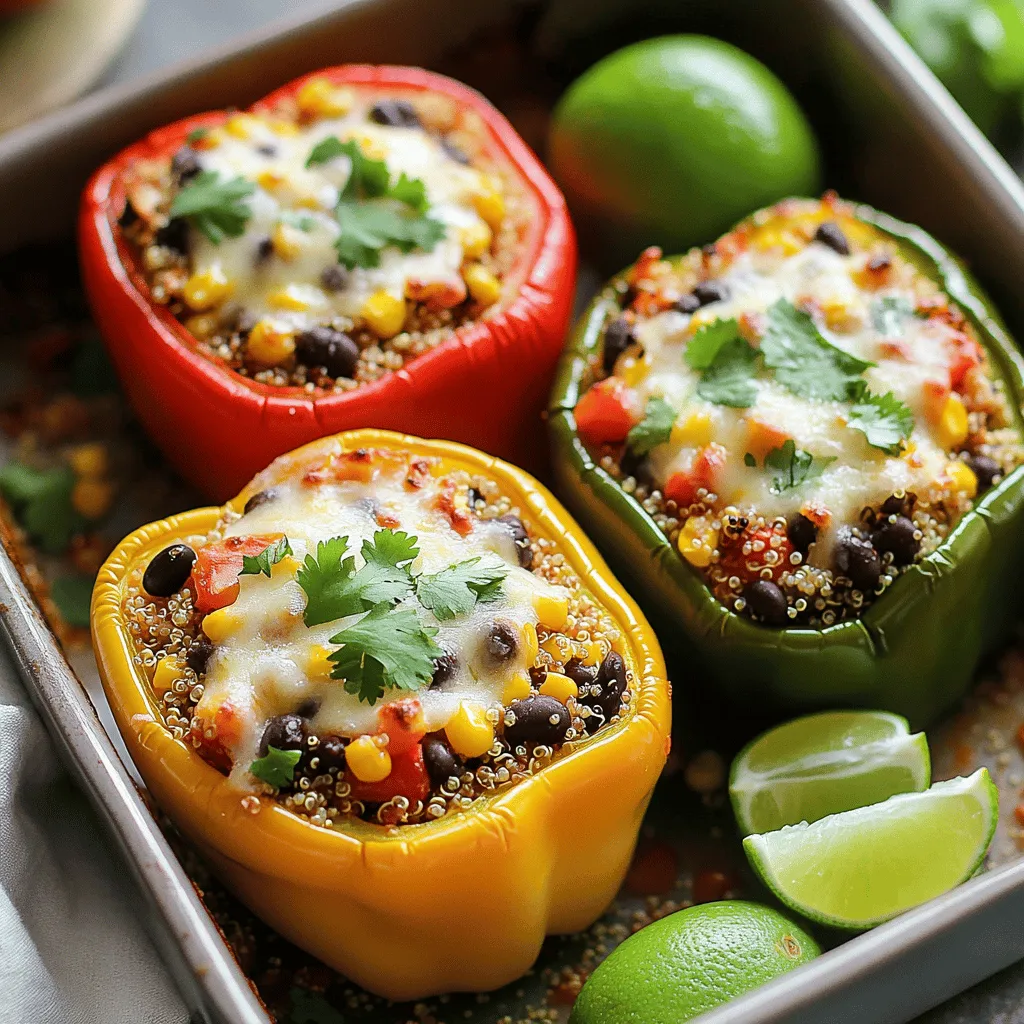
Looking for a fast and tasty dinner? Stuffed bell peppers can save your weeknights! These colorful veggies are easy to

To make a delicious Mediterranean quinoa salad, gather these fresh ingredients: - 1 cup quinoa, rinsed - 2 cups water - 1 cucumber, diced - 1 cup cherry tomatoes, halved - 1/2 cup red bell pepper, diced - 1/2 cup Kalamata olives, pitted and sliced - 1/4 cup red onion, finely chopped - 1/4 cup feta cheese, crumbled - 1/4 cup fresh parsley, chopped - 3 tablespoons olive oil - 2 tablespoons lemon juice - 1 teaspoon dried oregano - Salt and pepper to taste Prepare the quinoa first. Rinse it well to remove any bitterness. This step is key to great flavor. The water will help the quinoa cook perfectly and become fluffy. Next, pick your favorite vegetables. Cucumber adds crunch, while cherry tomatoes bring sweetness. Bell peppers add color, and red onion gives a nice bite. The olives and feta cheese provide a rich, salty taste. Finally, the dressing is simple yet full of flavor. Olive oil acts as a base. Lemon juice brightens the salad. Oregano adds an herbal note. A pinch of salt and pepper rounds it all out. For the full recipe, check the detailed instructions. Enjoy making this fresh and flavorful dish! Boiling Water Start by boiling 2 cups of water in a medium saucepan. Make sure to use a pot that has a lid. The water needs to be bubbling before you add the quinoa. Simmering Quinoa Once the water boils, add 1 cup of rinsed quinoa. Stir in a pinch of salt. Cover the pot and reduce the heat to low. Let it simmer for about 15 minutes. The quinoa should look fluffy and have absorbed all the water. After cooking, take it off the heat and let it cool. Dicing and Mixing While the quinoa cools, you can prepare the vegetables. Dice 1 cucumber, halve 1 cup of cherry tomatoes, and chop 1/2 cup of red bell pepper. Slice 1/2 cup of Kalamata olives and finely chop 1/4 cup of red onion. Add all these to a large mixing bowl. Don’t forget to crumble in 1/4 cup of feta cheese. Whisking Ingredients For the dressing, grab a small bowl. Whisk together 3 tablespoons of olive oil, 2 tablespoons of lemon juice, and 1 teaspoon of dried oregano. Add salt and pepper to taste. This dressing will bring all the flavors together. Mixing Quinoa with Vegetables and Dressing Now that the quinoa has cooled, add it to the bowl with the diced vegetables and feta. Pour the dressing over everything. Gently toss all the ingredients together. Make sure the quinoa mixes well with the veggies and dressing. Lastly, sprinkle 1/4 cup of chopped parsley over the top for a fresh taste. You can find the Full Recipe to follow along. Rinsing Techniques Rinsing quinoa is key to removing its bitter outer coating. Place the quinoa in a fine mesh strainer and rinse it under cold water. Use your hands to rub the grains gently. This helps to wash away the saponins that can affect the taste. Cooking Time Tips For perfect quinoa, use a 2:1 water to quinoa ratio. Bring the water to a boil, then add the rinsed quinoa. Reduce the heat to low, cover, and let it simmer for about 15 minutes. The quinoa should be fluffy and the water fully absorbed when done. Adding Fresh Herbs Fresh herbs can brighten your salad. I recommend adding chopped parsley or mint. These herbs add a burst of flavor and a fresh aroma. You can mix them in with the vegetables for an extra zing. Adjusting Dressings to Taste Dressings can make or break your salad. Start with olive oil and lemon juice, but feel free to adjust. If you like it tangy, add more lemon juice. For a richer taste, add more olive oil or some minced garlic. This lets you create a flavor that suits your palate. Presentation Ideas Presentation matters! Serve the salad in a large glass bowl to show off the vibrant colors. Garnish with extra parsley and a few whole olives on top. This makes it look inviting and ready to share. Pairing with Other Dishes This salad pairs well with grilled chicken or fish. You can also serve it alongside a warm pita and hummus for a complete meal. The flavors of the salad complement these dishes nicely, making your meal feel more balanced. For the full step-by-step recipe and more tips, check out the Full Recipe. {{image_2}} You can easily make this salad vegan. Instead of feta cheese, use avocado or tofu. Both options add creaminess without dairy. Try crumbling seasoned tofu or slicing ripe avocado atop the salad. They enhance flavor and provide healthy fats. Quinoa is gluten-free, but you can explore other grains too. Try millet, rice, or buckwheat. Each grain brings a unique texture and taste. Cook them as you would quinoa for best results. Adding roasted vegetables makes this salad shine. Roast zucchini, bell peppers, or eggplant for extra flavor. Toss them with olive oil and herbs, then mix them in when they cool. Utilizing fresh herbs boosts the salad's taste. Use basil, mint, or dill depending on the season. Chopped herbs enhance freshness and add vibrant color. For the full recipe, see the section above. You can keep your Mediterranean quinoa salad in the fridge for about 3 to 5 days. Store it in an airtight container to keep it fresh. If you notice any extra moisture, just drain it before eating. This will help maintain the texture and flavor. If you want to save some for later, you can freeze portions. Use freezer-safe containers or bags. It’s best to leave out the feta and fresh herbs before freezing. They don’t freeze well and may lose their taste. When you’re ready to eat, thaw it in the fridge overnight. To reheat, place the salad in a bowl and microwave it for 30 seconds to 1 minute. Stir it halfway through to heat evenly. You can also serve it cold for a refreshing taste. If you prefer, add a drizzle of olive oil or lemon juice after reheating to keep the flavor bright. For the full recipe, check out the Mediterranean Quinoa Salad recipe section. Mediterranean Quinoa Salad is a bright and tasty dish. It combines fresh veggies with quinoa, a healthy grain. You will find key ingredients like: - 1 cup quinoa, rinsed - 2 cups water - 1 cucumber, diced - 1 cup cherry tomatoes, halved - 1/2 cup red bell pepper, diced - 1/2 cup Kalamata olives, pitted and sliced - 1/4 cup red onion, finely chopped - 1/4 cup feta cheese, crumbled - 1/4 cup fresh parsley, chopped - 3 tablespoons olive oil - 2 tablespoons lemon juice - 1 teaspoon dried oregano - Salt and pepper to taste This salad is colorful, healthy, and very easy to make. It is perfect for a light lunch or side dish. You can enjoy it cold or at room temperature. Yes, you can make this salad ahead of time. It tastes great after a few hours in the fridge. To prep, follow these tips: - Make the quinoa and let it cool. - Chop the veggies and store them separately. - Mix the dressing and store it in a jar. - Combine everything when you are ready to serve. This way, the salad stays fresh and crunchy. If you don’t have quinoa, you can use other grains. Some good alternatives include: - Couscous - Bulgur wheat - Brown rice - Farro These grains have different tastes and textures. Choose one based on what you have at home. You can still follow the same steps in the Full Recipe. To make the salad more filling, add protein sources. Here are a few ideas: - Chickpeas or black beans for plant-based protein. - Grilled chicken or shrimp for meat lovers. - Tofu for a vegetarian option. Adding protein will make the salad heartier and more satisfying. Enjoy your Mediterranean Quinoa Salad! This blog post covered the key elements of making a Mediterranean quinoa salad. We explored the ingredients you need and the steps for cooking quinoa and preparing vegetables. You learned tips for enhancing flavors and variations to meet different diets. Finally, we discussed storage and reheating practices. In summary, this salad is colorful, healthy, and easy to enjoy. Feel free to mix it up or prep it in advance. Enjoy your cooking!

Mediterranean Quinoa Salad Fresh and Flavorful Dish

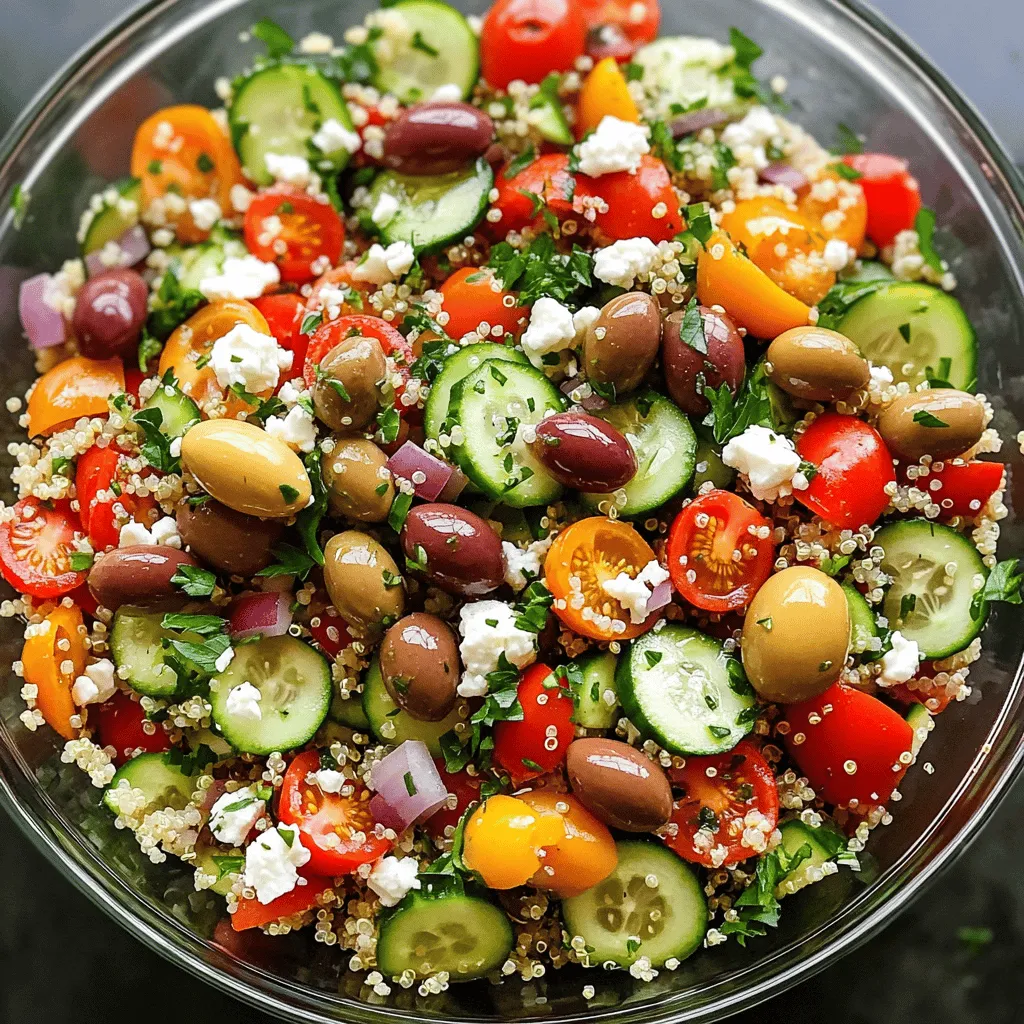
Looking for a fresh and tasty dish? Try my Mediterranean Quinoa Salad! This colorful meal combines protein-packed quinoa, crisp veggies,

- 2 cups cooked chicken, shredded - 1 cup black beans, rinsed and drained - 1 cup corn kernels (fresh, frozen, or canned) - 1 teaspoon cumin - 1 teaspoon chili powder - ½ teaspoon garlic powder - 8 small flour tortillas - 2 cups enchilada sauce (store-bought or homemade) - 1 cup shredded cheese (Cheddar or Monterey Jack) - ¼ cup fresh cilantro, chopped (for garnish) - Sour cream (optional for serving) To make the best easy chicken enchiladas, gather these fresh ingredients. Use cooked chicken that you shredded at home or bought from a store. Black beans add protein and fiber. Corn brings sweetness and texture. Spices like cumin, chili powder, and garlic powder give the dish a warm kick. The flour tortillas hold everything together, creating a soft, delicious wrap. Enchilada sauce keeps the enchiladas moist and flavorful. For the cheese, I prefer the rich taste of Cheddar or Monterey Jack. Use fresh cilantro to add a pop of color and flavor on top. You can serve with sour cream for extra creaminess. You can find the full recipe to guide you through the process. Enjoy cooking! - First, combine the cooked chicken, black beans, corn, cumin, chili powder, and garlic powder in a large bowl. - Mix everything until all ingredients are well incorporated. This ensures each bite is packed with flavor. - Next, spread half a cup of enchilada sauce on the bottom of a 9x13-inch baking dish. - Take a tortilla and place about half a cup of the chicken mixture in the center. - Roll it up tightly and place it seam-side down in the dish. Repeat this step with the remaining tortillas and chicken mixture. - Cover the baking dish with aluminum foil and bake in a preheated oven at 375°F (190°C) for 20 minutes. - After 20 minutes, remove the foil and bake for an additional 10 minutes. This allows the cheese to melt and get bubbly. - Once done, take the dish out of the oven and let it cool for a few minutes. Using leftover chicken or rotisserie chicken makes this recipe quick and easy. Just shred the chicken and mix it with the other ingredients. This saves time and adds great flavor. For spice, I love using cumin and chili powder. They add warmth and depth. A pinch of garlic powder also helps to brighten up the dish. Experiment with these spices to find your perfect mix. Softening tortillas is key to rolling them easily. To do this, heat them briefly in a pan or wrap them in a damp cloth. This makes them more flexible. When filling the tortillas, use about half a cup of the chicken mixture. This keeps everything neat and avoids spills. Roll them tightly and place them seam-side down in your baking dish. To achieve that bubbly cheese topping, cover the dish with foil for the first part of baking. This keeps moisture in and helps everything cook evenly. After 20 minutes, remove the foil to let the cheese brown on top. Bake for an additional 10 minutes for that perfect golden color. I always watch closely to avoid overcooking. Trust me, the cheese should be melty and slightly crispy! For the Full Recipe, check out the main section of this article. {{image_2}} You can change the chicken in this recipe. Beef or shrimp works well too. You can even use veggies for a tasty vegetarian option. Try black beans, bell peppers, or zucchini. These give a great mix of flavor and color. For shrimp, just cook them until they turn pink. For beef, use ground beef or shredded beef. Each option brings its own twist! You can explore different sauces for your enchiladas. Making your own enchilada sauce is fun! Use tomatoes, peppers, and spices to create a unique flavor. If you're short on time, use salsa or store-bought sauce. They can add a nice kick to your dish. Don't be afraid to experiment with different sauces. You might just find a new favorite! Choosing cheese is key for great enchiladas. Cheddar and Monterey Jack are both excellent choices. They melt well and taste amazing. You can use a blend of cheeses for extra flavor. Also, try adding queso fresco or feta on top. These cheeses add a lovely creamy texture and a bit of salt. You can mix and match to find your perfect cheese combination! To keep your enchiladas fresh, refrigerate them in an airtight container. This helps prevent drying out. They last about three to four days in the fridge. For longer storage, you can freeze them. Wrap each enchilada in plastic wrap, then place them in a freezer bag. This method protects them from freezer burn. Frozen enchiladas can last up to three months. For the best flavor, reheat enchiladas in the oven. Preheat your oven to 350°F (175°C). Place the enchiladas in a baking dish, cover with foil, and heat for about 20 minutes. This keeps them moist and allows the cheese to melt nicely. If you're in a hurry, use the microwave. Place one enchilada on a microwave-safe plate. Cover it with a damp paper towel to keep it from drying out. Heat for about one minute or until warm. Enjoy your enchiladas just like they were fresh! Yes, you can prep your enchiladas ahead. Start by making the chicken filling and mixing it well. You can store this in the fridge for up to two days. You can also assemble the enchiladas in the baking dish. Just wait to add the sauce and cheese until right before baking. This keeps the tortillas soft and fresh. Cover the dish with foil and chill it. When you’re ready, pour the sauce, add cheese, and bake as directed. Chicken enchiladas pair well with many side dishes. Here are some tasty options: - Mexican rice: Fluffy rice adds a nice texture. - Refried beans: Creamy beans complement the enchiladas. - Guacamole: Fresh and creamy, it adds flavor. - Corn salad: A zesty salad brightens the meal. - Salsa: Fresh salsa gives a nice kick. You can store enchiladas in the fridge for up to four days. Keep them in an airtight container to keep them fresh. If you want to store them longer, consider freezing. Just wrap them well to prevent freezer burn. When reheating, check that they are warm throughout. This ensures safety and keeps them tasty. Enjoy your delicious enchiladas! In this post, we explored how to make easy chicken enchiladas. We covered the ingredients needed, preparation steps, and tips for the best results. You can use different proteins and sauces based on your taste. Remember to store leftovers properly to enjoy later. These enchiladas are not just tasty; they’re also simple to make. Enjoy creating your delicious twist on this classic dish!

Easy Chicken Enchiladas Simple and Delicious Recipe

Are you ready to whip up a meal that’s both easy and delicious? In this post, I’ll guide you through

- 8 oz spaghetti or linguine - 1 lb large shrimp, peeled and deveined - 4 tablespoons olive oil - 4 cloves garlic, minced - Zest of 1 lemon - 1/4 cup fresh lemon juice - 1/2 teaspoon red pepper flakes (optional) - 1/4 cup fresh parsley, chopped - Grated Parmesan cheese, for serving (optional) - Salt and pepper - Tips for Adjusting Seasoning I love using fresh and simple ingredients in Lemon Garlic Shrimp Pasta. For the base, choose either spaghetti or linguine. Both work perfectly with the shrimp. I prefer large shrimp, as they soak up the flavors well. Olive oil is key for sautéing the garlic and shrimp. Use fresh garlic to add a fragrant taste. Lemon zest and juice give the dish its bright flavor. If you like a little heat, add red pepper flakes. Fresh parsley adds a pop of color and flavor. Season with salt and pepper to taste. Adjust the seasoning as you go. Start with a little, then add more if needed. You can find the full recipe [here]. Boiling Water & Cooking Time Fill a large pot with water and add a pinch of salt. Bring the water to a rolling boil. Once boiling, add 8 oz of spaghetti or linguine. Cook according to package instructions, usually about 8 to 10 minutes. You want the pasta to be al dente, which means it should have a slight bite. Reserving Pasta Water Before you drain the pasta, scoop out 1 cup of the pasta water. This water is starchy and helps to thicken the sauce later. After reserving the water, drain the pasta and set it aside. Preparing the Skillet In a large skillet, heat 2 tablespoons of olive oil over medium heat. Once the oil shimmers, add 4 cloves of minced garlic and, if you like a kick, 1/2 teaspoon of red pepper flakes. Sauté for about 1 minute. This helps to release the garlic's flavor without burning it. Cooking Time for Shrimp Now, increase the heat to medium-high. Add 1 lb of large shrimp that are peeled and deveined. Season the shrimp with salt and pepper. Cook for about 2 to 3 minutes. You’ll know they are done when they turn pink and opaque. Adding Pasta and Sauce Components Lower the heat to medium. Add the drained pasta to the skillet with the shrimp. Pour in the lemon zest and juice from 1 lemon, along with the remaining 2 tablespoons of olive oil. Toss everything together gently. Achieving Desired Sauce Consistency Now comes the fun part! Gradually add the reserved pasta water, about 1/4 to 1/2 cup, while tossing the pasta. This will help create a silky sauce. Keep tossing until you reach your desired sauce thickness. Adjust the taste if needed by adding more salt, pepper, or a splash of lemon juice. Enjoy this quick and flavorful meal! For the full recipe, check the section above. How to Know When Shrimp is Done Shrimp cooks fast. Look for a pink color and a firm texture. When shrimp curl into a "C" shape, they are ready. This usually takes about 2-3 minutes. If they turn white, they may be overcooked. Avoiding Overcooked Shrimp To avoid overcooked shrimp, use medium-high heat. Stir often, and don’t crowd the pan. If shrimp cook too long, they get tough. Always remove them from heat as soon as they look pink and opaque. Tips for Al Dente Pasta For al dente pasta, cook it for 1-2 minutes less than the package says. Start tasting it a minute or two before the time is up. It should be firm yet tender when you bite into it. Reheating Leftover Pasta To reheat leftover pasta, add a splash of water and cover it. Microwave it for about 1-2 minutes. Stir it halfway through to heat evenly. This keeps the pasta from drying out. Garnishing Ideas Garnish your dish with fresh parsley or lemon wedges. These add a bright touch. You can also sprinkle grated Parmesan on top for extra flavor. Pairing with Sides and Drinks Pair this dish with a crisp green salad or garlic bread. For drinks, try a chilled white wine or sparkling water with lemon. Both enhance the meal’s flavors. For a full recipe, explore the steps to create this delightful dish. {{image_2}} Gluten-Free Options If you want a gluten-free meal, use gluten-free pasta. Many brands offer great taste and texture. Rice noodles or zucchini noodles are also good choices. They soak up the sauce well and keep the dish light. Low-Carb Alternatives For a low-carb option, swap pasta for spiralized vegetables like zucchini or squash. These add crunch and flavor. You can also use shirataki noodles. They have few calories and carbs, making them a great choice for low-carb diets. Adding Vegetables Mix in fresh spinach or cherry tomatoes for added color and nutrition. Spinach wilts nicely and adds a mild taste. Cherry tomatoes burst with flavor when cooked. You can also try bell peppers or broccoli for a crunchy texture. Different Proteins If you want to switch things up, use chicken or tofu instead of shrimp. Cook the chicken until golden brown for a hearty meal. Tofu absorbs flavors well, making it a tasty plant-based option. Creamy Lemon Garlic Sauce For a creamy twist, add heavy cream or cream cheese to the sauce. Stir it in after cooking the shrimp. This makes the dish rich and smooth. You can also add a splash of white wine for depth. Adding Herbs or Spices Herbs like basil or dill can brighten the dish. Fresh or dried herbs work well. You can also add spices like paprika or cumin for a different kick. Adjust the amounts to suit your taste. For a full recipe, check out the [Full Recipe]. To keep your Lemon Garlic Shrimp Pasta fresh, use an airtight container. This helps prevent moisture loss and keeps the flavors intact. Place the pasta in the fridge within two hours of cooking. It stays tasty for about three days in the fridge. If you want to enjoy it later, ensure it cools completely before sealing it. If you want to store your pasta for longer, freezing is a great option. First, let the pasta cool completely. Then, portion it into freezer-safe bags or containers. Remove as much air as you can to prevent freezer burn. It can stay in the freezer for up to three months. To reheat frozen pasta, thaw it overnight in the fridge. Heat it in a skillet on low. Add a splash of olive oil or pasta water to help it warm evenly. Stir until heated through, and enjoy! To keep your pasta tasty, avoid freezing it with sauce for best results. Instead, freeze the pasta and sauce separately. This helps maintain the texture of both. When you reheat, mix them together for a fresh taste. For best flavor, add fresh herbs like parsley after reheating. This adds a burst of freshness that is key to a great meal. Always taste and adjust seasoning before serving. For the full recipe, check the earlier section. To make Lemon Garlic Shrimp Pasta, follow these simple steps: 1. Cook the Pasta: Boil salted water and cook your spaghetti or linguine until al dente. Save some pasta water before draining. 2. Sauté the Shrimp: Heat olive oil in a skillet. Add minced garlic and, if you like spice, red pepper flakes. Cook for one minute. 3. Add Shrimp: Increase heat and add shrimp. Season with salt and pepper. Cook for 2-3 minutes until shrimp are pink. 4. Combine Ingredients: Lower the heat. Mix in the cooked pasta with the shrimp. Add lemon zest, lemon juice, and more olive oil. Stir in reserved pasta water until the sauce is just right. 5. Finish and Serve: Remove from heat. Mix in fresh parsley. Taste and add more seasoning if needed. Serve hot, topped with Parmesan cheese if you want. This recipe is quick and gives you a burst of flavor. For the full recipe, check out the previous section. Yes, you can use frozen shrimp. Just remember to thaw them before cooking. Place the shrimp in cold water for about 15-20 minutes. This will save time and ensure even cooking. When you cook frozen shrimp, add an extra minute to the cooking time. This gives them enough time to heat through. Make sure they turn pink and opaque. Always check for doneness, as you want them just cooked. If you don't have white wine, you can use chicken broth or vegetable broth. Both add great flavor without the wine. Another option is a mix of lemon juice and a splash of vinegar. This gives you the acidity that wine offers. You can also use apple juice or white grape juice for a sweeter taste. Just remember to adjust the other flavors to balance it. These swaps help keep your pasta dish tasty, no matter what you have on hand. This guide covered how to make a delicious Lemon Garlic Shrimp Pasta. We explored essential ingredients, cooking steps, and helpful tips. You learned how to cook shrimp and pasta perfectly. Dietary options and variations help you customize the dish. Remember to store leftovers right to keep them fresh. Enjoy creating this meal, sharing it with others, and exploring new flavors. With a little practice, you’ll become an expert in the kitchen. Happy cooking!

Lemon Garlic Shrimp Pasta Quick and Flavorful Meal

Looking for a quick and tasty meal? Lemon Garlic Shrimp Pasta is the answer! This dish combines juicy shrimp with

Older posts
Newer posts
← Previous Page1 … Page62 Page63 Page64 … Page68 Next →

dsad

© 2025 So Yum Recipes • Built with GeneratePress

Our Policies

  • Copyright Policy
  • Cookie Policy
  • GDPR Policy
  • Privacy Policy
  • Disclaimer
  • Terms Of Use

More Information

  • Home
  • About
  • Contact
  • Appetizers
  • Dessert
  • Dinner
  • Drinks
©2025, So Yum Recipes About Back To Top