Skip to content
DisclaimerTerms Of UseGDPR PolicyCookie Policy

So Yum Recipes

  • Home
  • Drinks
  • Appetizers
  • Dinner
  • Dessert
  • About
  • Contact
  • Privacy Policy
DisclaimerTerms Of UseGDPR PolicyCookie Policy

Chloe

- Cauliflower - Olive oil - Onion, garlic, bell peppers - Peas and eggs To start, the main star is the cauliflower. It replaces traditional rice and adds nutrition. Use a medium head for best results. Next, olive oil helps sauté the veggies. It gives a nice flavor without overpowering the dish. Onion and garlic add a savory base. When you sauté them, they become sweet and fragrant. Bell peppers bring color and crunch. You can use any combination of red, yellow, or green. Peas add a pop of sweetness, and eggs round out the dish, providing protein. - Soy sauce (or tamari) - Sesame oil - Salt and pepper - Green onions and sesame seeds Seasonings play a big role in flavor. Soy sauce or tamari gives a salty kick. Tamari is perfect for those needing a gluten-free option. Sesame oil adds a nutty depth that makes this dish special. Don’t forget salt and pepper to taste! They balance the flavors. For garnishing, green onions add freshness. Sesame seeds, if you choose to use them, add a nice crunch. Together, these ingredients create a colorful and tasty meal. For the full recipe, check the section above. To rice cauliflower, start by removing the leaves and stem. Chop the cauliflower into smaller florets. Then, place the florets in a food processor. Pulse them until they look like small grains of rice. This method is quick and easy. If you don’t have a food processor, you can use a box grater. Just grate the florets on the large holes. This method works well, too, but it takes a bit longer. After you rice the cauliflower, set it aside for later. Heat two tablespoons of olive oil in a large skillet over medium-high heat. Add a small onion, finely chopped. Sauté the onion for about 2-3 minutes. It should become soft and translucent. Next, add two cloves of minced garlic and one cup of diced bell peppers to the skillet. Stir and cook for another 3-4 minutes. The peppers should soften, adding color and flavor to the dish. Now, push the vegetables to one side of the skillet. Pour in two lightly beaten eggs into the empty space. Scramble the eggs until they are fully cooked. Once scrambled, mix the eggs with the vegetables. Add the riced cauliflower to the skillet along with one cup of frozen peas. Stir everything together well. Cook for about 5-7 minutes, stirring occasionally. The cauliflower should be tender but not mushy. Finally, drizzle three tablespoons of soy sauce and one teaspoon of sesame oil over the mixture. Stir again to combine. Season with salt and pepper to taste. Cook for an additional 1-2 minutes to let the flavors blend. For the full recipe, refer to the instructions provided earlier. To keep your cauliflower fried rice from becoming mushy, follow these tips: - Rice the cauliflower well. Use a food processor for even-sized grains. You can also use a box grater if you prefer. - Cook it fast. Aim for medium-high heat to get a nice sear. This keeps the cauliflower firm. - Watch your time. Cook the cauliflower for about 5-7 minutes. Stir often but don’t overcook it. You can make your cauliflower fried rice unique by adding proteins and veggies: - Proteins. Chicken, shrimp, or tofu work great. Cook them separately first, then add them back to the skillet. - Veggies. Try carrots, broccoli, or snap peas. Use what you have on hand or what you like best. Serve your cauliflower fried rice with these ideas: - Accompaniments. Pair it with a fresh salad or your favorite sauce. A drizzle of soy sauce adds great flavor. - Best temperatures. Enjoy it hot right off the stove. It tastes best when served fresh. For a full recipe and more details, check out the Full Recipe section. {{image_2}} Cauliflower fried rice is a great low-carb dish. You use riced cauliflower instead of regular rice. This keeps the carbs low while still giving you a filling meal. Ricing cauliflower is easy and quick. Just pulse it in a food processor or grate it. For gluten-free options, use gluten-free soy sauce. Tamari is a perfect choice. It tastes great and keeps your dish gluten-free. You can boost the flavor easily. Try adding spices like ginger or chili flakes. Ginger adds warmth, while chili flakes give a nice kick. Adding these spices can change the whole taste of your dish. You can also explore different cuisines. For example, add curry powder for an Indian twist. Or, try some cumin for a Mexican flair. These variations keep your meals interesting and fun! Prepping cauliflower fried rice in advance is smart. You can save time on busy days. Make a big batch and store it for later. Just follow the recipe, then let it cool before packing it away. When it comes to storing leftovers, use airtight containers. This keeps your dish fresh. Cauliflower fried rice lasts about 3-4 days in the fridge. You can also freeze it for longer storage. Just remember to reheat it well to keep the texture nice. For the full recipe, check out the recipe section above. To keep your cauliflower fried rice fresh, store it in airtight containers. This helps prevent moisture loss and keeps flavors intact. In the fridge, it lasts about 3 to 4 days. Make sure to let it cool before sealing the container. This helps avoid sogginess. If you want to store it longer, freezing is a great option. Divide the fried rice into portions and place them in freezer-safe bags. Remove as much air as you can to prevent freezer burn. When you're ready to eat, thaw it in the fridge overnight. To reheat, use a skillet over medium heat. Add a splash of water to help steam it and keep the texture nice. Stir often until it’s heated through. Enjoy your tasty, homemade meal again anytime! For the full recipe, check out the details above. Yes, you can make cauliflower fried rice vegan. To do this, you need to replace the eggs. Use tofu or chickpea flour instead. - Tofu: Mash firm tofu and cook it in the skillet. This gives a good texture and protein. - Chickpea flour: Mix chickpea flour with water to make a batter. Cook it in the skillet like scrambled eggs. These swaps keep the dish delicious and nutritious. You can make cauliflower rice ahead of time. Here are some tips for prepping and storing it: - Rice the cauliflower: First, chop the cauliflower into florets. Use a food processor or a grater to rice it. - Store in the fridge: Keep the riced cauliflower in an airtight container. It stays fresh for 3-4 days. - Freezing: You can freeze the riced cauliflower for up to a month. Just spread it out on a baking sheet, freeze, and then transfer to a freezer bag. Prepping ahead saves time on busy days. Cauliflower fried rice pairs well with many dishes. Here are some ideas: - Proteins: Serve with grilled chicken, shrimp, or tofu for a hearty meal. - Side dishes: A fresh salad or steamed vegetables complement the dish. - Sauces: Try adding a drizzle of sriracha or sweet chili sauce for extra flavor. These pairings enhance your meal and make it even more enjoyable. We covered how to make delicious cauliflower fried rice. Start with fresh ingredients like cauliflower, olive oil, and your favorite vegetables. Follow the steps I shared to prepare and cook. Don’t forget the tips for great texture and customization options. This dish is not only tasty but also healthy. You can even meal prep it for the week. Enjoy your cooking, and make this recipe your own!

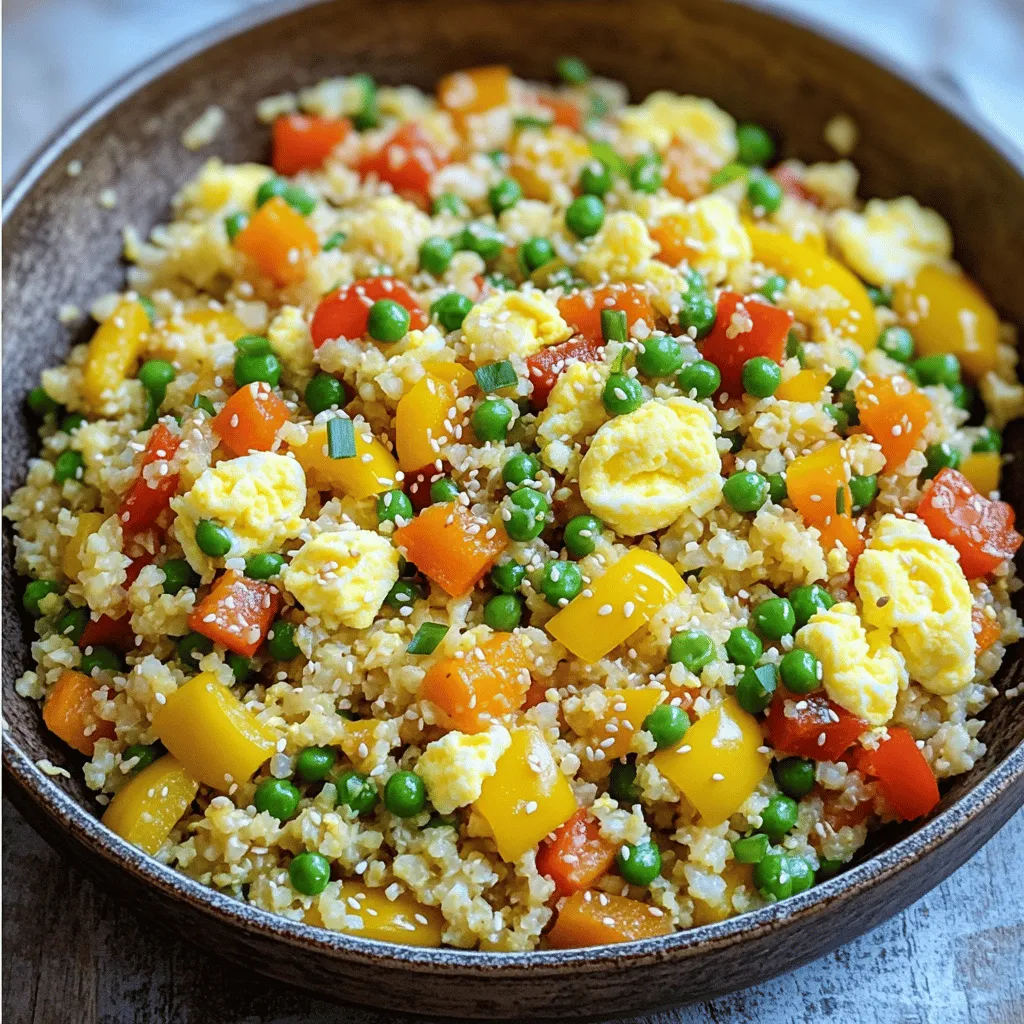
Cauliflower Fried Rice Flavorful and Easy Recipe

Are you ready to try a healthier twist on a classic dish? Cauliflower Fried Rice is simple, flavorful, and perfect

- 6 large eggs - 1 cup spinach, chopped - 1 bell pepper, diced (any color) - 1/2 cup cherry tomatoes, halved - 1/2 cup feta cheese, crumbled - 1/4 cup green onions, finely sliced - 1 tsp garlic powder - Salt and pepper to taste - Olive oil spray or muffin liners for greasing The mix of these ingredients makes breakfast egg muffins both tasty and healthy. Eggs provide protein, while spinach and bell peppers add vitamins. Cherry tomatoes bring sweetness, and feta cheese adds a tangy flavor. Green onions give a nice crunch. Each muffin has around 100 calories. They have about 7 grams of protein, 6 grams of carbs, and 6 grams of fat. This makes them a balanced option for breakfast. Want to make these muffins even better? You can add more veggies like zucchini or mushrooms. For extra protein, try adding cooked bacon or sausage. These add-ins can change the flavor and keep things fresh! Check out the Full Recipe for more ideas. - Preheat the oven to 350°F (175°C). - Prepare the muffin tin with grease or muffin liners. Start by getting your oven nice and hot. This helps the muffins cook evenly. Take a muffin tin and either spray it with olive oil or place liners inside. This makes for easy removal later. - Beat the eggs and season with spices. - Incorporate vegetables and cheese into the egg mixture. Next, grab a large bowl. Crack six large eggs into it. Beat them well, adding garlic powder, salt, and pepper for flavor. Now, it's time to add in the fun part. Toss in chopped spinach, diced bell pepper, halved cherry tomatoes, crumbled feta cheese, and sliced green onions. Stir everything together until it looks colorful and mixed. - Pour mixture into muffin tin. - Baking time and indicators for doneness. Now, carefully pour the egg mixture into the prepared muffin tin. Fill each cup about two-thirds full. Place the tin in your preheated oven. Bake for 18-20 minutes. You’ll know they’re done when they look set and slightly golden on top. Let them cool for a few minutes before you take them out. Enjoy these tasty treats warm or save them for later! For the full recipe, check out the detailed instructions. To batch cook and store egg muffins, start by making a large batch. You can double or triple the recipe. Once they cool, place them in an airtight container. Store them in the fridge for up to five days. For longer storage, freeze them. Wrap each muffin in plastic wrap. Then place them in a freezer bag. They can last up to three months in the freezer. For best practices when reheating, remove the muffin from the wrap. Place it on a microwave-safe plate. Heat for about 30 to 60 seconds. If you prefer the oven, preheat to 350°F (175°C) and bake for about 10 minutes. This keeps the muffins moist while warming. Adjusting baking time depends on your oven type. Most ovens heat unevenly. If you have a convection oven, reduce the baking time by about 2 to 3 minutes. For a regular oven, keep an eye on your muffins after the 18-minute mark. To avoid overcooked or undercooked muffins, check for doneness by inserting a toothpick. If it comes out clean, they are done. If the muffins jiggle, they need more time. For garnishing ideas, sprinkle fresh herbs like parsley or chives on top. This adds color and flavor. Serve the egg muffins on a nice platter for an inviting look. They pair well with sides like sliced avocado or fresh fruit. This not only adds flavor but also boosts nutrition. You can enjoy your breakfast muffins with a side of berries or a light salad for a refreshing start to your day. {{image_2}} You can make breakfast egg muffins fun by adding different flavors. For a Mediterranean twist, try sun-dried tomatoes and olives. This mix gives a bright taste that wakes up your palate. Simply chop and stir them into the egg mixture. For a Southwestern version, use black beans, corn, and cheddar cheese. This combo adds a hearty bite. Just fold them in with your other ingredients. The flavors work great together, creating a tasty meal. You can adapt these muffins for different diets. If you want a vegetarian or vegan option, replace eggs with a tofu scramble. Simply crumble tofu and cook it lightly before adding your veggies. This keeps the dish filling and delicious. For gluten-free options, make sure to check that your add-ins are gluten-free. Most veggies and cheeses work perfectly, so you can enjoy without worry. Using seasonal vegetables makes your muffins fresh and tasty. In winter, add hearty veggies like kale or butternut squash. In the summer, use zucchini or bell peppers. These choices keep your dish vibrant and full of flavor. You can also adapt the recipe based on what you find at the market. If you see something fresh, try it! This keeps your breakfast exciting and new. Want to try making your own? Check out the Full Recipe for more details! To keep your breakfast egg muffins fresh, I recommend storing them in the fridge or freezer. If you plan to eat them within a week, the fridge is perfect. Use an airtight container to lock in moisture and flavor. For longer storage, freeze your muffins in a single layer, then transfer them to a freezer bag. This helps prevent sticking and saves space. In the fridge, your egg muffins last about five days. After that, they may lose their taste and texture. When frozen, they can last up to three months. Just remember to label the bags with the date. This way, you know how long they’ve been in the freezer. You have two great options for reheating: the oven or microwave. For the oven, preheat it to 350°F (175°C) and heat the muffins for about 10 minutes. This keeps them warm and crispy. For the microwave, place one muffin on a plate and heat it for 30 seconds to a minute. To keep the texture nice, cover it with a damp paper towel. This helps prevent the muffins from drying out. By following these storage and reheating tips, you’ll enjoy delicious breakfast egg muffins anytime! For the full recipe, check out the Morning Glory Egg Muffins. Yes, you can make Breakfast Egg Muffins in advance. Here are some tips: - Batch Cooking: Make a large batch on the weekend. Store them in the fridge or freezer. - Storing: Cool them fully before storing. Use an airtight container for the fridge. For freezing, wrap them in plastic wrap and place in a freezer bag. - Reheating: For fridge muffins, reheat in the microwave for about 30 seconds. Frozen muffins need about 1-2 minutes in the microwave. To check if your muffins are done, look for these signs: - Firmness: The tops should feel firm to the touch. - Color: They should be slightly golden brown on top. - Toothpick Test: Insert a toothpick in the center. It should come out clean if they are done. Absolutely! Here are some great options for customization: - Vegetables: Add zucchini, mushrooms, or even broccoli for more greens. - Cheese: Swap feta for cheddar, mozzarella, or goat cheese. - Protein: Mix in cooked bacon, sausage, or even tofu for a vegetarian twist. You can also experiment with herbs and spices to find your favorite flavor! These breakfast egg muffins are easy to make and packed with flavor. We covered the key ingredients, from eggs to veggies. We also shared tips for cooking and storing, ensuring your muffins stay fresh. You can customize them based on your taste or dietary needs. Whether you want a quick breakfast or something to meal prep, these muffins fit the bill. Try these recipes to enjoy a tasty and healthy meal. Cooking should be fun, and these egg muffins make it simple.

Breakfast Egg Muffins Tasty and Healthy Dish Ideas

Start your day on a healthy note with Breakfast Egg Muffins! These tasty bites pack protein and flavor into each

To make sweet potato black bean tacos, you need a few key ingredients. Each one adds flavor and texture to the dish. Here’s what you’ll need: - 2 medium sweet potatoes, peeled and diced - 1 can (15 oz) black beans, drained and rinsed - 1 red bell pepper, diced - 1 small red onion, diced - 2 cloves garlic, minced - 1 teaspoon ground cumin - 1 teaspoon smoked paprika - 1 tablespoon olive oil - Salt and pepper to taste - Corn tortillas (8-10) - Fresh cilantro, chopped (for garnish) - Avocado slices (for topping) - Lime wedges (for serving) These ingredients create a colorful and tasty meal. Sweet potatoes offer a natural sweetness, while black beans provide protein. The bell pepper and onion add crunch and flavor. Garlic, cumin, and smoked paprika give warmth and depth. You can find the full recipe to explore how these ingredients come together. Enjoy making these delicious tacos! First, preheat your oven to 400°F (200°C). This step is key for roasting our sweet potatoes. Next, peel and dice the sweet potatoes into small cubes. In a large bowl, toss the diced sweet potatoes with one tablespoon of olive oil. Add one teaspoon of ground cumin, one teaspoon of smoked paprika, and salt and pepper to taste. Mix until all the sweet potato pieces are well-coated. Spread the seasoned sweet potatoes on a baking sheet in a single layer. Roast them in the preheated oven for about 25 to 30 minutes. Stir the sweet potatoes halfway through for even cooking. While they roast, heat a skillet over medium heat. Add one diced red onion and one diced red bell pepper. Sauté for about five minutes until they soften. Then, add two minced garlic cloves and cook for one more minute. When the sweet potatoes are ready, stir in one can of drained and rinsed black beans with the sautéed veggies. Mix everything gently. In a separate dry skillet, warm your corn tortillas over low heat for one to two minutes on each side. This makes them easier to fold. To assemble your tacos, place a generous scoop of the sweet potato and black bean mix onto each tortilla. Top them with avocado slices and chopped cilantro. Serve with lime wedges for a fresh squeeze. For the full recipe, check out the recipe guide above. Choosing the right sweet potatoes makes a big difference. Look for firm potatoes with smooth skin. Avoid any with spots or soft spots. This ensures a flavorful base for your tacos. To ensure even roasting, cut the sweet potatoes into similar-sized pieces. This lets them cook at the same speed. Spread them out on the baking sheet without crowding. Stir them halfway through to brown all sides. When sautéing the vegetables, use medium heat. This helps them soften without burning. Keep an eye on them and stir often. Add the garlic last to keep its flavor fresh. To boost flavor, think about adding other spices. You can try chili powder for heat or oregano for earthiness. A pinch of cayenne can also wake up the dish. Adjusting seasoning is easy. After mixing everything, taste the filling. If it needs more salt or spice, add it slowly. This way, you can find the right balance for your taste. Explore the [Full Recipe] for more tips and ideas on creating the perfect sweet potato black bean tacos! {{image_2}} You can easily swap ingredients in these tacos. If you want a change, try using chickpeas or lentils instead of black beans. Both options add a nice texture and flavor. You can also switch up your taco shells. Try flour tortillas, lettuce wraps, or even pita bread for a fun twist. You don’t have to stick to one way to cook these tacos. You can prepare the filling on the stovetop, use the microwave, or grill the sweet potatoes for a smoky taste. If you want to add creaminess, try vegan cheese or top with fresh salsa. This way, each bite brings new flavors and joy. Check out the Full Recipe to start your taco adventure! After enjoying your sweet potato black bean tacos, store leftovers properly. Place the tacos in an airtight container. This keeps them fresh and prevents odors. When stored this way, they last in the fridge for up to three days. Make sure to separate the filling from the tortillas if you want to keep them crispy. Freezing is a great way to save these tasty tacos for later. I recommend freezing the sweet potato and black bean filling separately from the tortillas. This keeps everything fresh and tasty. Use a freezer-safe container or bag for best results. When you're ready to eat, thaw the filling overnight in the fridge. To reheat, warm the filling in a skillet over medium heat until hot. For the tortillas, warm them in a dry skillet for one to two minutes on each side. Enjoy your tacos just like the day you made them! Can I make this taco recipe ahead of time? Yes, you can make these tacos ahead of time. I recommend cooking the sweet potatoes and the black bean mix first. You can store them in the fridge for up to three days. When you’re ready to eat, just heat them up and warm the tortillas. This makes for a quick meal on busy days. Are sweet potato black bean tacos gluten-free? Yes, these tacos are gluten-free. The main ingredients are sweet potatoes and black beans, which are both gluten-free. Just make sure to use corn tortillas, as some tortillas may contain gluten. Always check the labels to confirm. What can I serve with these tacos? These tacos pair well with many sides. You might serve them with a fresh salad or some rice. You can also add a side of guacamole or a simple salsa. For a fun twist, try serving them with tortilla chips for extra crunch. Enjoy mixing and matching! Sweet potato black bean tacos are tasty and easy to make. We explored the key ingredients like sweet potatoes, black beans, and spices. I shared step-by-step instructions for preparation and cooking. You learned tips for perfecting your method and options for variations. Lastly, I covered storage and answered common questions. Embrace this recipe for a fun, healthy meal. Enjoy making these tacos your own!

Sweet Potato Black Bean Tacos Flavorful and Filling Meal

If you’re craving a meal that’s both tasty and filling, let’s dive into Sweet Potato Black Bean Tacos! With a

- 1 lb chicken thighs, cut into 1-inch cubes - 3 tablespoons gochujang (Korean red chili paste) - 2 tablespoons soy sauce - 1 tablespoon sesame oil - 2 tablespoons honey - 3 cloves garlic, minced - 1 tablespoon fresh ginger, minced - 2 green onions, chopped (plus extra for garnish) - 1 tablespoon sesame seeds (for garnish) In this recipe, chicken thighs shine with their juicy texture. They soak up flavors well. Gochujang adds heat and depth. Pair it with soy sauce for saltiness. The sesame oil gives a nutty taste. Honey balances the spice with sweetness. Fresh garlic and ginger add aromatic notes. Green onions bring freshness and color to the dish. Don’t skip the sesame seeds. They add a nice crunch and look great on top. - Skewers (wooden or metal) - Grill or grill pan - Mixing bowls You need skewers to hold the chicken pieces. Wooden skewers need soaking. This prevents burning. A grill or grill pan helps get that smoky flavor. Mixing bowls are key for combining ingredients. They make marinating easy and fun. - Alternative proteins - Vegetarian options If you want alternative proteins, try pork or beef. They also taste great with this marinade. For vegetarian options, consider tofu or mushrooms. Both soak up flavors well. Cut them into cubes and marinate just like chicken. Experimenting can lead to new favorite meals! To make the best Korean BBQ chicken skewers, start by preparing the marinade. In a large bowl, mix together these ingredients: - 3 tablespoons gochujang - 2 tablespoons soy sauce - 1 tablespoon sesame oil - 2 tablespoons honey - 3 cloves garlic, minced - 1 tablespoon fresh ginger, minced - 2 green onions, chopped This blend gives your chicken that sweet and spicy kick. After mixing, add 1 lb of chicken thighs cut into 1-inch cubes. Toss the chicken well to coat it with the marinade. Cover the bowl and place it in the fridge. I recommend marinating for at least 30 minutes. If you have time, let it sit for up to 2 hours for deeper flavor. Before you cook, preheat your grill or grill pan over medium-high heat. This helps to get nice grill marks on your chicken. While it heats, oil the grilling surface lightly. Use a paper towel dipped in oil and carefully wipe the grill grates. This step prevents sticking and helps with cleanup later. Once the chicken is marinated, it’s time to thread it onto the skewers. If you use wooden skewers, soak them in water for 30 minutes first. This helps prevent burning. Thread the marinated chicken pieces onto the skewers, leaving a little space between each piece. Now, grill the chicken skewers for about 10-15 minutes. Turn them occasionally. You want to see a nice char on the outside. The chicken should reach an internal temperature of 165°F (75°C) for safety. After grilling, let the skewers rest for 5 minutes. This keeps the juices inside. Before serving, sprinkle with sesame seeds and extra chopped green onions. Enjoy your delicious Korean BBQ chicken skewers! For the full recipe, check out the complete instructions. - Marinating time: Marinate the chicken for at least 30 minutes. For the best flavor, let it soak for up to 2 hours. This allows the chicken to absorb the rich flavors of the marinade. - Fresh vs. dried ingredients: Use fresh garlic and ginger for a bright taste. Dried spices are useful, but fresh ingredients make a big difference. They bring out the best in your skewers. - Skewering techniques: Thread the chicken pieces onto the skewers, leaving space between them. This helps hot air circulate and cooks the chicken evenly. - Meat temperature checking: Use a meat thermometer to check the chicken. It should reach 165°F (75°C) to be safe. This ensures you serve perfectly cooked skewers. - Side dishes that pair well: Serve your skewers with rice or a fresh salad. Kimchi adds a spicy kick and complements the flavors nicely. - Sauces for dipping: Offer a mix of dipping sauces. A sweet soy sauce or a spicy gochujang sauce works great. These add extra taste and fun for your guests. For the complete recipe, check out the Full Recipe section! {{image_2}} To make your skewers hotter, add more gochujang. You can also mix in chili flakes for extra heat. Try adding a splash of hot sauce in the marinade. This adds a kick that many love. For alternative spices, use smoked paprika or cayenne. These enhance the flavor and heat. You can adjust the spice level to your taste. If you want a smoky flavor, try a smoked seasoning blend. For a teriyaki twist, swap some soy sauce for teriyaki sauce. This gives the chicken a sweet and salty flavor. Mix in pineapple juice for a fruity touch. It adds a new layer of taste that is very refreshing. You can also try a sesame-infused recipe. Add toasted sesame oil for a nutty flavor. Mixing in sesame seeds in the marinade will enhance this taste. This makes the chicken rich and flavorful. If you want a different protein, try pork or beef skewers. Use the same marinade for great results. Cut the meat into similar-sized cubes to ensure even cooking. For a vegetarian option, use tofu or veggies. Firm tofu works best as it holds up on the grill. You can marinate bell peppers, zucchini, or mushrooms too. These options give a tasty alternative that everyone can enjoy. For the full recipe, check out the details above. To store leftover skewers, first let them cool down. Then, place them in an airtight container. You can keep them in the fridge for up to three days. This helps keep the chicken moist. If you want to save them longer, you can freeze the skewers. Wrap them tightly in plastic wrap and then place them in a freezer bag. They can last up to three months in the freezer. Just remember to label the bag with the date. When it's time to eat your leftovers, you have a few good options. The best method is to reheat them in the oven. Set it to 350°F (175°C). Place the skewers on a baking tray and cover with foil. This keeps the chicken juicy and warm. Heat for about 10-15 minutes. You can also use a microwave. Place the skewers on a microwave-safe plate and cover them. Heat in short bursts of 30 seconds. Be careful not to overheat, or the chicken may dry out. Preparing Korean BBQ chicken skewers in advance is smart for busy nights. You can marinate the chicken and freeze it. This way, you have a quick meal ready to go. On a busy weeknight, just take the marinated chicken from the freezer. Let it thaw in the fridge overnight. Then, you can thread it onto skewers and grill. This makes dinner easy and tasty! To marinate chicken for BBQ, focus on flavor and time. Use a mix of sauces like soy sauce and gochujang for depth. Add garlic and ginger for extra zest. A good rule of thumb is to marinate for at least 30 minutes. For richer flavor, let it sit for up to 2 hours. Always cover the chicken while it marinates. This keeps the flavors locked in and the chicken moist. Yes, you can make Korean BBQ chicken skewers in the oven. Preheat your oven to 400°F (200°C). Place the skewers on a baking tray lined with foil. Bake for about 15 to 20 minutes. Flip them halfway through cooking for even browning. Keep an eye on them to avoid burning. This method works well and gives tasty results. Soak wooden skewers in water for at least 30 minutes before grilling. This helps prevent burning on the grill. The water makes the skewers expand, which reduces the risk of them catching fire. If you are in a hurry, even 15 minutes can help. Just remember to soak them well for the best outcome. To find authentic Korean BBQ chicken skewers, check local Korean restaurants or BBQ spots. Look for places that have good reviews online. You can also ask friends or family for recommendations. If you have a Korean market nearby, they might offer ready-made skewers. Explore food apps for nearby options too. Chicken should reach an internal temperature of 165°F (75°C) when cooked. This ensures it is safe to eat. Use a meat thermometer for accuracy. Insert it into the thickest part of the chicken without touching the bone. This guarantees the chicken is fully cooked and juicy. Always check before serving to ensure food safety. Korean BBQ chicken skewers are a tasty dish packed with flavor. We covered key ingredients like chicken thighs, gochujang, and spices. I also shared tips for grilling, marinating, and serving. Remember to try different proteins or marinades for fun twists. Store leftovers properly, so you can enjoy them later. Grilling offers many benefits, and now, you have the tools to make great skewers at home. Dive in, experiment, and savor every bite!

Korean BBQ Chicken Skewers Tasty and Easy Recipe

Get ready to fire up the grill with my tasty and easy Korean BBQ Chicken Skewers recipe! These sweet and

To make these easy no-bake lemon bars, you need a few simple ingredients: - 1 cup graham cracker crumbs - 1/4 cup unsweetened shredded coconut - 1/2 cup melted coconut oil - 1/4 cup maple syrup - 1/2 cup fresh lemon juice (about 2-3 lemons) - Zest of 2 lemons - 1 cup full-fat coconut milk - 1/4 cup powdered sugar - 1 teaspoon vanilla extract - Pinch of salt These ingredients come together to create a tart and refreshing treat. You can easily swap some ingredients if you need to. Here are a few ideas: - Graham cracker crumbs: Use crushed digestive biscuits or almond flour for a gluten-free option. - Coconut oil: Substitute with unsalted butter if you prefer. - Maple syrup: Honey or agave syrup works well too. - Fresh lemon juice: Bottled lemon juice can work, but fresh is better for taste. - Coconut milk: Use any dairy milk if you want a non-dairy option. These swaps can help you adjust based on what you have at home. Understanding the nutrition of these bars can help you enjoy them wisely. Each bar (based on a recipe yielding 12 bars) has roughly: - Calories: 180 - Fat: 12g - Carbohydrates: 18g - Fiber: 2g - Sugar: 8g - Protein: 2g These bars offer a nice mix of healthy fats and natural sugars. They can be a great treat when enjoyed in moderation. To start, gather all your ingredients. You will need graham cracker crumbs, coconut, coconut oil, and maple syrup. Make sure to have fresh lemons for juice and zest. This step is quick and easy. First, mix the graham cracker crumbs, shredded coconut, melted coconut oil, and maple syrup in a bowl. Stir until everything blends well. Next, press this mix firmly into an 8x8-inch baking dish lined with parchment paper. Use the back of a measuring cup to flatten it. In another bowl, whisk together the lemon juice, zest, coconut milk, powdered sugar, vanilla extract, and salt. Keep whisking until smooth. Pour this lemon mixture over the crust. Spread it evenly for a nice finish. Now, cover the dish with plastic wrap. Place it in the fridge for at least 4 hours. This chill time helps the bars set correctly. Once they are firm, lift them out using the parchment paper. Cut into squares or bars. Enjoy this fresh and tart treat! For the complete recipe, check the Full Recipe section. To make your no-bake lemon bars shine, follow these tips. Use fresh lemons for juice and zest. The bright flavor comes from fresh fruit. Measure your ingredients carefully. This ensures the right balance of sweet and tart. Press the crust firmly into the dish. A compact base holds everything together. Chill your bars for at least four hours. This wait makes them firm and easy to slice. Avoid these common pitfalls when making your lemon bars. Don’t skip the chilling time. If you cut them too soon, they will fall apart. Also, make sure to mix the filling until smooth. Lumps can ruin the texture. Another mistake is not using enough lemon juice. The tangy flavor is key to a great dessert. For a smooth filling, whisk thoroughly. Blend the coconut milk and powdered sugar until no lumps remain. If you want a creamier texture, add a bit more coconut milk. Taste the filling before pouring it over the crust. Adjust the sweetness if needed. Finally, when slicing, use a sharp knife. Clean the knife between cuts for neat squares. This way, you ensure each piece looks as good as it tastes! For the complete recipe, check out the Full Recipe section. {{image_2}} You can switch up the flavors in your no-bake lemon bars. Try using lime juice instead of lemon juice for a zesty twist. Orange juice can also add a sweet note. If you want something different, mix in some berries. Blueberries or raspberries work well. Just mash them and add to the filling. You can also change the crust. Use almond flour instead of graham cracker crumbs for a nutty flavor. These bars can fit many diets. For a vegan version, use maple syrup, coconut milk, and oil, which are all plant-based. To make them gluten-free, ensure your graham crackers are gluten-free or use almond flour. If you need a nut-free version, replace coconut with sunflower seeds. These swaps keep the bars delicious for everyone. Serving your no-bake lemon bars with toppings can elevate them. A dollop of coconut whipped cream adds creaminess. You can sprinkle some crushed nuts or shredded coconut for crunch. A drizzle of chocolate sauce can bring in sweetness. For a fresh touch, top with mint leaves or lemon slices. Each of these options adds a fun twist to the classic recipe. For the full recipe, check the earlier section. To keep your no-bake lemon bars fresh, store them in the fridge. Use an airtight container to prevent drying out. They will stay good for about 5-7 days. If you plan to keep them longer, consider freezing. To freeze no-bake lemon bars, first cut them into squares. Wrap each piece in plastic wrap. Then, place the wrapped bars in a freezer-safe bag or container. This method keeps them fresh for up to three months. When you’re ready to eat, just thaw them in the fridge overnight. These lemon bars are best served cold and do not need reheating. If you prefer them at room temperature, leave them out for about 30 minutes before serving. This way, they will still taste great and have the perfect texture. For a touch of flair, add a dusting of powdered sugar right before serving. No-bake lemon bars stay fresh for about 5 days in the fridge. Place them in an airtight container to keep them moist and tasty. If you want them to last longer, you can freeze them. Just wrap them well in plastic wrap and foil. They can last up to 2 months in the freezer. Yes, you can use bottled lemon juice. However, fresh lemon juice gives a brighter taste. Bottled juice may have added preservatives, which can change the flavor. If using bottled juice, look for a brand with no additives for the best taste. If your filling doesn’t set, it may need more time in the fridge. Check after a few hours; it might just need a bit longer. If it still feels runny, try adding more powdered sugar to thicken it. You can also chill it in the freezer for a quick fix. You can find the full recipe for no-bake lemon bars above. It includes all the steps and tips you need to make this delightful treat. Enjoy! You now know how to make delicious no-bake lemon bars. I covered the key ingredients, step-by-step instructions, and tips to perfect your bars. You can also find tasty variations for diet needs and ideas for storage. With these tools, you can create a treat everyone will enjoy. Dive in and make your own no-bake lemon bars today!

No-Bake Lemon Bars Easy and Tart Dessert Recipe

Looking for a refreshing treat that’s easy to make? These No-Bake Lemon Bars are tart, creamy, and perfect for any

This soup is simple and tasty. Here are the main ingredients you'll need: - 1 cup dried green or brown lentils, rinsed and drained - 1 medium onion, diced - 2 cloves garlic, minced - 2 medium carrots, diced - 2 celery stalks, diced - 1 can (14 oz) diced tomatoes - 4 cups vegetable broth - 1 teaspoon cumin - 1 teaspoon smoked paprika - 1 teaspoon dried thyme - 2 bay leaves - Salt and pepper to taste - 2 tablespoons olive oil To make your soup even better, consider these optional ingredients: - A handful of spinach or kale - Fresh parsley for garnish Adding spinach or kale boosts nutrition and adds color. Fresh parsley gives a bright finish to each bowl. Lentils are protein-rich and full of fiber. They help keep you full and satisfied. Onions and garlic add flavor and health benefits, like boosting your immune system. Carrots and celery provide vitamins and minerals. The spices, like cumin and smoked paprika, not only enhance taste but also offer anti-inflammatory properties. Overall, this soup is nourishing and comforting. For the full recipe, check out the details above. To start, gather all your ingredients. This makes the process smooth and fun. Here’s what you need: - 1 cup dried green or brown lentils, rinsed and drained - 1 medium onion, diced - 2 cloves garlic, minced - 2 medium carrots, diced - 2 celery stalks, diced - 1 can (14 oz) diced tomatoes - 4 cups vegetable broth - 1 teaspoon cumin - 1 teaspoon smoked paprika - 1 teaspoon dried thyme - 2 bay leaves - Salt and pepper to taste - 2 tablespoons olive oil - A handful of spinach or kale (optional) - Fresh parsley for garnish Now, wash your lentils under cold water. This helps remove dirt and any small stones. Next, chop your onion, garlic, carrots, and celery. Having everything ready saves time. Heat the olive oil in a large pot over medium heat. Add the diced onions and sauté them for 3-4 minutes. You want them to look clear. Then, toss in the minced garlic, carrots, and celery. Cook these for about 5-6 minutes until they soften. Next, stir in the cumin, smoked paprika, and dried thyme. Let them cook for one minute so the spices release their aroma. Now, add the rinsed lentils, diced tomatoes (with juice), and vegetable broth. Toss in the bay leaves and season with salt and pepper. Bring this mixture to a boil. After it boils, lower the heat. Let it simmer uncovered for around 30 minutes. You want the lentils to be tender but not mushy. If you choose to add spinach or kale, stir it in and cook for 5 more minutes. Before serving, don’t forget to remove the bay leaves. Adjust the seasoning to your taste, and garnish with fresh parsley. To get the best texture, avoid overcooking the lentils. They should be soft but still hold their shape. If you want a thicker soup, mash a few lentils with a fork. This adds creaminess without using dairy. For added flavor, consider sautéing the garlic for a minute before adding other veggies. You can also play with spices. Try a pinch of chili powder for heat or some lemon juice for brightness. Using good quality vegetable broth makes a big difference. It adds depth to the soup. Lastly, let the soup sit for a while before serving. This allows the flavors to mix well. For the complete cooking experience, refer to the Full Recipe. Enjoy your warm, hearty bowl of vegan lentil soup! When making lentil soup, avoid these common mistakes: - Not rinsing lentils: Always rinse them to remove dirt and debris. - Overcooking vegetables: Add delicate veggies like spinach late in cooking. - Skipping spices: These add depth, so don’t skip the cumin or smoked paprika. - Not tasting while cooking: Always taste and adjust seasoning as needed. To make your lentil soup bold, try these tips: - Use fresh herbs: Add fresh parsley or cilantro right before serving. - Add acid: A splash of lemon juice brightens the flavors. - Use homemade broth: Homemade vegetable broth has a richer taste than store-bought. - Incorporate umami: Add a tablespoon of miso or soy sauce for depth. Having the right tools makes cooking easier: - Heavy-bottomed pot: This helps distribute heat evenly. - Sharp knife: A sharp knife makes chopping vegetables quick and safe. - Measuring cups and spoons: Accurate measurements ensure great flavor balance. - Wooden spoon: Perfect for stirring without scratching your pot. Try these tips and tricks to elevate your vegan lentil soup experience! For the complete recipe, refer to the Full Recipe. {{image_2}} To give your vegan lentil soup a kick, try adding some heat. You can mix in red pepper flakes or diced jalapeños. If you want a smoky taste, add chipotle peppers in adobo sauce. These small changes can make your soup bold and exciting. You can also serve it with a side of hot sauce for those who love spice. For a creamy texture, blend part of the soup. Use an immersion blender or a regular blender. Blend until smooth, then stir it back into the pot. You can also add coconut milk for richness. This adds a lovely flavor and makes the soup velvety. It’s a great way to change up the classic recipe. You can use many types of lentils in this soup. Green and brown lentils are the most common choices. They hold their shape well during cooking. If you prefer a softer texture, use red lentils. They break down and create a thicker soup. Each type brings its own taste and texture, so feel free to experiment. To keep your leftover soup fresh, store it in an airtight container. Let it cool down first. Place it in the fridge if you plan to eat it within three days. For longer storage, use the freezer. This way, you can enjoy it later! If you want to freeze the soup, portion it out into smaller containers. Leave some space at the top. The soup will expand as it freezes. It can last up to three months in the freezer. Just remember to label the containers with the date! When you’re ready to enjoy your soup again, take it out of the fridge or freezer. If frozen, let it thaw overnight in the fridge. Reheat it on the stove over medium heat. Stir often to prevent sticking. For the best taste, add a splash of vegetable broth or water if it seems thick. Enjoy your delicious Vegan Lentil Soup! For the full recipe, check out the details above. Yes, you can cook Vegan Lentil Soup in a slow cooker. Just follow the same steps but adjust the timing. Combine all ingredients in the slow cooker. Set it to low for 6-8 hours or high for 3-4 hours. This method allows flavors to deepen and the soup to become very rich. It's a great option if you want to set it and forget it! Vegan Lentil Soup lasts about 5 to 7 days in the fridge. Store it in an airtight container for the best results. Make sure it cools down before sealing. If you notice any changes in smell or color, it’s best to toss it out. You can also freeze it for up to three months for longer storage. You can serve Vegan Lentil Soup with many tasty sides. Here are some great options: - Crusty bread for dipping - A fresh green salad - Rice or quinoa for added texture - A slice of avocado on top - Vegan grilled cheese for a cozy combo These pairings enhance the meal and make it more filling. Enjoy exploring different combinations! You now know how to make a tasty vegan lentil soup. We explored main ingredients, optional flavors, and the soup's health benefits. The step-by-step guide makes cooking easy and fun. We addressed common mistakes and shared tools for great results. You can even try spicy or creamy variations to mix things up. Remember to store leftovers properly for future meals. With these tips, you're set for soup success! Enjoy your cooking and stay healthy.

Vegan Lentil Soup Bold and Flavorful Recipe

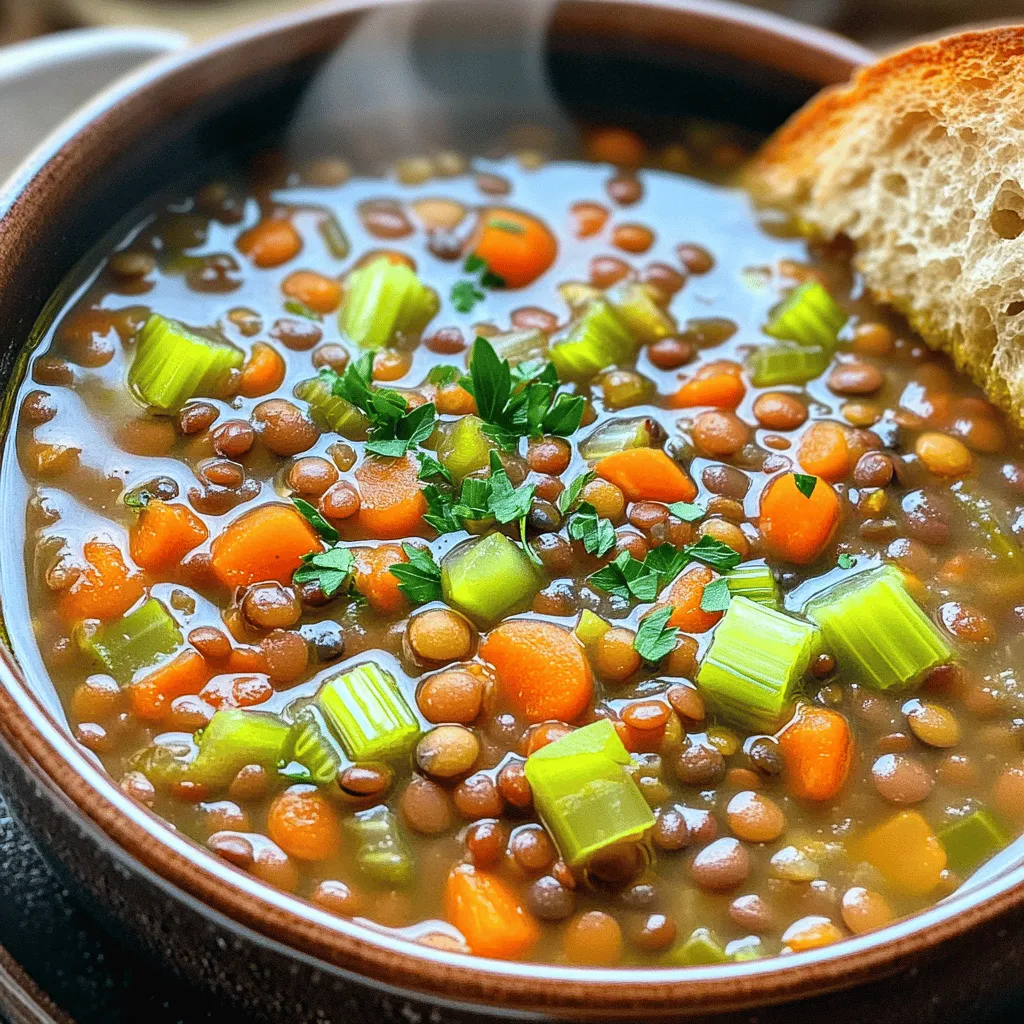
Ready to dive into a bowl of comfort? My Vegan Lentil Soup recipe is bold, flavorful, and packed with nutrients.

To make easy chicken fried rice, you need these key items: - 2 cups cooked rice (preferably day-old) - 1 cup cooked chicken, diced - 1 cup mixed vegetables (carrots, peas, bell peppers) - 2 eggs, lightly beaten - 3 tablespoons soy sauce - 2 tablespoons sesame oil - 1 tablespoon olive oil - 2 green onions, sliced - 2 cloves garlic, minced - Salt and pepper to taste These core ingredients give the dish its great taste and texture. Day-old rice works best because it is drier and won’t clump up. You can change up your chicken fried rice with these optional ingredients: - Cooked shrimp or tofu for different protein options - Other vegetables like broccoli or corn - Spices like ginger or chili flakes for added heat - Fresh herbs like cilantro for brightness Feel free to mix and match based on what you have on hand. This recipe is very flexible! If you don’t have an item, here are some easy swaps: - Use leftover turkey instead of chicken - Swap soy sauce with tamari for a gluten-free option - Olive oil can be replaced with vegetable or canola oil - Any frozen vegetable mix works in a pinch These substitutions keep your dish tasty while making cooking easier. Don't worry if you can't find every ingredient; you can still make a delicious meal. For the complete cooking process, check out the Full Recipe. First, gather your ingredients. You need cooked rice, chicken, mixed veggies, and green onions. Make sure your rice is cold and not sticky. Chop your chicken into small pieces. Cut the mixed vegetables into bite-sized bits. Slice the green onions thinly. Mince the garlic as well. This prep makes cooking faster. Now, heat your olive oil and sesame oil in a large skillet or wok. Use medium-high heat. Once the oil shimmers, add the minced garlic. Sauté it for about 30 seconds until it smells great. Next, push the garlic to one side of the skillet. Pour in the beaten eggs and scramble them until fully cooked. Mix the eggs with the garlic. Add the diced chicken and mixed vegetables to the skillet. Stir-fry all this for about 3 to 5 minutes. You want the veggies to be tender but still colorful. Now, add the cold rice to the pan. Break up any clumps as you stir. Pour the soy sauce over the rice mixture and stir well. Season with salt and pepper to taste. Finally, stir in the sliced green onions. Cook everything for another 1 to 2 minutes until hot. Remove from heat to stop cooking. To serve, scoop the chicken fried rice into bowls. You can garnish with more green onions. Drizzle some sesame oil on top for extra flavor. Enjoy your easy chicken fried rice, which is simple and tasty! For the full recipe, check the earlier section. To make perfect fried rice, start with day-old rice. Fresh rice has too much moisture. Cold rice helps it fry well. Use a large skillet or wok for cooking. This gives you space to stir. Always keep the heat high. This lets the rice get crispy edges. Stir-frying is quick. You must work fast. Heat the oil until it shimmers. Add garlic first; it gives flavor. Push it aside to scramble eggs. This makes it easier to mix later. Add your chicken and veggies next. Stir them for a few minutes until they soften. Then, add the rice and soy sauce. Mix it well to coat every grain. One mistake is using too much oil. This can make the dish greasy. Another is not breaking up the rice. Clumps can form and make it hard to fry. Avoid overcooking the eggs. They should be fluffy, not dry. Lastly, don’t skip the green onions. They add freshness and color to your dish. For more detailed steps, check the Full Recipe. {{image_2}} You can make a tasty vegetarian fried rice. Just skip the chicken. Use more veggies like mushrooms, spinach, or zucchini. You can also add tofu for protein. Tofu soaks up flavors well and adds great texture. If you want variety, try shrimp or pork. Shrimp cooks fast and adds a nice seafood taste. You can also use diced ham or beef. Each option brings its own flavor and flair to the dish. To boost flavor, add a splash of rice vinegar or chili sauce. You can also mix in nuts like cashews for crunch. Fresh herbs like cilantro or basil can brighten each bite. For extra richness, drizzle sesame oil on top just before serving. Each tweak makes the dish unique and fun. For the full recipe, check the section above. To keep your chicken fried rice fresh, place it in an airtight container. Let it cool to room temperature first. Then, store it in the fridge for up to 3 days. Make sure to label the container with the date. This helps you track how long it has been stored. When you are ready to eat leftovers, use a skillet or microwave. If using a skillet, heat it over medium heat. Add a splash of water or oil to help steam the rice. Stir often for even heating. If using a microwave, place the rice in a microwave-safe bowl. Cover it with a damp paper towel to keep moisture in. Heat in 1-minute intervals until hot. For longer storage, you can freeze chicken fried rice. Place it in a freezer-safe container or a zip-lock bag. Remove as much air as possible to prevent freezer burn. It will stay good for up to 2 months. When ready to use, thaw it overnight in the fridge. Then, reheat as mentioned above. This method keeps the flavors intact, letting you enjoy your meal later. For the full recipe, check out the Easy Chicken Fried Rice section! You can use fresh rice, but day-old rice works best. Fresh rice is moist and sticky. It clumps together when you fry it. Day-old rice is drier and easier to stir-fry. For best results, make your rice a day in advance. You can add many vegetables to fried rice. Some great options include: - Broccoli - Corn - Snow peas - Zucchini - Mushrooms Feel free to mix and match based on what you have on hand. The more colorful, the better! To make chicken fried rice gluten-free, swap regular soy sauce for gluten-free soy sauce. Tamari is a good option. Check that your other sauces are also gluten-free. This way, you can enjoy the same great taste without gluten. Chicken fried rice is a complete meal. You can serve it alone or with sides like: - Egg rolls - Dumplings - A side salad - Steamed vegetables These sides add variety and texture to your meal. Yes, this recipe is great for meal prep! You can make a big batch and store it. Keep it in airtight containers in the fridge. It lasts for up to four days. Just reheat it when you're ready to eat! For the full recipe, check out the recipe section. In this post, we covered how to make easy chicken fried rice. We explored essential and optional ingredients, plus great substitutions. You learned step-by-step how to prepare, cook, and serve. I shared tips to avoid common mistakes. We looked at variations for all diets and how to store leftovers. Remember, fried rice is fun and flexible. Enjoy experimenting with flavors and ingredients. Now you can impress family and friends with your meal!

Easy Chicken Fried Rice Simple and Flavorful Recipe

Welcome to my simple guide for making Easy Chicken Fried Rice! This dish is quick to prepare, packed with flavor,

- Chicken and Marinade Components - 2 boneless, skinless chicken breasts - 3 tablespoons olive oil - 3 teaspoons ground cumin - 3 teaspoons ground paprika - 2 teaspoons ground turmeric - 1 teaspoon ground cinnamon - 1 teaspoon cayenne pepper (adjust to taste) - 4 cloves garlic, minced - Juice of 1 lemon - Salt and pepper to taste For the chicken, you want to start with good quality breasts. The olive oil helps keep the chicken moist. The spices add a lot of flavor. Cumin and paprika give warmth, while turmeric and cinnamon bring depth. Cayenne adds a kick, but you can adjust it based on your taste. Garlic and lemon juice are key for brightness. - Vegetables and Grains - 1 cup cooked quinoa or couscous - 1 cup cherry tomatoes, halved - 1 cup cucumber, diced - ½ red onion, thinly sliced Quinoa or couscous makes a great base. They both soak up flavors well. The cherry tomatoes add sweetness, while cucumbers give crunch. Red onion adds a sharp taste. Feel free to mix and match with your favorite veggies. - Tzatziki Sauce and Garnish - ½ cup tzatziki sauce (store-bought or homemade) - Fresh parsley, chopped, for garnish Tzatziki sauce cools the dish and adds creaminess. You can buy it or make your own. Fresh parsley brightens up the bowl, adding a nice touch. This combination of ingredients makes your Chicken Shawarma Bowl fresh and flavorful. For the full recipe, check the details above. To start, you need to make a tasty marinade. In a bowl, mix together: - 3 tablespoons olive oil - 3 teaspoons ground cumin - 3 teaspoons ground paprika - 2 teaspoons ground turmeric - 1 teaspoon ground cinnamon - 1 teaspoon cayenne pepper (adjust to taste) - 4 cloves garlic, minced - Juice of 1 lemon - Salt and pepper to taste This mix gives the chicken a great flavor. Make sure to coat the chicken well. Place the chicken breasts in the marinade and cover them. Let them sit in the fridge for at least one hour. If you have time, marinate overnight. This helps the flavors soak in. Preheat your oven to 400°F (200°C) or heat your grill pan over medium-high heat. Take the marinated chicken out of the fridge. Place it on a baking sheet lined with parchment paper or directly on the grill. Cook the chicken for 20-25 minutes. It should reach an internal temperature of 165°F (74°C). Once done, take the chicken out and let it rest for 5 minutes. This makes it juicier. After resting, slice it into strips. Now it’s time to put your Chicken Shawarma Bowls together! Start with a base of cooked quinoa or couscous in each bowl. Then, add the sliced chicken. Top it off with: - 1 cup cherry tomatoes, halved - 1 cup cucumber, diced - ½ red onion, thinly sliced Drizzle tzatziki sauce over everything. You can use store-bought or homemade. Finally, sprinkle fresh parsley on top for a pop of color. Your Chicken Shawarma Bowls are ready to enjoy! For the full recipe, check the sections above. Marinating is key for great taste. It helps the chicken soak up all the spices. I recommend marinating the chicken for at least an hour. For even better flavor, let it sit overnight. Use a mix of olive oil, spices, garlic, and lemon juice. This combo gives the chicken a rich and zesty flavor. You can cook the chicken in two ways: oven or grill. The oven method is simple. Preheat your oven to 400°F (200°C). Place the marinated chicken on a baking sheet. Roast for 20 to 25 minutes until cooked through. The grill gives a nice smoky taste. Heat a grill pan over medium-high heat and grill the chicken for the same time. Both methods yield juicy chicken! The way you serve the chicken matters. Start with a base of quinoa or couscous in a bowl. Layer on the sliced chicken and veggies like cherry tomatoes and cucumbers. Add red onion for crunch. Drizzle with tzatziki sauce for creaminess. Finish with a sprinkle of fresh parsley for color. This not only tastes good but looks great too. For the full recipe, check out the instructions above. {{image_2}} You can easily switch the chicken for beef or tofu. Use thin slices of beef for a rich flavor. Marinate it just like the chicken for the best taste. If you choose tofu, press it first to remove extra water. Then, cut it into cubes and marinate. Both options give a delicious twist to your bowl. For a gluten-free meal, use quinoa instead of couscous. Quinoa is high in protein and easy to cook. It adds a nice nutty flavor that pairs well with the spices in the chicken. Just rinse it before cooking to remove the bitter coating. This way, you can enjoy your Chicken Shawarma Bowls guilt-free. You can adjust the spice level to suit your taste. If you like it spicy, add more cayenne pepper to the marinade. For a mild option, skip the cayenne and use sweet paprika instead. You can also add fresh herbs, like cilantro or mint, for a unique flavor. Experiment with these changes to make the dish your own. For the complete recipe, check out the Full Recipe section. After enjoying your Chicken Shawarma Bowls, store any leftovers in an airtight container. This helps keep the dish fresh. Place it in the fridge for up to three days. Make sure to separate the chicken from the grains and veggies, if possible. This keeps everything from getting soggy. You can freeze your Chicken Shawarma Bowls for a quick meal later. Use freezer-safe containers or bags. Just be sure to cool the dish completely first. You can freeze the chicken and grains together. However, it's best to keep the fresh veggies and sauce separate. They taste better when added fresh. To reheat your Chicken Shawarma Bowls, use the microwave or oven. For the microwave, place the bowl in for about two minutes on high. Stir halfway through for even heating. If using the oven, set it to 350°F (175°C). Cover the bowl with foil to keep moisture in. Heat for about 10-15 minutes. Check that the chicken is hot all the way through before serving. Enjoy your meal again! You can find the full recipe for these tasty bowls to recreate this delicious dish. A Chicken Shawarma Bowl is a tasty meal made with marinated chicken. The chicken is spiced with cumin, paprika, and other warm spices. You serve it over grains like quinoa or couscous. Fresh veggies like tomatoes and cucumbers add crunch. A drizzle of tzatziki sauce brings creaminess. You get a mix of flavors and colors in one bowl. It's a fun way to enjoy Middle Eastern flavors. You can prepare parts of the Chicken Shawarma Bowl ahead of time. Start by marinating the chicken. You can do this the night before. Just store it in the fridge until you are ready to cook. Cooked quinoa or couscous can also be made ahead. Store it in an airtight container. Chop the veggies and store them separately. This way, you can assemble your bowls quickly when it's time to eat. You can serve many sides with Chicken Shawarma Bowls. Here are some ideas: - Pita bread for a crunchy side - Hummus for dipping - A simple green salad for freshness - Roasted vegetables for extra flavor - Pickles for a tangy bite These sides add variety and make your meal more fun. Enjoy mixing and matching! In this blog post, we explored the key ingredients for Chicken Shawarma Bowls. We discussed how to prepare the marinade, cook the chicken, and assemble the bowls. I shared tips for marinating and cooking, plus ideas for presentation. Remember, you can swap proteins or change flavors to fit your taste. This dish is flexible and fun to make. With proper storage, leftovers can be enjoyed later. By following these steps, you can create delicious meals that impress. Enjoy your cooking adventure!

Chicken Shawarma Bowls Fresh Flavorful Meal Idea

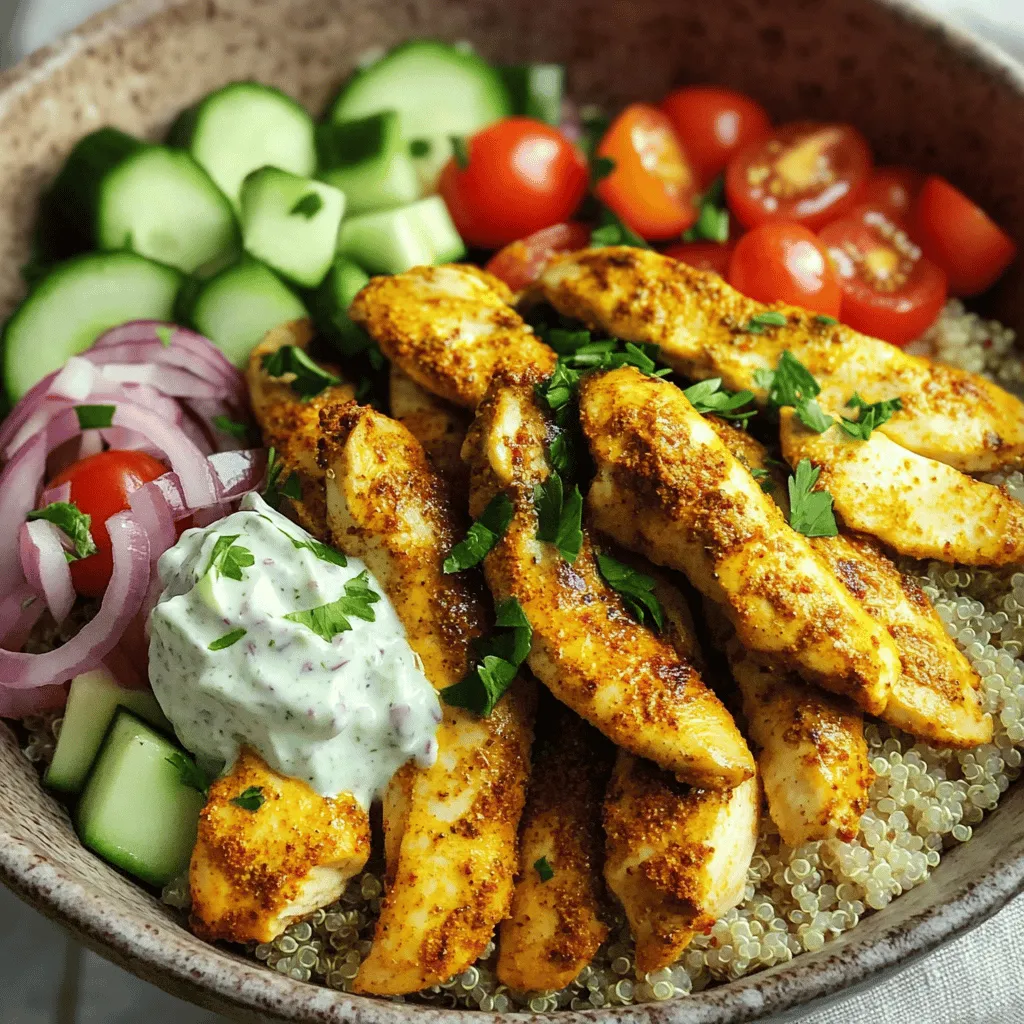
Looking for a fresh, flavorful meal idea that’s easy to make? Chicken Shawarma Bowls are a perfect choice! You’ll love

To make a Tropical Green Smoothie, gather these fresh ingredients: - 1 cup fresh spinach leaves - 1 ripe banana, sliced - 1 cup diced pineapple (fresh or frozen) - 1/2 ripe avocado - 1/2 cup coconut water - 1/2 cup unsweetened almond milk - 1 tablespoon chia seeds - 1 tablespoon shredded coconut (optional) These ingredients work together to create a smooth and tasty drink. Spinach adds green goodness. The banana gives a creamy texture. Pineapple adds a sweet, tropical twist. Avocado makes it rich and filling. Coconut water hydrates, while almond milk keeps it light. Chia seeds boost nutrition and add fiber. You can also top it with shredded coconut for a fun touch. This smoothie packs a punch of vitamins and minerals. Here are some of the highlights: - Spinach is rich in iron and vitamins A, C, and K. - Banana provides potassium and vitamin B6. - Pineapple offers vitamin C and manganese. - Avocado is full of healthy fats and fiber. - Coconut water hydrates and has electrolytes. - Almond milk is low in calories and has vitamin E. - Chia seeds are high in omega-3 fatty acids and antioxidants. Now let’s look at the health benefits. Spinach helps with blood health. Bananas boost energy and heart health. Pineapple supports digestion. Avocado aids in heart health and weight management. Coconut water helps keep you hydrated. Almond milk provides a dairy-free option. Chia seeds promote gut health and fullness. In total, this smoothie is low in calories, making it a great snack or light meal option. The Tropical Green Smoothie yields about two servings. Each serving is about 1 cup. This makes it perfect for sharing or enjoying later. You can adjust the servings by doubling the recipe if you have more people. Enjoy this smoothie as a healthy breakfast or a refreshing snack during the day. For the full recipe, check out the Tropical Green Smoothie section above. 1. Washing and preparing spinach: Begin by rinsing one cup of fresh spinach leaves under cold water. Make sure to remove any dirt or grit. After rinsing, gently shake off the excess water and set the spinach aside. It’s important to use fresh spinach for the best taste and nutrients. 2. Chopping fruits for blending: Next, chop your fruits. Slice one ripe banana and dice one cup of pineapple. If you're using frozen pineapple, there's no need to thaw it first. Also, cut half of a ripe avocado in half, remove the pit, and scoop out the flesh. These fresh fruits will give your smoothie a sweet, tropical flavor. 1. Layering ingredients in the blender: Start by adding the washed spinach leaves to the blender. Then, layer in the sliced banana, diced pineapple, and avocado. This order helps the blender mix everything smoothly. 2. Choosing the right blending speed: Pour in half a cup of coconut water and half a cup of unsweetened almond milk. Blend on high speed until the mixture is smooth and creamy. If you like it colder, add ice cubes and blend again. You want a nice, thick consistency that feels refreshing. 1. Pouring the smoothie: Once blended, pour the smoothie into glasses or bowls. It should have a vibrant green color with a creamy texture. 2. Garnishing tips for presentation: To make your smoothie look even better, sprinkle some chia seeds on top. You can also add a few pieces of fresh pineapple or coconut for a fun touch. Using colorful straws can add a playful vibe to your drink. For the full recipe, check out the Tropical Green Smoothie section! To get the right thickness, you can play with the amount of liquid. If your smoothie is too thick, add more coconut water or almond milk. If it's too thin, add a bit more spinach or banana. You can also use frozen fruits instead of fresh ones. Frozen fruits make your smoothie colder and creamier. Adding ice cubes can work, but frozen fruit is a better choice for a thicker texture. For a touch of sweetness, try using honey or agave syrup. These natural sweeteners blend well and add nice flavor. If you want to balance flavors, add a bit more banana or pineapple. These fruits are sweet and can help enhance the taste without being overpowering. Taste your smoothie before serving. Adjust the sweetness to suit your own taste. A high-speed blender works best for smoothies. It breaks down the ingredients smoothly, giving you a creamy drink. If you don’t have one, a regular blender can still work. Just blend a bit longer. After making your smoothie, cleaning up is key. Rinse your blender right away to avoid stuck bits. For a deep clean, fill it with warm water and a drop of soap. Blend for a minute, then rinse. This keeps your blender ready for the next delicious drink. For the complete recipe, check out the [Full Recipe]. {{image_2}} You can make your Tropical Green Smoothie even better by adding more fruits. Try mango or kiwi for a sweet twist. Passion fruit can add a fun tang. Seasonal fruits are great too. In summer, use fresh berries. In winter, try oranges or pears. Each fruit gives a different flavor and nutrition. Mixing in different greens can change your smoothie. Kale adds a bolder taste. Swiss chard offers a mild flavor. You can also try herbs like mint or basil. These herbs add freshness and a nice aroma. Experiment with these to find your favorite combo. If you follow a vegan diet, this recipe works perfectly. It is already vegan and gluten-free. You can add protein sources like nut butter or protein powder. This helps keep you full longer. If you want a creamier texture, try using cashew milk instead of almond milk. To keep your Tropical Green Smoothie fresh, store it in the fridge. Use an airtight container. This will help to keep it from losing flavor or nutrients. You should drink it within 24 hours for the best taste. After that, it may start to separate or lose its vibrant color. If you want to save your smoothie for later, freezing is a great option. Pour the smoothie into ice cube trays or freezer-safe bags. Once frozen, you can store the cubes in a bag for easy use. To thaw, simply place the cubes in the fridge overnight. You can also blend the frozen smoothie again for a quick drink. If you have some smoothie left in the fridge, don’t waste it! Use it in your oatmeal or yogurt for breakfast. You can also add it to pancakes or waffles for a fruity twist. Get creative! You can mix it into salad dressings for a sweet touch or even use it in popsicles for a refreshing treat. To sweeten your Tropical Green Smoothie, you have a few options. You can use natural sweeteners like honey or agave syrup. These will add a nice sweetness without changing the smoothie’s taste too much. You can also add more fruit. Bananas and ripe pineapples are great choices. They add natural sugars, making your drink sweeter and more flavorful. Yes, you can use different greens! While spinach is a great base, you can try kale or Swiss chard. Each green has its own flavor. Kale is a bit stronger, while Swiss chard is mild. Mixing different greens can add nutrition and change the taste of your smoothie. Both fresh and frozen fruit have benefits. Fresh fruit can give a bright taste and texture. However, frozen fruit makes the smoothie colder and creamier. Using frozen fruit can also save time. I often keep frozen fruit on hand for quick smoothies. Choose what works best for your taste. You can store your Tropical Green Smoothie in the fridge for up to 24 hours. Make sure to use an airtight container. If you want to keep it longer, freeze it. A frozen smoothie can last for up to a month. Just remember to let it thaw in the fridge before drinking. You learned how to make a tasty Tropical Green Smoothie. We covered fresh ingredients, recipe steps, and storage tips. Each component gives you vitamins and flavor. Adjust sweetness and texture to your liking. Enjoy exploring different fruits and greens. Repurpose leftovers for new meals. Make this smoothie a fun part of your day! By following these tips, you create a delicious and healthy treat every time. Now, blend and enjoy your own unique twist on this refreshing drink!

Tropical Green Smoothie Refreshing and Nourishing Drink

Looking for a drink that refreshes and nourishes? The Tropical Green Smoothie is just what you need! Packed with vibrant

- 1 pint fresh strawberries, hulled and washed - 1 cup dark chocolate chips (or milk chocolate, if preferred) - 1 tablespoon coconut oil (optional for smoothness) - 1/4 cup crushed nuts (e.g., almonds, pistachios) - 1/4 cup shredded coconut (optional) - Sea salt for garnish To make chocolate-covered strawberry bites, you need fresh strawberries. I always choose ripe ones for the best flavor. The chocolate is key, too. I use dark chocolate chips, but milk chocolate works great as well. If you want a smooth finish, add coconut oil. It helps the chocolate coat better. For a fun twist, I like to use crushed nuts or shredded coconut on top. They add a nice crunch! A sprinkle of sea salt also enhances the flavors. You can get all these ingredients at your local store. Check for fresh strawberries, and choose good quality chocolate. This recipe is simple and fun. Let your creativity flow as you mix and match toppings! For the full recipe, you can refer to the section above. - Line a baking sheet with parchment paper. - Prepare strawberries by hulling and washing them. To start, you want to make sure your baking sheet is ready. The parchment paper helps keep the strawberries from sticking. Next, take your strawberries and remove the green tops. Rinse them under cold water to clean them well. Dry them gently with a paper towel. This step is key for a smooth chocolate coat. - Combine chocolate chips and coconut oil in a heatproof bowl. - Microwave in intervals and stir until fully melted. For the chocolate, I like to use dark chocolate chips. You can also use milk chocolate if you prefer. Put the chocolate chips in a heatproof bowl. Add a tablespoon of coconut oil. This oil makes the chocolate smooth and shiny. Microwave the bowl in 30-second bursts. Stir the chocolate after each burst. Be patient and don’t overheat it, or it may seize up. - Dip each strawberry in melted chocolate. - Place on the prepared baking sheet and sprinkle with toppings. Once your chocolate is melted and smooth, it’s time to dip! Grab a strawberry by the top and dip it into the chocolate. Make sure to coat the whole berry. Let any extra chocolate drip off. Place the dipped strawberry on the baking sheet. While the chocolate is still wet, sprinkle toppings like crushed nuts or shredded coconut. This adds a fun crunch and flavor. - Chill in the refrigerator until chocolate hardens. - Enjoy your homemade chocolate covered strawberry bites! After dipping, pop the baking sheet into the fridge. Chill the strawberries for about 30 minutes. This helps the chocolate harden and set. Once they are firm, they are ready to eat! Enjoy your chocolate covered strawberry bites as a sweet treat. You can find the full recipe for even more details. When making chocolate-covered strawberry bites, selecting the right chocolate is key. You can use dark or milk chocolate based on your taste. Dark chocolate offers a rich flavor and a slight bitterness, while milk chocolate is sweeter and creamier. For high-quality chocolate, I recommend brands like Ghirardelli, Callebaut, or Guittard. These brands melt smoothly and taste fantastic. Look for chocolate that contains cocoa butter for the best results. To get an even coating on your strawberries, dip them carefully into the melted chocolate. Make sure the chocolate covers the strawberry fully. Use a fork to lift the strawberry out of the chocolate. This helps tap off excess chocolate before placing it on the baking sheet. Tapping the fork against the bowl's edge can help remove extra chocolate. This step keeps your bites from being too thick or messy. To add crunch and flavor, try different toppings. You can use crushed nuts like almonds or pistachios. Shredded coconut is also a great choice for a tropical flair. For a nice presentation, sprinkle a pinch of sea salt on top while the chocolate is still wet. This small touch enhances the chocolate flavor and makes your bites look gourmet. These tips will help you create delicious chocolate-covered strawberry bites that impress everyone! For the complete process, refer to the Full Recipe. {{image_2}} You can make chocolate-covered strawberry bites even more fun by adding flavors. One way is to infuse the chocolate with extracts. You can use vanilla or mint extract to give a nice twist. Just add a few drops to the melted chocolate. Another great option is to use different types of chocolate. White chocolate adds a creamy taste. You can also try specialty flavored chocolates, like raspberry or caramel. These will give your bites a unique flavor that tastes amazing. If you want a healthier treat, you have options. You can use sugar-free chocolate chips. They taste just as good but have less sugar. Dairy-free chocolate is another great choice for those with allergies. For toppings, think about using nuts, seeds, or dried fruits. These add crunch and nutrition. You can use crushed almonds or pistachios for a nutty flavor. Keep it fresh and tasty with these healthier choices. For the full recipe, check out the section above. To keep your chocolate-covered strawberries fresh, store them in the fridge. Place them in a single layer in an airtight container. This will help stop moisture and air from ruining the chocolate. Avoid stacking them, as they can stick together. You can enjoy these treats within two days for the best taste. Can chocolate-covered strawberries be frozen? Yes, but they might not taste the same once thawed. The chocolate may get a bit dull, and the strawberries can become mushy. If you still want to freeze them, follow these steps: 1. Prepare the strawberries: Let them cool completely after dipping them in chocolate. 2. Arrange on a baking sheet: Place them in a single layer on a baking sheet lined with parchment paper. 3. Freeze: Put the baking sheet in the freezer for about two hours, or until they are firm. 4. Store in a bag: Once frozen, transfer the strawberries to a resealable bag. Remove as much air as possible before sealing. 5. Label and date: Write the date on the bag. Use them within three months for the best flavor. Try to enjoy them fresh, but freezing is an option if you have leftovers. For the full recipe, check out the earlier sections. Chocolate-covered strawberries can last for about 2 to 3 days in the fridge. To keep them fresh, store them in a sealed container. Avoid washing the strawberries before dipping. Moisture can make them spoil faster. Place parchment paper between layers to prevent sticking. Yes, you can make chocolate-covered strawberries in advance. Make them up to 24 hours ahead. For best results, store them in the fridge. They taste best when fresh, so try not to wait too long. Some popular toppings include: - Crushed nuts (like almonds or pistachios) - Shredded coconut - Sprinkles - Sea salt These add flavor and crunch. Mix and match toppings for fun combinations! Absolutely! You can use dark, milk, or white chocolate. Each type has a unique taste. Dark chocolate is rich and bold. Milk chocolate is sweet and creamy. White chocolate adds a sweet, buttery flavor. Just remember, each type may melt differently. Making chocolate-covered strawberries is fun and easy. You need fresh strawberries, chocolate chips, and toppings. Follow simple steps to melt chocolate, dip strawberries, and chill them. You can use different chocolates and toppings for variety. Store them well to keep them fresh. In conclusion, enjoy these bites as a treat or share with friends. Experiment with flavors and toppings to make it your own. Now you have a tasty dessert that’s sure to impress!

Chocolate Covered Strawberry Bites Delightful Treats

Looking for a sweet and simple treat? Chocolate Covered Strawberry Bites are quick to make and impossible to resist! With

Older posts
Newer posts
← Previous Page1 … Page5 Page6 Page7 … Page68 Next →

dsad

© 2025 So Yum Recipes • Built with GeneratePress

Our Policies

  • Copyright Policy
  • Cookie Policy
  • GDPR Policy
  • Privacy Policy
  • Disclaimer
  • Terms Of Use

More Information

  • Home
  • About
  • Contact
  • Appetizers
  • Dessert
  • Dinner
  • Drinks
©2025, So Yum Recipes About Back To Top