Skip to content
DisclaimerTerms Of UseGDPR PolicyCookie Policy

So Yum Recipes

  • Home
  • Drinks
  • Appetizers
  • Dinner
  • Dessert
  • About
  • Contact
  • Privacy Policy
DisclaimerTerms Of UseGDPR PolicyCookie Policy

Chloe

- Pasta Selection: - 8 oz (225g) fettuccine or your favorite pasta - Salmon Fillets: - 2 salmon fillets (about 6 oz each) - Creamy Sauce Components: - 3 tablespoons olive oil - 4 cloves garlic, minced - 1 cup heavy cream - 1/2 cup grated parmesan cheese - Fresh Additions: - 1 cup baby spinach - 1 tablespoon lemon juice - Fresh parsley, chopped, for garnish - Seasoning: - Salt and pepper to taste This creamy garlic salmon pasta is a delight. First, choose your pasta. Fettuccine works great, but any pasta will do. Next, we need two salmon fillets. They should be about six ounces each. For the creamy sauce, gather olive oil, garlic, heavy cream, and parmesan cheese. Add some fresh spinach for color and nutrients. A splash of lemon juice brightens the dish. Don't forget salt and pepper to enhance all the flavors. You can find the full recipe [here](#). Start by boiling water in a large pot. Add a good pinch of salt to flavor the pasta. Once the water boils, add 8 oz of your favorite pasta. I prefer fettuccine for its nice texture. Cook according to package instructions until it is al dente. This usually takes about 8 to 10 minutes. Remember to reserve 1/2 cup of pasta water before draining. This starchy water helps the sauce stick later. For the salmon, heat 2 tablespoons of olive oil in a large skillet over medium heat. Season your two salmon fillets with salt and pepper. When the oil is hot, place the salmon skin-side down in the skillet. Cook for about 4 to 5 minutes until golden brown. Flip the fillets and cook for another 3 to 4 minutes. This method ensures even cooking and a lovely crust. Once done, take it out and set it aside. In the same skillet, add the last tablespoon of olive oil. Toss in 4 minced garlic cloves and sauté for about 1 to 2 minutes. You want the garlic fragrant but not browned. Next, pour in 1 cup of heavy cream. Bring it to a gentle simmer. Stir in 1/2 cup of grated parmesan cheese, letting it melt into the sauce. If it gets too thick, add your reserved pasta water slowly until you reach the right consistency. Now, add the cooked pasta and 1 cup of baby spinach to the sauce. Toss everything together, ensuring the pasta is well coated. Squeeze in 1 tablespoon of fresh lemon juice for brightness. Flake the cooked salmon into large chunks. Gently fold it into the pasta, being careful not to break it apart too much. This step adds a lovely texture and flavor to your dish. Enjoy the process, and savor the smell of your creamy garlic salmon pasta. If you want, check out the Full Recipe for more details. To make the sauce just right, you can adjust its thickness. If it feels too thick, add some reserved pasta water. This helps create a smooth, creamy texture. You can also enhance the flavor by mixing in cheese or fresh herbs. For example, adding a bit of fresh basil or dill can make the sauce sing. You can cook the salmon in different ways. Baking or grilling are great options if you want a smoky flavor. Just be sure to season your salmon well. Try using lemon zest, dill, or even a bit of paprika for a twist. Each method brings a unique taste to the dish. For side dishes, think about light and fresh options. A simple green salad pairs well with the pasta. Roasted vegetables or garlic bread are also tasty choices. When serving, arrange the pasta nicely on the plate. Top it with the salmon pieces and a sprinkle of parsley for a beautiful touch. You want it to look as good as it tastes! For the full recipe, check out the Creamy Garlic Salmon Pasta. {{image_2}} You can easily change the pasta. Try whole grain or gluten-free pasta. They taste great and keep it healthy. If you want a different protein, use chicken or shrimp. Both options work well with the creamy sauce. Add some colorful veggies to your dish. Bell peppers or broccoli can boost the flavor and nutrition. If you like heat, sprinkle in some red pepper flakes. They add a nice kick and make the dish exciting. Looking for lighter options? Use low-fat milk or yogurt instead of heavy cream. They can still give you a creamy feel without all the fat. If you need a dairy-free sauce, try coconut milk or cashew cream. Both options keep the dish rich and tasty without dairy. For the Full Recipe, you can visit the link provided. To store your creamy garlic salmon pasta, let it cool first. Place it in an airtight container. This keeps it fresh and tasty. It will last in the fridge for 2 to 3 days. When you want to eat it again, just take it out. You can freeze this dish, but I suggest freezing the pasta and sauce separately. This helps keep the pasta from getting soggy. The salmon is great fresh, so add it when reheating. Wrap each part tightly to avoid freezer burn. For best quality, use within 3 months. For reheating, I prefer the stovetop method. It helps keep the creaminess. Add a splash of water or broth to the pan. Heat on medium until warm. Stir gently to mix the sauce back in. You can use a microwave too, but be careful. Heat in short bursts to avoid drying it out. To keep salmon moist, I suggest a few key tips. First, avoid overcooking the fish. Cook it just until it flakes easily with a fork. Use a medium heat to sear the salmon. This helps it cook evenly. You can also marinate the salmon for extra flavor and moisture. A simple mix of olive oil, lemon juice, and herbs works well. Finally, let the salmon rest after cooking. This allows the juices to redistribute, keeping each bite juicy. Yes, you can switch up the pasta! While I love fettuccine, other options work great too. Penne, spaghetti, or even whole wheat pasta can be used. If you prefer gluten-free, try brown rice or chickpea pasta. Just make sure to adjust the cooking time according to the pasta you choose. Absolutely! To make this dish dairy-free, swap the heavy cream with coconut cream or a dairy-free alternative. For cheese, use nutritional yeast or a vegan parmesan. These options still give a rich flavor without dairy. Always check the labels to ensure they fit your dietary needs. This dish pairs well with many sides. A fresh green salad brightens the meal. Roasted vegetables like asparagus or broccoli add great color and taste. Garlic bread can also be a nice touch for soaking up the creamy sauce. To scale up the recipe, simply increase the ingredient amounts. For every extra serving, add more pasta, salmon, and sauce. A good rule is to plan for about 4 oz of pasta and 6 oz of salmon per person. Keep an eye on cooking times, especially for the salmon, as it may take longer in larger batches. Yes, you can prepare this dish ahead of time! Cook the pasta and sauce separately. Store them in airtight containers in the fridge. When ready to serve, reheat the sauce and pasta together on low heat. Add the salmon just before serving to keep it fresh. This way, you enjoy a tasty meal without all the fuss on busy nights. You can find the Full Recipe to guide you through the process. This blog post covered how to make creamy garlic salmon pasta. We discussed ingredients, cooking steps, and helpful tips. You learned about pasta, salmon, and the rich sauce. Experiment with variations and enjoy fresh flavors. Proper storage ensures your leftovers taste great. Choose the best methods for reheating. You can serve this delicious dish with sides for a complete meal. Keep these tips in mind to create a lovely dinner. Happy cooking!

Creamy Garlic Salmon Pasta Savory Dinner Delight

Looking for a simple yet scrumptious dinner option? Creamy Garlic Salmon Pasta will make your taste buds dance! This dish

To make these delightful cookies, you need simple, fresh ingredients. Here’s the list: - 1 cup cream cheese, softened - 1/2 cup unsalted butter, softened - 1/2 cup granulated sugar - 1/4 cup brown sugar, packed - 1 egg - 1 teaspoon vanilla extract - 2 cups all-purpose flour - 1 teaspoon baking powder - 1/2 teaspoon baking soda - 1/4 teaspoon salt - 1 cup fresh blueberries (or frozen, thawed and drained) - 1/2 cup white chocolate chips (optional) - Zest of 1 lemon (for a fresh twist) These key ingredients help create the rich cheesecake flavor and the sweet blueberry burst. You can add a few optional ingredients for a twist. Consider these additions: - 1/2 cup white chocolate chips for a sweet touch - Zest of 1 lemon for a fresh, citrusy kick - A dash of cinnamon for warmth These extras can enhance the taste and make your cookies unique! Gathering the right tools makes baking easier. Here’s what you need: - Mixing bowls - Electric mixer - Measuring cups and spoons - Cookie scoop or tablespoon - Baking sheet - Parchment paper - Wire rack for cooling With these tools, you will prepare your cookies with ease. For the full recipe, check out the details provided earlier. First, set your oven to 350°F (175°C). This step is key for even baking. While the oven warms up, line a baking sheet with parchment paper. The paper keeps the cookies from sticking to the pan. In a large bowl, mix 1 cup of softened cream cheese and 1/2 cup of unsalted butter. Use an electric mixer to beat them together until smooth. Next, slowly add 1/2 cup of granulated sugar and 1/4 cup of brown sugar. Mix until fluffy. Then, add 1 egg and 1 teaspoon of vanilla extract. Beat the mixture until it is well blended. In a separate bowl, combine 2 cups of all-purpose flour, 1 teaspoon of baking powder, 1/2 teaspoon of baking soda, and 1/4 teaspoon of salt. Gradually add this dry mixture to the wet ingredients. Stir until just combined, being careful not to overmix. Finally, gently fold in 1 cup of fresh blueberries and the zest of 1 lemon. If you want, you can also add 1/2 cup of white chocolate chips. Now, use a cookie scoop or a tablespoon to drop the dough onto your prepared baking sheet. Make sure to space them about 2 inches apart. Bake the cookies in the preheated oven for 12-15 minutes. Look for lightly golden edges. The centers may seem soft, but they will firm up as they cool. After baking, let the cookies cool on the sheet for about 5 minutes. Then, move them to a wire rack to cool completely. Enjoy your Easy Blueberry Cheesecake Cookies! For the full recipe, check out the instructions above. To make the best blueberry cheesecake cookies, start with room temperature cream cheese and butter. This helps create a smooth texture. Mix the ingredients well, but don’t overmix after adding the flour. Overmixing can lead to tough cookies. When folding in blueberries, be gentle. This keeps the berries whole and juicy. If your cookies spread too much, check your butter temperature. It should be soft but not melted. If they are too dry, you may have added too much flour. Measure it carefully. If they are flat, try chilling the dough for 30 minutes before baking. This helps them hold their shape. Serve your cookies on a pretty plate. Dust them lightly with powdered sugar for a sweet touch. You can add fresh blueberries around the cookies for a pop of color. For a fun twist, pair these cookies with a scoop of vanilla ice cream. This will make a delightful dessert. For the full recipe, refer to the recipe section above. {{image_2}} You can switch out the blueberries for other fruits. Try fresh raspberries or chopped strawberries. Both add nice color and taste. You can also use peaches or cherries when they are in season. Adjust the sugar slightly based on the fruit's sweetness. Each fruit brings a new twist to your cookies. Want a gluten-free version? Swap the all-purpose flour for a gluten-free blend. Look for one that measures cup-for-cup like regular flour. This keeps your cookies soft and chewy. Make sure your baking powder is also gluten-free. It’s an easy change that keeps everyone happy. You can enhance the flavor in fun ways. Add a pinch of cinnamon for warmth. Try a splash of almond extract instead of vanilla for a unique twist. You can also mix in some crushed nuts for a nice crunch. White chocolate chips are a great option too. They add creaminess and sweetness, making every bite special. For the full recipe, check out the complete details above. To keep your Easy Blueberry Cheesecake Cookies fresh, store them in an airtight container. Place parchment paper between layers if you stack them. This helps prevent sticking. Keep the container at room temperature for up to five days. If you want to keep them longer, the fridge is a good option. Freezing these cookies is simple and keeps them tasty. First, let them cool completely. Then, arrange the cookies in a single layer on a baking sheet. Freeze them for about one hour until firm. After that, place them in a freezer-safe bag or container. They can stay frozen for up to three months. When ready to eat, simply thaw them at room temperature. To enjoy your cookies warm, preheat your oven to 350°F (175°C). Place the cookies on a baking sheet and heat them for about five minutes. This warms them nicely without drying them out. You can also use a microwave if you're short on time. Heat them for about 10-15 seconds, but watch closely so they don't get too hot. Enjoy these sweet treats fresh! For the complete recipe, check out the Full Recipe. If you need a cream cheese substitute, use ricotta or Greek yogurt. Both give a creamy texture. You can also use mascarpone cheese for a rich taste. Keep in mind, the flavor may change slightly. Adjust sugar levels if you use a sweeter option. Yes, you can use frozen blueberries. Just make sure to thaw and drain them first. This prevents extra liquid in your dough. Frozen blueberries may burst during mixing. This can create a lovely swirl in your cookies. Check the edges for a light golden color. The centers should look soft but set. Press gently on a cookie; it should spring back slightly. If the edges are firm and the centers still look wet, give them a minute more. These blueberry cheesecake cookies combine creamy and sweet flavors, perfect for any treat. You learned key ingredients, essential tools, and step-by-step baking methods. I shared tips for perfecting your cookies and ways to store or freeze them for later. Don't forget the fun variations to try. Enjoy these delicious cookies that can impress friends and family. With these skills, you can make dessert time special. Happy baking!

Easy Blueberry Cheesecake Cookies Simple and Sweet Delight

Craving a tasty treat that’s both sweet and simple? You’re in the right place! I’m excited to share my Easy

- 1 pound breakfast sausage, casings removed - 6 large eggs - 1 cup milk - 1 cup shredded cheddar cheese - 1 medium onion, diced - 1 bell pepper (any color), diced - 2 cups spinach, roughly chopped - 1 teaspoon garlic powder - 1 teaspoon paprika - Salt and pepper to taste - 1 tablespoon olive oil - 4 slices whole wheat bread, cubed The main ingredients in this tasty casserole are simple and fresh. The breakfast sausage gives a savory kick. Eggs and milk provide the base for the dish. The vegetables add color and nutrients. I use onion, bell pepper, and spinach for great flavor. Seasonings like garlic powder and paprika elevate the taste. Finally, cheese brings it all together, making each bite creamy and delicious. - Other types of cheese - Additional vegetables or herbs - Alternative bread options If you want to mix things up, you can try different cheeses. Mozzarella or feta can work well too. You can also add more veggies. Think about mushrooms, zucchini, or even kale. Fresh herbs like basil or thyme can add a nice touch. For your bread choice, feel free to use gluten-free options or even croissants for a unique twist. For the full recipe, check out the details above. This dish is all about flexibility and fun! 1. First, preheat your oven to 350°F (175°C). This ensures even cooking. 2. Next, grease a 9x13 inch baking dish. You can use non-stick spray or olive oil for this. 1. In a large skillet, heat 1 tablespoon of olive oil over medium heat. 2. Add 1 diced onion and 1 diced bell pepper. Sauté them until they soften, about 5-7 minutes. 3. Now, add 1 pound of breakfast sausage. Break it apart with a spatula as it cooks. 4. Cook until the sausage is brown and no longer pink, which takes about 8-10 minutes. Drain any excess grease if needed. 1. In a large bowl, whisk together 6 large eggs and 1 cup of milk. Add 1 teaspoon of garlic powder, 1 teaspoon of paprika, and salt and pepper to taste. Mix well. 2. Stir in the sausage mixture, 2 cups of chopped spinach, and 4 cups of cubed whole wheat bread. Gently fold in 1 cup of shredded cheddar cheese. 3. Pour the mixture into the prepared baking dish, spreading it evenly. 4. Bake in the oven for 30-35 minutes. The casserole is done when it is set and lightly golden on top. 5. Let it cool for 5-10 minutes before slicing into squares. For the full recipe, feel free to check the details provided earlier. This dish is quick, tasty, and perfect for breakfast! To get a fluffy texture in your casserole, be gentle. Do not overmix the eggs and other ingredients. This keeps air in the mixture, making it light. You can whisk the eggs well, but stop once you combine them with the sausage and veggies. Resting the casserole is key. Let it sit for about 5-10 minutes after baking. This helps it firm up, making it easier to slice. A warm casserole can be a bit runny, but resting helps set it just right. Spices and herbs can make a big difference. I like to add a pinch of cayenne for heat or some Italian herbs for freshness. You can also try fresh parsley or chives sprinkled on top just before serving for a burst of flavor. Using leftover vegetables is a great way to add flavor too. If you have some zucchini or mushrooms, chop them up and toss them in. This not only adds taste but also makes the dish more colorful. Feel free to be creative with what you have on hand! {{image_2}} You can change the sausage type to fit your taste. Try turkey sausage for a leaner option. If you prefer not to eat meat, use vegetarian sausage. Both options offer great flavor. For bread, gluten-free choices work well too. Look for gluten-free bread that suits your preference. This keeps the dish tasty while meeting dietary needs. If you want to try a different cooking method, consider using a slow cooker. Just mix all the ingredients and let it cook on low for about 6-8 hours. This method is great for busy mornings. Another fun option is the mini casserole method. Use muffin tins to make individual servings. This makes it easy to grab and go. Plus, they are perfect for kids or meal prep. Feel free to get creative! For more tips and the full recipe, check out the details above. To store leftovers, let the casserole cool down first. Place it in an airtight container. Keep it in the fridge for up to three days. When you’re ready to eat, reheat individual portions in the microwave. Heat for about one to two minutes, checking to ensure it is warm throughout. Alternatively, you can reheat it in the oven at 350°F (175°C) for about 10-15 minutes. This helps keep the top crispy. For proper freezing, wrap the cooled casserole tightly in plastic wrap. Then place it in a freezer-safe container or bag. It can stay frozen for up to three months. To thaw, move it to the fridge overnight. After thawing, reheat it in the oven at 350°F (175°C) for 20-30 minutes. Make sure it’s hot all the way through before serving. You can also microwave it, but the oven gives a better texture. Can I prepare this casserole in advance? Yes, you can prepare this casserole a day ahead. Mix the ingredients and store them in the fridge. Just bake it in the morning for a warm breakfast. What can I substitute for eggs? If you need an egg substitute, try using flaxseed meal or silken tofu. Each of these options works well to bind the casserole. How long can I store leftovers? You can store leftovers in the fridge for up to 3 days. Keep them in an airtight container to maintain freshness. Can I make this dish ahead and freeze it? Absolutely! You can freeze the casserole before or after baking. Wrap it tightly in foil. It lasts for about 2-3 months in the freezer. How do I know when the casserole is done? Check for a firm texture and a golden top. A toothpick inserted in the center should come out clean when it’s fully cooked. Can I add other toppings? Yes! Feel free to add toppings like diced tomatoes, avocado, or extra cheese. These will add more flavor and texture. Is it possible to make a vegetarian version? Definitely! Swap the sausage for a plant-based alternative. You can also add more veggies to enhance the taste. This blog post covered how to make a tasty breakfast casserole. We discussed key ingredients like sausage, eggs, and veggies. You learned important preparation steps and tips for the perfect texture. We explored variations and storage tips to keep your casserole fresh. Now you can enjoy a delicious meal with easy options. Experiment with flavors and make it your own! Enjoy your cooking journey.

Easy Sausage and Egg Casserole Quick Breakfast Dish

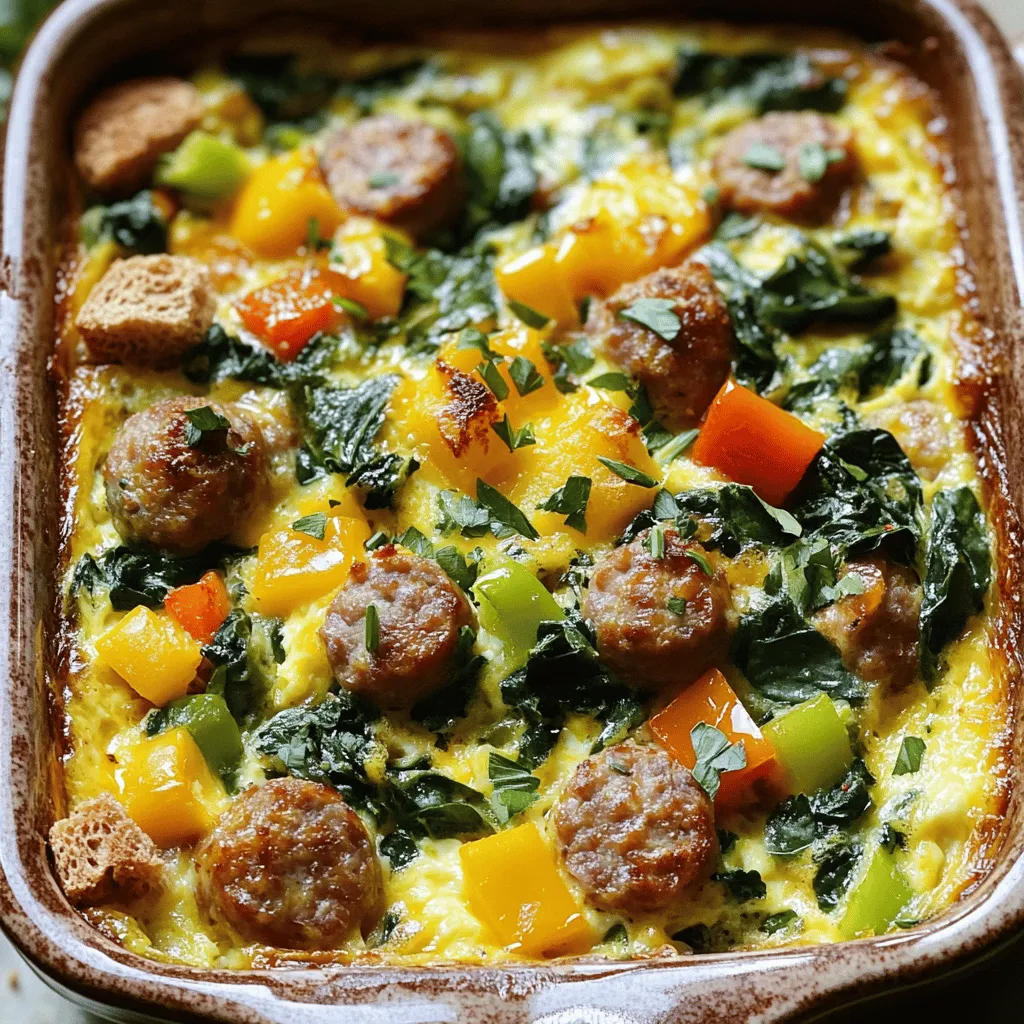
Looking for a quick and tasty breakfast? This Easy Sausage and Egg Casserole is just what you need! Packed with

- 1 pound sea scallops, cleaned and patted dry - 4 tablespoons unsalted butter, melted - 4 cloves garlic, minced - 2 tablespoons fresh parsley, finely chopped - 1 tablespoon lemon juice - 1 teaspoon paprika - Salt and pepper to taste - Lemon wedges for serving - Baking dish - Mixing bowl - Whisk To make garlic butter baked scallops, start with fresh sea scallops. Look for plump and shiny ones. These add great flavor and texture. The garlic gives a rich taste. You can’t go wrong with butter, garlic, and scallops. Next, you will need fresh parsley. It adds a nice color and taste. The lemon juice brightens up the dish. Paprika gives a hint of warmth. Adjust salt and pepper to your liking. For tools, a baking dish is key. You need a mixing bowl to combine the ingredients. A whisk helps mix the garlic butter evenly. Every ingredient plays a role. This mix makes scallops tasty and simple. For the full recipe, check the detailed instructions. - Preheat the oven to 400°F (200°C) and grease the baking dish. - In a small mixing bowl, combine the melted butter, minced garlic, chopped parsley, lemon juice, paprika, salt, and pepper. Whisk until well mixed. - Place the scallops in the prepared baking dish in a single layer. - Pour the garlic butter mixture evenly over the scallops, making sure they are well coated. - Bake the scallops in the preheated oven for 12-15 minutes or until they turn opaque. For a crispy top, switch to broil for the last 2 minutes. Watch closely to avoid burning. - Serve with fresh lemon wedges for a zesty kick. - Garlic butter scallops pair well with side dishes like rice or a crisp salad. Enjoy the flavors! When you shop for scallops, choose ones that look plump and shiny. Fresh scallops should be translucent and have a nice sheen. If they look dull or dry, skip them. Always give scallops a sniff. If they smell strong or fishy, they are not fresh. You want that sweet, ocean scent to ensure you get the best scallops for your dish. Baking scallops takes a bit of care. When broiling, keep your eyes on them. They can go from perfect to burnt quickly. Use a timer but check them often during the last few minutes. Also, consider the size of your scallops. Larger scallops may need a bit more time, while smaller ones cook faster. Adjusting the bake time helps ensure that each scallop is tender and juicy. To make your garlic butter baked scallops shine, think about adding herbs and spices. Fresh parsley adds a nice touch, but you could also try thyme or basil. These herbs enhance the flavor nicely. For extra richness, consider a sprinkle of cheese on top before baking. Parmesan works well and adds a savory layer to each bite. For the full recipe, follow the steps carefully to enjoy this delicious dish. {{image_2}} You can tweak this recipe to fit your taste. Try using olive oil instead of butter. This gives a lighter touch to the dish. It also adds a nice flavor. You can also try different herbs. Thyme or basil work great here. They add a fresh taste that pairs well with scallops. If you need gluten-free options, you're in luck! This dish is naturally gluten-free. Just watch for any added sauces. For those on a low-carb diet, this recipe fits perfectly. Scallops are low in carbs and high in protein. You can enjoy this dish without worry. Want to mix things up? Serve the scallops atop pasta or rice. The garlic butter sauce will soak in, making it extra tasty. Another fun idea is to add them to a seafood salad. The scallops bring a rich flavor that enhances any salad. You can find the full recipe to try these ideas. To keep your garlic butter baked scallops fresh, store them correctly. First, let the scallops cool down to room temperature. Then, place them in an airtight container. They can stay in the fridge for up to two days. Make sure to label the container with the date. If you want to keep them longer, you can freeze them. Place the scallops in a freezer-safe bag. Remove as much air as you can before sealing. Frozen scallops can last for about three months. When you're ready to eat them, move them to the fridge to thaw overnight. When you're ready to enjoy your leftovers, reheating is key. The best way to reheat scallops is in the oven. Preheat your oven to 350°F (175°C). Place the scallops in a baking dish and cover it with foil. Heat for about 10 minutes. This keeps them warm without drying them out. You can also use a microwave for quick reheating. Set it to medium heat and warm for 30 seconds at a time. Make sure to check often to avoid overcooking. To maintain their texture and flavor, avoid high heat. Reheating slowly helps keep their delicious taste and tender feel. Enjoy your meal just as you did the first time with these simple storage tips! For the full recipe, check back to make these scallops again. How long should I bake scallops for optimal doneness? Bake scallops for 12 to 15 minutes at 400°F (200°C). They should be opaque and firm. A little overcooking can make them tough. So, keep an eye on them. Can I use frozen scallops for this recipe? Yes, you can use frozen scallops. Just thaw them first. Pat them dry to remove extra moisture. This will help them bake evenly and absorb the garlic butter flavor. What sides pair well with garlic butter scallops? I love serving garlic butter scallops with light sides. Try a fresh salad or roasted vegetables. Garlic bread also makes a great choice. It soaks up the extra garlic butter well. How can I adjust the recipe for a larger group? To serve more people, double the recipe. Use two baking dishes to avoid crowding. This keeps the scallops from steaming and ensures they bake perfectly. Can I use shrimp instead of scallops? Yes, shrimp is a great substitute. Use the same amount and prepare it the same way. The cooking time may change slightly. Watch them closely to avoid overcooking. What can I substitute for lemon juice? If you don't have lemon juice, use lime juice or vinegar. Both add a nice tang. You can also skip it if you prefer a milder flavor. You can enjoy making garlic butter baked scallops at home. We covered the key ingredients, tools, and steps needed. I shared tips to select fresh scallops and perfect your bake. Variations allow you to explore different flavors or dietary needs. Proper storage helps keep leftovers tasty. Remember, cooking should be fun and creative. Experiment with sides and try new ingredient swaps. Enjoy this dish as a delightful treat you’ll make again and again.

Garlic Butter Baked Scallops Savory and Simple Treat

If you’re craving a seafood dish that’s both simple and delicious, look no further! Garlic Butter Baked Scallops are the

- 1 ripe pineapple, peeled and sliced into thick rings - 1/4 cup honey - 1 tablespoon coconut oil, melted - 1 teaspoon cinnamon - 1/2 teaspoon vanilla extract - Pinch of sea salt - Fresh mint leaves, for garnish - Lime wedges, for serving For this delightful treat, you need simple, fresh ingredients. Start with a ripe pineapple. It should smell sweet and feel slightly soft. This means it is ready to eat. The honey adds a rich sweetness, while coconut oil helps the glaze stick. Cinnamon and vanilla give your dish warmth and depth. The pinch of sea salt enhances the sweetness. Fresh mint leaves add a lovely touch. They make your dish pop with color and flavor. Lime wedges serve as a bright side. The tanginess of lime cuts through the sweetness of the roasted pineapple, making it a balanced dish. You can find the full recipe in the article above. - Preheat your oven to 425°F (220°C). - Line a baking sheet with parchment paper. - In a small bowl, mix together: - 1/4 cup honey - 1 tablespoon melted coconut oil - 1 teaspoon cinnamon - 1/2 teaspoon vanilla extract - Pinch of sea salt - Stir until the mix is smooth and well blended. - Lay the pineapple rings on the baking sheet. - Use a pastry brush to coat each ring with the honey glaze. - Roast the pineapple for about 20 minutes. - Flip the rings halfway through to get even browning. - Look for a golden brown color and slight charring on the edges. For the full recipe, check out the details above. Enjoy your delightful treat! To get that lovely golden color, flip the rings halfway through roasting. This helps both sides cook evenly. Keep a close eye on them to avoid burning. Pineapple can go from perfect to charred very quickly! You can experiment with spices to make the flavor pop. Try adding nutmeg or ginger for a twist. Let the glaze cool a bit before applying. This helps it stick better to the pineapple. For a stunning look, stack the rings in a pyramid. Drizzle any leftover glaze on top to make it shine. Add fresh mint leaves for color and freshness. A sprig of mint brightens the plate and makes it feel special. {{image_2}} You can make your roasted pineapple even sweeter. Adding brown sugar gives a nice crunch. It caramelizes well and enhances the flavor. Another option is to swap honey with maple syrup. Maple syrup adds a unique taste. It works great with the pineapple, making it a fun twist. If you crave some heat, add chili flakes. They give a spicy kick that pairs well with sweet pineapple. You can also serve your pineapple with feta cheese. The salty cheese balances the sweet fruit. This combination brings out new flavors and textures. You don’t have to use the oven. Grilling the pineapple gives it a smoky flavor. The grill marks also add a nice touch. A stovetop skillet is another option. It cooks quickly and can add a nice char. Experimenting with these methods can lead to exciting results. Store leftovers in an airtight container in the fridge. This keeps the roasted pineapple fresh for up to three days. It’s best to let it cool before sealing. If you want to keep the flavors strong, add a layer of plastic wrap before closing the lid. To freeze roasted pineapple, let it cool completely. Cut it into smaller pieces if you prefer. Place the pieces in a single layer on a baking sheet and freeze for about two hours. Once frozen, transfer the pieces to a freezer bag. This way, they won’t stick together. You can enjoy them for up to three months. Reheat the pineapple in an oven for the best results. Preheat your oven to 350°F (175°C). Place the pineapple on a baking sheet and cover it with foil. Heat for about 10 minutes. This method helps keep the texture nice. You can also use a microwave, but the texture might change. Heat in short bursts of 30 seconds, checking often. You can use canned pineapple, but fresh is better. Fresh pineapple tastes bright and sweet. It has a firm texture that holds up well when roasted. Canned pineapple is softer and can lose its shape. It also has added syrup, which can make the dish too sweet. For the best flavor, stick with fresh pineapple. Look for a golden brown color on the edges. The pineapple should look slightly charred but not burnt. When it is soft to the touch, it is ready. The glaze will bubble and caramelize, adding a lovely shine. If you see these signs, your pineapple is perfectly roasted. Roasted pineapple goes well with many dishes. Serve it with grilled meats like chicken or pork for a tasty contrast. You can add it to salads for a sweet twist. It also pairs well with yogurt or ice cream for a quick dessert. Try it as a topping on pancakes or waffles for a fun breakfast idea. Roasting pineapple is simple and fun. You learned about the main ingredients, from pineapple to honey glaze. The step-by-step instructions make cooking easy. I shared tips for perfect caramelization and ways to add unique flavors. You can even experiment with different cooking methods. Enjoy your tasty roasted pineapple now, and remember, it’s great to share! This treat can fit into various meals and occasions. Get creative with garnishes and storage tips, too. Happy cooking and tasting!

Roasted Pineapple with Honey Glaze Delightful Treat

Are you ready to treat yourself to a sweet, tropical delight? Roasted pineapple with honey glaze combines juicy pineapple rings

To make this dish, you will need: - 1 lb boneless, skinless chicken thighs, cut into bite-sized pieces - 1 cup long-grain rice - 1 small onion, diced - 1 bell pepper (any color), diced - 2 celery stalks, diced - 3 cloves garlic, minced - 2 cups chicken broth - 1 tablespoon Cajun seasoning - 1 teaspoon paprika - 1/2 teaspoon cayenne pepper (optional for extra heat) - 1 cup frozen peas - 2 tablespoons olive oil - Salt and pepper to taste - Fresh parsley, chopped (for garnish) You can add a few items to enhance the taste: - Chopped green onions for a fresh kick - Smoked sausage for a heartier meal - Diced tomatoes for added moisture and flavor - Bay leaves for a herbal touch To prepare this meal, gather these tools: - A large pot or Dutch oven for even cooking - A cutting board and sharp knife for prep - Measuring cups and spoons for accuracy - A wooden spoon for stirring - A fork for fluffing the rice This recipe is easy and fun to make. You will love how it all comes together in one pot. For the complete method, check out the Full Recipe. To make this dish, gather all your ingredients first. It helps to have everything ready. Chop the chicken, onion, bell pepper, celery, and garlic before you start cooking. This will save you time and keep your cooking smooth. Ensure your rice is measured out and set aside. 1. Heat two tablespoons of olive oil in a large pot over medium heat. 2. Once hot, add the diced chicken thighs. Season them with salt, pepper, and half of the Cajun seasoning. 3. Sear the chicken for about 5-7 minutes until it turns golden brown. 4. Remove the chicken from the pot and set it aside. 5. In the same pot, add the diced onion, bell pepper, and celery. Sauté for 3-4 minutes until the onion is soft and clear. 6. Stir in the minced garlic and cook for about 30 seconds, just until fragrant. 7. Add the remaining Cajun seasoning, paprika, and cayenne pepper if you like heat. Mix it well. 8. Pour in the rice and stir for 1 minute. This helps to toast the rice lightly. 9. Next, add the chicken broth. Bring it to a boil. 10. Once boiling, lower the heat and return the chicken to the pot. 11. Cover and let it simmer for 20 minutes or until the rice absorbs the broth. 12. In the last 5 minutes, add the frozen peas. Mix gently. 13. When done, fluff the rice with a fork. Adjust seasoning with salt and pepper if needed. 14. Garnish with fresh parsley before serving. To fluff the rice, use a fork instead of a spoon. This keeps the grains separate. Gently lift the rice without smashing it. This will give your dish a nice, airy texture. If the rice seems sticky, let it sit for a few minutes with the lid on before fluffing. This helps it firm up a bit. Enjoy your One Pot Cajun Chicken & Dirty Rice from the Full Recipe! To make the best one pot chicken and dirty rice, follow these tips: - Use bone-in chicken: Bone-in chicken adds more flavor. If you prefer thighs, go for skin-on for extra taste. - Sauté the veggies well: Cook the onion, bell pepper, and celery until soft. This step builds a rich base. - Toast the rice: Stir the rice in the pot for a minute. This adds a nutty flavor and helps it cook well. - Don’t skip the broth: Chicken broth enhances flavor. It gives the dish depth and moisture. - Let it rest: After cooking, let it sit for a few minutes. This helps the flavors meld together. Here are common mistakes that can ruin your dish: - Overcooking the chicken: Remove the chicken just when it turns brown. Overcooking can make it dry. - Using too much liquid: Stick to the right amount of broth. Too much liquid leads to mushy rice. - Not seasoning enough: Always taste your dish before serving. Adjust salt and spices for flavor. - Skipping the peas: Adding peas at the end keeps them bright and fresh. Don’t skip this step. To add more flavor, try these adjustments: - Add hot sauce: A splash of hot sauce can boost the spice level. It adds a nice kick. - Fresh herbs: Mix in fresh thyme or basil for a fresh taste. These herbs complement the dish well. - Smoky flavor: Use smoked paprika instead of regular paprika for a deeper flavor. - Citrus zest: A bit of lemon or lime zest can brighten the overall taste. It gives a refreshing note. For a full recipe, check out the [Full Recipe]. {{image_2}} You can switch the chicken for other meats. Try using shrimp or sausage for a tasty twist. Ground turkey or beef also works well. Each protein adds its flavor and texture. Simply adjust the cooking time based on what you choose. For example, shrimp cooks faster than chicken. For a meatless option, leave out the chicken. Replace it with mushrooms or lentils for protein. Use vegetable broth instead of chicken broth to keep it rich. You can also add more veggies like carrots or zucchini. This gives the dish color and nutrition. Season well to enhance the flavors. You can change the flavor by tweaking spices. For a smoky taste, add some smoked paprika. If you like heat, increase the cayenne pepper or add diced jalapeños. You can also try adding fresh herbs like thyme or oregano for a fragrant touch. Each change can make your dish unique and exciting. Feel free to explore these variations to make your One Pot Chicken and Dirty Rice truly your own! For the complete recipe, check out the Full Recipe. After you enjoy your one pot chicken and dirty rice, let it cool first. Then, place it in an airtight container. This helps keep the meal fresh. Store it in the fridge for up to three days. If you want to keep it longer, freezing is a great option. To reheat your leftovers, use the stove or microwave. If using the stove, add a splash of water or broth. Heat it on low, stirring often. This helps keep the rice from sticking. If you use the microwave, cover the dish to trap steam. Heat in short bursts, stirring in between, until hot throughout. For freezing, pack your dirty rice in a freezer-safe container. Leave a little space at the top for expansion. You can also use freezer bags, squeezing out the air before sealing. It can last up to three months in the freezer. When ready to eat, thaw it overnight in the fridge before reheating. Yes, you can use brown rice. Brown rice takes longer to cook. It also needs more liquid. Use 2 ½ cups of chicken broth instead of 2 cups. Cook it for about 30-40 minutes, until tender. This adds a nutty flavor and more fiber to your meal. To make One Pot Chicken and Dirty Rice in a slow cooker, first, brown the chicken in a pan. This adds great flavor. Then, place the chicken into the slow cooker. Add the veggies, broth, rice, and spices. Cook on low for 4-6 hours or high for 2-3 hours. Stir in the peas 30 minutes before serving. One Pot Chicken and Dirty Rice pairs well with many sides. Try a fresh green salad for crunch. Garlic bread is great for soaking up flavors. You can also serve it with coleslaw for a creamy touch. Each of these sides brings balance to the meal. This blog post shared how to make a tasty one-pot chicken and dirty rice. We covered the key ingredients, cooking steps, and tools you will need. I provided tips to avoid common mistakes and enhance flavors. You learned about variations and how to store leftovers. As you cook this dish, remember, practice makes perfect! Enjoy experimenting with flavors, and your meals will shine. Happy cooking!

One Pot Chicken and Dirty Rice Flavorful Meal Guide

Are you ready to spice up your dinner? One Pot Chicken and Dirty Rice is a tasty dish that brings

- 1 tomahawk steak (about 2-3 pounds) - 4 large shrimp, deveined and peeled - Olive oil - Salt - Black pepper - Garlic powder - Smoked paprika - Butter - Fresh lemon juice - Chopped parsley - Lemon wedges When I create a surf and turf dish, I love to start with the star players: the tomahawk steak and shrimp. The tomahawk steak, with its long bone and rich marbling, brings a bold flavor. A good shrimp adds a sweet touch that balances the steak perfectly. For the best taste, I choose high-quality ingredients. The right tomahawk steak should feel heavy and have a good amount of marbling. Look for bright, fresh shrimp that smell like the ocean. Next, I focus on seasonings. Olive oil helps the spices stick to the meat. Salt and black pepper enhance the natural flavors. Garlic powder gives a nice kick, while smoked paprika adds depth. Garnishes are key to making the dish stand out. I love to finish with a dollop of butter, some fresh lemon juice, and chopped parsley. The lemon brightens the dish, and the parsley adds a pop of color. You can find the full recipe for this delicious surf and turf dish to guide you through each step. Enjoy the process! First, let your tomahawk steak sit out for about 30-45 minutes. This helps it get to room temperature. A steak at room temp cooks more evenly. Next, pat the steak dry with paper towels. This step helps create a nice sear. Now, rub olive oil all over the steak. Use enough to coat it well. Then, season the steak generously. Sprinkle salt, black pepper, garlic powder, and smoked paprika on both sides. These spices add great flavor to your steak. Now, it's time to cook! Preheat your grill or cast-iron skillet over high heat. If you use an oven, set it to 400°F (200°C). When it's hot, place the steak on the grill or in the skillet. Cook it for about 4-6 minutes on each side for medium-rare. If you like it more done, cook it longer. If you're using a skillet, sear the steak for about 4-5 minutes on each side. Then, transfer it to the preheated oven to finish cooking for 15-20 minutes. Use a meat thermometer to check the doneness. Aim for 130°F for medium-rare. While the steak cooks, let’s make the shrimp! In a small skillet, melt 2 tablespoons of butter over medium heat. Once the butter is melted, add the shrimp. Cook them for about 2-3 minutes on each side. They should turn pink and opaque. After cooking, drizzle the shrimp with fresh lemon juice and sprinkle with chopped parsley. This brightens up the dish and adds fresh flavor. For the full recipe, check out the detailed instructions. To make your tomahawk steak perfect, know the right internal temperatures. For medium-rare, aim for 130°F. For medium, go for 140°F. Remember to use a meat thermometer for accuracy. This tool helps you avoid overcooking. Resting the steak is key too. Once cooked, let it rest for 10 minutes. This lets the juices spread out, making every bite juicy. Choosing the best tomahawk steak matters. Look for bright red meat with a good amount of marbling. Marbling means small white streaks of fat. This fat adds flavor and keeps the meat tender. For the shrimp, choose large, fresh ones that smell like the ocean. If you can, buy shrimp with the shell on for more flavor. Fresh herbs like parsley should look bright and fragrant. To impress your guests, serve the tomahawk steak on a large cutting board. Cut the steak into thick pieces. Arrange the shrimp around the steak for a colorful display. Drizzle some pan butter over the steak for extra flavor. Use lemon wedges and fresh herbs to add a pop of color. This makes your dish look as good as it tastes. For the full recipe, check out the detailed steps. {{image_2}} If you want to switch things up, try different proteins with your tomahawk steak. Shrimp is tasty, but lobster or scallops can elevate your meal even more. Lobster has a rich flavor that pairs well with steak. Scallops are sweet and meaty, giving a nice contrast. You can enhance your meal by adding spices or marinades. Try a mix of chili powder and cumin for a kick. A simple garlic and herb marinade can also add depth. For sauces, consider a garlic butter sauce or a tangy chimichurri. Both complement the steak and seafood perfectly. Pair your surf and turf with sides that balance the rich flavors. Creamy mashed potatoes are a classic choice. Grilled asparagus or sautéed green beans add freshness. A crisp salad with a light vinaigrette can cleanse the palate. You can find the full recipe to guide you through these pairings. To keep leftover tomahawk steak fresh, wrap it tightly in plastic wrap. You can also place it in an airtight container. This helps prevent air from drying it out. Store the steak in the fridge for up to three days. For longer storage, you can freeze it. Wrap it well in foil and then place it in a freezer bag. Leftover steak can last for up to three months in the freezer. For shrimp, the best method is similar. Store leftover shrimp in an airtight container in the fridge. You can keep shrimp for one to two days in the fridge. If you want to freeze them, make sure they are fully cooled first. Place them in a freezer bag and remove as much air as possible. Frozen shrimp should also last about three months. To reheat the tomahawk steak, the best method is to use the oven. Preheat the oven to 250°F (120°C). Place the steak on a baking sheet and cover it with foil. This keeps it warm without cooking it more. Heat the steak for about 20-30 minutes. Keep an eye on it so it doesn't overcook. For shrimp, a quick way to reheat is in a pan. Heat a small amount of oil over medium heat. Add the shrimp and cook for about 2-3 minutes. Make sure they are heated through but not overcooked. The ideal temperature for reheating leftovers is around 165°F (74°C). This keeps your meal tasty and safe to eat. Surf and turf is a dish that combines seafood and meat, creating a rich meal. It often features steak and shrimp, or lobster. The mix of flavors and textures makes each bite exciting. You get the savory taste of the steak and the sweet, tender meat of the seafood. This dish brings together the best of both worlds for a truly special dining experience. Yes, you can grill a tomahawk steak! Here are some tips for grilling it perfectly: - Preheat the grill: Make sure your grill is hot before adding the steak. - Oil the grates: This helps prevent sticking. - Sear the steak: Grill the tomahawk for about 4-6 minutes per side. - Use indirect heat: Move the steak to a cooler part of the grill if it browns too fast. - Rest the steak: Let it sit for 10 minutes after cooking to keep it juicy. To check if the steak is done, use a meat thermometer. Insert it into the thickest part of the steak. Here are some guidelines for steak doneness: - Rare: 120°F - Medium-rare: 130°F - Medium: 140°F - Medium-well: 150°F - Well done: 160°F and above Always remember that the steak will continue to cook a bit while it rests. Several sides complement surf and turf beautifully. Here are some tasty suggestions: - Garlic mashed potatoes: Creamy and flavorful, they pair well with steak. - Grilled asparagus: Adds a nice crunch and fresh taste. - Caesar salad: Crisp romaine and dressing balance the richness of the meal. - Corn on the cob: Sweet and juicy, it matches well with grilled flavors. - Roasted vegetables: A mix of your favorites adds color and health. Explore these sides to enhance your surf and turf experience. For the complete preparation, check the Full Recipe. In this article, we explored how to craft the perfect surf and turf dish. You learned about the key ingredients, from the tomahawk steak to shrimp. We walked through each step, including preparation, cooking methods, and tips for success. Remember to rest your steak and pick quality seafood for the best taste. Each bite should impress your guests. Now, you can enjoy this delicious meal at home. Cooking doesn't have to be hard; it can be fun. Dive in and enjoy your cooking journey!

Surf & Turf Tomahawk Steak Juicy and Flavorful Meal

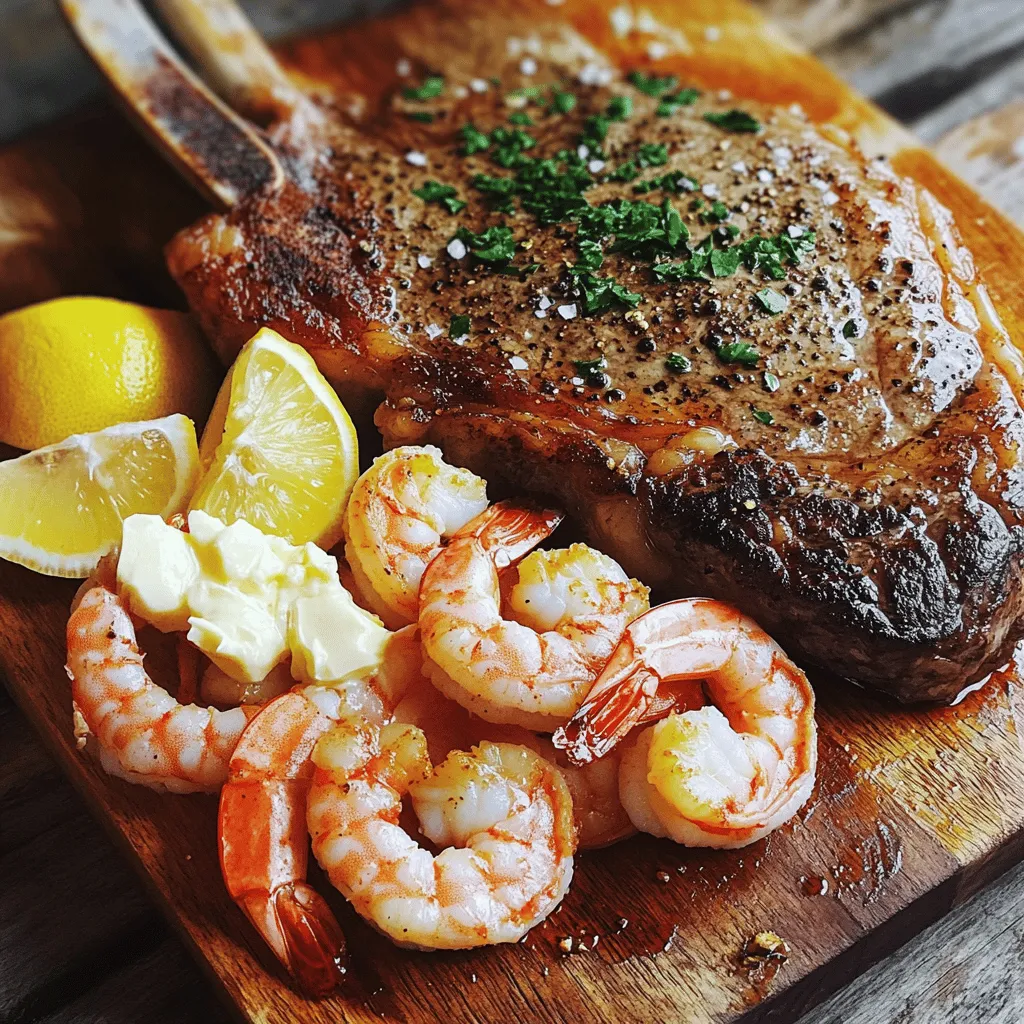
Are you ready to elevate your dinner game? The Surf & Turf Tomahawk Steak is the ultimate meal for meat

- Italian sausage (mild or spicy) - Ditalini pasta - Fresh spinach For this soup, the main ingredients are key. Italian sausage adds rich flavor. You can choose mild for a gentle taste or spicy for a kick. Ditalini pasta gives a nice bite. It looks cute and fits well in the soup. Fresh spinach adds color and nutrients. It wilts nicely, making the dish vibrant. - Grated Parmesan cheese - Fresh herbs (e.g., parsley, basil) Garnishes can really elevate your soup. Grated Parmesan cheese adds creaminess and depth. Fresh herbs, like parsley or basil, bring brightness and freshness. Sprinkle these on top before serving. They make the dish more appealing and tasty. - Low-sodium chicken broth - Diced tomatoes - Heavy cream Pantry staples make this recipe easy. Low-sodium chicken broth provides a savory base. It keeps the soup light and healthy. Diced tomatoes add sweetness and texture. They also enhance the color of the soup. Heavy cream makes it creamy and luxurious. It ties all the flavors together. For the full recipe, check out the detailed instructions to create this delicious dish! To start, heat a large pot over medium-high heat. Add 1 pound of Italian sausage to the pot. Cook until it is browned and fully cooked. This takes about 5 to 7 minutes. Use a wooden spoon to break the sausage apart as it cooks. Next, add 1 medium diced onion to the pot. Sauté the onion for 3 to 4 minutes until it turns translucent. This adds great flavor to the dish. After that, stir in 3 minced garlic cloves. Cook for 1 more minute until it smells great. Now it's time to add more flavor. Pour in 4 cups of low-sodium chicken broth and 1 can of diced tomatoes with juice. Make sure to scrape the bottom of the pot to get all the tasty bits. Bring this mixture to a boil. Once boiling, add 1 cup of ditalini pasta. Cook it according to the package instructions, usually about 7 to 8 minutes. Stir it occasionally to keep it from sticking. When the pasta is just right, reduce the heat to low. Stir in 1 cup of heavy cream and 2 cups of chopped fresh spinach. Add 1 teaspoon of dried Italian herbs, like oregano, basil, and thyme. Let it cook for another 2 to 3 minutes until the spinach is wilted. Finally, season the soup with salt and pepper to taste. Remove the pot from the heat. Let the soup sit for a couple of minutes to thicken slightly. For the full recipe, check out the details provided. To make your soup great, cook the pasta al dente. This means it should be firm when bitten. Follow the package directions for timing. Usually, it takes about 7-8 minutes. Stir it often to stop it from sticking. After cooking, let the soup thicken for a couple of minutes. This makes it creamy and rich. The heavy cream helps, but resting the soup really brings it together. Using fresh herbs can make a big difference. Fresh basil or parsley adds bright flavor. If you use dried herbs, add them early in the cooking. They blend in well. Spice levels are also up to you! If you like heat, add red pepper flakes. Start small and taste as you go. You can always add more spice, but you can't take it out. Preparing ingredients ahead saves time. Chop onions and garlic the night before. You can also pre-measure the spices and cream. This makes cooking faster. If you have leftovers, freezing is a great option. Store the soup in airtight containers. It can last for up to three months in the freezer. Just thaw it in the fridge overnight before reheating. Enjoy your creamy Italian sausage ditalini soup again! For the full recipe, check out the section above. {{image_2}} For those needing gluten-free options, swap the ditalini pasta for rice or gluten-free pasta. This keeps the soup hearty and tasty. You can also use cauliflower or zucchini noodles for a veggie touch. If you want a low-fat alternative, try using lighter cream or milk. This keeps the soup creamy but cuts down on calories. You can also use Greek yogurt as a base for a tangy twist. You can change up the protein by using chicken or turkey sausage. These options lower the fat while keeping the flavor big. For a veggie-packed version, add chopped carrots or zucchini. These veggies boost nutrition and add color to your dish. To enhance the flavor, experiment with different herbs like thyme or rosemary. These herbs give a fresh twist to the soup. You can also try adding a pinch of red pepper flakes for some heat. Incorporating different types of cheese adds richness. Try using mozzarella for a gooey texture or feta for a salty bite. These changes keep the soup exciting and full of flavor. For the full recipe, check out the [Full Recipe]. You can keep your creamy Italian sausage ditalini soup in the fridge for about three days. Make sure to let the soup cool before storing it. Use an airtight container to keep it fresh. When you're ready to eat, just reheat it on the stove or in the microwave. If you want to save some for later, freezing is a great option! Allow the soup to cool completely. Then, pour it into freezer-safe bags or containers. Lay the bags flat in the freezer for easy stacking. When you're ready to enjoy it, thaw it overnight in the fridge. Reheat on the stove, adding a little broth if needed. Choose containers that are safe for both freezing and reheating. Glass or BPA-free plastic containers work well. For easy meals, portion the soup into single servings. This way, you can grab just what you need. It helps reduce waste and makes meal prep a breeze. If you can’t find ditalini pasta, don’t worry! You can use other small pasta shapes. Here are some great options: - Small shells - Orzo - Elbow macaroni - Fusilli These shapes will work well in this creamy Italian sausage ditalini soup. Just remember to adjust the cooking time as needed. Yes, you can make this soup in a slow cooker! Start by browning the sausage in a skillet. Then, add the sausage, diced onion, garlic, chicken broth, and diced tomatoes to the slow cooker. Cook on low for 6-8 hours or on high for 3-4 hours. About 30 minutes before serving, stir in the ditalini pasta, heavy cream, and spinach. Let it cook until the pasta is tender. This creamy Italian sausage ditalini soup is not low-carb due to the pasta. However, you can make it lower in carbs. Substitute the ditalini pasta with vegetables, like: - Zucchini noodles - Cauliflower rice - Chopped broccoli These swaps will help you enjoy a tasty, lower-carb version without losing flavor. If you want to add some heat, try these tips: - Use spicy Italian sausage instead of mild. - Add red pepper flakes to taste while cooking. - Stir in some hot sauce before serving. These changes will give your soup a delightful kick! For the full recipe, check out the original instructions. This blog post covered a tasty soup with Italian sausage, ditalini pasta, and fresh spinach. You can add your favorite garnishes and pantry staples for extra flavor. I shared tips for cooking and storing the soup, as well as ideas to switch up ingredients or adjust the recipe for dietary needs. Enjoy making your soup your way. Explore the variations and savor every bowl!

Creamy Italian Sausage Ditalini Soup Delight

Looking for a hearty, comforting meal? This Creamy Italian Sausage Ditalini Soup is your answer! Packed with tasty sausage, ditalini

Flour and Water Base The main ingredients for a great pajeon are flour and water. I use all-purpose flour because it gives the pancake a nice texture. Mixing flour with water creates a smooth batter. This batter holds everything together. Importance of Scallions Scallions are the star of this dish. They add fresh flavor and a crunch. You should chop them finely so they mix well into the batter. The more scallions, the better the taste. Optional Add-ins (Carrots, Gochugaru) You can add grated carrots for a hint of sweetness. This makes the pancake colorful and fun. If you like some heat, consider adding gochugaru, which are Korean red pepper flakes. This gives the pajeon a spicy kick. Here is the full recipe for crispy Korean scallion delight: - 1 cup all-purpose flour - 1 cup water - 1/2 teaspoon salt - 1 bunch scallions, finely chopped - 1/2 cup grated carrots (optional for sweetness) - 1/2 teaspoon gochugaru (Korean red pepper flakes, optional for heat) - 2 tablespoons vegetable oil (plus more for frying) - Soy sauce, for dipping Whisking the Ingredients Together Start by grabbing a large mixing bowl. In it, whisk together 1 cup of all-purpose flour, 1 cup of water, and 1/2 teaspoon of salt. You want a smooth batter without lumps. This batter is the foundation for your pajeon. The Role of Each Ingredient The flour gives the pancake its structure. Water helps to create a light texture. Salt enhances the flavors. Scallions, which you should chop finely, bring freshness and a nice crunch. If you like, add 1/2 cup of grated carrots for a touch of sweetness. For heat, mix in 1/2 teaspoon of gochugaru. Heating the Pan Correctly Use a non-stick frying pan and heat it over medium heat. Once hot, add 2 tablespoons of vegetable oil. You need enough oil to make the pancake crispy. Cooking Time and Texture Guidelines Pour half of your batter into the pan, spreading it out evenly. Cook for about 3-4 minutes. The edges should crisp up, and the bottom should turn golden brown. Flip the pancake carefully using spatulas. Cook the other side for another 3-4 minutes until it’s golden and crispy. Ideal Dipping Sauces (Soy Sauce) Serve your pajeon warm with soy sauce for dipping. The salty flavor pairs perfectly with the pancake. Presentation Tips for the Final Dish Place the scallion pancakes on a bright plate. Garnish with sesame seeds or fresh cilantro for color. A small dish of soy sauce and some chopped scallions make it look even better. For the full recipe, check the earlier section. Achieving Crispiness To make your pajeon crispy, use cold water in your batter. Cold water helps create steam, which adds air and lightness. Mix the batter until smooth but don't overmix. A few lumps are fine. Heat your pan well before adding oil. The oil should shimmer, not smoke. This step creates a nice crust. Avoiding a Soggy Pancake A soggy pancake is a common issue. To prevent this, keep the heat on medium-high. Avoid adding too many vegetables; they release moisture. If using carrots, make sure they're grated fine. You can also let the batter sit for about 10 minutes. This can help thicken it slightly. How to Adjust Ingredients for Personal Taste Feel free to change your pajeon. Love spice? Add more gochugaru. Want a sweeter taste? Toss in extra carrots. You can even add cooked seafood or mushrooms for a twist. Just remember to keep the flour and water ratio the same for best results. Cooking Techniques for Various Stovetops Different stovetops can affect cooking. If you use an electric stove, set it to medium-high. For gas stoves, adjust based on how fast it heats. Use a non-stick pan if you're new to cooking. This helps avoid sticking and makes flipping easier. If you have a cast-iron skillet, it retains heat well, giving a great crispy edge. {{image_2}} Pajeon has several tasty twists. One popular version is Seafood Pajeon. You can add shrimp or squid for a fresh ocean flavor. The seafood cooks quickly, adding a nice texture. Just chop the seafood into small pieces and mix it into the batter with the scallions. Another exciting option is Kimchi Pajeon. This version includes kimchi, giving your pancake a spicy kick. The fermentation adds depth to the flavor. Simply chop your kimchi and fold it into the batter. This adds a nice tang and heat, making it perfect for spice lovers. You can enjoy Pajeon even with dietary needs. For a vegan option, replace the egg with a flaxseed meal mix. Mix one tablespoon of flaxseed meal with three tablespoons of water. Let it sit to thicken before adding to the batter. For gluten-free Pajeon, use rice flour instead of all-purpose flour. It will give you that crispy texture you crave. You can also mix in other gluten-free flours, like almond or chickpea flour. Each adds a unique flavor while keeping things gluten-free. Feel free to experiment with these variations. You can create your own special Pajeon that suits your taste. Check out the Full Recipe to start making your crispy delight today! To keep your pajeon fresh, use proper storage techniques. First, let the pancakes cool completely. Place them in an airtight container. You can layer parchment paper between each pancake to prevent sticking. Seal the container tightly. For refrigeration, pajeon lasts up to three days. If you want to keep them longer, consider freezing. Wrap each pancake in plastic wrap and place them in a freezer bag. This method protects them from freezer burn. Frozen pajeon can last up to two months. To enjoy pajeon again, reheating is key. The best method is using a skillet. Heat a non-stick pan over medium heat. Add a small amount of oil to the pan. Place the pajeon in the pan and cook for about two minutes on each side. This keeps them crispy. You can also use an oven. Preheat it to 350°F (175°C). Place the pajeon on a baking sheet. Bake for about 10 minutes or until heated through. Avoid microwaving pajeon, as this may make them soggy. Proper reheating ensures you retain their delicious texture and flavor. What is Pajeon? Pajeon is a Korean scallion pancake. It combines flour, water, and scallions. This dish is crispy on the outside and soft inside. You can add optional ingredients like carrots or spicy gochugaru. It makes a great snack or side dish. How long can I store Pajeon? You can store Pajeon in the fridge for about 2 days. Just place it in an airtight container. To keep it fresh, reheat it in a pan. This helps restore its crispiness. Why is my Pajeon soggy? A soggy Pajeon often comes from too much water in the batter. Make sure to follow the recipe closely. If your pan isn’t hot enough, it can also cause sogginess. Always preheat your pan before adding the batter. How to fix burnt edges? If the edges of your Pajeon burn, lower the heat next time. Cooking on medium heat helps prevent burning. You can also trim off the burnt parts after cooking to make it look nicer. When is Pajeon traditionally served? Pajeon is popular during rainy days in Korea. People believe it brings good luck. It is also served during celebrations like Chuseok, the harvest festival. What are the cultural celebrations involving Pajeon? Pajeon plays a role in many Korean festivals. It is often served at family gatherings. Making Pajeon is a way to bond and share food with loved ones. Pajeon combines simple ingredients like flour, water, and scallions to create a tasty dish. We explored how to prepare the batter, cook it perfectly, and serve it well. Remember, adjusting flavors and textures can make it your own. Variations like seafood or kimchi add fun twists. Store leftovers properly to keep them fresh. Understanding Pajeon's cultural background adds to its enjoyment. Cooking should be fun, so enjoy making your Pajeon just the way you like it.

Pajeon: Korean Scallion Pancake Crispy Delight

If you love savory snacks, let me introduce you to Pajeon—Korean scallion pancakes that are crispy and delicious! This easy

For this seafood pasta salad, you want a mix of tasty seafood. Here are my top picks: - 1 cup cooked shrimp, peeled and deveined - 1 cup calamari rings, cooked - 1 cup scallops, cooked and quartered Using these seafood options gives your salad a fresh and rich flavor. Each type provides a unique taste and texture. Shrimp adds sweetness, calamari offers a nice bite, and scallops bring a buttery richness. The pasta and veggies play a big role in this dish. I recommend: - 8 ounces fusilli pasta - 1 cup cherry tomatoes, halved - 1/2 cup red bell pepper, diced - 1/4 cup red onion, finely chopped - 1/4 cup black olives, sliced - 1/3 cup fresh parsley, chopped Fusilli pasta holds the dressing well. Cherry tomatoes add a pop of color and sweetness. The bell pepper and red onion give a nice crunch, while black olives add a salty bite. Fresh parsley brings brightness and a lovely aroma. The dressing ties everything together. You’ll need: - 1/4 cup olive oil - 2 tablespoons lemon juice - 1 teaspoon garlic powder - 1 teaspoon dried oregano - Salt and pepper to taste This dressing is zesty and light. Olive oil adds richness, while lemon juice brings brightness. Garlic powder and oregano add depth, enhancing the seafood’s flavor. Adjust salt and pepper to your liking for a perfect balance. For the full recipe, check out the Full Recipe section. To start, cook 8 ounces of fusilli pasta in boiling water. Follow the package instructions until the pasta is al dente. This means it should still have a bit of bite. Once done, drain the pasta in a colander. Rinse it under cold water to stop the cooking. This helps keep the pasta firm and fresh. Now, place the cooled pasta in a large bowl. Next, grab another bowl. Here, mix 1 cup of halved cherry tomatoes, 1 cup of cooked shrimp, 1 cup of cooked calamari rings, and 1 cup of cooked scallops. Add in 1/2 cup of diced red bell pepper, 1/4 cup of finely chopped red onion, and 1/4 cup of sliced black olives. Then, sprinkle in 1/3 cup of chopped fresh parsley. This colorful mix adds flavor and texture to the salad. In a small bowl, whisk together 1/4 cup of olive oil and 2 tablespoons of lemon juice. Add 1 teaspoon of garlic powder and 1 teaspoon of dried oregano. Season with salt and pepper to taste. Whisk until the dressing looks smooth and well-mixed. This tangy dressing will elevate the flavors of the salad. Now, pour the dressing over the seafood and vegetable mixture. Gently toss everything together to coat evenly. After that, add this mixture to the bowl with the cooled pasta. Toss gently again until all ingredients are well combined. Cover the bowl and refrigerate for at least 30 minutes. This allows the flavors to blend. For the full recipe, check out the details above. To make great seafood pasta salad, you must cook the pasta just right. I recommend using fusilli pasta. This shape holds the dressing well and mixes with the seafood nicely. Cook the pasta until it's al dente, which means it's firm to the bite. This keeps the pasta from getting mushy. After cooking, drain the pasta and rinse it under cold water. This stops the cooking process and cools the pasta quickly. Flavor is key in any dish, especially in seafood pasta salad. I love to use fresh ingredients like cherry tomatoes and herbs. They add color and taste. A mix of garlic powder and dried oregano in the dressing boosts the flavor. Don't forget to add a splash of lemon juice for a bright finish. Salt and pepper are also important; they help bring all the flavors together. How you serve the salad matters. I like to use a large, shallow bowl for a beautiful display. It allows the colorful ingredients to shine. Garnish with extra parsley on top for a fresh look. Lemon wedges on the side offer a pop of color and can be squeezed over the salad for added zing. These small touches make your seafood pasta salad not just tasty but also a feast for the eyes. For the full recipe, check out the Zesty Seafood Pasta Salad Extravaganza. {{image_2}} You can switch up the seafood in your pasta salad. Try using crab meat or lobster for a rich taste. Cooked mussels or clams also add a nice touch. Each type brings its unique flavor. Mix and match to find what you love. While fusilli creates a great base, other pasta shapes work well too. You could use penne, farfalle, or even spaghetti. Each shape holds onto the dressing differently. Choose what sounds good to you! For a vegan twist, swap seafood for plant-based proteins. Use chickpeas or marinated tofu for protein. You can also add more crunchy veggies like cucumber and carrots. A lemon-tahini dressing would taste great here. This way, everyone can enjoy a fresh, flavorful delight. Check out the Full Recipe for more options! To keep your seafood pasta salad fresh, store it in an airtight container. This will keep out air and moisture. Place the salad in the fridge right after serving. It stays good for up to three days. If you notice any changes in color or smell, toss it out. Freezing is not the best option for seafood pasta salad. The texture of seafood changes when frozen and thawed. If you must freeze it, use a freezer-safe container. It can last for up to a month. When ready to eat, thaw it overnight in the fridge. Check for any off smells before serving. When you reheat, do it gently. Use the microwave or a stovetop. Heat only what you plan to eat. Seafood can become tough if heated too long. If it's cold, you can enjoy it straight from the fridge. The flavors will still be great! For the full recipe, check out the Zesty Seafood Pasta Salad Extravaganza. You can make this pasta salad a day before. Just follow the full recipe, and store it in the fridge. The flavors will mix well overnight. Before serving, give it a good stir. If it looks dry, add a little olive oil or lemon juice. The best seafood for a pasta salad is shrimp, scallops, and calamari. These options provide great taste and texture. You can also try crab or lobster for a twist. Make sure the seafood is cooked well and cut into bite-sized pieces. Yes, you can switch up the dressing. A creamy dressing, like ranch or Caesar, works well too. You can even make a simple vinaigrette with vinegar and mustard. Just make sure your dressing complements the seafood and veggies. Seafood pasta salad lasts about three days in the fridge. Keep it in an airtight container to maintain freshness. If you notice any off smells or changes in texture, it's best to discard it. In this blog post, we explored key seafood, pasta, and vegetable choices. You learned how to prepare these ingredients, create a tasty dressing, and mix everything together. I shared tips for cooking perfect pasta and enhancing flavors, plus fun presentation ideas. You also discovered variations, storage tips, and answers to common questions. Overall, seafood pasta salad is flexible, tasty, and perfect for any meal. Enjoy your cooking, and don’t hesitate to experiment with new flavors!

Savory Seafood Pasta Salad Fresh and Flavorful Delight

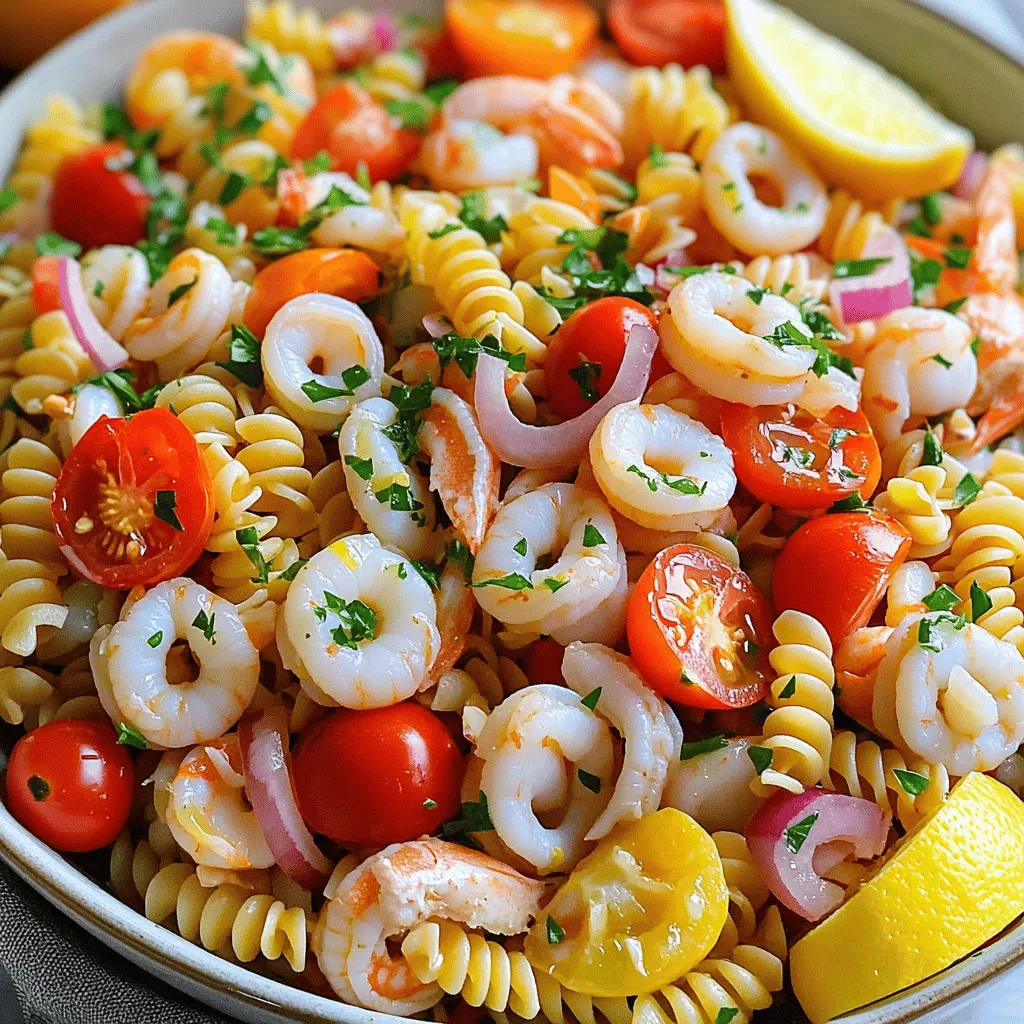
If you’re craving a dish that’s both fresh and tasty, a savory seafood pasta salad is the answer. This vibrant

Older posts
Newer posts
← Previous Page1 … Page53 Page54 Page55 … Page70 Next →

dsad

© 2025 So Yum Recipes • Built with GeneratePress

Our Policies

  • Copyright Policy
  • Cookie Policy
  • GDPR Policy
  • Privacy Policy
  • Disclaimer
  • Terms Of Use

More Information

  • Home
  • About
  • Contact
  • Appetizers
  • Dessert
  • Dinner
  • Drinks
©2025, So Yum Recipes About Back To Top