Skip to content
DisclaimerTerms Of UseGDPR PolicyCookie Policy

So Yum Recipes

  • Home
  • Drinks
  • Appetizers
  • Dinner
  • Dessert
  • About
  • Contact
  • Privacy Policy
DisclaimerTerms Of UseGDPR PolicyCookie Policy

Chloe

- 2 cans (15 oz each) chickpeas, drained and rinsed - 1 tablespoon olive oil - 2 teaspoons smoked paprika - 1 teaspoon cumin - 1 teaspoon chili powder - 1/2 teaspoon cayenne pepper (adjust to taste) - Salt and pepper to taste - 8 small corn or flour tortillas - 1 avocado, sliced - 1 cup red cabbage, shredded - 1/2 cup cilantro, chopped - 1 lime, cut into wedges - Optional: hot sauce for extra spice In this recipe, chickpeas are the star. They provide a hearty base for your tacos. Olive oil adds moisture and helps the spices stick. Spices like smoked paprika, cumin, and chili powder bring warmth and depth. You can adjust the cayenne pepper based on your heat preference. Tortillas serve as the perfect vessel for your filling. Choose corn or flour based on your taste. Fresh avocado adds creaminess, while shredded red cabbage gives a nice crunch. Cilantro brings a fresh note to each bite. Finally, lime adds brightness. A squeeze of lime elevates the flavors. These tacos are not just tasty; they're also good for you. Each serving has around 350 calories. Chickpeas are packed with protein and fiber. They help keep you full and satisfied. Chickpeas have many health benefits. They aid digestion and support heart health. Their rich nutrient profile includes vitamins and minerals. They are also low in fat, making them a great choice for balanced meals. When topping your tacos, consider your nutrition. Adding more veggies can boost vitamins and minerals. You can also use low-fat or no-fat toppings for a lighter meal. Enjoying a variety of toppings helps balance taste and nutrition. For the full recipe, check the details above. First, drain and rinse the chickpeas. Use a colander and let them sit for a minute. Rinsing helps remove excess sodium and starch. Next, prepare and warm your tortillas. Heat a dry skillet over medium-low heat. Warm the tortillas for about 30 seconds on each side. This makes them soft and easy to fold. In a large skillet, heat the olive oil over medium heat. Add the drained chickpeas to the skillet. Next, sprinkle them with smoked paprika, cumin, chili powder, cayenne pepper, salt, and pepper. Stir well to coat the chickpeas with spices. Sauté them for about 5 to 7 minutes. Stir occasionally until they are heated through and slightly crispy. For a crispy texture, give them space in the pan. If they are crowded, they may steam instead of crisping. Now, it's time to assemble your tacos. Start by layering a generous spoonful of the pan-fried chickpeas into each warm tortilla. Next, top each taco with sliced avocado, shredded red cabbage, and chopped cilantro. For a burst of flavor, serve with lime wedges on the side. You can also drizzle hot sauce on top for extra spice. Enjoy your flavorful and nutritious meal! You can find the full recipe [here]. You can easily change the spice in your tacos. For milder tacos, skip the cayenne pepper. Or, reduce the amount to suit your taste. If you want more heat, try adding a splash of hot sauce. I recommend sriracha or a smoky chipotle sauce. Both add great flavor and spice. Adding fresh herbs makes a big difference. Consider using fresh dill or parsley for a fresh twist. You can also top your tacos with a dollop of yogurt or sour cream. For even more flavor, marinate the chickpeas before cooking. Mix them with olive oil, lemon juice, and spices. Let them sit for 30 minutes for a deeper taste. Use a heavy skillet for sautéing. A cast iron skillet works best. It heats evenly and gives a nice sear. For warming tortillas, a non-stick skillet is great too. Heat them for about 30 seconds on each side. This makes them soft and easy to fold. Check out the Full Recipe for more details on making these tasty tacos! {{image_2}} You can switch chickpeas for other legumes. Black beans or lentils work great. Each option adds a unique taste and texture. Black beans have a rich flavor that pairs well with spices. Lentils are soft and absorb the flavors. Just cook them the same way I do with chickpeas in the recipe. For gluten-free tacos, use corn tortillas. They are tasty and safe for those with gluten issues. If you follow a vegan or vegetarian diet, this recipe is perfect! It has no meat and is full of plant-based protein. You can enjoy these tacos without any worries. You can mix up the spices for different tastes. Southwest spices add warmth and depth, while classic Mexican spices give a fresh vibe. Try using seasonal ingredients. Fresh corn or tomatoes can brighten up your tacos. Add these elements for a fun twist to your meal. Check out the [Full Recipe] for more details on making these flavorful tacos! To keep your spicy chickpea tacos fresh, store them in the fridge. Place the tacos in an airtight container. This method helps prevent them from getting soggy. If you have leftover chickpeas, store them separately. This keeps them crispy. You can use parchment paper between layers to absorb moisture. If you want to save chickpeas for later, freezing works well. First, drain and rinse them. Pat them dry with a paper towel. Spread them in a single layer on a baking sheet. Freeze for a few hours until firm. Transfer them to a freezer bag. When you are ready to use them, thaw in the fridge overnight. Reheat in a skillet over medium heat to keep them crispy. Stored in the fridge, assembled tacos last about 1-2 days. If stored separately, chickpeas can last up to 5 days. Signs of spoilage include an off smell or mold. Always check your food before eating. Following these tips will help you enjoy your spicy chickpea tacos longer. For the full recipe, be sure to check the earlier section. You can use black beans or lentils as a substitute for chickpeas. Both add protein and flavor. If you want a different texture, try using cooked quinoa. Each option will give your tacos a unique twist. Yes, you can prepare the chickpeas in advance. Store them in an airtight container in the fridge. Warm them up before serving. However, I recommend warming the tortillas fresh to keep them soft. Absolutely! These tacos are perfect for meal prep. You can portion out chickpeas and toppings. Just store them separately. When it's time to eat, assemble your tacos quickly. To amp up the heat, add more cayenne pepper or chili powder. You can also use a spicier hot sauce. If you enjoy fresh flavors, consider adding sliced jalapeños or serrano peppers. There are many toppings that can boost flavor! Here are some great options: - Salsa or pico de gallo - Fresh lime juice - Shredded cheese - Sour cream or yogurt - Pickled onions - Fresh herbs like basil or mint These extras can take your spicy chickpea tacos to the next level! For the complete recipe, check out the Full Recipe section. In this blog post, I covered how to make delicious chickpea tacos. We explored the key ingredients, nutritional benefits, and step-by-step instructions. I shared tips for adjusting spice levels and enhancing flavor. You also learned about variations, storage, and answers to common questions. Chickpea tacos are tasty and healthy. They fit many diets and are easy to customize. With these tips, you can enjoy a fun and nutritious meal any night. Happy cooking!

Spicy Chickpea Tacos Flavorful and Nutritious Meal

If you’re craving a meal that’s both tasty and packed with nutrients, you can’t miss these spicy chickpea tacos! With

- 1 cup fresh spinach, chopped - 1 cup artichoke hearts, drained and chopped - 1/2 cup cream cheese, softened - 1/2 cup sour cream - 1/2 cup mayonnaise - 1 cup shredded mozzarella cheese - 1/2 cup grated parmesan cheese - 2 cloves garlic, minced - 1 teaspoon garlic powder - 1 teaspoon onion powder - Salt and pepper to taste - 1/2 teaspoon crushed red pepper flakes (optional) - Fresh herbs (such as parsley or basil) for garnish For this dip, precise measurements matter. Use a measuring cup for the cheese and other ingredients. This ensures each bite is rich and creamy. A kitchen scale can also help if you want to be exact. Just make sure all your ingredients are fresh for the best taste. Want to mix things up? Here are some fun ideas: - Add 1/2 cup of chopped sun-dried tomatoes for a tangy twist. - Try 1/4 cup of diced jalapeños if you love heat. - A splash of lemon juice adds brightness. Feel free to play with these options. They will make your dip even more special! For the full recipe, check out the detailed instructions. Start by gathering all your ingredients. This dip comes together quickly, so you want to be ready. You will need fresh spinach, artichoke hearts, cream cheese, sour cream, and mayonnaise. Don't forget the garlic and spices. Preheat your oven to 350°F (175°C) to get it ready for baking. In a large mixing bowl, combine the cream cheese, sour cream, and mayonnaise. Use a hand mixer or a spatula to blend until smooth and creamy. This base gives your dip its rich texture. Next, add the chopped spinach and artichoke hearts. Then, include the minced garlic, mozzarella, and parmesan cheese. Finally, sprinkle in garlic powder, onion powder, salt, and pepper. If you want a kick, add crushed red pepper flakes. Gently fold all the ingredients together until they mix well. Transfer the creamy mixture into a baking dish, about 8x8 inches. Spread it evenly across the dish. Place it in the oven and bake for 25 to 30 minutes. You will know it's ready when the dip is hot and bubbly. The top should look slightly golden. Once done, take it out and let it cool for a few minutes. Garnish with fresh herbs for a nice touch. Serve warm with your favorite chips or bread. Enjoy this creamy spinach artichoke delight! To make your dip super creamy, use room temperature cream cheese. Cold cream cheese mixes poorly. Blend it well with sour cream and mayonnaise. This step adds smoothness. Don’t skip the mozzarella; it melts beautifully and adds richness. For a silky texture, mix until every bit blends well. Add fresh herbs to boost flavor. Parsley or basil works great. You can also sprinkle in some lemon juice for a bright zing. If you love spice, try adding more crushed red pepper flakes. A dash of Worcestershire sauce gives depth. Taste as you mix to find your perfect balance. Serve this dip warm for the best taste. The cheese should be melty and gooey. If it cools down, it may harden a bit. Keep it in the oven on low heat if you need to hold it. You can also serve it with warm pita chips or fresh veggies for dipping. For more ideas, check the Full Recipe. {{image_2}} You can switch up the cheese in your dip for a twist. Try using goat cheese for a tangy taste. Creamy feta adds a nice saltiness. You can also mix in cheddar for a sharper flavor. Each cheese brings its own character to the dish. Spices and herbs can make your dip unique. Add a pinch of cayenne for heat. Dried oregano or thyme offers a fresh taste. Fresh basil or parsley can brighten it up too. You can also mix in a squeeze of lemon juice for zest. Experiment to find your favorite blend! If you want a lighter dip, swap full-fat items for low-fat versions. Use Greek yogurt instead of sour cream for added protein. Light cream cheese can cut calories without losing creaminess. You can also reduce the amount of cheese for a lighter touch. These swaps help keep the flavor while making it healthier. For the full recipe, check out Creamy Spinach Artichoke Delight. After enjoying your creamy spinach artichoke dip, let it cool down. Place it in an airtight container. Store it in the fridge. It stays fresh for about 3-5 days. Make sure to cover it well to avoid drying out. If you have a lot left, consider splitting it into smaller containers. To reheat your dip, you can use the oven or microwave. If using the oven, preheat it to 350°F (175°C). Place the dip in a baking dish and cover it with foil. Heat for about 15-20 minutes, until warm. If you use a microwave, put the dip in a microwave-safe bowl. Heat it in short bursts, stirring in between, until it’s hot. Avoid overheating, as this can change the texture. You can freeze this dip for longer storage. Use a freezer-safe container and make sure to seal it tightly. It can last for up to 2 months in the freezer. When you are ready to eat it, move it to the fridge to thaw overnight. Reheat it as mentioned before. Note that freezing may change the dip's texture slightly, but it will still taste great. For the full recipe, check out the earlier sections. You can keep Creamy Spinach Artichoke Dip in the fridge for up to four days. Make sure to store it in an airtight container. The flavors get better over time, but it may lose some creaminess. Yes, you can make this dip a day ahead. Just mix all the ingredients and store it in the fridge. When you are ready to serve, bake it as directed. This saves time for your party or gathering. You have many tasty options for serving this dip. Here are some ideas: - Tortilla chips - Sliced baguette - Fresh veggies like carrots and celery - Pita bread - Crackers These choices add crunch and balance the creamy dip. You can mix and match to please your guests. Yes, you can use frozen spinach. Just thaw it first and squeeze out the extra water. This helps keep the dip from getting too watery. Yes, as long as you serve it with gluten-free dippers, this dip is gluten-free. Check the labels on your chips or crackers to be sure. The dip has a mild flavor, but you can add crushed red pepper flakes for some heat. Start with a little and taste before adding more. This way, you can adjust it to your liking. Yes, you can use low-fat versions of cream cheese, sour cream, and mayonnaise. The dip will still taste great, but it may be less creamy. We explored the key ingredients, step-by-step instructions, and helpful tips for making Creamy Spinach Artichoke Dip. You learned about various cheese options and healthy swaps to fit your taste. Remember to store leftovers properly and follow reheating tips for the best flavor. This dip is great for any gathering. Enjoy sharing it with friends and family. Your cooking skills can shine with this simple recipe!

Creamy Spinach Artichoke Dip Irresistible Delight

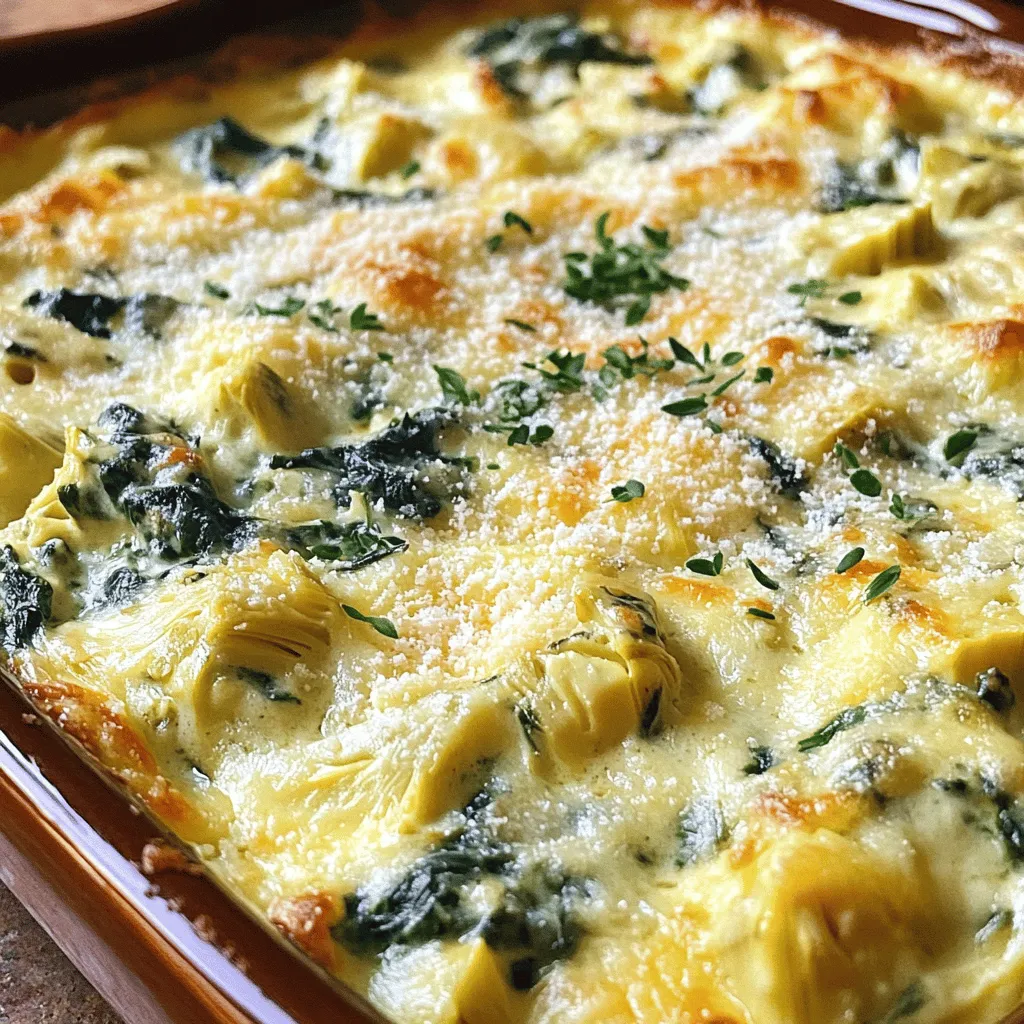
If you crave a tasty dip that wows every crowd, look no further! My Creamy Spinach Artichoke Dip is the

Chocolate kataifi bars are a fun dessert. They mix crispy kataifi pastry with rich chocolate. This recipe is simple and quick to follow. You will love how they look and taste. Here’s what you need: - 200g kataifi pastry - 100g unsalted butter, melted - 200g dark chocolate, chopped - 150g sweetened condensed milk - 50g chopped nuts (walnuts or pistachios) - 1 teaspoon vanilla extract - A pinch of salt - 1 tablespoon sugar (optional, for extra sweetness) Each ingredient plays a key role in flavor and texture. The kataifi gives a light crunch. The chocolate adds a rich, creamy taste. Nuts provide a nice bite. If you don't have kataifi, try phyllo dough. It gives a similar texture. You can swap dark chocolate with milk chocolate for a sweeter taste. For nuts, choose almonds or skip them for a nut-free option. You can use coconut milk instead of sweetened condensed milk for a dairy-free treat. These changes keep the bars tasty and fun! To start making your Chocolate Kataifi Bars, you first need to prepare the kataifi pastry. If your kataifi isn't already shredded, take a bowl and break it apart. This helps create those lovely strands. Next, pour the melted unsalted butter over the shredded kataifi. Use your hands to toss the pastry until it is well-coated. This step is key for flavor and texture. Now, take half of the buttered kataifi and press it firmly into the bottom of an 8x8 inch baking pan. Make sure it’s even. Bake this layer in a preheated oven at 180°C (350°F) for about 15 minutes, or until it turns golden brown. This gives your bars a nice base. While your kataifi bakes, it’s time to make the chocolate filling. In a saucepan, combine chopped dark chocolate, sweetened condensed milk, a pinch of salt, and vanilla extract. Place the saucepan over low heat. Stir gently as the chocolate melts. This should take just a few minutes. Once smooth, remove the pan from the heat. Add the chopped nuts, mixing them in well. Now, pour the melted chocolate mixture over the baked kataifi layer in your pan. Use a spatula to spread the chocolate evenly. Next, take the remaining kataifi and sprinkle it over the chocolate layer. Press it down gently to create an even top layer. If you want, add a sprinkle of sugar for extra sweetness and crunch. Return the pan to the oven and bake for another 20-25 minutes, until the top is golden and crispy. After baking, let your bars cool in the pan for about 30 minutes. Use the parchment overhang to lift the bars out and slice them into squares or rectangles. For a delightful finish, serve your Chocolate Kataifi Bars on a nice plate, perhaps dusted with cocoa or powdered sugar. Enjoy! For the best texture, make sure to bake the kataifi until golden. This step gives a nice crunch. Use high-quality dark chocolate for a rich, deep flavor. The balance of chocolate and sweetened condensed milk is key. Do not skip the pinch of salt; it enhances the chocolate. If you like nuts, chop them finely. This helps them mix well into the chocolate filling. For a softer bar, reduce the baking time slightly. Keep an eye on the bars as they bake. Presentation makes a big difference. You can serve the bars on a nice plate. A dusting of cocoa powder or powdered sugar adds charm. Garnish with whole nuts on top for a rustic look. You can also pair these bars with a scoop of vanilla ice cream. This adds creaminess and complements the chocolate flavor. Consider using small dessert cups for serving. This way, guests can grab a bar without mess. One common mistake is over-baking the kataifi. This can make it too hard. Aim for a golden color, not dark brown. Another mistake is not letting the bars cool completely before slicing. This can lead to messy cuts. If the chocolate mixture is too hot, it can melt the kataifi below. Be careful when pouring it over the kataifi layer. Lastly, do not forget to line the baking pan with parchment paper. This step helps with easy removal of the bars later. Follow these tips for a perfect treat every time! {{image_2}} If you want to make nut-free chocolate kataifi bars, just skip the nuts. The bars will still taste great! You can add a bit of crunch by using seeds. Try sunflower seeds or pumpkin seeds instead. They will add texture without the nut allergy risk. You can switch up the chocolate for these bars. Use milk chocolate for a sweeter taste. Dark chocolate gives a rich flavor, while white chocolate adds a creamy touch. You can even mix different chocolates for a fun twist. Just remember, the type of chocolate affects the sweetness and taste of your bars. To make your bars unique, think about adding flavors. Dried fruits like raisins or cranberries can add sweetness. You could also use spices like cinnamon or cardamom for a warm flavor. Another fun option is to mix in some coffee or espresso powder. This will enhance the chocolate taste and give a kick. For the complete instructions on making these delicious bars, check out the Full Recipe. To keep your Chocolate Kataifi Bars fresh, store them in an airtight container. This helps maintain their texture and flavor. Place a layer of parchment paper between layers to prevent sticking. Keep the container in a cool, dry place. You can also store them in the fridge for extra freshness. However, be aware that cold storage can affect the crunchiness of the kataifi. Yes, you can freeze these bars! After cutting them, wrap each piece tightly in plastic wrap. Then, place the wrapped bars in a freezer-safe container or bag. They can last up to three months in the freezer without losing flavor. When you’re ready to enjoy them, simply remove from the freezer and let them thaw in the fridge overnight. If your bars lose their crispiness, you can restore it easily. Preheat your oven to 180°C (350°F). Place the bars on a baking sheet and warm them for about 10 minutes. This process revives that lovely crunch. Enjoy your bars warm for a delightful treat! You can make many tasty desserts with kataifi pastry. Try these ideas: - Baklava: This classic uses layers of kataifi, nuts, and honey syrup. - Kataifi Nest: Shape the pastry into nests, fill with cream, and top with fruit. - Kataifi Cheesecake: Use kataifi as a crust for a creamy cheesecake. - Kataifi Pudding: Layer kataifi with custard or pudding for a fun treat. These options let you play with textures and flavors, just like in chocolate kataifi bars. Yes, you can make chocolate kataifi bars ahead of time. They stay fresh for a few days. Here’s what to do: - Prepare: Make the bars as directed and let them cool completely. - Store: Wrap them tightly in plastic wrap or foil. This keeps them moist. - Refrigerate: Place them in the fridge to keep them fresh longer. If you want to serve them warm, you can reheat them in the oven for a few minutes. You might find chocolate kataifi bars at local bakeries or specialty shops. Look for these places: - Middle Eastern Markets: They often have kataifi-based sweets. - Online Stores: Check websites that specialize in international foods. - Gourmet Bakeries: Some bakeries make unique desserts with kataifi. If you can’t find them, making your own is fun and rewarding. Check the Full Recipe for guidance! In this article, we explored how to make delicious chocolate kataifi bars. We covered the key ingredients, detailed step-by-step instructions, and helpful tips to perfect your dish. You can try fun variations to suit your taste, and I shared best practices for storing your bars. Remember, practice makes perfect in the kitchen. With simple steps and a few tricks, you can create a dessert everyone will enjoy. Don't hesitate to experiment with ingredients and flavors to make this treat your own. Enjoy your baking!

Chocolate Kataifi Bars Irresistible Sweet Treat

Are you ready to dive into a delicious world of dessert? Chocolate Kataifi Bars are a sweet delight that’s hard

To make soft Italian torrone, you need some key ingredients. Here’s what you will need: - 300g honey - 200g granulated sugar - 2 large egg whites - 300g roasted almonds (or hazelnuts) - 150g candied orange peel, finely chopped - 1 teaspoon vanilla extract - A pinch of salt - Wafer sheets (for layering) The honey gives the torrone its sweet flavor and smooth texture. Sugar adds sweetness and helps with the structure. The egg whites make it light and fluffy. The nuts add a nice crunch, while the candied orange peel gives a hint of citrus. Vanilla adds warmth and depth. You can swap out some ingredients if you like. For a nut-free version, use seeds like sunflower seeds instead of nuts. If you want less sugar, you can try using agave syrup or maple syrup. For a fruity twist, use dried fruits like cranberries or cherries instead of orange peel. You will need a few tools to make your torrone. Here’s what to gather: - Medium saucepan - Electric mixer - Clean, dry mixing bowl - Baking dish (about 10x8 inches) - Parchment paper - Spatula Having these tools ready will make your cooking process smooth and fun. Make sure to measure your ingredients before you start to keep things easy. For the full recipe, refer to the section above. Start by gathering your ingredients. You will need honey, sugar, and salt. In a medium saucepan, mix the honey and sugar together over medium heat. Stir constantly until the sugar dissolves. Once dissolved, let the mixture come to a gentle boil. Allow it to simmer for about 5 to 7 minutes. You want it to thicken slightly. This step is crucial for the texture of your torrone. While your honey-sugar mixture simmers, prepare your egg whites. In a clean bowl, beat the egg whites with a pinch of salt. Use an electric mixer on high speed. Whip until stiff peaks form, which should take a few minutes. Once your sugar mixture is ready, carefully pour it into the whipped egg whites. Mix on low speed as you add the hot mixture. This step helps combine everything without cooking the egg whites. Keep mixing until well combined and slightly cooled. Now it’s time to fold in your extras. Gently add roasted almonds, candied orange peel, and vanilla to the mixture. Ensure everything is evenly mixed. Prepare your baking dish by lining it with parchment paper. Place wafer sheets on the bottom of the dish. Next, pour the torrone mixture over the sheets, smoothing it with a spatula. Place another wafer sheet on top and press down gently. This helps level the surface. Allow the torrone to cool for at least 4 hours at room temperature. If you want it to set faster, refrigerate it for about 2 hours. Once set, lift the torrone out using the parchment paper. Cut it into squares or rectangles for serving. Enjoy your homemade delight! To get that soft, chewy texture, whip the egg whites until they form stiff peaks. This step is key. When you mix in the hot honey-sugar blend, do it slowly. Pour it in a thin stream while mixing. This helps keep the air in the egg whites. One big mistake is not mixing the egg whites enough. If they aren’t stiff, your torrone may not set right. Another error is stirring the honey-sugar mix while it cooks. Let it boil gently without stirring to avoid crystals forming. Be careful when adding hot syrup to the egg whites, as it can cook them if you pour too fast. Let your torrone cool at room temperature for at least four hours. If you're in a hurry, you can chill it in the fridge for two hours. Once set, wrap each piece in wax paper. Store them in an airtight container at room temperature. This keeps them fresh and tasty for longer. Enjoy your homemade treat! {{image_2}} I love to experiment with flavors in soft Italian torrone. You can mix in chocolate for a rich taste. Just melt dark or milk chocolate and fold it into the mixture. You can also add pistachios for a nutty crunch. They pair well with almonds or hazelnuts. For a fruity twist, consider adding dried fruits like cherries or apricots. Each flavor brings a new experience to this classic treat. If you want a healthier version, try low-sugar options. Use natural sweeteners like agave syrup or maple syrup. These alternatives can give you the sweetness without the added sugar. Be aware that using different sweeteners may change the texture slightly. It's best to test them out to find what you enjoy most. Italy has many regions, and each has its own take on torrone. In Sicily, they often include pistachios and almonds. In Naples, they add hazelnuts and different spices. Each region uses local ingredients, making each torrone unique. You can even try adding local honey for a special twist. Exploring these regional variations adds depth to your homemade treat. For the full recipe, check out the one I shared earlier. To keep your soft Italian torrone fresh, store it in an airtight container. This prevents moisture from ruining its texture. Place parchment paper between layers if you have multiple pieces. Avoid storing it in direct sunlight or near heat sources. A cool, dry place works best for keeping it tasty. Homemade torrone lasts about two weeks when stored properly. If you keep it in the fridge, it can last up to a month. However, the texture may change slightly in the fridge. Always check for any signs of spoilage before eating. If you want to freeze your torrone, wrap each piece in wax paper. Then place the wrapped pieces in a zip-top bag. Remove as much air as possible to prevent freezer burn. You can keep it in the freezer for up to three months. When ready to enjoy, thaw it in the fridge overnight before serving. The traditional way to make soft Italian torrone starts with honey and sugar. You heat these together until they dissolve. Then, you whip egg whites until they form peaks. Next, you mix the hot honey-sugar blend into the egg whites. This creates a fluffy base. Finally, you add nuts and flavorings before pouring the mixture into a mold. After cooling, you cut it into pieces. This method keeps the torrone chewy and soft. Yes, you can use different nuts in the recipe. While almonds are classic, hazelnuts work well too. You can even try pistachios for a twist. Just make sure the nuts are roasted for the best flavor. This gives your torrone a unique taste and texture. Mix and match to find your favorite nut blend. Yes, you can make soft Italian torrone vegan. Instead of egg whites, use aquafaba, which is the liquid from canned chickpeas. Whip it until it forms stiff peaks, just like egg whites. You can also substitute honey with maple syrup or agave nectar. These swaps keep your torrone tasty and cruelty-free. You can buy authentic soft Italian torrone at specialty Italian shops. Many local markets also carry it during the holidays. If you prefer online shopping, look for well-rated brands. Websites like Amazon or specialty food stores often sell it. Just make sure to read reviews for quality. Torrone has a rich history in Italy, dating back to the 15th century. It first appeared in the northern regions, especially during holidays. Traditionally, families share torrone during celebrations like Christmas and weddings. Each region has its own twist on the recipe, showcasing local flavors. This sweet treat represents love and togetherness in Italian culture. Making it at home connects you to these traditions. For a full recipe, check the earlier section. Soft Italian Torrone offers a delightful treat for anyone. We covered key ingredients and substitutes, ensuring you can tailor it to your taste. You learned step-by-step instructions, from mixing to pouring and setting. I also shared tips for the perfect texture and common mistakes to avoid. Remember to store your torrone properly for longer freshness. With flavor variations and storage tips, you can truly make this recipe your own. Enjoy creating your unique soft torrone that delights your friends and family!

Soft Italian Torrone Irresistible Homemade Delight

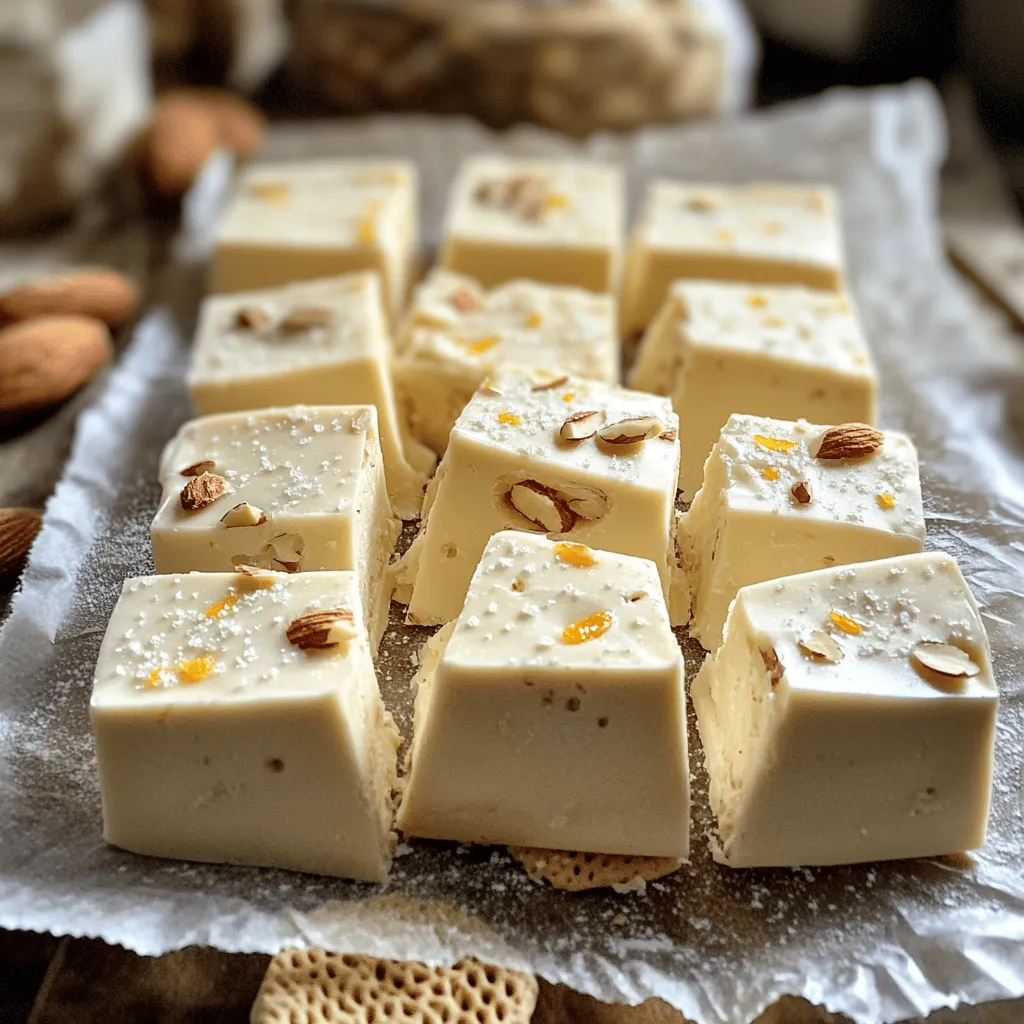
If you’ve ever dreamed of making your very own Soft Italian Torrone, you’re in for a treat! This irresistible delight

- 1 ½ cups crushed graham crackers - ½ cup unsalted butter, melted - 2 tablespoons sugar - 16 oz cream cheese, softened - ½ cup sugar - 3 large eggs - Zest of 2 lemons - ⅓ cup freshly squeezed lemon juice - 1 teaspoon vanilla extract - 3 large eggs - ¾ cup sugar - ⅓ cup freshly squeezed lemon juice - Zest of 1 lemon - 4 tablespoons unsalted butter, cut into pieces - 3 large egg whites - ¾ cup sugar - ¼ teaspoon cream of tartar - 1 teaspoon vanilla extract The ingredients for this triple lemon meringue cheesecake bring bright flavors. The crust starts with crunchy graham crackers, which give a nice base. You mix them with melted butter and sugar to form a delicious layer. For the cheesecake filling, cream cheese is the star. It adds that rich and creamy texture we all love. The addition of lemon juice and zest gives a sweet and tangy twist. Next, we make the lemon curd, which is smooth and vibrant. It uses fresh lemon juice and zest for a real citrus kick. This layer adds extra depth and flavor. For the final touch, we whip up the meringue topping. This topping is light and airy, creating a beautiful contrast with the dense cheesecake. Use the full recipe to guide you through the fun process. Each layer has its own charm and taste. You will create a delightful dessert that impresses everyone! - Preheat to 325°F (165°C) - Grease a 9-inch springform pan Start by preheating your oven. Set it to 325°F (165°C). While the oven heats, grease a 9-inch springform pan. This helps the cheesecake come out smoothly later. - Combine crust ingredients and press into the pan - Bake and cool the crust In a bowl, mix 1 ½ cups crushed graham crackers, ½ cup melted butter, and 2 tablespoons sugar. Press this mixture evenly into the bottom of your springform pan. Bake for 10 minutes. Allow the crust to cool completely before adding the cheesecake filling. - Mix cream cheese and sugar until smooth - Add eggs, lemon zest, lemon juice, and vanilla In a large bowl, beat 16 oz softened cream cheese with ½ cup sugar until smooth. This takes about 2-3 minutes. Add 3 large eggs one at a time, mixing slowly after each. Then, mix in the zest of 2 lemons, ⅓ cup lemon juice, and 1 teaspoon vanilla extract. Ensure everything is well combined. - Pour filling over cooled crust and bake - Cool cheesecake in the oven Pour the cheesecake filling onto your cooled crust. Smooth the top with a spatula. Bake for 50-60 minutes. The center should jiggle slightly but firm up as it cools. After baking, turn off the oven and crack the door. Let the cheesecake cool in the oven for 1 hour, then refrigerate for at least 4 hours or overnight. - Whisk eggs, sugar, lemon juice, and zest in a saucepan - Thicken over medium heat and add butter In a small saucepan, whisk together 3 large eggs, ¾ cup sugar, ⅓ cup lemon juice, and the zest of 1 lemon. Cook over medium heat, whisking constantly. The mixture will thicken in about 8-10 minutes. Remove from heat and stir in 4 tablespoons of butter until melted. Let this lemon curd cool before spreading it on the cheesecake. - Spread lemon curd over the cheesecake - Prepare and add the meringue topping Once the lemon curd is cool, spread it evenly over the chilled cheesecake. Prepare the meringue next. - Create peaks and broil until golden - Cool before serving In a clean bowl, beat 3 large egg whites until frothy. Add ¼ teaspoon cream of tartar and continue beating until soft peaks form. Gradually add ¾ cup sugar, one tablespoon at a time, until you get stiff peaks. Mix in 1 teaspoon vanilla extract. Spread the meringue over the lemon curd, creating peaks. Broil for 1-2 minutes, watching closely until golden. Allow cooling before serving. You can find the full recipe [here](#). To make the best cheesecake, start with room temperature ingredients. This helps create a smooth and creamy filling. Cold ingredients can lead to lumps. When mixing the batter, be careful not to overmix. Just mix until everything is combined. Overmixing can make the cheesecake dense. When making meringue, clean your mixing bowl first. Any grease can stop the egg whites from whipping properly. Make sure the bowl is dry as well. While mixing, add sugar slowly. This helps the meringue become stable and fluffy. If you add it too fast, the meringue may not hold its shape. To make your cheesecake look lovely, garnish it with lemon slices or fresh berries. This adds color and makes it more appealing. Always serve the cheesecake chilled. This brings out all the flavors and gives you the best taste experience. Enjoy your slice of joy! {{image_2}} You can make your cheesecake even more exciting by adding flavor infusions. Try mixing in other citrus zests, like lime or orange. This adds a fresh twist to the lemon flavor. You can also add a hint of almond or coconut extract. Just a little will enhance the taste and give your cheesecake a unique touch. While meringue is classic, you can switch it up with different toppings. Whipped cream is a light option that pairs well with lemon. It adds a soft texture and a creamy taste. You can also top with seasonal fruits like berries or kiwi. This not only looks beautiful but adds natural sweetness and color to your dessert. For those needing gluten-free options, you can still enjoy this treat. Substitute regular graham crackers with gluten-free ones. They work just as well in the crust. You might also explore almond flour as an alternative for the crust. Almond flour gives a nice nutty flavor that complements the cheesecake beautifully. These variations let you customize your Triple Lemon Meringue Cheesecake. You can create a dessert that fits your tastes and dietary needs. For the complete recipe, check out the [Full Recipe]. Store your Triple Lemon Meringue Cheesecake in the fridge. Keep it in an airtight container to keep it fresh. It tastes best within 3-4 days. You can enjoy the bright lemon flavor and creamy texture for a few days after making it. Want to save some for later? You can freeze portions of the cheesecake. Wrap each piece tightly in plastic wrap. This helps keep the cheesecake from getting freezer burn. Be sure to label it with the date, so you know when you made it! When you’re ready to enjoy your frozen cheesecake, thaw it in the refrigerator overnight. This way, it will be nice and cool when you serve it. Remember, do not refreeze after thawing. This will keep the texture and flavor just right. Triple Lemon Meringue Cheesecake is a sweet dessert. It mixes creamy cheesecake, tangy lemon curd, and fluffy meringue. Each layer brings a burst of lemon flavor. The cheesecake has a smooth texture, while the meringue is light and airy. Lemon curd adds a tart twist that balances the sweetness. This dessert is a treat for lemon lovers! Yes, you can make this cheesecake a day ahead. This helps the flavors blend well. Just cool it completely and store it in the fridge. Letting it sit overnight makes it even tastier. When ready to serve, top it with meringue for a fresh look. To keep the crust firm, bake it first. After baking, let it cool completely. This step prevents moisture from the filling from making the crust soggy. A well-baked crust holds up nicely under the creamy filling. If your meringue weeps, it may be due to overcooking. Meringue can also weep if egg whites are not whipped enough. Make sure to beat the egg whites until they form stiff peaks. This ensures a stable meringue that stands tall on your cheesecake. You now know how to make a Triple Lemon Meringue Cheesecake. We covered the ingredients, from the crust to the meringue. I shared step-by-step instructions to guide you through each stage. Plus, I included tips for perfecting your cheesecake and variations to make it your own. Enjoy crafting this delicious dessert that combines tangy lemon and sweet meringue. Remember to store any leftovers properly. Happy baking!

Triple Lemon Meringue Cheesecake Delightful and Easy

If you love lemon desserts, you’re in for a treat! This Triple Lemon Meringue Cheesecake is a tasty twist on

- 1 (15 oz) can pumpkin puree - 1 (12 oz) can evaporated milk - 3 large eggs - 1 cup sugar - 1 teaspoon vanilla extract - 1 teaspoon ground cinnamon - 1/2 teaspoon ground nutmeg - 1/2 teaspoon ground ginger - 1/4 teaspoon salt - 1 box (15.25 oz) yellow cake mix - 1/2 cup unsalted butter, melted - 1 cup chopped pecans (optional) - Whipped cream for serving (optional) When it comes to making Pumpkin Pie Dump Cake, the ingredients are key. Each one adds to the flavor and texture. First, I use a can of pumpkin puree. This is the heart of the recipe. It gives the cake its rich taste and smooth texture. Next, I add evaporated milk. It makes the cake moist and creamy. The eggs help bind everything together. They give it structure. Sugar brings out the natural sweetness of the pumpkin. Vanilla extract adds a nice touch of warmth. For spices, I stick to ground cinnamon, nutmeg, and ginger. These spices make the cake smell and taste like fall. A pinch of salt balances the sweetness. The topping is where the magic happens. A box of yellow cake mix creates a light, fluffy layer. I drizzle melted butter on top for a crispy finish. If you like nuts, sprinkle some pecans for added crunch. Finally, whipped cream is a must for serving. It adds a creamy layer on top. You can find the full recipe above. Enjoy making this easy and delicious dessert! - Preheat your oven to 350°F (175°C) and grease a 9x13 inch baking dish. - In a large bowl, mix together pumpkin puree, evaporated milk, eggs, sugar, vanilla, cinnamon, nutmeg, ginger, and salt. Stir until everything is well mixed. - Pour the pumpkin mixture into the prepared baking dish. - Sprinkle the dry cake mix evenly on top of the pumpkin layer. Do not stir; the cake mix will create a nice topping as it bakes. - Drizzle the melted butter over the dry cake mix. You can also add chopped pecans if you want some crunch. - Bake in the preheated oven for 50-60 minutes. Check for doneness using a toothpick; it should come out clean when inserted in the center. This method makes the process simple and gives you a tasty dessert. For the full recipe, check out Pumpkin Delight Dump Cake. To make the pumpkin layer smooth, mix all the ingredients well. This helps each bite taste great. If your oven runs hot or cool, check the cake a bit early or late. Each oven is different, so adjust your time as needed. I love to top my dump cake with whipped cream and a sprinkle of cinnamon. It adds a nice touch and flavor. You can serve this dessert warm or cold. Both options are tasty, but warm gives a cozy feel. For the best texture, do not stir the cake mix into the pumpkin layer. Let it sit on top; it will bake into a nice crust. To avoid a dry topping, make sure you drizzle enough melted butter over the cake mix. This keeps everything moist and delicious. {{image_2}} You can change up the flavors in your pumpkin pie dump cake. Using different pie spices can add a fun twist. Try adding cardamom or allspice for a warm kick. You can also mix in chocolate chips. They add a rich flavor and surprise element. Just fold in a cup of chocolate chips before pouring the pumpkin layer. This makes it even more delicious! If you need gluten-free options, look for gluten-free cake mix. Many brands offer great choices that work well. For vegan adaptations, swap the eggs with flax eggs or applesauce. You can also use almond or coconut milk in place of evaporated milk. These changes keep it tasty while meeting dietary needs. For a festive touch, add cranberries or pecans. These can bring in fall flavors and add texture. You can sprinkle cranberries on top before baking. Pecans can be mixed into the cake or used as a topping. If it's a special occasion, serve in a pretty dish. You can even decorate with whipped cream and a sprinkle of cinnamon. This makes your dump cake stand out! For the full recipe, check the section above! To keep your Pumpkin Pie Dump Cake fresh, store it in the fridge. Use an airtight container or cover it with plastic wrap. This way, it stays moist and tasty. Yes, you can freeze Pumpkin Pie Dump Cake! Slice it into portions first. Wrap each piece tightly in plastic wrap, then place them in a freezer bag. This helps prevent freezer burn. In the fridge, your dump cake lasts about 4 to 5 days. It’s best to eat it within this time for the best taste and texture. If you freeze it, it can last up to 2 months. Just remember to thaw it in the fridge overnight before eating. To reheat your Pumpkin Pie Dump Cake without drying it out, use the oven. Preheat it to 350°F (175°C). Place the cake in an oven-safe dish and cover it with foil. Heat for about 15-20 minutes. You can also use a microwave. Just warm a slice for 30 seconds. If it seems dry, add a little whipped cream on top for moisture. For the Full Recipe, refer back to the earlier section. A dump cake is a simple dessert. You mix ingredients in one dish. Then, you bake it without much fuss. The name comes from "dumping" the ingredients in. It’s an easy way to enjoy cake with less work. Yes, you can use fresh pumpkin. Just cook and mash it first. This gives you a rich flavor. However, canned pumpkin is more convenient. It saves time and ensures a smooth texture. You know it's done when the top is golden brown. A toothpick should come out clean when poked in the center. The edges will pull away from the dish slightly. This means it has baked properly. You can serve it with whipped cream. A scoop of vanilla ice cream works well, too. Adding a sprinkle of cinnamon enhances the taste. Fresh pecans on top can add a nice crunch. Yes, you can make it ahead of time. Prepare it and store it in the fridge. Bake it the next day for fresh flavors. This dessert is perfect for gatherings or holidays. Check the Full Recipe for more details. This blog post covered the wonderful recipe for Pumpkin Pie Dump Cake. You learned about the key ingredients, easy steps to prepare it, and tips for perfecting your cake. Remember, use fresh spices for the best flavor and enjoy it warm, topped with whipped cream. I hope this scrumptious dessert brings joy to your table. Now, gather your ingredients and start baking! You'll love how simple and delicious it is.

Pumpkin Pie Dump Cake Easy and Delicious Dessert

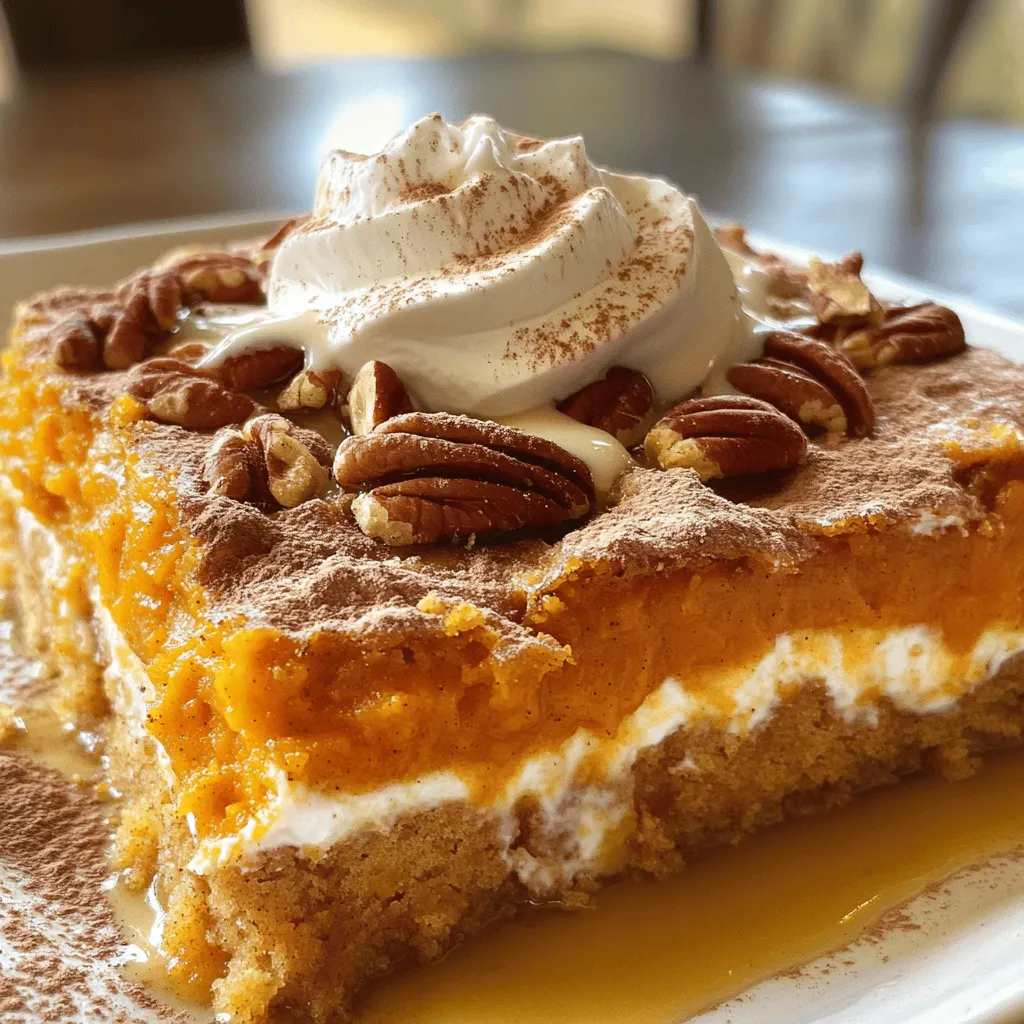
Are you ready to bake a sweet treat that screams comfort? This Pumpkin Pie Dump Cake is simple, quick, and

- 2 boneless, skinless chicken breasts - 8 oz fettuccine pasta - 1 cup cherry tomatoes, halved - 1 cup heavy cream - ½ cup grated Parmesan cheese - 2 cloves garlic, minced - 1 teaspoon Italian seasoning - 2 tablespoons olive oil - Fresh basil leaves, for garnish - Salt and pepper, to taste Gather these ingredients before you start. Each one plays a key role in the dish. The chicken offers protein and texture. Fettuccine pasta provides the perfect base. Fresh cherry tomatoes add a burst of flavor. Heavy cream makes the sauce rich and creamy. Parmesan cheese brings depth and a savory kick. Garlic and Italian seasoning enhance the overall taste. Olive oil helps to cook the chicken and adds flavor. Fresh basil leaves give a fresh touch at the end. Salt and pepper round out all the flavors. Having everything ready makes cooking smooth and fun. You can find the full recipe to guide you through every step of making this creamy delight. Enjoy the process and savor the tasty results! - First, fill a large pot with water and add a good amount of salt. - Bring the salted water to a rolling boil. - Add the fettuccine pasta and cook according to the package instructions. - Once cooked, drain the pasta and set it aside for later. - Take your chicken breasts and season them well with salt, pepper, and Italian seasoning. - In a large skillet, heat two tablespoons of olive oil over medium-high heat. - Add the seasoned chicken breasts to the skillet. Cook each side for about 5-7 minutes until golden brown. - Remove the chicken from the skillet and let it rest before slicing. - In the same skillet, add two cloves of minced garlic. Sauté for about 30 seconds until it smells great. - Next, toss in the halved cherry tomatoes and cook them for 2-3 minutes until they soften. - Pour in one cup of heavy cream and bring it to a gentle simmer. Stir in half a cup of grated Parmesan cheese until it melts into a creamy sauce. - Take the cooked pasta and add it to the skillet with the sauce. Toss everything together until the pasta is well coated. - Slice the rested chicken and place it on top of the pasta. - Finish by adding fresh basil leaves for a pop of color and flavor. - If you like, sprinkle some extra Parmesan cheese on top before serving. For the full recipe, check out Marry Me Chicken Pasta . To ensure your chicken is cooked perfectly, use a meat thermometer. The safe internal temperature is 165°F. Sear the chicken until golden brown. This gives it flavor and keeps it juicy. Let it rest before slicing. This helps the juices stay in the meat. For a creamy sauce, add the heavy cream slowly. Stir it in and let it simmer. This helps the sauce thicken and become smooth. If it's too thick, add a splash of pasta water. If you want alternatives for heavy cream, try coconut cream or cashew cream. Both add richness without dairy. You can also use half-and-half for a lighter option. For pasta, fettuccine is great, but you can use penne or spaghetti. Each type absorbs the sauce differently, so choose what you like best. To make a complete meal, serve with garlic bread or a fresh salad. A side of steamed broccoli or green beans adds color and crunch. Pair this dish with a white wine like Chardonnay or Pinot Grigio. These wines complement the creamy flavors and brighten the meal. For the full recipe, check out the complete list of steps and ingredients. {{image_2}} You can make Marry Me Chicken Pasta lighter. Here are some ideas: - Lower-calorie versions: Use less heavy cream. Try low-fat milk or Greek yogurt instead. This will cut calories but keep some creaminess. You can also use less cheese. - Gluten-free pasta options: If you need gluten-free, choose gluten-free pasta. Many brands offer tasty options that cook well and taste great. To boost the flavor of your Marry Me Chicken Pasta, try these tips: - Adding spices or herbs for extra flavor: Add red pepper flakes for heat. Fresh thyme or rosemary can bring a nice touch. Mix in fresh parsley for a burst of color and taste. - Incorporating vegetables into the recipe: You can add bell peppers, spinach, or broccoli. These veggies are not only healthy but also add great color and texture to your dish. Make sure to check the Full Recipe for all the details. Enjoy experimenting! To keep Marry Me Chicken Pasta fresh, follow these tips: - Cool it down: Let the pasta cool to room temperature. - Use airtight containers: Store in containers with tight lids to avoid air exposure. - Refrigerate: It lasts up to 3 days in the fridge. If you want to save it for later: - Freeze: Place the pasta in freezer-safe bags or containers. - Label and date: Mark the bag with the date you froze it. - Store: It keeps well for up to 3 months in the freezer. When you're ready to enjoy leftovers, you have two easy options: - Microwave instructions: - Place a portion in a microwave-safe bowl. - Add a splash of water to keep it moist. - Cover it with a lid or a damp paper towel. - Heat in 30-second intervals, stirring until warmed through. - Stovetop reheating for best results: - Add a little olive oil or butter in a skillet. - Heat on low, stirring often to prevent sticking. - Cook until heated through, about 5 to 7 minutes. Enjoy your creamy delight again with these simple tips! For the full recipe, check out the Marry Me Chicken Pasta . Marry Me Chicken Pasta is a creamy, dreamy dish full of flavors. It features chicken, fettuccine pasta, and a rich sauce. The dish has a fun name, suggesting it could win hearts. It became popular on social media and food blogs. Many people love its creamy texture and tasty ingredients. Some say it’s a perfect meal for a romantic dinner. Yes, you can prepare this dish ahead of time. Cook the pasta and chicken, then store them separately. Keep the sauce in a jar or bowl in the fridge. When ready to eat, heat the sauce, mix in the pasta and chicken, and serve. This makes for a quick meal. For storage, use airtight containers to keep everything fresh. To add some heat, try these spices. Red pepper flakes are a great choice. You can also use cayenne pepper for more kick. If you like fresh herbs, try adding chopped jalapeños or serrano peppers. Adjust the amount to match your taste. Just remember, a little goes a long way! This blog showed you how to make Marry Me Chicken Pasta. We covered ingredients, step-by-step cooking, tips, and variations. You can craft a creamy, delicious meal that impresses anyone. Remember to use fresh herbs and garnish well for the best taste. Don’t forget about storing leftovers, as they can be just as tasty. Enjoy experimenting with flavors and ingredients to make this dish your own. Cooking should be fun and rewarding, so dive in and savor every bite!

Marry Me Chicken Pasta Irresistible Creamy Delight

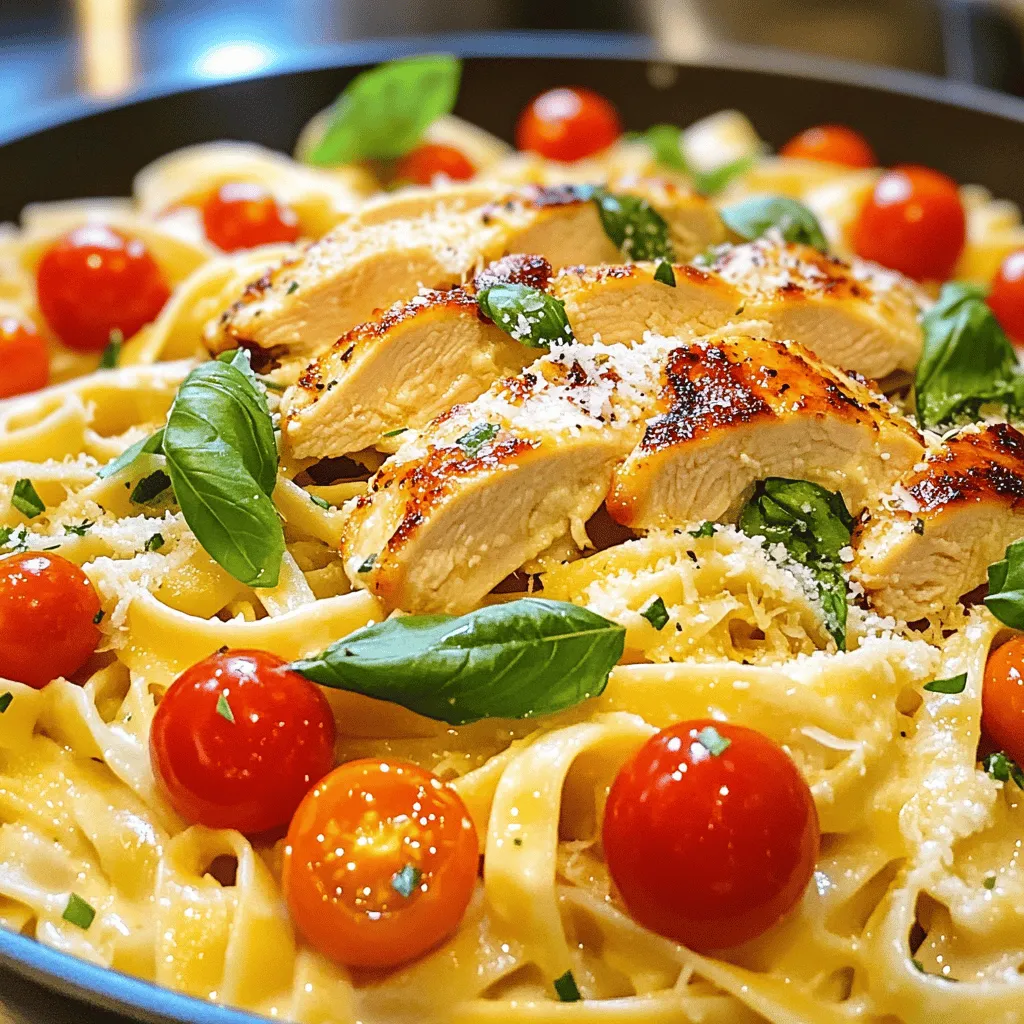
If you’re looking for a dish that will steal hearts, you’ve found it! Marry Me Chicken Pasta is a creamy,

- Large shrimp (1 lb) - Coconut milk (13.5 oz can) - Red curry paste (2 tablespoons) - Fresh ginger (1 tablespoon) - Garlic (1 tablespoon) - Variety of vegetables (bell pepper, snap peas) - Fish sauce (2 tablespoons) - Lime juice (1 tablespoon) - Coconut oil (1 tablespoon) - Fresh cilantro for garnish Gathering these ingredients sets the stage for a rich and bold meal. The large shrimp is the star of the dish, bringing sweetness and a tender bite. Coconut milk adds creaminess and a hint of tropical flavor. Red curry paste offers warmth and depth, making every bite exciting. Fresh ginger and garlic provide a fragrant base. The bell pepper adds color and crunch, while snap peas bring a fresh snap. Fish sauce enhances umami, balancing the dish perfectly. Lime juice adds brightness, cutting through the creaminess. Coconut oil helps in cooking while adding a hint of sweetness. Finally, cilantro gives a fresh finish to each plate. You can find the full recipe at the end of this article to help you whip up this coconut curry shrimp dish in no time. - Start with 1 pound of large shrimp. Peel and devein each shrimp. This step removes the shell and the dark vein along the back. - Next, take a bell pepper and slice it into thin strips. You can choose any color you like. - Then, grab 1 cup of snap peas. Trim the ends to prepare them for cooking. - In a large skillet, heat 1 tablespoon of coconut oil over medium heat. - Add 1 tablespoon of minced ginger and 2 minced garlic cloves. Sauté them for about 1 minute until they smell great. - Now, stir in 2 tablespoons of red curry paste. Cook for another minute to blend the flavors well. - Pour in 1 can (13.5 oz) of coconut milk. Stir until the curry paste mixes completely into the milk. - Bring the mixture to a gentle simmer. Add the sliced bell pepper and trimmed snap peas. Cook for about 5 minutes. The veggies should be tender but still crisp. - Now, it’s time to add the shrimp. Cook for 3 to 4 minutes until they turn pink and opaque. - Stir in 2 tablespoons of fish sauce and 1 tablespoon of lime juice. Season with salt to taste. - Remove from heat and let the dish sit for a minute. This helps the flavors blend together nicely. For the full recipe, refer to the earlier section. Enjoy your flavor-packed coconut curry shrimp! To make perfect shrimp, avoid overcooking. Shrimp cooks fast, usually in just a few minutes. When they turn pink and opaque, they are done. If you cook them too long, they can become rubbery. Keep an eye on the time, especially when adding them to the curry. Adjusting heat is key for simmering. Start with medium heat to cook the ginger and garlic. Once you add the coconut milk, reduce the heat to low. This helps the flavors blend without boiling. A gentle simmer allows the shrimp to cook just right while keeping the sauce creamy. Balancing spice levels can make your dish shine. If the curry is too spicy, add more coconut milk. This will cool the heat and keep it creamy. Taste as you go. If you want it sweeter, a touch of honey or sugar works great. Just a small amount can make a big difference. Presentation makes your dish look inviting. Serve the coconut curry shrimp over jasmine rice. The white rice contrasts nicely with the vibrant curry. Add fresh cilantro on top for color and flavor. Lime wedges on the side add a zesty pop. For side dishes, consider serving with a simple salad or steamed broccoli. These pair well and add texture to the meal. You can check out the Full Recipe for more tips on serving this delightful dish. {{image_2}} You can make coconut curry shrimp vegan by using tofu or chickpeas. Tofu absorbs flavors well and gives a nice texture. Cut firm tofu into cubes, and sauté it just like shrimp. Chickpeas also work well. They add protein and a hearty feel. For gluten-free options, use gluten-free fish sauce or tamari. Both options fit well in the dish. Always check labels for hidden gluten in other sauces too. Coconut curry has many regional styles. Thai and Indian versions offer unique tastes. Thai curries often use lemongrass and kaffir lime leaves. These add a fresh, zesty flavor. Indian curries may include spices like cumin and coriander. These spices give a warm, earthy taste. You can customize your dish by adding unique regional spices. A pinch of turmeric or a dash of garam masala can change the flavor profile. This keeps your curry exciting every time you cook it. Feel free to add different vegetables to the dish. Zucchini, carrots, or spinach work well. They not only add color but also boost nutrition. If you want to switch from shrimp, consider chicken, tofu, or even fish. Each option brings its own flavor and texture. These swaps can make the dish fun and fresh every time you cook it. For the full recipe, check out the Coconut Curry Shrimp recipe above. To store leftover coconut curry shrimp, let it cool down first. Place the shrimp in an airtight container. This step helps keep the flavor intact. I recommend glass or BPA-free plastic containers. They provide a good seal and prevent spills. If you want to save the dish for later, freezing is a great option. Portion the shrimp into freezer-safe bags or containers. Remove as much air as possible to avoid freezer burn. When you're ready to enjoy it, thaw overnight in the fridge. Reheat on the stove over low heat. This method keeps the shrimp tender. Leftovers will stay fresh in the fridge for up to three days. After this time, the shrimp may lose its taste and texture. Signs of spoilage include a sour smell or a change in color. Always check before eating to ensure it’s safe. To enjoy the full flavor, eat the leftovers sooner rather than later. For the full recipe, check the earlier section. Yes, you can use frozen shrimp. Thaw them before cooking for the best results. To thaw, place the shrimp in a bowl of cold water. Change the water every 30 minutes. This method takes about an hour. You can also leave them in the fridge overnight. This keeps them safe and fresh. If you need a fish sauce substitute, try soy sauce. It adds a nice salty flavor. For a vegan option, use coconut aminos. This adds sweetness without fish. You can also mix soy sauce with a bit of lime juice. This gives a similar taste to fish sauce. Yes, you can prepare some parts ahead. Cook the shrimp and veggies just before serving. You can make the sauce and store it in the fridge. Combine it with shrimp and veggies when ready to eat. This keeps the dish fresh and full of flavor. This blog post shared a simple coconut curry shrimp recipe. We discussed essential ingredients, like shrimp, coconut milk, and red curry paste. I provided step-by-step cooking instructions and tips for perfect results. You can customize the dish for dietary needs and see how to store leftovers. Experiment with flavors and make it your own. Enjoy creating a tasty meal!

Coconut Curry Shrimp Flavor-Packed Delight to Savor

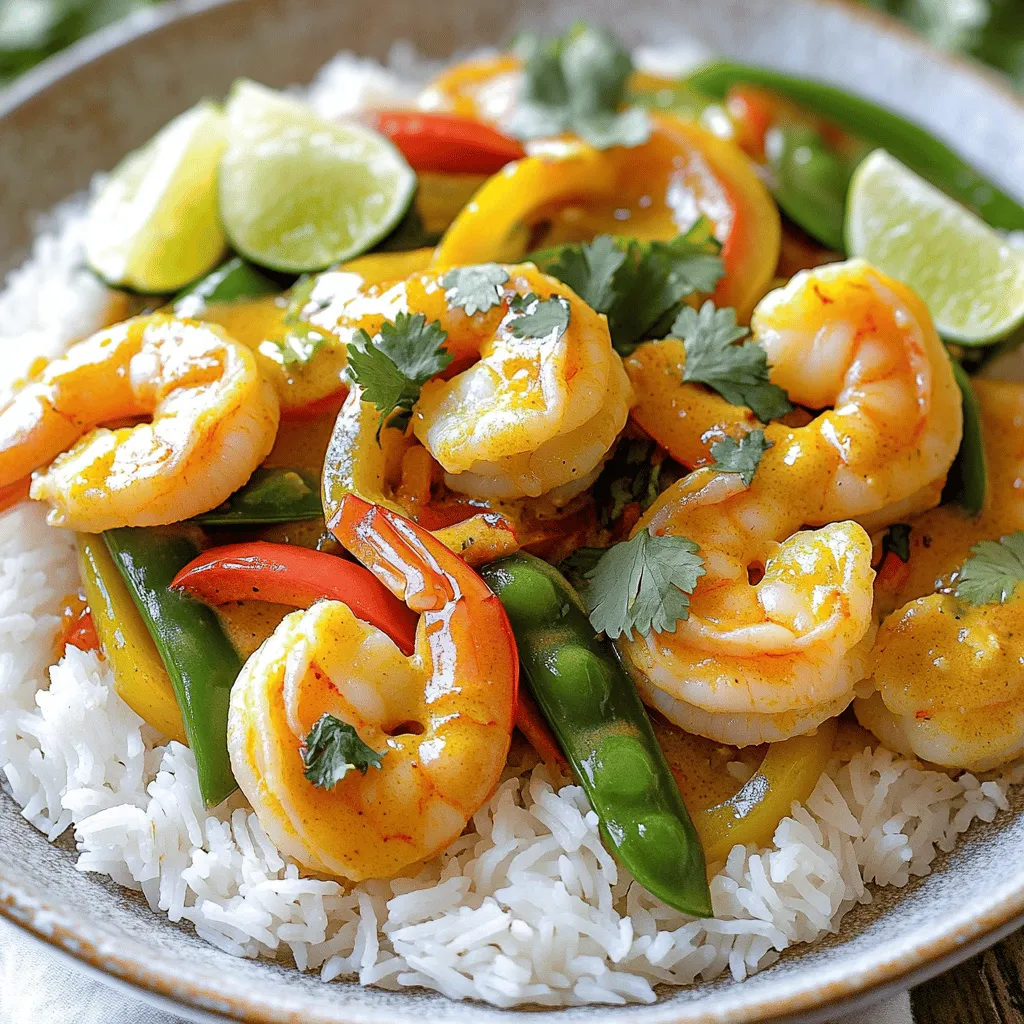
Are you ready to savor a rich and vibrant dish? Coconut Curry Shrimp combines a creamy coconut base with bold

To make the best French toast, you'll need some key ingredients. Here’s what you need: - 4 thick slices of brioche bread - 2 large eggs - 1 cup whole milk - 1 teaspoon vanilla extract - 1 teaspoon ground cinnamon - 2 tablespoons sugar - 1 tablespoon butter - Pinch of salt - Maple syrup (for serving) - Fresh berries (for garnish) - Powdered sugar (for dusting) These items create a rich and creamy base that makes each bite delightful. You can add fun toppings to make your French toast even better. Here are some ideas: - Sliced bananas - Chopped nuts - Whipped cream - Chocolate chips - Honey - Nut butter These toppings let you customize your dish to your liking. Feel free to mix and match! If you don't have a few ingredients, don't worry! You can easily swap them out. Here are some substitutions: - Brioche bread: Use challah, sourdough, or whole grain bread. - Whole milk: Almond milk or oat milk works great too. - Eggs: You can use mashed banana or applesauce for a vegan option. - Sugar: Try honey or maple syrup instead. These swaps keep your French toast tasty and fun. Enjoy creating your own version! To start, grab a mixing bowl. Add 2 large eggs and 1 cup of whole milk. Then, pour in 1 teaspoon of vanilla extract and 1 teaspoon of ground cinnamon. Next, add 2 tablespoons of sugar and a pinch of salt. Use a whisk to mix everything until it’s smooth. This mixture is key for tasty French toast. Now, heat a skillet or griddle over medium heat. Add 1 tablespoon of butter to the pan. Let it melt and coat the bottom. Take each slice of brioche bread and dip it into the egg mixture. Make sure both sides are coated but not soaked. Place the bread on the skillet. Cook for 3-4 minutes until golden brown. Flip and cook the other side. Repeat with the rest of the slices. Keep them warm on a plate. Serve your French toast hot! Drizzle it with maple syrup. Add fresh berries on top for color and flavor. A light dusting of powdered sugar makes it look fancy. You can stack the slices in a slanted pile for a great presentation. Enjoy your delicious creation! For the Full Recipe, check the details above. To get a great texture, use thick slices of bread. Brioche or challah works best. Soak the bread in the egg mixture, but don’t let it get too soggy. A quick dip on each side is perfect. Cook on medium heat until golden and crisp. This ensures a soft inside and a crunchy outside. One mistake is not using enough fat in the pan. Use butter to create a nice crust. Another error is cooking on high heat. This can burn the toast before it cooks through. Also, avoid over-soaking the bread. You want it moist but not falling apart. To add more flavor, mix in spices like nutmeg or cardamom. A pinch of salt brings out the sweetness too. You can also try adding orange zest for a fresh twist. These small changes can make your French toast stand out. Enjoy experimenting to find your perfect blend! {{image_2}} You can enjoy classic French toast in many ways. Try using different breads. Challah and sourdough work great. Each type adds its own flavor. You can also change the milk. Use almond milk or oat milk for a twist. Try adding nutmeg for a warm spice flavor. Top it with your favorite fruits, like bananas or strawberries. Stuffed French toast is a fun idea. You can fill it with cream cheese and berries. For a savory touch, try ham and cheese. Spread the filling between two slices of bread. Dip it in the egg mix and cook as usual. Another twist is to make French toast roll-ups. Fill and roll the bread, then cook. The options are endless! If you need gluten-free French toast, use gluten-free bread. You can also try chickpea flour mixed with water as an egg substitute. For a vegan option, use plant milk and add flaxseed meal for binding. Both options work well with the same cooking method. You can still enjoy delicious French toast no matter your diet! To store leftover French toast, let it cool first. Place the slices in an airtight container. Keep them in the fridge for up to three days. If you want to keep them longer, use the freezer. Reheat French toast in a few ways. Use a microwave for a quick option. Heat it for about 30 seconds per slice. For better texture, use an oven. Preheat it to 350°F (175°C). Place the slices on a baking sheet and warm them for 10 minutes. Freezing is great for meal prep. Wrap each slice in plastic wrap. Then, place them in a freezer-safe bag. You can freeze them for up to two months. When you're ready to eat, thaw the slices in the fridge overnight. Then, reheat using your preferred method. Enjoy your French toast any time! For the Full Recipe, check above. The best bread for French toast is thick and fluffy. I love using brioche. It soaks up the egg mixture well. Challah and sourdough also work nicely. You want a bread that can hold its shape. This helps it stay soft inside and crispy outside. Yes, you can make French toast without eggs. Use a mix of plant-based milk and a banana instead. This gives a nice texture. You can also use flaxseed mixed with water as an egg replacer. Just remember, the flavor may change a bit. To make crispy French toast, use a hot skillet. Use butter or oil to coat the pan. Cook each side until golden brown, about 3-4 minutes. Avoid soaking the bread too long in the egg mix. This helps keep it from getting soggy. Serve French toast warm. I love drizzling it with maple syrup. Add fresh berries for color and flavor. A dusting of powdered sugar can make it look fancy. You can stack the slices for a great presentation. You can find the Full Recipe for Heavenly Cinnamon Vanilla French Toast above. It includes everything you need for a delicious morning treat. Enjoy making it! In this post, we explored how to make perfect French toast. We covered essential ingredients, cooking steps, and tips for the best texture. You learned about tasty variations and how to store leftovers. French toast can be simple or fancy, depending on what you want. I hope these tips help you make a delicious meal. Enjoy making French toast your way!

Best French Toast Recipe for Delicious Mornings

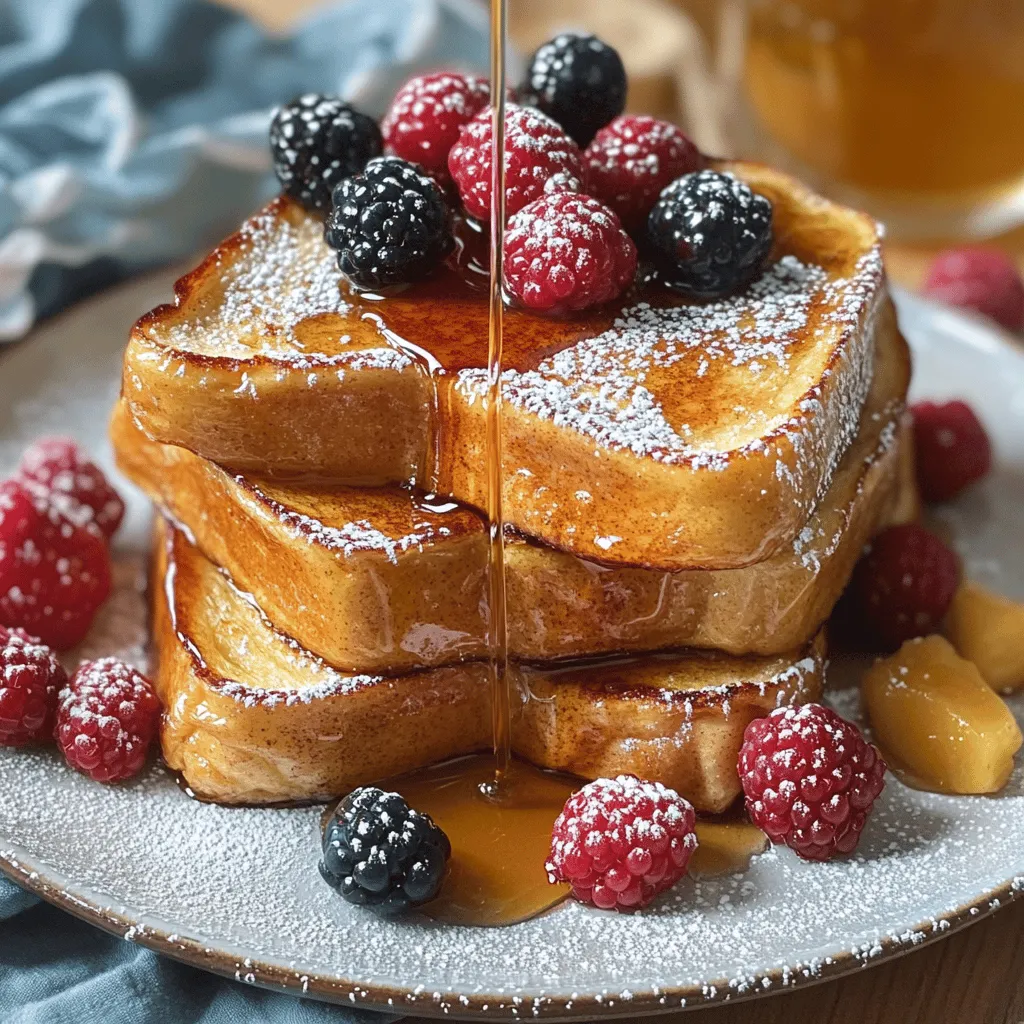
Want to kickstart your mornings with the tastiest treat? I’m here to share my best French toast recipe! This simple

To make Creamy Jamaican Cornmeal Porridge, gather these simple items: - 1 cup cornmeal - 4 cups water - 1 cup coconut milk - 1/4 cup sugar (adjust to taste) - 1/2 teaspoon salt - 1 teaspoon vanilla extract - 1/2 teaspoon ground cinnamon - 1/2 teaspoon nutmeg - 1/4 cup raisins (optional) - Fresh fruits or nuts for topping (optional) Using high-quality ingredients makes a big difference. Choose fresh cornmeal for a great taste. Look for organic coconut milk, as it adds a rich flavor. If you can, use whole spices like cinnamon and nutmeg. Fresh spices give better aroma and taste than pre-ground ones. You can switch up the ingredients easily. Try almond milk instead of coconut milk for a nutty flavor. If you prefer less sugar, use honey or maple syrup. You can add chopped fruits like bananas or mango for sweetness. Nuts like almonds or pecans can add crunch and protein. First, gather all your ingredients. You will need cornmeal, water, coconut milk, sugar, salt, vanilla, cinnamon, nutmeg, and raisins if you like. This dish comes together quickly, so having everything ready is key. 1. In a medium-sized saucepan, bring 3 cups of water to a gentle boil. 2. While waiting, mix the cornmeal with 1 cup of water in a bowl. This makes a smooth slurry. 3. Once the water is boiling, whisk in the cornmeal slurry slowly. This helps avoid lumps. 4. Add the coconut milk, sugar, salt, cinnamon, and nutmeg. Stir well and bring it back to a gentle boil. 5. Lower the heat and let it simmer for 15 to 20 minutes. Stir often to prevent sticking. The porridge will thicken nicely. 6. If you want, stir in raisins for extra sweetness during the last few minutes of cooking. 7. When cooked, take it off the heat. Mix in the vanilla extract. Let it cool a bit before serving. Serve the porridge in bowls. You can top it with fresh fruits or nuts for extra flavor. A drizzle of coconut milk adds a nice creamy finish. Enjoy your creamy Jamaican cornmeal porridge! For the full recipe, see above. To get the best texture, start with the right cornmeal. I recommend using fine cornmeal. Mix your cornmeal with cold water first. This helps avoid lumps when you whisk it into boiling water. Stir continuously while cooking. This keeps it smooth and creamy. If the porridge is too thick, add a bit more coconut milk or water. For a thinner porridge, reduce cooking time slightly. Adding spices can take your porridge to the next level. I love using ground cinnamon and nutmeg. They add warmth and depth. You can also add vanilla extract for sweet notes. If you want extra sweetness, stir in some raisins. Fresh fruits like bananas or mangoes make great toppings too. They add color and flavor to your bowl. One common mistake is not stirring enough. If you leave it alone, lumps can form. Another mistake is not measuring water correctly. Too little can make it dry, while too much can make it runny. Be sure to taste as you go. Adjust sugar levels to your liking. Following these tips will help you create a perfect dish every time. For the full recipe, see the recipe section above. {{image_2}} You can change some ingredients to fit your taste. Instead of coconut milk, try almond or oat milk. These options add a different flavor while keeping it creamy. You can also use honey or maple syrup in place of sugar. This switch adds natural sweetness that many enjoy. If you want a richer taste, try using half-and-half instead of milk. Add different spices to mix things up. You can use cardamom or ginger for a warm kick. If you like nuts, mix in chopped almonds or walnuts for crunch. Try adding a splash of orange or lime juice for a fresh twist. For a chocolatey version, stir in cocoa powder or chocolate chips. Each of these changes can make the porridge exciting and new. Serve the porridge warm in a bowl. Top with fresh fruits like bananas or berries for brightness. Nuts or seeds add a nice crunch on top. You can also drizzle extra coconut milk for creaminess. If you want a dessert-like treat, add a dollop of yogurt or whipped cream. These toppings not only look good but taste great too. For the full recipe, check out the details above. To keep your creamy Jamaican cornmeal porridge fresh, let it cool first. Then, place it in an airtight container. Store it in the fridge for up to three days. If you plan to eat it later, put a piece of plastic wrap directly on the surface to prevent drying. When you are ready to eat your leftovers, pour the porridge into a saucepan. Add a splash of water or coconut milk to make it creamy again. Heat over low heat, stirring often until warm. You can also use a microwave. Just heat it in a bowl for 1-2 minutes. Stir halfway through for even heating. You can freeze leftover porridge for up to a month. Use freezer-safe containers, leaving some space for expansion. When you want to eat it, thaw it overnight in the fridge. Reheat it gently, adding a bit of liquid to restore its texture. Enjoy it warm, just like fresh! For the full recipe, check the section above. Creamy Jamaican cornmeal porridge is a warm, comforting dish. It uses cornmeal, water, and coconut milk. You cook it until thick and creamy. This porridge is popular for breakfast in Jamaica. It has a sweet and nutty flavor that many love. You can enjoy it plain or with toppings. Add fruits, nuts, or a drizzle of honey for extra taste. Yes, you can easily make this recipe vegan. The main ingredients are already plant-based. Use coconut milk as your milk source. For sweetening, use maple syrup or agave instead of sugar. This way, you keep it vegan while still enjoying a rich flavor. You can adjust the sweetness to your taste. Start with the 1/4 cup of sugar in the recipe. If you want it sweeter, add more sugar or a sweetener of your choice. Taste it as you go to find the right balance. You can also use ripe bananas or dates for natural sweetness. Cornmeal porridge is not just tasty; it's good for you too. Cornmeal is a whole grain. It provides fiber, which helps digestion. It also has vitamins and minerals like iron and magnesium. Coconut milk offers healthy fats that can boost energy. This dish can keep you full and satisfied for a long time. Enjoy it knowing you’re eating something wholesome! This blog post covered all you need to know about creamy Jamaican cornmeal porridge. We discussed the ingredients, from quality notes to great substitutions. The step-by-step instructions helped you cook easily. Tips and tricks offered insights on consistency and flavor. Variations let you personalize your dish, while storage info ensures freshness. In closing, this porridge is versatile and delicious. You can create unique flavors that suit your taste. Enjoy cooking and savor every bite!

Creamy Jamaican Cornmeal Porridge Simple and Tasty

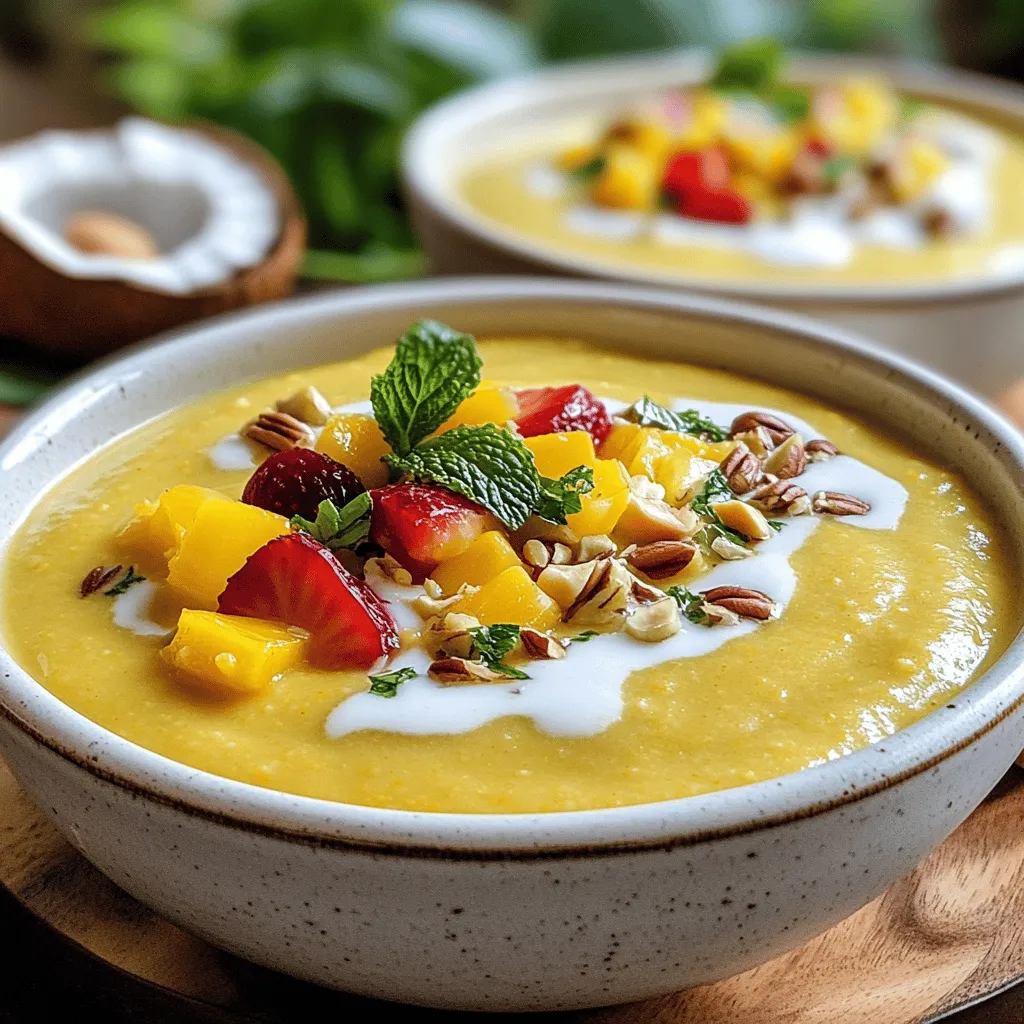
Are you ready to savor a warm bowl of Creamy Jamaican Cornmeal Porridge? This simple and tasty dish offers comfort

Older posts
Newer posts
← Previous Page1 … Page52 Page53 Page54 … Page71 Next →

dsad

© 2025 So Yum Recipes • Built with GeneratePress

Our Policies

  • Copyright Policy
  • Cookie Policy
  • GDPR Policy
  • Privacy Policy
  • Disclaimer
  • Terms Of Use

More Information

  • Home
  • About
  • Contact
  • Appetizers
  • Dessert
  • Dinner
  • Drinks
©2025, So Yum Recipes About Back To Top