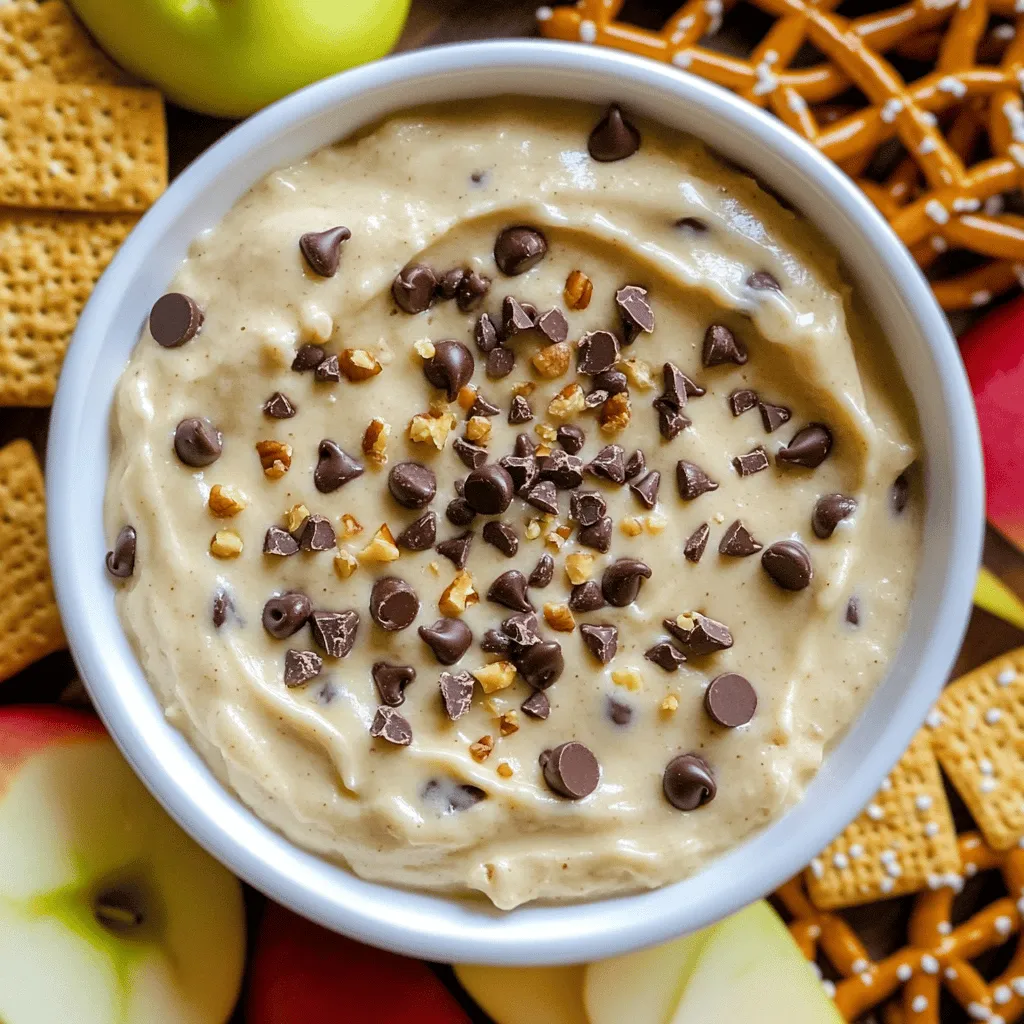
Chocolate Chip Cookie Dough Dip Tasty Party Treat
Get ready to wow your guests with a sweet treat that’s hard to resist! This Chocolate Chip Cookie Dough Dip
Get ready to wow your guests with a sweet treat that’s hard to resist! This Chocolate Chip Cookie Dough Dip
![- 1 pound large shrimp, peeled and deveined - 4 cloves garlic, minced - 2 tablespoons olive oil Large shrimp are the star of this dish. Look for fresh, firm shrimp for the best flavor. Minced garlic adds a punch of taste that pairs well with shrimp. Olive oil helps in cooking and adds richness to the dish. - 1/4 cup grated Parmesan cheese - 1 tablespoon fresh lemon juice - 1 teaspoon paprika Parmesan cheese gives a salty and nutty flavor. Fresh lemon juice brightens the dish. Paprika adds a hint of spice and color. - 1 teaspoon Italian seasoning - Fresh parsley, chopped (for garnish) - Salt and pepper to taste Italian seasoning brings a mix of herbs that enhance the shrimp. Fresh parsley adds a pop of color and freshness. Don’t forget salt and pepper to balance all the flavors. For the full recipe, check out the provided link. Enjoy making this tasty dish! - Preheat the oven to 400°F (200°C). This step is key for even cooking. - In a large bowl, mix together 2 tablespoons of olive oil, 4 minced garlic cloves, 1 tablespoon of fresh lemon juice, 1 teaspoon of paprika, 1 teaspoon of Italian seasoning, and salt and pepper to taste. This garlic mixture will coat the shrimp and add great flavor. - Add 1 pound of peeled and deveined shrimp into the bowl. Toss the shrimp well, ensuring they are fully coated in the garlic mixture. This makes sure each bite is packed with flavor. - Spread the shrimp evenly on a baking sheet lined with parchment paper. This helps the shrimp cook evenly and makes cleanup easier. - Roast the shrimp in the preheated oven for about 8-10 minutes. They will turn pink and be cooked through. If you want a crispy topping, switch the oven to broil for the last 1-2 minutes. Just watch them closely to prevent burning! - Remove the shrimp from the oven. Garnish with chopped fresh parsley and serve with lemon wedges on the side. The lemon adds a fresh kick that brightens the dish. For the complete recipe, refer to the [Full Recipe]. - Use fresh ingredients: Fresh shrimp and garlic boost the taste. They add natural sweetness and depth. Always choose high-quality shrimp for the best outcome. - Experiment with additional spices: Try adding a pinch of red pepper flakes for heat. Alternatively, mix in some fresh herbs like thyme or basil. These small changes can elevate the dish. - Avoid overcooking: Shrimp cooks fast. Once they turn pink, they are done. Overcooked shrimp become rubbery and tough. Set a timer to avoid this issue. - Check the shrimp for doneness: The shrimp should curl slightly and be opaque. If you see this, you are good to go. - Pairing with side dishes: Garlic Parmesan Roasted Shrimp goes well with rice or pasta. A simple green salad adds freshness. Roasted vegetables also complement the flavors nicely. - Wine pairings: A crisp white wine works best. Consider a Sauvignon Blanc or Pinot Grigio. These wines enhance the garlic and lemon notes in the dish. For the complete details on how to make this dish, check out the Full Recipe. {{image_2}} You can switch up the seafood in this dish. Feel free to use scallops or fish fillets. Both work well with garlic and Parmesan. You can also try shrimp in different sizes. Large shrimp hold up well in the oven, but medium or small shrimp can work too. If you want to change the flavors, swap seasonings. Instead of Italian seasoning, use Cajun spice for a kick. You might also try using lemon pepper for a zesty twist. Adding fresh herbs like thyme or basil can give a nice touch too. Roasting shrimp is great, but grilling adds a smoky flavor. If you grill, aim for medium heat. Cook the shrimp for about 2-3 minutes on each side. Keep an eye on them to prevent overcooking. You can also cook shrimp in a skillet. Heat some olive oil in the pan and add the shrimp. Cook for about 3-4 minutes until they turn pink. This method is quick and offers a nice sear. For gluten-free options, this recipe is already safe. The ingredients do not include any gluten. Just check your seasonings to ensure they are gluten-free too. If you want a low-carb version, you can skip the Parmesan cheese. You can use nutritional yeast instead for a cheesy flavor. Serve the shrimp with a side of steamed veggies for a complete meal. For the full recipe, see the earlier section. Enjoy your cooking! To keep your Garlic Parmesan Roasted Shrimp fresh, follow these steps: - Let the shrimp cool to room temperature. - Place the shrimp in an airtight container. - Make sure to seal it well to keep air out. This method helps prevent the shrimp from drying out. Refrigerate the container right away. You can enjoy the leftovers within 2-3 days for the best taste. If you want to save the shrimp for later, freezing is a great option. Here's how to do it: - First, let the shrimp cool completely. - Then, spread them in a single layer on a baking sheet. - Freeze the shrimp for about 1-2 hours until they are firm. - Once frozen, transfer the shrimp to a freezer-safe bag. When you're ready to eat, thaw the shrimp in the fridge overnight. Reheat them in the oven or on the stove. This keeps the flavors intact. How long does Garlic Parmesan Roasted Shrimp last? Here are the details: - In the fridge, the shrimp stays fresh for 2-3 days. - In the freezer, they can last for up to 2 months. Always check for signs of spoilage. If the shrimp smells off or looks discolored, it's best to discard them. Keeping an eye on freshness ensures you enjoy each bite of this delicious dish. Cook shrimp in the oven for about 8-10 minutes. They should turn pink and curl up. If you use larger shrimp, add 1-2 minutes. Always check for doneness. Overcooked shrimp can become tough and rubbery. Yes, you can use frozen shrimp. Just thaw them first. Place the shrimp in a bowl of cold water for about 15-20 minutes. Drain and pat dry. This helps the seasoning stick better. You can follow the same cooking time as fresh shrimp. Serve Garlic Parmesan Roasted Shrimp with a side of rice or pasta. A fresh salad pairs well too. You might enjoy roasted vegetables or garlic bread as sides. Lemon wedges enhance the dish's flavor. This recipe is quite healthy. Shrimp are low in calories and high in protein. The olive oil adds healthy fats. Garlic has many health benefits, like boosting your immune system. Parmesan cheese adds flavor but should be used in moderation. Overall, this dish is a tasty, nutritious option for any meal. For the full recipe, check the previous section! This blog post covered how to make delicious Garlic Parmesan Roasted Shrimp. We looked at the main ingredients like shrimp, garlic, and olive oil. You learned step-by-step instructions, from preparation to serving. We also shared tips for flavor and ensuring your shrimp cooks just right. Lastly, we explored variations, storage tips, and FAQs. Overall, this dish is easy and fun to make. With fresh ingredients and simple techniques, you can impress anyone. Enjoy your cooking adventure and make it your own!](https://soyumrecipes.com/wp-content/uploads/2025/05/9d264638-3359-469d-b85f-d243bd4a2b62.webp)
Craving a dish that’s simple yet bursting with flavor? Look no further! My Garlic Parmesan Roasted Shrimp is just what
. This blog post detailed a tasty recipe for Tuscan shrimp and scallops. You learned about the key ingredients, preparation steps, and helpful tips for cooking. I shared variations to make the dish your own and how to store leftovers for later. Remember, using quality ingredients and fresh herbs boosts flavor. Enjoy creating this dish for your next meal and impressing your friends and family with your skill. Trust me, it’s worth it!](https://soyumrecipes.com/wp-content/uploads/2025/05/ad437808-7667-4775-805a-430c37664738.webp)
Are you ready to impress with a delicious and colorful dinner? Tuscan Shrimp and Scallops combine juicy seafood with vibrant
![To make your savory sweet potato, chickpea, and red lentil soup, gather these items: - 1 large sweet potato, peeled and cubed - 1 cup canned chickpeas, drained and rinsed - 1/2 cup red lentils, rinsed - 1 medium onion, chopped - 2 cloves garlic, minced - 2 carrots, diced - 1 celery stalk, diced - 6 cups vegetable broth - 1 teaspoon cumin - 1 teaspoon turmeric - 1/2 teaspoon smoked paprika - Salt and pepper to taste - 2 tablespoons olive oil - Fresh parsley or cilantro for garnish - Juice of 1 lemon If you lack chickpeas, use white beans or black beans instead. They offer a similar texture and flavor. For the red lentils, yellow lentils work well too. If you want a milder taste, try using sweet potatoes as your main base instead of regular potatoes. You can swap fresh herbs like parsley with dried ones, but use less since dried herbs are more potent. Using fresh ingredients gives your soup a vibrant taste. Fresh sweet potatoes and carrots offer better texture. However, canned chickpeas save time and still taste great. If fresh herbs are not available, dried versions can work in a pinch. The key is to balance freshness with convenience to create a delicious soup. For the best flavor, try to use fresh garlic and onion. To make sweet potato, chickpea, and red lentil soup, gather your ingredients first. This soup is easy and quick to prepare. You will need a large pot and a blender if you want a smooth texture. 1. Sauté the Aromatics: Heat the olive oil in a large pot over medium heat. Add the chopped onion, garlic, carrots, and celery. Cook for about 5-7 minutes. The veggies should soften, and the onion will turn translucent. 2. Add Spices: Stir in the cumin, turmeric, and smoked paprika. Cook for 1-2 minutes until you smell the spices. 3. Combine Ingredients: Add the cubed sweet potato, drained chickpeas, and rinsed red lentils to the pot. Mix everything well. 4. Add Broth: Pour in the vegetable broth. Bring the mixture to a boil. 5. Simmer: Once it boils, lower the heat. Cover the pot and let it simmer for 25-30 minutes. The sweet potatoes and lentils should be tender. 6. Blend (Optional): For a creamier soup, use an immersion blender. You can blend part of the soup or transfer half to a blender. Blend until smooth, then return it to the pot. 7. Season: Taste the soup and add salt and pepper to your liking. 8. Finish with Lemon: Just before serving, stir in the fresh lemon juice. This adds a nice bright flavor. 9. Garnish: Serve hot with fresh parsley or cilantro on top for extra flavor. - If you want a smooth texture, blend more of the soup. - Be careful when blending hot liquids. Let the soup cool slightly before blending. - If you like some chunks, blend just half of the soup. This gives a nice mix of textures. For the complete recipe, check the Full Recipe link. To make this soup burst with flavor, use fresh spices. Ground spices lose their strength over time. If you can, toast them in the pot before adding other ingredients. This step brings out their natural oils and makes your soup taste better. Adding fresh lemon juice at the end brightens the flavor. It makes each spoonful refreshing and lively. You can also add a touch of heat with cayenne pepper or red pepper flakes if you like spice. Some like their soup thick, while others prefer it thin. If you want a thicker soup, blend part of it. This method makes it creamy without adding cream. If it's too thick, add more broth or water. Stir gently to mix as you adjust the consistency. For a chunkier soup, don’t blend it too much. Keep some sweet potato and chickpeas whole for texture. This soup pairs well with crusty bread or a fresh salad. A simple green salad with vinaigrette balances the richness. Top the soup with fresh herbs like parsley or cilantro for color and flavor. You can also sprinkle some feta cheese or a dollop of yogurt for added creaminess. For a fun twist, serve it in a bread bowl. It makes for a hearty and satisfying meal. If you're looking for more ideas, check out the Full Recipe for more serving options! {{image_2}} This soup is naturally gluten-free. You can enjoy it without any worries. Always check your broth for gluten. Most vegetable broths are safe. If you want to add grains, use quinoa or rice. Both add texture without gluten. For a protein boost, add chicken or tofu. If you use chicken, cut it into small pieces. Add it to the pot when you sauté the onions. Cook it until it's no longer pink. For tofu, use firm or extra-firm. Cube it, then add it when you mix in the sweet potatoes. This way, it soaks up all the flavors. You can change this soup with the seasons. Fresh greens like spinach or kale work well. Add them during the last few minutes of cooking. This keeps them bright and full of nutrients. You can also add seasonal veggies. Try zucchini or bell peppers for extra color and taste. The options are endless! For the complete recipe, check out the [Full Recipe]. After you enjoy your savory sweet potato, chickpea, and red lentil soup, store any leftovers in an airtight container. Make sure the soup cools down to room temperature before sealing it. This keeps the flavors fresh and prevents bacteria from growing. Store in the fridge for up to four days. Always label your containers with the date to keep track of freshness. To freeze your soup, wait until it cools completely. Pour the soup into freezer-safe containers or bags. Leave some space at the top, as the soup will expand when frozen. You can freeze it for up to three months. Thaw the soup in the fridge overnight when you are ready to eat it. This will help maintain its great taste and texture. Reheat your soup on the stove over medium heat. Stir often to prevent it from sticking. If the soup seems too thick after thawing, add a little vegetable broth or water to reach your desired consistency. You can also microwave it in a microwave-safe bowl. Heat in short intervals, stirring in between, until it’s hot all the way through. Enjoy your warm bowl of goodness! For the full recipe, check out the Cozy Sweet Potato & Chickpea Red Lentil Soup. Yes, you can make this soup ahead of time. It keeps well in the fridge for about 4 days. The flavors deepen as it sits, making it even better. Just store it in an airtight container. When you are ready to eat, reheat it on the stove or microwave. This soup pairs well with many sides. Here are some great options: - Crusty bread for dipping - A fresh green salad - Quinoa or rice for extra carbs - Grilled cheese for a fun twist Absolutely! This soup is 100% vegan. It uses vegetable broth and plant-based ingredients. You can enjoy this dish without worry. It's hearty and filling while being meat-free. To change the spice level, add more or less smoked paprika. For a kick, try adding red pepper flakes. You can also include jalapeños for heat. Taste as you go to find the right balance for you. Yes! You can swap chickpeas for other legumes. Black beans, cannellini beans, or even kidney beans work well. Just ensure they are cooked or canned for the best results. Store leftovers in a sealed container in the fridge. They last up to 4 days. For longer storage, freeze the soup in portions. It will keep well for about 3 months. Definitely! Feel free to add more veggies. Spinach, kale, or zucchini can boost nutrition. Just chop them up and add them when you add the sweet potatoes. Yes, this soup is gluten-free. All ingredients are free from gluten. It’s a safe choice for anyone with gluten sensitivities. For a creamier soup, use an immersion blender. Blend part of the soup until smooth. You can also add coconut milk for a rich, creamy texture. This blog post covered how to make a tasty Sweet Potato, Chickpea, and Red Lentil Soup. We detailed the ingredients, offered cooking steps, and shared useful tips. You can tweak flavors and adjust thickness to suit your taste. We also looked at variations to try and how to store your soup for later. Remember, cooking is fun! Try new ideas, enjoy your soup, and make it your own. Keep experimenting, and share your adventures in the kitchen!](https://soyumrecipes.com/wp-content/uploads/2025/05/e9b71cd9-0819-4686-8e98-5da1eb2989f6.webp)
Warm up your kitchen with my Savory Sweet Potato, Chickpea, and Red Lentil Soup! This dish bursts with flavor, and
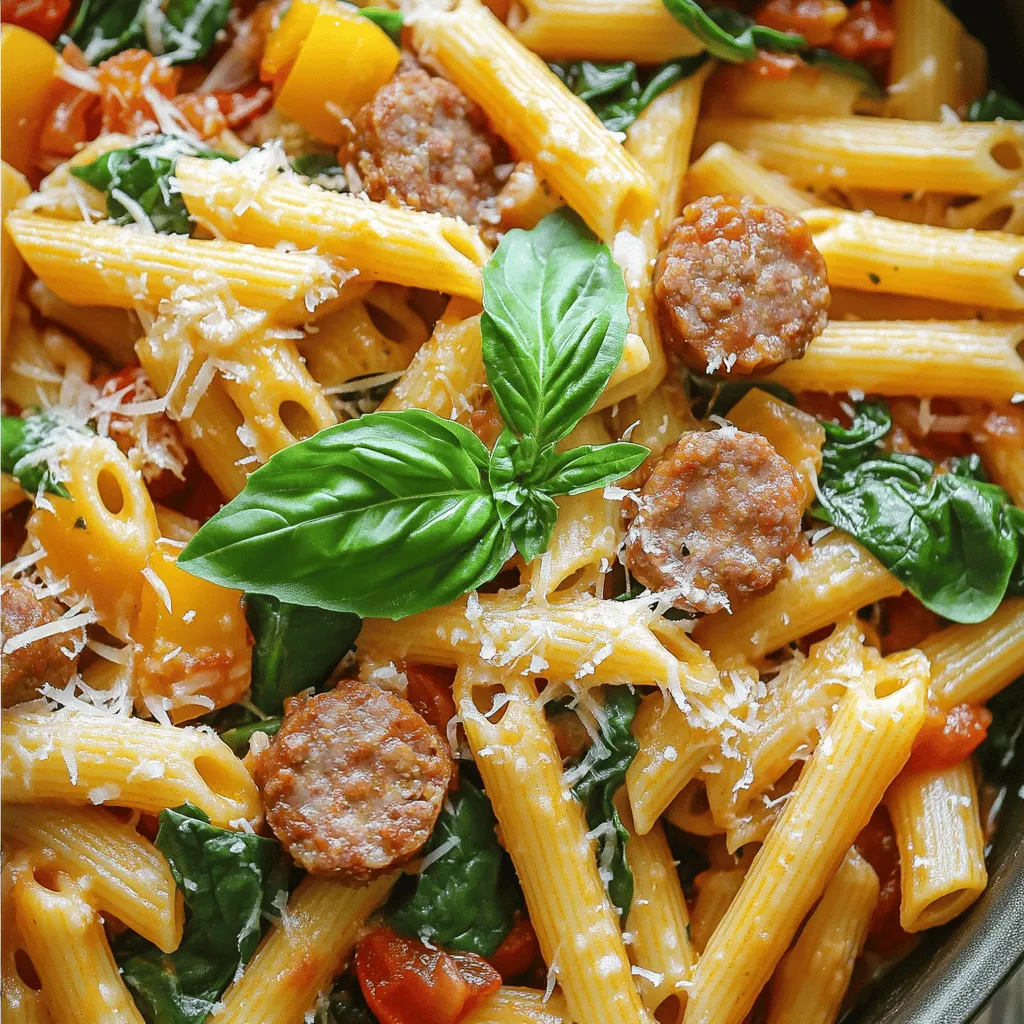
Looking for a quick and tasty dinner idea? This One Pot Smoked Sausage Pasta is perfect for busy weeknights! Combining
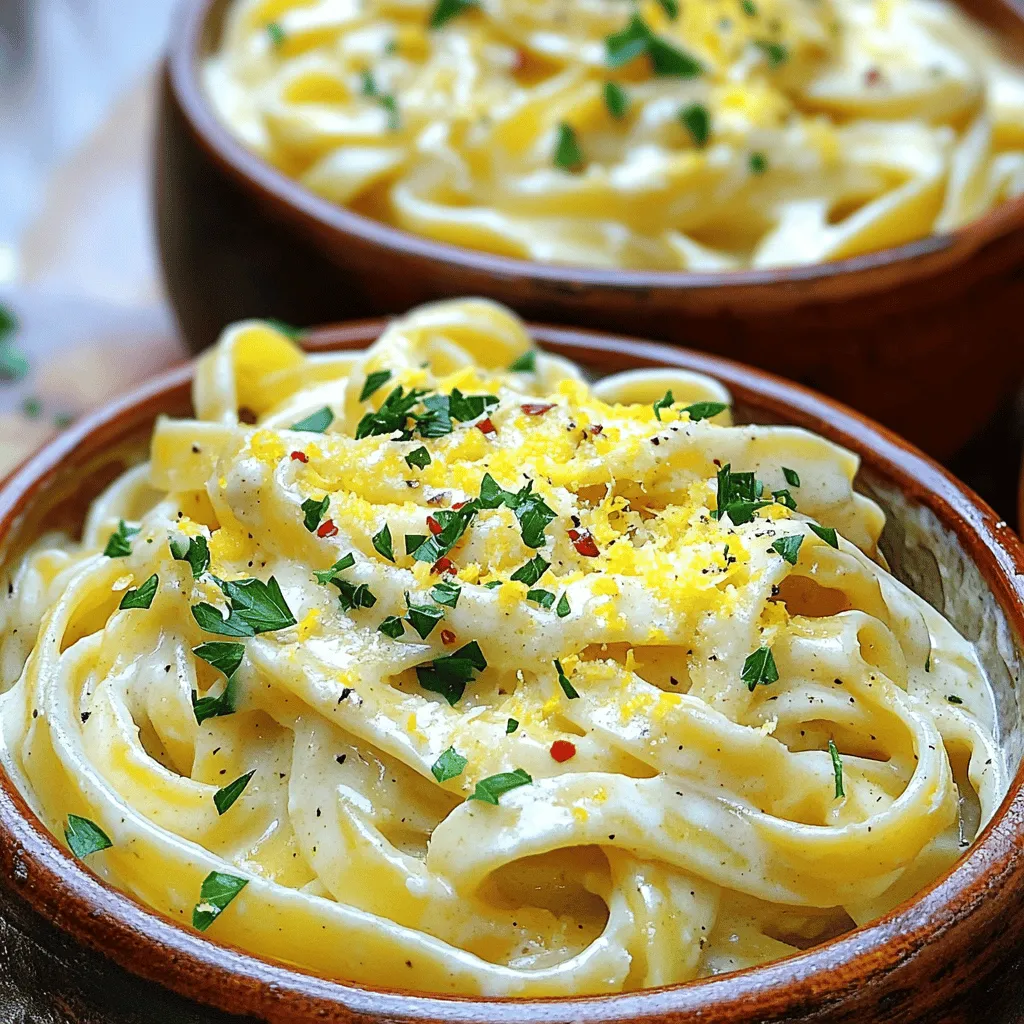
Ready for a simple yet mouthwatering meal? My Garlic Parmesan Pasta recipe is your answer. With just a few key
![To make your Honey-Lime Garlic Butter Baked Salmon, gather these simple ingredients: - 4 salmon fillets - 1/4 cup unsalted butter, melted - 1/4 cup honey - 2 tablespoons lime juice - 4 cloves garlic, minced - Zest of 1 lime - Salt and pepper to taste - Fresh parsley or cilantro, chopped, for garnish - Lime slices for serving Each ingredient plays a key role in creating a delicious dish. The salmon fillets are the star, providing a rich source of protein and omega-3 fatty acids. The melted butter adds a creamy richness, while honey brings a touch of sweetness. Lime juice and zest give a bright, zesty flavor that perfectly balances the dish. Garlic adds depth and aroma, making your meal truly mouthwatering. You can adjust the salt and pepper to fit your taste. The fresh herbs at the end add a pop of color and freshness. The lime slices not only look nice but also boost the dish's lime flavor when served. For the full recipe, check out the [Full Recipe]. Prepare these ingredients, and you’re ready to create a healthy delight that’s sure to impress! - Preheat the oven to 375°F (190°C). - Prepare the baking sheet with parchment paper. - Combine melted butter, honey, lime juice, minced garlic, and lime zest. - Whisk until well blended. - Season salmon with salt and pepper. - Drizzle the sauce over the salmon. - Bake for 15-20 minutes. This method makes the salmon tender and tasty. The honey-lime garlic butter keeps the fish moist. You will love the mix of sweet and tangy flavors. The salmon should flake easily when done. For a full recipe, check out the details above. Enjoy your cooking! How do I test for doneness? You can test salmon by using a fork. Gently poke the thickest part. If it flakes easily, it's done. You can also check the internal temperature. It should reach 145°F (63°C). Use a meat thermometer for best results. What are the best cooking methods? Baking works great for this recipe. It keeps the salmon moist and allows flavors to blend. You can also grill the salmon for a smoky taste. Just make sure to keep an eye on it. Grilling can cook salmon faster than baking. What spices can I add? You can add paprika or cayenne for a kick. Dill or thyme can also boost the flavor. Fresh herbs like basil or rosemary work well too. Just sprinkle them on top before baking. What are some substitutions for honey and butter? Maple syrup can replace honey for a different sweetness. Coconut oil is a great butter substitute. It adds a nice tropical twist to the dish. If you need a vegan option, use agave syrup and plant-based butter. For the full recipe, check out the details above. {{image_2}} You can swap out salmon for other fish like trout or tilapia. These fish work well with the honey-lime garlic butter. They have a mild taste that allows the sauce to shine. If you prefer chicken, use boneless, skinless chicken breasts. The baking time will change, so check for doneness. For a plant-based option, try firm tofu. Slice it into thick pieces and follow the same steps. The sauce will give it great flavor. To change up the taste, consider adding fresh herbs. Chopped dill or thyme can add a nice twist. You could also sprinkle in some red pepper flakes for heat. If you want a different citrus flavor, try lemon or orange juice. Each fruit brings its own zest and aroma. These easy swaps make the dish your own. You can play around and find your favorite combination. For more details, you can check the Full Recipe. To keep your Honey-Lime Garlic Butter Baked Salmon fresh, you need proper storage. First, let the salmon cool down. Once cool, place it in an airtight container. This helps keep moisture in and prevents drying. Store it in the fridge for up to three days. If you want to keep it longer, freezing is a great option. Wrap each fillet tightly in plastic wrap, then place it in a freezer-safe bag. This method prevents freezer burn and keeps the flavor intact. You can freeze it for up to three months. When it comes to reheating, the goal is to keep the salmon moist and flavorful. A great method is to use the oven. Preheat it to 300°F (150°C). Place the salmon on a baking sheet and cover it with foil. Heat for about 10-15 minutes. This method warms the fish without drying it out. You can also use a microwave, but be careful. Heat in small bursts to avoid overcooking, which can make it tough. Enjoy your leftovers just as much as the first serving! For the full recipe, click here. Bake salmon for 15 to 20 minutes. The time depends on the thickness of the fillets. Thinner fillets cook faster, while thicker ones need more time. A good rule is to bake for about 4 to 6 minutes per half-inch of thickness. Check for doneness by using a fork; the salmon should flake easily. Overcooking can dry it out, so keep an eye on it. Yes, you can make the sauce ahead of time. Combine melted butter, honey, lime juice, minced garlic, and lime zest. Store it in the fridge for up to three days. When ready to use, simply warm it slightly before drizzling it over the salmon. This saves time on busy days and still gives you that fresh flavor. Serve your salmon with a side of steamed vegetables, like broccoli or asparagus. A light salad with mixed greens is also great. For a heartier option, consider quinoa or brown rice. These pair well and create a balanced meal. Don't forget to add lime wedges for extra zest! For the full recipe, check the section above. This recipe for Honey-Lime Garlic Butter Baked Salmon is simple and full of flavor. We covered the ingredients, preparation steps, and baking instructions to ensure your salmon comes out perfectly. Remember to test for doneness and feel free to try different proteins or flavors. With proper storage and reheating methods, your leftovers can also taste great. Enjoy this dish with your favorite sides for a complete meal. You’ll impress your family and friends with this tasty recipe!](https://soyumrecipes.com/wp-content/uploads/2025/05/5f61193f-ddae-4fef-b181-c77d102e589f.webp)
Are you ready to elevate your dinner game? This Honey-Lime Garlic Butter Baked Salmon recipe brings a burst of flavor
![- 1 cup lentils, cooked and drained - 1/2 cup breadcrumbs (use gluten-free if desired) - 1 cup vegan mozzarella cheese, shredded These ingredients make the base of our Vegan Meatball Mozzarella Hot Pockets. Lentils give the meatballs a hearty texture. Breadcrumbs help bind the mixture together. Vegan mozzarella adds the cheesy goodness we all love. - Gluten-free breadcrumbs - Marinara sauce for dipping Using gluten-free breadcrumbs is great for those with dietary needs. Marinara sauce makes a tasty dip for your hot pockets. You can also add your favorite spices for extra flavor. - Ground flaxseed and water mixture To replace eggs, mix 1 tablespoon of ground flaxseed with 3 tablespoons of water. Let it sit for a few minutes to thicken. This mixture works well to help seal the hot pockets. It also gives a nice color when baked. Check out the [Full Recipe] for more details on making these tasty treats! 1. Preheating the oven: Start by setting your oven to 400°F (200°C). This heat will make the hot pockets crispy and golden. 2. Preparing the puff pastry: Thaw your puff pastry sheets as per package instructions. Once thawed, roll them out on a lightly floured surface. Aim for about 1/8 inch thickness. This helps create a nice pocket for your filling. 1. Combining lentils and seasonings: In a mixing bowl, add 1 cup of cooked lentils. Next, mix in 1/2 cup of breadcrumbs, 1/4 cup of nutritional yeast, 1/4 cup of finely chopped onion, 2 minced cloves of garlic, and 1 tablespoon of Italian seasoning. Don’t forget to add salt and pepper to taste. Stir until everything blends well. 2. Adding vegan mozzarella: Now, fold in 1 cup of shredded vegan mozzarella cheese. Mix until the cheese is evenly distributed throughout the lentil mixture. 1. Rolling out puff pastry: After preparing the filling, cut the rolled-out puff pastry into squares, around 6x6 inches each. 2. Sealing the pockets: Place a generous tablespoon of the lentil mixture in the center of each pastry square. Fold the pastry over the filling to create a pocket. Press the edges with a fork to seal them tight. This step is key to keeping the filling inside while baking. Now you’re ready to bake your vegan meatball mozzarella hot pockets! For complete instructions, check the Full Recipe. To keep your hot pockets filled, you need a good seal. Press the edges with a fork. This method keeps the filling from leaking during baking. It also gives a nice design on the edges. You can use an egg replacement to brush on top. This gives a golden color and a shiny look. The texture of your filling is key. Cook lentils properly; they should be soft but not mushy. Rinse and drain them well before mixing. Choosing the right breadcrumbs is also important. Use fresh breadcrumbs for a better texture. If you want it gluten-free, look for gluten-free options. Hot pockets taste great alone, but sides and dips enhance them. Marinara sauce is a classic dip. It pairs well with the cheesy flavor. You can also try a creamy vegan ranch. For sides, a fresh salad or steamed veggies work well. They add color and balance to your meal. {{image_2}} You can change the filling to make these hot pockets even better. Adding vegetables, like bell peppers or zucchini, gives a fresh taste. Spinach is another great choice. It adds nutrients and color. You can also use different plant-based cheeses. Try cheddar or pepper jack for a kick. Each cheese changes the flavor, making your hot pockets unique. If you want a different dough, you have choices. Gluten-free pastry options work well for those with gluten issues. Many brands offer tasty gluten-free puff pastry. Whole wheat pastry is another option. It gives a nutty flavor and adds fiber. Just roll it out like regular pastry and fill it the same way. Looking to boost flavor? Spices and herbs can make a big difference. Add crushed red pepper for heat or garlic powder for depth. Fresh herbs like basil or parsley can brighten up the dish. Vegan sauces are great too. Try BBQ sauce or spicy mustard for dipping. They add a fun twist and extra flavor to your hot pockets. For a full recipe, check out the Vegan Meatball Mozzarella Hot Pockets . To keep your Vegan Meatball Mozzarella Hot Pockets fresh, follow these simple steps: - Refrigeration Guidelines: Store leftover hot pockets in an airtight container in the fridge. They will last for about 3-4 days. Make sure they cool down first before sealing to avoid moisture build-up, which can make them soggy. - Freezing for Future Meals: For longer storage, freeze your hot pockets. Wrap each one tightly in plastic wrap, then in aluminum foil. This helps prevent freezer burn. They can last up to 2 months in the freezer. When you're ready to enjoy them, just thaw them in the fridge overnight. To bring your hot pockets back to life, reheating is key. Here are the best methods: - Best Methods for Reheating Hot Pockets: The oven is the best option. Preheat it to 350°F (175°C). Place the hot pockets on a baking sheet and heat for about 15-20 minutes. You can also use an air fryer for about 10 minutes at the same temperature for a crispy texture. - Maintaining Texture and Flavor: Avoid microwaving as it can make them soggy. If you must use a microwave, place a cup of water in the microwave with the hot pockets. This helps keep the texture better. Enjoy them warm with a side of marinara sauce for dipping! You can check the full recipe for more tips on making these delicious treats. How to make Vegan Meatball Mozzarella Hot Pockets? To make these hot pockets, you first mix the filling. Combine cooked lentils, breadcrumbs, nutritional yeast, chopped onion, minced garlic, and Italian seasoning in a bowl. Add salt and pepper to taste. Then, stir in shredded vegan mozzarella cheese. Roll out puff pastry and cut it into squares. Place a spoonful of the filling in the center of each square. Fold the pastry over and seal the edges with a fork. Brush with an egg replacement before baking at 400°F (200°C) for 20-25 minutes. You can find the Full Recipe for more details. Where can I buy vegan hot pocket alternatives? Many stores sell vegan hot pocket alternatives. Check your local grocery store’s freezer section. Brands like Amy's and Good Food Made Simple often have tasty options. You can also find them at health food stores. Online retailers like Amazon offer a variety too. Always read labels to ensure they fit your diet. Calorie count and nutritional benefits Vegan Meatball Mozzarella Hot Pockets are a tasty choice. A serving usually has around 250-300 calories. They are high in protein from lentils and provide fiber. Nutritional yeast adds B vitamins, making them a healthy snack or meal option. Comparison with traditional meat hot pockets Vegan hot pockets are often lower in calories and fat compared to meat ones. Traditional meat hot pockets can have around 400 calories and more saturated fat. Plus, vegan options have no cholesterol, making them a heart-friendly choice. Substitutes for common ingredients You can easily swap ingredients to meet your needs. Use quinoa instead of lentils for a different texture. Try chickpea flour for a gluten-free option. If you cannot find vegan cheese, use mashed avocado or cashew cream for creaminess. Tips for beginners in vegan cooking Start with simple recipes like these hot pockets. Read through the whole recipe before cooking. Prep all your ingredients first. Don't be afraid to experiment! Taste your filling as you go. This way, you can adjust flavors to your liking. Enjoy the process! In this post, we explored how to make tasty vegan hot pockets with simple ingredients like lentils and vegan mozzarella. We covered preparation steps, tips for the perfect seal, and fun variations for different flavors. You can easily store leftovers for later, ensuring they stay fresh. If you’re a beginner, don’t worry—these hot pockets are fun to make and packed with flavor. Enjoy experimenting with new fillings and dips to make them your own!](https://soyumrecipes.com/wp-content/uploads/2025/05/1ac3a2e1-73c5-496a-b034-ec43997ad556.webp)
Craving a hearty yet simple meal? Let’s dive into an easy recipe for Vegan Meatball Mozzarella Hot Pockets! These savory

If you crave a sweet treat that’s quick and easy, you’re in the right place. I’m excited to share my
![- 2 cups rolled oats - 1 cup chopped pecans - 1/2 cup almond butter - 1/2 cup maple syrup - 1/4 cup honey These ingredients create a tasty and hearty base for your granola bars. The rolled oats give a chewy texture. Chopped pecans add a nice crunch and rich flavor. Almond butter serves as a creamy binder, while maple syrup and honey provide natural sweetness. - 1/2 cup dried cranberries or raisins - 1/2 teaspoon vanilla extract - 1/2 teaspoon cinnamon - 1/4 teaspoon salt You can add dried cranberries or raisins for a fruity twist. Vanilla extract enhances the flavor, while cinnamon adds warmth. The salt balances the sweetness, making each bite more enjoyable. - Caloric value per serving: About 150 calories per bar - Macros breakdown: - Carbs: 20g - Protein: 4g - Fats: 6g Each bar is packed with energy, making it a great snack. The oats provide fiber, while pecans offer healthy fats. Maple syrup and honey are natural sweeteners that bring vitamins and minerals. These bars are not just tasty; they are also good for you! For the full recipe, check out the [Full Recipe]. Start by preheating your oven to 350°F (175°C). This step is key for even baking. Next, line an 8x8-inch baking dish with parchment paper. Leave some paper hanging over the edges. This makes it easy to lift out the bars later. Measuring your ingredients correctly is very important. Accurate amounts lead to better texture and taste. Use a measuring cup for dry ingredients and a liquid measuring cup for sticky ones like almond butter and maple syrup. In a large bowl, combine 2 cups of rolled oats and 1 cup of chopped pecans. Mix these until they are evenly combined. This mixture is the base of your bars. Next, melt the almond butter mixture. In a small saucepan, add 1/2 cup of almond butter, 1/2 cup of maple syrup, and 1/4 cup of honey. Add 1/2 teaspoon of vanilla extract, 1/2 teaspoon of cinnamon, and 1/4 teaspoon of salt. Heat this over low heat. Stir until smooth, which takes about 3-5 minutes. Once melted, pour this mixture over your oats and pecans. If you want, add 1/2 cup of dried cranberries or raisins. Mix well until the oats and nuts are fully coated. Now, transfer the mixture to your prepared baking dish. Press it down firmly and evenly. This helps the bars hold together after baking. Bake in the preheated oven for 20-25 minutes. Look for golden brown edges. Check them often to avoid over-baking. After baking, remove the dish from the oven. Let it cool in the pan for about 10 minutes. Use the parchment paper to lift the bars out and place them on a wire rack to cool completely. When cool, cut them into bars or squares. Store your delicious maple pecan granola bars in an airtight container at room temperature for up to a week. For longer freshness, keep them in the fridge. For the full recipe, you can refer to the complete instructions provided earlier. To avoid crumbly bars, make sure to press the mixture firmly into the pan. Use a spatula or a flat object to pack it down evenly. This helps the bars stick together after baking. If your bars still crumble, try adding more almond butter or honey. These ingredients act as glue. Let the bars cool in the pan for about 10 minutes. Then, carefully lift them out using the parchment paper. Place them on a wire rack to cool fully. This step keeps them from getting soggy. Once they are cool, cut them into bars or squares. Use a sharp knife for clean edges. You can make these bars your own by adding different nuts or seeds. Almonds, walnuts, or chia seeds work great. Each option brings a unique flavor and texture. Mix it up to keep things fun! Incorporating spices can also add extra flavor. Try adding a pinch of nutmeg or a dash of ginger. You can even mix in cocoa powder for a chocolate twist. These small changes can make a big difference in taste. Preparing ingredients ahead of time saves you effort. Measure out your oats, nuts, and other items in advance. Store them in sealed bags or containers. This will make your baking day smoother. Freezing the bars is a great option for longer storage. After cutting, wrap each bar in plastic wrap. Then, place them in a freezer bag. They can stay fresh for up to three months. Just thaw them in the fridge overnight before enjoying. For the full recipe, check out the Crunchy Maple Pecan Granola Bars. {{image_2}} You can easily change the flavor of your maple pecan granola bars. Adding chocolate chips makes them sweeter. Use dark chocolate for a rich taste. You can also switch up the nuts. Try walnuts, almonds, or hazelnuts for a new twist. If you want to use a different sweetener, agave syrup or coconut sugar works well. These options give you control over taste and health. If you are vegan, you can make these bars using plant-based ingredients. Substitute almond butter with sunflower seed butter. You can also replace honey with more maple syrup. This keeps the bars sweet and vegan-friendly. For gluten-free options, choose certified gluten-free oats. This change makes them safe for those with gluten issues. These granola bars pair well with yogurt. Just crumble them on top of your favorite yogurt for extra crunch. You can also enjoy them with smoothies. They make a great snack for meal prep. Pack them for lunch or a quick breakfast on the go. They are filling and tasty, perfect for busy days. Store your Maple Pecan Granola Bars in an airtight container. This keeps them fresh and tasty. You can keep them at room temperature or in the fridge. Room temperature storage works well for a week. If you want them to last longer, store them in the fridge. These bars stay fresh for about one week at room temperature. In the fridge, they can last up to two weeks. Look for signs of spoilage. If they smell off or have an unusual color, it's time to toss them. If your bars become hard, warm them for a few seconds in the microwave. This makes them soft and chewy again. You can also crumble stale bars over yogurt or ice cream for a tasty treat. For a fun snack, mix crumbled bars with fresh fruit and nuts. You can use seeds instead of nuts. Try sunflower seeds or pumpkin seeds. These add crunch and flavor. You can also mix in coconut flakes for a different texture. If you want a different nut butter, try peanut butter or cashew butter. For a seed option, use sunflower seed butter. Each will give a unique taste but still bind your bars well. Yes, you can! Use certified gluten-free oats. Also, check that your almond butter and any sweeteners are gluten-free. This way, you can enjoy your bars without worry. Granola bars can last up to a week at room temperature. Store them in an airtight container. For longer freshness, keep them in the fridge. If they feel hard, you can warm them slightly to soften. Maple pecan granola bars are easy to make with simple, tasty ingredients. You can customize them to suit your taste. Whether you want chocolate or different nuts, the options are endless. Store them well to keep them fresh and delicious. Remember to follow the tips to avoid crumbling. Making these bars is fun and rewarding. You’ll enjoy healthy snacks that fit your diet. Try them out and treat yourself to a yummy bite!](https://soyumrecipes.com/wp-content/uploads/2025/05/545f7241-f46d-4a39-8a20-5a90048baa5a.webp)
If you’re craving a snack that’s both simple and healthy, these Maple Pecan Granola Bars are perfect. Packed with oats,
