Skip to content
DisclaimerTerms Of UseGDPR PolicyCookie Policy

So Yum Recipes

  • Home
  • Drinks
  • Appetizers
  • Dinner
  • Dessert
  • About
  • Contact
  • Privacy Policy
DisclaimerTerms Of UseGDPR PolicyCookie Policy

Chloe

- 10 cups popped popcorn - 1 cup unsalted butter - 2 cups packed brown sugar - 1/2 cup light corn syrup - 1 teaspoon vanilla extract - 1/2 teaspoon baking soda - 1/2 teaspoon sea salt - 1 cup mixed nuts (cashews, almonds, pecans) - 1 cup chocolate chips (milk or dark) To make Moose Munch Caramel Popcorn, you need simple yet key ingredients. Popped popcorn is the base. The butter adds richness, while brown sugar gives it that sweet flavor. Light corn syrup makes the caramel smooth. Vanilla extract adds warmth and depth. Baking soda helps the caramel puff up, creating a light texture. Sea salt balances the sweetness. Mixed nuts add crunch and flavor, and chocolate chips finish it off with a sweet touch. Using high-quality ingredients will enhance your final treat. For the best taste, I recommend using fresh nuts and good chocolate. You can find the Full Recipe online to guide you through the steps. 1. Preheat your oven to 250°F (120°C) and prepare a baking sheet with parchment paper. 2. Pop the popcorn according to the package instructions. Place it in a large bowl and remove any unpopped kernels. 3. In a medium saucepan over medium heat, melt the unsalted butter. Stir in the packed brown sugar and light corn syrup. Bring this mixture to a boil while stirring constantly. Let it boil for about 4-5 minutes without stirring. 4. Remove the saucepan from heat. Carefully stir in the vanilla extract, baking soda, and sea salt. The mixture will bubble up, which is normal. 5. Immediately pour the caramel sauce over the popped popcorn. Use a spatula or wooden spoon to mix thoroughly. Make sure all the popcorn gets coated. 6. Gently fold in the mixed nuts for added crunch. Spread the caramel popcorn mixture evenly on the prepared baking sheet. 7. Bake in the preheated oven for about 1 hour. Stir every 15 minutes to ensure even coating and prevent burning. 8. Once done, remove the popcorn from the oven and let it cool completely. 9. While it cools, melt the chocolate chips in a microwave-safe bowl. Heat in 30-second intervals, stirring in between until smooth. 10. Drizzle the melted chocolate over the cooled popcorn mixture. Let it set for about 30 minutes before breaking it into clusters. For the full recipe, check the ingredients and detailed steps provided above. Enjoy your Moose Munch Caramel Popcorn! How to pop popcorn perfectly To pop popcorn well, use fresh kernels. Heat them in a pot with a lid. Add a bit of oil to help them pop. When you hear pops slow down, remove it from heat. Ensuring even caramel coating Pour the caramel over the popcorn while it is hot. Mix with a spatula quickly. This helps cover each piece evenly. Stir gently to avoid breaking the popcorn. Tips for using various nut combinations Mix and match nuts for fun flavors. Try cashews, almonds, or pecans. You can even use walnuts or peanuts. Just ensure they are roasted for the best taste. Adding different flavors to caramel You can spice up the caramel. Try adding a pinch of cinnamon or nutmeg. For a kick, mix in some cayenne pepper. This makes your treat unique and tasty. Substituting nuts or adding dried fruits If you want a twist, swap nuts for seeds. Pumpkin seeds or sunflower seeds work well. You can also add dried fruits like cranberries or raisins for a sweet touch. Using flavored chocolate for drizzling Instead of regular chocolate, use flavored ones. White chocolate or dark chocolate makes it special. Melt your choice and drizzle it over the popcorn for a gourmet feel. Check out the Full Recipe for more details! {{image_2}} You can have fun with this recipe by making seasonal versions. For Halloween, mix in candy corn for a spooky twist. The bright colors and sweet taste make it perfect for parties. Just sprinkle the candy on top before the caramel sets. During Christmas, try adding festive sprinkles. Use red and green sprinkles to bring holiday cheer. This adds a pop of color and makes the snack look special. You can also add mini marshmallows for a fun touch. If you need gluten-free options, use gluten-free popcorn. Most plain popcorn is naturally gluten-free. Check labels when buying pre-popped popcorn or flavorings. For those who follow a vegan diet, replace butter with dairy-free margarine. Use dairy-free chocolate chips for the drizzle. This way, everyone can enjoy Moose Munch Caramel Popcorn. You can feel good sharing this treat with friends and family. Don't forget to check out the Full Recipe for more delicious ideas! To keep Moose Munch Caramel Popcorn fresh, store it in airtight containers. This helps prevent moisture and keeps the popcorn crunchy. You can also use resealable plastic bags. For the best taste, keep it at room temperature. Avoid placing it in the fridge, as this can make it chewy. Moose Munch Caramel Popcorn stays fresh for about one to two weeks. After that, it may lose its crunch. Signs of spoilage include a stale taste or a soft texture. If you notice these, it’s best to toss it out. Always check the popcorn before serving it to friends and family. What is Moose Munch Caramel Popcorn? Moose Munch Caramel Popcorn is a sweet, crunchy snack. It combines popcorn, caramel, nuts, and chocolate. This treat is both fun and satisfying. You can enjoy it at parties or movie nights. Can I make it ahead of time? Yes, you can make it ahead of time. Just store it in an airtight container. It will stay fresh for about two weeks. This makes it great for gifts or events. Is there a way to make this recipe healthier? You can use less butter and sugar for a lighter version. Try using air-popped popcorn instead of oil-popped. Nuts are a healthy addition, so keep them in! What if my caramel doesn't harden? If the caramel stays soft, it may need more cooking time. Make sure to boil it for about 4-5 minutes. You can also try adding a bit more baking soda to help it set. How do I fix burnt popcorn? If your popcorn burns, start fresh with new kernels. Avoid using burnt pieces in your mix. For the best results, watch the popcorn closely while popping. This blog post covered all you need to make Moose Munch Caramel Popcorn. You learned about the simple ingredients and step-by-step prep. We shared tips to enhance flavor and ideas for seasonal versions. Plus, we discussed how to store your tasty treat properly. Now, you can enjoy this sweet snack any time. Experiment with flavors and share it with friends. This recipe brings joy to any occasion. Enjoy your popcorn adventure!

Moose Munch Caramel Popcorn Delightfully Sweet Treat

Are you ready to indulge in a sweet and crunchy treat? Moose Munch Caramel Popcorn combines fluffy popcorn, rich caramel,

- 1 cup rolled oats - 1 cup almond milk (or milk of choice) - 1 ripe banana, sliced - 2 tablespoons peanut butter (creamy or crunchy) - 1 tablespoon honey or maple syrup (optional for sweetness) - 1/2 teaspoon vanilla extract - 1/4 teaspoon cinnamon - A pinch of salt - Chopped nuts and banana slices for topping These ingredients create a tasty, filling breakfast. Each one plays a key role. The oats give you fiber, while the banana adds natural sweetness. Peanut butter brings in healthy fats and protein. You can swap some ingredients if needed. Here are a few ideas: - Oats: Use quick oats or steel-cut oats instead. Quick oats will soften faster. - Milk: Any milk works, like coconut or soy milk. - Banana: Use applesauce for a different flavor or texture. - Peanut Butter: Almond or cashew butter are great options. - Sweetener: Maple syrup can replace honey. For no sweetener, just skip it. - Spices: Try nutmeg or cardamom if you want a twist. These swaps let you tailor the recipe to your taste. Each serving of Peanut Butter Banana Overnight Oats has: - Calories: About 350-400, depending on your choices. - Protein: Roughly 12 grams from oats and peanut butter. - Fat: About 15-20 grams, mostly healthy fats from peanut butter. - Carbohydrates: Around 50 grams, mainly from oats and banana. - Fiber: About 6-8 grams, good for digestion. This meal is nutritious and keeps you full. It’s a smart way to start your day. For the full recipe, check out the detailed instructions above. To start, gather your ingredients. You will need rolled oats, almond milk, a ripe banana, peanut butter, honey or maple syrup, vanilla extract, cinnamon, and salt. In a mixing bowl, combine one cup of rolled oats with one cup of almond milk. Add two tablespoons of peanut butter next. If you like it sweet, include one tablespoon of honey or maple syrup. Pour in half a teaspoon of vanilla extract, one-fourth teaspoon of cinnamon, and a pinch of salt. Mix everything well until smooth. Once your mixture is ready, slice half of the banana. Gently fold the banana slices into the oat mix. Next, grab a mason jar or any airtight container. Spoon the oat mixture into the jar, filling it evenly. After that, place the remaining banana slices on top. This layering makes it pretty and tasty. When you mix the ingredients, be sure to stir slowly. This helps keep the banana slices intact. If you want a creamier texture, add a splash more almond milk. Before you eat it, stir again in the morning. This helps blend the flavors. If it seems too thick, just add more milk. For a great finish, top with nuts and extra banana slices. For the full recipe, check the recipe section. To make your Peanut Butter Banana Overnight Oats just right, follow these tips: - Use rolled oats. They soak up the almond milk well. - Choose a ripe banana. It adds natural sweetness and flavor. - Mix the ingredients well. This helps all flavors blend together. - Store in a mason jar. It keeps things fresh and makes for easy serving. Watch out for these common slip-ups: - Skipping the salt. It boosts flavor and balances sweetness. - Using too much liquid. This can make your oats soupy. - Forgetting to stir before serving. A good stir ensures an even texture. - Not letting them chill long enough. Aim for at least four hours. Feel free to make this recipe your own! Here are some fun ideas: - Add chopped nuts for crunch. Almonds and walnuts work well. - Try different sweeteners. Maple syrup or agave are great options. - Mix in berries for a fruity twist. Strawberries or blueberries add color. - Top with yogurt for creaminess. Greek yogurt adds protein and silkiness. For the full recipe, check out the detailed instructions and ingredient list! {{image_2}} You can switch up the nut butter in this recipe. Try almond butter, cashew butter, or sunflower seed butter. Each nut butter brings a new flavor and texture. For a protein boost, add a scoop of your favorite protein powder. Chia seeds are another great add-in. They add fiber and healthy fats. Just remember to adjust the liquid if you add more dry ingredients. If you want a dairy-free or vegan option, use almond milk or coconut milk. These milks work well and keep the oats creamy. For sweetening, use maple syrup instead of honey. It keeps the recipe vegan-friendly. You can also add a dollop of coconut yogurt on top for extra creaminess. Mix flavors to keep things exciting. Add cocoa powder for a chocolate twist. You can also stir in some berries, like strawberries or blueberries, for a fresh taste. A sprinkle of nutmeg or ginger can add warmth and spice. For a tropical flair, try adding shredded coconut or diced pineapple. Each mix will change the flavor and keep breakfast fun! To store your peanut butter banana overnight oats, use a mason jar or an airtight container. Make sure to seal it tightly. This keeps the oats fresh and prevents them from absorbing unwanted smells from your fridge. Store it in the refrigerator for the best taste. These oats can last up to five days in the fridge. If you want to freeze them, put them in a freezer-safe container. They can stay good for up to three months in the freezer. Just remember to thaw them overnight in the fridge before eating. If you prefer warm oats, you can reheat them easily. Just scoop the desired amount into a bowl. Then, microwave for 30 to 60 seconds. Stir well and check the temperature. If it’s too thick, add a splash of almond milk or water to loosen it. Enjoy your warm, comforting breakfast! For the full recipe, check out the [Full Recipe] section above. Yes, you can make Peanut Butter Banana Overnight Oats in advance. They store well in the fridge. I often prepare them the night before or even a few days ahead. Just remember to keep your oats in a sealed jar or container. This keeps them fresh and tasty. If you want to swap out oats, try using quinoa, chia seeds, or even crushed nuts. Quinoa gives a nice texture and is high in protein. Chia seeds make a fun gel-like consistency. Crushed nuts add a crunchy bite. Each option gives a unique twist to your overnight oats. To make your oats creamier, use more milk or yogurt. You can also try adding mashed banana or nut butter. These ingredients add richness and smoothness. I love using a bit of Greek yogurt for extra creaminess. It makes the oats thick and delicious. For the full recipe, check out the Peanut Butter Banana Overnight Oats recipe. Peanut butter banana overnight oats are simple and delicious. We covered ingredients, steps, and tips for best results. Remember, you can switch ingredients for your needs. Keep your oats fresh by storing them right. With these ideas, you can make your oats unique and tasty. Enjoy making this easy, healthy breakfast that fits your lifestyle!

Peanut Butter Banana Overnight Oats Simple Recipe

Are you looking for a quick and tasty breakfast? Peanut Butter Banana Overnight Oats are the answer! These creamy oats

Let’s dive into the essential ingredients for making these delightful Coconut Cream Pie Bars. Each item plays a key role in creating that rich and creamy texture, along with a burst of coconut flavor. - 1 cup graham cracker crumbs - 1/4 cup unsweetened shredded coconut - 1/4 cup granulated sugar - 1/2 cup unsalted butter, melted - 1 (14 oz) can coconut milk - 1 cup heavy cream - 1/2 cup powdered sugar - 3 tablespoons cornstarch - 1/4 teaspoon salt - 1 teaspoon vanilla extract - 2 large egg yolks - Toasted coconut flakes for topping Here’s how these ingredients work together. The graham cracker crumbs form a crunchy base. The shredded coconut adds texture and flavor to the crust. Granulated sugar sweetens the mix, while melted butter binds everything together. Next, coconut milk and heavy cream create a rich filling. The powdered sugar adds sweetness, and cornstarch helps thicken the filling. Salt enhances all the flavors, and vanilla extract adds a warm note. Finally, egg yolks give the filling its creamy texture. Don’t forget to sprinkle toasted coconut flakes on top for that perfect finish. For the full recipe, check the section above. Enjoy creating your Coconut Cream Pie Bars! Preheating the Oven Start by preheating your oven to 350°F (175°C). This step is key for a perfect crust. Mixing the Crust Ingredients In a bowl, combine: - 1 cup graham cracker crumbs - 1/4 cup unsweetened shredded coconut - 1/4 cup granulated sugar - 1/2 cup unsalted butter, melted Stir these until they mix well. This will be your crust. Baking the Crust Press the mixture into the bottom of a greased 8x8 inch baking dish. Make sure it is even. Bake for about 10 minutes. You want the crust to be lightly golden. Remove it from the oven and let it cool. Combining the Filling Ingredients In a medium saucepan, whisk together: - 1 (14 oz) can coconut milk - 1 cup heavy cream - 3 tablespoons cornstarch - 1/2 cup powdered sugar - 1/4 teaspoon salt This mix will be creamy and rich. Cooking the Mixture Place the saucepan over medium heat. Whisk continuously until the mixture thickens. You want it to just begin to simmer. Tempering the Egg Yolks In a small bowl, whisk 2 large egg yolks until they are lightly beaten. Gradually pour about a cup of the hot coconut cream mixture into the egg yolks. Whisk as you pour to prevent cooking the eggs. Then, add this back into the saucepan. Cook for another 2-3 minutes until it thickens further. Remove from heat and stir in 1 teaspoon vanilla extract. Pouring the Filling over the Crust Carefully pour the coconut cream filling over your cooled crust. Spread it evenly to cover the entire surface. Cooling Process Let the bars cool to room temperature. Then, transfer them to the refrigerator for at least 4 hours. This helps them set properly. Cutting and Serving the Bars Once set, cut the bars into squares. Top each square with toasted coconut flakes for added crunch. Enjoy your delicious creation! For the full recipe, check out the Coconut Cream Pie Bars. - Importance of Cooling Time Cooling is key! After baking your crust, let it cool fully. This helps the filling set well. If you skip this step, your bars may turn out mushy. Trust me, wait for it to cool down before adding the filling. This way, you get a nice, firm base. - How to Avoid Curds in the Filling To avoid curds, whisk well when cooking the filling. Make sure the heat is medium, not too high. If you see clumps forming, keep stirring until smooth. Also, temper the egg yolks properly. This means mixing them with hot filling first, then combining. It prevents curdling and keeps your filling silky. - Suggestions for Additional Toppings Add fun toppings! Try whipped cream for a soft touch. Fresh fruit like bananas or berries can brighten the taste. You can also sprinkle extra toasted coconut on top. It adds crunch and looks pretty too! - Using Quality Ingredients Always choose good ingredients. Use fresh coconut milk for a rich flavor. Opt for real vanilla extract instead of imitation. Quality makes a big difference in taste. When you use the best, your Coconut Cream Pie Bars will shine! For a detailed guide on making these bars, check out the Full Recipe. {{image_2}} To make vegan coconut cream pie bars, swap the dairy for plant-based options. Use coconut cream instead of heavy cream. You can also replace egg yolks with cornstarch. A good ratio is 1 tablespoon of cornstarch mixed with 3 tablespoons of water for each egg yolk. This keeps the filling thick and creamy. For a gluten-free version, choose gluten-free graham cracker crumbs. Many brands offer tasty options, so read the labels carefully. You might also use almond flour or oats in place of crumbs. This makes the crust just as delightful without gluten. You can add variety to the filling by mixing in chocolate or fruit. For a chocolate twist, stir in some cocoa powder or melted dark chocolate. If you prefer fruit, try adding mashed bananas or fresh berries. These additions give a fun flair to the classic taste. Feel free to explore these variations. Each one brings its own joy to the table. You can find the full recipe for coconut cream pie bars and customize it to your liking! To keep your Coconut Cream Pie Bars fresh, place them in an airtight container. This will help prevent moisture loss and keep them from drying out. Store the bars in the fridge. They will stay good for up to a week. If you want the best taste, eat them within three days. If you want to save some bars for later, freezing is a great option. First, cut the bars into squares. Wrap each square in plastic wrap, then place them in a freezer bag. Be sure to remove as much air as possible before sealing. You can freeze the bars for up to three months. To enjoy them, let them thaw in the fridge overnight. This keeps them fresh and tasty. For more details, refer to the Full Recipe. Coconut Cream Pie Bars stay fresh for about 4 to 5 days when stored in the fridge. Make sure to cover them well. This helps keep them moist and tasty. If you want to enjoy them longer, you can freeze them. They can last up to 2 months in the freezer. Just wrap them tightly in plastic wrap and then foil. Yes, you can make Coconut Cream Pie Bars without egg yolks. If you want to skip the eggs, use a thickener like cornstarch. You can increase the cornstarch to about 4 tablespoons to help with the creaminess. The bars will still taste great and be smooth. To cut the bars neatly, first chill them until they are fully set. Use a sharp knife for clean cuts. Run the knife under hot water, then dry it before cutting. This helps create smooth edges. Cut them into squares or rectangles, depending on your preference. You can make the crust more flavorful by adding spices or extras. Try mixing in a teaspoon of cinnamon or a pinch of nutmeg. You can also use crushed nuts, like almonds or pecans, for added crunch. A touch of brown sugar can add a deeper taste, too. The main difference between bars and a pie is their shape and serving style. Bars are typically cut into squares or rectangles, while pies are served in slices. Bars usually have a thicker crust and filling ratio. Pies often have a crust on the bottom and sometimes on the top. Both are delicious, but bars are easier to grab and go! This blog post revealed a tasty recipe for Coconut Cream Pie Bars. You learned about the key ingredients and simple steps for making the crust and filling. I shared tips for perfecting the texture and enhancing flavor. You also discovered vegan and gluten-free options. In short, making these bars is fun and easy. Enjoy experimenting with flavors and impressing your friends and family with this delicious treat.

Coconut Cream Pie Bars Irresistible and Simple Treat

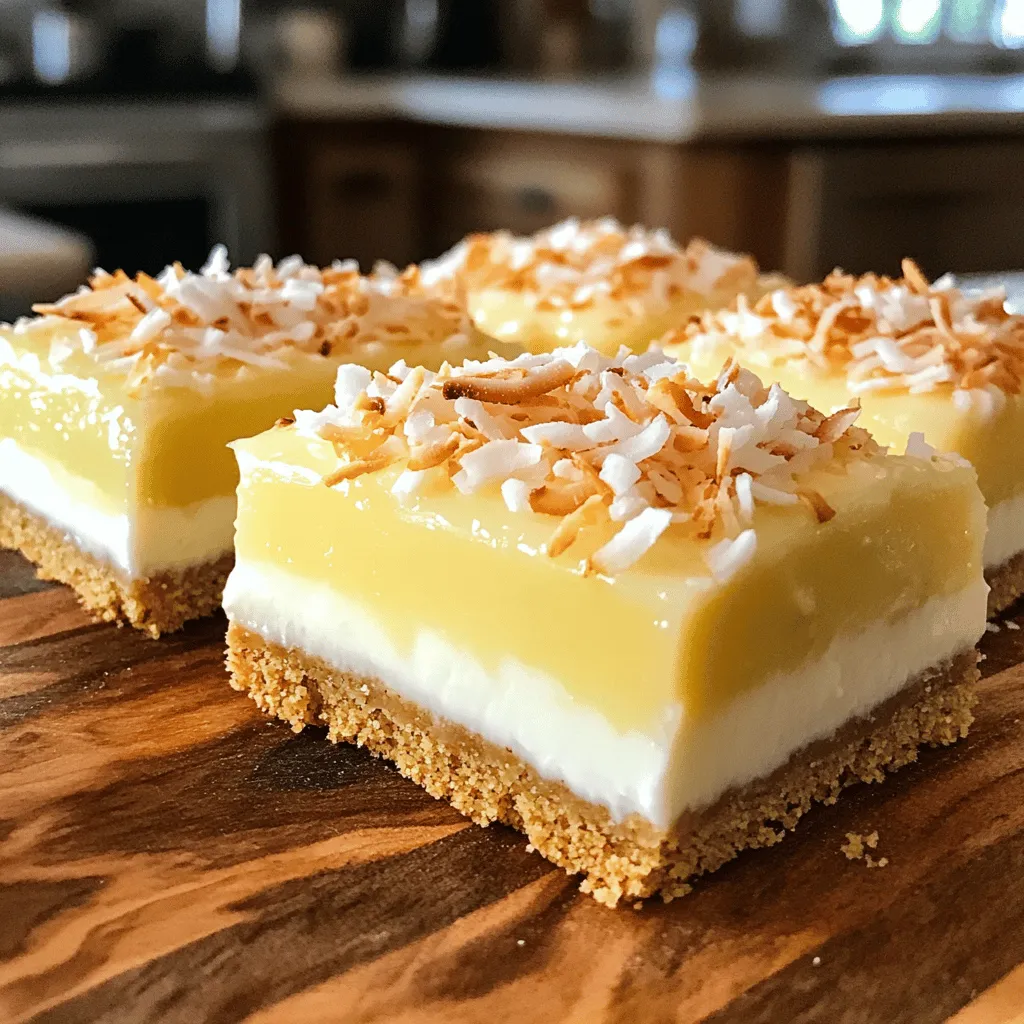
Looking for a sweet treat that’s simple and oh-so-delicious? Coconut Cream Pie Bars are the answer! With a crunchy crust

To make Chocolate Chip Cookie Dough Dip, you need simple ingredients. Each one plays a key role in creating a creamy, sweet treat. - Flour: Use 1 cup of all-purpose flour, but remember to heat-treat it. This makes it safe to eat raw. - Sugars: You will need ½ cup of packed brown sugar and ½ cup of granulated sugar. These give the dip its sweet flavor. - Butter: Use ½ cup of softened unsalted butter. It helps create a rich, smooth texture. - Vanilla and Milk: Add 1 teaspoon of vanilla extract for flavor. You’ll also need 2 tablespoons of milk, or more for the right texture. - Chocolate Chips and Salt: Finally, use 1 cup of mini chocolate chips for that classic cookie taste. A pinch of salt balances the sweetness. Gather these ingredients for a dip that will wow your taste buds. For the full recipe, check out the cooking instructions. Creaming the Butter and Sugars Start with soft butter. Place it in a mixing bowl. Add both sugars. You want to mix until it looks light and fluffy. This takes about two minutes. The fluffy mix gives your dip a nice texture. Incorporating Flour and Salt Next, add the heat-treated flour and salt. Mix slowly to avoid a flour cloud. Stir until everything is combined well. You should not see any dry spots. This step is key for a smooth dip. Adjusting Consistency with Milk Now, pour in the milk. Start with two tablespoons. Mix and see if it looks creamy. If the dip is too thick, add more milk. Keep stirring until you get your desired texture. This will make the dip smooth and easy to scoop. Adding Mini Chocolate Chips Finally, fold in the mini chocolate chips. Gently mix them in so they spread evenly. This adds sweet bites throughout the dip. Make sure you don't break the chips while mixing. After preparing the dip, transfer it to a serving bowl. Smooth the top with a spatula. Cover it with plastic wrap and chill in the fridge for 30 minutes. This helps the flavors blend well. Plus, it makes the dip nice and cool. When you're ready to serve, take it out of the fridge. Pair it with graham crackers, apple slices, or pretzels. For a fun twist, drizzle melted chocolate on top. This dip is perfect for parties or movie nights. Enjoy every creamy, chocolatey bite! To get the best texture for your chocolate chip cookie dough dip, focus on these steps: - Always use heat-treated flour. This helps kill any bacteria. - Soften your butter well. This makes it easy to mix with sugars. - Gradually add milk. Start with two tablespoons, then add more if needed. - Mix until smooth. Avoid lumps for a creamy, dreamy dip. If you have leftover dip, store it right. Here’s how: - Place it in an airtight container. - Keep it in the fridge for up to five days. - If you want to save it longer, freeze it. Just use a freezer-safe container. Avoid these common pitfalls to ensure your dip shines: - Don’t skip the heat treatment on the flour. It’s key for safety. - Be careful not to overmix. This can make your dip too dense. - Don’t forget to taste! Adjust sweetness or creaminess as needed. - Avoid using regular chocolate chips. Mini chips blend in better. These tips will help you create a delicious and smooth chocolate chip cookie dough dip every time! For the complete recipe, check out the Full Recipe section. {{image_2}} You can easily make a vegan version of this dip. Replace the butter with vegan butter or coconut oil. Use almond milk or oat milk instead of regular milk. For the sugars, ensure they are vegan-friendly. This dip stays just as creamy and tasty! To make this dip gluten-free, swap out regular flour for gluten-free flour. Make sure your chocolate chips are also gluten-free. This way, everyone can enjoy the dip without worry. The taste remains rich and delightful, just like the classic version! Want to change things up? Add peanut butter for a nutty twist! Mix in about ½ cup of creamy peanut butter with the butter. You can also try almond butter or Nutella for fun flavors. Chopped nuts, like walnuts or pecans, can add a nice crunch. Feel free to get creative with your favorite flavors! Check out the Full Recipe for more ideas! Store your chocolate chip cookie dough dip in an airtight container. It stays fresh in the fridge for up to five days. This way, you can enjoy a sweet treat anytime. Before you serve, stir it a bit to bring back its creamy texture. You can freeze this dip for up to three months. Use a freezer-safe container and leave some space at the top. It will expand as it freezes. When you're ready to eat it, thaw the dip in the fridge overnight. Stir well before serving. You don’t really need to reheat this dip. It tastes best chilled. However, if you want a warm treat, microwave it for about 10-15 seconds. Check it often to avoid overheating. Always stir it after microwaving to get an even warmth. Enjoy your delicious dip with graham crackers, apple slices, or pretzels! For the full recipe, check the previous sections. You can store chocolate chip cookie dough dip for up to five days in the fridge. To keep it fresh, place it in an airtight container. If you want to enjoy it later, chill it first. Just take it out of the fridge about 15 minutes before serving. This helps it soften a bit. Yes, you can use different types of chocolate chips. Milk chocolate, dark chocolate, or even white chocolate work well in this dip. You can mix them too for a fun twist. Just remember to adjust the sweetness if you use very sweet chocolate. Serve chocolate chip cookie dough dip with a variety of dippers. I love using graham crackers, apple slices, or pretzels. You can also add some fun toppings like sprinkles or drizzled chocolate. Make it a fun display by using colorful bowls or platters. Your guests will love it! Check out the full recipe to get started. You’ve learned to make a tasty chocolate chip cookie dough dip. This recipe includes simple ingredients and easy steps. Know how to store and serve it too. Remember, variations allow you to adjust the dip to your taste. Keep these tips in mind to avoid common mistakes. Enjoy this delicious treat at your next gathering. It's sure to be a hit!

Chocolate Chip Cookie Dough Dip Irresistible Treat

Are you ready for a treat that’s as fun to make as it is to eat? This Chocolate Chip Cookie

When making lemon blueberry muffins, gathering the right ingredients is key. Here’s a detailed list of what you need: - 2 cups all-purpose flour - 1 cup granulated sugar - 2 teaspoons baking powder - ½ teaspoon baking soda - ½ teaspoon salt - 1 cup buttermilk (or homemade with milk and vinegar) - ½ cup unsalted butter, melted and cooled - 2 large eggs - Zest of 2 lemons - 2 tablespoons fresh lemon juice - 1 teaspoon vanilla extract - 1 ½ cups fresh blueberries (frozen works too) - Optional: powdered sugar for dusting Each ingredient plays a vital role in achieving the perfect flavor and texture. All-purpose flour gives the muffins structure. Granulated sugar adds sweetness and helps with browning. Baking powder and baking soda create lift, making the muffins light and fluffy. Buttermilk provides moisture and a slight tang. Butter adds richness, while eggs bind everything together. Lemon zest and juice bring a bright, fresh flavor that pairs perfectly with blueberries. Lastly, fresh blueberries add bursts of sweetness in every bite. To make these muffins extra special, you can dust them with powdered sugar before serving. This recipe is not just tasty; it’s fun to make and share. For the full recipe, check out the details above! 1. Preheat your oven to 375°F (190°C). Line a muffin tin with paper liners or grease it lightly. 2. In a large mixing bowl, combine 2 cups of all-purpose flour, 1 cup of granulated sugar, 2 teaspoons of baking powder, ½ teaspoon of baking soda, and ½ teaspoon of salt. Mix these dry ingredients well. 3. In a separate bowl, mix 1 cup of buttermilk, ½ cup of melted butter, 2 large eggs, the zest of 2 lemons, 2 tablespoons of fresh lemon juice, and 1 teaspoon of vanilla extract until smooth. 4. Now, pour the wet mixture into the dry mixture. Stir gently until just combined. It’s okay if there are a few lumps. 5. Gently fold in 1 ½ cups of fresh blueberries. Make sure they are evenly distributed in the batter. 6. Divide the batter among the muffin cups, filling each about two-thirds full. 7. Bake the muffins in the preheated oven for 18-20 minutes. Check for doneness by inserting a toothpick into the center of a muffin. It should come out clean. 8. Once baked, remove the muffins from the oven. Let them cool in the tin for about 5 minutes. Then, transfer them to a wire rack to cool completely. For the complete recipe, don't forget to check out the Full Recipe section for all the details. To achieve the best texture for your lemon blueberry muffins, avoid overmixing the batter. When you combine the wet and dry ingredients, stir gently. A few lumps are okay. Overmixing can make the muffins tough. Next, ensure your oven is at the right temperature, around 375°F (190°C). An accurate oven temperature is key for even baking. Use an oven thermometer if you have one. This small tool can help you avoid undercooked or burnt muffins. To boost the lemon flavor, consider adding lemon extract along with the zest. This extra kick can elevate the taste. Fresh lemon zest gives a bright flavor, so don’t skip it! When selecting blueberries, look for firm, plump berries. They should be deep blue with a slight shine. Avoid berries with wrinkles or soft spots. Fresh blueberries add the best taste, but you can use frozen ones. Just be sure to thaw them and pat them dry first. For the complete recipe, check the [Full Recipe]. {{image_2}} To make gluten-free lemon blueberry muffins, swap the all-purpose flour for a gluten-free blend. Look for one with xanthan gum added for the best texture. You can also use almond flour or coconut flour, but adjust the liquid. For a vegan version, replace eggs with flax eggs. Mix 1 tablespoon of ground flaxseed with 3 tablespoons of water. Let it sit for a few minutes to thicken. Use almond milk or soy milk in place of buttermilk. Also, choose a dairy-free butter for the recipe. You can add fun twists to these muffins. Try mixing in chopped strawberries or raspberries along with the blueberries. Cinnamon or nutmeg can also enhance the flavor. For a citrus boost, add orange zest. The possibilities are endless! For the full recipe, check out the Zesty Lemon Blueberry Bliss Muffins 🫐 recipe. To store your lemon blueberry muffins at room temperature, place them in a container. You can use a plastic or glass container with a lid. If you don't have a container, a zipper bag works great too. Make sure to keep them in a cool area, away from sunlight. They will stay fresh for about two to three days. For long-term storage, freezing muffins is a smart choice. First, let them cool completely. Then, wrap each muffin in plastic wrap. After that, place them in a freezer-safe bag. This method keeps them fresh for about three months. When you're ready to eat one, simply take it out and let it thaw at room temperature. To reheat your muffins, you can use the microwave. Heat on low for about 15-30 seconds. This makes them warm and soft, just like fresh out of the oven. Enjoy your lemon blueberry muffins any time you want! For the full recipe, refer back to the earlier section. You can make these muffins healthier by reducing the sugar. Try using half the amount of sugar. You can also replace granulated sugar with honey or maple syrup. These options add sweetness with less impact on blood sugar. Another idea is to use whole wheat flour. This adds fiber and nutrients, making your muffins more filling. Yes, you can use frozen blueberries! They work well in this recipe. However, frozen blueberries can make the muffins a bit wetter. To reduce this, do not thaw the blueberries before adding them to the batter. Just fold them in straight from the freezer. This keeps the muffins from turning too blue. If you don't have buttermilk, you can easily make your own! Just mix one cup of milk with one tablespoon of vinegar or lemon juice. Let it sit for about five minutes. This will create a similar tangy flavor. If you prefer, you can also use plain yogurt or sour cream. Just thin them out with a bit of water or milk until you reach the right consistency. To check if your muffins are done, look for a golden-brown top. You can also do the toothpick test. Insert a toothpick into the center of a muffin. If it comes out clean, the muffins are ready. If there is wet batter, bake them a few more minutes. Enjoy your freshly baked Lemon Blueberry Muffins! You learned about making tasty Lemon Blueberry Muffins, from gathering ingredients to storing them. Each step is key for great flavor and texture. Remember, don't overmix the batter to keep them soft. You can even try gluten-free or vegan options for a fun twist. These muffins are a delight for breakfast or snacks. Enjoy your baking and the delicious results!

Lemon Blueberry Muffins Fresh and Flavorful Treat

Craving a sweet and tangy treat? You’re in the right place! I’ll show you how to make delicious Lemon Blueberry

- 2 chicken breasts, diced - 8 oz pasta (fettuccine or penne) - 4 cloves garlic, minced - 1 cup heavy cream - 1 cup chicken broth - 1 cup spinach (fresh or frozen) - 1/2 cup grated Parmesan cheese - 2 tablespoons olive oil - Salt and pepper to taste - 1 teaspoon Italian seasoning - Fresh parsley for garnish When measuring your ingredients, be precise. Use a kitchen scale for chicken. For pasta, a standard 8 oz package works well. Use a measuring cup for liquids like cream and chicken broth. Remember to adjust seasonings to fit your taste. If you prefer a stronger garlic flavor, feel free to add more minced garlic. If you need alternatives, here are some options: - Chicken: Swap for turkey or tofu for a vegetarian dish. - Pasta: Use whole wheat or gluten-free pasta if preferred. - Cream: Substitute with coconut cream for a dairy-free option. - Spinach: Kale or arugula can replace spinach in this recipe. This recipe is versatile and allows for many adjustments. For more details, refer to the Full Recipe. To start, boil a large pot of salted water. Once it bubbles, add 8 oz of pasta. I love using fettuccine or penne, but you can choose your favorite. Cook until it’s al dente, which usually takes about 8-10 minutes. Don’t forget to reserve 1/2 cup of that pasta water. Drain the pasta and set it aside. Next, grab a large skillet and heat 2 tablespoons of olive oil over medium heat. Add 2 diced chicken breasts to the pan. Season them with salt, pepper, and 1 teaspoon of Italian seasoning. Cook the chicken for 5-7 minutes until it turns golden brown and is cooked through. Once done, remove it from the pan and set it aside. In the same skillet, toss in 4 minced garlic cloves. Sauté them for about 30 seconds. You want them fragrant but watch out! Garlic burns quickly. Now, pour in 1 cup of chicken broth and bring it to a simmer. Let it bubble for 2-3 minutes, allowing it to reduce a bit. Then, stir in 1 cup of heavy cream. Let this simmer for about 5 minutes until it thickens slightly. Add 1 cup of spinach and the cooked chicken back into the pan. Stir until the spinach wilts. Mix in 1/2 cup of grated Parmesan cheese until it melts and makes the sauce creamy. If it’s too thick, add some of that reserved pasta water to make it just right. Time to bring it all together! Add the drained pasta into the skillet and toss everything well. You want every piece of pasta coated in that creamy sauce. Taste and adjust the seasoning with more salt and pepper if needed. Divide the creamy garlic chicken pasta onto plates or bowls. For a fresh touch, garnish with chopped parsley. You can also serve it with garlic bread or a simple salad on the side. Enjoy the rich flavors! For the complete guide, check out the Full Recipe. To get the ideal creaminess, use heavy cream. It makes the sauce rich and smooth. When you mix in the Parmesan cheese, it adds flavor and thickness. If the sauce feels too thick, add some pasta water. This keeps everything creamy without making it too runny. Herbs can change the dish's taste. Fresh parsley adds a nice touch when you serve it. You can also try basil or thyme. These herbs will give a fresh note to your dish. If you have Italian seasoning, use it while cooking the chicken. This will help build layers of flavor. Many people overcook the garlic. This can make it bitter. Always sauté it just until fragrant, about 30 seconds. Another mistake is not reserving pasta water. This water helps adjust the sauce's thickness later. Lastly, don't skip the seasoning. Properly seasoning your dish makes all the difference. For more detailed steps, check the Full Recipe. {{image_2}} You can easily add more veggies to this dish. Spinach is a great choice, but try others too. Bell peppers, broccoli, or peas add color and nutrients. Just chop them small and add them when you mix in the chicken. Cook until the veggies are tender. This makes the dish more balanced and tasty. If you want to switch up the protein, you have options. Shrimp is a quick and tasty choice. Cook it in the same way as chicken. You can also use turkey or tofu for a lighter meal. Each protein brings its own flavor, so feel free to experiment. To make this dish gluten-free, choose a gluten-free pasta. There are many good options available now. For a dairy-free version, swap the heavy cream for coconut milk. Use nutritional yeast instead of Parmesan for that cheesy flavor. These swaps keep the dish creamy and delicious, while suiting your needs. For the full recipe, check out the details above! To store your creamy garlic chicken pasta, let it cool first. Place it in an airtight container. This helps keep it fresh. Store it in the fridge for up to three days. Make sure to label the container with the date. This way, you’ll know when to eat it. When you're ready to enjoy your leftovers, take them out. You can reheat them on the stove or in the microwave. If using the stove, add a splash of chicken broth or water. This keeps it moist. Heat it slowly over medium heat. Stir often to avoid burning. If using a microwave, cover the bowl with a lid or plate. Heat it in short bursts, stirring in between. This ensures even heating. If you want to store it longer, freezing is an option. Use a freezer-safe container or freezer bags. Leave some space at the top, as the pasta expands. Label the bags with the date and contents. You can freeze it for up to three months. To thaw, place it in the fridge overnight. Reheat it as mentioned earlier. For a full recipe, check the linked section. To make this dish dairy-free, swap heavy cream with coconut cream or cashew cream. Use dairy-free cheese instead of Parmesan. You still get a rich flavor without any dairy. Yes, you can use any pasta you love. Fettuccine and penne work great, but spaghetti, rotini, or even whole wheat pasta can work too. Just follow cooking times on the package. This pasta pairs well with a fresh salad or garlic bread. You can also add steamed veggies for more color and nutrition. A light white wine can make a great drink pairing. The dish can last up to three days in the fridge. Make sure to store it in an airtight container. Reheat it on low heat to keep it creamy. Yes, you can prep the chicken and sauce ahead. Cook the pasta fresh when ready to serve. This keeps the pasta from getting mushy. The full recipe guides you through it. This blog post gives you all the info for making Creamy Garlic Chicken Pasta. We covered ingredients, measurements, and substitutions. You learned step-by-step cooking methods for tasty pasta. I shared tips for the perfect creamy texture and flavor boosts. Remember, you can customize it with veggies or protein choices. Store leftovers correctly and reheating is easy. Use this recipe to impress, and don’t shy away from making it your own! Enjoy cooking!

Creamy Garlic Chicken Pasta Tasty and Simple Recipe

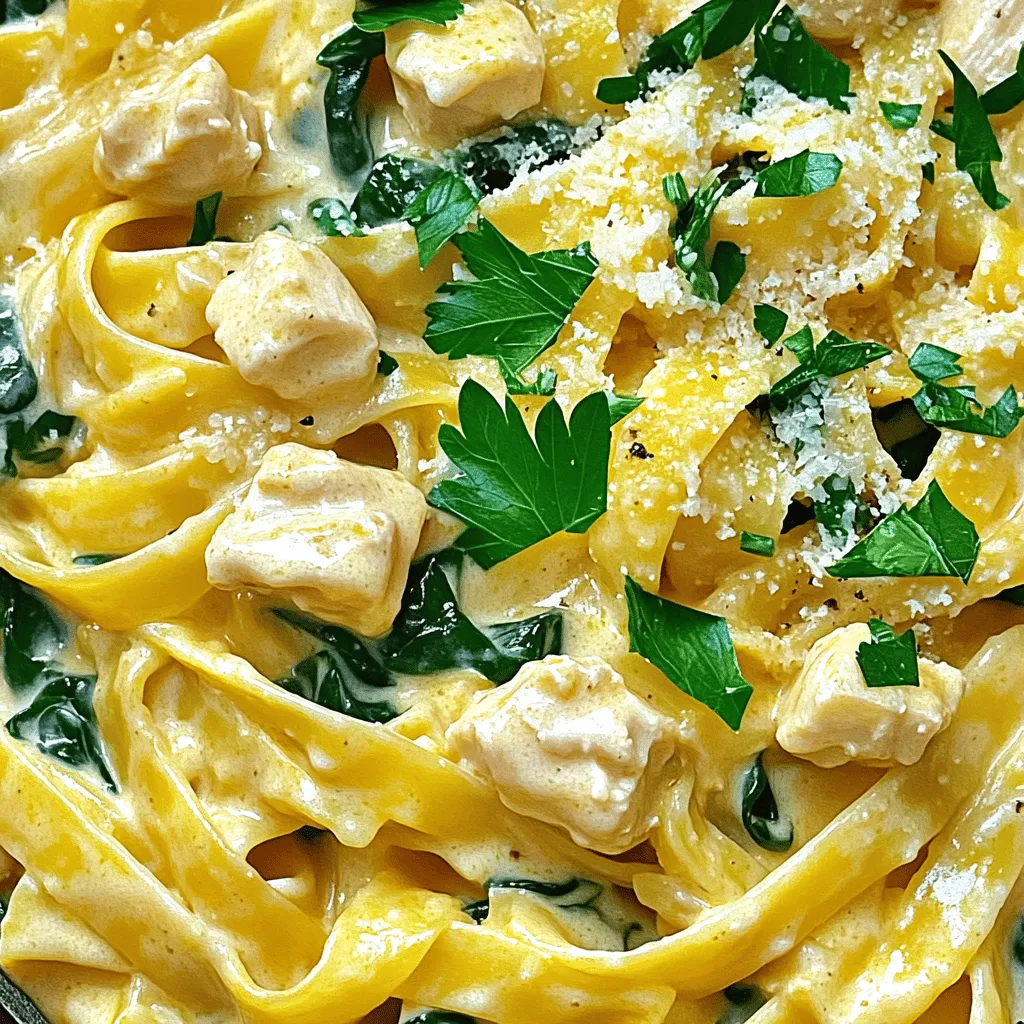
Looking for a quick, delicious meal? This Creamy Garlic Chicken Pasta recipe is your answer. It combines tender chicken, rich

To make a great seafood pasta salad, you need some key ingredients. Here’s what you’ll need: - 8 oz. rotini pasta - 1 cup cooked shrimp, peeled and deveined - 1 cup canned tuna, drained - 1 cup cherry tomatoes, halved - 1/2 cup cucumber, diced - 1/4 cup red onion, finely chopped - 1/4 cup black olives, sliced - 1/2 cup bell peppers (any color), diced - 1/4 cup fresh parsley, chopped - 1/4 cup mayonnaise - 2 tablespoons lemon juice - 1 tablespoon Dijon mustard - Salt and pepper to taste You can choose fresh seafood options for this dish. Fresh shrimp adds a delightful texture and flavor. You can also use crab meat or scallops if you wish for a twist. When it comes to pasta, rotini is my favorite because it holds the dressing well. You can also use penne or fusilli for similar results. These shapes give you great bites in every forkful. For the full recipe, check out Ocean Breeze Seafood Pasta Salad. To cook rotini pasta, start with a large pot. Fill it with water and add salt. Bring the water to a boil. Once boiling, add 8 ounces of rotini pasta. Stir it gently to prevent sticking. Cook until it’s al dente, about 8-10 minutes. Drain the pasta in a colander. Rinse it under cold water. This cools the pasta and stops the cooking process. Set the cooled pasta aside in a large mixing bowl. For the seafood, use 1 cup of cooked shrimp. Peel and devein the shrimp if needed. If you use canned tuna, make sure to drain it well. Add the shrimp and tuna to your mixing bowl. Next, chop your vegetables. Halve 1 cup of cherry tomatoes. Dice 1/2 cup of cucumber. Finely chop 1/4 cup of red onion. Slice 1/4 cup of black olives and dice 1/2 cup of bell peppers. Add all these chopped veggies to the bowl with pasta. For the dressing, you need a few simple ingredients. Gather 1/4 cup of mayonnaise, 2 tablespoons of lemon juice, and 1 tablespoon of Dijon mustard. In a small bowl, whisk these together. Add salt and pepper to taste. Whisk until the dressing is smooth. This step is key for a great texture. Now it’s time to mix everything. Pour the dressing over the pasta and seafood mixture. Use a spatula to gently toss all the ingredients together. You want everything to be well coated in dressing. Then, fold in 1/4 cup of chopped parsley. Taste the salad and adjust seasoning if needed. Cover the bowl with plastic wrap. Let it refrigerate for at least 30 minutes. This allows the flavors to blend well. Once ready, serve it chilled and enjoy your flavorful seafood pasta salad! For the full recipe, check out the details above. To make your seafood pasta salad pop, seasonings matter. I recommend using: - Salt - Black pepper - Garlic powder - Fresh lemon zest - A pinch of cayenne for heat These will add depth to your salad. You can also boost the dressing with extra lemon juice or a splash of vinegar. A hint of Dijon mustard brightens the flavor. A great salad looks as good as it tastes. For serving, try these ideas: - Use a large, colorful bowl. - Layer the ingredients for a stunning look. - Top with fresh herbs like parsley or basil. You can also add slices of lemon or lime as a garnish. This adds color and invites the eye. For best taste, you can prep your salad early. Here’s how: - Cook the pasta and seafood a day in advance. - Store each component separately in the fridge. Mix everything together just before serving. This keeps your salad fresh and crisp. Store leftovers in a sealed container for up to three days. {{image_2}} For a Mediterranean twist, you can add unique ingredients. Try using artichoke hearts and feta cheese for a burst of flavor. You might also include sun-dried tomatoes for a deeper taste. Fresh basil and oregano can brighten up the dish. For the dressing, consider mixing olive oil, lemon juice, and a pinch of garlic. This combo gives a fresh and zesty flavor. You can also add fresh herbs like dill or parsley for extra aroma. In an Asian-style version, consider using rice noodles instead of rotini. Shrimp and crab work well in this salad. You can also add sliced bell peppers and snap peas for crunch. For the dressing, mix soy sauce, sesame oil, and a little rice vinegar. This will create a tangy flavor that pairs well with the seafood. You can also add some chili paste for a spicy kick if you like heat. To make a healthier seafood pasta salad, you can substitute light ingredients. Use Greek yogurt instead of mayonnaise for the dressing. This will reduce fat while adding protein. Incorporating more vegetables will boost the nutrients. You can add spinach, arugula, or broccoli florets. These vegetables will add color and crunch to your salad. You can adjust the amount of pasta to keep the dish lighter and more veggie-focused. For more detailed instructions, check out the Full Recipe. To store leftovers, use an airtight container. Glass or plastic containers work well. Keep the salad in the fridge. It lasts for up to three days. After that, the flavor and texture may change. You can freeze this salad, but it may lose some texture. Before freezing, divide it into portions. Use freezer-safe bags or containers. When ready to eat, thaw it overnight in the fridge. If using frozen shrimp, cook it before adding to the salad. This keeps everything fresh. Reheat carefully to maintain flavor and texture. The best method is to use the microwave. Heat in short bursts, stirring in between. You can also serve it cold, as it's great that way. Enjoy your tasty seafood pasta salad! You can use many types of seafood in your salad. Here are some great options: - Cooked shrimp - Canned tuna - Crab meat - Scallops - Cooked mussels - Smoked salmon Feel free to mix and match your favorites. Each type adds its unique flavor. For a richer taste, consider adding crab or scallops. They pair well with fresh veggies and pasta. Yes, you can use gluten-free pasta! Many brands offer tasty options made from rice or corn. Look for rotini or penne shapes that mimic wheat pasta. Just check the cooking time, as it may differ. This way, you can enjoy your seafood pasta salad without worry. To make your seafood pasta salad more filling, try adding: - Diced avocado - Cooked beans like chickpeas - Extra vegetables such as spinach or arugula - Grains like quinoa or farro These additions boost the nutrition and flavor. They also make a great side dish or main meal. Absolutely! Making seafood pasta salad ahead of time enhances the flavors. Here’s how to do it: - Prepare the salad, but don't add the dressing yet. - Store it in the fridge for up to two days. - Add the dressing just before serving. This keeps the pasta and seafood fresh. I recommend using an airtight container for best results. For the full recipe, check out Ocean Breeze Seafood Pasta Salad. In this blog post, I covered how to create a delicious Seafood Pasta Salad. I detailed essential ingredients, step-by-step cooking instructions, and tips for perfecting flavor. We explored fun variations and smart storage methods. For a satisfying meal, don’t hesitate to get creative with your ingredients. Remember, fresh seafood and vibrant veggies make a big difference. Enjoy your cooking and share this tasty dish with friends and family!

Flavorful Seafood Pasta Salad Quick and Easy Recipe

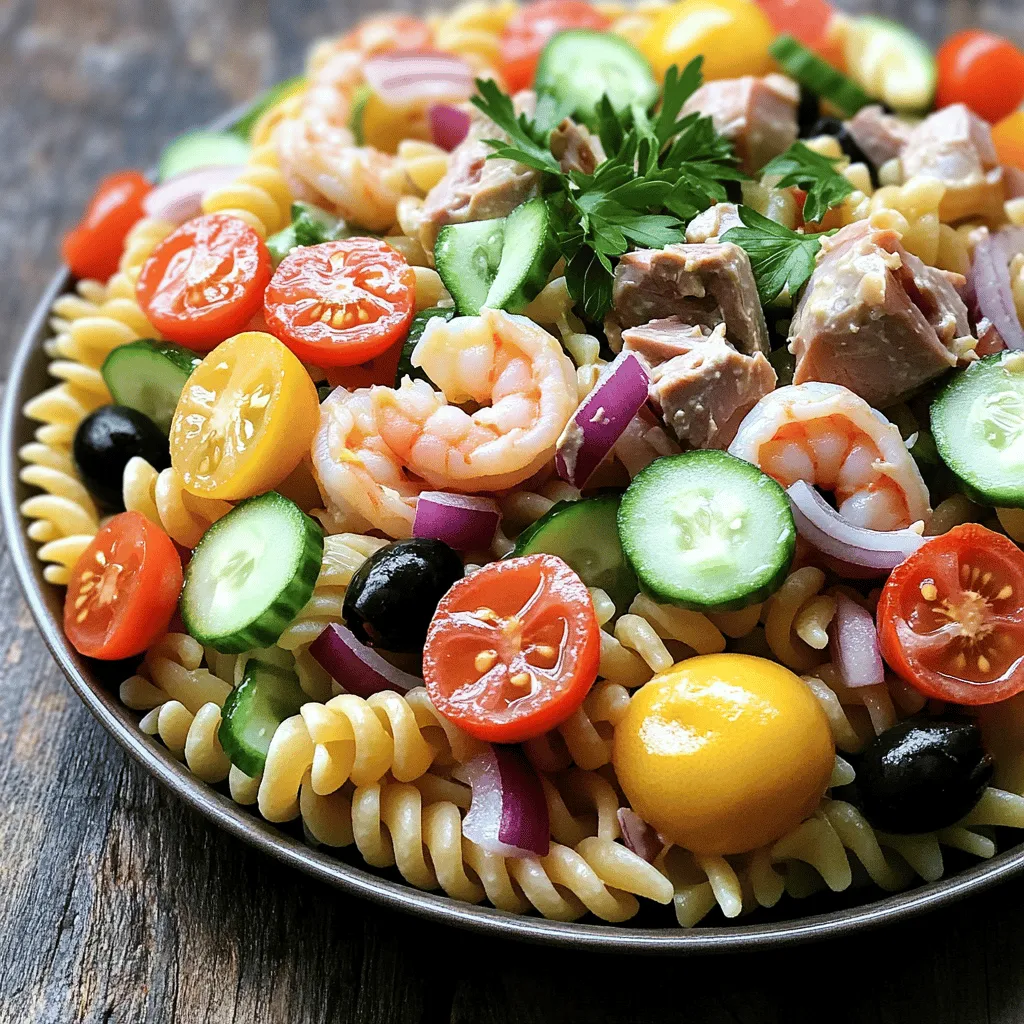
Looking for a delightful dish that’s quick and easy? This flavorful Seafood Pasta Salad is just what you need! Packed

To make the best Southern Bananas Foster, you need a few key items. These ingredients create the rich flavors and textures we love in this dish. Here’s what you’ll need: - 4 ripe bananas, peeled and sliced lengthwise - 1/2 cup brown sugar - 1/4 cup unsalted butter - 1 teaspoon ground cinnamon - 1 teaspoon vanilla extract - Vanilla ice cream, for serving You can add a few extra ingredients to change things up. These options can enhance the flavor and texture of your dessert: - 1/4 cup chopped pecans (optional) - A splash of rum for a classic touch - A pinch of nutmeg for extra warmth For the best experience, serve Southern Bananas Foster in clear dessert bowls. This way, everyone can see the pretty layers. Here are some ideas to make it even better: - Drizzle extra caramel sauce on top for sweetness - Sprinkle a bit of cinnamon for added flavor - Garnish with whole pecans for a nice crunch You can find the full recipe and instructions to create this delightful dessert. Enjoy making this treat! Start with ripe bananas. Peel them and slice them lengthwise. This helps them cook evenly. Set the slices aside on a plate. You want them ready for the skillet. Grab a large skillet and heat it over medium heat. Add the unsalted butter first. Let it melt completely. Once melted, stir in the brown sugar and ground cinnamon. Whisk these together until smooth. This should take just 1-2 minutes. The sugar must dissolve fully. Now, gently add the banana slices to the skillet. Cook them for 2-3 minutes on each side. They should be golden and soft. Carefully pour in the vanilla extract and stir. Cook for one more minute to blend the flavors. If you like nuts, add the chopped pecans now. Mix well to coat them in the sauce. To serve, scoop vanilla ice cream into dessert bowls. Spoon the warm banana mixture over the ice cream. This creates a lovely contrast of hot and cold. For a beautiful look, use clear bowls to show off the layers. Drizzle extra caramel sauce on top. Finish with a sprinkle of cinnamon and a few whole pecans. This adds a nice touch to your dish. For the full recipe, check out our detailed guide. Enjoy this sweet treat! To make great caramel for your Southern Bananas Foster, use medium heat. This heat helps the sugar melt but not burn. Stir the sugar often. This keeps it from sticking to the pan. Once the sugar turns a golden color, it is ready. Don't rush this step. Take your time to get it right. The bananas will soak up all that sweet goodness! Flambéing adds a fun twist to your dish. First, remove the skillet from the heat. This keeps flames from spreading. Then, carefully add your rum or liquor. Use a long lighter to ignite the liquid. Stand back and enjoy the show! The flames will burn off the alcohol, leaving a rich flavor. Always have a lid nearby to cover the pan if flames get too high. Serve Southern Bananas Foster in clear bowls. This lets everyone see the pretty layers of bananas and sauce. A scoop of vanilla ice cream on top makes it even better. You can also sprinkle some chopped pecans for a nice crunch. For extra flair, drizzle more caramel on top. A light dusting of cinnamon makes it look fancy and tastes great too. For the full recipe, check out the section on ingredients and instructions! {{image_2}} You can easily make a dairy-free or vegan version. Replace the unsalted butter with coconut oil or vegan butter. Use a plant-based ice cream made from almond, coconut, or cashew milk. This way, you still enjoy the rich flavors without dairy. Add a splash of dark rum for a classic twist. Rum enhances the flavor and brings warmth. For a chocolatey touch, add chocolate chips to the skillet when cooking the bananas. This adds a rich layer of flavor that many find delightful. You can even mix in a bit of cocoa powder for a fun chocolate sauce. While vanilla ice cream is a classic choice, feel free to experiment. Try serving with caramel, chocolate, or even coffee-flavored ice cream. Each flavor changes the dish, creating a new experience. You can also top it with whipped cream for extra sweetness. Each variation makes Southern Bananas Foster even more fun to enjoy. To keep your Southern Bananas Foster fresh, place leftovers in an airtight container. This helps prevent moisture loss. Store the container in the fridge. Enjoy them within two days for the best taste. When you're ready to enjoy your leftovers, reheat them in a skillet. Use low heat to prevent burning. Stir gently until warmed through, about 3-5 minutes. If you want, add a bit of butter to enhance the flavor. To stop bananas from turning brown, try these tips: - Use fresh bananas for the best results. - Squeeze some lemon juice on sliced bananas before cooking. - Cook the bananas right away after slicing to keep them vibrant. Following these steps will ensure your dessert stays delicious and appealing. For the full recipe, check the details above. Bananas Foster comes from New Orleans. A chef named Paul Blangé created it in the 1950s. He named it after a friend, Richard Foster. The dish features bananas, butter, and brown sugar. It's cooked with rum and served warm. This classic dessert shows off the flavors of the South. Yes, you can make Bananas Foster without alcohol. Simply skip the rum in the recipe. Use a bit of apple juice for extra flavor. The dish will still taste great. The bananas will caramelize just as well. You will know the bananas are done when they are golden brown. They should be soft but not mushy. Cook them for about 2-3 minutes per side. You want them to be warm and coated in the sauce. Vanilla ice cream is the classic choice for Bananas Foster. It balances the warm, sweet sauce perfectly. You could also try caramel or rum-flavored ice cream. The rich flavors enhance the dessert. Feel free to get creative with your favorite ice cream! You now know how to make Southern Bananas Foster step by step. We covered essential ingredients, cooking tips, and fun variations. Remember to use fresh bananas and perfect that caramel sauce. With these tricks, you’ll impress anyone you serve. Enjoy experimenting and find the best flavors for your taste. The joy of cooking this dish is in sharing it, so gather your friends and family. Now, make this tasty treat and watch everyone smile.

Southern Bananas Foster Irresistible Dessert Delight

Are you ready to indulge in a classic Southern treat? Southern Bananas Foster is a warm, sweet delight that combines

- Paneer and Dairy Products - 250g paneer, cubed - 100ml heavy cream - 2 tablespoons butter - 1 tablespoon oil - Spices and Seasonings - 1 teaspoon cumin seeds - 1 teaspoon garam masala - 1 teaspoon red chili powder - ½ teaspoon turmeric powder - Salt to taste - Vegetables and Garnishes - 1 medium onion, finely chopped - 2 tomatoes, pureed - 1 tablespoon ginger-garlic paste - 1 tablespoon kasuri methi (dried fenugreek leaves) - Fresh coriander leaves for garnish In Butter Paneer, fresh ingredients shine bright. The paneer is the star. When you use firm, high-quality paneer, it holds up well in the rich sauce. The heavy cream adds a smooth texture, making every bite a creamy delight. Spices bring life to the dish. Cumin seeds add warmth. Garam masala brings depth. Red chili powder gives a hint of heat. Turmeric adds color and earthiness. Each spice plays its part in this flavorful symphony. Onions and tomatoes create a balanced base. They blend beautifully with the spices. The ginger-garlic paste brings a zesty kick. Kasuri methi adds a unique aroma, enhancing the overall flavor. Garnishing with fresh coriander leaves brightens the dish. It adds color and freshness. Serve Butter Paneer with warm naan or fluffy rice. It makes for a filling and satisfying meal. For the complete method, check out the [Full Recipe]. Enjoy every creamy flavor bliss of this dish! Cooking the Base Start by heating 2 tablespoons of butter and 1 tablespoon of oil in a large pan over medium heat. Add 1 teaspoon of cumin seeds. Let them sizzle for a few seconds. This step builds a strong flavor base. Next, toss in 1 finely chopped medium onion. Sauté until it turns golden brown. This usually takes about 5-7 minutes. Then, stir in 1 tablespoon of ginger-garlic paste. Cook this mixture for about 2 minutes. You want to remove the raw smell. Adding Spices and Paneer Once the onions and ginger-garlic mix well, pour in 2 pureed tomatoes. Cook this for about 5-7 minutes. You will see oil separating from the mixture. Now, add 1 teaspoon of red chili powder, ½ teaspoon of turmeric powder, and 1 teaspoon of garam masala. Mix all the spices well. Gently fold in 250g of cubed paneer. Make sure to coat the paneer with the spicy tomato sauce. Finishing with Cream and Kasuri Methi Next, pour in 100ml of heavy cream. Stir gently to create a smooth, creamy sauce. Cook for an additional 5 minutes so the paneer can soak up the flavors. Finally, crumble 1 tablespoon of kasuri methi between your fingers and sprinkle it in. Season with salt to taste. Give it one last gentle stir and take it off the heat. This step adds a lovely aroma and a unique taste. For the full recipe, refer to the detailed instructions provided above. Achieving the Right Consistency To get that creamy texture, use heavy cream. It makes the sauce rich and smooth. Mix it in gently after cooking your spices and paneer. This helps bind all the flavors. If the sauce is too thick, add a splash of water or milk. This will help you reach the perfect consistency. Balancing Flavors Taste as you cook. Start with salt and spices, then adjust as needed. The sweetness of the tomatoes needs balance with the spices. If it feels too spicy, add more cream or a pinch of sugar. This softens the heat and brings harmony to the dish. Selecting Quality Ingredients Fresh paneer makes a big difference. Look for soft, high-quality paneer. Fresh tomatoes are key too. They should be ripe and juicy for a sweet base. Use real butter and good spices. Fresh spices have more flavor than old ones. The right ingredients truly elevate your Butter Paneer. For the complete recipe, check out the [Full Recipe]. {{image_2}} Butter Paneer is so versatile. You can change it up to fit your taste. Here are some fun variations to try. You can make a vegan version of Butter Paneer. Instead of paneer, use tofu or cashew cheese. Both options are creamy and soak up flavors well. For cooking, use coconut oil or vegan butter. Swap the heavy cream for coconut cream. This gives a rich taste without dairy. You can boost the nutrition by adding veggies. Peas, bell peppers, or spinach work well. Just sauté them with the onions for a colorful dish. Want more protein? Try adding chickpeas or lentils. They make the meal heartier and filling. If you like heat, spice it up! Add extra red chili powder or green chilies while cooking. You can also use spicy garam masala for a kick. This version gives your taste buds a fun ride. These variations keep Butter Paneer exciting. You can make it your own with just a few tweaks. For the full recipe, check out the Creamy Butter Paneer Delight section. Enjoy your cooking! After enjoying your Butter Paneer, you may have some left. Storing it right keeps it tasty. - Refrigerator Storage Tips: Let the dish cool to room temperature. Place it in an airtight container. It stays fresh for up to 3 days in the fridge. - Freezing Instructions: To freeze, use a freezer-safe container. It can last up to 2 months. Thaw it in the fridge overnight before reheating. - Reheating Recommendations: Reheat Butter Paneer on the stove over low heat. Stir it gently to avoid sticking. You can also use the microwave. Heat it in short bursts, stirring in between. These methods help keep your Butter Paneer delicious and creamy, just like when you first made it. For the full recipe, check out the Creamy Butter Paneer Delight section. What is Butter Paneer (Paneer Makhani)? Butter Paneer, also known as Paneer Makhani, is a rich and creamy dish. It features soft paneer cubes in a smooth tomato and butter sauce. This dish is popular in Indian cuisine and loved by many. The blend of spices adds warmth, while the cream gives a silky texture. Can I make Butter Paneer in advance? Yes, you can make Butter Paneer ahead of time. Cook it and let it cool. Store it in an airtight container in the fridge. It lasts about 2-3 days. When you're ready to serve, just reheat it gently on the stove. The flavors will still be great! What's the best way to serve Butter Paneer? Serve Butter Paneer hot, garnished with fresh coriander leaves. I love pairing it with warm naan or steamed rice. The bread soaks up the creamy sauce well. This makes for a satisfying meal. How can I make Butter Paneer spicier? To spice it up, add more red chili powder or fresh green chilies. You can also try adding crushed black pepper. Adjust the spice level to your taste. Just remember to balance it with cream to maintain richness. Is there a way to make Butter Paneer healthier? Yes, you can make some easy swaps to make it healthier. Use less butter and cream, or replace them with yogurt or low-fat cream. You can also add more veggies, like spinach or bell peppers, for extra nutrition. Enjoy your creamy Butter Paneer without the guilt! For the full recipe, check out the [Full Recipe]. This blog post covered how to make Butter Paneer from start to finish. We discussed key ingredients like paneer, spices, and fresh vegetables. You learned step-by-step cooking methods, tips for the perfect dish, and various tasty variations. Proper storage techniques were also shared for keeping leftovers fresh. In conclusion, Butter Paneer is a fun dish to make. With these easy steps and tips, you can impress your friends and family. Enjoy experimenting with flavors and find your favorite version of Butter Paneer.

Butter Paneer (Paneer Makhani) Creamy Flavor Bliss

Welcome to the world of Butter Paneer! If you crave creamy, rich flavors, you’ve found your dish. Butter Paneer, also

- Sourdough bread - Mozzarella cheese - Pepperoni slices For this pizza grilled cheese, you need a few main ingredients. Sourdough bread gives a nice crunch. Mozzarella cheese melts perfectly. Pepperoni slices add that classic pizza taste. - Variations of cheese - Vegetables like peppers or mushrooms You can switch up the cheese if you want. Cheddar or provolone works great too. Adding veggies like peppers or mushrooms brings more flavor and nutrition. - Marinara sauce - Italian seasoning - Salt and pepper Don’t forget the marinara sauce for dipping. Italian seasoning adds great taste. A pinch of salt and pepper brings it all together. For the full recipe, check out the detailed instructions. Enjoy making this tasty pizza grilled cheese! To start, heat your skillet over medium heat. This step warms the pan, which is crucial for cooking the sandwich evenly. While your skillet heats, mix minced garlic with olive oil in a small bowl. This mixture adds a nice flavor to the bread. Brush one side of each slice of sourdough bread with this garlic oil. Now, let’s build our pizza grilled cheese. On the unbrushed side of two slices of bread, layer half of the shredded mozzarella cheese. Next, add the pepperoni slices on top. For a burst of flavor, spread a tablespoon of marinara sauce over the pepperoni. Then, sprinkle Italian seasoning, salt, and pepper on top. Finish by adding the rest of the mozzarella cheese. Close the sandwich with the other slices of bread, keeping the brushed side facing out. To achieve the best texture, cook the sandwiches in the skillet for about 3-4 minutes on each side. Look for a golden-brown color and melted cheese. For tips on flipping, use a sturdy spatula to lift the sandwich. Carefully turn it to avoid spilling the filling. Once cooked, remove the sandwiches from the skillet and let them cool for a minute before slicing. Enjoy your pizza grilled cheese delight! Check the [Full Recipe] for specific details. To achieve the ideal melt, use low heat. This helps the cheese melt without burning the bread. I recommend using a mix of mozzarella and a sharper cheese for better flavor. For the pan, a cast iron skillet works great. It holds heat well and gives even cooking. Make sure to preheat the pan before adding the sandwich. This step ensures a golden brown crust. You can use alternative meats or plant-based options. Try turkey pepperoni or even grilled chicken for a twist. If you want a veggie version, add bell peppers or mushrooms. Experimenting with different cheeses can also change the flavor. Cheddar, provolone, or gouda can add a nice kick. Don’t be afraid to mix and match until you find your favorite. Pair your pizza grilled cheese with dips for extra flavor. Marinara sauce works well, but ranch or garlic sauce are great too. For sides, a simple salad or crunchy chips complement the sandwich nicely. These sides will add freshness and texture to your meal. Enjoying this dish with friends makes it even better. For a full guide to making this dish, check out the Full Recipe. {{image_2}} For a hearty twist, try the Meat Lover's Pizza Grilled Cheese. Just add more meats like sausage or bacon. These meats can bring rich flavors and a nice crunch. You can layer the meats with cheese and marinara sauce. This combination makes a very tasty sandwich. You can use any meat you love, too! If you want a lighter option, go for the Veggie Pizza Grilled Cheese. You can pack it with toppings like mushrooms or spinach. These veggies add great flavor and nutrition. Slice them thin and layer them with cheese. They will blend well with the other ingredients. This version is perfect for veggie lovers! Are you a fan of heat? Try the Spicy Pizza Grilled Cheese. Simply add jalapeños or spicy marinara to your sandwich. This will give it a nice kick. You can adjust the spice level based on your taste. The heat enhances the rich cheese and savory toppings. It's a fun way to spice up your meal! For more ideas and details, check the Full Recipe. To keep your leftover pizza grilled cheese fresh, follow these steps. First, let the sandwich cool completely. This helps avoid steam, which can make it soggy. Next, wrap each sandwich in foil or parchment paper. This keeps the bread crisp. Place the wrapped sandwiches in an airtight container. Store them in the fridge for up to three days. To reheat your pizza grilled cheese, the skillet method works best. Preheat a skillet over medium heat. Unwrap the sandwich and place it in the skillet. Heat for about three minutes on each side. This method helps keep the bread crispy. If you want a faster option, use a microwave. Place the sandwich on a microwave-safe plate. Cover it with a damp paper towel. Heat for about 30 seconds. This keeps the cheese melty but may soften the bread. Yes, you can freeze pizza grilled cheese! Here’s how: First, make the sandwich and let it cool completely. Then, wrap it tightly in plastic wrap. You can also use a freezer bag. Make sure to remove as much air as possible. Label the bag with the date. Store in the freezer for up to three months. When you are ready to eat, let it thaw in the fridge overnight. Reheat it in a skillet for the best results. Enjoy your delicious creation later! You can use gluten-free bread in place of sourdough. Look for brands that taste good and hold together well. Some options include almond flour bread or oat-based bread. Always check the labels to ensure they are truly gluten-free. Yes, you can! Preheat your air fryer to 375°F. Assemble the sandwich as usual. Lightly spray both sides with cooking oil. Cook for 8 to 10 minutes, flipping halfway through. This method gives a nice crisp without using a skillet. I recommend mozzarella for that classic pizza taste. You can also mix in provolone for extra flavor or cheddar for a sharper bite. If you want a kick, try pepper jack. Each cheese adds its unique twist to the dish. To avoid soggy bread, use a good amount of cheese to act as a barrier. Brush the outside of the bread with olive oil or butter. Cooking on medium heat also helps the bread crisp up without getting wet. Enjoy your crispy sandwich! For a full recipe, check out the detailed steps above! This blog post covered the key ingredients for a delicious pizza grilled cheese, from sourdough to mozzarella. We explored topping options and seasonings for extra flavor. You learned step-by-step instructions for preparing and cooking your sandwich to perfection. Lastly, I shared storage tips, variations, and answers to common questions. With these ideas, you can craft a tasty meal that suits your style. Enjoy making and sharing your pizza grilled cheese!

Pizza Grilled Cheese Delight with Satisfying Flavors

Craving a cheesy, melty treat? Let me introduce you to the Pizza Grilled Cheese Delight! This tasty twist combines your

Older posts
Newer posts
← Previous Page1 … Page50 Page51 Page52 … Page72 Next →

dsad

© 2025 So Yum Recipes • Built with GeneratePress

Our Policies

  • Copyright Policy
  • Cookie Policy
  • GDPR Policy
  • Privacy Policy
  • Disclaimer
  • Terms Of Use

More Information

  • Home
  • About
  • Contact
  • Appetizers
  • Dessert
  • Dinner
  • Drinks
©2025, So Yum Recipes About Back To Top