![- Sweet corn kernels - Grated zucchini - All-purpose flour - Cornmeal - Eggs - Green onions - Fresh parsley - Baking powder - Garlic powder - Salt and pepper - Olive oil Gathering the right ingredients is key to making tasty fritters. Fresh sweet corn kernels add a sweet crunch. Grated zucchini brings moisture and flavor. All-purpose flour and cornmeal help bind everything together. You will need two eggs for a nice texture. Chopped green onions and parsley give your fritters a fresh taste. Baking powder makes them light and fluffy. Garlic powder enhances the flavor. Finally, salt and pepper add the perfect seasoning. You will fry the fritters in olive oil for that golden crust. - Gluten-free flour alternatives - Egg substitutes for vegan options - Fresh vs. frozen corn If you need gluten-free fritters, use almond flour or a gluten-free blend. For a vegan version, try flaxseed meal mixed with water instead of eggs. You can use frozen sweet corn if fresh corn isn’t available. Just thaw it and drain excess liquid before mixing. These substitutions will still give you delicious fritters. If you follow the Full Recipe, you will enjoy every bite! First, gather your ingredients. In a large bowl, mix the grated zucchini and sweet corn kernels. This combination brings bright flavors and textures. Next, add the chopped green onions and parsley, which add freshness and color. In a separate bowl, whisk the eggs until they are frothy. This step helps make the fritters light and airy. Once whisked, pour them into the vegetable mix. Now it's time to add the dry ingredients. Sprinkle in the all-purpose flour, cornmeal, baking powder, garlic powder, salt, and pepper. Stir gently until everything is just combined. The mixture should be thick but still spreadable, perfect for frying. Now, heat a skillet over medium heat. Add a drizzle of olive oil to the pan. When the oil is hot, take about 1/4 cup of the fritter mix. Drop it into the skillet and flatten it slightly with a spatula. Be careful not to overcrowd the skillet; you want space for each fritter. Cook for about 3-4 minutes on each side. Look for a golden-brown color and a crispy texture. When they are ready, remove the fritters from the skillet. Place them on a plate lined with paper towels to absorb any extra oil. Continue this process with the remaining batter, adding more oil as needed. For a beautiful presentation, serve the fritters on a colorful platter. A dollop of yogurt or sour cream on the side adds creaminess. Garnish with more fresh parsley for a pop of color. These fritters pair well with a fresh salad or a light dipping sauce. Enjoy your tasty delight! To keep your fritters from getting soggy, squeeze the grated zucchini well. Remove as much moisture as you can. This step is key for crispy fritters. Also, avoid adding too much flour. You want a thick but spreadable mix. If the mix is too runny, it won’t hold together. Frying at the right temperature is vital. Heat your oil over medium heat until it shimmers. This helps the fritters cook evenly and get golden brown. If the oil is too hot, they will burn. If it’s too cool, they will soak up oil and become greasy. Cook in batches to keep the frying temperature steady. Overcrowding the pan can lead to uneven cooking. Spices and herbs can elevate your fritters. Try adding paprika for a smoky kick or cumin for warmth. Fresh herbs like basil or cilantro can also brighten the flavor. Pair your fritters with yogurt or a spicy dipping sauce for extra taste. A squeeze of lemon juice can add a refreshing zing too. For the full recipe, check the previous section. {{image_2}} You can easily change the flavors of your fritters. Adding cheese gives them a rich taste. Try sharp cheddar or creamy feta for a great twist. You can also mix in other veggies. Bell peppers, carrots, or spinach add color and nutrition. These changes make each batch unique. Need a vegan option? Replace eggs with flaxseed meal or a banana. This keeps the fritters moist. For a low-carb version, try almond flour instead of all-purpose flour. This keeps the fritters light and tasty without all the carbs. Want to spice things up? Make Mexican-inspired fritters by adding cumin and chili powder. Serve these with a side of salsa for a zesty kick. For a Mediterranean twist, add herbs like oregano and basil. Serve with a dollop of tzatziki for a fresh taste. These international flavors can make your fritters exciting and new. Enjoy the Full Recipe for more ideas! To store leftovers, let the fritters cool first. Place them in an airtight container. They can last up to three days in the fridge. To reheat, put them in a hot skillet for a few minutes. This keeps them crispy and delicious. For freezing, place the cooled fritters in a single layer on a baking sheet. After they freeze solid, transfer them to a freezer bag. They can last up to three months in the freezer. Just make sure to label the bag with the date. To keep fritters crispy after storage, avoid stacking them. Use parchment paper between layers if needed. When reheating, preheat your oven to 375°F (190°C). Bake them for about 10 minutes until hot and crisp. This method keeps them tasty! For a quick fix, you could also use an air fryer. To make your fritters crispy, follow these simple tips: - Use hot oil: Heat your skillet well before adding the fritter mix. - Don't overcrowd: Fry a few fritters at a time to avoid steaming. - Use enough oil: Make sure there's enough oil to fry each fritter evenly. - Let them rest: After frying, place fritters on paper towels to absorb extra oil. These steps will help you achieve that perfect crunchy texture. Yes, you can make the batter ahead of time! Store it in the fridge for up to 24 hours. If you wait longer, the fritters may lose their texture. Always stir the batter before using. This helps mix any settled ingredients and keeps it fresh. These fritters pair well with many sides and dips. Here are some ideas: - Yogurt or sour cream: A creamy dip adds coolness to the fritters. - Fresh salsa: Bright flavors from salsa enhance the taste. - Mixed greens: Serve the fritters on a bed of fresh salad for crunch. - Grilled meats: Chicken or fish make a hearty meal with fritters. Feel free to mix and match to suit your taste! For the full recipe, check [Full Recipe]. We've covered all you need to make sweet corn and zucchini fritters. You learned about key ingredients, substitutions, and step-by-step instructions to prepare them perfectly. Tips and tricks help you avoid sogginess and enhance flavor. You can customize the fritters with various ingredients and store them for later use. Embrace these recipes and ideas to make delicious fritters at home. Enjoy experimenting and discovering your favorite combinations!](https://soyumrecipes.com/wp-content/uploads/2025/07/8335555d-0870-4e2e-871b-9da283f086b9.webp)
Sweet Corn and Zucchini Fritters Tasty Delight
Craving a tasty treat that’s simple to make? Welcome to the world of Sweet Corn and Zucchini Fritters! These delightful
Craving a tasty treat that’s simple to make? Welcome to the world of Sweet Corn and Zucchini Fritters! These delightful
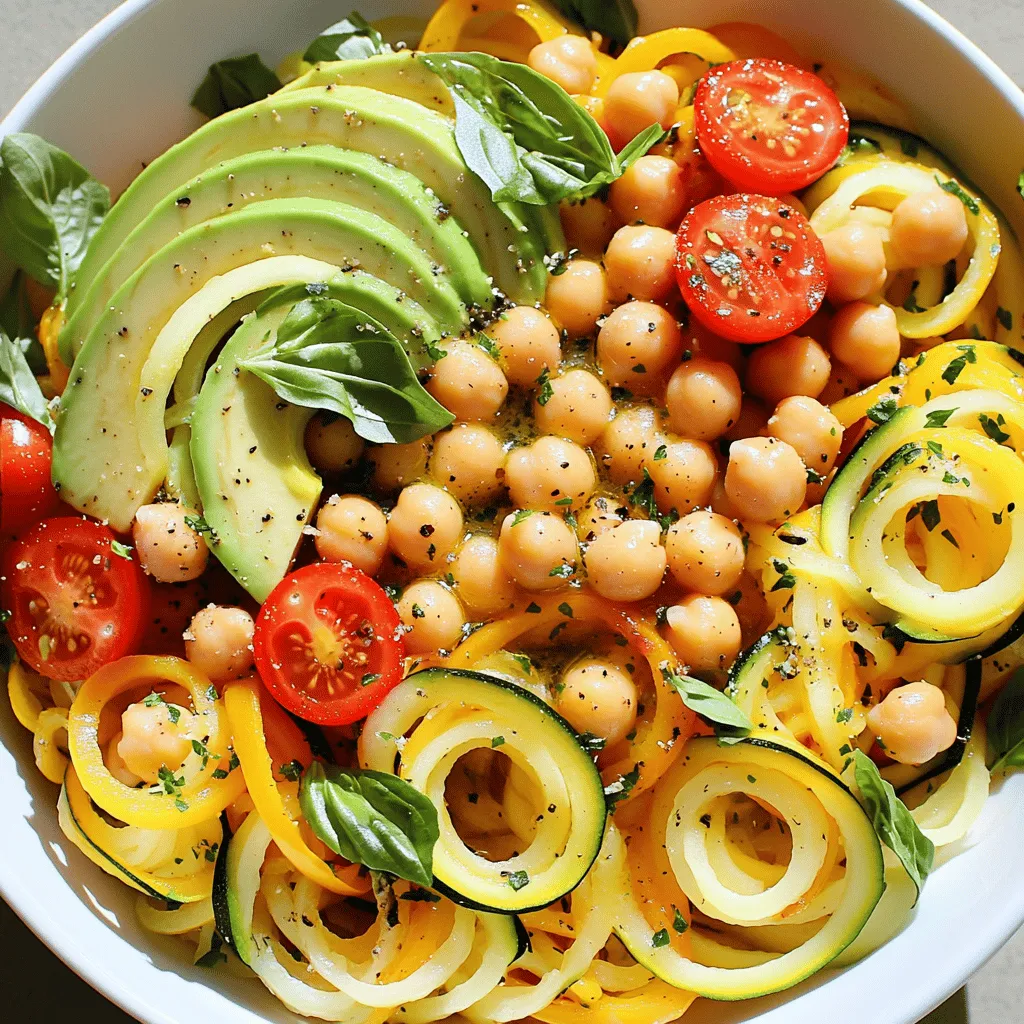
Are you ready to savor a dish that’s as healthy as it is delicious? My Savory Summer Squash Noodle Bowl

Are you ready for a delicious, healthy dish that’s easy to make? This Easy Zucchini Quiche is perfect for breakfast,
![To make a delicious avocado cucumber gazpacho, you need: - 2 ripe avocados, peeled and pitted - 1 large cucumber, peeled and diced - 1 cup ripe tomatoes, chopped - 1 small red onion, roughly chopped - 2 cloves garlic, minced - 2 cups vegetable broth (chilled) - 2 tablespoons fresh lime juice - 1 tablespoon olive oil - 1 teaspoon ground cumin - Salt and pepper to taste - Fresh cilantro or mint leaves for garnish Each ingredient plays an important role in the flavor and texture of the gazpacho. The ripe avocados add creaminess, while the cucumber keeps it light and fresh. Tomatoes bring color and sweetness. The red onion and garlic add depth. For the broth, use chilled vegetable broth to keep your soup cool. Lime juice gives it a nice zing, while olive oil adds richness. Ground cumin adds warmth, and salt and pepper balance everything. If you want to change things up, consider these substitutions: - Use Greek yogurt instead of olive oil for a creamier texture. - Swap fresh lime juice for lemon juice for a different citrus kick. - Try adding basil or dill instead of cilantro or mint for a unique flavor. - For heat, add chopped jalapeños or a dash of hot sauce. - If you prefer a chunkier soup, leave some diced veggies aside and stir them in after blending. You can find the full recipe to get all the steps for this refreshing dish. Start with your fresh ingredients. Gather two ripe avocados, one large cucumber, and one cup of ripe tomatoes. You also need one small red onion and two cloves of garlic. Peel and pit the avocados. Next, peel and dice the cucumber. Chop the tomatoes and roughly chop the red onion. Finally, mince the garlic. This prep work makes blending easier. Now, it’s time to blend. In a blender, add the avocados, cucumber, tomatoes, red onion, and minced garlic. Then pour in two cups of chilled vegetable broth. Add two tablespoons of fresh lime juice, one tablespoon of olive oil, and one teaspoon of ground cumin. Season with salt and pepper to taste. Blend this mixture on high. You want it to be smooth and creamy. If you want a thinner consistency, add more broth. After blending, taste the gazpacho and adjust the seasoning if needed. Pour it into a bowl or an airtight container. Cover it and refrigerate for at least 30 minutes. This chilling time lets the flavors mix together. When ready to serve, give it a good stir. Pour the gazpacho into bowls and garnish with fresh cilantro or mint leaves. Enjoy this refreshing dish as a light meal or appetizer. For the full recipe, check the details above. To get the best texture for your gazpacho, blend until smooth. Start with ripe avocados and cucumber. They create a creamy base. If the mixture is too thick, add more chilled vegetable broth. A little at a time works best. You want it silky, not too runny. This way, each spoonful feels rich and satisfying. Seasoning is key for great flavor. Start with salt and pepper to taste. You can always add more, but it's hard to take it out. The lime juice adds a nice zing and balances the creaminess. Taste as you go. You may want to add more cumin for warmth. Fresh herbs like cilantro or mint also boost the taste. Garnishes make your dish eye-catching. Use fresh cilantro or mint leaves for color. You can also add thin cucumber slices on top. A drizzle of olive oil adds shine and flavor. For a crunch, sprinkle some toasted seeds or nuts. These little touches make your gazpacho look gourmet and fun to eat. For the full recipe, check out the details above. {{image_2}} Want a kick? Add jalapeños to your gazpacho. Start with one small jalapeño, seeds removed. Chop it finely and blend it with the other ingredients. This adds heat and flavor. You can adjust the spice by adding more or less. The heat pairs well with the cool avocado. For a rich twist, mix in yogurt or sour cream. Add about half a cup when blending. This makes the soup creamy and adds a tangy taste. Greek yogurt works great if you want extra protein. The creaminess complements the fresh flavors beautifully. No blender? No problem! You can chop everything by hand. Dice the avocados, cucumber, tomatoes, and onion into small pieces. Mix them together in a bowl with garlic and lime juice. Add the cold broth and stir well. This gives your gazpacho a nice texture. Plus, it looks great with big chunks of veggies. For the full recipe, check out the [Full Recipe]. To keep your avocado cucumber gazpacho fresh, use an airtight container. This helps seal in flavors and maintain texture. Make sure to cool it down to room temperature before sealing. If you have extra, consider dividing it into smaller portions. This way, you can enjoy it later without opening the entire batch. Store your gazpacho in the fridge for the best taste. It stays fresh for about three days. If you want to keep it longer, freezing is an option. However, keep in mind that freezing may change the texture. Pour the gazpacho into freezer-safe containers, leaving space for expansion. Label them with the date, and you can enjoy it later! In the fridge, avocado cucumber gazpacho lasts about three days. After that, it may lose its freshness and flavor. Always check for any signs of spoilage before eating. If it smells off or has changed color, it’s better to toss it. Enjoy your gazpacho while it's still delicious! Avocado Cucumber Gazpacho is a cold soup. It blends ripe avocados and cucumbers with fresh tomatoes. This dish is creamy, smooth, and full of flavor. The lime juice adds brightness, while cumin gives depth. It’s refreshing and perfect for hot days. You can find the full recipe in the article for easy cooking. Yes, you can make this gazpacho a day ahead. It tastes even better after chilling overnight. Just store it in an airtight container. This helps the flavors mix well and improve. Make sure to stir it before serving. You can serve this gazpacho with crusty bread or crackers. A simple green salad pairs well too. Grilled shrimp or chicken can add protein to the meal. For a light lunch, you might enjoy it with a sandwich. Yes, this gazpacho is great for meal prep. It lasts up to three days in the fridge. Just keep it in an airtight container. Portion it out for easy meals throughout the week. Enjoy this healthy and simple dish anytime! Avocado cucumber gazpacho is fresh, easy, and full of flavor. We covered the key ingredients, how to prepare them, and tips for the best texture. You can make variations to suit your taste or use what you have. Remember to store leftovers properly to enjoy later. This dish is perfect for hot days or meal prep. By following these steps, you can make a delicious soup everyone will love. Now, grab your ingredients and get started on your refreshing gazpacho!](https://soyumrecipes.com/wp-content/uploads/2025/07/c5efed30-59f9-4be9-bb09-cffefb3b66e5.webp)
Looking for a refreshing dish that bursts with flavor? You’ve found it! This vibrant Avocado Cucumber Gazpacho is a cool,
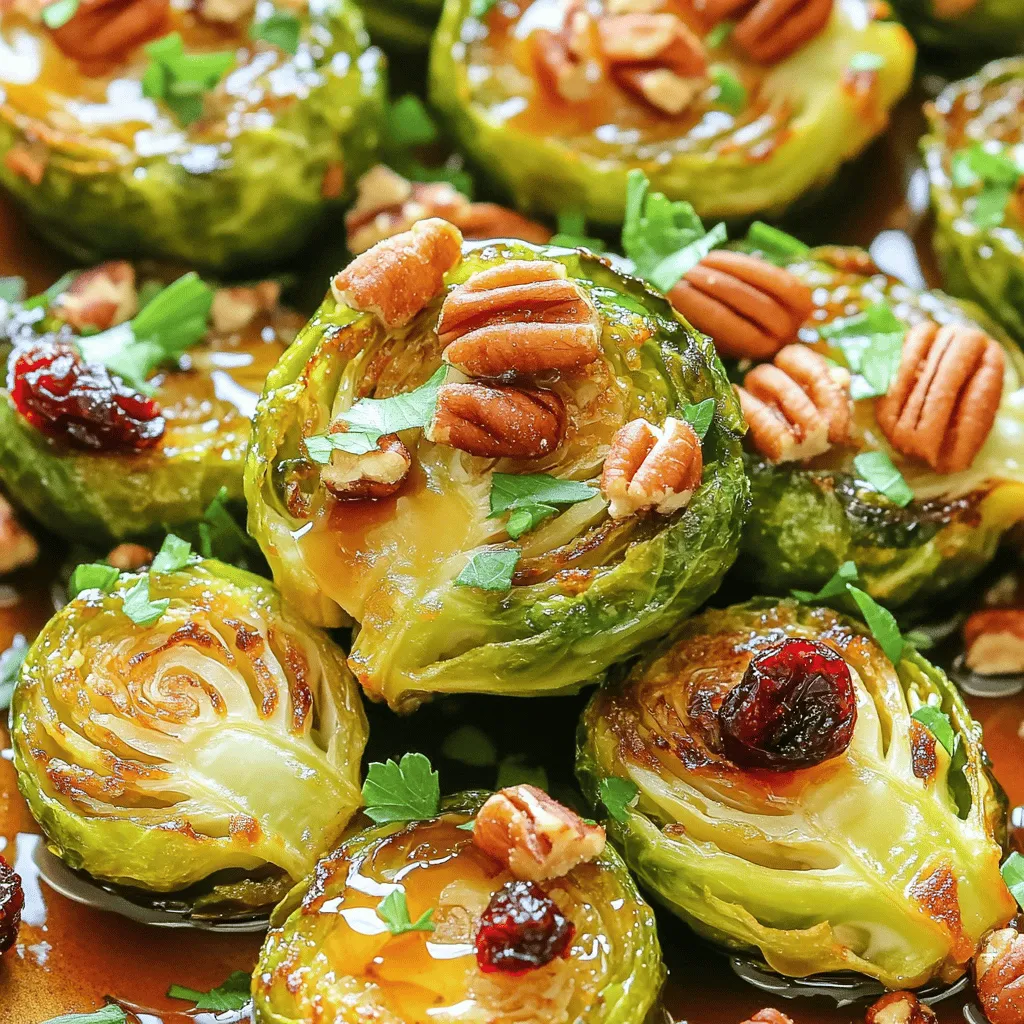
Looking for a simple, tasty dish that’s perfect for any occasion? Let me introduce you to maple roasted Brussels sprouts!
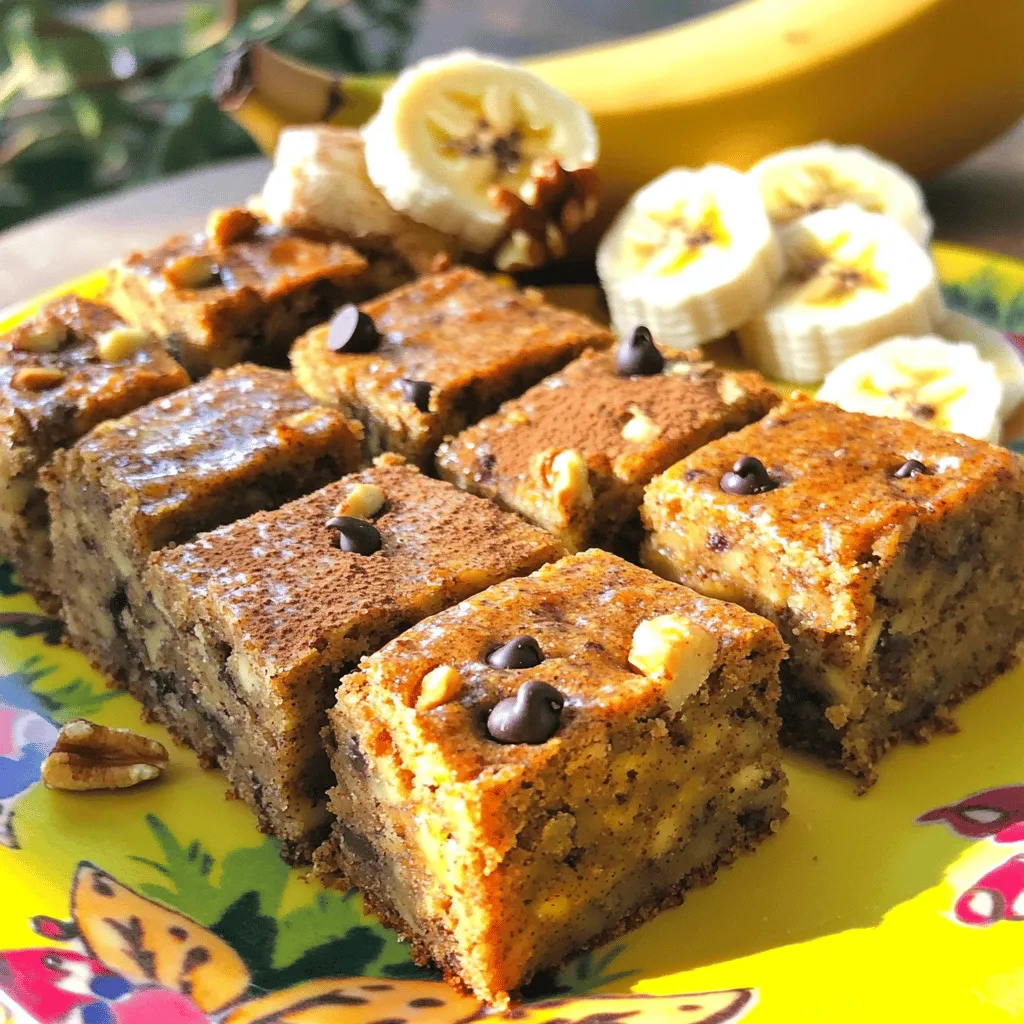
Looking for a delicious snack that’s also good for you? Try my Healthy Banana Bread Bars! These simple treats are

Ready to spice up your meals? This Garlic Lemon Roasted Broccoli is the savory side dish you need! Packed with
![- Ripe peaches - Mixed salad greens - Feta cheese - Walnuts - Honey - Balsamic vinegar - Olive oil - Salt and pepper - Fresh basil To make the grilled peach salad shine, you need some key ingredients. Start with ripe peaches. They should feel soft but not mushy. Their sweetness will elevate your salad. Next, grab mixed salad greens. I love using arugula, spinach, and romaine together. They add great texture and taste. Feta cheese is another must-have. Its creamy and tangy flavor pairs perfectly with sweet peaches. For a nice crunch, add walnuts. Toast them lightly to enhance their flavor. For the dressing, you will need honey, balsamic vinegar, and olive oil. The honey adds sweetness, while the balsamic brings a nice tang. Olive oil rounds it all out, making the dressing smooth. Don't forget the seasoning! Salt and pepper will bring out the flavors. Finally, fresh basil leaves make a lovely garnish. They add aroma and a bit of color to the dish. You can find the [Full Recipe] to guide you through the steps in detail. First, you need to preheat your grill. Set it to medium-high heat. This step is crucial for getting those perfect grill marks. While the grill heats up, brush the cut sides of the peach halves with olive oil. This helps prevent sticking. Next, place the peaches cut-side down on the grill. Grill them for about 3 to 4 minutes. You want to see those beautiful grill marks. After that, flip the peaches and grill for another 2 to 3 minutes. The peaches should become slightly soft. Once they are done, remove them from the grill and let them cool a bit. In a small bowl, whisk together honey, balsamic vinegar, and olive oil. Mixing these ingredients well is key. The honey adds sweetness, while the balsamic brings tang. After whisking, taste the dressing. If you want more flavor, add salt and pepper to your liking. Adjust the flavors to suit your taste buds. In a large mixing bowl, toss together the mixed salad greens, walnuts, and feta cheese. Make sure to mix them well for an even distribution. Next, slice the grilled peaches into wedges. Gently fold these into the salad mixture. This will add a warm, sweet touch to your salad. Finally, drizzle the honey-balsamic dressing over the salad. Toss lightly to coat everything evenly. Once it looks great, plate the salad. To finish, garnish with fresh basil leaves. These add a pop of color and extra flavor to your dish. For the full recipe, check out the earlier section. To make great grilled peaches, choose ripe ones. Look for peaches that feel slightly soft when you press them. They should have a sweet smell and rich color. Avoid peaches that are hard or have dark spots. Grilling time is key. Grill the peaches cut-side down for 3 to 4 minutes. This gives you nice grill marks and a sweet, smoky flavor. Then flip them and grill for 2 to 3 more minutes. You want them warm and slightly soft but not mushy. Layering your ingredients helps build flavor. Start with the mixed greens as your base. Next, add the crumbled feta and toasted walnuts. This way, your flavors mix well. When you dress the salad, drizzle the dressing evenly. Toss gently to coat all the ingredients. This ensures every bite is tasty and balanced. Grilled peach salad pairs well with proteins. Try adding grilled chicken or shrimp for a filling meal. If you prefer a plant-based option, quinoa or beans work great too. This salad also goes well with grilled meats or fish. Serve it alongside roasted vegetables for a complete meal. Enjoy the fresh and vibrant flavors! {{image_2}} You can add grilled chicken or shrimp for extra protein. These meats bring a nice flavor. If you prefer a plant-based option, try quinoa or beans. Both options add protein and texture. They also make the salad more filling. You can mix and match proteins to suit your taste. Change up the cheese for a new taste. Goat cheese adds creaminess and tang. Blue cheese gives a bold flavor that many love. Both options can work well with the sweet grilled peaches. You can even try a mix of cheeses for more flavor. The dressing can also change the salad’s flavor. A citrus vinaigrette offers a bright, zesty taste. Yogurt-based dressings provide creaminess and a light touch. Each dressing option adds its unique twist to the dish. Experiment with these to find your favorite flavor combinations. For the full recipe, check the previous section! To keep your grilled peach salad fresh, store it in the fridge. Place the salad in an airtight container. This helps keep moisture and flavors intact. If possible, store the dressing separately. This way, your greens stay crisp and tasty. Your grilled peach salad lasts about 3 days in the fridge. After that, the flavors may fade. Look for signs of spoilage. If the salad smells off or the peaches look mushy, it’s time to toss it. Freshness is key for the best taste! To reheat grilled peaches, use a skillet. Heat them gently over medium heat. You want them warm but not mushy. You can also add them to new dishes. Try mixing them into oatmeal, yogurt, or even a smoothie for a sweet twist. For the full recipe, check out the Grilled Peach Salad 🥗. To choose ripe peaches, look for these signs: - The skin should be golden or yellow. - It should give a little when you gently press it. - A sweet, fruity aroma is a good sign of ripeness. - Avoid peaches that are hard or have green spots. Ripe peaches are key for grilling. They get soft and sweet, enhancing your salad's flavor. Yes, you can prep this salad in advance. Here are some tips: - Grill the peaches a few hours before serving. - Store them in the fridge to keep them fresh. - Mix the salad greens, nuts, and cheese in a bowl. - Keep the dressing separate until you are ready to serve. This way, your salad stays crisp and tasty. Grilled peaches are healthy and full of nutrients. They provide: - Vitamin C for a strong immune system. - Fiber to help with digestion. - Antioxidants that protect your body. One medium peach has about 60 calories. This makes them a great low-calorie treat in your salad. Yes, you can easily make this recipe vegan. Here’s how: - Use a plant-based cheese instead of feta. - Replace honey with maple syrup or agave nectar. These swaps keep the salad delicious while fitting a vegan diet. Making balsamic dressing is simple. Here’s an easy recipe: - In a small bowl, whisk together: - 2 tablespoons balsamic vinegar - 3 tablespoons olive oil - Salt and pepper to taste You can adjust the vinegar and oil to your liking. This dressing adds a great flavor to your grilled peach salad. Check out the Full Recipe for more details! This salad with grilled peaches is simple and delicious. You learned about key ingredients like ripe peaches, feta cheese, and walnuts. I shared step-by-step instructions to prepare the salad, dress it, and serve it. Remember to use fresh herbs to enhance the flavor. Experiment with proteins or different cheeses to make it your own. This dish is easy to store and reheat. Enjoy this recipe as a fresh, tasty meal anytime. With a few tweaks, you can create a salad that works for anyone's taste or diet.](https://soyumrecipes.com/wp-content/uploads/2025/07/042bd3a7-f925-445c-86c8-9ec8cfac8c49.webp)
Welcome to the world of summer flavors! Today, I’m excited to share my Grilled Peach Salad recipe, bursting with freshness
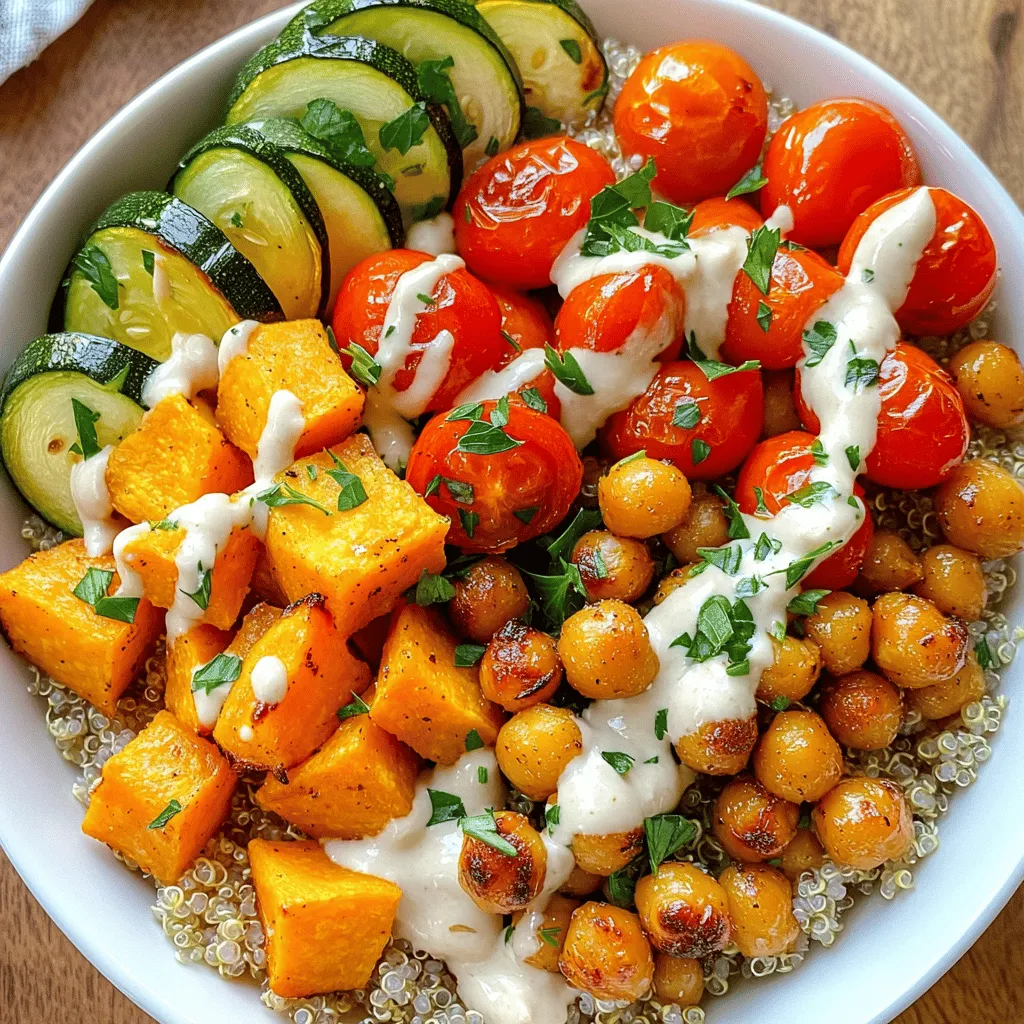
Are you ready to boost your meals with a tasty and healthy choice? The Roasted Veggie Buddha Bowl is packed

Smashed potatoes with herbs are a must-try side dish! They’re easy to make and bursting with flavor. With just baby
