Skip to content
DisclaimerTerms Of UseGDPR PolicyCookie Policy

So Yum Recipes

  • Home
  • Drinks
  • Appetizers
  • Dinner
  • Dessert
  • About
  • Contact
  • Privacy Policy
DisclaimerTerms Of UseGDPR PolicyCookie Policy

Chloe

To make Honey Butter Sweet Potato Cornbread, gather these key items: - 1 cup mashed sweet potatoes (about 2 medium sweet potatoes) - 1 cup cornmeal - 1 cup all-purpose flour - 1/4 cup sugar - 1 tablespoon baking powder - 1/2 teaspoon salt - 1 cup milk - 2 large eggs - 1/3 cup unsalted butter, melted - 1/4 cup honey These ingredients create a rich, sweet, and moist cornbread that will impress everyone. You can boost the taste with these optional ingredients: - 1/2 cup corn kernels (fresh or frozen) - 1 teaspoon cinnamon Adding corn kernels gives a nice texture. Cinnamon adds warmth and spice that pairs well with sweet potatoes. If you need to swap out some ingredients, here are some ideas: - Use almond milk or oat milk instead of regular milk for a dairy-free option. - You can substitute coconut oil for unsalted butter if you want a different flavor. - For a gluten-free version, try using a gluten-free all-purpose flour blend. These substitutions keep the essence of the dish while catering to different dietary needs. For the complete recipe, check out the Full Recipe section. First, you need to gather everything. Start by preheating your oven to 400°F (200°C). Grease a 9-inch square baking pan. You can also use a cast iron skillet for that crispy edge. This cornbread is easy and fun to make. In a large bowl, mix the dry ingredients. Combine 1 cup of cornmeal, 1 cup of all-purpose flour, 1/4 cup of sugar, 1 tablespoon of baking powder, and 1/2 teaspoon of salt. If you like cinnamon, add 1 teaspoon now. Use a whisk to blend them well. In another bowl, mash about 2 medium sweet potatoes. You need 1 cup of this mash. Add 1 cup of milk, 2 large eggs, 1/3 cup of melted unsalted butter, and 1/4 cup of honey. Mix until everything is smooth. Now, pour the sweet potato mix into the dry ingredients. Stir gently until just combined. If you want extra corn flavor, fold in 1/2 cup of corn kernels. This adds a nice pop! Pour the batter into your greased pan. Spread it evenly. Now, bake for 25–30 minutes. Check if it’s done by inserting a toothpick in the center. If it comes out clean, it’s ready! The top should be golden brown. After baking, let it cool in the pan for about 10 minutes. This helps it set. Serve warm, and if you like, top it with honey butter. To make honey butter, just mix softened butter with honey. This recipe is a simple delight, perfect for any meal. For the complete recipe, check the Full Recipe section. To get the best texture in your Honey Butter Sweet Potato Cornbread, use soft, smooth sweet potatoes. Mash them well. Lumps can make the bread dense. Mix your dry and wet ingredients gently. Overmixing can lead to a tough cornbread. Aim for a smooth batter, but a few small lumps are okay. The key is to blend just enough. Many people forget to measure their ingredients correctly. Too much flour or cornmeal can make the bread dry. Always level off your measuring cups. Another common mistake is not checking your oven temperature. Ovens can vary. Use an oven thermometer for accuracy. Lastly, don’t skip the cooling time. Letting the cornbread sit for ten minutes helps it set and makes slicing easier. I love serving this cornbread warm with honey butter on top. Just mix softened butter with honey for a sweet treat. It pairs well with soups or chili. You can also enjoy it at breakfast with jam. For a fun twist, try it with maple syrup. The sweet and savory flavors complement each other perfectly. For the full recipe, see above. {{image_2}} You can make this cornbread gluten-free. Just swap out regular flour for gluten-free flour. Use a 1:1 baking blend, which works well. This change will keep the texture light and airy. You can enjoy this cornbread without worry. To make your cornbread pop, add spices. A teaspoon of cinnamon gives warmth and sweetness. You can also try nutmeg for a cozy taste. If you want heat, add a pinch of cayenne pepper. These spices will make each bite exciting. Get creative with your cornbread! Add 1/2 cup of corn kernels for a sweet crunch. Diced jalapeños bring a spicy kick. For a savory twist, mix in shredded cheese. Fresh herbs like chives or rosemary add freshness too. Each add-in changes the flavor in fun ways. For the complete recipe, check out the Full Recipe. To keep your cornbread fresh, store it in an airtight container. Let it cool completely before sealing. You can keep it at room temperature for up to two days. If you want to keep it longer, store it in the fridge for up to a week. Wrapping it in plastic wrap or foil can help it stay moist. When you want to enjoy leftovers, the best way to reheat is in the oven. Preheat the oven to 350°F (175°C). Place the cornbread on a baking sheet. Heat for about 10–15 minutes, or until warm. If you want it soft, cover it with foil. You can also use a microwave. Heat a slice for about 20–30 seconds. Just be careful not to overheat it, or it may get tough. Freezing is a great way to save cornbread for later. First, cut it into slices. Wrap each slice in plastic wrap, then place them in a freezer bag. Make sure to squeeze out all the air. Label the bag with the date. You can freeze the cornbread for up to three months. To thaw, place it in the fridge overnight or microwave it for a quick treat. Enjoy your Honey Butter Sweet Potato Cornbread even after it has been frozen! For the detailed steps, check the Full Recipe. Yes, you can make this cornbread ahead of time. Bake it and let it cool. Then, wrap it in plastic wrap. Store it in the fridge for up to three days. When you are ready to serve, just warm it in the oven. This keeps it tasty and fresh. I love serving this cornbread warm. A pat of honey butter on top makes it even better. You can also enjoy it with chili or soup. The sweet flavor pairs well with spicy dishes. For a fun twist, try it with a drizzle of maple syrup. You can easily change the sweetness. If you want it sweeter, add more honey or sugar. Start with an extra tablespoon and taste the batter. If it’s not sweet enough, add a bit more. For less sweetness, cut the sugar in half. Taste as you go to find your perfect balance. This blog post covered how to make Honey Butter Sweet Potato Cornbread. We explored key ingredients, mixing steps, and baking tips. You learned about texture, common mistakes, and serving ideas. Variations and storage info were also included. In summary, this cornbread is easy and fun to make. With these tips, you can enjoy a tasty treat anytime. Experiment with flavors and make it your own! Happy baking!

Honey Butter Sweet Potato Cornbread Simple Delight

Are you ready to indulge in something truly delightful? Honey Butter Sweet Potato Cornbread is a game-changer! This recipe offers

- Beef: For this dish, choose a cut that is tender but has some fat. Cuts like chuck or brisket work best. They bring flavor and tenderness after slow cooking. - Fresh vegetables: Tomatoes and peppers are key. They create a rich base for the stew. Use ripe, juicy tomatoes for a sweet taste. Red bell peppers add depth and color. - Spices: Nigerian cooking relies on bold flavors. Thyme, curry powder, and smoked paprika are essential. They add warmth and complexity to the dish. Ground crayfish is optional but adds a unique twist. - 2 lbs beef, cut into cubes - 1 large onion, chopped - 3 medium tomatoes, blended into a paste - 1 red bell pepper, blended into a paste - 2 green chili peppers, blended (adjust for spice level) - 4 cloves garlic, minced - 1-inch ginger, minced - 1/4 cup vegetable oil - 2 teaspoons ground crayfish (optional for flavor) - 2 teaspoons thyme - 2 teaspoons curry powder - 1 teaspoon smoked paprika - Salt and pepper to taste - 2 cups beef broth or water - Fresh parsley for garnish This complete ingredient list ensures a hearty and flavorful stew. For the full recipe, check the section above. Start by chopping your vegetables. You need to chop one large onion and mince four cloves of garlic. For the peppers, blend three medium tomatoes, one red bell pepper, and two green chili peppers into a smooth paste. You can adjust the chili for more or less heat. Now, let's season the beef. Use two pounds of beef cut into cubes. Sprinkle salt and pepper over the beef. Add two teaspoons of thyme, two teaspoons of curry powder, and one teaspoon of smoked paprika. Make sure every piece is coated well. This adds rich flavor right from the start. Heat a large pot over medium heat and pour in a quarter cup of vegetable oil. Once the oil is hot, add the chopped onions. Sauté them until they turn translucent, which takes about five minutes. Then, stir in the minced garlic and ginger. Cook for an additional two minutes. The smell will be amazing! Next, add the seasoned beef cubes to the pot. Brown them on all sides, which takes about five to seven minutes. This step is vital for building flavor. Once browned, pour in the blended tomato and red pepper paste. Stir well and let it cook for about ten minutes. This helps the flavors mix together. Now it’s time to add the blended green chili peppers and two cups of beef broth or water. Stir gently. Bring this mixture to a boil, then reduce the heat to low. Cover the pot and let it simmer for one and a half to two hours. Stir occasionally and add more broth if needed. Browning the beef is crucial. It seals in the juices and adds depth to the stew. Without this step, your beef may turn out tough or bland. Simmering the stew is just as important. The longer you simmer, the more tender the beef will become. Keep an eye on the pot! Taste it along the way and adjust the seasoning if necessary. This stew is hearty and full of flavor, making it perfect for any meal. For the full recipe, refer to the original recipe section. How can I adjust spice levels to taste? Start by adding fewer chili peppers if you prefer less heat. You can always add more later. Taste as you go. This way, you control the heat level in your stew. What can I add to enhance flavor? You can add a bay leaf for depth. A splash of lime juice brightens the dish. Ground crayfish adds a unique taste if you want to try something new. What traditional pairings work well with Nigerian Beef Stew? Serve the stew with rice, yams, or fried plantains. These sides soak up the rich sauce and balance the meal. You can also enjoy it with fufu, a soft dough made from cassava or yams. What are some presentation tips for a beautiful dish? Use a large bowl or plate for serving. Garnish with fresh parsley for color. Place the stew in the center and arrange the sides around it. A well-presented dish makes the meal more inviting. What are common mistakes like overcooking or underseasoning? Overcooking makes the beef tough. Cook it just until tender. Underseasoning can leave the stew bland. Taste and adjust seasoning during cooking. How can I balance ingredients correctly? Ensure you have enough liquid for the beef to simmer. If the stew is too thick, add more broth or water. Too much spice can overpower the dish, so balance is key. Using these tips will help you create a comforting and flavorful Nigerian Beef Stew. Check the [Full Recipe] to get started on this delicious dish! {{image_2}} Nigerian beef stew varies across regions. Each area adds its own twist. In the north, they may use more spices like cumin and coriander. Southwestern regions often blend in unique peppers for extra heat. In some areas, people swap beef for chicken or goat meat. These options make the stew different yet delicious. You can easily adapt this stew to fit dietary needs. To make it gluten-free, skip any sauces with gluten. Low-carb versions can replace potatoes or rice with cauliflower. For a vegetarian option, use mushrooms or jackfruit instead of beef. These swaps keep the dish full of flavor while meeting diverse diets. Explore these variations to find your perfect version of Nigerian beef stew. Each twist offers a new taste experience! After making your Nigerian Beef Stew, let it cool down first. This helps keep the beef tender. Store it in an airtight container. It will stay fresh in the fridge for up to three days. If you want to keep it longer, freezing is a great option. To freeze Nigerian Beef Stew, follow these simple steps: 1. Cool Completely: Allow the stew to cool before freezing. 2. Portion It Out: Divide the stew into smaller portions. This makes it easy to thaw just what you need. 3. Use Freezer Bags: Place the portions in freezer bags. Squeeze out as much air as possible. 4. Label the Bags: Write the date on each bag. This helps you track how long it’s been frozen. For reheating after freezing, thaw the stew in the fridge overnight. You can also use the microwave for quick thawing. Heat it on the stove until it bubbles. Stir occasionally to ensure even heating. Enjoy your flavorful stew again! You can find the full recipe for this delicious dish in the earlier sections! How long to simmer for optimal flavor? You should simmer the stew for 1.5 to 2 hours. This time lets the beef become tender. It also allows the spices and flavors to blend well. Stir occasionally to prevent sticking. If you need more liquid, add more broth or water. Can I use fresh tomatoes instead of canned? Yes, fresh tomatoes work great! Use about 4 medium tomatoes. Blend them into a smooth paste. Fresh tomatoes can add a bright flavor to your stew. Just remember to adjust the cooking time slightly. What cut of beef is best for stew? I recommend using chuck roast. It has enough fat and collagen to keep the meat juicy. Other good options are brisket or round. These cuts also become tender when cooked slowly. How to adjust spice levels for different tastes? You can change the spice level by adding or removing chili peppers. Use fewer green chili peppers for a milder stew. You can also add more spices like curry powder for warmth. Taste the stew as it cooks and adjust to your liking. For the full recipe, you can check out the Savory Nigerian Beef Stew . Nigerian Beef Stew offers rich flavors and a comforting meal. We explored key ingredients like beef, tomatoes, and spices. You learned preparation steps, cooking techniques, and tips to avoid mistakes. Variations cater to different tastes and diets, making this dish versatile. Remember, balancing ingredients is key for great flavor. Store and freeze leftovers properly to enjoy later. Follow these tips, and your stew will impress everyone. Enjoy the process, share with friends, and savor the delicious results. Happy cooking!

Nigerian Beef Stew Flavorful and Hearty Comfort Dish

If you’re craving a warm, tasty dish that feels like a hug, you’ve come to the right place! Nigerian Beef

- 12 oz (340g) pasta of your choice (e.g., spaghetti, fettuccine) - 2 cups fresh mushrooms, sliced (e.g., cremini or button) - 1 cup ricotta cheese - 1/4 cup grated Parmesan cheese - 1/4 teaspoon red pepper flakes - 2 tablespoons olive oil - 2 cloves garlic, minced - 1 teaspoon dried thyme - Salt and pepper to taste - Fresh parsley, chopped for garnish To make Mushroom Ricotta Pasta, gather these ingredients first. The pasta is the base and can be any shape you like. I enjoy using spaghetti or fettuccine for this dish. Fresh mushrooms bring a lovely texture and deep flavor. Choose cremini or button mushrooms for the best results. Ricotta cheese adds a rich and creamy element that ties everything together. Optional ingredients like Parmesan cheese can enhance the creaminess. The red pepper flakes add a bit of heat if you like spice. You can skip them if you prefer a milder taste. For flavor, olive oil and garlic are key. They create a savory base for the mushrooms. Dried thyme adds earthiness, while salt and pepper elevate all the flavors. Finally, fresh parsley not only adds color but also a fresh touch to the dish. You can find the Full Recipe to guide you through making this delightful meal! To start, fill a large pot with water. Add a good amount of salt to the water. Bring it to a boil over high heat. Once boiling, add your pasta. Cook it according to the package instructions until it is al dente. This usually takes about 8 to 10 minutes. Before draining, save one cup of the pasta water. This water has starch, which helps the sauce stick. Drain the pasta and set it aside. In a large skillet, heat olive oil over medium heat. Once hot, add the sliced mushrooms. Stir them often for about 5 to 7 minutes. You want them to turn golden brown and lose their moisture. This step brings out their rich flavor. Next, add minced garlic and dried thyme to the mushrooms. If you like a little heat, toss in red pepper flakes. Cook this mix for about one minute. You will smell the garlic and herbs coming together. Now, pour in the vegetable broth. Scrape the bottom of the skillet to mix in any bits. Let it simmer for about 2 to 3 minutes. This lets the broth reduce and flavor the sauce. Turn the heat down to low and add the ricotta cheese. Stir it in well. If the sauce seems too thick, use the reserved pasta water. Add it a little at a time until you get the creaminess you want. The ricotta brings a nice, rich texture to the sauce. Now, it’s time to add the drained pasta to the skillet. Use tongs or a large spoon to toss the pasta gently. Make sure each piece is coated with the creamy sauce. This step ensures that every bite is flavorful and delicious. Taste your pasta and adjust the seasoning. Add salt and pepper to your liking. For an extra touch, sprinkle some grated Parmesan cheese if you want more creaminess. Serve the pasta hot, and add freshly chopped parsley on top. This adds a nice color and fresh taste. Enjoy your creamy mushroom ricotta pasta! For the complete recipe, check out the Full Recipe section. To get the best pasta, use a large pot with plenty of water. This helps the pasta cook evenly. Add salt to the water before it boils. The salt adds flavor. Wait until the water is at a rolling boil, then add the pasta. Stir it often, so it doesn’t stick. Cook it until it's al dente, which means firm to the bite. Reserve some pasta water before draining. This starchy water can help thicken your sauce later. Choosing the right mushrooms is key for flavor. I love using cremini mushrooms for their rich taste. They are more flavorful than white button mushrooms. Shiitake mushrooms also add a nice umami kick. If you want a more delicate flavor, try oyster mushrooms. For a fun twist, you can even mix different types. Just make sure they are fresh. Fresh mushrooms have a firmer texture and better taste. If you're looking for a dairy-free or lower-fat option, try using tofu instead of ricotta. Blend soft tofu until smooth. It gives a similar texture. For lower-fat options, use part-skim ricotta cheese. You can also look for almond or cashew-based ricotta. These options are creamy and delicious. They can add a unique flavor to your dish. {{image_2}} You can use various pasta shapes for this dish. While spaghetti and fettuccine work well, try penne or farfalle for fun. Each shape holds sauce differently, giving you new tastes. If you want a unique twist, use whole wheat or gluten-free pasta. These options add extra flavor and texture. Adding protein boosts the meal and makes it heartier. Chicken or shrimp are great choices. For chicken, use diced, cooked pieces. Sauté them with the mushrooms for added flavor. For shrimp, cook them until pink and tender. They cook quickly and mix well with the creamy sauce. You could also try diced ham or bacon for a smoky taste. Feel free to add more veggies to this dish. Spinach or kale brings color and nutrients. Just toss in greens at the end to wilt them. Bell peppers or zucchini also add a nice crunch. Roasted cherry tomatoes give a sweet burst of flavor. Mix and match your favorite veggies to create a new dish each time. For the full recipe, check out the Creamy Mushroom Ricotta Pasta. To keep your Mushroom Ricotta Pasta fresh, place it in an airtight container. Make sure the pasta cools down before sealing it. This helps prevent moisture build-up, which can make the dish soggy. Store it in the fridge for up to three days. If you want to enjoy it later, consider freezing it. When reheating, I recommend using the stove or microwave. If using the stove, add a splash of water or broth to help maintain moisture. Heat it on low, stirring gently. In the microwave, cover the dish with a microwave-safe lid or plate. Heat it in short bursts, stirring in between. This keeps the texture creamy and delightful. If you want to freeze Mushroom Ricotta Pasta, make sure it’s fully cooled first. Portion it into freezer-safe containers or bags. Squeeze out as much air as possible before sealing. It can last in the freezer for up to two months. To thaw, move it to the fridge overnight. Reheat it gently, adding a bit of water or broth to restore its creamy texture. Yes, you can make Mushroom Ricotta Pasta ahead. To meal prep, cook the pasta and sauce separately. Store them in airtight containers in the fridge. When you're ready to eat, heat them up together. This keeps the pasta from getting mushy. If you need a substitute, try cottage cheese or cream cheese. Both can provide a creamy texture. You can also blend tofu for a dairy-free option. Each will give a unique taste to the dish. Yes, you can make it gluten-free. Choose gluten-free pasta made from brown rice or chickpeas. These options cook well and keep the dish tasty. Just follow the package instructions for cooking time. To boost flavor, add herbs like basil or oregano. You can also toss in sun-dried tomatoes for a zing. A splash of lemon juice brightens the taste too. Garlic powder or smoked paprika can add depth. Great sides include a fresh green salad or garlic bread. A light tomato salad works well too. Serve with steamed broccoli for added nutrition. Each side complements the creamy pasta nicely. For the full recipe, check the detailed instructions above to create this delightful meal! In this post, we explored how to make a delicious Mushroom Ricotta Pasta. We covered key ingredients like pasta, mushrooms, and ricotta, and offered tips for cooking perfection. I shared ways to customize your dish and how to store leftovers properly. Remember, cooking is about fun and creativity. Use my tips to make a meal you love. Enjoy experimenting with flavors, and don't hesitate to try new ingredients in your cooking.

Mushroom Ricotta Pasta Delightful and Creamy Meal

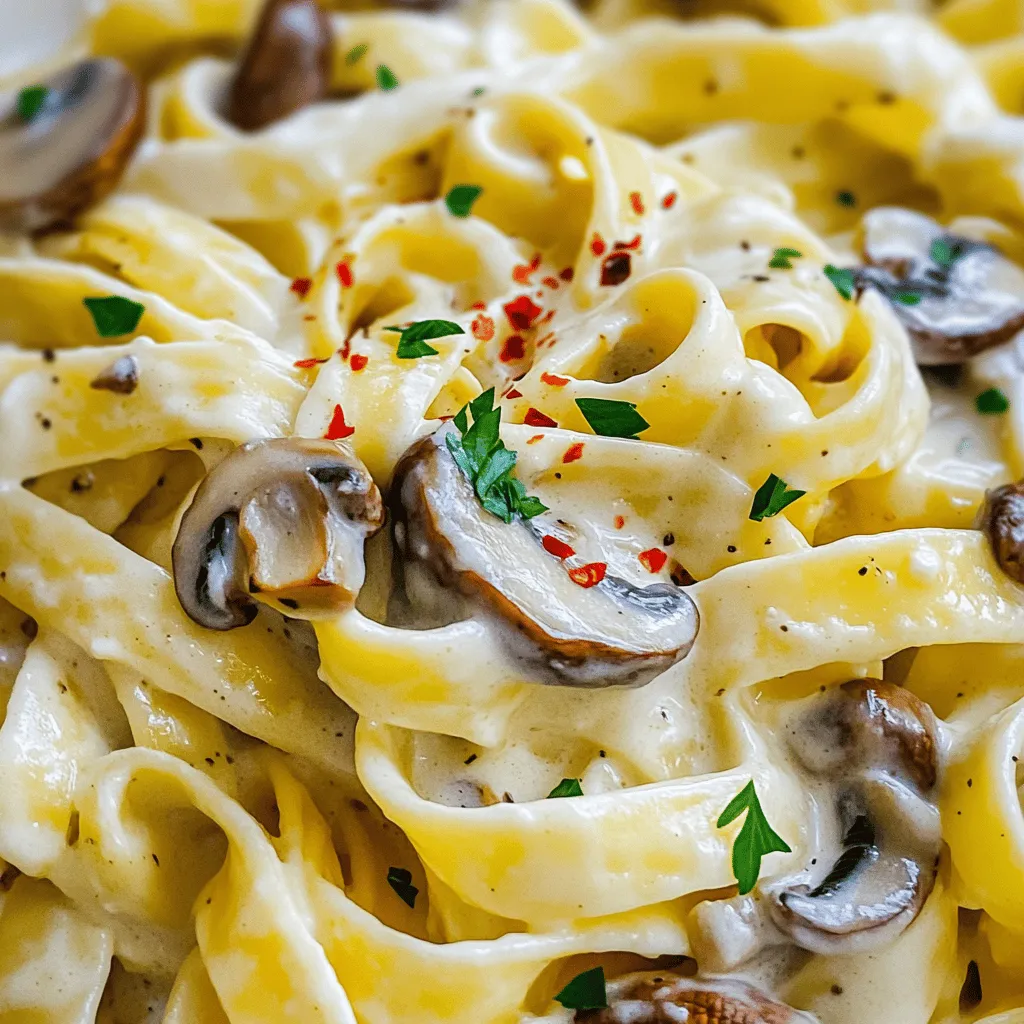
Craving a creamy, dreamy meal? Mushroom Ricotta Pasta is your answer! This dish blends rich flavors and comforting textures with

- 1 lb (450g) boneless, skinless chicken thighs - 6 cups chicken broth - 1 onion, quartered - 1 tablespoon ginger, sliced - 3 star anise pods - 1 cinnamon stick - 2 tablespoons fish sauce - 1 tablespoon soy sauce - 8 oz rice noodles - 1 cup bean sprouts - 1 jalapeño, sliced - Fresh basil and cilantro - Lime wedges for serving - Salt and pepper to taste The key to great chicken pho lies in the ingredients. The chicken thighs are tender and juicy, making the broth rich. Chicken broth serves as the base for flavor. The onion adds depth and sweetness. For flavor, we include fresh ginger. The star anise pods give a warm, sweet aroma. A cinnamon stick adds a touch of spice. Fish sauce and soy sauce bring umami and saltiness. Fresh additions make your pho lively. Rice noodles soak up the broth. Bean sprouts add crunch. Sliced jalapeño gives a spicy kick. Fresh herbs like basil and cilantro brighten the dish. Lime wedges add a zesty finish. Follow the [Full Recipe] to create this comforting dish. To start, you will need a large pot. Combine the chicken broth, onion, sliced ginger, star anise, and the cinnamon stick. This mix adds deep flavors to your broth. Bring the pot to a boil over medium-high heat. Once the broth boils, add the chicken thighs to the pot. After that, reduce the heat and let it simmer for 20-25 minutes. This will cook the chicken fully. When done, remove the chicken and strain the broth. This step keeps your broth clear and flavorful. Now, add fish sauce, soy sauce, salt, and pepper to the broth. Stir well and keep it warm over low heat. Next, cook the rice noodles according to the package instructions. Be sure to drain them and set them aside. Shred the cooled chicken into bite-sized pieces. You can add the chicken back to the broth for a few minutes to reheat it. To serve, place a portion of rice noodles in a bowl. Ladle the hot chicken broth over the noodles. Finally, top your pho with bean sprouts, sliced jalapeños, fresh basil, and cilantro. Don't forget to serve lime wedges on the side for squeezing over your soup. For the full recipe, check out the earlier section. To make the best broth, use high-quality chicken broth. It adds rich flavor. You can also add optional aromatics like whole cloves of garlic or fresh herbs. These will enhance the broth's taste. Cooking rice noodles can be tricky. To avoid overcooking, soak them in hot water first. This gives you better control. Drain them right before you serve. For the best rice noodles, I recommend brands like Banh Pho or Thai Kitchen. They cook well and taste great. Make your pho look appetizing. Use a large, shallow bowl. Place the rice noodles at the bottom. Ladle hot broth over them. Then, add the shredded chicken. For garnishes, use fresh bean sprouts, sliced jalapeños, basil, and cilantro. A squeeze of lime brightens the dish and adds flavor. {{image_2}} You can switch up the protein in your pho. Instead of chicken, try beef or shrimp. Beef brisket or sliced flank steak works well. For shrimp, use large, peeled shrimp and add them towards the end. If you want a vegetarian option, use tofu. Firm tofu absorbs the broth’s flavor nicely. You can also add mushrooms for a hearty texture. Using different proteins helps you customize your pho to your taste. Want a kick in your pho? Add sliced jalapeños for heat. You can also use other chilies, like serrano or Thai chilies. Adjust the number based on your spice tolerance. For a bolder flavor, try adding crushed red pepper flakes or ground chili powder to the broth. A pinch of cayenne pepper can also add heat. Remember, start small and taste as you go. You can always add more! Making a deeper broth can enhance your pho. Try simmering the broth longer for richer flavor. You can also roast the onion and ginger before adding them to the pot. This gives a nice, smoky taste. Experiment with herbs like cilantro, mint, or lemongrass for extra freshness. You can also add spices like cardamom or cloves for a unique twist. The broth is your canvas—get creative! To store your pho, let it cool first. Then, place it in the fridge. Use airtight containers to keep it fresh. I like to separate the broth and noodles. This helps keep the noodles from getting soggy. Store the broth in one container and the noodles in another. You can also store toppings like herbs and sprouts in separate bags. When you reheat your pho, do it slowly. Heat the broth in a pot over low heat. Stir it often to keep the flavor. For the noodles, add them to the broth for a minute. This warms them up without making them mushy. If you want crispy toppings, add them just before serving. Yes, you can freeze chicken pho! To freeze, let the broth cool completely. Pour it into freezer bags, leaving space for air. For the noodles, it's best to freeze them separately. When you're ready to eat, take out the broth and let it thaw overnight. Then, heat it up and add fresh noodles. This keeps the texture just right. Making Simple Chicken Pho is quick and easy. Here’s a breakdown: - Prep time: 15 minutes - Cook time: 35 minutes - Total time: 50 minutes With just under an hour, you can enjoy a warm bowl of pho. You can easily fit this into a busy day. Yes, you can prepare this pho in advance. Here are some tips: - Broth: Make the broth and store it in the fridge for up to three days. - Chicken: Cook the chicken and shred it. Keep it in an airtight container. - Noodles: Cook rice noodles right before serving. They taste best fresh. When you’re ready to eat, just reheat the broth and add the chicken and noodles. If you need a substitute for chicken broth, here are a few options: - Vegetable broth: Great for a lighter flavor. - Mushroom broth: Adds a rich, earthy taste. - Water with seasoning: Use herbs and spices for more flavor. These alternatives work well for different diets and tastes. Enjoy your pho with your preferred broth! This blog post showed you how to make delicious chicken pho. You learned about the key ingredients, how to prepare the broth, and tips for serving. I shared ways to customize the flavors and make it your own. Remember, use good broth and fresh herbs to boost taste. Don’t hesitate to experiment with proteins and spices to fit your preferences. With practice, you'll master this comforting dish. Enjoy your pho, and share it with others!

Simple Chicken Pho Flavorful and Easy Recipe Guide

Are you craving a warm, comforting bowl of soup? Look no further! My Simple Chicken Pho recipe is flavorful, easy,

- 1 cup creamy peanut butter - 1 cup whipped cream cheese, softened - 1/4 cup honey or maple syrup - 1 teaspoon vanilla extract - 1 cup whipped topping - 1/2 cup crushed graham crackers - 1/4 cup chocolate chips - 1/4 cup chopped nuts When making Peanut Butter Fluff, I focus on using high-quality ingredients. The creamy peanut butter gives the fluff its rich flavor. The whipped cream cheese adds a nice texture. You can choose honey or maple syrup for sweetness, depending on your taste. Adding vanilla extract gives the fluff a warm, inviting scent. The whipped topping makes everything light and fluffy. Crushing graham crackers adds a wonderful crunch. You can also include chocolate chips for extra sweetness. Nuts are great for topping if you like a little crunch. This combination of ingredients makes Peanut Butter Fluff easy and delightful. For the full recipe, check out the recipe guide. You can easily adjust these ingredients to fit your taste. 1. In a large bowl, combine 1 cup of creamy peanut butter and 1 cup of whipped cream cheese. 2. Use an electric mixer to blend them until smooth and creamy. 3. Gradually add 1/4 cup of honey or maple syrup and 1 teaspoon of vanilla extract. 4. Mix continuously until everything is fluffy. 1. Gently fold in 1 cup of whipped topping. 2. Be careful not to deflate the fluffiness. 3. Stir in 1/2 cup of crushed graham crackers and, if you want, 1/4 cup of chocolate chips. 4. Make sure everything is evenly mixed. 1. Transfer your Peanut Butter Fluff to a serving dish or individual cups. 2. Chill in the fridge for at least 30 minutes. 3. This chilling helps the flavors blend and the fluff to set. 4. Before serving, sprinkle 1/4 cup of chopped nuts on top for extra crunch, if desired. Follow this [Full Recipe] for delicious Peanut Butter Fluff! To get the best texture for your Peanut Butter Fluff, start with room temperature ingredients. This makes them mix better. Cold ingredients can clump and make it hard to blend. Next, focus on folding instead of stirring. Folding keeps the fluffiness intact. Stirring can deflate the air you’ve whipped into your mixture. Gently fold in the whipped topping until you see no streaks of cream. You can enhance the flavor in fun ways. Try using different sweeteners like agave syrup or coconut sugar. Each sweetener adds a unique taste to your fluff. Adding spices can also boost flavor. A sprinkle of cinnamon gives warmth, while cocoa powder adds a rich chocolate taste. Experiment to find your favorite mix. Peanut Butter Fluff pairs well with many snacks. Serve it with sliced apples or pretzels for a crunchy contrast. You can also spread it on toast or pancakes for breakfast. For creative serving options, use cups or jars. Layer the fluff with fruit or granola for a parfait. This makes it look pretty and adds extra flavor and texture. Check out the Full Recipe for more serving ideas! {{image_2}} If you're vegan, you can still enjoy Peanut Butter Fluff. Use vegan cream cheese instead. Replace honey with agave syrup for a sweet touch. This way, you enjoy the same creamy goodness without animal products. For those needing gluten-free options, make sure your graham crackers are gluten-free. You can use crushed nuts or gluten-free cookies for added crunch. Always check labels to ensure your toppings and ingredients meet gluten-free standards. Want to switch things up? Try making Chocolate Peanut Butter Fluff. Just add cocoa powder or melted chocolate to the mix. This adds a rich, chocolatey taste that pairs well with peanut butter. You can also add fresh fruit. Sliced bananas or strawberries give a refreshing twist. They add sweetness and a pop of color. It’s a fun way to brighten up your dessert and add healthy fruit. Layering in jars is a cute way to serve Peanut Butter Fluff. This makes it look fancy and inviting. You can create layers of fluff, graham crackers, and chopped fruit. Each layer adds color and texture. Another fun idea is to serve it as a dip. Pair it with fresh fruits like apple slices or pretzels. This makes it easy to share and enjoy. Plus, it turns a simple dessert into a fun snack! For the full recipe, check out the Peanut Butter Fluff Delight. To keep your Peanut Butter Fluff fresh, store it in the fridge. Use airtight containers to prevent it from drying out or absorbing other smells. Make sure the lid is on tightly. This way, your fluff stays creamy and delicious. Peanut Butter Fluff lasts about five days in the fridge. After that, it may lose its flavor and texture. You can also freeze Peanut Butter Fluff if you want it to last longer. To freeze, place it in a freezer-safe container. Leave some space at the top for expansion. It can stay frozen for up to three months. When you're ready to enjoy your frozen Peanut Butter Fluff, thaw it in the fridge overnight. This method helps keep the texture smooth. Avoid using a microwave, as it can change the fluffiness. If the texture seems off after thawing, give it a quick stir to bring it back to life. Enjoy your Peanut Butter Fluff Delight! For the full recipe and more tips, check out the Full Recipe. What is Peanut Butter Fluff made of? Peanut Butter Fluff is made of a few simple ingredients. You need: - 1 cup creamy peanut butter - 1 cup whipped cream cheese, softened - 1/4 cup honey or maple syrup - 1 teaspoon vanilla extract - 1 cup whipped topping - 1/2 cup crushed graham crackers - 1/4 cup chocolate chips (optional) - 1/4 cup chopped nuts (optional) These ingredients blend to create a creamy and sweet treat. The whipped cream cheese and whipped topping make it light and fluffy. Can I use crunchy peanut butter instead? Yes, you can use crunchy peanut butter! It will add a fun texture to your Peanut Butter Fluff. Just keep in mind that it will change the smoothness of the final dish. If you love the crunch, go for it! How do I serve Peanut Butter Fluff at a party? At a party, you can serve Peanut Butter Fluff in several ways. Here are some ideas: - Use individual cups for easy serving. - Spread it on graham crackers or fruit slices. - Offer it as a dip with pretzels or apples. Make it fun and inviting! You can even add a sprinkle of nuts or chocolate chips on top for a nice look. Is Peanut Butter Fluff a healthy snack? Peanut Butter Fluff can be a treat, but it has some healthy ingredients. Peanut butter has protein and healthy fats. However, it also has sugar from honey or syrup. Enjoy it in moderation to keep it a fun snack without overdoing it. Why is my Peanut Butter Fluff too thin? If your Peanut Butter Fluff is too thin, it may be due to the whipped topping. If it was not whipped enough, it won’t add enough air. Try using a brand that holds its shape better. You can also chill it longer to help it thicken. What can I do if my Peanut Butter Fluff isn't fluffy? If your Peanut Butter Fluff isn't fluffy, check your mixing method. Make sure to fold the whipped topping in gently. If you mix too hard, you can lose the air that makes it light. If it's still not fluffy, try adding more whipped topping to increase the volume. To recap, we explored how to make a delicious Peanut Butter Fluff. You learned about the key ingredients, step-by-step instructions, and helpful tips for the best texture and flavor. We also discussed variations and storage tips to keep your treat fresh. Peanut Butter Fluff is simple, fun, and perfect for any gathering. With these ideas, you can impress your friends and family. Enjoy this tasty treat and get creative!

Peanut Butter Fluff Delightful and Easy Recipe

Are you ready to whip up something delicious and simple? Peanut Butter Fluff is the perfect treat that combines rich

- 1 cup black lentils (urad dal) - 1/3 cup red kidney beans (rajma) - 1 large onion, finely chopped - 2 tomatoes, pureed - 4 cloves garlic, minced - 1 inch ginger, grated - 2 green chilies, slit lengthwise - 1 teaspoon cumin seeds - 1 teaspoon garam masala - 1 tablespoon butter - 1/2 cup heavy cream or coconut cream - 2 teaspoons salt or to taste - Fresh cilantro leaves for garnish - 4 cups water - Additional spices (e.g., turmeric, paprika) - Lemon juice for acidity - Extra butter or ghee for richness To make the best Slow Cooker Dal Makhani, you need a mix of rich ingredients. Black lentils and kidney beans are the main stars. They give the dish its creamy texture and hearty feel. Chopped onions, pureed tomatoes, garlic, and ginger bring depth and warmth. Green chilies add a touch of heat, while cumin seeds and garam masala create a fragrant aroma. I love adding butter for a silky finish, and cream for that rich flavor. If you prefer a vegan option, coconut cream works great too. Don't forget to season with salt and garnish with fresh cilantro for color. For an extra boost of flavor, consider turmeric or paprika. A squeeze of lemon juice can brighten the dish, and a touch of extra butter or ghee can enhance richness. This mix of ingredients creates a delicious and satisfying meal that is easy to make in your slow cooker. For the full recipe, check out the detailed instructions in the next section. - Rinse and soak lentils and beans - Drain the soaked lentils and kidney beans Start by rinsing the black lentils and kidney beans under cold water. This helps remove dirt and impurities. Soak them in water for about eight hours, or overnight for best results. Soaking softens the beans and lentils, making them cook better. After soaking, drain them well. This step is key to ensure your dish is smooth and creamy. - Combine lentils, kidney beans, and water in the slow cooker - Sauté and add spices to enhance flavors - Mix sautéed ingredients into the slow cooker - Set cooking time and temperature (low or high) Next, add the soaked lentils and kidney beans into your slow cooker. Pour in four cups of water. This is where the magic begins! In a pan, melt some butter over medium heat. Add cumin seeds and let them splutter, releasing a warm aroma. Then, add chopped onions and sauté until they turn golden brown. Add minced garlic, grated ginger, and slit green chilies. Sauté for two to three minutes until fragrant. Pour in the pureed tomatoes and let everything cook together for five to seven minutes. This step brings out the rich flavors. Once done, mix this sautéed goodness into the slow cooker with the lentils and beans. Stir well. Add salt and garam masala, cover, and set your slow cooker. Cook on low for six to eight hours or on high for four to five hours. Your Dal Makhani will become tender and flavorful. - Stir in heavy cream or coconut cream - Adjust seasoning and garnish with cilantro About 30 minutes before serving, stir in the heavy cream or coconut cream. This adds a rich, creamy texture that everyone loves. Taste your dish and adjust the seasoning if needed. Finally, garnish with fresh cilantro leaves before serving. This not only adds color but also a fresh burst of flavor. Your Dal Makhani is now ready to enjoy! For the full recipe, check out the details above. Soaking black lentils and kidney beans is key. I recommend soaking them for 8 hours or overnight. This helps them cook faster and makes them creamier. Before you add the spices to the slow cooker, sauté them first. This brings out their true flavors. Start with cumin seeds in some butter until they pop. Then, add onions and let them turn golden. This step makes a big difference! Choosing the right spices is vital. I find that a mix of garam masala and cumin works best. You can also add turmeric for color and warmth. For toppings, consider fresh cilantro and a swirl of cream. A squeeze of lemon juice can also brighten the dish. These extra touches will elevate your Dal Makhani. Cooking times can vary by slow cooker. If yours runs hot, check after 4 hours on high. For cooler models, you may need up to 8 hours on low. Dal Makhani is done when the lentils and beans are soft and creamy. You should be able to mash them easily with a fork. This is when you know it’s time to enjoy your rich and creamy delight! {{image_2}} You can easily make a vegan version of Dal Makhani. Instead of using heavy cream, try coconut cream or cashew cream. Both options give a rich and creamy texture. Coconut cream adds a subtle sweetness and a hint of tropical flavor. Cashew cream has a mild taste and blends well with spices. Simply blend soaked cashews with water for a smooth cream. This keeps your Dal Makhani rich without dairy. Dal Makhani varies across India. Each region has its own twist. For example, Punjab is famous for its buttery version. In southern India, you might find a spicier variation using local spices. You can add fresh ingredients like curry leaves or asafoetida. These local flavors make the dish unique. Don’t hesitate to experiment with your local spices to create a new version that suits your taste. Adjusting the spice level is easy. If you prefer milder dishes, remove the seeds from the green chilies. You can also use less chili powder. For a spicier kick, add more green chilies or a pinch of cayenne. I recommend trying garam masala blends for different heat levels. Some blends mix sweet and hot spices, which can enhance the flavor without overwhelming heat. Always taste as you go to find your perfect balance. To keep your Dal Makhani fresh, store leftovers in the fridge. Use an airtight container to prevent moisture loss. It’s best to let the dish cool before sealing it up. You can enjoy it for up to four days this way. If you want to save Dal Makhani for later, freezing works great too. Use freezer-safe containers or heavy-duty freezer bags. Be sure to leave some space in the container, as the dish might expand. It can stay frozen for up to three months. When you’re ready to enjoy the leftovers, the best method to reheat is on the stove. Pour the Dal Makhani into a saucepan and heat over low to medium heat. Stir it often to keep it from sticking. You can also reheat it in the microwave. Just place it in a microwave-safe bowl, cover it, and heat in short bursts. Stir in between to ensure even heating. To keep the creamy texture, add a splash of water or cream while reheating. This helps revive that rich, smooth feel. Dal Makhani can be stored safely in the fridge for about four days. If frozen, it lasts for three months. Always check for signs that it has spoiled. Look for any off smells or changes in color. If it smells sour or looks unusual, it's best to toss it. Enjoy the rich and creamy delight of your Dal Makhani, knowing you can savor it again! For the full recipe, check out the earlier sections. To soak lentils and beans, rinse them well in cold water. Then, place them in a bowl and cover with fresh water. Soak for about 8 hours or overnight. This softens them, making them cook faster. It also helps remove some of the gas-causing compounds. If you're short on time, a quick soak works too. Boil them for 2 minutes, then let them sit for an hour. Yes, you can use dried lentils and beans. Just remember to soak them first. Dried legumes give better flavor and texture. They also tend to be cheaper. Canned options save time but may have added sodium. If you choose canned, rinse them to cut down on salt. Adjust cooking times as needed. Dried beans will take longer to cook than canned. Dal Makhani pairs well with naan, rice, or roti. You can also serve it with a fresh salad or yogurt. A side of pickles adds a nice tang. For a complete meal, add some grilled vegetables. These sides complement the rich, creamy flavors. You can also try serving it in a bowl topped with fresh cilantro. You can easily scale the recipe to serve more people. Just double or triple the ingredients. Keep the same cooking time, but check for doneness. You may need a larger slow cooker for bigger batches. Make sure to keep the flavor balanced. Adjust spices to your taste as you increase the quantity. Yes, Slow Cooker Dal Makhani is healthy. It is rich in protein and fiber. Black lentils and kidney beans provide essential nutrients. Adding cream adds richness but also calories. To lighten it, you can use coconut cream. This dish is filling and nutritious, perfect for a balanced meal. To add spice, use more green chilies or add red chili powder. You can also try cayenne pepper for extra heat. Start with a little and taste as you go. This way, you control the heat without losing flavor. If it gets too spicy, balance it with more cream. This keeps the dish creamy and delicious. In this blog post, we explored how to make Slow Cooker Dal Makhani. We discussed essential and optional ingredients, detailed step-by-step cooking instructions, and offered useful tips. You can also enjoy vegan versions and regional variations for more flavor. Proper storage and reheating methods ensure you enjoy leftovers. Dal Makhani provides great taste with nutritional benefits you can feel good about. Enjoy making this dish and have fun experimenting with your flavors. Happy cooking!

Slow Cooker Dal Makhani Rich and Creamy Delight

If you’re craving a hearty dish that’s rich in flavor and easy to prepare, you’ve come to the right place.

To make Baked French Onion Gnocchi, you need fresh and simple ingredients. Here is what you will need: - 1 pound gnocchi (store-bought or homemade) - 2 large yellow onions, thinly sliced - 2 tablespoons olive oil - 1 teaspoon sugar - 4 cups beef or vegetable broth - 1 teaspoon dried thyme - 1 teaspoon garlic powder - Salt and pepper to taste - 1 cup Gruyère cheese, grated - 1/2 cup mozzarella cheese, shredded - Fresh parsley, chopped for garnish These ingredients come together to create a warm and comforting dish. The gnocchi serves as a great base, while the onions add sweetness and depth. The cheeses melt beautifully, making the dish creamy and rich. You can find the full recipe to guide you through the cooking process step-by-step. Each ingredient plays a key role in building flavor, so make sure to use quality items. Enjoy picking out fresh onions and cheese; they will make a big difference! Start by preheating your oven to 375°F (190°C). This step ensures your dish cooks evenly. A hot oven helps the cheese melt perfectly and creates a lovely golden crust on top. Next, take a large skillet and heat 2 tablespoons of olive oil over medium heat. Add 2 thinly sliced yellow onions. Sprinkle in 1 teaspoon of sugar to help with caramelization. Stir the onions often for about 15-20 minutes. Look for a deep golden color. This brings out their natural sweetness. The smell will fill your kitchen and make you hungry! While the onions are cooking, grab another pot. Pour in 4 cups of beef or vegetable broth. Bring it to a gentle simmer. Add 1 teaspoon of dried thyme and 1 teaspoon of garlic powder to the broth. Season with salt and pepper to taste. Once it simmers, add 1 pound of gnocchi. Cook them according to the package instructions, which usually takes 2-3 minutes. Watch for them to float to the surface; that means they are ready! Mixing these steps together creates a dish full of flavor. Once your gnocchi is cooked, you can combine everything as per the [Full Recipe]. Enjoy the delicious process! First, I gently mix the cooked gnocchi with the caramelized onions. This adds rich flavor to the dish. Make sure the gnocchi is coated well with the sweet onions. The warmth from the gnocchi helps to blend the flavors. This step is key for a delicious result. Next, I spoon the gnocchi and onion mix into a greased baking dish. Use a spatula to spread it evenly. It’s important for even baking. You want every bite to have that great taste. Make sure to fill the dish to the edges. This will create a nice, crispy topping. Now comes the fun part: adding cheese! I sprinkle the Gruyère cheese first. This cheese melts beautifully and adds depth. Then, I add the mozzarella cheese. It gives that gooey, stretchy texture we love. Make sure to cover the top well. This cheesy layer will turn golden and bubbly while baking. Don’t forget to check the Full Recipe for more details! {{image_2}} After prepping your gnocchi and onions, it’s time to bake. Place the baking dish in your preheated oven at 375°F (190°C). Bake for 20-25 minutes. You want the cheese to melt and bubble. This gives the dish a golden, crispy top. The aroma will fill your kitchen with warmth and comfort. Once baked, take the dish out of the oven. Let it cool for a few minutes. This helps the dish set. Now, sprinkle fresh chopped parsley on top. This adds a pop of color and a fresh taste. It makes your dish look inviting and bright. Serve this dish warm, straight from the oven. It pairs well with a simple salad or crusty bread. You can even enjoy it as a cozy meal on its own. For extra flavor, consider adding a sprinkle of fresh herbs. This enhances the taste and presentation of your baked French onion gnocchi. Want more ways to enjoy it? You can try adding roasted vegetables or a side of garlic bread. Explore and make it your own! For the full recipe, check out the details above. To get the best flavor, take your time with the onions. Start with medium heat and add the olive oil. Stir in the sliced onions and sprinkle with sugar. The sugar helps them turn golden. Cook them low and slow for about 15 to 20 minutes. Stir often to avoid burning. Gruyère cheese gives a rich taste, but you can mix it up. Try Swiss or fontina for a different flavor. If you want a lighter cheese, mozzarella works well too. You can even use a vegan cheese if you prefer. Don't be afraid to experiment! When cooking gnocchi, make sure to stir gently in the broth. This keeps them from sticking together. Follow the package directions closely. Most gnocchi will float when done. This is your cue to take them out. Overcooked gnocchi can become mushy, so keep an eye on them! For the full recipe, check out the details above! You can easily make this dish vegetarian. Simply swap the beef broth for vegetable broth. This change keeps all the flavors while making it meat-free. The caramelized onions add a rich taste that balances the dish. You won’t miss the meat at all! Want to boost nutrition? Add some veggies! Spinach, mushrooms, or zucchini work well. Sauté them with the onions for extra flavor. You can also fold in cooked broccoli or peas before baking. This way, you get more color and taste in every bite. Cheese lovers can have fun here! If Gruyère is not your favorite, try different cheeses. Aged cheddar or fontina melts beautifully. For a tangy twist, add some crumbled goat cheese. Mixing cheeses can change the flavor and texture of the dish. Experiment and find your perfect blend! For the full recipe, check the original guide to make this dish a delightful experience. You can keep leftovers in an airtight container. Store them in the fridge. They will last for 3 to 4 days. When you are ready to eat, just take them out. To freeze, first let the dish cool completely. Then, place it in a freezer-safe container. It can last up to 2 months. When you want to eat it, thaw it in the fridge overnight. You can reheat the gnocchi in the oven or microwave. For the oven, preheat to 350°F (175°C). Place the dish in an oven-safe container. Cover with foil to keep it moist. Bake for 20 minutes or until heated through. If using a microwave, heat in short bursts. Stir in between to warm evenly. To make Baked French Onion Gnocchi, start by caramelizing onions. Heat olive oil in a skillet. Add thinly sliced onions and sprinkle with sugar. Cook for 15-20 minutes until golden brown. In another pot, simmer beef or vegetable broth. Stir in dried thyme and garlic powder. Season with salt and pepper. Add gnocchi to the broth and cook for 2-3 minutes until they float. Mix the cooked gnocchi and caramelized onions. Transfer to a greased baking dish. Top with Gruyère and mozzarella cheese. Bake at 375°F for 20-25 minutes until bubbly. For the full recipe, check out the details above. Store leftovers in an airtight container. Let the dish cool before sealing. Place it in the fridge. Enjoy within three days for the best taste. To reheat, use the oven for best results. You can also use the microwave, but it may not be as crispy. Yes, you can use different cheeses. Cheddar, fontina, or gouda work well. Each cheese gives a unique flavor. Mix and match to find your favorite combination. Just ensure the cheese melts well for that gooey finish. Making Baked French Onion Gnocchi takes about 50 minutes. This includes prep and cooking time. You can speed things up by having all ingredients ready before cooking. Absolutely! Homemade gnocchi adds a special touch. Just ensure they are cooked before mixing them with the sauce. This dish will taste even more delightful when you use your own gnocchi. This blog post covered how to make a delicious Baked French Onion Gnocchi. You learned about the key ingredients and the step-by-step process to caramelize onions, cook gnocchi, and layer cheese for a perfect bake. Tips on cheese substitutions and storage helped deepen your understanding. This dish is not only tasty but also flexible. You can tailor it to fit your needs, whether adding veggies or changing cheese. So, grab those ingredients and enjoy cooking this comforting meal. You'll impress everyone at your table!

Baked French Onion Gnocchi Simple and Savory Delight

Are you ready to dive into a dish that brings comfort and joy? Baked French Onion Gnocchi is a simple

To make this crispy vegan Nashville hot chicken, you will need the following ingredients: - 1 cup vital wheat gluten - 1/4 cup chickpea flour - 1/2 cup vegetable broth - 2 tablespoons soy sauce - 1 tablespoon nutritional yeast - 1 teaspoon garlic powder - 1 teaspoon onion powder - 1 teaspoon smoked paprika - 1/2 teaspoon cayenne pepper (adjust to taste) - Salt and pepper to taste - 1 cup almond milk (or any non-dairy milk) - 1 tablespoon apple cider vinegar - 1 cup all-purpose flour (for coating) - 1 cup panko breadcrumbs - Vegetable oil (for frying) - 1 tablespoon hot sauce (for the spicy sauce) - 1 tablespoon maple syrup (for the spicy sauce) - Fresh pickles (for serving) - Sliced bread (for serving) For better results, I recommend using high-quality brands. Look for organic vegetable broth and fresh spices. They make a big difference in flavor. You can customize this dish by adding more spices to the dough or using different non-dairy milk. You may try oat milk or soy milk if you prefer. If you like extra heat, add more cayenne pepper or your favorite hot sauce. Start by mixing the vital wheat gluten and chickpea flour in a large bowl. These two ingredients create a great base. Next, stir in the vegetable broth, soy sauce, and nutritional yeast. Add garlic powder, onion powder, smoked paprika, cayenne pepper, salt, and pepper. Ensure everything combines well. Knead the mixture for about five minutes. This step makes the dough stretchy, just like chicken. Shape the dough into fillets or pieces. Next, set up your breading station. You will need three bowls: one for all-purpose flour, one for the almond milk mixture, and one for panko breadcrumbs. Dip each piece of your vegan chicken into the flour first. Then, coat it in the almond milk mixture. Finally, roll it in the panko breadcrumbs. Make sure every piece is well covered. This will give your chicken a nice crunch. For frying, choose a large skillet. Heat about one inch of vegetable oil over medium-high heat. You want the oil hot but not smoking. Carefully add your breaded chicken pieces in batches. Fry them until they turn golden brown and crispy, about three to four minutes per side. Remove them and let them drain on a paper towel. This step helps keep them crispy. Follow these steps, and you'll have amazing crispy vegan Nashville hot chicken. For full details, check the Full Recipe. To get that crunchy bite, you need panko breadcrumbs. They are light and airy, creating a perfect crust. Regular breadcrumbs won't give you the same crispness. Next, the oil temperature matters a lot. Heat your vegetable oil to about 350°F (175°C). If it’s too cool, the chicken will soak up oil. If it’s too hot, it will burn. Fry each piece for about 3-4 minutes on each side. This timing ensures the outside gets golden and crispy while the inside cooks through. Adjust the spice levels to fit your taste. If you love heat, add more cayenne pepper. For less spice, cut back on it. You can also add other flavors. Try adding a splash of lemon juice or some smoked paprika for a deeper taste. Serve your crispy vegan Nashville hot chicken on soft sliced bread. Top it with fresh pickles for that classic crunch. Pair it with a side of coleslaw or fries for a tasty meal. For the sauce, mix hot sauce and maple syrup. This sweet and spicy blend adds a delightful kick. You can drizzle it over the chicken or serve it on the side for dipping. For more details on the recipe, check out the Full Recipe. {{image_2}} You can enjoy Nashville hot chicken in many ways. You can choose baked or fried options. Baked versions use less oil, making them healthier. Fried versions give you that crispy texture you crave. Both ways are delicious! For those on a gluten-free diet, there are options too. You can swap vital wheat gluten with gluten-free flour blends. Use rice flour or almond flour for a lighter texture. This way, everyone can enjoy the crispy goodness. You can also change up the flavors. Try a BBQ twist by using BBQ sauce instead of hot sauce. For a zesty kick, lemon pepper adds a bright taste. Each variation gives you a new way to enjoy this dish. Pair your Nashville hot chicken with creative side dishes. Creamy coleslaw complements the heat well. You can also serve it with sweet potato fries for a tasty contrast. Corn on the cob adds a fun touch too. Consider alternative serving styles like tacos or sliders. Use mini buns for sliders and fill them with crispy chicken. Tacos can be topped with fresh veggies and vegan sauce for a fun meal. Vegan sauces work wonders with Nashville hot chicken. A cool ranch dressing helps balance the spice. You can also try a tangy mustard sauce for a tasty kick. These sauces enhance the flavors and make your meal even better. Store leftovers in an airtight container. This keeps your crispy vegan Nashville hot chicken fresh. I recommend using glass containers. They do not absorb smells and are easy to clean. Make sure to cool the chicken to room temperature before packing. This step helps prevent moisture buildup. You can keep the leftovers in the fridge for up to three days. For longer storage, freezing works great. Wrap each piece in plastic wrap. Then, place them in a freezer bag. Try to remove as much air as possible. This helps avoid freezer burn. You can freeze the chicken for up to three months. To reheat, first, preheat your oven to 400°F (200°C). Place the frozen chicken on a baking sheet. Bake for about 15-20 minutes. This method keeps the chicken crispy. Avoid microwaving, as it makes the coating soggy. For extra crunch, you can also re-fry the pieces in a pan for a few minutes. Enjoy your crispy vegan Nashville hot chicken again! What is vegan chicken made of? Vegan chicken often uses vital wheat gluten and chickpea flour. These ingredients give it a meaty texture. The broth adds flavor, and spices enhance the taste. You can mix and match flavors to suit your taste. Can I prepare this dish in advance? Yes, you can prepare the dough ahead of time. Shape it and store it in the fridge. You can also bread the pieces and keep them in the fridge. Just fry them when you're ready to eat. How spicy is this recipe on a scale of 1 to 10? This recipe can range from a 5 to an 8. It depends on how much cayenne pepper you use. Start with half a teaspoon if you prefer mild heat. You can always add more spice later. How do I make a gluten-free version of Nashville hot chicken? To make a gluten-free version, replace vital wheat gluten with a gluten-free meat substitute. You can use chickpea flour and other gluten-free flours. Ensure all your ingredients are labeled gluten-free. Can I use an air fryer for this recipe? Yes, using an air fryer is a great option. It allows for less oil while keeping the crispiness. Set your air fryer to 375°F and cook each piece for about 10-12 minutes. Flip halfway for even cooking. What are some common mistakes to avoid when frying vegan chicken? One common mistake is overcrowding the pan. This lowers the oil's temperature and makes it soggy. Fry in small batches for the best results. Another mistake is not letting the oil heat up enough. Always test with a small piece first. To make crispy vegan Nashville hot chicken, we covered key steps. You learned the best ingredients to use, how to prepare the dough, and the right frying techniques for a perfect crunch. Don't forget about customization options and sides. You can enjoy this dish in many ways, from tacos to sliders. With these tips, you can make delicious, flavorful meals. I hope you feel ready to try this recipe and impress your friends!

Crispy Vegan Nashville Hot Chicken Flavorful Delight

Are you ready to dive into a world of flavor with my Crispy Vegan Nashville Hot Chicken? This recipe packs

- 1 cup mixed berries (strawberries, blueberries, raspberries) - 1 ½ cups all-purpose flour - ¾ cup granulated sugar - ½ cup unsalted butter, softened - 2 large eggs - ½ cup plain yogurt - 1 teaspoon vanilla extract - 1 teaspoon baking powder - ½ teaspoon baking soda - ¼ teaspoon salt - Zest of 1 lemon - 2 tablespoons lemon juice - Optional: powdered sugar for dusting Mixed berries are the star of this recipe. I love using strawberries, blueberries, and raspberries. They bring bright colors and sweet flavors. You can use fresh or frozen berries. Just remember to coat them with a bit of flour to keep them from sinking. All-purpose flour binds everything together. It gives the loaf structure. You need 1 ½ cups for the perfect texture. For sweetness, we use ¾ cup of granulated sugar. You can swap it for alternatives like honey or maple syrup if you prefer. Unsalted butter plays a vital role in baking. It gives a rich flavor and a tender crumb. Use softened butter for easy mixing. Plain yogurt adds moisture and tanginess. It balances the sweetness from the sugar. You need ½ cup to keep your loaf soft and delicious. Lemon zest and juice brighten the flavors. The zest adds a fresh aroma, while the juice gives a lovely zing. Using both enhances the overall taste of the loaf. For the complete recipe, check the Full Recipe section. 1. Prepping the oven and loaf pan: Start by setting your oven to 350°F (175°C). This is the perfect temperature for baking our Sweet Berry Loaf Delight. Grease a 9x5 inch loaf pan with butter or non-stick spray. This will help your loaf come out easily after baking. 2. Preparing the mixed berries: If you are using fresh berries, wash them well and remove any stems. For frozen berries, let them thaw slightly. In a medium bowl, mix the berries with one tablespoon of flour. This step helps keep the berries from sinking to the bottom during baking. Set aside while you prepare the batter. 1. Creaming butter and sugar: Why it’s important: In a large mixing bowl, add the softened butter and granulated sugar. Beat them together until the mixture looks light and fluffy. This step adds air into the batter, which helps make the loaf soft. 2. Combining dry and wet ingredients appropriately: In another bowl, whisk together the flour, baking powder, baking soda, salt, and lemon zest. After you mix the wet ingredients—eggs, yogurt, and vanilla—gradually add the dry mix. Stir gently until just combined. Be careful not to overmix, as that can make the loaf tough. 3. Baking time and temperature tips: Pour the batter into the greased loaf pan. Drizzle the lemon juice over the top for a burst of flavor. Bake in the oven for 55-60 minutes. Check with a toothpick; it should come out clean when the loaf is done. If the top browns too quickly, cover it loosely with foil. This will help it bake evenly. For the full recipe, you can refer to the earlier sections. Enjoy making this Sweet Berry Loaf Delight! To avoid a dry loaf, here are some simple steps you can follow: - Use room temperature ingredients. This helps them mix better. - Don’t overmix the batter. Mix just until combined for a moist loaf. - Add yogurt. It gives extra moisture and keeps the loaf tender. For a golden crust, try these tips: - Preheat your oven. A hot oven helps create a nice crust. - Use a light-colored pan. Dark pans can cause burning. - Bake until golden. Keep an eye on it during the last few minutes. Adding spices can bring out deeper flavors in your loaf: - Cinnamon adds warmth and pairs well with berries. - Nutmeg gives a cozy, festive feel. - Ginger adds a zesty kick that brightens the dish. When serving, consider these pairing suggestions: - Fresh whipped cream adds a rich touch. - A scoop of vanilla ice cream is a classic treat. - Serve with a drizzle of honey for added sweetness. You can find the Full Recipe to get started on your Sweet Berry Loaf Delight! {{image_2}} You can switch up the berries for fun. Try blackberries or cherries for a new taste. Each berry adds its own flavor and color. If you want to go gluten-free, choose almond flour or coconut flour. These options can change the texture but will still give you a tasty loaf. Add nuts like walnuts or pecans for crunch. They give a nice texture and flavor. You can also mix in chocolate chips for a sweet surprise. This loaf works well for seasonal changes too. Use pumpkin in fall or fresh citrus in spring. Each change brings a new vibe to your Sweet Berry Loaf Delight. For the full recipe, check out the Sweet Berry Loaf Delight . To keep your Sweet Berry Loaf Delight fresh, store it at room temperature. Place the loaf in a cool, dry area, away from sunlight. Wrap it in plastic wrap or foil to prevent it from drying out. This way, it stays moist and tasty for about three days. If you want it to last longer, refrigeration is the way to go. Just put the wrapped loaf in the fridge. It will keep for up to a week. However, the cold air might make the loaf a bit denser. To bring back some softness, let it sit at room temperature for a while before serving. Freezing the loaf is a smart choice for long-term storage. First, ensure the loaf is completely cool. Then, wrap it tightly in plastic wrap. After that, place it in a freezer bag. This protects it from freezer burn. The loaf can stay frozen for up to three months. When you're ready to enjoy your Sweet Berry Loaf, thaw it properly. Remove it from the freezer and keep it wrapped. Let it sit in the fridge overnight. This slow thaw helps preserve the loaf's texture. If you're in a hurry, you can thaw it at room temperature for a few hours. Just remember, don’t rush the process! Enjoy your delightful loaf fresh, as if it just came out of the oven. For the full recipe, check out the details above. Can I make this recipe vegan? Yes, you can. Replace eggs with flax eggs or applesauce. Use a plant-based yogurt and vegan butter. This way, you keep the loaf moist and tasty. How do I know when the loaf is done baking? To check if it's done, insert a toothpick into the center. If it comes out clean, your loaf is ready. You can also gently press the top; if it springs back, it’s done! What are the best berries to use for this recipe? I love using strawberries, blueberries, and raspberries. They add great flavor and color. You can mix and match based on your taste. Can I use frozen berries instead of fresh? Absolutely! Frozen berries work just as well. Just toss them with a bit of flour first. This helps them stay nice and even in the loaf. How to adjust the recipe for different loaf sizes? You can scale the ingredients up or down. For a smaller loaf, halve the amounts. For a larger one, double them. Adjust the baking time too; check for doneness earlier or later. What is the calorie count per slice? Each slice has about 180 calories. This can vary based on the ingredients you choose. It’s a tasty treat that fits well into a balanced diet! Are there healthier substitutes for the ingredients? Yes! You can use whole wheat flour for more fiber. Swap sugar for honey or maple syrup for sweetness. These changes can make the loaf a bit healthier without losing flavor. For the complete guide, check out the Full Recipe. This blog post shared a tasty berry loaf recipe. We covered key ingredients like berries, butter, and yogurt. You learned how to mix and bake to get the perfect loaf. I offered helpful tips to achieve a moist texture and a great crust. We also explored flavor variations and storage tips. You now have the tools to create your own sweet berry delight. Enjoy baking and sharing this treat with friends and family!

Sweet Berry Loaf Delight Simple and Fresh Recipe

Are you ready to bake a delicious Sweet Berry Loaf? This simple recipe bursts with the fresh taste of mixed

To make a tasty chorizo white bean soup, gather these main ingredients: - 8 oz chorizo sausage, diced - 1 can (15 oz) white beans (cannellini or great northern), rinsed and drained - 1 medium onion, chopped - 2 cloves garlic, minced - 1 carrot, diced - 1 celery stalk, diced - 4 cups chicken or vegetable broth - 1 teaspoon smoked paprika - 1/2 teaspoon ground cumin - 1/4 teaspoon cayenne pepper (adjust to taste) - Salt and pepper to taste - 2 tablespoons olive oil These items form a solid base for your soup. The chorizo adds spice and depth, while the white beans bring creaminess. To make your soup look great and add extra flavor, consider these garnishes: - Fresh parsley, chopped - Greek yogurt or sour cream These garnishes not only enhance the taste but also add a pop of color. You will need a few tools to make this recipe easier: - Large pot - Wooden spoon or spatula - Knife and cutting board - Measuring spoons and cups Having these tools ready will help you prepare the soup smoothly. Follow the full recipe to create a warm, satisfying meal you can enjoy any day! First, gather all your ingredients. You will need chorizo, white beans, onion, garlic, carrot, celery, broth, spices, and olive oil. Chop the onion, carrot, and celery into small pieces. Mince the garlic. Rinse and drain the white beans. This makes cooking easier. In a large pot, heat two tablespoons of olive oil over medium heat. Add the diced chorizo and cook it until it turns brown. This should take about 5 to 7 minutes. Stir the chorizo often to avoid sticking. Once the chorizo is ready, add the chopped onion, carrot, and celery. Sauté these for about 5 minutes until they soften. Next, stir in your minced garlic, smoked paprika, ground cumin, and cayenne pepper. Let this cook for another minute. The spices will add a rich aroma to your dish. Now, it’s time to add the rinsed white beans and broth to your pot. Bring this mixture to a boil. Once boiling, reduce the heat and let it simmer for 20 to 25 minutes. Season with salt and pepper to taste. If you notice the soup is too thick, feel free to add more broth or water. For a creamier soup, blend a portion of it and mix it back in. When serving, garnish with fresh parsley and a dollop of Greek yogurt or sour cream if you like. You can find the Full Recipe for more details. To boost the flavor of your soup, consider adding more spices. You can try a pinch of oregano or thyme. These herbs add depth without overpowering the dish. If you like heat, add more cayenne pepper. For a smoky touch, increase the smoked paprika. These spices make the soup richer and more exciting. Serve your chorizo white bean soup with crusty bread or a fresh salad. A slice of sourdough bread soaks up the broth well. You can also top each bowl with a dollop of Greek yogurt or sour cream. This adds creaminess and balances the spice. Fresh parsley on top gives a nice color and taste. One mistake is not browning the chorizo enough. This adds a lot of flavor to your soup. Another error is skipping the sauté step for the veggies. This softens them and brings out their natural sweetness. Be careful with salt; taste first before adding more. Lastly, don’t skip the blending step if you want a creamier texture. You can blend just a part of the soup for a nice mix of creaminess and chunkiness. For the full recipe, check out the detailed guidelines. {{image_2}} You can create a tasty vegetarian version of this soup. Start by skipping the chorizo. Use smoked paprika to add a nice, smoky flavor. Try adding mushrooms for an earthy taste. You can also use plant-based sausage for a similar texture. This swap keeps the dish rich and hearty. Feel free to mix in other vegetables. Spinach or kale can boost the nutrition. Sweet potatoes add sweetness and creaminess. Bell peppers or zucchini can bring in extra color and crunch. Just chop them up and add them when cooking the onions. This will make your soup more colorful and flavorful. You can change the soup's flavor to match different cuisines. For a Mexican twist, add lime juice and cilantro. For an Italian flair, stir in some diced tomatoes and basil. If you want a spicy kick, try adding jalapeños or chipotle peppers. Each tweak will create a new taste adventure. To explore these ideas, check out the Full Recipe. After enjoying your chorizo white bean soup, let it cool first. Then, transfer it to airtight containers. Store the soup in the fridge for up to three days. Keep the soup covered to maintain its flavor and prevent any odors from seeping in. If you have a large batch, consider dividing it into smaller portions. This makes it easier to reheat later. If you want to keep your soup longer, freezing is a great option. Let the soup cool completely before freezing. Use freezer-safe containers or bags. Write the date on each container. The soup can last for up to three months in the freezer. When you’re ready to eat it, simply thaw it in the fridge overnight. To reheat, pour the soup into a pot. Heat it on medium until warm, stirring occasionally. If the soup seems thick, add a splash of broth or water. This helps restore its creamy texture. You can also use the microwave. Just heat it in short bursts, stirring in between. Enjoy the soup hot, just like when it was freshly made. For the full recipe, check out the details above! To add more heat, use extra cayenne pepper. You can also add diced jalapeños. If you like smoky flavors, try adding smoked chipotle peppers. Start with a small amount and taste as you go. This way, you control the spice level. Remember, you can always add more, but you can't take it away. Yes, you can swap chorizo for other sausages. Italian sausage, kielbasa, or turkey sausage all work well. Just cook them until they brown, just like the chorizo. Each type of sausage brings its unique flavor. So, feel free to experiment and find your favorite. To thicken the soup, you have a few options. First, you can blend some of the soup with an immersion blender. This makes it creamy without adding extra ingredients. Another way is to add a cornstarch slurry. Mix equal parts cornstarch and cold water, then stir it into the soup. Let it cook for a few minutes to thicken. If you like it thick, don’t add too much broth. Chorizo White Bean Soup is full of rich flavors and easy to make. We discussed key ingredients, preparation, and cooking steps. I shared tips for enhancing taste and avoiding common mistakes. You can adapt the recipe to fit your needs, whether with extra veggies or vegetarian options. Storing leftovers and reheating them well ensures you enjoy the soup later. Now, it’s your turn to create a warm, comforting bowl of soup. Enjoy every spoonful!

Chorizo White Bean Soup Flavorful and Easy Recipe

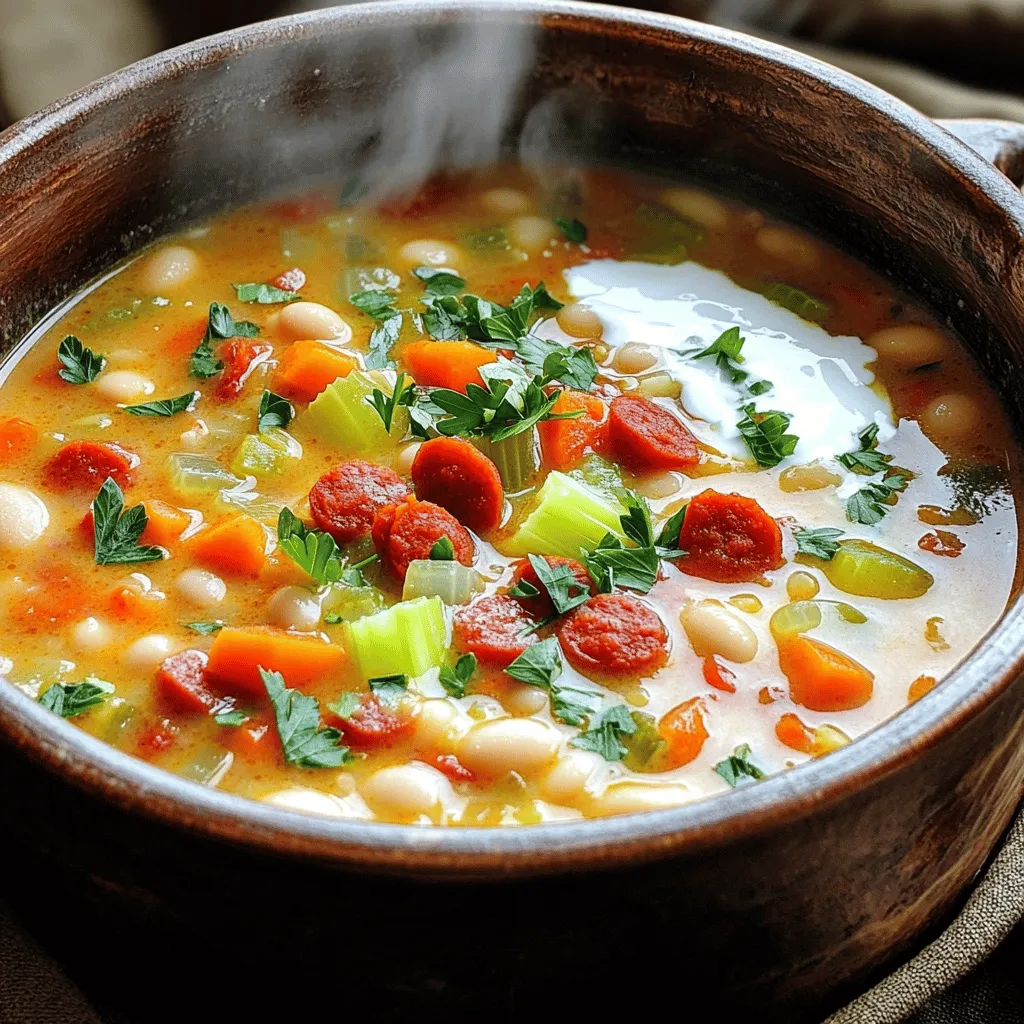
Are you ready to savor a delicious bowl of Chorizo White Bean Soup? This recipe is packed with flavor and

Older posts
Newer posts
← Previous Page1 … Page43 Page44 Page45 … Page73 Next →

dsad

© 2025 So Yum Recipes • Built with GeneratePress

Our Policies

  • Copyright Policy
  • Cookie Policy
  • GDPR Policy
  • Privacy Policy
  • Disclaimer
  • Terms Of Use

More Information

  • Home
  • About
  • Contact
  • Appetizers
  • Dessert
  • Dinner
  • Drinks
©2025, So Yum Recipes About Back To Top