Skip to content
DisclaimerTerms Of UseGDPR PolicyCookie Policy

So Yum Recipes

  • Home
  • Drinks
  • Appetizers
  • Dinner
  • Dessert
  • About
  • Contact
  • Privacy Policy
DisclaimerTerms Of UseGDPR PolicyCookie Policy

Chloe

To make a great mango salsa, you need fresh, quality ingredients. Here’s what you'll need: - 2 ripe mangoes, diced - 1 red bell pepper, finely chopped - 1/2 red onion, finely chopped - 1 jalapeño, deseeded and minced - 1/4 cup fresh cilantro, chopped - Juice of 1 lime - Salt to taste - 1 tablespoon olive oil (optional) Freshness is key for this salsa. Choose ripe mangoes that give slightly when pressed. The color should be vibrant, and the smell sweet. For the bell pepper and onion, look for firm and colorful options. You can customize the salsa by adding more ingredients. Want a fruit twist? Try adding diced pineapple or avocado. For more heat, consider using serrano peppers. Adjust these options to suit your taste. Check out the Full Recipe for more details on preparation! 1. Start with the mangoes. Dice them into small cubes. Make sure they are ripe, sweet, and juicy. This brings out the best flavors. 2. Next, finely chop the red bell pepper and the red onion. Add these to your mixing bowl with the mango. 3. For some heat, deseed the jalapeño. Mince it finely and mix it into the bowl. If you want less spice, use less jalapeño. 4. Chop the fresh cilantro and toss it in. This adds a fresh taste and bright color to your salsa. 5. Squeeze the juice of one lime over the mixture. This step boosts the flavors and keeps the salsa bright. 6. If you like, drizzle in some olive oil. This adds a richer texture and flavor. 7. Season the salsa with salt to taste. Gently toss everything together until well combined. 8. Let the salsa sit for about 15 minutes. This time lets the flavors meld beautifully. For best results, prepare the salsa about 15 minutes before serving. You can enjoy it fresh, but letting it sit enhances the taste. Serve it in a colorful bowl or on a platter. Add some whole cilantro leaves and lime wedges for a fun touch. Enjoy it with grilled chicken, fish, or tortilla chips. For the full recipe, check out the Tropical Mango Salsa section. To pick ripe mangoes, look for a firm fruit that gives slightly when pressed. The color should be bright yellow or red, depending on the type. Avoid green mangoes, as they are not sweet yet. If a mango feels hard, it is unripe. You can let it sit at room temperature for a few days to ripen. Once ripe, store mangoes in the fridge to keep them fresh longer. To boost the flavor of your mango salsa, try adding fresh herbs like mint or basil. Chopped green onions can also add a nice touch. If you like it spicy, try adding cayenne pepper or a dash of hot sauce. Adjust the spice level based on who will eat it. Start with a little, and you can always add more later. Remember, balance is key in flavors. For a full recipe, check out the Tropical Mango Salsa section. {{image_2}} You can play around with mango salsa to make it unique. Adding fruits like pineapple gives it a sweet twist. Just chop fresh pineapple and mix it in. You get a tropical taste that brightens any dish. Avocado is another fun addition. It adds creaminess and pairs well with mango. Just dice it and fold it in gently. You create a richer texture that is hard to resist. If you like heat, try spicy versions with different peppers. Serrano or habanero peppers can pack a punch. Just remember to adjust the amount based on your spice level. You can also roast the peppers for a smoky flavor. Mango salsa can reflect many cultures. Try incorporating regional ingredients or flavors. For example, add black beans for a Latin twist or coconut for a Caribbean vibe. These little changes can make a big difference. Fusion recipes using mango salsa can be exciting, too. Use it as a topping on tacos or grilled salmon. You can even mix it with quinoa for a healthy salad. The possibilities are endless. For a full recipe, check out the Tropical Mango Salsa section. Store your mango salsa in an airtight container. Glass containers work best, but plastic will do too. Make sure to seal it well to keep out air. This keeps the flavors fresh. You can keep it in the fridge for up to three days. After that, it may lose its crunch and taste. Mango salsa tastes best fresh. If you have leftovers, do not heat them. Just serve them cold. You can use leftover salsa in many ways. Try it on tacos or nachos for a quick snack. You can also mix it into salads for a fruity twist. It adds a bright flavor to grilled chicken or fish. You can even spoon it over rice or quinoa for a tasty meal. Enjoy your mango salsa in new ways! For the full recipe, check out the Tropical Mango Salsa section. Mango salsa pairs well with many dishes. Here are some tasty ideas: - Grilled chicken: The sweetness of the mango complements the smoky flavor. - Fish tacos: Add a scoop for color and zest. - Pork chops: The salsa brightens the dish with freshness. - Tortilla chips: A classic snack for dipping. - Salads: Use it as a dressing for a refreshing twist. Yes, you can make mango salsa ahead. Here are some tips: - Prep early: Make it a few hours before serving. This allows flavors to mix. - Store properly: Keep it in an airtight container in the fridge. - Avoid browning: Lime juice helps keep the mango bright and fresh. Homemade mango salsa stays fresh for about 3 to 5 days. Look for these signs of spoilage: - Smell: If it smells off, it’s time to toss it. - Color: If it turns brown or dull, it may not taste good. - Texture: If it gets slimy, do not eat it. For the full recipe, check out the Tropical Mango Salsa section. Enjoy your fresh and zesty creation! In this blog post, I covered everything you need to make delicious mango salsa. We talked about key ingredients, fresh options, and how to prepare each step. I shared tips for choosing mangoes and enhancing flavor. You also learned about variations and unique cultural twists. Finally, we discussed storage options and food pairings. Mango salsa is easy to make and perfect for any gathering. Keep experimenting with flavors to find your favorite mix!

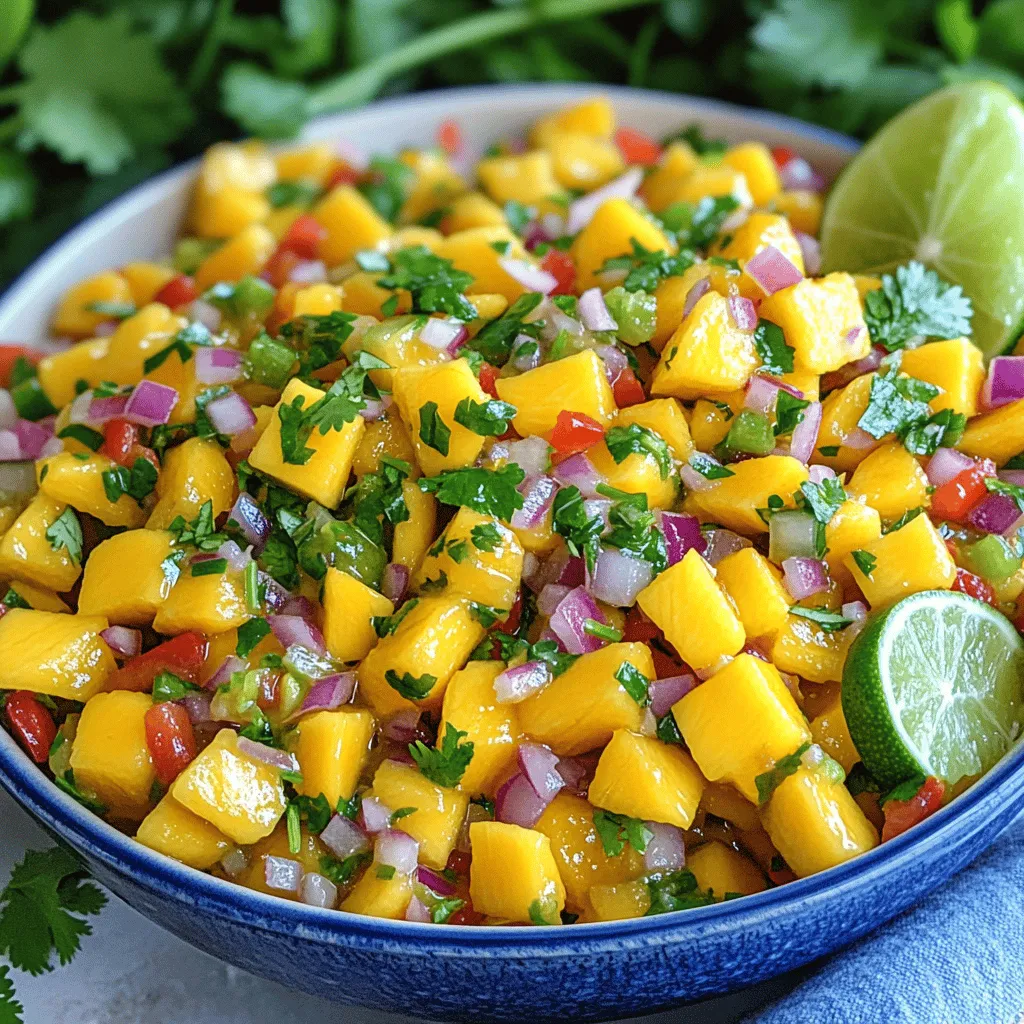
Mango Salsa Fresh and Flavorful Recipe Guide

Are you ready to spice up your meals with a burst of fresh flavor? In this guide, I’ll show you

To make Coconut Curry Butternut Squash Soup, you'll need a few simple ingredients: - 1 medium butternut squash, peeled and diced - 1 tablespoon coconut oil - 1 onion, chopped - 3 cloves garlic, minced - 1 inch ginger, grated - 2 tablespoons red curry paste - 1 can (14 oz) coconut milk - 3 cups vegetable broth - 1 tablespoon lime juice - Salt and pepper to taste - Fresh cilantro, for garnish - Toasted pumpkin seeds, for garnish You can switch out some ingredients if needed. For instance: - Butternut squash: You can use sweet potatoes or pumpkin. - Coconut oil: Olive oil or avocado oil works well too. - Red curry paste: Yellow or green curry paste will give a different flavor. - Coconut milk: Almond milk or cashew cream can be a lighter option. - Vegetable broth: You can use chicken broth for added flavor if you prefer. Choosing the best ingredients matters for taste. Here are some tips: - Butternut squash: Look for a firm squash with smooth skin. It should feel heavy for its size. - Onion: Choose onions that are dry and firm. Avoid any that feel soft. - Garlic: Pick garlic bulbs with tight, dry skins. They should not have any green sprouts. - Ginger: Fresh ginger should feel firm and have a smooth skin. Avoid any that are wrinkled. - Cilantro: Fresh cilantro should be bright green and free of wilting. These tips will help you create a rich and creamy soup bursting with flavor. For the full recipe, check out the details above. To make this coconut curry butternut squash soup, start by prepping your ingredients. First, peel and dice one medium butternut squash. Next, chop one onion, mince three cloves of garlic, and grate one inch of ginger. 1. In a large pot, heat one tablespoon of coconut oil over medium heat. 2. Add the chopped onion and sauté until it turns translucent, about five minutes. 3. Stir in the minced garlic and grated ginger. Cook for one more minute until you smell the great aroma. 4. Add two tablespoons of red curry paste to the pot. Mix it well and cook for two more minutes. This step helps release all the lovely flavors. 5. Now, add the diced butternut squash, one can of coconut milk, and three cups of vegetable broth. Stir everything to combine and bring the mixture to a gentle boil. 6. Once boiling, reduce the heat to low, cover, and let it simmer for 20 to 25 minutes. You want the squash to be tender. 7. Use an immersion blender to puree the soup until it is smooth. If you don’t have one, carefully transfer the soup in batches to a blender. 8. Finally, stir in one tablespoon of lime juice. Season with salt and pepper to taste. Serve the soup hot and garnish it with fresh cilantro and toasted pumpkin seeds for some crunch. This will make your dish look beautiful and add great texture! If you are new to cooking, here are some tips to help you. Always taste your food as you cook. This way, you can adjust the flavors. If you find the soup too thick, you can add more vegetable broth. Use fresh ingredients for the best flavor. If you are unsure about the spice level, start with less curry paste. You can always add more later. If you prefer using a slow cooker, you can easily make this soup. Start by sautéing the onion, garlic, and ginger in a pan. Then, add those to the slow cooker with the other ingredients. Cook on low for about 6 to 8 hours or on high for 3 to 4 hours. You will still get a rich and creamy soup. For the full recipe, refer to the section above. To get the best flavor from your Coconut Curry Butternut Squash Soup, start with fresh ingredients. Fresh butternut squash adds a natural sweetness. Use good quality coconut milk for creaminess. Make sure to sauté the onion, garlic, and ginger until fragrant. This step brings out their flavors. Stir the red curry paste well to coat the vegetables. This helps the spices bloom and enhances the soup's taste. One common mistake is cooking the squash too long. Overcooked squash may lose its shape and texture. Avoid adding too much liquid at once. This can make your soup too thin. Another mistake is not blending the soup enough. A smooth texture makes the soup rich and creamy. Lastly, don’t skip the lime juice. It adds brightness and balances the flavors. You can adjust the spice levels to suit your taste. If you like it mild, use less red curry paste. Start with one tablespoon and taste before adding more. Want it spicier? Add a pinch of cayenne pepper or chili flakes. Always keep tasting as you go. This way, you can find the perfect spice level for you. For a creamy touch without heat, try adding more coconut milk. This softens the spice while keeping it delicious. For the full recipe, check the [Full Recipe]. {{image_2}} This soup is already dairy-free and vegan thanks to coconut milk. If you want a thicker texture, use more coconut milk. You can also add a splash of almond milk for a different flavor. Coconut milk gives a rich taste, so feel free to use it as your base. You can boost the soup by adding protein. For a meaty option, cook diced chicken in the pot before adding other ingredients. For a plant-based choice, use tofu. Just cube firm tofu and add it with the squash. Both options will make the soup hearty and filling. To add more flavor, you can experiment with herbs and spices. Fresh basil or cilantro can brighten the dish. A pinch of cinnamon or nutmeg adds warmth. If you like heat, try adding red pepper flakes. Just sprinkle a little at a time to find your perfect spice level. For the complete recipe, check out the [Full Recipe]. Coconut curry butternut squash soup stays fresh in the fridge. Store it in an airtight container. Make sure to cool the soup before sealing. This helps keep it safe. It can last for about 3 to 5 days. Always check for any signs of spoilage before serving. If you notice any off smells or changes in texture, throw it out. You can freeze this soup for later enjoyment. First, let the soup cool completely. Then, pour it into freezer-safe containers or bags. Leave some space at the top, as it may expand when frozen. It should keep well for up to 3 months. To use it, thaw the soup overnight in the fridge. When you’re ready to enjoy your soup, reheat it gently. You can use a pot on the stove or the microwave. If using the stove, heat it over low to medium heat. Stir often to avoid sticking. If the soup seems too thick, add a little water or broth. Make sure it is heated evenly before serving. Enjoy this warm and comforting dish! For the full recipe, refer to the previous section. Yes, you can use other types of squash. Acorn squash or pumpkin works well. Each type brings a unique taste and texture. Make sure to peel and dice them like butternut squash. The cooking time may vary slightly, so check for tenderness with a fork. This soup pairs great with crusty bread or rice. You can also serve it with a fresh salad. For a heartier meal, try it with grilled chicken or shrimp. These options enhance the soup's flavors and add more nutrition. Coconut Curry Butternut Squash Soup lasts about 5 days in the fridge. Store it in an airtight container for best results. If you notice any off smells or changes in texture, toss it out. Reheat it slowly on the stove or microwave for a warm meal. For the full recipe, check out the details shared above. This blog covered important topics for making Coconut Curry Butternut Squash Soup. We looked at fresh ingredients, cooking methods, and tips to boost flavor. You learned about dairy-free variations and how to store the soup well. Remember to experiment with spices and protein to fit your taste. Using fresh ingredients and avoiding common mistakes will make your soup shine. Enjoy crafting this delicious dish!

Coconut Curry Butternut Squash Soup Rich and Creamy

Are you ready to warm your soul with a bowl of Coconut Curry Butternut Squash Soup? This rich and creamy

- 2 cups long-grain white rice - 4 cups vegetable broth - 1 zested lime - 1/4 cup freshly squeezed lime juice - 1 tablespoon olive oil To make Zesty Lime Rice, you need a few key ingredients. Start with long-grain white rice. This type cooks well and stays fluffy. Next, use vegetable broth instead of water. The broth adds rich flavor. You will also need a lime for zest and juice. Fresh lime gives the dish its zesty kick. Lastly, olive oil adds a nice touch when toasting the rice. - 1 teaspoon garlic powder - 1/2 teaspoon cumin - 1/2 teaspoon sea salt - 1/4 teaspoon black pepper Spices bring life to our rice. Garlic powder adds depth. Cumin gives a warm flavor. Use sea salt and black pepper for seasoning. These spices make each bite taste great. - 1/4 cup chopped fresh cilantro - Lime wedges Garnishes can make your dish pop. Fresh cilantro adds color and freshness. Lime wedges are perfect for serving. Guests can squeeze more lime on their rice. This simple touch enhances the zesty flavor. For the complete guide, check the Full Recipe for Zesty Lime Rice. To make Zesty Lime Rice, start with rinsing the rice. Place 2 cups of long-grain white rice in a fine mesh strainer. Rinse it under cold water until the water runs clear. This removes excess starch and helps the rice stay fluffy. Once done, let it drain well. Next, toast the rice in olive oil. Heat 1 tablespoon of olive oil in a large saucepan over medium heat. Add the drained rice to the pan. Stir the rice for about 3-4 minutes. You want it to turn slightly golden and smell fragrant. Now, it’s time to add the broth and seasonings. Pour in 4 cups of vegetable broth. Then, add 1 teaspoon of garlic powder, 1/2 teaspoon of cumin, 1/2 teaspoon of sea salt, and 1/4 teaspoon of black pepper. Stir everything well to combine the flavors. Bring the mixture to a boil. Once boiling, reduce the heat to low. Cover the pan with a lid and let it simmer. Cook for about 15-18 minutes. The rice will become tender, and the liquid will absorb. After simmering, remove the rice from the heat. Let it sit, covered, for an extra 5 minutes. This step helps the rice settle. Fluff the rice with a fork. Gently mix in the lime zest and juice from 1 zested lime and 1/4 cup of freshly squeezed lime juice. Taste the rice and adjust the seasoning if needed. Finally, transfer the rice to a serving dish. Sprinkle with 1/4 cup of chopped fresh cilantro for added color and flavor. Serve with lime wedges on the side. Enjoy this bright and zesty dish! For complete cooking details, refer to the Full Recipe. To make great zesty lime rice, start by rinsing the rice well. Rinse it under cold water until the water runs clear. This step helps remove excess starch and keeps the rice from being too sticky. After rinsing, drain the rice thoroughly. Next, focus on cooking time and water absorption. Use the right amount of liquid, which is typically a 2:1 ratio of broth to rice. Bring the broth to a boil and then reduce the heat. Cover and let it simmer until the rice is tender. This usually takes about 15 to 18 minutes. Letting it sit for 5 more minutes off the heat helps the rice absorb any remaining moisture. Fresh lime juice makes a big difference in flavor. I always choose fresh limes over bottled juice. The taste is brighter and more vibrant. When you add lime zest, it boosts the flavor even more. Adjust the seasoning levels to your taste. Start with the recipe’s amounts, but feel free to add more salt or spices. Each person has different preferences, so don’t hesitate to make it your own. For an eye-catching presentation, serve the rice with a sprinkle of fresh cilantro on top. This adds color and fresh flavor. You can also add lime wedges on the side for extra zest. Pair zesty lime rice with other sides for a complete meal. It goes well with grilled chicken, fish tacos, or spicy beans. Mixing it with these dishes makes for a delightful dining experience. {{image_2}} You can easily make Zesty Lime Rice even better! Adding vegetables brings in more taste and color. Try mixing in peas or diced bell peppers. These veggies cook quickly and add a nice crunch. You can also incorporate beans, like black beans or kidney beans. They add protein and make the dish heartier. Do you have an Instant Pot or a rice cooker? You can use them for Zesty Lime Rice! Adjust the liquid amount and cooking time for great results. If you prefer, use different types of broth. Chicken broth or mushroom broth can give it a new flavor twist. Want some spice? Add diced jalapeños to the rice while it cooks. They will give your dish a nice kick! For a fresh taste, mix in herbs like parsley or mint. These greens brighten the flavor and make the rice pop. To store your leftover Zesty Lime Rice, let it cool first. Place the rice in an airtight container. This helps keep it fresh. You can store it in the fridge for up to three days. After that, the flavors may fade. Always check for any odd smells before using. You can freeze Zesty Lime Rice for longer storage. First, let it cool completely. Then, portion the rice into freezer-safe bags or containers. Remove as much air as possible to prevent freezer burn. Label the containers with the date. This rice can last for about three months in the freezer. To reheat the rice, you have a few options. You can use the microwave or stovetop. For the microwave, place the rice in a bowl. Add a splash of water and cover it. Heat it in short bursts, stirring often, until warm. On the stovetop, add the rice to a pan with a little water. Heat it on low, stirring until warmed through. This will help keep the texture nice and fluffy. For the best flavor, consider adding a touch of fresh lime juice before serving. I recommend using long-grain white rice. This type cooks well and stays fluffy. Jasmine rice is also a great option. It has a nice aroma and flavor. Both types will soak up the lime zest and juice beautifully. Yes, you can easily make this dish vegan. Just use vegetable broth instead of chicken broth. It adds flavor and keeps it plant-based. All the other ingredients are already vegan-friendly. So, you can enjoy this zesty side without worry. To add heat, try mixing in diced jalapeños or crushed red pepper flakes. You can also use spicy vegetable broth. Another option is to add a dash of hot sauce. Start with a little, then taste and adjust to your liking. Zesty Lime Rice goes great with grilled chicken or fish. It also complements tacos and burritos perfectly. Consider serving it with black beans or spicy shrimp for a full meal. The bright flavor of the rice enhances many dishes. For the complete recipe, check out the [Full Recipe]. It includes all the steps and tips to make this tasty side dish. In this blog post, we covered how to make Zesty Lime Rice. You learned the essential ingredients, like long-grain rice, lime, and spices. I shared step-by-step instructions, tips for perfect texture, and ways to enhance flavor. We also discussed variations and smart storage tips. Zesty Lime Rice is tasty and easy to adapt. Try it with your favorite dishes, and enjoy the fresh, bright flavors!

Zesty Lime Rice Flavorful and Easy Side Dish

Looking for a simple, flavorful side dish? Zesty Lime Rice adds a punch to any meal! This easy recipe uses

- 1 ½ cups graham cracker crumbs - ½ cup unsalted butter, melted - 4 oz cream cheese, softened - 1 cup granulated sugar - 1 teaspoon vanilla extract - 3 large eggs - 2 cups cream cheese, softened - 1 tsp cinnamon - 2 cups chopped apples (such as Granny Smith) - 1 cup caramel sauce (store-bought or homemade) - Whipped cream for topping (optional) Each ingredient serves a key role in creating the perfect caramel apple cheesecake. - Graham cracker crumbs form the base. They add a crunchy texture and sweet flavor. - Unsalted butter helps hold the crust together. It also adds richness to the flavor. - Cream cheese is the star of the filling. It gives the cheesecake its creamy texture. - Granulated sugar sweetens the filling. It balances the tartness of the apples. - Vanilla extract enhances the flavor. It adds warmth and depth to the cheesecake. - Eggs provide structure. They help the cheesecake set and hold its shape. - Cinnamon adds warmth and spice. It complements the apples and makes the dish cozy. - Chopped apples provide freshness. They add flavor and a nice bite to the cheesecake. - Caramel sauce is the finishing touch. It adds sweetness and makes the cheesecake look beautiful. - Whipped cream (optional) gives a light and fluffy topping. It adds a nice finish. To make this dessert, you will need a few key tools: - 9-inch springform pan: This allows easy removal of the cheesecake. - Mixing bowls: You need a few for mixing crust and filling. - Electric mixer: It helps to beat the cream cheese and mix the batter smoothly. - Spatula: This is great for spreading the cheesecake batter evenly. - Measuring cups and spoons: Precision is key for great results. - Oven: You need to bake the cheesecake to achieve the right texture. - Refrigerator: This cools the cheesecake, making it firm and ready to serve. With these ingredients and tools, you're all set to make a caramel apple cheesecake that delights the taste buds! For the full recipe, check out the instructions above. To start, I preheat my oven to 325°F (160°C). I take a 9-inch springform pan and grease it with non-stick spray. In a mixing bowl, I combine 1 ½ cups of graham cracker crumbs with ½ cup of melted unsalted butter. I mix this until it looks crumbly. Then, I press the mixture firmly into the bottom of my pan. This forms the base of the cheesecake. Next, I grab a large mixing bowl and beat 2 cups of softened cream cheese until it is smooth. I slowly add 1 cup of granulated sugar, mixing until the mixture is light and fluffy. I also add 1 teaspoon of vanilla extract for flavor. Then, I add 3 large eggs, one at a time. I mix on low speed after each egg. Overmixing can hurt the texture. After that, I gently fold in 1 teaspoon of cinnamon and 2 cups of chopped apples. This gives the batter a delicious taste. Once the batter is ready, I pour it over the crust, smoothing the top with a spatula. I bake it in the preheated oven for 55 to 60 minutes. I look for the center to be set but slightly jiggly. After baking, I turn off the oven and crack the door open. This helps the cheesecake cool slowly, which prevents cracks. I let it cool in the oven for 1 hour. After that, I move it to the fridge to chill for at least 4 hours or overnight. When ready to serve, I drizzle caramel sauce on top and add whipped cream if I like. For the full recipe, check the details above! To keep your cheesecake smooth, follow a few key steps. First, mix the batter on low speed. This helps avoid too much air in the mix. Next, do not overbake. The center should be slightly jiggly when you take it out. After baking, turn off the oven and crack the door. Let it cool in the oven for one hour. This step helps the cheesecake cool slowly, reducing cracks. The best apples for a caramel apple cheesecake are Granny Smith and Honeycrisp. Granny Smith apples give a tart flavor that balances the sweet cheesecake. They also hold their shape well when baked. Honeycrisp apples are sweet and juicy, adding a nice texture. You can mix both types for extra flavor and crunch. Chop them into small pieces for even distribution in your cheesecake. To make your cheesecake look even more delicious, try these serving ideas. Drizzle extra caramel sauce over the top before serving. This adds a nice shine and a sweet touch. You can also sprinkle some cinnamon for a warm spice note. For a fun twist, add chopped nuts or chocolate shavings on top. Serve with a dollop of whipped cream or a scoop of ice cream. These simple touches make your cheesecake not only tasty but also eye-catching. For the complete recipe, check out the Full Recipe. {{image_2}} You can add nuts to your Caramel Apple Cheesecake for extra crunch. Walnuts or pecans work great. Chop them coarsely and mix them into the cheesecake batter. You can also sprinkle them on top before serving. This adds texture and a nutty flavor that pairs well with caramel and apples. Switching up the caramel can change the taste of your cheesecake. You might try sea salt caramel for a sweet and salty mix. A dark caramel sauce can add depth and richness. If you like a hint of spice, try spiced caramel. Each type brings a new twist to this classic dessert. You don't have to stick to a graham cracker crust. You can use crushed cookies like Oreos or gingersnaps for a unique base. Just mix the crumbs with melted butter and press them into your pan. This change adds flavor and gives a fun twist to the traditional cheesecake. For the full recipe, check out my complete guide on making this delightful dessert. To keep leftover cheesecake fresh, cover it well. Use plastic wrap or foil. You can also place it in an airtight container. Store it in the fridge. This helps keep it creamy and tasty. It will stay good for about 3 to 5 days. If you want to save the cheesecake for later, freezing works great. First, let it cool completely. Cut it into slices. Wrap each slice in plastic wrap. Then, place the wrapped slices in a freezer bag. Label the bag with the date. Your cheesecake can last in the freezer for up to 3 months. To enjoy a frozen slice, move it to the fridge to thaw overnight. If you’re in a hurry, you can set it on the counter for a few hours. Once thawed, avoid reheating in the microwave. It can change the texture. Instead, enjoy it cold, topped with more caramel sauce or whipped cream. For the full recipe, you can follow the steps I shared earlier. Yes, you can make this cheesecake ahead of time. I often prepare it a day before serving. This allows the flavors to meld nicely. Just ensure you store it in the fridge. Cover it well to keep it fresh. If your cheesecake is too watery, check your baking time. It should be set but slightly jiggly in the center. You can also try using room-temperature ingredients next time. This helps with a smoother batter and better mixing. Caramel Apple Cheesecake lasts about 5 to 7 days in the fridge. Store it in an airtight container. If you notice any changes in texture or smell, it's best to toss it. Always trust your senses when checking for freshness. Yes, you can freeze it. Wrap the cheesecake tightly in plastic wrap. Then, place it in a freezer-safe container. It can last up to 3 months frozen. Thaw it in the fridge before serving for the best taste. Absolutely! While Granny Smith apples work great, you can try Honeycrisp or Fuji apples. Each type will give a unique flavor and texture. Taste a slice to see which apple you prefer for your cheesecake. The cheesecake is done when it is set around the edges but slightly jiggly in the center. A toothpick inserted should come out clean. It will continue to set as it cools. If you want a different flavor, try chocolate sauce or fruit preserves. You can even skip the sauce and top it with fresh whipped cream. The choice is yours! Add spices like cinnamon or nutmeg to the graham cracker crust. You can also mix in finely chopped nuts for extra crunch. This enhances the overall flavor and texture of your cheesecake. Yes, you can use a regular round cake pan or a square pan. Just be sure to adjust the baking time. A springform pan makes it easier to remove the cheesecake. If you use a different pan, greasing the bottom well is key. You can use low-fat cream cheese or Greek yogurt to cut calories. You may also use less sugar or a sugar substitute. Experiment with the recipe to find your perfect balance! For the full recipe, check the earlier section. Enjoy your baking adventure! In this blog post, we explored how to make a delicious Caramel Apple Cheesecake. We covered important ingredients and why they matter. You learned essential cooking tools and step-by-step instructions for the perfect bake. We shared tips to avoid cracks and offered serving ideas. You also discovered variations, storage tips, and answers to common questions. With these insights, you can create a stunning dessert. Enjoy sharing your cheesecake with friends and family!

Caramel Apple Cheesecake Delightful Creamy Dessert

Craving a dessert that combines creamy cheesecake and sweet caramel apples? You’re in the right place! This Caramel Apple Cheesecake

- 4 boneless, skinless chicken breasts - 1 cup balsamic vinegar - 1/2 cup honey - 2 tablespoons olive oil - 2 cloves garlic, minced - 1 teaspoon dried thyme - 1 teaspoon dried rosemary - Salt and pepper to taste - Fresh basil leaves for garnish For this recipe, I keep it simple and fresh. You will need four boneless, skinless chicken breasts. These cook quickly and stay juicy. The marinade includes a cup of balsamic vinegar and half a cup of honey. This mix gives a rich, sweet flavor. Next, you will add two tablespoons of olive oil. This oil keeps the chicken from sticking. Minced garlic really boosts the taste. Use two cloves for a fragrant touch. Dried thyme and rosemary give more depth to the flavor. A teaspoon of each is just right. Finally, season with salt and pepper to your liking. Fresh basil leaves add color and taste. You can use them to garnish your dish before serving. For the full recipe, check out the details above. To start, you need to make the glaze. First, combine the following ingredients in a medium saucepan: - 1 cup balsamic vinegar - 1/2 cup honey - 2 cloves garlic, minced - 1 teaspoon dried thyme - 1 teaspoon dried rosemary - Salt and pepper to taste Place the saucepan over medium heat. Bring the mixture to a gentle boil. After boiling, lower the heat. Let it simmer for about 15 to 20 minutes. Stir it occasionally. The glaze will thicken and coat the back of a spoon. When ready, remove it from the heat and set it aside. This glaze adds a rich flavor to your chicken. Next, you will prepare the chicken. Preheat your grill or grill pan to medium-high heat. Brush 4 boneless, skinless chicken breasts with 2 tablespoons of olive oil. Season both sides with salt and pepper. Once the grill is hot, place the chicken on it. Grill for 5 to 7 minutes on each side. You want the chicken to be golden brown and reach an internal temperature of 165°F (75°C). In the last few minutes of cooking, brush the balsamic glaze over the chicken. This step allows the glaze to caramelize slightly, adding a nice finish. When the chicken is done, take it off the grill. Let it rest for 5 minutes. Resting is important for juicy chicken. After resting, drizzle any remaining glaze over the chicken. This adds extra flavor. For a colorful touch, garnish with fresh basil leaves. You can now enjoy a delicious meal that tastes gourmet, yet is simple to make. If you want to see the full process, check the Full Recipe for more details. How to achieve the right thickness To get the perfect glaze, simmer it for about 15-20 minutes. This time helps the mix thicken. Stir it often to avoid sticking. You want the glaze to coat the back of a spoon. If it is too thin, cook a bit longer. If it is too thick, add a splash of water. Avoiding burning the glaze Keep an eye on the glaze while it cooks. The sugar from honey can burn easily. Use medium heat and stir frequently. If it starts to darken too much, lower the heat. Best temperature for juicy chicken For juicy chicken, grill at medium-high heat. This usually means about 375°F to 400°F. At this heat, the chicken cooks evenly and stays moist. Use a meat thermometer to check for 165°F inside. Recommended tools for grilling A good grill or grill pan is key. Use tongs to flip the chicken without piercing it. A meat thermometer will help you avoid undercooking or overcooking. Ideal side dishes for balsamic glazed chicken Balsamic glazed chicken pairs well with many sides. Try roasted vegetables, like carrots or zucchini. You can also add quinoa or a fresh salad. These sides balance the sweet and tangy flavors of the chicken. Pairing with wines or beverages For drinks, a light white wine works great. Try a Sauvignon Blanc or Pinot Grigio. If you prefer something non-alcoholic, iced tea or sparkling water is refreshing. These drinks enhance the meal without overpowering it. You can find the full recipe to guide you through each step and ensure a delightful dish. {{image_2}} You can easily change the flavor of balsamic glazed chicken. Try adding spices like red pepper flakes for some heat. This adds a nice kick without being too spicy. You can also mix in fresh fruit. Strawberries or figs work great. These fruits add sweetness and a unique twist to the dish. Pairing savory chicken with fruity notes enriches your meal. You can cook balsamic glazed chicken in different ways. Grilling gives a smoky flavor and nice char. Baking is an easy option too. Just set your oven to 375°F (190°C) and bake for about 25-30 minutes. You can also use a slow cooker for a hands-off approach. Just add the chicken and glaze, and let it cook for 4-6 hours on low. This method makes the chicken super tender and full of flavor. If you need gluten-free options, use tamari instead of soy sauce in the glaze. This keeps the flavor while meeting dietary needs. For those cutting sugar, substitute honey with a low-sugar sweetener. This keeps the glaze sweet but healthier. You can adjust recipes to fit your needs and still enjoy this tasty dish. Making these changes allows everyone to enjoy a delicious meal. For the full recipe, check out Balsamic Glazed Chicken Delight. To store leftover balsamic glazed chicken, place it in an airtight container. Make sure to let it cool first. This helps keep the chicken juicy and flavorful. You can also store the glaze in a separate jar. It stays fresh longer that way. Use the glaze within a week for the best taste. Freezing cooked balsamic glazed chicken is easy! First, let the chicken cool completely. Then, wrap it tightly in plastic wrap, followed by aluminum foil. This keeps out air and prevents freezer burn. You can store it in the freezer for up to three months. To defrost, place the chicken in the fridge overnight. If you're in a hurry, you can use the microwave. Just be careful not to overcook it. For the best flavor, try to reheat it gently on the stove or in the oven. Balsamic glazed chicken lasts about three to four days in the fridge. After that, it may start to spoil. Look for signs like a sour smell or changes in color. If the chicken feels slimy, it’s best to throw it away. Always trust your senses; they are your best guide! Yes, you can use white vinegar. However, the taste will change. Balsamic vinegar adds a rich, sweet flavor. White vinegar is sharper and less sweet. If you want a similar taste, try adding a bit of sugar to the white vinegar. This can help mimic balsamic's sweetness. To check if the chicken is done, use a meat thermometer. The inside should reach 165°F (75°C). You can also cut into the chicken. The juices should run clear, not pink. If you see any pink, cook it a bit longer. Make sure to check the thickest part of the chicken. Yes, you can make the glaze ahead. Just store it in the fridge. It can last for about a week. When you are ready to use it, warm it up on the stove. This will help it become smooth again. For the best taste, use it fresh when possible. You can find the full recipe above. This article covered making balsamic glazed chicken from start to finish. We explored how to prepare the chicken and marinade, cook it to perfection, and enhance it with serving tips. Remember, a great glaze boosts flavor, while proper cooking ensures juicy meat. Feel free to try variations like spices or fruits to suit your taste. Store leftovers properly for future meals. Enjoy experimenting with this simple, flavorful dish!

Balsamic Glazed Chicken Tasty and Simple Recipe

Looking for a tasty dinner that’s easy to make? You’ll love my Balsamic Glazed Chicken recipe! With just a few

To make a delicious Fruit and Yogurt Parfait, gather the following items: - 2 cups plain Greek yogurt - 1 tablespoon honey (or to taste) - 1 teaspoon vanilla extract - 1 cup granola (your choice) - 1 ripe banana, sliced - 1 cup strawberries, hulled and sliced - 1 cup blueberries - 1 cup kiwi, peeled and diced - 1 cup mango, diced - Fresh mint leaves for garnish These ingredients create a balance of creamy yogurt, sweet fruit, and crunchy granola. Greek yogurt gives a thick texture and loads of protein. Honey adds just the right amount of sweetness. You can change the fruit based on what you like or what is in season. I love using a mix of colors for a pretty look. You can find the Full Recipe if you need more detailed steps. This parfait is perfect for breakfast or a snack. Enjoy the burst of flavors with every spoonful! Start by taking a medium bowl. Add 2 cups of plain Greek yogurt. Then, mix in 1 tablespoon of honey and 1 teaspoon of vanilla extract. Stir well until smooth. If you want it sweeter, add more honey. Taste and adjust as needed. Select your favorite glasses or bowls for serving. I like using clear ones to show off the layers. Begin by adding about 1/4 cup of the yogurt mix at the bottom of each glass. It’s the perfect base for your parfait. Now it’s time to layer! Sprinkle about 2 tablespoons of granola over the yogurt. Next, add your fruits. I recommend starting with banana slices, then strawberries, blueberries, kiwi, and mango. You can mix and match based on what you like! Keep building layers. Repeat the yogurt, granola, and fruits until the glasses are full. Finish with a colorful layer of fruit on top. Garnish with fresh mint leaves for a nice touch. These steps make your parfait look beautiful and tasty! For the full recipe, check out the Fruity Rainbow Yogurt Parfait. Enjoy your delicious creation! When making a parfait, yogurt choice matters. Greek yogurt is thick and creamy. It has more protein than regular yogurt. This helps keep you full longer. If you want a lighter option, use regular yogurt. It has a smoother texture and is also tasty. For those who prefer non-dairy, there are many options. Almond, coconut, and soy yogurts are popular. They have unique flavors and textures. Just check for added sugars. You want a healthy snack, after all! Choosing granola can be fun! Look for one with whole grains and nuts. A good granola adds crunch and flavor. Some brands add lots of sugar, so read the label. You want to keep your parfait healthy. You can also make your granola at home. It’s easy! Mix oats, nuts, and a little honey. Bake until golden and crispy. Homemade granola tastes fresh and allows you to control the ingredients. How you layer your parfait makes a big difference. Use a clear glass to show off the colors. Start with yogurt, then granola, followed by fruit. Repeat the layers until you fill the glass. It looks pretty and invites you to dig in. For garnishing, fresh herbs add a nice touch. Mint leaves are a great option. They make your parfait pop with color and flavor. You can also sprinkle some nuts on top. This adds texture and makes your parfait even more delicious. For the full recipe, check out the Fruity Rainbow Yogurt Parfait section. {{image_2}} You can use different fruits based on the season. In spring and summer, berries shine. Ripe strawberries, blueberries, and raspberries are sweet and juicy. Fall brings apples and pears, which add crunch. In winter, citrus fruits like oranges and grapefruits bring brightness. When fruits are in season, they taste better and cost less. You can mix and match based on what you find at your store or market. You don’t have to stick to plain yogurt. Flavored yogurts add a twist, like vanilla or berry. You can also make your yogurt unique by adding spices. A pinch of cinnamon can warm up the flavor. For a tropical vibe, try adding a drop of coconut extract. These small changes can make a big difference in taste and keep things exciting. If you want a vegan parfait, use plant-based yogurt. Almond, coconut, or soy yogurt works great. You can also sweeten with maple syrup or agave instead of honey. For granola, check the label to avoid honey. Many brands offer vegan options. You can make a tasty parfait that fits your diet while still enjoying the same fun layers. For the full recipe, check out the Fruity Rainbow Yogurt Parfait section. To keep your fruit and yogurt parfait fresh, use airtight containers. Glass jars work well, as they help preserve flavor and freshness. Avoid using metal containers, as they can affect taste. If you have granola leftover, store it in a separate container. This keeps it crunchy. A prepared yogurt parfait lasts about 1 to 2 days in the fridge. The fruit may lose some texture but will still taste good. To extend its life, store the yogurt and fruit layers separately until ready to eat. Adding lemon juice to some fruits can help keep them fresh longer. You can make the parfait ahead of time, but it’s best to eat it fresh. If you refrigerate it, the granola will soften slightly. When serving after refrigeration, check the texture. You can always add more granola on top for crunch. Enjoy your parfait cold for a refreshing snack! A Fruit and Yogurt Parfait lasts about 1 to 2 days in the fridge. The yogurt stays fresh, but the granola may get soft. To keep it crunchy, store granola separately. You can layer it right before serving for the best texture. If you don't have Greek yogurt, you can use regular yogurt. You might also try dairy-free yogurt made from almond or coconut. Each option brings a different taste and texture. Choose one that fits your diet and flavor preference. Yes, you can make a Fruit and Yogurt Parfait the night before. Just layer the yogurt and fruits in a glass. Keep the granola separate until you are ready to eat. This way, it stays crunchy and fresh. In this post, we explored how to craft a delicious fruit and yogurt parfait using simple ingredients. From choosing the right yogurt and granola to layering your parfait for stunning presentation, I hope you feel ready to try it. Remember to customize with seasonal fruits and your flavor favorites. Enjoy the fresh taste and create a beautiful dish that’s both fun and healthy. Your parfait journey starts now—get creative!

Fruit and Yogurt Parfait Delightful Healthy Snack

Are you looking for a tasty and healthy snack? The Fruit and Yogurt Parfait fits the bill! This delightful treat

To make savory breakfast burritos, you will need a few key ingredients. Here’s what you need: - 4 large flour tortillas - 6 large eggs - 1 cup black beans, drained and rinsed - 1 cup diced bell peppers (mix of red and green) - 1 small onion, diced - 1 cup shredded sharp cheddar cheese - 1 avocado, sliced - 1 tablespoon olive oil - 1 teaspoon ground cumin - 1 teaspoon paprika - Salt and pepper to taste - Fresh cilantro, chopped (for garnish) - Salsa (optional, for serving) These ingredients create the perfect balance of flavors and textures. If you have dietary restrictions, there are great substitutions. For a gluten-free option, use corn tortillas. If you are vegan, swap the eggs for scrambled tofu and use plant-based cheese. You can also add more veggies, like spinach or mushrooms, to boost nutrition. Feel free to mix and match. Cooking is all about personal taste. Use what you have at home, and make it your own! For the full recipe, check the details above. 1. Detailed Cooking Instructions Start by heating the olive oil in a large skillet over medium heat. Add the diced onion and bell peppers. Cook them for about 5 minutes until soft. In a medium bowl, whisk the eggs with ground cumin, paprika, salt, and pepper. Once the veggies are ready, push them to one side of the skillet. Pour the eggs into the other side. Let them cook for one minute. Stir gently until they scramble and mix with the veggies. Add the black beans, stirring until everything is hot, which takes about 2 minutes. Take the skillet off the heat and stir in half of the cheddar cheese. It will melt a bit in the warm mix. 2. Tips for Efficient Assembly When you assemble the burritos, lay a tortilla flat on your surface. Place about a quarter of the egg mixture in the center. Top it with slices of avocado and a sprinkle of the remaining cheese. Fold the sides of the tortilla inwards. Then roll from the bottom to the top to form a burrito. Repeat this with the other tortillas. If you want a crispy skin, place the burritos seam-side down on a heated skillet. Cook them for 2-3 minutes on each side. 3. Recommended Cooking Tools You will need a large skillet for cooking, a medium bowl for whisking, and a spatula for stirring. A cutting board and knife will help you dice the onions and peppers. Use measuring cups and spoons for accuracy. A flat surface is key for assembling the burritos. This method makes savory breakfast burritos easy and fun to enjoy! For the full recipe, check out the details above. When making breakfast burritos, a few simple tricks can help you shine in the kitchen. Start by seasoning your eggs well. I like to use ground cumin and paprika. These spices give the eggs a warm flavor that pairs great with the beans and veggies. You can also add a pinch of salt and pepper to enhance all the flavors. If you want a kick, try adding a dash of hot sauce. To keep tortillas from getting soggy, warm them first. You can heat them in a dry skillet for about 30 seconds on each side. This step adds a nice texture. Another tip is to avoid overfilling your burritos. Keep the filling to about a quarter of the tortilla. This way, you can roll them tightly without leaks. If you want a crispy finish, you can grill them seam-side down in a hot skillet for a few minutes. This gives a nice crunch to the outside. For the full recipe, check out the details above! {{image_2}} Adding different vegetables makes your savory breakfast burritos colorful and tasty. You can try spinach, zucchini, or mushrooms. Each veggie brings a unique flavor and texture. Mixing them up keeps breakfast fun and fresh. For cheese alternatives, consider using goat cheese or feta. These options give a tangy twist to your burrito. If you want to skip dairy, try nutritional yeast. It adds a cheesy flavor without the milk. Using plant-based proteins is also a smart choice. Black beans are a great start, but you can add chickpeas or lentils too. They fill you up and boost nutrition. These swaps make your burritos healthy and satisfying. Incorporating breakfast sausage or bacon brings bold flavors to your burrito. Cook them until crispy, then mix them with the veggies and eggs. The smoky taste of bacon pairs well with the creamy avocado. Using different meats can change your flavor profile. You could use chorizo for a spicy kick or shredded chicken for a lighter option. Each meat adds a unique taste, so feel free to experiment! Check out the Full Recipe for all the details on making these delicious burritos. To keep your savory breakfast burritos fresh, follow these simple steps. First, let the burritos cool down to room temperature. Then, wrap each burrito tightly in plastic wrap or foil. Place them in an airtight container or a resealable plastic bag. Store them in the fridge if you plan to eat them within three days. For longer storage, freeze the burritos. To freeze, use the same wrapping method, but make sure to label the bag with the date. They can last for up to three months in the freezer. When you are ready to enjoy your leftover burritos, reheating them properly is key. For the microwave, unwrap the burrito and place it on a microwave-safe plate. Cover it with a damp paper towel to keep it moist. Heat for about 1-2 minutes or until hot. If you prefer a crispy tortilla, use a skillet. Heat the skillet over medium heat and place the burrito seam-side down. Cook for about 2-3 minutes per side. This method helps keep the flavor and texture intact. How to make breakfast burritos ahead of time? You can prepare the filling in advance. Cook the eggs, beans, and veggies as usual. Let them cool, then store in an airtight container. You can wrap the tortillas with filling and freeze them. Just reheat in a microwave or skillet when ready to eat. What are the best sauces to serve with breakfast burritos? Salsa is a classic choice. You can also try hot sauce for some spice. A creamy avocado sauce or sour cream adds a nice touch. Experiment with different sauces to find your favorite. Can I use whole wheat tortillas for a healthier version? Yes, whole wheat tortillas are a great option. They add fiber and nutrients. Just make sure they are large enough to hold all the tasty filling. What other ingredients can I add to my burritos? Feel free to mix in ingredients like spinach, mushrooms, or zucchini. You can also add cooked bacon, sausage, or tofu for protein. Chopped herbs like cilantro or green onions can brighten the taste too. The choice is yours! For a complete guide on making these delicious burritos, check the Full Recipe. In this blog post, I shared how to make delicious breakfast burritos. We covered ingredients, like healthy swaps for various diets. I provided step-by-step cooking instructions and tips for assembling your burrito. You learned ways to enhance flavor without soggy tortillas and explored variations for vegetarian and meat-lover options. Lastly, I detailed smart storage and reheating tips. Now, you have the tools to create your own perfect breakfast burritos. Enjoy experimenting with flavors and ingredients!

Savory Breakfast Burritos Flavorful and Easy Recipe

Start your day right with my savory breakfast burritos! This easy recipe packs bold flavors and can be customized for

To make my Lemon Herb Couscous, you need a short list of items. Here’s what you will need: - 1 cup couscous - 1 1/4 cups vegetable broth - 1 tablespoon olive oil - Zest of 1 lemon - Juice of 1 lemon - 1/4 cup chopped fresh basil - 1/4 cup chopped fresh parsley - 1/4 cup cooked chickpeas (optional for protein) - Salt and pepper to taste - 1/4 teaspoon red pepper flakes (optional) These ingredients come together to create a fresh and vibrant dish. Fresh herbs make this dish pop. I love using basil and parsley. They bring bright flavors and beautiful colors. You can mix them in just before serving. This keeps their taste fresh. The lemon zest and juice add a tangy kick. If you want a bit of heat, add red pepper flakes. They add warmth without overpowering the other flavors. Feel free to switch things up! You can use different herbs like mint or cilantro. If you enjoy nuts, try adding toasted pine nuts or slivered almonds. For a heartier dish, add more chickpeas or even diced bell peppers. You can also swap vegetable broth for chicken broth for added flavor. Each change can create a new twist on this dish, making it your own. For the complete recipe, check out the Full Recipe link. To start, you need to cook the couscous. In a saucepan, bring 1 1/4 cups of vegetable broth to a boil. This broth adds lots of flavor. When the broth boils, remove the pot from the heat. Stir in 1 cup of couscous, then cover the pot. Let it sit for 5 minutes. This allows the couscous to soak up the broth. After 5 minutes, fluff the couscous with a fork. This makes it light and airy. Next, we will mix in the fun flavors. Take a large mixing bowl. In it, combine 1 tablespoon of olive oil, the zest of 1 lemon, and the juice of 1 lemon. If you want more protein, add 1/4 cup of cooked chickpeas. Once you have this blend, add the fluffed couscous to the bowl. Gently stir in 1/4 cup each of chopped fresh basil and parsley. These herbs give a fresh taste. Season your mix with salt and pepper. If you like a little heat, add 1/4 teaspoon of red pepper flakes. Taste your couscous and adjust the seasoning if needed. You can add more lemon juice if you want it tangy. Now it's time to serve your lemon herb couscous. You can serve it warm or at room temperature. For presentation, place the couscous in a large bowl or on individual plates. Garnish with a sprinkle of fresh herbs. Adding a lemon wedge on the side makes it look bright and inviting. This dish pairs well with grilled meats or veggies. It’s a versatile side that fits many meals. For the full recipe, check back to ensure you’ve got all the steps right! To get light and fluffy couscous, follow these steps. First, make sure to use the right liquid. I like vegetable broth for added flavor. Once you boil the broth, remove it from heat and stir in the couscous. Let it sit covered for five minutes. Then, take a fork and gently fluff it. This method helps separate the grains and keeps it airy. You can easily boost the taste of your couscous. Fresh herbs like basil and parsley add bright flavors. I also enjoy adding a pinch of red pepper flakes for a hint of heat. If you want extra protein, toss in cooked chickpeas. For a tangy twist, add more lemon juice. These small changes make a big difference. Watch out for a few common pitfalls. First, don’t skip letting the couscous sit. This step is key for absorption. Second, be careful not to overmix after fluffing. Overmixing can make your couscous sticky. Lastly, taste as you go. Adjusting seasoning as you mix helps ensure your dish is just right. By avoiding these mistakes, you can create a perfect lemon herb couscous every time. For the complete recipe, check out the full recipe. {{image_2}} You can boost the protein in your lemon herb couscous by adding chickpeas. Chickpeas are easy to use and pack a protein punch. Just mix in 1/4 cup of cooked chickpeas when you combine the couscous with the herbs and lemon. You can also try other proteins like diced chicken or shrimp for a heartier dish. This makes it a filling meal or a side dish. This recipe is already vegetarian and can easily be made vegan. Use plant-based broth for a vegan-friendly base. If you want to add creaminess, try mixing in some avocado or a dollop of dairy-free yogurt. You can also add nuts, like toasted almonds or pine nuts, to give it a nice crunch. These additions keep the dish fresh and vibrant while being friendly to all diets. To change up the flavors, think about adding different spices. You can sprinkle in some cumin or coriander for warmth. If you like a kick, add more red pepper flakes or even a splash of hot sauce. Fresh herbs can also be switched out. Instead of basil and parsley, try cilantro or dill. Each of these options will give your couscous a new twist and keep things exciting. You can find the full recipe [here](#). To keep your Lemon Herb Couscous fresh, store it in an airtight container. This helps prevent moisture loss and keeps flavors intact. Allow the couscous to cool completely before sealing. Place it in the fridge if you plan to eat it within three days. For longer storage, consider freezing it. When reheating couscous, add a splash of water or broth. This keeps it moist and fluffy. Heat it in a microwave-safe dish covered with a damp paper towel. Alternatively, reheat it on the stove over low heat, stirring frequently. This method helps avoid drying out the couscous. To freeze couscous, let it cool, then portion it into freezer bags. Remove as much air as possible to prevent freezer burn. It can last for up to three months. When you’re ready to enjoy it, thaw overnight in the fridge or use the microwave. This makes meal prep easy and saves time. Check out the Full Recipe for more tips! Yes, you can make Lemon Herb Couscous ahead of time. It stays fresh for a few days in the fridge. Just store it in an airtight container. When you're ready to eat it, simply fluff it up with a fork. You can serve it cold or warm. This makes it great for meal prep or large gatherings. To adjust the lemon flavor, you can add more lemon juice. Start with a small amount, then taste. If you want it more tart, add more juice little by little. You can also increase the lemon zest for a stronger lemon aroma. This way, you control the zest and tang. Lemon Herb Couscous pairs well with many dishes. Try it with grilled chicken or fish for a light meal. It complements roasted vegetables beautifully too. You can also serve it with a fresh salad. This dish adds a nice touch to any meal. Check out the Full Recipe for more ideas! The blog post covered how to make delicious Lemon Herb Couscous. We discussed key ingredients, fresh herbs, and flavor variations. I detailed the step-by-step instructions for preparation and mixing. You learned tips for fluffing couscous and avoiding common mistakes. We explored several variations, including adding proteins and vegan options. Lastly, I shared best practices for storage and reheating. In closing, this recipe is simple and versatile. Enjoy experimenting with flavors and serving it to others. Happy cooking!

Lemon Herb Couscous Fresh and Flavorful Side Dish

Lemon Herb Couscous is a bright and tasty side dish you need to try! I love how simple it is

- 2 cans (14 oz each) of diced tomatoes - 1 medium onion, chopped - 2 cloves garlic, minced - 2 cups vegetable broth - 1 cup heavy cream (or coconut cream for a non-dairy option) For creamy tomato soup, start with diced tomatoes. They give the soup a rich base. Next, add a chopped onion and minced garlic. Both bring great flavor. Then, pour in vegetable broth for added depth. Finally, stir in heavy cream or coconut cream for that perfect smoothness. - 4 slices of your favorite bread (sourdough or whole grain recommended) - 1 cup shredded sharp cheddar cheese - Butter for grilling For the grilled cheese, choose your bread. Sourdough or whole grain works best. Spread butter on the outside of the bread slices. This helps achieve a golden crust. Add sharp cheddar cheese inside. It melts beautifully, making every bite a delight. - 1 teaspoon sugar (to balance acidity) - Fresh herbs for garnishing You can add sugar to balance the soup's acidity. It enhances the tomato's sweet flavor. Fresh herbs like basil or parsley add a nice touch. They brighten the dish and make it look lovely. You can find the full recipe in the earlier section. 1. Sautéing vegetables: Start by heating olive oil in a large pot over medium heat. Add the chopped onion and diced carrot. Cook for about 5-7 minutes until they soften. This step builds a great base for flavor. 2. Adding tomatoes and broth: Next, stir in minced garlic and cook for one more minute. Then, pour in the canned diced tomatoes and vegetable broth. Add dried basil and sugar if you want to balance the acidity. Bring it all to a gentle simmer. Let it cook for 15-20 minutes. This will help the flavors mix nicely. 3. Blending for creaminess: Use an immersion blender to blend the soup until it's smooth. If you don’t have one, carefully transfer the soup in batches to a blender. Once blended, return the soup to the pot and stir in heavy cream. Heat gently over low heat and season with salt and pepper to taste. 1. Buttering the bread: Take four slices of your favorite bread. Butter one side of each slice. This butter will help create a crispy, golden crust. 2. Layering cheese and grilling: Place shredded cheddar cheese on the unbuttered side of two slices. Top with the other slices, buttered side up. 3. Achieving golden brown perfection: Heat a skillet over medium heat. Grill the sandwiches for about 3-4 minutes on each side. Look for a nice golden brown color and make sure the cheese melts. Remove from heat and slice the sandwiches in half. 1. How to serve the soup and grilled cheese: Ladle the creamy tomato soup into bowls. Arrange the grilled cheese halves neatly on the side. 2. Presentation tips for a visual appeal: For a lovely touch, drizzle a bit of heavy cream or olive oil on the soup. Garnish with fresh basil leaves. This adds color and makes your meal look amazing. Enjoy every spoonful of this creamy tomato soup with grilled cheese delight! For the complete recipe, check out the Full Recipe. Using fresh herbs adds bright taste. I love fresh basil in tomato soup. It gives a sweet, aromatic touch. Dried herbs work too, but fresh ones shine brighter. Spices can deepen the flavor. Try a pinch of red pepper flakes for heat or oregano for earthiness. Experiment with what you have. For a smooth soup, blend it well. An immersion blender works great. If using a regular blender, let the soup cool a bit first. This prevents splatters. You can adjust creaminess by adding more or less heavy cream. For a lighter option, use less cream or substitute with coconut cream. Grill your cheese at medium heat. This ensures the bread toasts while the cheese melts. If the heat is too high, bread burns before the cheese melts. To prevent soggy bread, butter the outside only. This keeps it crispy. Grilling on low heat for longer can help too, giving time for that perfect melt. For the full recipe, check out Creamy Tomato Bliss Soup with Grilled Cheese Delight. {{image_2}} You can change up your tomato soup in fun ways. One great option is to use roasted tomatoes. Roasting adds a rich, sweet flavor. Just toss fresh tomatoes with olive oil and roast them until they are soft and slightly charred. This will make your soup taste even better. If you want a vegan or dairy-free version, simply swap out the heavy cream for coconut cream. This will give your soup a lovely, creamy texture without any dairy. You can also use vegetable broth to keep it plant-based. When it comes to grilled cheese, the cheese you use can make a big difference. While sharp cheddar is classic, try mozzarella or gouda for a twist. Each cheese brings its own flavor and melts differently, which can change each bite! You can also add extra ingredients to your grilled cheese. Slices of fresh tomato can brighten things up, while avocado adds creaminess. Spinach or pesto can also boost flavor and nutrition. Get creative with what you have! While grilled cheese is a classic side, you have other tasty options. Try pairing your soup with a crunchy salad for freshness. A simple green salad with lemon dressing works well. You can also serve crunchy breadsticks or homemade croutons with your soup. They add texture and make each bite exciting. Dip them in the soup for a fun experience. For the full recipe, check out Creamy Tomato Bliss Soup with Grilled Cheese Delight. Store leftover creamy tomato soup in a sealed container. This keeps it fresh and safe. It’s best to refrigerate the soup within two hours of cooking. When done right, the soup stays tasty for about three to four days. If you want to keep it longer, freeze the soup. Use freezer-safe containers or bags to prevent freezer burn. For reheating, warm the soup on the stove over low heat. Stir often to keep it smooth. You can also use a microwave, but cover it to avoid mess. For leftover grilled cheese, let the sandwiches cool first. Wrap them in foil or place them in a sealed bag. This keeps them from drying out. You can store them in the fridge for up to two days. If you want to keep them longer, freeze the sandwiches. To reheat grilled cheese, place it in a skillet over medium heat. This method helps it get crispy again. You can also use an oven set at 350°F (175°C) for about 10-15 minutes. Refrigerated creamy tomato soup lasts about three to four days. If you freeze it, aim to use it within three months. Always label your containers with the date. This helps you track how long it’s been stored. For grilled cheese, eat it within two days if kept in the fridge. If frozen, try to consume it within a month for the best taste. You can use several options instead of heavy cream. Coconut cream works great for a non-dairy choice. It gives a nice richness to the soup. You can also try cashew cream for a similar texture. If you want a lighter option, use whole milk or half-and-half. Just note that the soup may not be as thick. Each choice adds its unique flavor, so feel free to experiment! Yes, you can make the soup ahead of time! It tastes even better after sitting. Make the soup and let it cool. Store it in an airtight container in the fridge. It will last for about three days. When you are ready to eat, reheat it on the stove over low heat. Stir well to get the creaminess back. If it seems too thick, add a splash of broth or water. To keep your grilled cheese crispy, start by using dry bread. Butter the outside well before grilling. Cook over medium heat to avoid burning. If you cook too fast, the inside may not melt while the outside gets too brown. You can also place a lid on the skillet briefly to help melt the cheese. This method keeps the bread toasty while ensuring a gooey center. Enjoy your grilled cheese with the creamy tomato soup for a delightful meal! This blog post covered the key ingredients for both creamy tomato soup and grilled cheese. I shared steps to cook both dishes and tips for great flavors and texture. You learned about variations and storage methods to enjoy these meals later. Remember to experiment with fresh herbs and spices as you cook. With this guide, you can create cozy meals that satisfy. Enjoy making and sharing these tasty comfort foods!

Creamy Tomato Soup with Grilled Cheese Delight

Do you crave the warm comfort of creamy tomato soup paired with crispy grilled cheese? You’re not alone! This classic

- 1 pound Brussels sprouts, trimmed and halved - 3 tablespoons olive oil - 1 teaspoon sea salt - ½ teaspoon black pepper - 1 tablespoon honey or maple syrup - 3 tablespoons balsamic vinegar - 2 cloves garlic, minced - ¼ teaspoon red pepper flakes (optional) The main ingredients create a great base for crispy Brussels sprouts. The Brussels sprouts bring a nutty flavor. Olive oil helps them roast perfectly. Sea salt and black pepper add simple seasoning. The sweetness from honey or maple syrup balances the tangy balsamic vinegar. Garlic gives depth to the dish, while red pepper flakes add a hint of heat. - Honey or maple syrup - Red pepper flakes for heat Using honey or maple syrup is optional but recommended. Both add a sweet touch to the glaze. Red pepper flakes are also optional. They spice things up and make the dish brighter. - Fresh parsley, chopped Chopped fresh parsley is a must for garnish. It adds color and freshness to the dish. Plus, it makes your plate look beautiful. I always sprinkle it on before serving. You can find the full recipe above for all the details. Enjoy making these crispy Brussels sprouts with balsamic glaze! Preheat your oven to 425°F (220°C). This high heat helps make the Brussels sprouts crispy. Next, line a baking sheet with parchment paper. This step keeps them from sticking. In a large bowl, add 1 pound of halved Brussels sprouts. Pour in 3 tablespoons of olive oil, 1 teaspoon of sea salt, and ½ teaspoon of black pepper. Toss well to coat every piece. Spread the Brussels sprouts on the baking sheet, cut side down. Roast them for 20 to 25 minutes. Flip them halfway through for even cooking. They should be golden brown and crispy when done. While the Brussels sprouts cook, you can make the glaze. In a small saucepan, mix 1 tablespoon of honey or maple syrup, 3 tablespoons of balsamic vinegar, 2 minced garlic cloves, and ¼ teaspoon of red pepper flakes, if you want some heat. Simmer this mixture over medium heat for about 3 to 5 minutes. It should thicken slightly. When your Brussels sprouts are ready, drizzle the glaze over them. Toss gently to coat. Finally, transfer them to a serving plate and garnish with fresh parsley. For the full recipe, check the earlier sections. To get those Brussels sprouts nice and crispy, follow these steps: - Dry them well: After washing, pat the sprouts dry. Moisture can make them soggy. - Cut size matters: Halving them helps cook evenly. Smaller pieces get crispy faster. - Single layer: Spread them out on your baking sheet. Crowding them traps steam. - High heat: Roasting at 425°F (220°C) creates a nice crunch. You can boost the flavor of your Brussels sprouts easily. Here are some ideas: - Spices: Try adding garlic powder or smoked paprika for depth. - Herbs: Fresh thyme or rosemary gives a lovely aroma. - Cheese: A sprinkle of Parmesan adds a salty kick. - Nuts: Toasted walnuts or pecans add crunch and richness. Present your crispy Brussels sprouts beautifully for gatherings: - Serving platter: Use a large, colorful platter to show off the dish. - Garnish: Fresh parsley not only looks great but adds freshness. - Pairing: Serve with roasted meats or as part of a vibrant salad. - Family style: Let guests help themselves from the platter for a warm feel. For the complete guide, check out the Full Recipe for all the details. {{image_2}} You can easily make this dish vegan. Simply swap honey for maple syrup. Maple syrup gives a sweet flavor that works well with the balsamic glaze. This change keeps the recipe plant-based while still being delicious. Feel free to get creative with your veggies. You can add carrots, sweet potatoes, or bell peppers. Just cut them to match the size of the Brussels sprouts. Toss them all together with the olive oil and seasonings. Roasting different veggies adds color and flavor to your dish. You can explore other sauces too. Try a soy sauce glaze for a savory kick. Or use a lemon vinaigrette for a fresh twist. If you want a spicy touch, add some sriracha or chili sauce. Each glaze brings a new taste, making the dish unique every time. For the full recipe, check out the Crispy Brussels Sprouts with Sweet Balsamic Glaze. To store leftovers, let the Brussels sprouts cool first. Place them in an airtight container. They will stay fresh for about 3 days in the fridge. Avoid stacking them too high to keep them crispy. The best way to reheat these Brussels sprouts is in the oven. Preheat your oven to 375°F (190°C). Spread the sprouts on a baking sheet. Heat for about 10 minutes until they are warm and crispy again. You can also use an air fryer for a quick reheat. You can freeze crispy Brussels sprouts, but they may lose some crunch. If you want to freeze them, place them in a single layer on a baking sheet. Freeze until solid, then transfer to a freezer bag. They will keep for up to 3 months. When ready to eat, bake them straight from the freezer for a bit longer to regain some crispiness. You can use frozen Brussels sprouts, but fresh is better. Frozen sprouts change texture. They can become mushy when cooked. This mushiness affects the crunch you want. If you must use frozen, thaw them first. Pat them dry to remove excess moisture. This helps achieve some crispiness when you roast them. Brussels sprouts can taste bitter, but there are ways to fix this. First, trim the stems and remove any yellow leaves. This reduces bitterness. Second, try soaking them in cold water for 30 minutes. This helps to draw out some bitterness. Lastly, roasting them with a sweet glaze, like balsamic, balances the flavors. The sweetness helps mask the bitterness. Balsamic glazed Brussels sprouts pair well with many dishes. Try serving them with roasted chicken or pork. Their flavor complements these meats nicely. You can also serve them alongside grains, like quinoa or rice. Add a sprinkle of feta cheese for extra flavor. For a vegetarian option, pair them with a hearty grain salad. This makes a colorful, tasty meal. Check out the Full Recipe for more ideas! In this post, we explored how to make crispy balsamic glazed Brussels sprouts. You learned about key ingredients, from fresh sprouts to tasty garnishes. The step-by-step instructions guide you in cooking and making a delicious glaze. Tips on crispiness and flavor enhancements help you create a perfect dish. For storage, I shared methods to keep leftovers fresh. Overall, these Brussels sprouts can impress anyone at your next meal. Enjoy experimenting with variations and serving suggestions!

Crispy Brussels Sprouts with Balsamic Glaze Recipe

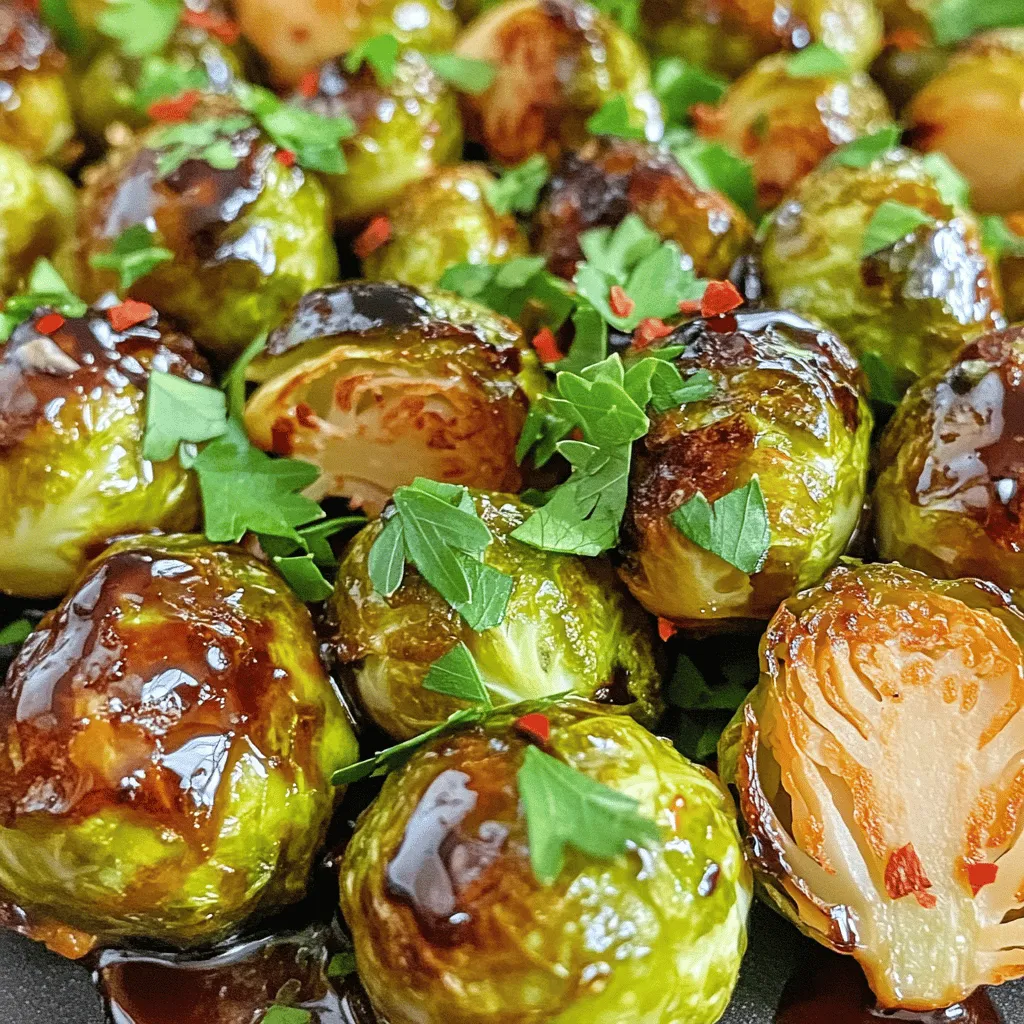
If you’re tired of boring side dishes, let me introduce you to Crispy Brussels Sprouts with Balsamic Glaze! These little

Older posts
Newer posts
← Previous Page1 … Page41 Page42 Page43 … Page74 Next →

dsad

© 2025 So Yum Recipes • Built with GeneratePress

Our Policies

  • Copyright Policy
  • Cookie Policy
  • GDPR Policy
  • Privacy Policy
  • Disclaimer
  • Terms Of Use

More Information

  • Home
  • About
  • Contact
  • Appetizers
  • Dessert
  • Dinner
  • Drinks
©2025, So Yum Recipes About Back To Top