Skip to content
DisclaimerTerms Of UseGDPR PolicyCookie Policy

So Yum Recipes

  • Home
  • Drinks
  • Appetizers
  • Dinner
  • Dessert
  • About
  • Contact
  • Privacy Policy
DisclaimerTerms Of UseGDPR PolicyCookie Policy

Chloe

To make these delightful muffins, you'll need: - 2 ripe bananas, mashed - 1/2 cup granulated sugar - 1/4 cup brown sugar - 1/3 cup plain yogurt or applesauce - 1/4 cup melted coconut oil or vegetable oil - 1 large egg - 1 teaspoon vanilla extract - 1 teaspoon baking soda - 1/2 teaspoon baking powder - 1/4 teaspoon salt - 1 1/2 cups all-purpose flour - 1 cup dark chocolate chips - 1/2 cup chopped walnuts (optional) You can easily swap some ingredients in this recipe. For a healthier option, use applesauce instead of yogurt. You can also swap coconut oil for vegetable oil if preferred. If you want to skip the egg, try a flax egg. Just mix one tablespoon of ground flaxseed with three tablespoons of water. Let it sit for a few minutes before adding it to the mixture. For gluten-free muffins, use a gluten-free flour blend. These muffins are not just tasty; they're also quite nutritious. Each muffin has about: - Calories: 190 - Protein: 3g - Fat: 7g - Carbohydrates: 30g - Fiber: 2g - Sugar: 10g These numbers can change based on your ingredient choices. For instance, using applesauce instead of sugar can cut down on calories. You can find the full recipe [Full Recipe] for more details on cooking and serving. Making chocolate chip banana muffins is simple and fun. You will mix wet and dry ingredients separately. Then, combine them and bake. 1. Preheat the Oven: Start by preheating your oven to 350°F (175°C). This step is key for even baking. 2. Prepare the Muffin Tin: Line a muffin tin with paper liners. If you prefer, lightly grease each cup. 3. Mix Wet Ingredients: In a large bowl, mash two ripe bananas. Add granulated sugar, brown sugar, yogurt, melted coconut oil, egg, and vanilla extract. Stir until smooth. 4. Mix Dry Ingredients: In another bowl, whisk together baking soda, baking powder, salt, and all-purpose flour. 5. Combine Mixtures: Gradually add the dry mix to the wet mixture. Stir gently until just combined. Avoid overmixing to keep muffins light. 6. Add Chocolate Chips: Fold in one cup of dark chocolate chips. If you like, add half a cup of chopped walnuts too. 7. Fill Muffin Cups: Spoon the batter into the muffin cups. Fill each about three-quarters full. 8. Bake: Place the muffin tin in the oven. Bake for 18-20 minutes. Check with a toothpick; it should come out clean. 9. Cool: After baking, let the muffins cool in the tin for about five minutes. Then, transfer them to a wire rack to cool completely. Bake your muffins at 350°F (175°C) for 18-20 minutes. This temperature helps them rise nicely and stay moist. Enjoy them warm, or save some for later! For the full recipe, check [Full Recipe]. One common mistake is using unripe bananas. You want ripe bananas for the best taste. They add natural sweetness and moisture. Another mistake is overmixing the batter. Mix just until combined to keep muffins fluffy. Lastly, don’t skip the baking time. Keep an eye on them so they don’t burn. To keep your muffins moist, use ripe bananas. They have more sugars and moisture. Adding yogurt or applesauce also helps. These ingredients keep the muffins soft and tender. Make sure not to overbake them. Check for doneness with a toothpick; it should come out clean but not dry. Getting the right banana-to-sugar ratio is key. Two ripe bananas give enough natural sweetness. Use 1/2 cup of granulated sugar for balance. You can also add brown sugar for a richer taste. Adjust sugar if you want sweeter muffins. Experiment a bit to find your perfect mix. Try the Full Recipe to see how it all comes together! {{image_2}} You can easily swap some ingredients to make these muffins healthier. Here are my favorite substitutions: - Sugar: Use honey or maple syrup instead of granulated sugar. This adds natural sweetness. - Yogurt: Substitute with Greek yogurt or a dairy-free option like almond yogurt. Both keep the muffins moist. - Oil: Try applesauce or mashed avocado instead of oil. This reduces fat and adds creaminess. - Flour: Use whole wheat flour for added fiber. This makes the muffins more filling. Get creative by adding new flavors to your muffins! Here are some ideas: - Spices: Add cinnamon or nutmeg for warmth. These spices enhance the banana flavor. - Fruit: Toss in blueberries or chopped strawberries. They add a fresh burst of flavor. - Nut Butters: Swirl in peanut or almond butter. This adds richness and a nutty taste. - Zest: Grate some lemon or orange zest for a bright twist. This adds freshness and depth. To make gluten-free muffins, you can easily adjust the recipe. Here’s how: - Flour: Use a 1:1 gluten-free flour blend. These blends are made to replace regular flour without changing texture. - Xanthan Gum: If your blend doesn't contain it, add 1/2 teaspoon of xanthan gum. This helps bind the ingredients. - Baking Time: Keep an eye on baking time. Gluten-free muffins may need a minute or two more to bake properly. With these variations, you can make your chocolate chip banana muffins fit any diet or flavor preference. For the full recipe, check out the details in the recipe section above. To keep your muffins fresh, place them in an airtight container. This helps stop air from drying them out. You can also wrap them in plastic wrap for extra safety. Store them at room temperature for up to three days. If you want to keep them longer, consider freezing them. If you have extra muffins, freezing is a great option. Let the muffins cool completely first. Then, wrap each muffin in plastic wrap. After that, place them in a freezer bag. Remember to remove as much air as possible. These muffins can last in the freezer for about three months. To enjoy your muffins again, reheat them in the oven. Preheat it to 350°F (175°C). Place the muffins on a baking sheet and warm them for about 10 minutes. This method keeps them soft and tasty. You can also microwave them for about 15-20 seconds. Just be careful not to overheat them, or they may get tough. For a special touch, add a small pat of butter on top before reheating! Yes, you can use frozen bananas. Just thaw them first. Once thawed, mash them well. This adds great flavor and moisture. Using frozen bananas can also save you from waste. If you have overripe bananas, freeze them for later use. They work just as well in your muffins. To make these muffins dairy-free, swap yogurt for applesauce. You can also use non-dairy yogurt. Coconut oil is a great choice for oil. Make sure to check labels for dairy-free options. This way, you can enjoy the muffins without dairy. They will still taste amazing! You can add many fun mix-ins to your muffins. Here are a few ideas: - Chopped nuts like pecans or almonds - Dried fruit such as raisins or cranberries - Peanut or almond butter for a nutty twist - Shredded coconut for extra texture - Different types of chocolate chips, like white or butterscotch Feel free to get creative! Mix and match to find your favorite combination. You can make a new treat each time! For the full recipe, check out the Choco-Banana Bliss Muffins. You now know how to make delicious chocolate chip banana muffins. Start with fresh ingredients or smart swaps to meet your needs. Follow step-by-step instructions for perfect results. Keep in mind handy tips to avoid common mistakes and ensure moist muffins. Explore variations for healthy choices or mix-ins to make them your own. Finally, store or freeze leftovers to enjoy later. With these insights, you'll have muffins that delight every time you bake them. Happy baking!

Chocolate Chip Banana Muffins Easy and Tasty Treat

Are you ready to indulge in a warm, sweet treat? Chocolate chip banana muffins are easy to make and so

- 4 Oreo cookies, crushed - 1/4 cup all-purpose flour - 1/4 cup milk - 2 tablespoons sugar - 1/4 teaspoon baking powder - 1 tablespoon vegetable oil - A pinch of salt To make a great Oreo mug cake, you need just a few simple items. First, grab four Oreo cookies. These are the stars of the show! Crush them well to release their sweet flavor. Then, you will need 1/4 cup of all-purpose flour. This gives the cake its structure. Next, 1/4 cup of milk adds moisture and richness. You also need 2 tablespoons of sugar for sweetness. Baking powder is important too, just 1/4 teaspoon will help the cake rise. You will also want 1 tablespoon of vegetable oil, which keeps the cake soft. Lastly, a pinch of salt enhances all these flavors. - Sprinkles - Whipped cream For added fun, you can use some toppings. Sprinkles bring color and joy to your dessert. Whipped cream adds a soft, creamy layer. Both are great ways to make your cake even better! If you want the full experience, check out the Full Recipe for more details on how to put it all together. First, grab your microwave-safe mug. Use a fork or your fingers to crush 4 Oreo cookies into fine pieces. Leave some larger chunks for extra texture. Next, add 1/4 cup of all-purpose flour, 2 tablespoons of sugar, 1/4 teaspoon of baking powder, and a pinch of salt. Mix these dry ingredients well until they are fully combined. Now it's time to add your wet ingredients. Pour in 1/4 cup of milk and 1 tablespoon of vegetable oil. Stir until your batter is smooth, and make sure there are no lumps. If you want, fold in some chocolate chips or extra Oreo pieces for fun. Place your mug in the microwave. Cook it on high for about 1 minute and 30 seconds. Keep an eye on it, as cooking times may differ based on your microwave’s power. Check if the cake has risen and is fully cooked. Let it cool for a minute before diving in. Top it with whipped cream or sprinkles if you like. Enjoy your delicious treat! For the full recipe, see above. To get the best mug cake, you must adjust cooking time. Each microwave has its own power, so check your cake after 1 minute. If it needs more time, add 10-second intervals until it's done. To avoid a dry cake, do not overcook it. If the top looks dry, it’s probably too late. A moist cake will pull away from the mug’s sides slightly. If you find your cake is undercooked, microwave it for a few more seconds. You can add more fun to your mug cake! Try mixing in chocolate chips for an extra treat. These melt and create gooey pockets of chocolate. You can also stir in a splash of vanilla extract or a dash of cinnamon to boost flavor. If you love peanut butter, add a spoonful for a rich twist. Experiment to find your favorite mix-ins! {{image_2}} You can change the Oreo mug cake to fit your taste. For a peanut butter twist, add two tablespoons of peanut butter. Mix it in with the wet ingredients. The creamy peanut butter blends well with the Oreos. You can also try Nutella. Just swap in two tablespoons of Nutella for the oil. This adds a rich chocolate flavor. Seasonal variations are fun too! In fall, add pumpkin spice. Mix in half a teaspoon of pumpkin spice with the dry ingredients. This gives a warm, cozy taste perfect for chilly days. You can even add a few pumpkin puree spoonfuls to the mix for more flavor. If you need gluten-free options, swap the all-purpose flour for gluten-free flour. It works just as well in this recipe. Ensure your Oreo cookies are gluten-free too. Many brands offer gluten-free versions. For vegan adaptations, replace the milk with almond or oat milk. You can also use a flax egg. To make one, mix one tablespoon of ground flaxseed with three tablespoons of water. Let it sit for a few minutes until it thickens. This will help bind the ingredients together. Enjoy making this treat fit your diet! For the full recipe, check out the Oreo Delight Mug Cake . After enjoying your Oreo mug cake, you might have some left. To store it, let it cool completely first. Place it in an airtight container. This keeps it fresh in the fridge for up to two days. When you want to eat it again, just take it out. For reheating, pop it in the microwave for 15 to 20 seconds. This warms it up nicely. If it seems dry, you can add a splash of milk before heating. Can you freeze a mug cake? Yes! You can freeze your mug cake for later. Just make sure it’s cool. Wrap it tightly in plastic wrap. Then place it in a freezer bag. It can stay good in the freezer for up to a month. When you’re ready to enjoy it, take it out of the freezer. Thaw it in the fridge overnight. Once thawed, warm it in the microwave for 20 seconds. Now, you can enjoy your tasty treat again! The best way is to use your microwave. It cooks the cake fast and keeps it moist. Start with a microwave-safe mug to avoid spills. Make sure to monitor the cooking time closely. I usually cook it for about 1 minute and 30 seconds. Your microwave may work differently, so check it often. If it looks puffed and firm, it’s done. Let it cool for a minute before eating. This way, you avoid burning your mouth. To make your mug cake fluffier, use fresh baking powder. This ingredient helps the cake rise well. Be sure to mix the dry ingredients thoroughly before adding wet ones. Another tip is to add an extra tablespoon of milk. This little boost makes a big difference in texture. You can also try adding an egg if you want a richer cake. Just remember, this will make your cake less quick. Yes, you can use other cookies! Chocolate chip cookies work great too. Try using peanut butter cookies for a nutty flavor. Just crush them the same way as Oreos. Adjust the sugar if needed, as some cookies are sweeter. You could even mix different cookies for a fun twist. Don’t be afraid to experiment with flavors! Each cookie gives a unique taste to your mug cake. For the full recipe, check the earlier section. You now have a simple way to make an Oreo mug cake. We covered key ingredients, like Oreo cookies and all-purpose flour. I shared step-by-step mixing and cooking instructions. Tips helped you perfect your cake and explore fun flavors. Don't forget about storage options and variations, like gluten-free. You can enjoy this treat anytime. Get creative with toppings and flavors, and have fun in your kitchen. This mug cake can bring joy in just minutes. Try it out and let your taste buds rejoice!

Oreo Mug Cake Quick and Simple Dessert Treat

Craving something sweet but short on time? The Oreo Mug Cake is your key to a quick dessert fix! Made

For a great Thai Basil Chicken, you need these key items: - 1 lb (450g) ground chicken - 2 cups fresh Thai basil leaves - 4 cloves garlic, minced - 2-3 Thai bird's eye chilies, finely chopped - 1 bell pepper, thinly sliced - 2 tablespoons soy sauce - 1 tablespoon oyster sauce - 1 tablespoon fish sauce - 1 tablespoon sugar - 1 tablespoon vegetable oil - Cooked jasmine rice, for serving - Lime wedges, for garnish - Sesame seeds, for garnish (optional) These ingredients create a dish full of bold flavors. The Thai basil gives a sweet and spicy taste. The bird's eye chilies add heat, but you can adjust them to your liking. You can add other items to enhance your dish: - 1 onion, sliced - 1 cup snap peas - 1 tablespoon chili paste - Fresh cilantro for garnish These optional ingredients bring more texture and flavor to your meal. Feel free to mix and match based on what you have. If you can't find certain items, don't worry! Here are some swaps: - Ground turkey or beef instead of ground chicken - Regular basil if Thai basil is not available - Tamari for gluten-free soy sauce - Coconut aminos as a soy sauce substitute These substitutions still keep the dish tasty. Cooking should be fun and flexible, so use what you have! For the full recipe, check the section above. To make Thai Basil Chicken, start with easy prep. Gather all your ingredients first. This makes cooking smooth and fun. Chop the garlic and chilies. Slice the bell pepper. Rinse and dry the Thai basil leaves. This helps them stay fresh. You can measure out the sauces in small bowls. This way, you are ready to cook. Now, let’s cook! Heat the vegetable oil in a large skillet or wok over medium-high heat. Add the minced garlic and chopped chilies. Sauté for about 30 seconds until fragrant. This step fills your kitchen with a great smell. Next, add the ground chicken. Break it apart with a spatula. Cook for 4-5 minutes until it is browned. Then, stir in the sliced bell pepper. Cook for another 2-3 minutes until it softens. In a small bowl, mix the soy sauce, oyster sauce, fish sauce, and sugar. Pour this sauce over the cooked chicken. Mix well to coat everything. Now, remove the skillet from heat. Fold in the fresh Thai basil leaves. They will wilt from the heat. Serve this delicious dish over jasmine rice. Garnish with lime wedges and sesame seeds if you like. For the best taste, serve Thai Basil Chicken hot. The fresh basil adds a nice touch. You can also add more lime juice for zest. If you want extra heat, keep some chilies on the side. This way, everyone can adjust the spice to their taste. Enjoy your meal! For a complete guide, check the Full Recipe. To get the best flavor in Thai basil chicken, use fresh Thai basil. It has a unique taste that makes this dish shine. When you cook, add the basil last. This way, it wilts but keeps its bright flavor. Use fish sauce and soy sauce for a salty kick. The balance of these sauces gives the dish depth. Don't skip the bird's eye chilies if you like heat. Adjust the amount to match your spice level. One common mistake is overcooking the chicken. This can make it dry and tough. Cook it just until it's browned and no longer pink. Another mistake is not using enough basil. This herb is key to the dish's taste. Lastly, don't rush the sauce. Let it simmer for a minute to blend the flavors. If you skip this step, the dish can taste flat. A large skillet or wok works best for this recipe. It allows for even cooking and easy stirring. A spatula is also helpful for breaking up the chicken as it cooks. Use a sharp knife for slicing the bell pepper and garlic. A small bowl is handy for mixing the sauce. Having these tools makes cooking smoother and more enjoyable. {{image_2}} You can easily make Thai basil chicken vegetarian. Use tofu or tempeh instead of chicken. Both options soak up flavors well. For the sauces, choose vegetarian oyster sauce. This keeps the taste close to the original. You can also substitute fish sauce with soy sauce. This change keeps it delicious and plant-based. Feel free to add more veggies to your dish. Carrots, zucchini, or snap peas work great. Cut them into small pieces for quick cooking. Adding vegetables adds color and nutrition. It also makes the meal more filling. Toss in your favorites and enjoy the burst of flavors. If you love heat, spice it up! You can add more bird's eye chilies for extra kick. Another great option is to use chili paste. Mix it in with the sauces for a bold flavor. Adjust the spice level to your taste. You want the dish to be tasty, not too hot. With these tweaks, you'll have a fun and spicy version of Thai basil chicken. For the full recipe, check the earlier section. Once you make Thai Basil Chicken, let it cool down. Store it in an airtight container. It keeps well in the fridge for up to three days. Make sure to cover it tightly to prevent odors from other foods. You can freeze Thai Basil Chicken for later meals. Allow it to cool and then place it in a freezer bag or container. Remove as much air as possible. It will stay good for up to three months. When you are ready to eat it, thaw it in the fridge overnight. To reheat, use a skillet over medium heat. Add a splash of water or broth to keep it moist. Stir until it's heated through. You can also use the microwave. Heat in short bursts, stirring in between. Enjoy your flavorful Thai Basil Chicken just like it was fresh! For the full recipe, check the main article. Thai Basil Chicken is a stir-fry dish from Thailand. It features ground chicken, fresh Thai basil, and bold flavors. This dish is quick to make and packs a punch in taste. The main sauce includes soy sauce, fish sauce, and sugar, which brings it all together. You can serve it with jasmine rice for a complete meal. It is often topped with lime for extra zing. The fresh Thai basil adds an amazing aroma and flavor. To make your Thai Basil Chicken spicier, use more bird's eye chilies. Chop them finely and add them to the dish early in the cooking process. You can also try adding chili paste or sriracha for more heat. Taste as you cook, and adjust to your preference. Remember, the spice will build as you add more. Start with a little, and you can always add more later. Yes, you can use different proteins in Thai Basil Chicken. Ground turkey, beef, or pork make great options. For a vegetarian choice, try using tofu or tempeh. If you use tofu, press it to remove extra water. This helps it absorb the flavors better. Each protein will give you a unique taste and texture. Just follow the same cooking steps in the Full Recipe to get great results. Thai Basil Chicken is simple to make and full of flavor. We covered the main ingredients, optional additions, and substitutions. I shared easy steps for preparation and cooking, plus tips for serving. You learned how to get the best taste and avoid common mistakes. For those who want variations, I suggested vegetarian choices and ways to spice it up. Finally, I provided clear storage and reheating tips. You can enjoy this dish fresh or saved for later. Dive in and create your own Thai Basil Chicken masterpiece!

Thai Basil Chicken Flavorful and Easy Home Recipe

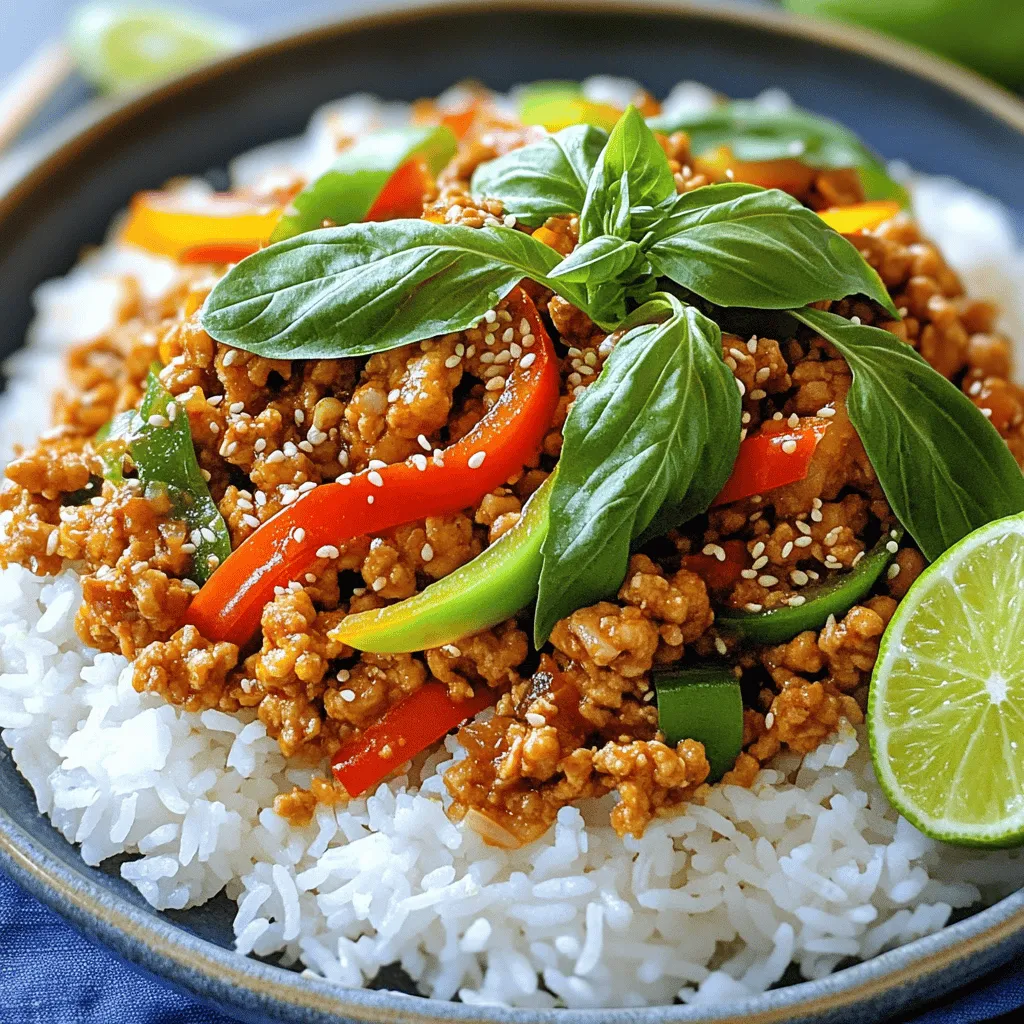
If you crave a dish that bursts with flavor, you’ll love Thai Basil Chicken! This simple recipe combines fresh herbs

To make the Cheesy Cauliflower Bake, you will need: - 1 large head of cauliflower, cut into florets - 1 cup cheddar cheese, shredded - 1 cup mozzarella cheese, shredded - ½ cup cream cheese, softened - 1 cup heavy cream - 2 teaspoons garlic powder - 1 teaspoon onion powder - Salt and pepper to taste - ¼ cup fresh parsley, chopped (for garnish) - ½ cup breadcrumbs (for topping) - 2 tablespoons olive oil When measuring, use dry measuring cups for solids like cheese and breadcrumbs. For liquids, use a liquid measuring cup. Make sure to pack the cream cheese gently in your cup for an accurate measurement. Also, adjust salt and pepper to your taste, but start small. You can always add more later. If you want to change things up, there are many options. You can use different cheeses like gouda or provolone instead of cheddar or mozzarella. For cream cheese, Greek yogurt offers a lighter touch. If you prefer a dairy-free version, use nut milk or a plant-based cream cheese. For a gluten-free option, swap breadcrumbs with crushed nuts or gluten-free breadcrumbs. First, gather your ingredients. You will need: - 1 large head of cauliflower, cut into florets - 1 cup cheddar cheese, shredded - 1 cup mozzarella cheese, shredded - ½ cup cream cheese, softened - 1 cup heavy cream - 2 teaspoons garlic powder - 1 teaspoon onion powder - Salt and pepper to taste - ¼ cup fresh parsley, chopped (for garnish) - ½ cup breadcrumbs (for topping) - 2 tablespoons olive oil Next, preheat your oven to 375°F (190°C). Grease a baking dish with olive oil to prevent sticking. In a large pot, bring water to a boil. Add the cauliflower florets and cook for about 5-7 minutes. You want them tender but still firm. Drain the florets and set them aside. In a mixing bowl, combine the softened cream cheese and heavy cream. Whisk until the mixture is smooth and creamy. Now, stir in the garlic powder, onion powder, salt, and pepper. Mix these spices well into the cream mixture. Add the shredded cheddar and mozzarella cheeses to the bowl. Reserve a handful of cheese for topping later. Mix until everything is combined. Gently fold the cooked cauliflower into the cheese mixture. Make sure all florets get coated evenly. Transfer the cauliflower mixture into your prepared baking dish. In a small bowl, mix the breadcrumbs with the reserved cheese. Sprinkle this topping over the cauliflower mixture for a crunchy finish. Bake in the preheated oven for 25-30 minutes. Look for a golden and bubbly top. To ensure your Cheesy Cauliflower Bake is perfect, do not overcook the cauliflower. It should be tender yet firm. Make sure to whisk the cream cheese and heavy cream well. A smooth mixture helps coat the cauliflower better. For a crunchy topping, mix the breadcrumbs with cheese. This adds great flavor and texture to your dish. Let the bake cool for a few minutes before serving. This helps it set and makes serving easier. Enjoy your delicious Cheesy Cauliflower Bake! For the full recipe, refer back to the beginning. To boost the taste of your Cheesy Cauliflower Bake, use fresh herbs. Fresh parsley adds a bright touch. You can also try thyme or chives for extra flavor. A little smoked paprika brings warmth. It adds a nice twist without overpowering the dish. One mistake is overcooking the cauliflower. Keep it tender but firm. If it’s too soft, it will mush in the bake. Another mistake is skimping on salt and pepper. These spices bring out the cheese's richness. Always taste the mixture before baking to get the seasoning right. Serve your cheesy bake with a simple green salad. The freshness of the salad balances the rich cheese. You can also pair it with grilled chicken or fish for a complete meal. Try it with crusty bread to scoop up the cheesy goodness. For a fun twist, serve it in small bowls as a side dish at a party. It’s sure to impress! If you want to follow a detailed guide, check out the Full Recipe. {{image_2}} You can mix different cheeses in your cheesy cauliflower bake. Try using gouda or fontina for a rich taste. A blend of cheeses adds depth. You can also use pepper jack for a spicy kick. If you want a creamier dish, add ricotta cheese. Get creative with your cheese choices to make this dish unique. Add-ins make this bake even better. You can toss in cooked bacon for extra flavor. Spinach or kale adds color and nutrients. For a bit of crunch, try adding chopped nuts. You can also mix in some cooked chicken for protein. These options let you customize the bake to your taste. If you're watching carbs, use cauliflower rice instead of florets. This keeps the dish low in carbs while still giving that cheesy goodness. For a vegan option, swap out dairy cheese for cashew cheese or nutritional yeast. You can also use coconut cream in place of heavy cream. These swaps keep your dish tasty and suitable for different diets. After enjoying your cheesy cauliflower bake, store leftovers in an airtight container. Make sure to cool the dish to room temperature first. Refrigerate for up to four days. This dish tastes great even after a day in the fridge! To reheat, preheat your oven to 350°F (175°C). Place the leftovers in a baking dish and cover with foil. Heat for about 15-20 minutes or until warm. You can also use a microwave. Heat in short bursts of 30 seconds until it’s hot. If you want to freeze your cheesy cauliflower bake, let it cool completely. Transfer it to a safe freezer container. It can last up to three months in the freezer. To bake from frozen, remove it and let it thaw overnight in the fridge. Then, reheat as mentioned above. Enjoy your cheesy goodness anytime! Yes, you can use frozen cauliflower. It makes the dish easy and quick. Just thaw and drain it well. You may skip boiling it. This saves time but still gives great flavor. Cheesy Cauliflower Bake pairs well with many dishes. It goes great with grilled chicken or steak. You can also serve it with a fresh salad. A side of garlic bread is perfect too. To add spice, mix in red pepper flakes or hot sauce. You can also use pepper jack cheese for a kick. Experiment to find the heat level you enjoy best! For the full recipe, check the detailed instructions in the earlier section. You will find all the steps to make this tasty dish. Be sure to gather all your ingredients first and enjoy cooking! This blog post covered the essential ingredients and steps for a great cheesy cauliflower bake. I shared tips to enhance flavor and avoid common mistakes. You learned about tasty variations and how to store leftovers properly. In closing, embrace your creativity. Play with flavors and textures. Enjoy your cooking adventure!

Cheesy Cauliflower Bake Simple and Tasty Dish

Are you ready to enjoy a warm, cheesy delight? My Cheesy Cauliflower Bake is simple yet packed with flavor. By

To make Spicy Sriracha Shrimp, you need fresh and zesty ingredients. Here’s what you should gather: - 1 pound of large shrimp, peeled and deveined - Key sauces: - 2 tablespoons Sriracha sauce - 1 tablespoon soy sauce - 1 tablespoon honey - Aromatics: - 3 cloves of garlic (minced) - 1 teaspoon fresh ginger (grated) - Zesty elements: - 1 tablespoon lime juice - Cooking essentials: - 2 tablespoons olive oil - 1/4 teaspoon black pepper - Garnishing touches: - 1/4 cup green onions (chopped) - Sesame seeds Each ingredient adds its own unique flavor. The shrimp provide a sweet and tender base. The Sriracha sauce brings heat, while honey balances it out with sweetness. Fresh garlic and ginger add depth. Lime juice gives a bright zing that lifts the dish. Olive oil helps cook the shrimp to perfection. Black pepper adds a subtle kick, and the green onions and sesame seeds create a beautiful finish. For the full recipe, check here: [Full Recipe]. To start, gather your ingredients. In a large bowl, combine the following: - 2 tablespoons Sriracha sauce - 1 tablespoon soy sauce - 1 tablespoon honey - 3 cloves of garlic, minced - 1 teaspoon fresh ginger, grated - 1 tablespoon lime juice - 1/4 teaspoon black pepper Mix these together well. Stir until everything blends nicely. This marinade packs a punch and adds great flavor. Next, take your shrimp. You need 1 pound of large shrimp, peeled and deveined. Add the shrimp to the marinade. Toss them around so they coat evenly. Let them sit for about 15-20 minutes. This helps the shrimp soak up all that tasty goodness. Now, it’s time to cook! Heat 2 tablespoons of olive oil in a skillet over medium-high heat. Once hot, add the shrimp in a single layer. Cook each side for about 2-3 minutes. They should turn pink and look caramelized. Flip them over to cook the other side for another 1-2 minutes. When done, remove the shrimp from heat and transfer them to a serving dish. Garnish with chopped green onions and sesame seeds for that extra flair. You can find the full recipe [here](#). To make shrimp just right, watch the size. Larger shrimp need a bit more time. Usually, cooking them for 2 to 3 minutes on one side is enough. When they turn pink and twist, they are ready to flip. Cook the other side for 1 to 2 minutes. If you cook them too long, they can turn rubbery. Juicy shrimp are the goal. Sriracha brings the heat! Adjust the amount based on your taste. If you want it spicier, add more Sriracha. For a tangy kick, try adding a splash of rice vinegar. This small change can lift the whole dish. You can also add some fresh herbs like cilantro for extra zest. Spicy Sriracha shrimp pairs well with many sides. Serve them over steamed rice or toss them with noodles. Fresh veggies on the side add color and crunch. If you're hosting a party, use toothpicks for easy serving. They make great appetizers! For a full meal, add a simple salad to balance the flavors. Don’t forget to check out the Full Recipe for more tips and steps! {{image_2}} You can easily swap shrimp for chicken or tofu. Chicken works well and adds a hearty bite. Use bite-sized pieces for even cooking. Tofu gives a great plant-based option. Press and cube it, then marinate just like the shrimp. Both options soak up the flavors nicely. Adding veggies makes the dish even better. Try colorful bell peppers or snap peas. Chop them into small pieces to cook quickly. You can toss them in the skillet with the shrimp. This adds crunch and a fresh taste to your meal. If you want a different flavor, try other hot sauces. Each sauce brings a unique taste. For a smoky flavor, consider chipotle sauce. If you prefer something sweeter, go for a sweet chili sauce. Adjust the amount based on your heat level. It's fun to experiment with different options. Store leftovers in an airtight container in the fridge for up to 2 days. This keeps the shrimp fresh and tasty. When you are ready to eat, just take it out and enjoy the zesty flavors again. You can freeze marinated shrimp before cooking. This works well for meal prep. Place the shrimp in a freezer-safe bag or container. When you want to cook it, just thaw it in the refrigerator overnight. This way, you have a quick meal ready to go. To reheat, do it gently in a skillet. This helps preserve the shrimp's texture. Heat it on low for a few minutes, stirring often. You want it warm, not overcooked, so it stays juicy and delicious. For a full recipe, check the complete guide on Spicy Sriracha Shrimp. To make Spicy Sriracha Shrimp less spicy, you can reduce the amount of Sriracha. Use just one tablespoon instead of two. You can also try mixing in a mild hot sauce or even ketchup. This adds sweetness without the heat. Another option is to add more honey. This will balance the spice and give a nice flavor. Yes, you can use frozen shrimp. Just make sure to thaw them first. Place the shrimp in the fridge overnight or run them under cold water. Once thawed, pat them dry before marinating. This helps the marinade stick better. Cooking frozen shrimp directly can lead to uneven cooking and extra water. Spicy Sriracha Shrimp pairs well with many sides. Steamed rice soaks up the sauce nicely. You can also serve it with noodles for a fun twist. Fresh vegetables, like broccoli or snap peas, add crunch and color. For a lighter option, serve it on a salad. You can find the full recipe to guide your cooking adventure! In this post, we looked at how to make Spicy Sriracha Shrimp. I shared a list of key ingredients and simple steps to cook shrimp that are tender and packed with flavor. Remember to adjust the heat and experiment with different proteins if you wish. Pair this dish with rice, noodles, or veggies for a tasty meal. Enjoy the leftovers in the fridge or freeze them for later. I hope you try this easy recipe and savor each bite!

Spicy Sriracha Shrimp Zesty and Flavorful Delight

A bowl of Spicy Sriracha Shrimp brings big flavor to your table in minutes! This dish combines juicy shrimp with

- 1 pound fresh asparagus - 3 tablespoons olive oil - 3 cloves garlic, minced - Zest of 1 lemon - 2 tablespoons fresh lemon juice - Salt and pepper to taste - ¼ teaspoon red pepper flakes - 2 tablespoons grated Parmesan cheese - Fresh parsley for garnish To make Lemon Garlic Roasted Asparagus, you need just a few items. First, choose 1 pound of fresh asparagus. This gives your dish a bright and crisp base. Next, grab 3 tablespoons of olive oil. This adds richness and helps the flavor stick. You will also need 3 cloves of garlic, minced. Garlic brings a lovely aroma and depth. Zest of 1 lemon is key for that fresh punch. You will add 2 tablespoons of fresh lemon juice later to enhance the flavor even more. Optional items can take your dish up a notch. For taste, add salt and pepper to your liking. If you want heat, sprinkle in ¼ teaspoon of red pepper flakes. For a cheesy twist, mix in 2 tablespoons of grated Parmesan cheese. Finally, fresh parsley makes a great garnish and adds a pop of color. You can find the full recipe [here](#). - Preheat the oven to 400°F (200°C). - In a large bowl, mix the olive oil, minced garlic, lemon zest, and lemon juice. - Toss the asparagus in the garlic-lemon mix until well coated. - Spread the asparagus on a baking sheet lined with parchment paper. - If you like, sprinkle Parmesan cheese on top in the last two minutes of cooking. - Transfer the roasted asparagus to a platter and garnish with fresh parsley. This dish is a bright, tasty side that pairs well with many meals. For the full recipe, check the details above. Enjoy your cooking! - Adjust roasting time for thinner or thicker asparagus. Thinner asparagus cooks faster, while thicker stalks need more time. Test for tenderness at 12 minutes and add more time as needed. - Use fresh garlic for better flavor. Fresh garlic gives a strong, bright taste that dried garlic cannot match. Mince it just before using for the best flavor. - Arrange asparagus in a fan shape for visual appeal. This layout makes the dish look more inviting. Use a large platter to showcase your beautifully roasted asparagus. - Drizzle with extra lemon juice before serving. This adds a fresh burst of flavor and makes the dish shine. A sprinkle of lemon zest on top enhances the look, too. - Experiment with additional seasonings like lemon pepper. This adds a zesty kick that pairs well with the garlic and lemon. A little goes a long way in boosting flavor. - Try adding nuts for crunch. Toasted almonds or pine nuts add a satisfying texture. They also bring a nutty flavor that complements the lemon and garlic. For a complete guide, refer to the [Full Recipe]. {{image_2}} You can make this dish vegan by simply omitting the Parmesan cheese. The lemon and garlic will still give you great flavor. This keeps the dish light and fresh, perfect for any meal. To boost the color and taste, add cherry tomatoes or bell peppers. They roast well and add a sweet pop. You can also mix the roasted asparagus with cooked quinoa. This creates a hearty salad that is both tasty and filling. Feel free to switch up the citrus. Lime or orange zest can bring a fun twist to the dish. You can also try adding fresh herbs like basil or thyme. These herbs will add layers of flavor and make your meal even more exciting. After enjoying your lemon garlic roasted asparagus, store any leftovers in an airtight container. This keeps the flavors fresh and prevents drying out. For the best taste, aim to eat them within three days. Asparagus can lose its crunch over time, so enjoy them soon! To bring back the crispiness, reheat your asparagus in the oven. Set it to 350°F (175°C) and warm for about 5-10 minutes. This method gives you the best texture. If you're in a hurry, you can use the microwave. Just heat it for 30 seconds at a time until warm. Keep an eye on it to avoid overcooking. I don't recommend freezing roasted asparagus. The texture changes when frozen and thawed. It can become mushy, losing that delightful crunch. If you want to enjoy asparagus later, consider prepping it fresh instead. This way, you can savor the perfect texture and flavor. For the full recipe on how to prepare this dish, check out [Full Recipe]. Roast for 12-15 minutes at 400°F (200°C). This time helps the asparagus become tender and slightly crispy. Keep an eye on it to avoid overcooking. Fresh is recommended; frozen may not achieve desired crispness. Frozen asparagus can be mushy and lose its bright color. Fresh asparagus gives the best taste and texture. It makes a great side dish for grilled meats or added to pasta dishes. The lemon and garlic flavor pairs well with chicken, fish, or steak. You can also toss it into your favorite pasta for a fresh twist. For more ideas, check out the full recipe. Lemon garlic roasted asparagus is a simple, tasty dish. We covered the ingredients, steps, and tips to nail this recipe. Remember, fresh asparagus shines here, especially with a zesty kick. Feel free to adjust flavors, and try new add-ins. This dish pairs well with many meals. Enjoy your cooking, and savor each bite of this bright, healthy vegetable!

Lemon Garlic Roasted Asparagus Flavorful Side Dish

Looking for a simple yet tasty side dish? Lemon Garlic Roasted Asparagus is your answer! With just five fresh ingredients,

To make a warm and tasty One-Pot Taco Soup, gather these key items: - 1 lb ground turkey or beef - 1 onion, diced - 2 cloves garlic, minced - 1 bell pepper, diced (any color) - 1 can (15 oz) black beans, rinsed and drained - 1 can (15 oz) corn, drained - 1 can (28 oz) diced tomatoes with green chilies - 1 packet taco seasoning (or homemade) - 2 cups chicken or vegetable broth - 1 cup water - Salt and pepper to taste These ingredients blend to create a hearty dish. The ground turkey or beef gives it protein. The onion and bell pepper add flavor and crunch. The canned goods bring convenience and taste. Taco seasoning gives that needed kick, while broth adds depth. You can make your soup even better with these toppings: - Shredded cheese - Sour cream and avocado - Fresh herbs and tortilla chips These toppings add creaminess and freshness. They also give a lovely crunch when you top your soup. Feel free to mix and match your favorites. Enjoy the layers of flavor as you dig in! For the full recipe, you can refer to the provided link. First, you need to brown the ground meat. Use a large pot or Dutch oven over medium heat. Add 1 pound of ground turkey or beef. Cook it for about 5-7 minutes. Break it apart with a spoon as it cooks. This helps it brown evenly. If there’s too much fat, drain it off. Next, it’s time to sauté the onion and bell pepper. Add 1 diced onion and 1 diced bell pepper to the pot. Cook these for about 3-4 minutes until they soften. Stir in 2 minced garlic cloves and cook for an extra minute. You want to smell that garlic! Now, let’s add some flavor. Sprinkle in 1 packet of taco seasoning. Mix it well so it coats the meat and veggies. This gives your soup that classic taco taste. After mixing the seasoning, it’s time for the canned ingredients and broth. Pour in 1 can of diced tomatoes with green chilies (28 oz), 1 can of black beans (15 oz), and 1 can of corn (15 oz). Then, add 2 cups of chicken or vegetable broth and 1 cup of water. Stir everything together until well combined. Bring the mixture to a boil. Watch for bubbles to form. Once it boils, reduce the heat to low. Let it simmer for about 20 minutes. This allows the flavors to blend. Stir occasionally to prevent sticking. After 20 minutes, taste your soup. Adjust the seasoning with salt and pepper if needed. Serve hot and enjoy your comforting one-pot taco soup! For the full recipe, check out the details above. To make your One-Pot Taco Soup truly shine, adjusting the seasoning is key. I suggest tasting the soup before serving. If it needs more flavor, add salt or pepper. You can also try a splash of lime juice for a fresh twist. When serving, think about toppings. Shredded cheese melts beautifully on hot soup. Sour cream adds creaminess, while diced avocado brings richness. Fresh cilantro gives a pop of color and flavor. You can even add crunchy tortilla chips for texture. These little touches make a big difference! One-pot meals like this soup mean less cleanup. After cooking, you only need to wash one pot. This makes it fast and easy. Plus, you can enjoy more time with family or friends. This soup is also great for meal prep. You can make a big batch and store it for later. Just keep it in the fridge for up to three days. You can also freeze it for up to three months. When you’re ready to eat, just reheat it on the stove or in the microwave. It’s a quick and hearty meal any day! {{image_2}} You can easily adapt One-Pot Taco Soup for different diets. If you want a vegetarian option, use beans and veggies instead of meat. Black beans, kidney beans, and corn work well. You can add zucchini or carrots for extra nutrition. This makes a filling and tasty soup for everyone. For those who need gluten-free meals, swap the taco seasoning with a gluten-free blend. Many brands offer this option. Make sure to check labels on canned goods, too. Most canned beans and tomatoes are gluten-free. You can change up the flavor to match your taste. If you like heat, add jalapeños or hot sauce. Start with a little and taste as you go. You can always add more spice, but you can't take it out! Feel free to switch proteins as well. Ground chicken or plant-based meat are great choices. You can even use shredded rotisserie chicken for a quick meal. Don't forget about vegetables! Throw in spinach, kale, or even sweet potatoes for a hearty twist. For the full recipe, check it out above and have fun experimenting! To keep your One-Pot Taco Soup fresh, store it in an airtight container. Refrigerate it within two hours of cooking. This helps prevent bacteria growth. Your soup will last about three to four days in the fridge. If you want to save it for later, freeze your soup. Use freezer-safe containers or bags. Make sure to leave some space at the top. Soup expands when frozen. Label your containers with the date. Your soup can stay fresh in the freezer for up to three months. When it's time to enjoy your soup again, you can reheat it on the stovetop or in the microwave. For the stovetop, pour the soup into a pot. Heat it on medium until it’s hot. Stir often to avoid sticking. If you choose the microwave, put the soup in a microwave-safe bowl. Heat it in short bursts, about one minute at a time. Stir in between to keep the heat even. Avoid reheating too many times. This can change the soup's texture. You want to keep it as tasty as possible. Enjoy your warm, comforting bowl of One-Pot Taco Soup! For the complete recipe, check out the Full Recipe above. One-Pot Taco Soup can last in the fridge for about 3 to 4 days. Make sure to store it in an airtight container. This keeps it fresh and safe to eat. If you want it to last longer, consider freezing it. When frozen, it can last up to 3 months. Just thaw it in the fridge before reheating. Yes, you can use fresh vegetables instead of canned ones. For example, you can chop fresh tomatoes, bell peppers, and even zucchini. Aim for about 2 cups of diced fresh tomatoes for the same flavor. Remember to adjust the cooking time. Fresh veggies may take a bit longer to soften. Just keep an eye on them as you cook. Leftover One-Pot Taco Soup is very versatile. You can make taco bowls by adding rice or quinoa. You could also use it as a filling for tacos or burritos. Another idea is to turn it into a dip by adding cheese on top and baking it. Don't forget to garnish with fresh herbs or avocado for extra flavor. One-Pot Taco Soup is easy to make and packed with flavor. We covered the key ingredients, cooking steps, and helpful tips. You can adjust this recipe to suit your taste. Remember, it's perfect for meal prep and very simple to store. With just one pot, clean-up is a breeze. Now, enjoy your delicious soup and share it with family or friends!

One-Pot Taco Soup Comforting and Hearty Meal

Looking for a warm, tasty meal? One-Pot Taco Soup is the answer! This dish combines ground turkey or beef with

- 2 cups cooked jasmine rice (preferably day-old) - 2 large eggs - 1 cup mixed vegetables (carrots, peas, corn) - 3 tablespoons soy sauce - 2 tablespoons vegetable oil - 3 green onions, chopped - 1 teaspoon sesame oil - Salt and pepper to taste You can try different rice types for this dish. Brown rice adds more fiber. Basmati rice can bring a nice aroma. If you need an egg alternative, try tofu or chickpea flour. For veggies, feel free to swap in bell peppers or broccoli. Both add color and nutrients. These changes keep the meal exciting and tasty. Just remember to adjust cooking times if you switch ingredients. Explore these options to find your favorite mix! To make egg fried rice, start with jasmine rice. Use day-old rice if you can. It is drier and helps the rice stay separate during cooking. If you need fresh rice, cook it, then spread it on a tray to cool. This will help reduce moisture. Next, let's scramble the eggs. Crack two large eggs into a bowl. Beat them well with a fork. Heat a skillet over medium heat and add a little oil. Pour in the eggs and stir with a spatula. Cook until they are firm and no longer runny. This should take about two minutes. Remove the eggs from the skillet and set them aside. Now, let’s cook the fried rice. First, heat one tablespoon of vegetable oil in the same skillet over medium-high heat. Add your mixed vegetables. Stir-fry them for about three to four minutes. You want them tender but still bright in color. After that, add the cooked jasmine rice. Break up any clumps as you stir-fry for about five minutes. This will heat the rice evenly. Once hot, it’s time for the flavor. Pour in three tablespoons of soy sauce and one teaspoon of sesame oil. Mix well to coat all the rice. Next, add the scrambled eggs back into the skillet. Toss in three chopped green onions, too. Stir everything together to combine. Season with salt and pepper to taste. Stir-fry for another one to two minutes. This allows the flavors to blend nicely. For the final touch, check the flavor. Adjust seasoning if needed. You can add more salt or soy sauce based on your taste. This step is key to a delicious dish. Serve your egg fried rice hot. For a nice presentation, use individual bowls. Garnish with extra green onions and a drizzle of sesame oil from the [Full Recipe]. Enjoy! To make great egg fried rice, start with day-old rice. Fresh rice has too much moisture. This moisture makes it sticky. Day-old rice is dry and fluffy. It gives the best texture. Cook your rice in advance and chill it. When you fry it, use high heat. This helps to keep the rice from clumping. Stir quickly so the rice heats evenly. You can boost the flavor of your fried rice easily. Add sauces like oyster sauce or chili sauce. These sauces add depth. Use them to make your dish shine. When you add extra ingredients, timing matters. Put in the sauces when the rice is hot. This allows the flavors to soak in well. You can also add spices like garlic powder for more taste. Watch out for overcooking the eggs. Cook them just until firm. If you cook them too long, they become rubbery. This ruins the dish's texture. Another mistake is using too little oil. Oil helps to keep the rice from sticking. It also adds flavor. Use at least two tablespoons to coat everything nicely. For the complete recipe, check the Full Recipe section. {{image_2}} You can easily make egg fried rice vegetarian or vegan. For a vegetarian version, use tofu instead of eggs. Tofu adds protein and a nice texture. Just cube it and fry until golden before mixing it back with the rice. To enhance flavor and nutrition, add more vegetables. Try bell peppers, broccoli, or snap peas. This makes your dish colorful and tasty. If you want to add meat, chicken, shrimp, or beef work great. For chicken, use bite-sized pieces. Cook them first, then add the rice. Shrimp cooks quickly, so add it just before the rice. When cooking beef, slice it thinly. Cook it until just brown before mixing everything. Adjust cooking times based on the protein to keep it juicy and tender. Different regions have unique takes on egg fried rice. For a Thai-style dish, add some garlic and a squeeze of lime. Use fish sauce instead of soy sauce for a different flavor. Chinese-style egg fried rice can be made with a splash of oyster sauce. Toss in some bean sprouts for extra crunch. Try these regional styles to explore new tastes. For a complete guide, check out the Full Recipe. To keep your egg fried rice fresh, store it in the fridge. Here are some best practices: - Cool it down: Let the rice cool for about 30 minutes before storing. - Use airtight containers: Glass or plastic containers work well. They keep moisture in and odors out. - Divide into portions: Store in smaller containers for easy access during the week. Reheating your egg fried rice properly helps it taste great. Here are some tips: - Microwave method: Place rice in a microwave-safe bowl. Add a splash of water to keep it moist. Cover with a lid or a damp paper towel. Heat in 30-second bursts, stirring in between. - Stovetop method: Heat a skillet over medium heat. Add a little oil. Add the rice and stir often. Cook until heated through, about 5-7 minutes. Both methods work, but the stovetop keeps the texture best. Enjoy your meal! For the full recipe, check out the Quick & Easy Egg Fried Rice. Day-old rice is best for fried rice because of its texture. Freshly cooked rice has more moisture. This can make it mushy. Day-old rice dries out a bit. It helps the grains stay separate. This prevents clumping when you cook it. Yes, you can make this recipe without soy sauce. If you want a gluten-free option, try tamari. Coconut aminos is another great choice. You can also use a mix of broth and spices to add flavor. Just adjust the salt to taste. To add heat, try adding chili flakes or hot sauce. You can also mix in diced jalapeños or sriracha. Start with a little and taste as you go. You can always add more spice later! You can personalize your egg fried rice easily. Add your favorite vegetables like bell peppers or broccoli. For protein, consider chicken, shrimp, or tofu. You can also switch up the sauces. Try adding garlic or ginger for extra flavor. Feel free to experiment! For the full recipe, check out the section above. Egg fried rice is simple and fun to make. You need basic ingredients like day-old rice, eggs, and veggies. Follow the steps for perfect cooking. Remember, day-old rice gives the best texture, and timing matters. Think about adding vegetables or proteins for variety. Customize it to match your taste. With proper storage, leftovers can stay fresh too. Enjoy your tasty dish anytime. Now, gather your ingredients and start cooking your egg fried rice!

Easy Egg Fried Rice Flavorful and Quick Meal Prep

Looking for a quick and tasty meal? My Easy Egg Fried Rice recipe is your solution. With just a few

- 8 oz rice noodles - 1/4 cup creamy peanut butter - 3 tablespoons soy sauce - 2 tablespoons sesame oil - 2 tablespoons honey or maple syrup These ingredients form the heart of the dish. Rice noodles serve as the base, offering a light and chewy texture. Peanut butter brings a rich flavor and creamy touch. Soy sauce adds saltiness and depth. Sesame oil gives a nutty aroma. Sweeteners balance the heat and enhance the taste. - Fresh cilantro - Chopped peanuts - Lime wedges These garnishes elevate the dish. Fresh cilantro adds a bright note. Chopped peanuts give a crunchy texture. Lime wedges provide a zesty kick, making each bite exciting. - Gluten-free options: Use gluten-free soy sauce. - Vegan alternatives: Choose maple syrup instead of honey. - Low-sodium alternatives: Opt for low-sodium soy sauce. These substitutions help everyone enjoy the dish. You can easily adapt this recipe to fit dietary needs without losing flavor. To cook the rice noodles, start by boiling water in a large pot. Once the water is bubbling, add the rice noodles to the pot. Cook them for about 4 to 6 minutes, or until they are tender. Be sure to check the package instructions for exact times, as they can vary. When they are done, drain the noodles in a colander. Rinse them under cold water to stop the cooking process. This helps keep them from sticking together. Set the noodles aside while you prepare the sauce and vegetables. For the peanut sauce, grab a large mixing bowl. Add the creamy peanut butter, soy sauce, sesame oil, and honey or maple syrup. Next, add the sriracha, rice vinegar, minced garlic, and grated ginger. Whisk everything together until it is smooth. If the sauce seems too thick, add a little warm water. Keep adding water until it reaches your desired consistency. This sauce is what makes your noodles special, so take your time to get it right. Now it's time to stir-fry the vegetables. Heat a small amount of oil in a large pan or wok over medium heat. Add the julienned bell peppers, shredded carrots, and snap peas. Cook them for about 3 to 4 minutes. You want them to be tender but still crisp. Stir them frequently so they cook evenly. If you want extra flavor, you can add a pinch of salt or some pepper at this stage. This quick cooking keeps the veggies bright and tasty. To make your sauce just right, you can adjust the spice. Start with one tablespoon of sriracha. Taste it, and add more if you want it spicier. If you like milder flavors, reduce the sriracha. You can also swap out the soy sauce for tamari. This works well if you want a gluten-free option. You can use almond butter or cashew butter too. They add a unique twist to the sauce. To avoid sticky noodles, rinse them after cooking. This cools them down and helps separate them. Make sure to use rice noodles. They are best for this dish. Look for thin rice noodles labeled “vermicelli” for a softer texture. If you want a heartier option, use wider rice noodles. Both work well with the sauce. Pair your spicy peanut noodles with grilled chicken or tofu for protein. They also go well with a side salad. For a beautiful plate, twirl the noodles. Use tongs to create a nest shape. Add colorful veggies on top for a pop of color. A sprinkle of chopped peanuts and fresh cilantro will make it look fancy. Don’t forget a lime wedge for extra zest! {{image_2}} You can make spicy peanut noodles even better by adding protein. Here are a few tasty ideas: - Chicken: Cooked chicken adds a nice boost. Use grilled or rotisserie chicken for ease. - Tofu: Firm tofu is a great choice. Cube it and sauté until golden. It soaks up the sauce well. - Shrimp: Shrimp cooks quickly and adds a nice flavor. Just toss it in the pan until it turns pink. These protein options make the dish more filling and fun. You can mix and match based on what you have at home. Seasonal vegetables can enhance your spicy peanut noodles. Here are some suggestions: - Zucchini: Cut into thin strips and add for a fresh crunch. - Broccoli: Florets add color and nutrients. Steam them lightly for the best taste. - Spinach: Toss in fresh spinach at the end. It wilts quickly and adds a nice green touch. Feel free to use what’s fresh in your fridge. This makes your dish more vibrant and tasty. If you want to switch things up, try different nut butters. Each brings a unique flavor: - Almond Butter: Milder and sweeter than peanut butter. It pairs well with the spicy sauce. - Cashew Butter: Creamy and rich. It adds a nice depth to the dish. - Sunflower Seed Butter: A great nut-free option. It’s tasty and allergy-friendly. Experimenting with nut butters can give your noodles a whole new taste. Enjoy the journey of flavor! For the full recipe, check the recipe section above. To keep your spicy peanut noodles fresh, put them in an airtight container. Make sure they cool down first. Then, store them in the fridge. If you want to save them longer, you can freeze them. Just use a freezer-safe bag or container. Remove as much air as possible before sealing. This helps prevent freezer burn. When it’s time to eat your leftovers, reheating matters. The best way is to use a stove. Heat a pan over low heat. Add a splash of water or oil to keep the noodles moist. Stir gently until warmed through. You can also use the microwave. Place the noodles in a bowl with a sprinkle of water. Heat in short bursts, stirring in between to avoid hot spots. Properly stored, your spicy peanut noodles last about 3 to 5 days in the fridge. They taste best when eaten fresh, but you can still enjoy them later. If you freeze them, they can last up to 2 months. Just remember, the longer they sit, the more flavor may fade. Spicy peanut noodles are simple yet tasty. Here are the key ingredients: - 8 oz rice noodles - 1/4 cup creamy peanut butter - 3 tablespoons soy sauce - 2 tablespoons sesame oil - 2 tablespoons honey or maple syrup - 1 tablespoon sriracha (adjust to taste) - 1 tablespoon rice vinegar - 2 garlic cloves, minced - 1-inch piece of ginger, grated - 1 cup julienned bell peppers (red and yellow) - 1 cup shredded carrots - 1 cup snap peas - Fresh cilantro, for garnish - Chopped peanuts, for garnish - Lime wedges, for serving These ingredients mix together to create a rich and flavorful dish. Yes, you can! Meal prep for spicy peanut noodles is easy. Cook the noodles and prepare the sauce ahead of time. Store them separately in the fridge. This way, you keep the noodles from getting mushy. When ready to eat, stir-fry fresh veggies and mix in the sauce. This keeps everything fresh and tasty. If you want less heat, adjust the sriracha. Start with less than one tablespoon. You can also add more peanut butter or honey to balance the spice. Adding coconut milk can help cool it down. This way, you can enjoy the dish without too much heat. Yes, this recipe is great for vegans! It uses peanut butter and plant-based ingredients. Substitute honey with maple syrup for a vegan option. All veggies are plant-based too, making this dish healthy and vegan-friendly. You can find the full recipe [here](#). It includes detailed steps and tips to make your spicy peanut noodles perfect. In this post, we explored how to make spicy peanut noodles. We covered the key ingredients, like rice noodles and peanut butter. You learned cooking steps, along with tips for perfecting the sauce and noodle texture. I shared variations for proteins and vegetables. Lastly, I explained storage and reheating options for your leftovers. These noodles are easy to make and tasty. Try different ingredients and find what you love most.

Spicy Peanut Noodles Satisfying and Simple Recipe

Craving a dish that’s both spicy and easy to whip up? Look no further! My Spicy Peanut Noodles blend creamy

You need simple items to make this cheesy broccoli casserole. Gather these: - 4 cups fresh broccoli florets - 1 cup uncooked brown rice - 2 cups shredded sharp cheddar cheese - 1 cup cream of mushroom soup (or homemade) - 1 cup vegetable broth - 1/2 cup milk - 1 teaspoon garlic powder - 1 teaspoon onion powder - 1/2 teaspoon paprika - Salt and pepper to taste - 1/2 cup breadcrumbs (optional for topping) - 2 tablespoons olive oil These ingredients work together to create a dish that is creamy, cheesy, and full of flavor. You can tweak this recipe to fit your taste. Here are some ideas: - Add cooked chicken or turkey for extra protein. - Swap broccoli for cauliflower or spinach. - Use different cheese like mozzarella or gouda. - Toss in some cooked bacon or ham for a savory bite. - Replace brown rice with quinoa for a nutty flavor. Feel free to get creative! Each change can give your casserole a new twist. Each serving of this casserole packs a punch. Here’s what you get per serving: - Calories: 350 - Protein: 15g - Carbohydrates: 45g - Fat: 15g - Fiber: 4g This dish provides a good mix of nutrients. It’s filling and tasty, making it a great choice for any meal. For the full recipe, check out the earlier section. Enjoy your cooking! Start by cooking the rice. Heat olive oil in a large pot over medium heat. Add 1 cup of uncooked brown rice. Toast it for about 2-3 minutes. Stir often to prevent burning. Next, pour in 1 cup of vegetable broth. Cover the pot and bring it to a boil. Once boiling, lower the heat and let it simmer. Cook for about 30 minutes or until the rice is soft and the broth is all gone. While the rice cooks, prepare the broccoli. Bring a pot of water to a boil. Add 4 cups of fresh broccoli florets. Blanch them for 2-3 minutes until they turn bright green. This step keeps the broccoli crunchy. Drain the broccoli and set it aside. In a large bowl, combine your cooked rice and blanched broccoli. Add 1 cup of cream of mushroom soup and 1/2 cup of milk. Then, mix in 1 teaspoon of garlic powder, 1 teaspoon of onion powder, and 1/2 teaspoon of paprika. Add salt and pepper to taste. Finally, fold in 2 cups of shredded sharp cheddar cheese. Stir everything until it’s well mixed. Once combined, transfer the mixture to a greased 9x13 inch baking dish. Spread it out evenly with a spatula. Preheat your oven to 350°F (175°C). Once it reaches the right temperature, sprinkle the remaining cheese on top of the casserole. If you want, add 1/2 cup of breadcrumbs for extra crunch. Place the baking dish in the preheated oven. Bake for 25-30 minutes. Watch for the cheese to melt and bubble. The top should become slightly golden. After baking, let the casserole sit for 5-10 minutes to cool. This makes serving easier. Enjoy your cheesy broccoli casserole! For the full recipe, check the section above. To make your casserole shine, use fresh broccoli. It adds a bright color and taste. Blanch the broccoli before mixing it in. This keeps it tender yet crisp. For the rice, toast it before boiling. This step gives it a nutty flavor. Mix the ingredients well for even cooking. Ensure the cheese is evenly spread. This helps it melt nicely. Lastly, let it cool before serving. This makes it easier to cut and serve. One common mistake is overcooking the broccoli. It can turn mushy and lose flavor. Another error is not seasoning enough. Taste as you mix and adjust salt and pepper. Don't skip the breadcrumbs if you like a crispy top. They add a nice crunch. Lastly, avoid using low-quality cheese. It can affect the casserole's overall taste. Always choose good cheese for the best results. Serve your casserole hot for the best taste. Add a sprinkle of fresh herbs on top. Parsley or chives work great for color and flavor. You can pair it with a side salad for freshness. A light vinaigrette can balance the richness of the cheese. If you're feeling adventurous, serve with a squeeze of lemon. This adds a bright twist to every bite. For an extra kick, consider hot sauce on the side. It can bring a new layer of flavor to your dish. For the full recipe, you can refer to the earlier section. {{image_2}} To make this dish gluten-free, swap brown rice with quinoa or gluten-free rice. Both options cook well and blend nicely with the flavors in the casserole. You can also use a gluten-free cream of mushroom soup. This keeps your meal tasty and safe for those who avoid gluten. For a veggie boost, add cooked carrots or bell peppers. You can also mix in some spinach for extra nutrients. Toss in a can of drained beans for more fiber. This adds flavor and makes the dish even heartier. To add protein, consider stirring in cooked chicken, turkey, or beans. Shredded rotisserie chicken works great for a quick option. If you want a meatless boost, use chickpeas or lentils. These options enhance the dish without losing its cheesy goodness. Feel free to explore these variations to make your Cheesy Broccoli Casserole your own. You can find the Full Recipe above to get started. After enjoying your cheesy broccoli casserole, let it cool down. Place leftovers in an airtight container. This keeps the flavors fresh and prevents drying. Store it in the fridge for up to three days. If it is still warm, let it cool for about 30 minutes before sealing. To reheat, take the casserole out of the fridge. Preheat your oven to 350°F (175°C). Cover the dish with foil to keep it moist. Heat for about 20 minutes or until hot. You can also use the microwave. Heat in short bursts, stirring in between, until warm. This method works well too! Want to save some for later? You can freeze the casserole! First, cool it completely. Then, place it in a freezer-safe container. This keeps it fresh for up to three months. When you are ready to eat, thaw it overnight in the fridge. Reheat it as mentioned above. Enjoy your cheesy goodness whenever you like! For the full recipe, refer to the steps above. Yes, you can use frozen broccoli. Frozen broccoli is quick and easy. Just thaw it before adding it to the mix. This saves time and keeps the dish simple. However, fresh broccoli gives a better texture. If you prefer crunch, stick with fresh florets. To make this casserole dairy-free, swap regular cheese and milk for plant-based options. Use dairy-free cheese, like cashew or almond cheese. Almond milk or oat milk works well too. Make sure the cream of mushroom soup is also dairy-free. This way, you keep all the yummy flavors without dairy. The best way to reheat your casserole is in the oven. Preheat the oven to 350°F (175°C). Cover the dish with foil to keep moisture in. Heat for about 20 minutes or until warm. You can also use the microwave, but keep it covered and check often. This prevents it from drying out. For more details, check the Full Recipe. You've learned how to make a tasty cheesy broccoli casserole. I covered all the ingredients you need, including fun options to customize. The step-by-step guide makes cooking easy, while tips ensure great results. You also found variations for different diets and proper storage methods. Now, you can enjoy this dish anytime! Keep experimenting and make it your own. Happy cooking!

Cheesy Broccoli Casserole Savory and Simple Dish

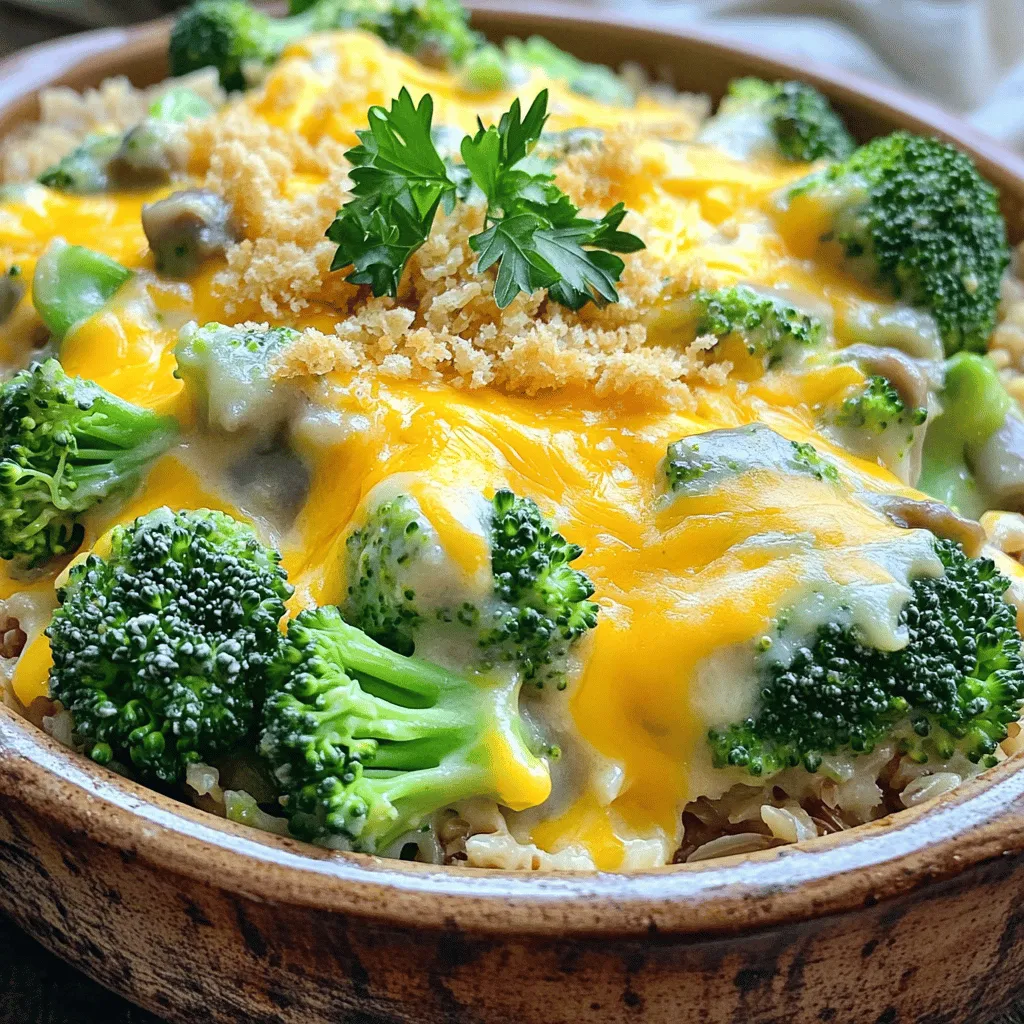
Looking for a quick and tasty dinner? This Cheesy Broccoli Casserole is your perfect solution! It’s simple to make and

Older posts
Newer posts
← Previous Page1 … Page37 Page38 Page39 … Page76 Next →

dsad

© 2025 So Yum Recipes • Built with GeneratePress

Our Policies

  • Copyright Policy
  • Cookie Policy
  • GDPR Policy
  • Privacy Policy
  • Disclaimer
  • Terms Of Use

More Information

  • Home
  • About
  • Contact
  • Appetizers
  • Dessert
  • Dinner
  • Drinks
©2025, So Yum Recipes About Back To Top