![- 1 cup frozen spinach, thawed and drained - 1 cup canned artichoke hearts, drained and chopped - 1 cup cream cheese, softened - 1 cup sour cream - 1 cup shredded mozzarella cheese - 1/2 cup grated Parmesan cheese - 2 cloves garlic, minced - 1 teaspoon lemon juice - 1/2 teaspoon red pepper flakes (optional) - Salt and pepper to taste - Tortilla chips or toasted baguette slices for serving Gathering these ingredients is the first step to making a tasty cheesy spinach artichoke dip. I love using frozen spinach because it is easy to store and always ready to use. Canned artichokes give a great flavor and texture without the need for cooking. Cream cheese and sour cream make the dip smooth and rich. Mozzarella and Parmesan add that cheesy goodness that everyone loves. Garlic adds a punch of flavor, while lemon juice brings brightness. If you like a little heat, toss in red pepper flakes. Don't forget the salt and pepper for seasoning. For serving, I like to use tortilla chips or toasted baguette slices. They complement the dip perfectly. You can find the full recipe for this delicious dip in the recipe section. - Preheat the oven to 350°F (175°C). - In a bowl, combine cream cheese and sour cream until smooth. - Add artichoke hearts, spinach, garlic, lemon juice, and red pepper flakes. - Incorporate mozzarella and Parmesan cheese into the mix. - Spread the mixture in a baking dish evenly. - Bake for 20-25 minutes until it is bubbly and golden on top. This recipe is quick and easy, perfect for any gathering. The warm, cheesy dip pairs well with tortilla chips or toasted baguette slices. Enjoy this tasty treat with friends! For the complete recipe, check the Full Recipe above. To make the best dip, start with room temperature cream cheese. This helps it mix well. If you use cold cream cheese, it can be hard to blend. Next, adjust the seasonings to fit your taste. You might like it spicy or mild. So, taste as you mix! Serve the dip warm for the best flavor. It pairs great with tortilla chips or sliced baguette. For a fresh look, add a sprinkle of chopped parsley on top. You can also use other garnishes like red pepper flakes for a pop of color. Avoid overmixing your ingredients. If you mix too much, the dip can become tough. Also, make sure to drain the spinach and artichokes well. Extra water can make your dip watery. Follow these tips for the best Cheesy Spinach Artichoke Dip. For the full recipe, check out the [Full Recipe]. {{image_2}} You can make your cheesy spinach artichoke dip lighter. First, try Greek yogurt instead of sour cream. Greek yogurt adds creaminess and a nice tang. Next, use low-fat cream cheese and cheese. This change cuts calories without losing flavor. Want to boost the flavor? Add cooked bacon or crab meat. Both add richness and a savory touch. You could also try different cheeses. Cheddar brings a sharp bite, while feta adds a unique tang. Mixing cheeses can elevate the dish. Seasonal ingredients can give your dip a fresh twist. Sun-dried tomatoes add a burst of flavor and color. Roasted peppers can also enhance the taste. Additionally, fresh herbs like basil or parsley can brighten the dish. Use what is available to keep it exciting and tasty. To keep your cheesy spinach artichoke dip fresh, start by refrigerating it. Place the dip in a container with a tight lid. This will help it stay tasty for up to three days. Make sure to cool the dip before you put it in the fridge. Using glass or plastic containers is best for storage. When you're ready to enjoy the dip again, you must reheat it properly. You can use a microwave or an oven. If you choose the microwave, heat it in 30-second bursts. Stir in between to ensure even warming. If using an oven, preheat it to 350°F (175°C). Bake the dip for about 10-15 minutes until it's hot and bubbly. To restore its creamy texture, you can add a splash of sour cream or cream cheese when reheating. You can freeze the dip if you want to save some for later. First, let it cool completely. Then, place it in a freezer-safe container. Make sure to leave a little space at the top, as the dip will expand when frozen. When you’re ready to eat it, thaw it overnight in the fridge. Then, reheat it using the steps above. This way, the flavor and texture remain great! Yes, you can make this dip ahead of time. Just prepare it, then store it in the fridge. Use an airtight container for best results. You can make it a day before your party. When you are ready to serve, just bake it until hot and bubbly. This saves you time on the day of your event. If you can't find artichoke hearts, try using chopped broccoli or cooked mushrooms. Both will change the taste a bit. Broccoli adds a nice crunch, while mushrooms bring a different earthy flavor. You can also use canned palm hearts for a similar texture. Each option gives a unique twist to your dip. To spice things up, add more red pepper flakes or some diced jalapeños. You can also mix in hot sauce for an extra kick. If you enjoy heat, try using pepper jack cheese instead of mozzarella. Just remember to taste as you go to find your perfect level of spice. Yes, you can make a vegan version of this dip. Use vegan cream cheese and sour cream instead. For cheese, try using vegan mozzarella or nutritional yeast to get a cheesy flavor. Replace artichokes with extra veggies like zucchini or bell peppers. This way, you keep it tasty and plant-based. For the full recipe, check the recipe section. This blog post covered how to make a cheesy spinach artichoke dip. You learned about the key ingredients and step-by-step instructions. I also shared tips, variations, and storage info for your leftovers. Remember, successful dips need right mixing and proper seasoning. Enjoy serving this dip warm for the best taste. Feel free to experiment with flavors and ingredients. With these simple methods, you’ll impress everyone at your next gathering. Keep this recipe handy for delicious dips anytime!](https://soyumrecipes.com/wp-content/uploads/2025/06/743bfa71-04c2-4463-a7b8-73293f2ec462.webp)
Cheesy Spinach Artichoke Dip Tasty Party Treat
Looking for the ultimate party dip? My Cheesy Spinach Artichoke Dip is a crowd-pleaser. With creamy cheese and tender artichokes,
Looking for the ultimate party dip? My Cheesy Spinach Artichoke Dip is a crowd-pleaser. With creamy cheese and tender artichokes,

Are you ready to whip up a delicious meal that’s quick and easy? In this blog, I’ll guide you through

There’s nothing quite like a warm, fragrant bowl of Classic Apple Crisp to cozy up your day. This hearty dessert

Craving a dish that’s both tasty and fun to make? Teriyaki Chicken Lettuce Wraps deliver that flavor-packed experience! With just
![- 4 medium zucchini - 1 cup cooked quinoa - 1 cup cherry tomatoes, halved - 1/2 cup corn kernels - 1/2 cup black beans - 1/4 cup red onion, finely chopped - 1 teaspoon garlic powder - 1 teaspoon cumin - 1/2 teaspoon smoked paprika - Salt and pepper to taste - 1 cup shredded cheese (cheddar or mozzarella) - Fresh cilantro or parsley for garnish - Olive oil for drizzling In this recipe, the main ingredients create a healthy and tasty base. The zucchini acts as a perfect vessel to hold the filling. Cooked quinoa offers a great source of protein and fiber. Cherry tomatoes add a burst of sweetness. Corn kernels bring a nice crunch, and black beans add heartiness. For seasoning, chopped red onion gives a fresh, sharp taste. Garlic powder adds depth, while cumin and smoked paprika bring warmth and earthiness. Salt and pepper balance all the flavors. The additional ingredients really elevate this dish. Shredded cheese melts beautifully, creating a gooey topping. Fresh herbs like cilantro or parsley make your dish look vibrant and fresh. Drizzling olive oil adds richness and enhances the flavor of the zucchini boats. You can find the full recipe to guide you through the cooking steps. Enjoy making these easy stuffed zucchini boats! - Preheat the oven to 375°F (190°C). - Prepare the zucchini by cutting in half and scooping out the seeds. To start, preheating your oven is essential. This ensures your zucchini cooks evenly. Next, grab your medium zucchini and slice them in half lengthwise. Use a spoon to scoop out the seeds. Aim to leave about 1/4 inch of flesh. This creates a sturdy boat to hold your filling. - Combine all filling ingredients in a large mixing bowl. - Stuff each zucchini with the prepared filling. Now comes the fun part! In a large mixing bowl, combine the filling ingredients. You’ll mix cooked quinoa, cherry tomatoes, corn, black beans, red onion, garlic powder, cumin, smoked paprika, salt, and pepper. Stir well until everything is combined. Grab each zucchini boat and stuff it with this tasty mixture. Press it down gently to pack it in. This will ensure every bite is flavorful. - Place stuffed zucchini in a greased baking dish. - Cover with foil and bake for 20 minutes, then uncover and bake for an additional 10-15 minutes. Once stuffed, place your zucchini boats in a greased baking dish. This helps them not stick. Drizzle a little olive oil on top for extra flavor. Cover the dish with foil to keep the moisture in. Bake for 20 minutes. After that, uncover and bake for another 10 to 15 minutes. The zucchini should be tender, and the cheese will be bubbly and golden. This method gives you a perfect balance of texture and taste. For the full recipe, check the details above! To get the best zucchini boats, choose fresh, firm zucchini. This ensures they hold their shape while cooking. Soft or overripe zucchini will not work well. You can save time by using leftover cooked quinoa. This makes the prep quick and easy, letting you focus on the fun part—stuffing. Cheese can change the whole dish. Try different types like feta or goat cheese for a special twist. They add a unique flavor that elevates your meal. You can also add cheese at different times. Putting it on before baking makes it gooey. If you add it near the end, it will melt softly on top. Garnishing your dish can make it look great. Use fresh herbs like cilantro or parsley before serving. This adds a pop of color and fresh taste. Pair your zucchini boats with a simple side salad for a complete meal. A fresh salad balances the flavors and adds crunch to your plate. {{image_2}} You can make stuffed zucchini boats even more exciting with vegetarian swaps. Here are some ideas: - Substitute quinoa with rice or couscous: Rice or couscous gives a different texture. They also soak up flavors well. - Add various vegetables like bell peppers or spinach: Toss in bell peppers or spinach for added color and nutrition. These veggies mix well with the filling. Need more protein? Boost your filling with these options: - Incorporate ground turkey, beef, or plant-based protein into the filling: Ground turkey or beef makes the dish heartier. Plant-based protein is a great choice for vegans. - Top with cooked sausage or bacon for a heartier dish: For a savory kick, add sausage or crispy bacon on top. This brings great flavor to the meal. Changing the spices can take your zucchini boats to the next level. Here’s how: - Try different spices such as Italian seasoning or chili powder for varied tastes: Italian herbs add a rich flavor. Chili powder gives a nice heat. - Add hot sauce for a spicy kick: A drizzle of hot sauce can wake up the dish with a zesty touch. Adjust the heat to your liking. These variations make your stuffed zucchini boats fit your tastes and needs! You can explore these ideas and find your favorite mix. For the full recipe, check out the [Full Recipe] section. Store leftovers in an airtight container in the refrigerator. This keeps them fresh. I find they taste best within 3-4 days. After that, they may lose flavor or texture. You can freeze stuffed zucchini boats before baking them. This is great for meal prep. When you're ready to eat, just reheat them in the oven. This method gives them a fresh taste after freezing. Reheat them in the oven to keep their texture. Microwaving can make them soggy. To boost flavor, add more cheese while reheating. This little trick makes a big difference! Yes, you can prep and stuff them ahead of time; just bake them when ready. This makes it easy for busy days. You can store them in the fridge for up to two days. When you are ready to eat, just pop them in the oven. This saves time and keeps the meal fresh. Zucchini is cooked when it's tender but still holds its shape; check with a fork. You want it soft enough to bite but firm enough to stand. If the fork goes in easily, it's ready. Avoid overcooking, or it may get mushy. Serve with a side salad, rice, or quinoa for a complete meal experience. A fresh salad adds crunch and color. Rice or quinoa can soak up flavors and balance the meal. Choose what you like best for a tasty combo. Enjoy your meal! Stuffed zucchini boats are a tasty way to enjoy fresh veggies. We covered the key ingredients to create a healthy filling and shared step-by-step baking instructions. You can mix and match ingredients to suit your taste and even prep meals in advance. Remember to store leftovers well for future meals. Enjoy making and sharing these zucchini boats as a healthy dish for you and your loved ones. Try different toppings and herbs to keep the flavors exciting every time.](https://soyumrecipes.com/wp-content/uploads/2025/06/35ad786e-a852-4f06-b40d-17fe01403686.webp)
Looking for a quick and tasty meal? Easy stuffed zucchini boats are the answer! With fresh zucchini filled with a
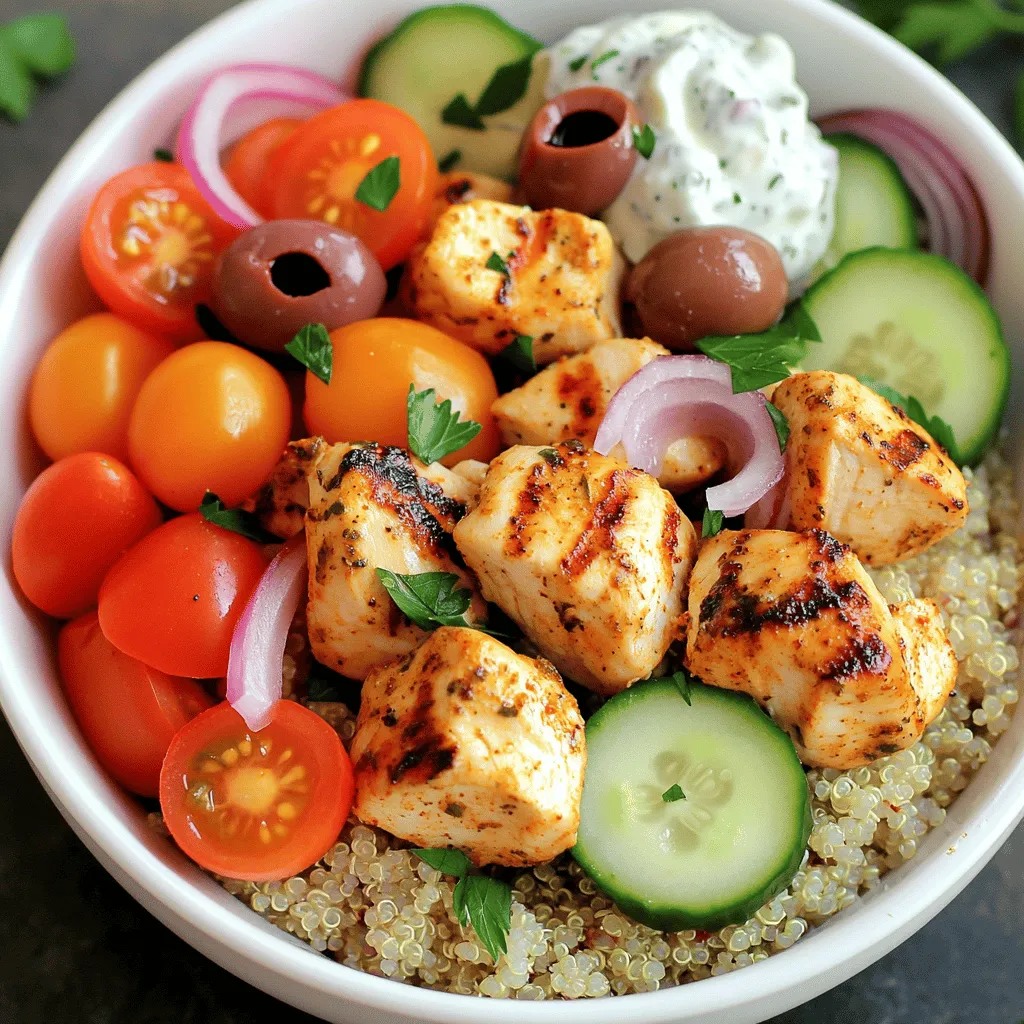
Looking for a tasty and easy meal? Greek Chicken Souvlaki Bowls are your answer! Packed with fresh flavors, these bowls
![- 1 cup strawberries, hulled and quartered - 1 cup blueberries - 1 cup raspberries Berries are the star of this dish. Strawberries add sweetness, while blueberries and raspberries bring a nice tartness. You can mix and match, but I love this trio for balance. - 1 tablespoon lemon juice - 1/2 cup granulated sugar, divided - 1 tablespoon cornstarch - 1 teaspoon vanilla extract - 1 cup rolled oats - 1/2 cup all-purpose flour - 1/2 teaspoon cinnamon - 1/4 cup brown sugar - 1/4 cup unsalted butter, melted - Pinch of salt The sugars help the berries shine and thicken the juices. Lemon juice brightens the flavor. Oats and flour create a crunchy topping. Cinnamon adds warmth, and butter brings richness. - Gluten-free options: Use almond flour instead of all-purpose flour. - Low-sugar alternatives: Replace granulated sugar with a sugar substitute, like stevia. - Dairy-free substitutes: Use coconut oil instead of butter. These swaps make the recipe fit various diets. You can enjoy a tasty dessert no matter your needs. For the full recipe, check the earlier section! 1. Preheating the oven: Start by setting your oven to 350°F (175°C). This step is key to help your crisp bake evenly. 2. Preparing the berry mixture: In a large bowl, mix together: - 1 cup strawberries, hulled and quartered - 1 cup blueberries - 1 cup raspberries Add 1 tablespoon of lemon juice, 1/4 cup of granulated sugar, and 1 tablespoon of cornstarch. Pour in 1 teaspoon of vanilla extract. Gently toss everything to coat the berries. Once mixed, pour it into a greased 9-inch baking dish. 1. Combining dry ingredients: In another bowl, mix together: - 1 cup rolled oats - 1/2 cup all-purpose flour - 1/2 teaspoon cinnamon - 1/4 cup brown sugar - 1/4 cup granulated sugar - A pinch of salt Stir these until they blend well. 2. Mixing in butter: Add 1/4 cup of melted unsalted butter to the dry mix. Stir until the mixture becomes crumbly but holds together when pressed. This is your topping. 1. Pouring mixtures into the baking dish: Spread the oat mixture evenly over the berry layer. Make sure to cover the berries well for a perfect bake. 2. Optimal baking times and temperatures: Place the baking dish in the oven. Bake for 30-35 minutes. Look for the berries to bubble and the topping to turn golden brown. After baking, let it cool for at least 10 minutes before serving. You can find the complete recipe details in the Full Recipe. To get the best topping, aim for a crumbly texture. Mix the dry ingredients well before adding the melted butter. This helps the topping stay light and crunchy. You want it to clump, but not too much. When baking, watch the berries closely. They should bubble gently when done. This means they are cooked but not mushy. If the topping turns golden brown, it’s ready. Always let it cool for a few minutes before serving. Triple berry crisp shines when served warm. Pair it with a scoop of vanilla ice cream. The cold ice cream melts into the warm crisp, creating a great mix of flavors. You can also add a dollop of yogurt for a tangy twist. For presentation, try adding mint leaves on top. They add color and flavor. A sprinkle of extra berries makes it look beautiful. One common mistake is overmixing the topping. This can make it dense instead of light. Mix just enough to combine the ingredients. Another mistake is using unripe berries. They won’t have the right sweetness or flavor. Always choose ripe, juicy berries for the best taste. For more detailed tips and a full recipe, check out the [Full Recipe]. {{image_2}} You can mix and match berries in this crisp. Strawberries, blueberries, and raspberries are classic choices. However, you can also try peaches or cherries for a different flavor. Seasonal fruits work well too. In summer, use fresh berries. In winter, frozen berries can be a great option. To boost flavor, consider adding nuts or spices. Walnuts or almonds add a nice crunch. You can also sprinkle in some cinnamon or nutmeg for warmth. Infusing flavors is simple. Add a bit of vanilla or almond extract to the berry mix. It adds depth and makes your crisp even tastier. If you want a healthier crisp, switch oats for flour. Oats give it a nice chew and extra fiber. You can also reduce sugar in the recipe. Use less sugar or try honey or maple syrup instead. These changes make the dessert lighter while still being delicious. For the full recipe, check out the details above! To store leftover Triple Berry Crisp, let it cool down first. Once cool, cover it with plastic wrap or transfer it to an airtight container. This keeps it fresh. It lasts for about 3-4 days in the fridge. You can freeze Triple Berry Crisp both before and after baking. If you freeze it before baking, wrap the dish tightly in plastic wrap, then foil. This helps prevent freezer burn. To freeze after baking, let it cool, then follow the same wrapping method. For reheating, bake from frozen at 350°F (175°C) for 45-55 minutes. If thawed, it will take about 25-30 minutes. When reheating, the best method is to use an oven. This keeps the topping crisp. Microwave reheating can make it soggy. Let it cool for a few minutes after reheating for the best texture. Enjoy it warm with a scoop of ice cream for a delightful treat! Making Triple Berry Crisp is quick and easy. It takes about 15 minutes to prep. After that, bake it for 30-35 minutes. In total, you need around 50 minutes to enjoy this delicious dessert. Yes, you can prepare Triple Berry Crisp in advance. Mix the berry filling and the crumble topping separately. Store them in the fridge. When you’re ready, just combine them and bake. This way, you save time on busy days. To freeze Triple Berry Crisp, let it cool first. Then, cover it tightly with plastic wrap or foil. You can also use an airtight container. When you want to eat it, thaw it in the fridge overnight. Just reheat it in the oven at 350°F (175°C) until warm. You can use frozen berries for this recipe. Just keep a few things in mind. First, do not thaw them before using. Add a little extra cornstarch to help thicken the juices. This will keep your crisp from getting too soggy. Enjoy the same great taste with less fuss! You now have everything you need to make a delicious Triple Berry Crisp. We explored the key ingredients, like strawberries, blueberries, and raspberries, along with helpful substitutions. The step-by-step instructions guide you from preparation to baking. I shared tips for the perfect crisp and fun variations to try. Finally, we covered storage and answered common questions. Enjoy this simple recipe, and make it your own! Your berry crisp will impress family and friends.](https://soyumrecipes.com/wp-content/uploads/2025/06/e7c1cb4f-fd3f-4c15-91d1-2f21fb56f1ce.webp)
If you’re craving a sweet treat that bursts with flavor, I have just the recipe for you! This Triple Berry
![For this recipe, you need the following ingredients: - 4 large bell peppers (any color) - 1 cup quinoa, rinsed - 2 cups vegetable broth - 1 can black beans, drained and rinsed - 1 cup corn (fresh, frozen, or canned) - 1 cup diced tomatoes (canned or fresh) - 1 small red onion, finely chopped - 2 cloves garlic, minced - 1 teaspoon cumin - 1 teaspoon smoked paprika - Salt and pepper to taste - 2 tablespoons olive oil - Fresh cilantro or parsley for garnish Choosing fresh produce is key to a great dish. Fresh bell peppers add color and crunch. The quinoa is a great source of protein and fiber. Black beans boost protein and offer a rich texture. Corn brings sweetness, while tomatoes add juiciness. Red onion and garlic give a savory base. Cumin and smoked paprika add warmth and depth. Olive oil helps with cooking and adds healthy fats. Garnishing with cilantro or parsley brings a fresh finish. You can enhance your stuffed bell peppers with various spices and herbs. Try adding chili powder for heat or oregano for earthiness. For unique fillings, consider using grains like brown rice or farro. You can also add lentils for more protein. Vegan cheese can be a creamy addition. It melts nicely and adds a cheesy flavor. Nutritional yeast is a great alternative for a cheesy taste without dairy. Using these options will make your dish even more exciting and flavorful! To prepare bell peppers, start by washing them well. Then, cut off the tops and scoop out the seeds and membranes. You want to make room for the tasty filling. Place the cleaned peppers upright in a baking dish. This keeps them stable while cooking. Set your oven to 375°F (190°C). This temperature helps the peppers cook evenly. A glass or ceramic baking dish works best for this recipe. It holds heat well and cooks the peppers gently. 1. In a medium saucepan, heat olive oil over medium heat. 2. Add the chopped red onion and minced garlic. Sauté them for about 3-4 minutes. You want the onion to look clear, not brown. 3. Next, add the rinsed quinoa and vegetable broth to the pan. Bring it to a boil. 4. Lower the heat and cover the pan. Cook for 15 minutes until the quinoa is fluffy. 5. In a large bowl, mix the cooked quinoa with black beans, corn, diced tomatoes, cumin, smoked paprika, salt, and pepper. Stir it well so all flavors blend. 6. Stuff each bell pepper with this mixture. Press gently to pack it in. 7. Cover the baking dish with aluminum foil. Bake for 30 minutes. 8. After 30 minutes, remove the foil. Bake for another 10-15 minutes until the peppers are soft. 9. When done, take them out of the oven and let them cool for a few minutes. For a nice presentation, garnish your stuffed peppers with chopped fresh cilantro or parsley. This adds color and freshness. For serving sizes, one stuffed pepper makes a good meal. You can serve them with a side salad or some rice. Enjoy your delicious vegan stuffed bell peppers! For the full recipe, check out [Full Recipe]. To make your vegan stuffed bell peppers tender, cook them longer. Bake at 375°F (190°C) for 30 minutes covered, then 10-15 minutes uncovered. This helps soften the peppers while keeping the filling warm. Common mistakes include overstuffing the peppers. If you pack them too tight, they may burst. Instead, fill them gently. Make sure to leave some space at the top for the filling to expand as it cooks. When choosing bell peppers, look for ones that are firm and shiny. Avoid any with soft spots or wrinkles. The color matters too! Red, yellow, and orange peppers are sweeter, while green peppers have a more bitter taste. Bell peppers are usually in season from late summer to early fall. This is when they taste their best and are the most affordable. To add crunch to your filling, consider mixing in some chopped nuts or seeds. Walnuts, sunflower seeds, or even some crispy chickpeas can give your dish that extra bite. Pair your stuffed peppers with a tasty sauce or dip. A simple avocado crema or a zesty salsa can enhance the dish's flavor. These additions not only make the meal more exciting but also add a fresh touch. For the full recipe, check out Vegan Fiesta Stuffed Bell Peppers. {{image_2}} You can make vegan stuffed bell peppers in many fun ways. Here are some tasty ideas: - Mediterranean Style: Use couscous, chickpeas, and spinach. Add olives and feta-style vegan cheese for a salty kick. - Italian Twist: Mix cooked rice with marinara sauce, diced zucchini, and mushrooms. Add Italian herbs for extra flavor. - Mexican Fiesta: Combine black beans, corn, and brown rice with taco seasoning. Top with avocado for creaminess. You can also use leftovers. Got some rice or beans? Toss them in! Use whatever you have in the fridge. You have different ways to cook these stuffed peppers. - Air Frying: This method cooks them fast. The peppers get crispy on the outside. Set your air fryer to 375°F for about 20 minutes. - Baking: This is the classic way. Preheat your oven to 375°F. Bake for about 40 minutes. You want the peppers to be tender. - Slow Cooker: Place your stuffed peppers in the slow cooker with a bit of water. Cook on low for 4 to 6 hours. They come out very soft. - Instant Pot: Add a cup of water to the pot. Place the peppers on the trivet. Cook on high pressure for 8 minutes. You can easily adapt this recipe for different diets. - Gluten-Free: Use quinoa or rice as your base. They are naturally gluten-free. Check labels for any added ingredients. - Low-Carb Alternatives: Use cauliflower rice instead of quinoa for fewer carbs. You still get great flavor and texture. These options keep the dish tasty and fit for everyone! For the full recipe, check out the Vegan Fiesta Stuffed Bell Peppers. To keep your vegan stuffed bell peppers fresh, refrigerate them right away. Let them cool to room temperature first. Place them in an airtight container. This method keeps the flavors strong and the texture nice. They should last for about 3 to 5 days in the fridge. When you want to reheat, use the oven. Preheat it to 350°F (175°C). Cover the peppers with foil to avoid drying them out. Bake for about 15 to 20 minutes, or until heated through. This helps keep the peppers tender and tasty. If you want to store the stuffed peppers for longer, freezing is a great option. First, let them cool completely. Wrap each pepper tightly in plastic wrap. Then, place them in a freezer-safe bag or container. They can stay fresh in the freezer for up to 3 months. When ready to eat, take them out of the freezer. Let them thaw in the fridge overnight. You can also microwave them but be careful; this might change their texture. Preparing vegan stuffed bell peppers in advance is smart. You can make a batch on Sunday for the week. Stuff the peppers, but don’t bake them yet. Store them in the fridge for up to 2 days before cooking. These peppers fit perfectly into weekly meal plans. You can pair them with a salad or grain for a complete meal. This makes it easy to enjoy healthy food all week long. For more details, check out the Full Recipe. To bake vegan stuffed bell peppers, set your oven to 375°F (190°C). Bake them for 30 minutes covered with foil. Remove the foil and bake for another 10 to 15 minutes. This time gives the peppers a nice texture and warmth. Yes, you can prepare these peppers in advance. Stuff the bell peppers and store them in the fridge for up to 24 hours. Just cover them well. When ready, bake them straight from the fridge. This makes meal prep easy and quick. If you need a substitute for quinoa, try brown rice or couscous. To use brown rice, cook it in vegetable broth for added flavor. Couscous cooks quickly, just add boiling water and let it sit for five minutes. Both options work well in this recipe. Yes! Stuffed bell peppers are packed with nutrients. Each pepper is full of vitamins A and C. The beans and quinoa add protein and fiber. This dish supports a balanced diet and can help with digestion. Enjoying them regularly can lead to better health. Absolutely! Other great options include zucchini, eggplant, or tomatoes. You can hollow out these veggies and fill them just like bell peppers. Each vegetable adds its unique taste and texture. Feel free to explore different flavors! Vegan stuffed bell peppers combine colorful produce with tasty fillings. We explored key ingredients, cooking methods, and tips for the best results. Fresh produce enhances flavor and nutrition. Various spices and herbs can take your dish to the next level. You can even use different vegetables for unique twists. In conclusion, these peppers are versatile and full of health benefits. Experiment with fillings and cooking methods. Enjoy creating your own flavorful versions, making mealtime exciting and healthy. Your culinary journey starts here!](https://soyumrecipes.com/wp-content/uploads/2025/06/44d9609c-af84-4bc4-9ce7-ae1c64f444c1.webp)
Are you ready to make a delicious and healthy meal? Vegan stuffed bell peppers are both flavorful and nutritious. With

Are you ready to spice up dinner? My Jalapeño Popper Chicken Bake is a game-changer! This dish combines creamy, cheesy
![To make One Pot Creamy Tomato Basil Pasta, you need: - 12 oz (340g) fettuccine or spaghetti - 2 tablespoons olive oil - 4 cloves garlic, minced - 1 can (14 oz) crushed tomatoes - 2 cups vegetable broth - 1 teaspoon dried oregano - 1 teaspoon sugar - Salt and pepper to taste - 1 cup heavy cream or coconut cream for a vegan option - 1 cup fresh basil leaves, roughly chopped - ½ cup grated Parmesan cheese (optional, for garnish) You can swap some ingredients for different flavors or needs. Here are some ideas: - Use penne or rigatoni instead of fettuccine or spaghetti. - If you don’t have olive oil, any cooking oil will work. - Try onion instead of garlic for a different taste. - Canned diced tomatoes can replace crushed tomatoes. - For a lighter option, use half-and-half instead of heavy cream. - Nutritional yeast can be a great substitute for Parmesan cheese. Fresh ingredients make your dish shine. Here are tips to choose the best basil and tomatoes: - Look for bright green basil leaves. Avoid yellow or brown spots. - Smell the basil; it should have a strong, sweet scent. - For tomatoes, choose ones that feel firm but slightly soft. - Ripe tomatoes should smell sweet and earthy. - Store fresh basil in water like a flower to keep it fresh longer. By focusing on quality ingredients, your One Pot Creamy Tomato Basil Pasta will taste amazing. For the complete recipe, refer to the Full Recipe section. To make One Pot Creamy Tomato Basil Pasta, start by gathering your ingredients. Grab a large pot or deep skillet. Heat 2 tablespoons of olive oil over medium heat. Add 4 cloves of minced garlic and sauté for about 1 minute. Be careful not to burn the garlic, as it can turn bitter. Next, pour in 1 can of crushed tomatoes and 2 cups of vegetable broth. Add 1 teaspoon of dried oregano and 1 teaspoon of sugar. Season the mixture with salt and pepper to taste. Stir everything together to combine the flavors. Now it’s time for the pasta! Add 12 ounces of fettuccine or spaghetti straight into the pot. Make sure the pasta is fully submerged in the liquid. Bring everything to a boil, then reduce the heat to a simmer. Cook for about 10 to 12 minutes. Stir occasionally until the pasta is al dente and most of the liquid is absorbed. Once the pasta is cooked, stir in 1 cup of heavy cream or coconut cream. Mix well until creamy. Let it simmer for another 2 to 3 minutes. Finally, remove the pot from heat and fold in 1 cup of roughly chopped fresh basil. Taste and adjust seasoning if needed. Serve hot and enjoy! To achieve the perfect creamy texture, ensure you follow the cooking times closely. If the pasta seems too dry, add a splash more vegetable broth. For a thicker sauce, let it simmer longer after adding the cream. Mixing in the basil at the end helps keep its flavor fresh and vibrant. Cooking times can vary based on the type of pasta you use. For thin pasta, check for doneness at 8 minutes. For thicker pasta, you might need an extra minute or two. Always taste the pasta to get the best results. Enjoy making this easy meal right at home with the Full Recipe. A few common mistakes can spoil your dish. First, don't skip the garlic. It adds depth. Also, be careful with the heat. Too high can burn the garlic. Next, make sure the pasta is fully submerged. This helps it cook evenly. Avoid overcooking the pasta. Al dente is key for the best texture. Finally, taste before serving. Adjust the seasoning as needed. You can boost the flavor with simple add-ins. Try adding red pepper flakes for heat. Spinach or kale can add nutrition and color. For a richer taste, toss in some sun-dried tomatoes. If you love cheese, add mozzarella or feta. Lastly, a squeeze of lemon juice brightens the dish. Having the right tools makes cooking easier. Use a large pot for even cooking. A deep skillet also works well. A wooden spoon is great for stirring. Don't forget a sharp knife for chopping. A measuring cup ensures you get the right amounts. Grab a cutting board for easy prep. These tools will help make your cooking smooth and fun. For the full recipe, please refer to the provided section. {{image_2}} You can easily make this dish vegan. Use coconut cream instead of heavy cream for a rich taste. It adds a slight sweetness that blends well with the tomatoes. You can also skip the Parmesan cheese or use a dairy-free version. Nutritional yeast is a great substitute. It adds a cheesy flavor without dairy. Want to add some protein? Chickpeas work great in this dish. Just toss in a can of drained chickpeas when you add the pasta. Tofu is another option. Sauté it with garlic for extra flavor. You can also use cooked chicken or shrimp for a heartier meal. They pair well with the creamy sauce. Feel free to switch up the pasta! Penne or rigatoni can hold the sauce nicely. Whole wheat pasta gives you a healthy twist. Gluten-free pasta is a good choice if you need it. Just adjust the cooking time as needed. You want the pasta to be al dente and absorb all those tasty flavors. For the full recipe, check out [Full Recipe]. After making your one pot creamy tomato basil pasta, let it cool down. Store it in an airtight container. This keeps the pasta fresh and prevents it from drying out. If you plan to eat it within three days, the fridge is perfect. Just make sure to label the container with the date. When you're ready to enjoy your leftovers, take them out of the fridge. Place the pasta in a pot over low heat. Add a splash of water or broth to help rehydrate it. Stir often until it warms up. You can also use a microwave. Heat it in a bowl for about 2-3 minutes, stirring halfway through. If you want to save your creamy pasta for a longer time, freezing is great. First, let the dish cool completely. Then, divide it into portions and place them in freezer-safe bags. Remove as much air as possible to avoid freezer burn. This dish can last up to three months in the freezer. When you're ready to eat, thaw it overnight in the fridge before reheating. Enjoy your meal anytime! Yes, you can make this dish gluten-free. Use gluten-free pasta instead of regular pasta. Many brands offer great options that cook well. Just check the cooking time on the package. You may need to adjust the liquid slightly as gluten-free pasta can absorb more. If you want a lighter option, use coconut cream instead of heavy cream. You can also try cashew cream or almond milk for a dairy-free choice. These alternatives will still give you that creamy texture in your pasta. Each option has a unique taste, so choose what you like best. Leftovers of this dish last about 3 to 5 days in the fridge. Store them in an airtight container for best results. To enjoy, simply reheat on the stove or in the microwave. If it seems dry, add a splash of water or broth while reheating. This blog covered ingredients, step-by-step cooking, and useful tips. You learned how to choose the best basil and tomatoes and avoid common mistakes. I shared ways to enhance flavor and adjust cooking times. You discovered options for variations and proper storage methods. In my final thoughts, remember that cooking is about creativity and fun. Use these tips to make your dish tasty and suited to your needs. Happy cooking!](https://soyumrecipes.com/wp-content/uploads/2025/06/47cd2845-e7ef-4485-8703-bbbc21e79bbd.webp)
Are you ready for a quick and creamy dinner? This One Pot Creamy Tomato Basil Pasta is simple to make
