Skip to content
DisclaimerTerms Of UseGDPR PolicyCookie Policy

So Yum Recipes

  • Home
  • Drinks
  • Appetizers
  • Dinner
  • Dessert
  • About
  • Contact
  • Privacy Policy
DisclaimerTerms Of UseGDPR PolicyCookie Policy

Chloe

For this dish, I love using ground meat options like: - 1 pound ground turkey (or beef) - 1 can (15 oz) black beans, rinsed and drained - 1 can (11 oz) corn, drained - 1 packet taco seasoning - 1 can (10 oz) diced tomatoes with green chilies - 4 cups tortilla chips - 2 cups shredded cheese (a blend of cheddar and Monterey Jack) - 1/2 cup sliced jalapeños (fresh or pickled) These ingredients create a hearty base that packs a punch. To make it your own, consider adding: - 1 avocado, diced - 1/2 cup sour cream - Chopped fresh cilantro for garnish These toppings add freshness and creaminess. You can mix and match based on your taste. When making this casserole, choose fresh ingredients when possible. Fresh meat and veggies enhance flavor. Canned items are fine, but check for low sodium options. Good seasoning is key. Use the right cheese blend for the best melted texture. A mix of sharp cheddar and Monterey Jack works great. It gives that gooey, cheesy goodness everyone loves. Using high-quality ingredients makes a big difference in taste. So, don’t skip this step. For the full recipe, check out the complete details! First, preheat your oven to 350°F (175°C). In a large skillet, cook 1 pound of ground turkey or beef over medium heat. Make sure the meat is browned and no longer pink. If there is extra fat, drain it away. This step keeps your casserole from being greasy. Next, mix in the taco seasoning, diced tomatoes with green chilies, black beans, and corn. Stir everything well and let it simmer for about 5 minutes. This lets the flavors come together nicely. Always taste and add salt and pepper if needed. Now it’s time to layer your casserole. In a greased 9x13 inch casserole dish, start with half of the tortilla chips. Spread them evenly across the bottom. This creates a solid base. Then, spoon half of the meat mixture over the chips and sprinkle half of the cheese on top. This layering helps all the flavors mix as it cooks. Repeat these steps with the remaining tortilla chips, meat mixture, and cheese. Finish with sliced jalapeños on top for a kick. Place your casserole in the preheated oven. Bake it for 20-25 minutes. You want the cheese to be bubbly and golden. Once done, take it out and let it cool slightly. This cooling time makes it easier to serve. Top your casserole with diced avocado, sour cream, and fresh cilantro for a fresh touch. These toppings add great flavor and color. For the full recipe, refer to the previous section. Enjoy your delicious Loaded Nacho Casserole! When making a casserole, avoid overcooking the meat. It can dry out. Use a meat thermometer to check if the meat reaches 165°F. For layered casseroles, grease the dish well. This helps with easy serving. Watch the layers, too! Start with chips, then meat, and cheese. Repeat until you finish. To boost flavor, try adding spices. A pinch of cayenne or chili powder works great. Fresh herbs can elevate your dish. Use chopped cilantro or green onions. Fresh ingredients always taste better. They add brightness and crunch to your casserole. Serve your Loaded Nacho Casserole with a side salad. A simple mixed greens salad pairs well. You can also offer guacamole on the side. For drinks, try a light beer or sparkling water. They balance the flavors in your dish. If you want something sweeter, serve with fruit juice. For the Full Recipe, refer back to the earlier sections. {{image_2}} You can easily switch some ingredients in the Loaded Nacho Casserole to make it vegetarian or vegan. For protein, try using beans instead of meat. Black beans work great, but you can also use pinto or kidney beans. They add a nice texture and flavor. If you want cheese, look for plant-based cheese options. Many brands now make vegan cheese that melts well. Nutritional yeast is another great choice. It has a cheesy taste and is packed with nutrients. You can make your casserole unique by adding local spices or ingredients. For example, if you love Tex-Mex flavors, try adding cumin or smoked paprika. Both spices will give your dish a nice kick. You can also create classic spins on the loaded nacho theme. Think about adding barbecue sauce for a smoky twist. Or use green chili sauce for a more southwestern flair. Each change brings new flavors to the table. You can serve Loaded Nacho Casserole in different ways. One fun style is to make individual servings. Use small ramekins and layer the ingredients like the full dish. This way, each person gets their own portion. If you want to turn this casserole into a dip or appetizer, it’s easy. Just make the casserole as usual, then serve it warm with tortilla chips. It’s perfect for parties or game days. For more details on making this delicious dish, check out the Full Recipe. After you enjoy your Loaded Nacho Casserole, store any leftovers properly. First, let it cool to room temperature. Then, place it in an airtight container. You can keep it in the fridge for up to four days. If you want to save it for longer, freeze it. It will last up to three months in the freezer. Just make sure to label your container with the date. When you’re ready to enjoy your leftovers, reheating them right is key. The best method is to use the oven. Preheat your oven to 350°F (175°C), then cover the casserole with foil. This keeps it moist. Bake for about 15 to 20 minutes, until hot. If you want it crispy, remove the foil for the last five minutes. Avoid using the microwave if you can. It can make the dish soggy. If you want to make life easier, consider meal prepping. You can prepare your Loaded Nacho Casserole ahead of time. Just follow the recipe and store it in the fridge before baking. Then, bake it fresh when you’re ready. For freezing, portion out the casserole into smaller containers. This way, you can grab just what you need later. It’s a great way to save time and still enjoy a tasty meal. For the full recipe, check out the detailed instructions above. To add heat to your Loaded Nacho Casserole, try a few spices. You can mix in cayenne pepper or crushed red pepper flakes. Adding fresh jalapeños boosts the spice level too. If you want even more heat, choose hot taco seasoning instead of mild. For a smoky flavor, try adding chipotle powder. Remember to start with a small amount and taste as you go. This way, you can adjust the heat to your liking. Absolutely! You can use any cheese you love. Cheddar is a classic choice, but Monterey Jack adds creaminess. Pepper Jack gives a spicy kick. If you prefer a milder taste, use mozzarella or gouda. Mixing cheeses can create great flavors. Just make sure to shred the cheese for even melting. Feel free to get creative with your cheese blend! To make this dish more kid-friendly, consider a few simple tweaks. Cut the spice down by using mild taco seasoning and fewer jalapeños. Offer toppings like sour cream, diced avocado, or fresh cilantro on the side. Kids love to customize their dishes! Serve with a side of fresh fruit or a simple salad. This adds color and nutrition to the meal. Kids will enjoy making their own plates. Yes, you can prep this casserole ahead. Assemble the layers and cover the dish with foil. Store it in the fridge for up to a day before baking. When ready to cook, just bake it straight from the fridge. You may need to add a few extra minutes to the baking time. This makes it easy for meal planning! You can also freeze it for later use. Just thaw it overnight in the fridge before baking. Loaded Nacho Casserole is simple and fun. We covered key ingredients, from meats to toppings. You can customize it with fresh herbs and extra toppings. I shared step-by-step instructions for cooking and layering. Cooking tips help you avoid mistakes and enhance flavor. Explore variations like vegetarian options and regional twists. Lastly, proper storage keeps leftovers fresh. Enjoy making this tasty dish for any meal. Each bite is sure to delight everyone at your table. Let's get cooking!

Loaded Nacho Casserole Flavorful and Easy Delight

Ready to bring some excitement to your dinner table? My Loaded Nacho Casserole is the perfect mix of flavor and

- 1 ½ cups all-purpose flour - ½ cup granulated sugar - 2 tablespoons poppy seeds - 1 teaspoon baking powder - ½ teaspoon baking soda - ¼ teaspoon salt - ½ cup unsalted butter, softened - 2 large eggs - 1 tablespoon lemon zest - ½ cup plain Greek yogurt - ¼ cup fresh lemon juice These ingredients make the bread light and full of flavor. The all-purpose flour gives the bread a nice structure. Granulated sugar adds sweetness, while poppy seeds give crunch and a unique taste. Baking powder and baking soda help it rise, making the bread fluffy. Salt balances the sweetness, and softened butter adds moisture. Eggs bring richness, and lemon zest and juice add that bright, zesty flavor we all love. Greek yogurt keeps the bread moist and adds a slight tang. - Glaze options (e.g., lemon icing) - Garnish suggestions (e.g., lemon slices, extra poppy seeds) You can make it even better with a glaze. A simple lemon icing on top adds sweetness and shine. Garnishing with lemon slices or extra poppy seeds makes it pretty and tasty. These little touches can make your Lemon Poppy Seed Bread look like a bakery treat. For the complete details, check out the Full Recipe. First, preheat your oven to 350°F (175°C). This step is key for even baking. Next, you need to prepare your loaf pan. Grease and flour a 9x5-inch loaf pan. Alternatively, you can line it with parchment paper. This makes it easy to remove the bread later. In a large mixing bowl, combine the following dry ingredients: - 1 ½ cups all-purpose flour - ½ cup granulated sugar - 2 tablespoons poppy seeds - 1 teaspoon baking powder - ½ teaspoon baking soda - ¼ teaspoon salt Whisk these together until well mixed. This blend adds flavor and helps the bread rise. In another bowl, cream together: - ½ cup unsalted butter, softened - 2 large eggs Mix these until light and fluffy. Then, add in: - 1 tablespoon lemon zest - ½ cup plain Greek yogurt - ¼ cup fresh lemon juice Stir until everything is well blended. The lemon zest and juice really brighten the flavor. Now, gradually mix the dry ingredients into the wet ingredients. Stir gently until just combined. Be careful not to overmix! A few lumps are okay. Overmixing can lead to dense bread, and we want it light and fluffy. Pour the batter into your prepared loaf pan. Smooth the top with a spatula. Bake in your preheated oven for 50-60 minutes. To check if it's done, insert a toothpick into the center. If it comes out clean, your bread is ready. Enjoy the aroma as it bakes! For the complete recipe, you can check the Full Recipe. To get the best texture in your lemon poppy seed bread, avoid dryness. Use room temperature ingredients like butter and eggs. Cold ingredients can lead to a dense loaf. Also, measure flour correctly. Too much flour can make the bread dry. To ensure accuracy, spoon flour into the measuring cup and level it off. Mixing the batter too much can ruin your bread. Stir just until you see no dry flour. Small lumps are perfectly fine. Also, check your oven's temperature. An oven that’s too hot can burn the bread outside while leaving it raw inside. Use an oven thermometer to be sure. For a clean cut, use a serrated knife. Slice the bread after it cools completely. This helps keep the bread from squishing. Serve your slices on a bright platter, adding lemon slices and a sprinkle of poppy seeds for flair. Lemon poppy seed bread pairs wonderfully with tea or coffee, making it a delightful treat for any time of day. For the full experience, check out the Full Recipe. {{image_2}} You can boost the taste of lemon poppy seed bread in fun ways. Adding zests from lime or orange brings a fresh twist. These bright flavors mix well with the lemon, adding depth. You can also fold in berries like blueberries or raspberries. They add color and a sweet pop to each bite. Nuts like almonds or walnuts give a nice crunch too. Just be sure to chop them small for even mixing. If you want a lighter loaf, try swapping Greek yogurt for applesauce. This change keeps moisture while cutting calories. You can also use whole wheat flour instead of all-purpose flour. It adds fiber and a heartier taste. Just remember that whole wheat flour can make the bread a bit denser. For a gluten-free version, look for flour blends that include rice or almond flour. These blends often mimic the texture of regular flour. You may need to add a bit of xanthan gum to help the bread rise well. Adjust the liquid in the recipe as needed, since gluten-free flours can absorb more. Enjoy the same deliciousness without the gluten! For all these variations, you can use the Full Recipe as your base and let your creativity shine. Lemon poppy seed bread is best stored at room temperature for short periods. Wrap it tightly in plastic wrap or foil. This keeps it fresh and moist. Place it in a cool, dry spot. It can stay good for about 2-3 days. If you notice any mold, discard it right away. If you want to keep the bread fresh longer, refrigerate it. Slice the bread first for easier storage. Use an airtight container or wrap it well. This method can extend its life to about a week. The cool air helps prevent spoilage. However, the bread may dry out a bit. You can warm slices in the microwave for a few seconds to refresh them. Freezing is a great way to store lemon poppy seed bread. First, let it cool completely. Wrap the whole loaf or individual slices tightly in plastic wrap. Then, place them in a freezer bag. Make sure to remove excess air. This keeps the bread tasty for up to three months. To thaw, simply take out a slice and leave it at room temperature for about an hour. You can also use the microwave. Just warm it for 10-15 seconds. Enjoy your bread anytime with these simple storage tips! For the full recipe, check out the details above. Lemon Poppy Seed Bread lasts about 3 to 5 days at room temperature. Store it in an airtight container to keep it fresh. If you place it in the fridge, it can last up to 1 week. Always check for mold or an off smell before eating. Yes, you can use different flours! If you want a gluten-free version, try a gluten-free flour blend. Whole wheat flour can also work, but it may change the texture. You can even use almond flour for a nutty flavor. Each flour choice will give a unique taste and look! Lemon Poppy Seed Bread pairs well with many drinks and spreads. You can serve it with a cup of tea or coffee. Cream cheese or lemon curd spreads add a nice touch. Fresh fruit, like berries, also complements its zesty flavor. Yes, you can make this bread without eggs! Use flaxseed meal or chia seeds as a substitute. Mix 1 tablespoon of flaxseed or chia with 3 tablespoons of water and let it sit for a few minutes. Applesauce or mashed bananas also work well as egg replacements. Lemon poppy seed bread is simple to make and delicious. We covered key ingredients, step-by-step instructions, and thoughtful tips. Remember to mix well but avoid overmixing. Feel free to get creative with flavors and garnishes. Store your bread properly to keep it fresh. Enjoy it with drinks or as a snack. With practice, you'll master this recipe and impress everyone. Now, it's time to bake!

Lemon Poppy Seed Bread Simple and Flavorful Recipe

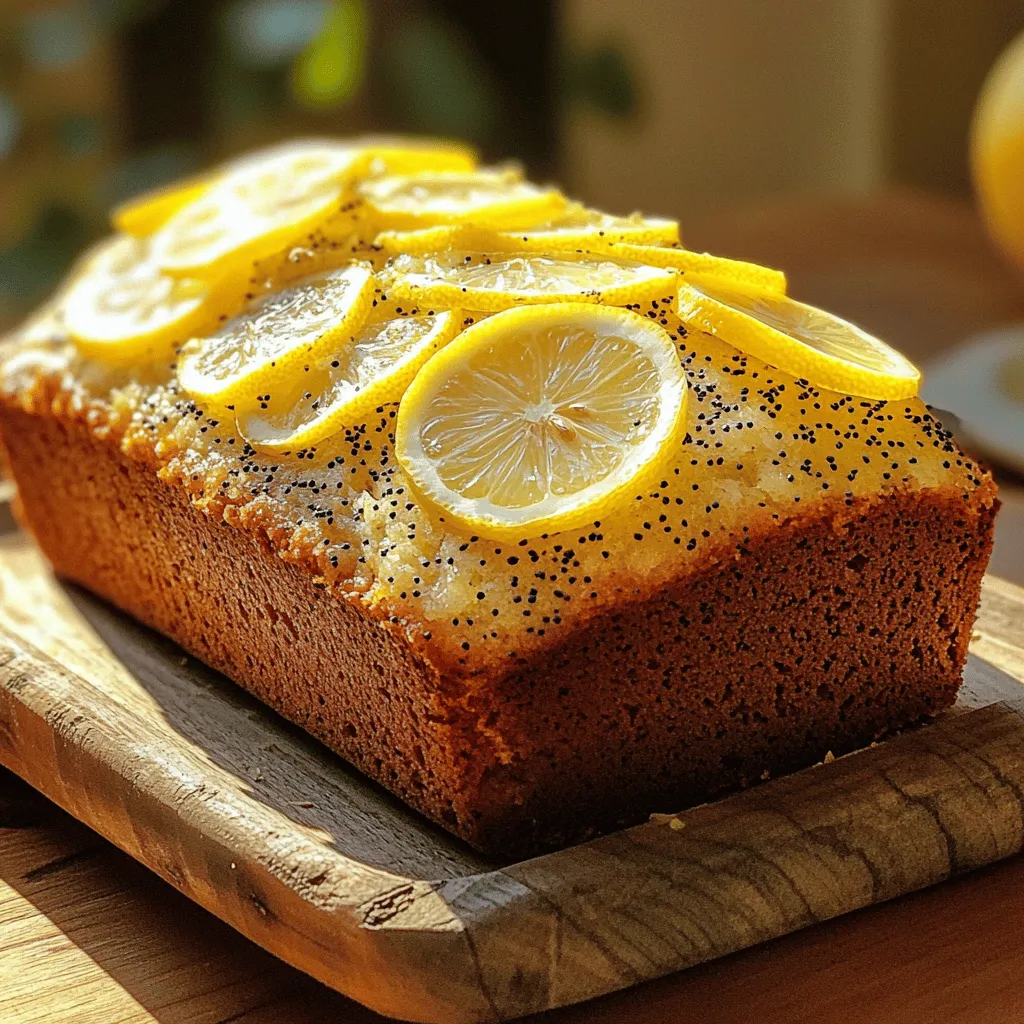
Are you ready to delight your taste buds with a bright and zesty treat? Lemon Poppy Seed Bread is easy

For Easy Skillet Lasagna, you will need: - 9 oz. lasagna noodles, broken into pieces - 1 lb. ground beef or turkey - 1 medium onion, chopped - 2 cloves garlic, minced - 24 oz. marinara sauce - 1 cup ricotta cheese - 1 ½ cups shredded mozzarella cheese - ½ cup grated Parmesan cheese - 1 tsp dried oregano - Salt and pepper to taste - Fresh basil leaves for garnish (optional) You can customize this dish by adding fresh spinach or mushrooms. You might also try using different types of cheese for a unique twist. Each serving of Easy Skillet Lasagna has about 450 calories. This dish offers key nutrients, including protein from the meat and cheese. It also provides calcium and iron. If you want a lighter meal, consider using ground turkey or a meat substitute. To start, I prepare the ground beef or turkey. I heat a large skillet over medium heat. Then, I add the meat and cook it until browned. This takes about 5-7 minutes. I break up the meat with a spatula as it cooks. If there’s excess fat, I drain it. Next, I sauté the onions and garlic. I add the chopped onion and minced garlic to the skillet. I let them cook for 3-4 minutes. The onion should become soft and clear during this time. This step adds great flavor to the dish. Now, I combine the ingredients and cook the noodles. I stir in the broken lasagna noodles and marinara sauce. I also add oregano, salt, and pepper for taste. Then, I pour in 2 cups of water, making sure the noodles are covered. I raise the heat and bring it to a boil. Once boiling, I reduce the heat to low. I cover the skillet and let it simmer for about 15-20 minutes. I stir it occasionally to keep everything mixed. This helps the noodles cook evenly, which is key for a great lasagna. For the best results, I suggest simmering for 15-20 minutes. This time lets the noodles soak up the flavors and become tender. It’s important to stir often. This keeps the noodles from sticking to the bottom of the pan. To ensure the noodles cook evenly, check the liquid levels. If it looks dry, add a bit more water. You want the noodles to be submerged while cooking. This makes sure they are soft and ready for the next steps. After the noodles are tender, I add the ricotta cheese on top. Then, I sprinkle the mozzarella and Parmesan cheese over it. I cover the skillet again and let it cook for another 3-5 minutes. This melts the cheese, creating a tasty and bubbly topping. With these steps, you will have a delicious Easy Skillet Lasagna ready to enjoy! For the full recipe, check out the details above. To keep your skillet lasagna from sticking, use a non-stick skillet. If you don't have one, add a bit of olive oil before cooking. This helps the food slide right off. Stir often, especially when the noodles cook. This way, they won’t stick to the bottom. Adjusting seasoning is key to making this dish your own. Start with the basic salt and pepper. Taste as you cook, and add more if needed. If you love spice, try adding red pepper flakes or Italian herbs. A common mistake is overcooking or undercooking the noodles. If you cook them too long, they turn mushy. If you don't cook them enough, they stay hard. Keep an eye on the timer and stir often. Another mistake is skipping an ingredient or cooking method that adds flavor. Don’t skip the garlic or onion; they bring amazing taste. You can also add fresh herbs for a burst of flavor. Every step counts in achieving a great dish. For more tips, check out the Full Recipe. {{image_2}} You can switch the ground beef for turkey or chicken. These meats are leaner and can make the dish lighter. If you want a plant-based option, try lentils or mushrooms. They add great flavor and texture. You can also mix in fresh spinach or zucchini for added nutrients. These veggies blend well with the noodles and sauce. To boost flavor, add spices like red pepper flakes or Italian seasoning. Fresh herbs like basil and parsley can brighten the dish. You can also try different cheeses. Swap ricotta for cottage cheese for a lighter taste. Use provolone or gouda instead of mozzarella for a twist. Each change can make this recipe feel new and exciting. Check out the Full Recipe for more ideas. To keep your Easy Skillet Lasagna fresh, follow these steps: - Refrigerate: Let the dish cool down first. Then, place it in an airtight container. This keeps moisture in and prevents drying. - Freeze: For longer storage, freeze in a freezer-safe container. Leave some space for expansion as it freezes. Using glass or BPA-free plastic containers works best. They help maintain freshness and flavor. Always label your containers with the date. This helps you keep track of how long they have been stored. To enjoy your leftovers, reheating is key. Here’s how to do it right: - Microwave: Place a portion in a microwave-safe dish. Cover it with a damp paper towel to keep moisture. Heat for 1-2 minutes. Stir halfway through for even warmth. - Stovetop: For a stovetop method, add a splash of water or marinara sauce to a skillet. Heat over low heat, stirring gently. This helps the dish warm without drying out. Both methods are quick and easy. They keep the lasagna tasty and moist. Enjoy your meal again with these simple steps! Can I make this dish in advance? Yes, you can make this dish in advance. Just cook it and let it cool. Then, store it in an airtight container in the fridge. You can reheat it later for an easy meal. How can I make it healthier? To make it healthier, use ground turkey instead of beef. You can add more veggies, like spinach or zucchini, for extra nutrients. Choose whole grain noodles for more fiber. Is it suitable for meal prep? Yes, this dish is great for meal prep. You can divide it into portions and store them in the fridge or freezer. It stays tasty and is easy to reheat. What to do if the noodles are too firm? If the noodles are too firm, add a bit more water. Cover the skillet and let it simmer longer. This helps the noodles cook fully and become tender. How to fix a lack of flavor? If the dish lacks flavor, you can add more salt or herbs. Fresh basil or extra oregano can boost the taste. A splash of balsamic vinegar can also add depth. Substitutions for missing ingredients? If you're missing something, there are easy swaps. Use cottage cheese instead of ricotta. You can also use any marinara sauce you have on hand. Be creative with what’s in your kitchen! Easy Skillet Lasagna combines simple ingredients and quick steps for a tasty dish. I shared key information on making this meal, from tips for cooking to variations for different tastes. Remember, avoiding common mistakes will help you get great results every time. You can customize it to fit your diet and enjoy leftovers easily. Follow the tips provided to make your cooking not just easy but fun and delicious! This dish is a winner for any night of the week.

Easy Skillet Lasagna Quick and Flavorful Dinner Recipe

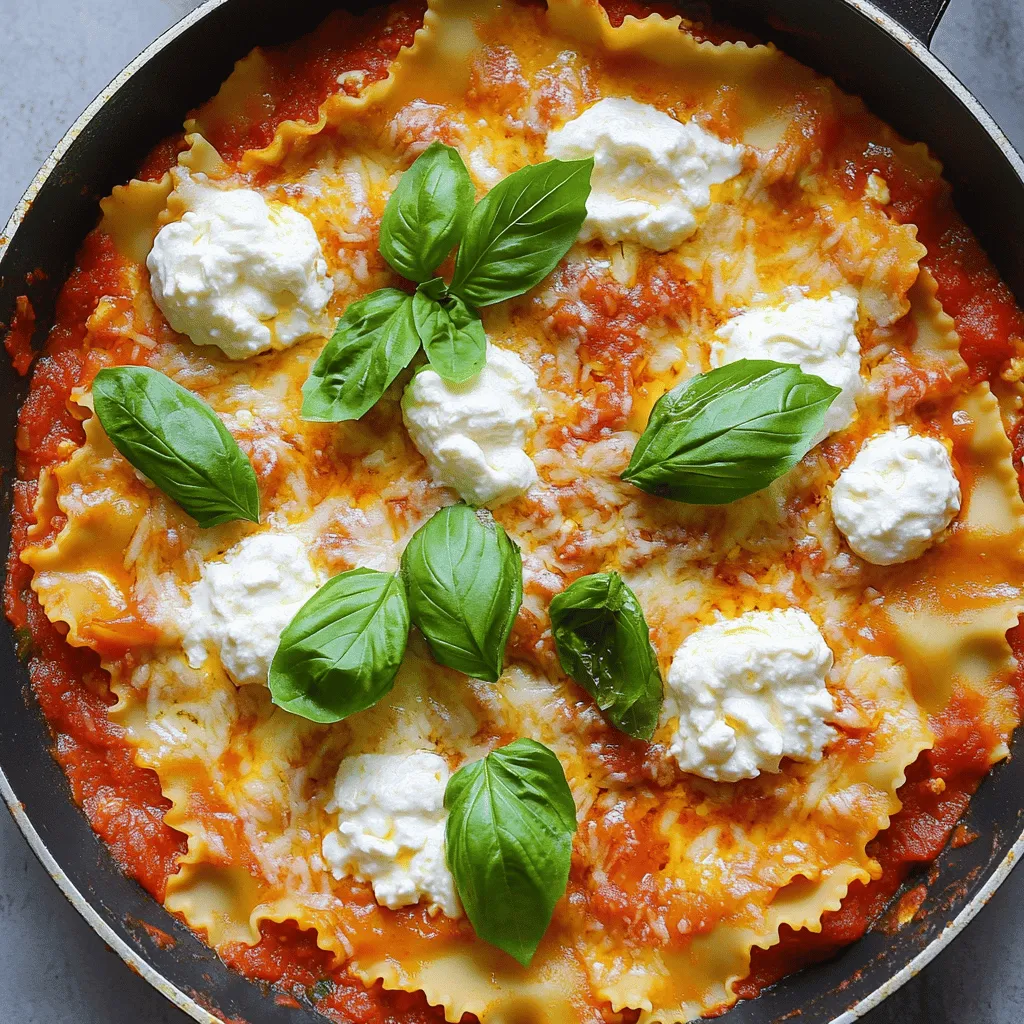
Looking for a quick and tasty dinner? You’ve come to the right place! My Easy Skillet Lasagna combines all the

To make these delicious chocolate chip cookie bars, you will need the following ingredients: - 2 1/4 cups all-purpose flour - 1 teaspoon baking soda - 1 teaspoon salt - 1 cup (2 sticks) unsalted butter, softened - 3/4 cup brown sugar, packed - 3/4 cup granulated sugar - 1 tablespoon vanilla extract - 2 large eggs - 2 cups semi-sweet chocolate chips - 1/2 cup chopped nuts (walnuts or pecans, optional) - Sea salt for sprinkling You can also consider adding some optional ingredients. For a fun twist, try using different types of chocolate chips. You can mix in dark chocolate or white chocolate chips for added flavor. If you like a bit of crunch, add chopped nuts like walnuts or pecans. Just remember, if you choose to add nuts, mix them in gently at the end. A sprinkle of sea salt on top will give your bars an extra flavor pop. This simple ingredient list makes it easy for you to bake these treats at home. You can find the full recipe above to guide you step by step. Enjoy preparing these delightful cookie bars! 1. First, preheat your oven to 350°F (175°C). This step is key for even baking. 2. Next, grease a 9x13 inch baking pan. You can also line it with parchment paper. This makes it easier to remove the bars later. 3. In a medium bowl, whisk together 2 1/4 cups of all-purpose flour, 1 teaspoon of baking soda, and 1 teaspoon of salt. Set this bowl aside. 4. In a large mixing bowl, beat 1 cup of softened butter, 3/4 cup of brown sugar, and 3/4 cup of granulated sugar together. Mix until creamy, which takes about 2-3 minutes. 5. Now, add 1 tablespoon of vanilla extract and 2 large eggs. Mix well after adding each egg. This helps create a smooth batter. 6. Gradually add the dry mix to the wet mix. Stir until just combined. Be careful not to overmix. This keeps the bars soft and chewy. 7. Gently fold in 2 cups of semi-sweet chocolate chips and optional 1/2 cup of chopped nuts. Make sure they are evenly spread throughout the dough. 8. Spread the cookie dough evenly in the prepared pan. Use a spatula to smooth the top. 9. Sprinkle a small pinch of sea salt over the top for an extra flavor boost. 10. Bake in the preheated oven for 25-30 minutes. Check for doneness by inserting a toothpick in the center. It should come out with a few moist crumbs, not wet batter. 11. Let the cookie bars cool in the pan for about 10-15 minutes. After that, transfer them to a wire rack to cool completely. 12. Once cooled, cut them into squares or rectangles and enjoy your delicious cookie bars! To bake the best chocolate chip cookie bars, avoid common mistakes. One mistake is overmixing the dough. This can make your bars tough. Mix just until the dry and wet ingredients blend. Another mistake is not measuring your flour correctly. Too much flour leads to dry bars. Use the spoon-and-level method to measure. Spoon flour into your measuring cup and level it off with a knife. To achieve the perfect texture, use room-temperature butter. Softened butter helps create a creamy mix. If your butter is too cold, it won’t mix well. Also, bake until the edges are golden brown. The center should have a few moist crumbs when tested with a toothpick. Want to boost the flavor of your cookie bars? You can use different types of chocolate. Try dark chocolate or milk chocolate for variety. Adding extracts is another great idea. Almond extract gives a unique twist. You can also add a sprinkle of sea salt on top. This enhances the sweet chocolate flavor. For more texture, consider adding nuts. Walnuts or pecans add crunch and flavor. You can also mix in dried fruits like cranberries or cherries for a fresh taste. {{image_2}} To make gluten-free cookie bars, swap all-purpose flour for gluten-free flour blends. These blends often contain rice flour, potato starch, and tapioca flour. You can also try almond flour or coconut flour, but adjust the liquid in the recipe. A good rule is to use less liquid for almond flour. For gluten-free baking, add a binding agent. Use 1 tablespoon of ground flaxseed mixed with 3 tablespoons of water as a substitute for eggs. This mix helps hold the bars together. For vegan cookie bars, replace eggs with flax eggs. Combine 1 tablespoon of ground flaxseed with 3 tablespoons of water. Let it sit for about 5 minutes until it thickens. Instead of butter, use coconut oil or vegan butter. Both provide a rich taste and texture. If you want to add a hint of flavor, use a dash of almond milk or oat milk. You can add fun flavors to your cookie bars. Try mixing in dried fruits, like cranberries or raisins. Chopped nuts, like almonds or pecans, also work great. For a festive touch, add spices like cinnamon or nutmeg. Around the holidays, consider mixing in white chocolate chips or peppermint pieces for a seasonal twist. For the full recipe, check out the details above. Enjoy baking! To keep your chocolate chip cookie bars fresh, use an airtight container. This method keeps moisture in and air out. You can store the cookie bars at room temperature for about 3 to 4 days. If you want them to last longer, place them in the fridge. They will stay fresh there for up to a week. Just remember, cold storage can change the texture slightly, making them a bit firmer. If you want to enjoy these bars later, freezing is a great option. First, let the cookie bars cool completely. Then, cut them into squares. Wrap each piece tightly in plastic wrap. Place the wrapped bars in a freezer-safe bag or container. They can last in the freezer for about 2 to 3 months. When you're ready to eat them, take out what you need. Thaw the bars at room temperature for about an hour. You can also warm them in the microwave for a few seconds. Freezing may change the texture a bit. They might not be as soft as when fresh, but they'll still taste great! How long do chocolate chip cookie bars last? Chocolate chip cookie bars can last up to a week when stored correctly. Keep them in an airtight container at room temperature. If you want them to last longer, you can refrigerate them. They may stay fresh for about two weeks in the fridge. Can I use frozen cookie dough for this recipe? Yes, you can use frozen cookie dough! Just let it thaw in the fridge overnight before using it. If you have a store-bought dough, check the package for any specific instructions. It may affect the baking time slightly, so keep an eye on them. Why are my cookie bars too dry? Dry cookie bars often happen due to too much flour or overbaking. Make sure to measure flour correctly. Use the spoon and level method instead of packing it down. Also, check your oven timer. If you bake them too long, they will dry out. What to do if the bars are undercooked? If your bars are undercooked, put them back in the oven right away. Bake them for an additional 5 to 10 minutes. Check often to ensure they don't overbake. The edges should look golden brown, and the center should look set. In this blog post, I shared how to make tasty cookie bars. We covered all the key ingredients, detailed steps for mixing and baking, and expert tips to avoid common mistakes. You also learned about variations for gluten-free and vegan options, plus fun flavor twists. Storing your cookie bars properly can keep them fresh and delicious. Remember, small changes can lead to great results. Enjoy baking and experimenting with your cookie bars!

Chocolate Chip Cookie Bars Delicious and Easy Recipe

Looking for a quick and tasty treat? My Chocolate Chip Cookie Bars recipe is your answer! In just a few

- 2 boneless, skinless chicken breasts - 1 cup quinoa, rinsed - 1 can black beans, rinsed and drained - 1 cup corn, fresh or frozen - 1 red bell pepper, diced - 1 avocado, sliced - 1 cup cherry tomatoes, halved - 1 tablespoon olive oil The chicken breasts are the star of the dish. They provide a lean protein base. I always recommend using high-quality chicken for the best flavor. Quinoa is a great grain that adds texture and nutrition. Black beans give a hearty feel and boost protein. Fresh vegetables, like corn and bell pepper, add color and crunch. Avocado and cherry tomatoes are perfect toppings to make each bite fresh and tasty. - 1 teaspoon cumin - 1 teaspoon chili powder - Salt and pepper to taste - Juice of 1 lime - Fresh cilantro for garnish Cumin and chili powder bring warmth and depth. They give the chicken a nice kick. Salt and pepper are simple but essential for flavor. The lime juice adds a bright finish that balances the dish. Fresh cilantro adds a pop of flavor and color, making it feel special. - Avocado and cherry tomatoes - Lime wedges These garnishes can make your bowl look and taste even better. Slicing an avocado adds creaminess. Halved cherry tomatoes add sweetness and freshness. Lime wedges are great for squeezing over the top, giving an extra zing. Personalize your bowl with these garnishes to suit your taste. For the complete recipe, check the Full Recipe. To cook quinoa, rinse it well. This removes the bitter coating called saponin. In a medium pot, combine the rinsed quinoa and vegetable broth. Bring it to a boil. Cover the pot and reduce the heat to low. Cook for about 15 minutes or until the quinoa is fluffy. You want all the broth to be absorbed. Fluff it with a fork before serving. Tips for fluffy quinoa: - Use a 2:1 ratio of liquid to quinoa. - Avoid stirring while it cooks. - Let it sit covered for 5 minutes after cooking. While the quinoa cooks, heat olive oil in a skillet over medium heat. Season the chicken breasts with cumin, chili powder, salt, and pepper. This adds great flavor. Place the chicken in the skillet. Cook for 6-7 minutes on each side until it is golden and cooked through. The chicken should reach an internal temperature of 165°F (75°C). Let it rest for a few minutes before slicing. This keeps it juicy. In the same skillet, add diced red bell pepper and corn. Sauté them for about 3-4 minutes. You want the bell pepper to be tender but still crisp. This adds color and nutrition to your bowl. The quick cooking keeps the vegetables fresh. Always pay attention to cooking times. Overcooking can make veggies mushy. Now, you're ready to assemble your Healthy Chicken Burrito Bowls! For the full recipe, check the previous section. Enjoy your cooking! To make your Healthy Chicken Burrito Bowls easier, prep ahead of time. Start by washing and chopping your veggies. Dice the red bell pepper and slice the avocado. Store them in airtight containers. Cook the quinoa in advance and keep it in the fridge. You can also cook the chicken earlier in the week. Slice it and store it in a separate container. This way, when you’re ready to eat, you can assemble your bowl quickly. To add more flavor, consider these spices: smoked paprika, garlic powder, or onion powder. You can mix these with your chicken seasoning. For a kick, add jalapeños or hot sauce. Pair your burrito bowl with a side of tortilla chips or a fresh salad. This will create a more filling meal. You can also serve it with a dollop of Greek yogurt or a sprinkle of cheese for extra creaminess. Serve your burrito bowls in colorful dishes. This makes your meal look more inviting. Layer the ingredients nicely. Start with a base of quinoa, then add the chicken, beans, and veggies on top. Finish with avocado and tomatoes. The colors of the food will pop, making it more appetizing. Don’t forget to garnish with fresh cilantro and a lime wedge. A well-presented bowl enhances the eating experience. For full details, check the Full Recipe. {{image_2}} You can switch out chicken for other proteins. Tofu or beef works great! If you want a plant-based option, try jackfruit. For beans, black beans are classic, but you can use pinto or kidney beans. Quinoa is healthy, but brown rice or farro adds nice texture. Mix it up to find your perfect bowl! To change the flavor, add new spices. Paprika, garlic powder, or oregano can give a fresh taste. You can also use fresh herbs like basil or parsley. Want some heat? Add hot sauce or jalapeños to spice things up! Just a few slices can make your bowl exciting and bold. If you're vegan, you can easily make this dish plant-based. Swap chicken for grilled veggies or tofu. For gluten-free options, stick with quinoa and beans. If you're watching carbs, skip the beans and use extra veggies. You can still enjoy a tasty and filling burrito bowl without the carbs! To store leftovers, use airtight containers. This keeps them fresh and safe. You can keep your Healthy Chicken Burrito Bowls in the fridge for about three to four days. Make sure to cool them down before sealing. This helps prevent moisture buildup. For freezing, divide the burrito bowls into single portions. Use freezer-safe containers or bags. Remove as much air as possible to avoid freezer burn. They can last for up to three months in the freezer. To thaw, place the bowl in the fridge overnight. This way, the food stays safe and tasty. When reheating, use the microwave or stovetop. If using a microwave, cover the bowl with a damp paper towel. This keeps moisture in and prevents drying out. If using the stovetop, add a splash of water and heat on low. Always check that the food reaches 165°F (75°C) to ensure safety. To make Healthy Chicken Burrito Bowls, follow these simple steps: 1. Cook the Quinoa: Rinse 1 cup of quinoa. Boil it in 2 cups of vegetable broth. Cover and simmer for 15 minutes until fluffy. 2. Prepare the Chicken: Season 2 chicken breasts with cumin, chili powder, salt, and pepper. Cook them in a skillet with olive oil for about 6-7 minutes on each side. Ensure they reach 165°F. 3. Sauté the Vegetables: In the same skillet, add diced red bell pepper and corn. Sauté for 3-4 minutes until tender. 4. Assemble the Bowls: Start with quinoa in each bowl. Top with sliced chicken, black beans, sautéed vegetables, avocado, and cherry tomatoes. 5. Add Final Touches: Squeeze lime juice over the bowls and garnish with cilantro. For more details, check the Full Recipe. Yes, you can use brown rice instead of quinoa. Here are the pros and cons: - Brown Rice Pros: - Chewy texture adds heartiness. - Good source of fiber. - Brown Rice Cons: - Takes longer to cook. - Slightly higher in carbs. Quinoa cooks faster and has more protein. Choose based on your taste and time. To enhance flavor in your burrito bowls, consider these sauces: - Salsa: Fresh or jarred, adds zest. - Guacamole: Creamy and rich. - Greek Yogurt: A tangy alternative to sour cream. - Chipotle Sauce: Adds a smoky kick. Balance flavors by mixing spicy and creamy sauces. This makes each bite exciting! In this post, we covered how to make healthy chicken burrito bowls. We explored main ingredients, cooking techniques, and tips for flavor. Each step helps you create a tasty meal. Remember, you can change proteins and spices to fit your taste. Store leftovers safely and reheat well for future meals. Enjoy your cooking journey, and don’t forget to get creative! A bowl of flavors awaits you, so dive in!

Healthy Chicken Burrito Bowls Packed with Flavor

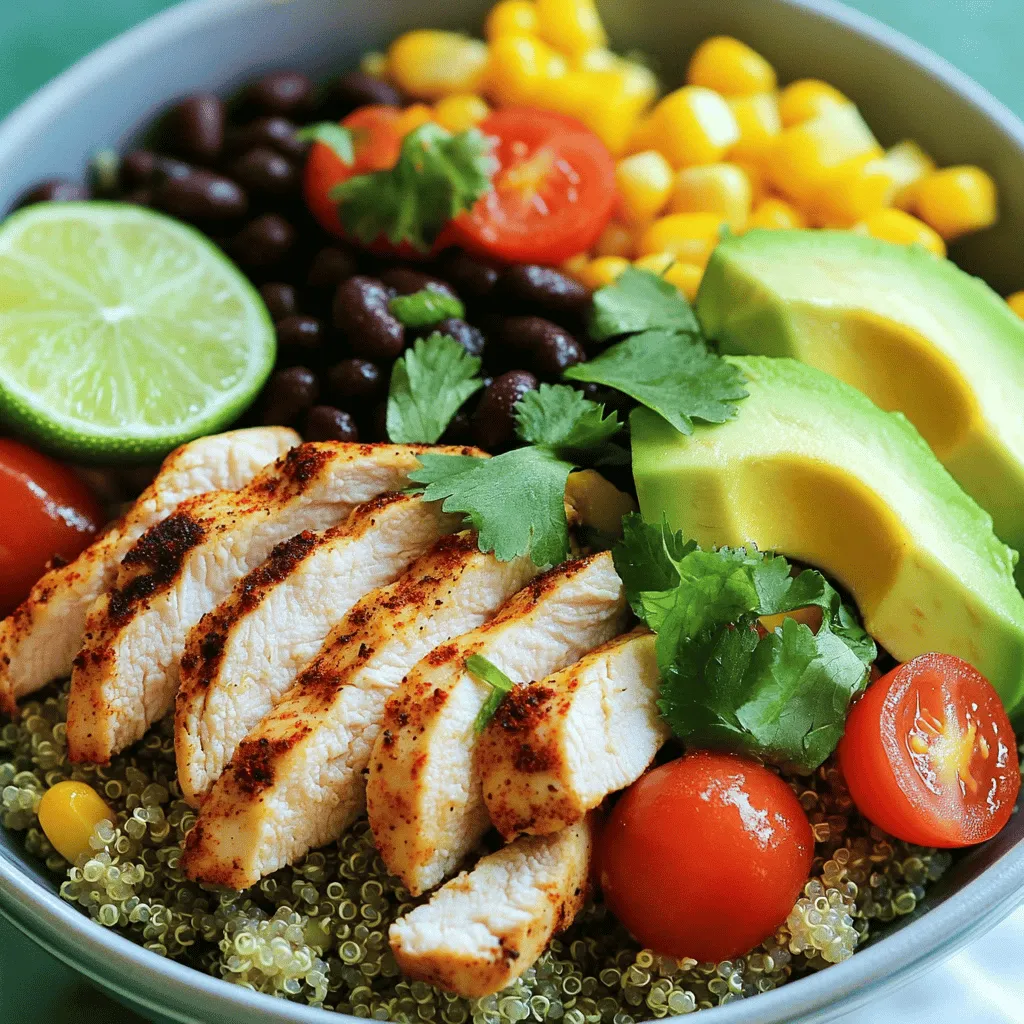
Looking for a meal that’s both healthy and bursting with flavor? You’ve found it! These Healthy Chicken Burrito Bowls are

- 4 chicken thighs, skinless and boneless - 1/2 cup soy sauce (low sodium) - 1/4 cup honey - 2 tablespoons rice vinegar - 2 tablespoons freshly grated ginger - 2 cloves garlic, minced - 1 tablespoon sesame oil - 1 tablespoon cornstarch mixed with 2 tablespoons water (for thickening) - 1/4 cup sliced green onions (for garnish) - Sesame seeds (for garnish) This dish shines with its juicy chicken and rich teriyaki flavor. Using chicken thighs keeps the meat tender. I prefer low-sodium soy sauce to control the saltiness. Honey gives the dish a sweet twist. Rice vinegar adds a nice tang. Fresh ginger brings warmth, and garlic adds depth. The sesame oil adds a nutty aroma. Cornstarch thickens the sauce for a glossy finish. For garnishing, I love fresh green onions and sesame seeds. They add color and texture. This combination creates a delightful and flavorful meal. Check out the Full Recipe for all the details! 1. Preheat your oven to 400°F (200°C). This step is key for even cooking. 2. Prepare a baking dish by lightly greasing it. This helps the chicken not stick. 3. In a medium bowl, whisk together the teriyaki sauce ingredients. Combine 1/2 cup soy sauce, 1/4 cup honey, 2 tablespoons rice vinegar, 2 tablespoons grated ginger, 2 minced garlic cloves, and 1 tablespoon sesame oil. Mix until it’s smooth and well blended. 1. Place the chicken thighs in your baking dish. Pour the teriyaki sauce over the chicken. Make sure each piece is coated. 2. Cover the baking dish with aluminum foil. This keeps moisture in while baking. 3. Bake the chicken for 25 minutes. This ensures the chicken cooks through. 4. Remove the foil and bake for another 15 minutes. This step lets the sauce caramelize and adds flavor. 5. While the chicken finishes, take the remaining sauce and pour it into a saucepan. Heat it over medium heat until it simmers. 6. Stir in the cornstarch mixture and cook for 2-3 minutes. This will thicken the sauce nicely. 1. Once the chicken is done, take it out of the oven. Let it rest for a few minutes before slicing. 2. Drizzle the thickened sauce over the chicken. This adds extra flavor. 3. Garnish with sliced green onions and sesame seeds for a nice touch. Enjoy your delicious meal! For more details, check out the Full Recipe for Baked Teriyaki Chicken. To bake chicken perfectly, set your oven to 400°F. This temperature cooks the chicken evenly. Use skinless, boneless chicken thighs for the best results. They stay juicy and tender. Place the chicken in a baking dish and cover it with foil. This helps trap moisture while baking. After 25 minutes, remove the foil. Let the sauce caramelize for 15 more minutes. This adds flavor and color. For juiciness, marinate the chicken in the teriyaki sauce. I recommend letting it soak for at least 30 minutes. If you have time, marinate overnight in the fridge. This gives the chicken a deep flavor. Always use fresh ingredients for the best taste. Grate fresh ginger and mince fresh garlic. These add a vibrant flavor to the sauce. If you like some heat, add a pinch of red pepper flakes or sriracha. This gives the dish an exciting kick. You can also try adding pineapple juice for a sweet twist. Plating is key to making your dish appealing. Slice the chicken after it rests. This helps keep the juices inside. Arrange the pieces on a clean plate. Drizzle the thickened teriyaki sauce over the top. Sprinkle green onions and sesame seeds for a nice touch. For side dishes, steamed rice or stir-fried veggies work well. They complement the flavors of the teriyaki chicken. Enjoy this savory baked teriyaki chicken, and don't forget to check the Full Recipe for full details! {{image_2}} You can change some ingredients in the teriyaki sauce. If you want a different sweet taste, try maple syrup or agave syrup. Both can add a nice twist. If you do not have chicken thighs, you can use chicken breasts or even tofu for a vegetarian option. Each protein brings its own flavor and texture. Adding pineapple can give your dish a bright, tropical taste. Just chop some fresh pineapple and mix it in with the chicken before baking. If you like spicy food, add a bit of sriracha or chili flakes to the sauce. This will give your teriyaki chicken a nice kick! For gluten-free diets, use tamari instead of soy sauce. It has the same flavor but is safe for those avoiding gluten. If you are on a low-carb diet, skip the honey and use a sugar-free sweetener instead. This keeps the dish tasty without the extra carbs. Explore these variations to find your perfect baked teriyaki chicken! For the full recipe, check out the details above. After enjoying your baked teriyaki chicken, store leftovers safely. First, let the chicken cool down. Then, place it in an airtight container. Refrigerate within two hours of cooking. The chicken stays fresh for up to three days. To keep it flavorful, try to separate the chicken from the sauce. This way, it won't get too soggy. If you want to save some for later, freezing is a great option. Wrap the cooled chicken tightly in plastic wrap or aluminum foil. Then, place it in a freezer-safe bag. Remove as much air as possible. This helps prevent freezer burn. You can freeze baked teriyaki chicken for up to three months. When you're ready to eat it, move it to the fridge overnight to thaw. Reheating your chicken properly keeps it moist and tasty. The best method is to use the oven. Preheat the oven to 350°F (175°C). Place the chicken in a baking dish and cover it with foil. Heat for about 15-20 minutes. You can also add a splash of water or sauce to help keep it juicy. If you’re in a hurry, you can use the microwave. Just cover it and heat in short bursts, checking often to avoid drying it out. Enjoy your meal again! To ensure your chicken is safe to eat, check its internal temperature. Use a meat thermometer to measure the thickest part of the chicken. The safe cooking temperature for chicken is 165°F (75°C). This ensures the meat is juicy and safe. When cooking baked teriyaki chicken, follow these steps: - Preheat your oven to 400°F (200°C). - Bake covered for 25 minutes, then uncovered for 15 minutes. - Check the temperature after baking to confirm doneness. Yes, you can easily swap chicken for other meats. Here are some options: - Pork: Use pork tenderloin or chops for a different flavor. - Beef: Thin strips of beef work well in teriyaki sauce. - Tofu: Firm tofu is a great vegetarian option. Just ensure it is pressed to remove excess water. Adjust cooking times based on the meat you choose. Pair your baked teriyaki chicken with many tasty side dishes. Here are some ideas: - Steamed rice: White or brown rice absorbs the teriyaki sauce well. - Vegetables: Broccoli, green beans, or stir-fried veggies add color and nutrition. - Salad: A fresh salad with a light dressing complements the rich flavors. These sides create a balanced and delicious meal. For the full recipe, visit the [Full Recipe]. In this post, we covered how to make flavorful teriyaki chicken. We explored key ingredients like chicken thighs, soy sauce, and honey. I provided simple steps for preparation and cooking, along with tips for juiciness. We discussed variations and substitutions to suit different tastes, plus storage and reheating advice. Teriyaki chicken is easy to make and delicious. Try it yourself to impress your friends and family. You’ll enjoy the flavors and the joy of cooking!

Baked Teriyaki Chicken Juicy and Flavorful Dish

If you crave a delicious, juicy meal that’s easy to make, you’re in the right place! Baked Teriyaki Chicken combines

To make cheesy garlic breadsticks, gather these tasty ingredients: - 2 cups all-purpose flour - 1 tablespoon instant yeast - 1 teaspoon sugar - 1 teaspoon salt - ¾ cup warm water (about 110°F) - 2 tablespoons olive oil - 3 cloves garlic, minced - 1 cup shredded mozzarella cheese - ½ cup grated Parmesan cheese - 2 tablespoons chopped fresh parsley - 1 teaspoon Italian seasoning - ¼ teaspoon red pepper flakes (optional) You will need a few tools for this recipe: - A large mixing bowl - A floured surface for kneading - A parchment-lined baking sheet - A damp cloth for covering the dough - A small bowl for mixing garlic oil Using fresh ingredients makes a big difference. Here are some tips: - Choose high-quality olive oil for rich flavor. - Use fresh garlic, as it has a stronger taste. - Grab fresh parsley from the market or your garden. - Check cheese expiration dates; fresh cheese melts better. These tips help you create the best cheesy garlic breadsticks. You can find the full recipe to guide you in making these tasty treats. Enjoy cooking! 1. In a large bowl, mix 2 cups of flour, 1 tablespoon of instant yeast, 1 teaspoon of sugar, and 1 teaspoon of salt. Stir it well. 2. In another bowl, combine ¾ cup of warm water (about 110°F) and 2 tablespoons of olive oil. Slowly add this to the dry mix. Stir until a dough forms. 3. Knead the dough on a floured surface for 5-7 minutes. It should feel smooth and elastic. 4. Place the dough in a greased bowl. Cover it with a damp cloth and let it rise for about 30 minutes. It should double in size. 5. Preheat your oven to 425°F (220°C). 6. After the dough rises, punch it down to remove air. Roll it out on a floured surface into a rectangle, about ½ inch thick. 7. Move the rolled dough to a parchment-lined baking sheet. 8. In a small bowl, mix 3 cloves of minced garlic with 2 tablespoons of olive oil. Brush this garlic oil over the dough, leaving a small edge. 9. Sprinkle 1 cup of shredded mozzarella cheese and ½ cup of grated Parmesan cheese evenly over the top. 10. In another bowl, mix 2 tablespoons of chopped parsley, 1 teaspoon of Italian seasoning, and ¼ teaspoon of red pepper flakes (if you like heat). Sprinkle this mix over the cheese. 11. Bake in the oven for 15-20 minutes. Look for a golden, bubbly surface. 12. Once baked, remove the breadsticks from the oven and let them cool slightly. 13. Cut the breadsticks into strips and serve them warm. 14. For a nice touch, serve on a wooden board with extra parsley and a small bowl of marinara sauce for dipping. This simple and fun recipe will surely delight everyone at your table. Enjoy your cheesy garlic breadsticks! For the full recipe, check out the entire guide. To get soft and chewy breadsticks, you need to knead the dough well. Kneading helps develop gluten. This gives the breadsticks their structure. Aim for about 5-7 minutes of kneading. The dough should feel smooth and elastic. If it feels sticky, add a little flour. But don’t add too much or the breadsticks will be dry. To boost the flavor, use fresh garlic. Fresh garlic gives a strong, rich taste. You can also mix in herbs like oregano and basil. Adding a pinch of red pepper flakes can add a nice kick. For a cheesy touch, don’t skimp on the mozzarella and Parmesan. Mixing them well ensures every bite is delicious. One big mistake is not letting the dough rise enough. If you skip this step, the breadsticks won't be fluffy. Another issue is brushing on too much garlic oil. This can make the breadsticks greasy. Make sure to leave a border when you spread the oil. Lastly, watch the baking time closely. Overbaking can lead to hard breadsticks. For the best results, follow the Full Recipe closely. {{image_2}} You can switch up the cheese in your cheesy garlic breadsticks. Try using provolone for a sharper taste. Cheddar adds a rich flavor, while gouda gives a nice smokiness. For a lighter option, consider feta or ricotta. Mixing cheeses can also provide a unique flavor blend. Aim for about 1 to 1.5 cups of cheese to keep it cheesy but not too heavy. Herbs and spices can bring your breadsticks to life. Fresh basil or oregano can add a classic Italian touch. Try rosemary for a more earthy flavor. If you like heat, sprinkle some chili powder or use spicy herbs. You can also add garlic powder to elevate the garlic taste. Experiment with these options to create your own perfect blend. Pair your cheesy garlic breadsticks with tasty sides. Marinara sauce is a classic dip, offering a tangy contrast. You can also serve them with ranch dressing for a creamy alternative. For a healthier choice, try hummus or tzatziki sauce. Serve alongside a fresh salad or a warm soup for a complete meal. These options will surely impress your guests! After you enjoy your cheesy garlic breadsticks, let them cool. Place them in an airtight container. You can also wrap them in plastic wrap. Store the container in the fridge. They will stay fresh for about three days. To reheat your breadsticks, use an oven for best results. Preheat it to 350°F (175°C). Place the breadsticks on a baking sheet. Heat them for about 10 minutes. You can also use a microwave. Just warm them for about 30 seconds. If you want to save some for later, freezing works great. First, let the breadsticks cool completely. Wrap each one in plastic wrap. Then, place them in a freezer bag. They can last for up to three months. When ready, simply thaw and reheat. You’ll enjoy the same delicious taste! For the full recipe, check out the main section. Homemade cheesy garlic breadsticks stay fresh for about 2-3 days at room temperature. To keep them longer, store them in an airtight container. You can also wrap them in plastic wrap. If you want to keep them for weeks, freeze them. They freeze well and last up to 3 months. Just make sure to let them cool before freezing. Yes, you can make cheesy garlic breadsticks without yeast. Instead, use baking powder as a leavening agent. This will give you a quicker rise and a denser texture. Combine the dry ingredients as usual and add the wet ingredients. The dough will be ready in no time. Just remember, the flavor will be a bit different, but still tasty! Cheesy garlic breadsticks pair well with many dishes. Here are a few ideas: - Marinara sauce for dipping - Creamy Alfredo sauce - Fresh salad for a light meal - Spicy wings for a fun snack - Soup, like tomato or minestrone For more exciting ideas, check out the Full Recipe! In this article, I covered how to make cheesy garlic breadsticks. We explored ingredients, special tools, and how to keep them fresh. I shared step-by-step instructions for preparation, baking, and serving. I also provided tips for texture and flavor, plus common mistakes to avoid. Variations, storage tips, and FAQs helped round out the guide. These breadsticks can be a tasty treat for your meals. Experiment with flavors and save any leftovers. Enjoy making them your own!

Cheesy Garlic Breadsticks Delightful and Easy Recipe

Craving a tasty snack that’s quick and simple? You’re in the right place! My Cheesy Garlic Breadsticks are packed with

- 1 ½ cups graham cracker crumbs - ½ cup unsalted butter, melted - 2 tablespoons sugar - 2 (8 oz) packages cream cheese, softened - 1 cup sugar - 1 teaspoon vanilla extract - 2 large eggs - 1 cup fresh strawberries, pureed - ½ cup fresh strawberries, diced (for topping) - ¼ cup whipped cream (for garnish) - Fresh mint leaves (for garnish) These ingredients create a delicious treat. I love how the crust is simple yet flavorful. The graham cracker crumbs provide a nice crunch. The melted butter helps bind the crust together. A little sugar sweetens it up just right. The filling is where the magic happens. Cream cheese gives it a rich, creamy texture. I use fresh strawberries for pureeing. This adds a bright, fruity taste. The vanilla extract enhances the sweetness, making each bite a delight. Adding eggs gives the filling a smooth structure. They help the cheesecake set well. I always fold in the pureed strawberries gently. This keeps the filling light and airy. Finally, the topping adds a fresh touch. Diced strawberries and whipped cream make it look pretty. Mint leaves add color and a hint of freshness. - Additional fruits for topping - Chocolate drizzle - Flavor extracts for variation You can customize this recipe with optional ingredients. Additional fruits, like blueberries or raspberries, add color and flavor. A chocolate drizzle gives a fun twist. You can also experiment with flavor extracts, like almond or lemon. For the full recipe, check out the detailed steps to make these bars. First, preheat your oven to 350°F (175°C). This makes sure your bars bake evenly. Next, line an 8x8 inch baking dish with parchment paper. Leave some paper hanging over the edges. This helps you lift the bars out later. Now, let’s make the crust. In a mixing bowl, combine: - 1 ½ cups graham cracker crumbs - ½ cup unsalted butter, melted - 2 tablespoons sugar Mix these ingredients until they look like wet sand. Then, press this mixture into the bottom of the baking dish. Make it even and flat. Bake the crust for 10 minutes. While it bakes, let it cool. Now it’s time for the filling. In another bowl, beat together: - 2 (8 oz) packages cream cheese, softened - 1 cup sugar Mix these until smooth and creamy. This will take about 2-3 minutes. Next, add in: - 1 teaspoon vanilla extract - 2 large eggs Add the eggs one at a time. Mix gently after each egg. Be careful not to overmix; you want a nice texture. Once combined, fold in: - 1 cup fresh strawberries, pureed Make sure the strawberries are mixed well into the cream cheese. Pour the cheesecake filling over your cooled crust. Spread it out evenly. Bake this for 30-35 minutes. The edges should be set, but the center should still jiggle a bit. It will firm up while it cools. After baking, take it out and let it cool to room temperature. Then, chill it in the fridge for at least 3 hours. This step is key for the best texture. Once fully chilled, lift the bars out using the parchment paper. Cut them into squares. Top each square with: - ½ cup fresh strawberries, diced (for topping) - ¼ cup whipped cream (for garnish) - Fresh mint leaves (for garnish) Enjoy your delicious strawberry cheesecake bars! For the complete recipe, check out the Full Recipe link. To make great cheesecake bars, avoid overmixing the filling. Mix just enough to combine the ingredients. Overmixing can add too much air, and this may cause cracks. For the best texture, bake until the edges set and the center remains slightly jiggly. This means the bars will firm up as they cool. These cheesecake bars taste great topped with fresh fruit. I suggest using diced strawberries or blueberries. You can also add a drizzle of chocolate for a fun twist. Serve them chilled for the best experience. They are perfect for parties or family gatherings. If you see cracks in your cheesecake, don’t worry. You can cover them with whipped cream or fruit. This hides the cracks and adds flavor. If your bars feel too soft, they may need more time in the fridge. Always chill them for at least three hours before cutting. This helps them set properly. {{image_2}} You can get creative with flavors in strawberry cheesecake bars. Try adding chocolate. Melt some chocolate and swirl it into your cheesecake mix. This will give a rich, decadent taste. You can also add lemon zest. It brightens the flavor and adds a tangy twist. If you want to swap strawberries, use other berries. Blueberries, raspberries, or blackberries work well. Each berry brings a unique flavor. You can mix and match to find your favorite. For a lighter version, use low-fat cream cheese. It cuts the calories but keeps the creamy texture. You can also choose a gluten-free crust. Use almond flour or gluten-free graham crackers. This way, everyone can enjoy these bars. To make vegan strawberry cheesecake bars, swap dairy ingredients. Use coconut cream instead of cream cheese. Silken tofu is another great option. Blend it until smooth for a creamy texture. Look for vegan products like aquafaba for eggs. It works well in cheesecakes. There are also many plant-based cream cheeses. Brands like Tofutti or Kite Hill are great choices. These make it easy to create a vegan treat everyone can enjoy. For the complete recipe, check the Full Recipe. To keep your strawberry cheesecake bars fresh, store them in the fridge. Place them in an airtight container. This helps prevent them from drying out or absorbing other smells. You can stack them neatly, but ensure they are separated by parchment paper. This keeps them intact and beautiful. If you want to save some for later, freezing is a great option. First, let the bars cool completely. Then, cut them into squares. Wrap each square in plastic wrap to keep them fresh. Place wrapped squares in a freezer-safe bag or container. Make sure to label it with the date. To enjoy later, take out a bar and thaw it in the fridge for a few hours or overnight. This helps retain the flavor and texture. Enjoy your delicious strawberry cheesecake bars anytime! You can store these bars in the fridge for up to five days. Keep them in an airtight container to keep them fresh. The bars taste great cold, making them a perfect treat to have on hand. Yes, you can make these cheesecake bars a day before. They need time to chill in the fridge. This makes them easier to slice and serve. Just remember to cover them tightly to keep them fresh. If you need a substitute, try mascarpone or ricotta cheese. You can also use Greek yogurt for a lighter option. Each will give a different taste, but they can work well in this recipe. Yes, frozen strawberries can work. Just thaw and drain them before pureeing. This helps to remove extra water. The flavor will still be great, and you can enjoy these bars year-round. To cut the bars easily, use a sharp knife. Dip the knife in hot water, then dry it off. This helps make clean cuts. Wipe the knife between cuts for the best results. Enjoy your perfectly sliced strawberry cheesecake bars! You can find the complete recipe for Strawberry Cheesecake Bars, including all details, by following this [link](#). These bars are easy to make and perfect for any occasion. They blend creamy cheesecake with fresh strawberries for a delightful treat. Enjoy each bite! In this post, we explored the key ingredients needed to make delicious strawberry cheesecake bars. You learned how to prep, bake, and store them. I shared helpful tips to avoid common mistakes and fun variations to try. Remember, these bars are great for any occasion and easy to customize. Now, it’s your turn to create this treat. Enjoy the process and taste the results! You will impress everyone with your baking skills.

Strawberry Cheesecake Bars Delightful and Easy Treat

If you love desserts that are both tasty and easy to make, these Strawberry Cheesecake Bars are perfect for you!

To make Sweet Chili Chicken Bowls, you will need these fresh ingredients: - 2 boneless, skinless chicken breasts, diced - 1 cup jasmine rice - 1 cup low-sodium chicken broth - 1 red bell pepper, thinly sliced - 1 cup snap peas, trimmed - 2 cloves garlic, minced - 1 tablespoon grated ginger - 1/3 cup sweet chili sauce - 2 tablespoons soy sauce - 1 tablespoon sesame oil - Salt and pepper to taste - 2 green onions, chopped for garnish - Sesame seeds for garnish - Fresh cilantro for garnish (optional) These ingredients work together to create a meal that is both tasty and easy to prepare. The chicken, jasmine rice, and veggies blend well with sweet chili sauce for a delightful taste. You can find the full recipe for detailed steps on how to combine these ingredients perfectly. Enjoy the bright colors and flavors in this dish! - Combine jasmine rice and chicken broth in a saucepan. - Bring to a boil and reduce heat to low. - Cook until tender and let sit covered for five minutes. - Season diced chicken with salt and pepper. - Sauté in sesame oil until golden brown, about five to seven minutes. - Stir in minced garlic and grated ginger. - Sauté sliced red bell pepper and snap peas for three to four minutes. - Pour sweet chili sauce and soy sauce over the chicken and veggies. - Allow sauce to thicken for two to three minutes. - Fluff the rice with a fork and divide it among bowls. - Top each bowl with the chicken and vegetable mixture. - Sprinkle with chopped green onions. - Add sesame seeds and fresh cilantro if desired. This simple process creates a meal that bursts with flavor. You can find the full recipe in the article. To keep your chicken juicy, use these simple tips: - Cook at medium-high heat. This helps the chicken brown nicely. - Don’t overcrowd the skillet. Cook in batches if needed. This helps with even cooking. - Let it rest. After cooking, let the chicken sit for a few minutes. This keeps it moist. For the best sauté, aim for a skillet temperature around 375°F. If the oil shimmers, you’re ready. Spice up your dish by adding: - Cilantro or basil. Both herbs add freshness. - Chili flakes. For a little heat, add a pinch. - Lime juice. A squeeze at the end brightens the flavors. To balance sweetness and saltiness, use low-sodium soy sauce. This way, the sweet chili sauce shines without being too sweet. Make your bowls look great with these tips: - Layer the rice first. This creates a nice base. - Arrange chicken and veggies neatly on top. This makes it inviting. - Garnish with green onions and sesame seeds. It adds color and texture. Garnishing is key. It not only looks good but enhances flavor too. Fresh herbs elevate the dish and make it more appealing. {{image_2}} You can swap chicken for tofu or shrimp. Tofu gives a great texture and absorbs flavors well. Cook the tofu for about 6-8 minutes until golden. Shrimp cooks faster, usually needing only 3-4 minutes. Both options still work great with sweet chili sauce. Boost the nutrition by adding more vegetables. Try carrots, broccoli, or zucchini. These veggies add color and crunch. Adjust cooking times; cook carrots for about 5 minutes, while broccoli takes about 4 minutes. Zucchini only needs 2-3 minutes to stay crisp. You can make your own sweet chili sauce too. Mix equal parts honey and soy sauce, then add chili flakes. For a twist, try adding peanut butter or sesame paste for a unique flavor. Each sauce brings its own taste, making your meal special. To keep your sweet chili chicken bowls fresh, store them in airtight containers. This helps lock in flavor and moisture. Place the bowls in the fridge within two hours of cooking. They stay good for about three days. After that, the taste and quality may drop. When reheating, use the microwave or a skillet. For the microwave, heat in short bursts. Stir and check to avoid hot spots. In a skillet, add a splash of water to keep moisture. This helps maintain the texture. Avoid sogginess by not overcrowding the pan. You can freeze the chicken and veggies separately from the rice. Let everything cool before packing. Use freezer-safe bags or containers. They can last up to three months in the freezer. For thawing, move them to the fridge overnight. Reheat gently to enjoy a quick meal later. This storage info helps keep your sweet chili chicken bowls tasty and ready for any time! For the complete recipe, check out the Full Recipe. Yes, you can use brown rice. However, it needs more time to cook. Brown rice takes about 40-45 minutes compared to 15-18 minutes for jasmine rice. The flavor is nuttier and chewier. This adds a different texture to your sweet chili chicken bowls. Sweet chili sauce has a mild heat. It is sweet with a hint of spice, making it great for many dishes. The heat level varies by brand, but most are not very hot. If you want more heat, add chili flakes or hot sauce. You can pair these bowls with several sides. Here are some ideas: - Steamed broccoli - Cucumber salad - Asian slaw - Fried rice - Spring rolls These options add freshness and crunch, enhancing your meal. To make it low-carb, swap jasmine rice for cauliflower rice. Cauliflower rice cooks quickly and absorbs flavors well. You can also use zucchini noodles or skip the grains entirely. This keeps the meal light but still delicious. Yes, you can prep these bowls ahead. Cook the chicken and veggies, then store them in the fridge. They last for about 3-4 days. When ready, reheat and serve over fresh rice. This makes for a quick and easy meal. For the complete recipe, check out the [Full Recipe]. This blog post covered a quick and tasty recipe for sweet chili chicken bowls. You learned about the key ingredients, step-by-step cooking instructions, and smart tips to make it better. I hope you try adding your favorite veggies or protein to make it unique. Enjoy leftovers and know how to store them well. These bowls are easy to make and perfect for any day. Dive in and have fun cooking!

Sweet Chili Chicken Bowls Flavorful and Easy Meal

Are you ready for a meal full of flavor and ease? Sweet Chili Chicken Bowls are your perfect solution! In

- 1 ½ cups graham cracker crumbs - ½ cup unsalted butter, melted - 1 cup sweetened condensed milk - ½ cup fresh lemon juice (about 2-3 lemons) - Zest of 2 lemons - 1 cup heavy whipping cream - ¼ cup powdered sugar - Fresh lemon slices and mint leaves for garnish (optional) Importance of using fresh lemon juice Using fresh lemon juice is key. It gives the pie a bright flavor. Bottled juice lacks that fresh taste. Always opt for fresh lemons when making this pie. Choosing the right graham crackers Not all graham crackers are the same. Look for a brand with a nice crunch. This helps your crust hold up well. A good crust is the base of a great pie. Tips for selecting powdered sugar When choosing powdered sugar, check the package. Make sure it is fresh and dry. Older sugar can clump and affect your cream. Fresh powdered sugar helps create a smooth, sweet whipped cream. For the full recipe, please refer to the section above. To make a great graham cracker crust, start with 1 ½ cups of graham cracker crumbs. Mix these crumbs with ½ cup of melted unsalted butter in a medium bowl. Make sure all the crumbs are coated well. Press the mixture into a 9-inch pie dish, forming an even layer. You can bake it for 8-10 minutes at 350°F for a crispier crust, or skip baking for a softer texture. Next, let's make the lemon filling. In another bowl, whisk together 1 cup of sweetened condensed milk, ½ cup of fresh lemon juice, and the zest of 2 lemons. Mix until everything is smooth and combined. This part adds a bright flavor to your pie. Now, we need to whip the cream. Take 1 cup of heavy whipping cream and whip it in a separate bowl until you see soft peaks. Gradually add in ¼ cup of powdered sugar while whipping until you reach stiff peaks. This cream will give your pie a light and airy texture. Now, for the fun part! Take the whipped cream and gently fold it into the lemon custard. Be careful not to deflate the cream. Keep folding until you see no white streaks. This mixture is what makes the pie so fluffy. Pour the lemon filling into your cooled graham cracker crust. Use a spatula to smooth out the top, making it look nice and even. A smooth finish makes the pie more appealing. For the best results, cover your pie with plastic wrap and refrigerate it for at least 4 hours. If you can, let it chill overnight. This helps the pie set properly. When it’s time to serve, slice the pie carefully. Use a sharp knife to get clean cuts. For a beautiful touch, garnish each slice with fresh lemon slices and mint leaves. This adds color and makes the pie look fancy. You can find the Full Recipe for more detailed guidance, but these steps will get you to a refreshing summer delight! To make the crust without baking, use a food processor. Combine graham cracker crumbs and melted butter until blended. Press this mix into your pie dish firmly. If you want a softer crust, skip baking altogether. To prevent a soggy bottom, chill the crust after pressing it. This step helps it firm up nicely. Adding extra zest from the lemons gives your pie a tangy kick. I suggest using the zest of three lemons for a burst of flavor. If you want to change the sweetness, try different sweeteners. Honey or agave syrup can give a unique twist. Adjust the amount to fit your taste buds. Pair your pie with fresh berries for a colorful touch. Raspberries or blueberries complement the lemon well. For a creative presentation, use a clear glass dish. This way, guests can admire the layers of lemon and cream. Garnish with lemon slices and mint leaves for a bright finish. {{image_2}} You can play with flavors to make this pie unique. Try a berry-infused lemon icebox pie. Just add fresh berries like strawberries or blueberries to the lemon filling. Blend them gently so the berries remain whole. This adds a nice pop of color and flavor. Another fun option is a chocolate lemon icebox pie. Mix in some melted dark chocolate into the lemon filling for a rich twist. The chocolate and lemon pair well, creating a delightful surprise. If you're looking for gluten-free options, swap regular graham crackers for gluten-free ones. Many brands offer gluten-free graham cracker crumbs that work great. You can also make your own with almond flour and coconut flour. For a dairy-free version, use coconut cream instead of heavy cream. Chill a can of coconut milk overnight. Scoop out the cream and whip it like regular cream. This gives you a light and airy texture without dairy. Mini icebox pies are perfect for parties or small servings. Use muffin tins or small jars to create individual pies. Simply follow the same recipe. Divide the crust and filling among the tins or jars. For portion control, aim for about half a cup of filling per mini pie. This way, everyone can enjoy their own without overindulging. Plus, they look cute when served! For presentation, add fresh fruit or a mint leaf on top of each mini pie. This makes them look fancy and inviting. You can find the full recipe to get started on this delicious journey! To keep your No-Bake Lemon Icebox Pie fresh, cover it tightly. Use plastic wrap or a lid. A good container keeps the pie from absorbing other smells. For best results, store it in a shallow, airtight container. This also makes it easier to slice later. If you have extra pie, just slice and store the pieces separately. This pie lasts about 3 to 4 days in the fridge. After that, it may start to lose its fresh taste. Look for changes in texture or smell. If it seems watery or has an off odor, it’s time to toss it. You can freeze this pie if you want to keep it longer. To do this, wrap the pie tightly in plastic wrap. Then, place it in a freezer-safe bag. It can stay frozen for about 1 month. When you're ready to eat it, move the pie to the fridge. Let it thaw overnight for the best texture. Avoid microwaving, as this can ruin the creamy filling. Enjoy your pie at its best! For the full recipe, check [Full Recipe]. To make this pie, you’ll start with the crust. Combine graham cracker crumbs and melted butter. Press the mixture into a pie dish. Next, make the filling by whisking sweetened condensed milk, fresh lemon juice, and zest. In another bowl, whip heavy cream and powdered sugar until it holds peaks. Fold the whipped cream into the lemon mix. Pour the filling into the crust and smooth it out. Then, chill the pie until firm. You can find the Full Recipe for all the details. The pie needs to chill for a minimum of four hours. For the best firmness, let it sit overnight. This time helps the filling set perfectly. The longer it chills, the better it tastes. You can use bottled lemon juice, but fresh juice is best. Fresh lemons give a brighter taste and better scent. Bottled juice may lack the same zing and can alter the texture. Always opt for fresh lemons if you can for the best results. To sum it up, you can create a delicious No-Bake Lemon Icebox Pie with key ingredients like graham crackers, fresh lemon juice, and heavy cream. Follow the simple steps to prepare, chill, and serve this treat. I shared tips for perfecting your crust and ways to enhance flavors. Explore variations for all diets, from gluten-free to mini pies. By storing it properly, your pie will stay fresh and tasty. With these insights, you're ready to enjoy this delightful dessert. Now, go make your lemon icebox pie!

No-Bake Lemon Icebox Pie Refreshing Summer Delight

Looking for a refreshing dessert to cool you down this summer? No-Bake Lemon Icebox Pie is a perfect choice! This

Older posts
Newer posts
← Previous Page1 … Page34 Page35 Page36 … Page77 Next →

dsad

© 2025 So Yum Recipes • Built with GeneratePress

Our Policies

  • Copyright Policy
  • Cookie Policy
  • GDPR Policy
  • Privacy Policy
  • Disclaimer
  • Terms Of Use

More Information

  • Home
  • About
  • Contact
  • Appetizers
  • Dessert
  • Dinner
  • Drinks
©2025, So Yum Recipes About Back To Top