Skip to content
DisclaimerTerms Of UseGDPR PolicyCookie Policy

So Yum Recipes

  • Home
  • Drinks
  • Appetizers
  • Dinner
  • Dessert
  • About
  • Contact
  • Privacy Policy
DisclaimerTerms Of UseGDPR PolicyCookie Policy

Chloe

- 6 large flour tortillas - 1 pound breakfast sausage (or a plant-based alternative) - 1 bell pepper, diced (any color) - 1 small onion, diced - 1 cup corn (fresh or frozen) - 1 can (15 oz) black beans, drained and rinsed - 8 large eggs - 1 cup milk (or plant-based milk) - 2 cups shredded cheddar cheese - 1 teaspoon cumin - 1 teaspoon chili powder - Salt and pepper to taste - Fresh cilantro, chopped (for garnish) - Salsa (for serving) Gathering the right ingredients is key to making a great Breakfast Burrito Casserole. You start with the main ingredients, where the tortillas form the base. Breakfast sausage adds a hearty flavor, but feel free to swap it for a plant-based version. Bell peppers and onions bring color and crunch. Corn and black beans add sweetness and protein. Next, you need eggs and milk to bind everything together. Shredded cheddar cheese melts beautifully, giving that rich taste we all love. Cumin and chili powder add warmth and spice, while salt and pepper round it out. For garnishing, fresh cilantro adds a burst of freshness. Don't forget the salsa to bring some zing to each bite! Check out the Full Recipe for more details on making this delicious dish. - Preheat your oven to 350°F (175°C). - Brown the breakfast sausage in a skillet and crumble as it cooks. - Add diced bell pepper, onion, corn, and black beans; sauté briefly. First, you need to preheat your oven. This step helps cook the casserole evenly. While it heats, brown the sausage in a large skillet. Use medium heat. Crumble the sausage as it cooks. This process adds flavor and texture. Next, add the diced bell pepper and onion. Sauté these for about 3-4 minutes. This softens them and boosts the taste. Now, stir in the corn and black beans. Cook for another 2 minutes. Season with cumin, chili powder, salt, and pepper. Once done, set this mixture aside. - Layer tortillas in the baking dish and add the sausage mixture. - Pour the combined egg and milk mixture over the layers. - Repeat the layers until all ingredients are used. Now, grab a 9x13 inch baking dish. Spray it with non-stick spray. Start by layering two tortillas at the bottom. Overlap them slightly for full coverage. Spread half of the sausage mixture over the tortillas. Next, take your egg and milk mixture. Whisk these together until smooth. Pour half of it over the sausage layer. Sprinkle one cup of shredded cheese on top. Repeat this layering process with the remaining tortillas, sausage, egg mixture, and cheese. Finish with a final layer of tortillas to cover everything. - Cover and bake for 30-35 minutes. - Allow to cool briefly, then slice and garnish with cilantro. Cover the baking dish with foil. This keeps the casserole moist while baking. Bake it in the preheated oven for 30-35 minutes. Check if the casserole is set in the middle and golden on top. After baking, take the casserole out and let it cool for a few minutes. This makes slicing easier. Finally, garnish each slice with fresh cilantro before serving. You can find the full recipe [here](#). Enjoy your delicious breakfast burrito casserole! - Ensure even browning of sausage by stirring frequently. - Use a non-stick spray generously to prevent sticking. - Allow the casserole to rest after baking for easier slicing. Cooking this Breakfast Burrito Casserole is fun and simple. I always make sure my sausage gets nice and brown. Stirring it often helps. This way, I get that rich flavor and good texture. Using a non-stick spray is key too. I spray my baking dish well to keep everything from sticking. After baking, I let the casserole rest for a few minutes. This step makes slicing easier and keeps it from falling apart. Trust me, you’ll appreciate this tip when serving! - Substitute sausage with turkey, chicken, or a plant-based option. - Add more veggies like spinach or mushrooms for added nutrition. - Experiment with cheese types like pepper jack for heat. I love to mix things up with my casseroles. You can swap sausage for turkey or chicken if you want. If you prefer plant-based options, that works too! Adding extra veggies like spinach or mushrooms boosts the nutrition and flavor. Don’t forget about cheese! I often use pepper jack for a spicy kick. It really makes the casserole pop with flavor! - Serve with additional salsa on the side. - Pair with avocado slices for a creamy touch. - Offer fresh fruit as a light side dish. When it’s time to serve, I always have extra salsa on the side. It adds a nice zing to each bite. I also like to offer avocado slices. They bring a creamy texture that complements the casserole. For a light side, fresh fruit is perfect. It balances the rich flavors of the casserole and adds a nice crunch. Enjoy the dish! For the full recipe, check out the links provided. {{image_2}} For a tasty vegetarian option, swap out the meat. Use black beans and a mix of colorful vegetables. You can add diced zucchini, spinach, or mushrooms for extra flavor and nutrition. If you want a fluffy texture instead of eggs, consider using tofu scramble. This will keep the dish light and packed with protein. If you need a gluten-free meal, it’s easy to adapt. Simply replace flour tortillas with corn tortillas. Make sure to check that all other ingredients, like sausage or cheese, are certified gluten-free. This keeps your dish safe and delicious for everyone. Want to kick up the flavor? Try adding chorizo for a spicy twist. It adds a rich taste that pairs well with the other ingredients. You can also toss in jalapeños for extra heat in the sausage mixture. This will give your casserole a bold and exciting flavor. For the full recipe, check out the [Full Recipe]. Store leftovers in an airtight container for up to 3 days. This keeps the dish fresh. For the best taste, reheat it in the oven. If you need a quick fix, the microwave works too. You can freeze the unbaked casserole for up to 3 months. This is great for meal prep! Just make sure to wrap it well. When you are ready, thaw it overnight in the refrigerator before baking. To reheat, bake in a preheated oven at 350°F (175°C) until heated through. This helps keep the texture nice. For quick reheating, microwave individual portions. This way, you can enjoy your delicious breakfast burrito casserole anytime! - Yes, prepare the casserole up to the baking step and refrigerate overnight. It saves time in the morning, and flavors blend overnight. - You can use a flaxseed mixture or commercial egg replacers for a vegan option. Mix 1 tablespoon of ground flaxseeds with 3 tablespoons of water for each egg. Let it sit until it thickens. - The casserole should be set in the center and golden brown on top. A knife inserted should come out clean. This shows it's fully cooked. - This recipe serves approximately 8 people when sliced into portions. It's great for family brunches or meal prep for the week. - Absolutely! Consider adding chili flakes or hot sauce to the egg mixture for more heat. You can also mix in jalapeños for extra flavor. This Breakfast Burrito Casserole combines key ingredients for a tasty dish. You start with savory sausage, fresh veggies, and eggs. Layer everything with tortillas and bake to perfection. Remember, customize it with your favorite spices or veggies. You can even make a gluten-free or vegetarian version. Leftovers store well and reheat easily. Enjoy making this fun casserole, and share it with friends!

Breakfast Burrito Casserole Tasty and Easy Dish

Looking for a quick, mouth-watering breakfast idea? This Breakfast Burrito Casserole combines savory sausage, fresh veggies, and creamy cheese into

- 2 pounds baby potatoes, halved - 4 tablespoons olive oil - 6 cloves garlic, minced - 2 teaspoons dried rosemary - 2 teaspoons dried thyme - 1 teaspoon smoked paprika - Salt and pepper to taste - Fresh parsley, chopped - Presentation tips for serving The base of this dish starts with baby potatoes. They are small and tender, perfect for roasting. Halving them helps them cook evenly and adds crunch. Olive oil gives rich flavor and helps the potatoes crisp up in the oven. Garlic adds a punch of taste that you can't resist. For the spices, I use dried rosemary and dried thyme. These herbs bring a warm, earthy taste. Smoked paprika adds a slight smokiness that really enhances the dish. Salt and pepper balance all the flavors. Make sure to taste as you go! Garnishing with fresh parsley not only looks great but adds a fresh touch. When serving, I like to use a rustic bowl. It makes the dish feel warm and inviting. You can also add a sprig of parsley on top. If you want a dip, try lemon aioli for a zesty kick. For the full recipe, check out the detailed instructions to make this easy and delicious dish! - Preheat the oven to 425°F (220°C). - In a large bowl, mix the halved baby potatoes with minced garlic, olive oil, dried rosemary, dried thyme, smoked paprika, salt, and pepper. Toss until the potatoes are well-coated. This helps to bring out all the flavors. - Spread the seasoned potatoes on a baking sheet. Make sure they are in a single layer. This is key for even cooking. - Roast in the preheated oven for 25-30 minutes. Toss the potatoes halfway through to ensure they brown evenly. You want them golden and crispy on the outside, and tender inside. - Once the potatoes are done, take them out of the oven. Adjust the salt and pepper if needed. This is your chance to tweak the flavor. - Transfer the roasted potatoes to a serving dish. Garnish with fresh chopped parsley for a pop of color. This adds freshness and makes the dish look great. For the complete recipe, check the [Full Recipe]. Enjoy this crunchy and flavorful dish! To get crispy potatoes, start with good quality baby potatoes. Cut them in half for even cooking. Make sure to soak them in cold water for 30 minutes. This helps remove excess starch, leading to a crunchier finish. When you roast, place them on a baking sheet in a single layer. This is key. If you overcrowd the sheet, steam forms, and your potatoes won't get crispy. For extra flavor, consider adding fresh herbs like basil or oregano. You can also try spices like chili powder or cumin for a twist. Olive oil is the best choice for roasting potatoes. It has a rich flavor that enhances the herbs. You can also use avocado oil for a higher smoke point, which is great for roasting at high heat. Watch out for overcooking or undercooking your potatoes. Overcooked potatoes can become mushy, while undercooked ones stay hard inside. Aim for that golden brown color on the outside. Another mistake is not cutting the potatoes evenly. This leads to uneven cooking. Always ensure they are similar in size. For the best results, toss them halfway through roasting. This helps them cook evenly. For the full recipe, check out the link to create your own garlic herb roasted potatoes! {{image_2}} You can get creative with garlic herb roasted potatoes. For a Mediterranean twist, add olives and feta cheese. This mix brings a salty, tangy flavor that pairs well with the herbs. You can also try a spicy version. Just sprinkle some chili flakes into your mix. This adds a nice kick and makes the dish pop. If you want to cook these potatoes faster, try an air fryer. Set it to 400°F (200°C) and cook for about 15-20 minutes. Shake the basket halfway through for even cooking. You can also grill the potatoes for a smoky taste. Just place them in a grill basket and cook over medium heat for about 20 minutes. This adds a fun outdoor flavor. This recipe is easy to adapt for different diets. You can keep it vegan and gluten-free by sticking to the original ingredients. If you want a lower-fat option, use less oil or try a cooking spray. These changes still keep the flavor while making the dish lighter. For the full recipe, check out the link provided. To keep your garlic herb roasted potatoes fresh, store them in an airtight container. Make sure they cool down before sealing. This helps prevent sogginess. In the fridge, they last about 3 to 5 days. Use them in salads or as a side dish for quick meals. You can reheat roasted potatoes in the microwave or oven. If you choose the microwave, heat them for one to two minutes. However, the oven gives better results. Preheat the oven to 400°F (200°C) and spread the potatoes on a baking sheet. Bake for about 10 to 15 minutes. This method keeps them crispy. To ensure the best texture, toss them halfway through reheating. Yes, you can freeze garlic herb roasted potatoes! First, let them cool completely. Then, place them in a freezer bag and remove as much air as possible. They can last up to three months in the freezer. When ready to eat, thaw them in the fridge overnight. Then, reheat using the oven to bring back their crunch. To achieve crispy garlic herb roasted potatoes, choose the right oil and oven settings. Use a good amount of olive oil. This helps the potatoes brown nicely. Preheat your oven to 425°F (220°C). A hot oven gives the best results. Spread the potatoes in a single layer. Crowding the pan traps steam and makes them soggy. Toss the potatoes halfway through cooking. This ensures they crisp evenly. Yes, you can use other types of potatoes. Yukon Gold and red potatoes work well. They have a creamy texture and hold up during roasting. Fingerling potatoes are also great for their unique shape. Each type brings its own flavor and texture. Experiment with what you have on hand to find your favorite. These potatoes pair well with many dishes. Try serving them with roast chicken or grilled steak. They also go nicely with salmon or a hearty veggie dish. For sides, consider a fresh green salad or steamed vegetables. This balance adds color and nutrition to your meal. You can find the full recipe for garlic herb roasted potatoes [here](#). This link provides all the details for your cooking adventure. Garlic herb roasted potatoes are easy to make and taste amazing. You need baby potatoes, garlic, olive oil, and simple seasonings for great flavor. We covered the steps to roast them perfectly, along with tips and variations to try. Don't forget to store and reheat them well to keep that crispy texture. With all these ideas, you can enjoy delicious potatoes any time! Get creative and make this dish your own. Enjoy your cooking!

Garlic Herb Roasted Potatoes Crunchy and Flavorful Dish

Are you craving a dish that is both crunchy and packed with flavor? Garlic Herb Roasted Potatoes are your answer!

- Canned chickpeas and variations: Use one can (15 oz) of chickpeas. Drain and rinse them well. You can also use dried chickpeas, but you must soak and cook them first. - Breadcrumb choices for crunch: I recommend using 1 cup of panko breadcrumbs. They give a great crunch. You can also use regular breadcrumbs or gluten-free options if you prefer. - Seasoning essentials for flavor: You will need 1/2 teaspoon garlic powder, 1/2 teaspoon onion powder, and 1/2 teaspoon smoked paprika. A little kick from 1/4 teaspoon cayenne pepper adds spice. Adjust this to your taste. - Optional additions for enhancement: Fresh herbs like parsley can brighten your nuggets. Use about 2 tablespoons, chopped. You can also add nutritional yeast for a cheesy flavor. 1. Preheat your oven to 400°F (200°C). This step is key for crispiness. Line a baking sheet with parchment paper. It keeps the nuggets from sticking. 2. For the chickpeas, use a fork or potato masher. Mash them until mostly smooth. Leave some chunks for texture. This blend gives the nuggets a nice bite. 3. In a mixing bowl, add flour, garlic powder, onion powder, smoked paprika, cayenne pepper, salt, and pepper to the mashed chickpeas. Mix it well. This is where the flavor comes from. 4. Gradually add water. Start with a little and mix. You want the mix moldable but not too wet. If you like, stir in chopped parsley for a fresh taste. 5. Now, use your hands to form nugget-sized shapes. Aim for about 1.5 inches in diameter. This size cooks well and is easy to eat. 6. Roll each nugget in breadcrumbs. Make sure they are fully coated. This adds crunch. Place them on the prepared baking sheet. 7. Drizzle olive oil over the nuggets. This helps them get crispy while baking. You can use a brush or just drizzle it on. 8. Bake for 20-25 minutes. Flip the nuggets halfway through. They should be golden brown and crispy when done. 9. Let them cool slightly before serving. This helps them firm up a bit more. Baking for the ultimate crispiness Baking makes these nuggets crispy without extra oil. It’s a healthier choice. Plus, it’s easy and hands-free. Option for frying (if applicable) If you want, you can fry these nuggets. Heat oil in a pan. Fry them until golden brown on both sides. This method gives a different texture. Cooking times for best results If baking, stick to 20-25 minutes. If frying, it takes about 4-5 minutes per side. Keep an eye on them to avoid burning. For the full recipe, refer back to the ingredients and instructions above. Enjoy making your crispy chickpea nuggets! To make your chickpea nuggets just right, focus on texture. Aim for a mix that is smooth but still has some chunks. This gives the nuggets a nice bite. If your mixture is too wet, add more flour. If it's too dry, add a little more water. Time-saving preparation methods: - Use a can of chickpeas to save time. - Mash the chickpeas in a bowl while you mix in the spices. - Form the nuggets as you go, instead of waiting until the end. Common mistakes to avoid: - Don't skip the breadcrumbs. They give the nuggets a great crunch. - Make sure to flip the nuggets halfway through baking. This helps them cook evenly. - If you crowd the baking sheet, the nuggets may steam instead of crisp up. For dipping sauces, I recommend a spicy aioli or a creamy tahini sauce. Both add flavor and moisture. You can even mix up a yogurt dip with herbs for something fresh. Creative ways to plate the dish: - Stack the nuggets high on a colorful plate. - Use fresh herbs or microgreens to add a pop of color. - Serve with sliced veggies for a fun crunch. Side dish ideas for a complete meal: - Pair your nuggets with a simple salad. - Roasted sweet potatoes make a great side. - Try some quinoa or rice to round out the meal. For the full recipe, check out the detailed instructions above. Enjoy your cooking! {{image_2}} You can change the flavors of crispy chickpea nuggets easily. For a spicy kick, add chili powder or crushed red pepper. These spices make the nuggets hot and full of flavor. You can also mix in vegan cheese for a creamy touch. Fresh herbs like basil or cilantro add great taste too. If you need a gluten-free option, swap all-purpose flour with chickpea flour. This keeps the nuggets crunchy and tasty. You won’t miss the regular flour at all! Want to make your nuggets even healthier? Add veggies like chopped spinach, carrots, or bell peppers. This boosts the vitamins and adds color. You can also mix in other legumes like black beans or lentils for extra protein. To turn your crispy chickpea nuggets into a full meal, serve them with grains. Quinoa or brown rice pairs well and makes a hearty dish. You can find the full recipe to explore these ideas further. To keep your crispy chickpea nuggets fresh, store them in the fridge. Place them in an airtight container. They last about 3 to 5 days. If you want to maintain their crunch, let them cool first. Cover them lightly with a paper towel before sealing. This helps absorb moisture. When you’re ready to eat, reheat them in the oven. Set the oven to 350°F (175°C). Bake for about 10 minutes. This method keeps them crispy. Avoid using the microwave, as it can make them soggy. You can freeze your nuggets before or after cooking. If you freeze them raw, shape the nuggets and lay them on a baking sheet. Freeze them for about 1 hour. Once they are firm, transfer them to a freezer bag. They last for about 3 months. If you prefer to freeze them after cooking, let them cool completely. Then, place them in a freezer bag and remove as much air as possible. To reheat, thaw them in the fridge overnight. Bake them at 350°F (175°C) for 15-20 minutes. This will keep them nice and crispy. Can I use dried chickpeas instead of canned? Yes, you can use dried chickpeas. Just soak and cook them first. This takes longer but adds great texture. How do I make them extra crispy? To get extra crunch, use panko breadcrumbs. You can also bake them longer or spray them with oil for more crispiness. What dipping sauces pair well? Great sauces include spicy aioli, tahini sauce, or a simple garlic dip. They add flavor and fun! Are chickpea nuggets gluten-free? Yes! If you use chickpea flour and gluten-free breadcrumbs, these nuggets are totally gluten-free. What is the best way to make them vegan-friendly? This recipe is already vegan! Just make sure all your ingredients are plant-based. Can I make these nut-free? Absolutely! This recipe is nut-free. Just check your breadcrumbs to ensure they are also nut-free. For the full recipe, check out the earlier sections! You can make delicious chickpea nuggets with simple ingredients and easy steps. We discussed how to prepare them, bake or fry them, and store leftovers. You learned tips for the best texture and tasty serving ideas. Consider all the variations to fit your taste. Feel free to explore alternatives and enhancements to make it your own. Chickpea nuggets are fun to make and share. Enjoy your cooking adventure and impress your family or friends with this tasty dish.

Crispy Chickpea Nuggets Simple and Tasty Recipe

Craving a tasty snack that’s both simple and healthy? Let me introduce you to Crispy Chickpea Nuggets! These golden bites

To make creamy avocado pasta, you need some simple ingredients. Here are the key items: - 12 ounces spaghetti or your favorite pasta - 2 ripe avocados, halved and pitted - 3 cloves garlic, minced - 1/4 cup fresh basil leaves, plus extra for garnish - 2 tablespoons lemon juice - 1/4 cup olive oil - 1/4 teaspoon red pepper flakes (optional) - Salt and pepper to taste - 1/4 cup grated Parmesan cheese (or nutritional yeast for a vegan option) - Cherry tomatoes, halved (for garnish) These ingredients blend together to create a rich, creamy sauce that will coat your pasta perfectly. The ripe avocados add a smooth texture, while the garlic and lemon juice give it a fresh kick. You can easily customize this dish based on your tastes. Here are some optional ingredients to consider: - Spinach or kale for added greens - Grilled chicken or shrimp for protein - A squeeze of lime for extra zest - Chopped nuts for crunch, like pine nuts or walnuts Feel free to experiment! Each addition can change the flavor and texture of your dish. Each serving of creamy avocado pasta offers a balanced meal. Here’s the nutritional breakdown: - Calories: 400 - Protein: 10g - Carbohydrates: 55g - Fat: 18g - Fiber: 8g This dish is not just tasty; it's also packed with nutrients. The avocados provide healthy fats, while the pasta offers energy and fiber. Enjoy this meal knowing it’s both delicious and good for you! For the complete recipe, check out the Full Recipe. First, boil a large pot of salted water. Add 12 ounces of spaghetti. Cook it until al dente, which takes about 8 to 10 minutes. This gives the pasta a nice bite. Save 1 cup of the pasta water before draining. Set the pasta aside in a big bowl. For the sauce, grab 2 ripe avocados. Cut them in half and remove the pits. In a food processor, add the avocados, 3 minced garlic cloves, and 1/4 cup of fresh basil leaves. Pour in 2 tablespoons of lemon juice and 1/4 cup of olive oil. If you like a bit of heat, add 1/4 teaspoon of red pepper flakes. Blend everything until it's creamy. Taste the sauce and add salt and pepper as needed. If it feels too thick, mix in some reserved pasta water until you reach your preferred thickness. Now, pour the avocado sauce over the cooked pasta. Toss well to coat every strand. Then, stir in 1/4 cup of grated Parmesan cheese, or nutritional yeast for a vegan option. Mix until fully combined. Serve right away for the best flavor. Top with halved cherry tomatoes and extra basil for a nice touch. For more details, check the Full Recipe. To make the best avocado sauce, start with ripe avocados. They should feel soft but not mushy. When you blend, add olive oil slowly. This helps mix well. If your sauce is thick, add reserved pasta water. This gives it a smooth, creamy texture. Blend until there are no lumps. For richer flavor, use fresh basil. It gives a bright taste. You can also add lemon juice for zest. If you like heat, sprinkle in red pepper flakes. Mix in some salt and pepper. Taste as you go to find the right balance. Serve your creamy avocado pasta in bowls. Top it with halved cherry tomatoes for color. Add more fresh basil for a nice touch. You can also sprinkle extra Parmesan cheese on top. This adds flavor and makes the dish look nice. For the full recipe, check out the details above. {{image_2}} To make creamy avocado pasta vegan, skip the cheese. Instead, use nutritional yeast for a cheesy flavor. This option keeps your dish rich while being plant-based. You can also add a splash of plant milk to make the sauce even creamier. Adding protein boosts the meal's heartiness. Grilled chicken makes a great choice. Cook it with some salt and pepper for flavor. Shrimp is another tasty option. Just sauté them until they turn pink. For a plant-based choice, cube firm tofu and pan-fry it. This adds texture and protein to your dish. You can swap out spaghetti for other pasta types. Try penne or fusilli for a fun twist. Whole wheat pasta adds fiber and nutrients. If you want gluten-free, use chickpea or zucchini noodles. These options keep your meal light and healthy. Find the full recipe for creamy avocado pasta to explore these variations further. You can store leftover creamy avocado pasta in the fridge. Place it in an airtight container. It will stay fresh for up to three days. The avocado sauce may darken, but it is still safe to eat. To keep it bright, add a little lemon juice before storing. When you reheat the pasta, do it slowly. Use a pan on low heat. Add a splash of water or olive oil to help it regain its creaminess. Stir often to prevent sticking. You can also use the microwave. Heat in short bursts, stirring in between. Freezing creamy avocado pasta is not the best option. The sauce may change texture when thawed. If you must freeze it, do so without the sauce. Cooked pasta can freeze well for up to three months. When ready to eat, thaw it in the fridge overnight. Then, mix it with fresh avocado sauce. For the full recipe, check out the section above. To make your avocado pasta creamy, use ripe avocados. Ripe avocados blend smoothly. You can add olive oil and lemon juice for extra richness. If the sauce is thick, add reserved pasta water until it reaches your desired creaminess. This method keeps the sauce light and fresh. Yes, you can use any pasta you like. Spaghetti works well, but penne or fusilli also taste great. Whole wheat or gluten-free pasta are good options too. Just cook the pasta according to the package directions for best results. If you need a substitute for Parmesan cheese, try nutritional yeast. It has a cheesy flavor and is vegan. You can also use a mix of ground nuts for a similar taste. Another option is to use grated Pecorino cheese for a different twist. Creamy avocado pasta is quite healthy. Avocados provide good fats, vitamins, and fiber. The dish is also fresh and light. You can add veggies like spinach or cherry tomatoes for more nutrients. Overall, it’s a tasty meal that supports a balanced diet. For the full recipe, check out the details above. Enjoy your cooking! This blog post covered the essential ingredients for creamy avocado pasta, from key components to nutritional info. I shared simple steps to make a delicious dish, along with tips for the best texture and flavors. You now have ideas for variations and storage tips to enjoy it later. Creamy avocado pasta is not just tasty; it's also easy to customize. Try your favorite add-ins and have fun with this dish! Enjoy creating a meal that is both healthy and delightful.

Creamy Avocado Pasta Rich and Flavorful Meal

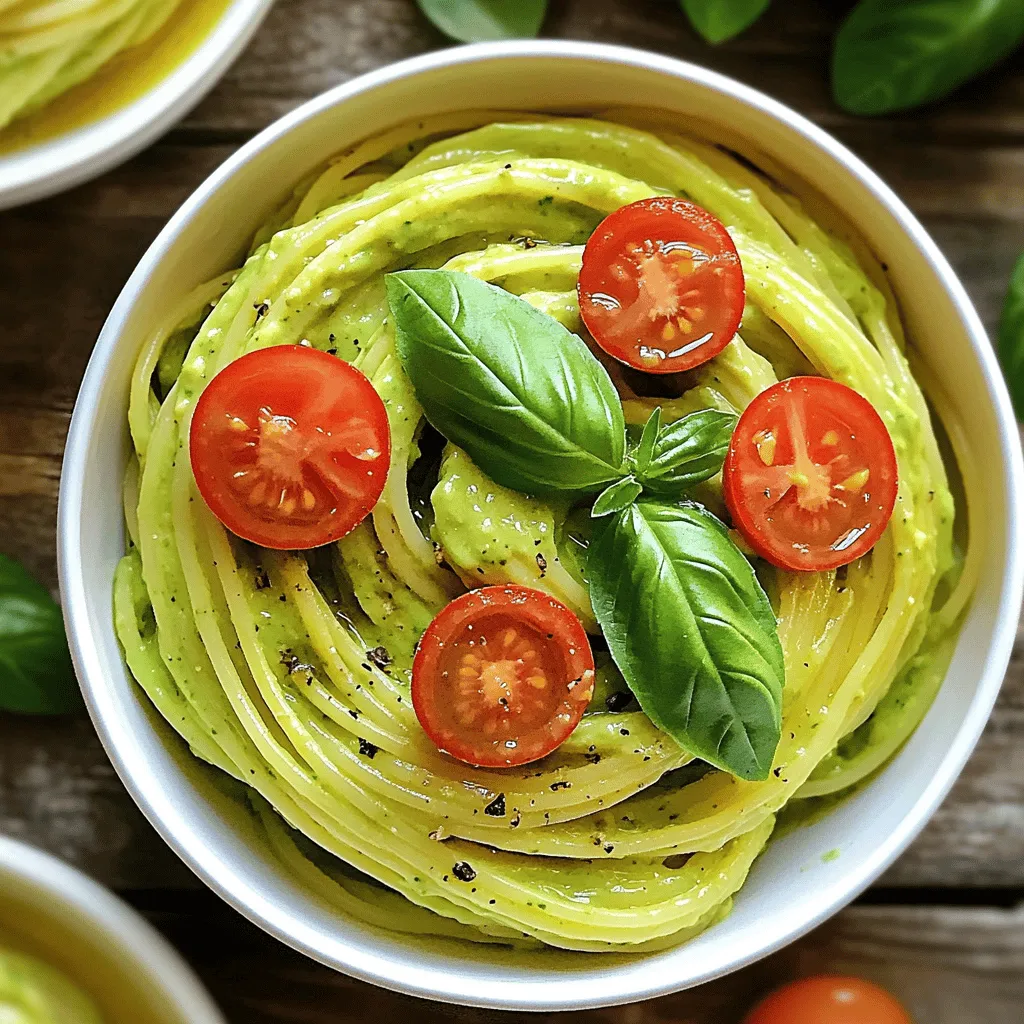
Creamy avocado pasta is a rich and tasty dish that everyone can love. If you crave fresh flavors and quick

- 1 cup silken tofu - 1/2 cup dark dairy-free chocolate chips - 1/4 cup maple syrup - 1 teaspoon vanilla extract - A pinch of sea salt - 1 tablespoon cocoa powder (optional, for extra chocolatey flavor) - Fresh berries and mint leaves for garnish Gathering the right ingredients is key to making a great vegan chocolate mousse. First, use silken tofu for a creamy base. It blends well and adds protein. Next, check for dark dairy-free chocolate chips. They give the mousse that rich chocolate flavor we all crave. Maple syrup adds sweetness and a touch of natural flavor. Don't skip the vanilla extract; it brightens the taste. A pinch of sea salt balances the sweetness perfectly. If you want a deeper chocolate taste, add cocoa powder. For a beautiful finish, consider garnishing with fresh berries and mint leaves. These extras not only look good but also add freshness to every bite. You can find the full recipe in the next section. 1. Begin by melting the dark chocolate chips. You have two options here: - Double boiler: Place the chocolate in a bowl over simmering water. Stir until smooth. - Microwave: Heat the chocolate in 20-second bursts. Stir after each burst until melted. 2. Next, blend the ingredients together. In a blender or food processor, add: - The drained silken tofu - The melted chocolate - Maple syrup - Vanilla extract - A pinch of sea salt - Optional: Cocoa powder for a richer taste Blend until the mixture is smooth and creamy. Scrape down the sides to mix everything well. 3. Now, adjust the sweetness to taste. After blending, taste the mousse. If you want it sweeter, add more maple syrup. Blend again briefly to mix. 4. Finally, transfer the mousse to serving dishes. You can use small bowls or dessert glasses for a nice presentation. - Chill the mousse for at least 30 minutes in the refrigerator. This step is crucial for a rich texture. Chilling helps the mousse set and enhances the flavors. - The right chilling makes the mousse creamy and delicious. You will love the smoothness when you take that first bite! To get the smooth and creamy texture you want, blending is key. Start by blending the silken tofu first. This step ensures a base that is light and fluffy. After that, add the melted chocolate and other ingredients. Blend until the mix is perfectly smooth. Scrape down the sides of the blender often. This helps avoid lumps and makes sure everything blends evenly. If you find lumps, just blend a bit longer. To make your mousse even better, you can add flavor boosters. Try a splash of espresso for a mocha twist. This adds depth and pairs well with chocolate. You could also mix in a bit of orange zest for a bright, fruity note. If you like it sweeter, add more maple syrup little by little. Taste as you go so you can find your perfect level of sweetness. For a richer chocolate flavor, don’t forget the optional cocoa powder from the full recipe. {{image_2}} You can take your vegan chocolate mousse to new heights with a few small changes. One great way is to add espresso for a mocha flavor. Simply mix one tablespoon of espresso powder into your melted chocolate. This step adds a rich coffee taste that pairs well with chocolate. You can also use brewed espresso for a smoother texture. Another fun twist is to use different types of dairy-free chocolate. Try using white chocolate or dark chocolate with sea salt. Each type brings its own unique flavor. You might even mix chocolates for a layered taste experience. If you want to switch up the sweetness, consider using agave or date syrup instead of maple syrup. Both options work well and change the taste slightly. Use the same amount of agave as maple syrup for a similar sweetness. If you choose date syrup, you might want to use a bit less, as it can be sweeter. Adjusting quantities is key with different sweeteners. Always taste your mousse after blending. If it’s not sweet enough, add a little more sweetener until you find the right balance. This way, you can customize the flavor to your liking. For the full recipe, refer to the main article. To store leftover mousse, first let it cool completely. Then, scoop it into an airtight container. Make sure the lid seals tightly to keep the mousse fresh. This way, you can enjoy it later without losing flavor or texture. In the fridge, the mousse lasts about three to five days. If you see any changes in color or smell, it may have spoiled. A sour smell or watery texture means it's time to toss it out. Can I use a different type of tofu? Yes, you can. Silken tofu works best for this mousse. It gives a creamy texture. If you use firm tofu, the mousse may not blend well. You might need extra liquid to help it blend smoothly. Is this mousse gluten-free? Yes, this mousse is gluten-free. All the ingredients, like chocolate chips and maple syrup, are gluten-free. Always check the labels if you buy packaged ingredients to be sure. How do I make this recipe nut-free? To keep it nut-free, use only the ingredients listed. The recipe does not include nuts. Be careful with chocolate chips, as some may have traces of nuts. Look for brands that are certified nut-free. Where to find vegan chocolate chips? You can find vegan chocolate chips at most grocery stores. Look in the baking aisle. Some health food stores also carry them. Online shops have a wide range too. Brands like Enjoy Life or Nestlé Toll House offer great options. Can I freeze vegan chocolate mousse? Yes, you can freeze it. Just put it in airtight containers. When ready to eat, let it thaw in the fridge overnight. The mousse may change texture slightly, but it will still taste good. In this guide, I shared how to make a delicious vegan chocolate mousse. We covered essential ingredients like silken tofu and dark dairy-free chocolate chips. I walked you through each step, from melting chocolate to chilling for the best texture. Remember to blend well to avoid lumps, and feel free to experiment with flavors like mocha or new sweeteners. Store your mousse in airtight containers, and it will stay fresh for up to a week. Enjoy creating this simple yet impressive treat that everyone will love!

Vegan Chocolate Mousse Simple and Delicious Recipe

Craving a deliciously creamy dessert without the guilt? This Vegan Chocolate Mousse is simple to make and wholly satisfying. With

- 1 pre-made pie crust - 2 cups fresh spinach, roughly chopped - 1 cup mushrooms, sliced (preferably cremini or button) - 1 small onion, finely chopped - 3 large eggs - 1 cup heavy cream - 1 cup shredded mozzarella cheese - 1/2 cup grated Parmesan cheese - 1 teaspoon garlic powder - Salt and pepper to taste - 1 tablespoon olive oil - Fresh parsley, for garnish (optional) I love using fresh ingredients for this quiche. Fresh spinach brings vibrant color and nutrients. Mushrooms add depth and a nice texture. I prefer cremini mushrooms for their rich flavor, but button mushrooms work too. The pie crust is easy to use and saves time. You can also make your own if you feel adventurous. Onions give a sweet taste when sautéed. The blend of mozzarella and Parmesan cheese creates a creamy, cheesy goodness. Three eggs and heavy cream bind everything together, creating a rich filling. Garlic powder adds a subtle flavor, while salt and pepper enhance all the tastes. Lastly, I often sprinkle fresh parsley on top for a pop of color. This not only looks nice, but it also adds a fresh taste. For the full recipe, check out the details above. - Preheating the oven: Start by preheating your oven to 375°F (190°C). This step ensures even cooking. - Sautéing the onion and mushrooms: In a large skillet, heat one tablespoon of olive oil over medium heat. Add the finely chopped onion and sauté for about 3-4 minutes until it becomes soft and clear. Next, add the sliced mushrooms. Cook these for about 5 minutes until they soften and brown. - Cooking the spinach: Stir in the roughly chopped spinach. Cook until it wilts, about 2 minutes. Season with garlic powder, salt, and pepper. Once done, remove the skillet from the heat and let the mixture cool for a bit. - Whisking together eggs and cream: In a mixing bowl, crack three large eggs. Pour in one cup of heavy cream. Whisk these together until they blend well. This mix gives the quiche its rich texture. - Mixing in cheeses and spinach mixture: Add one cup of shredded mozzarella cheese and half a cup of grated Parmesan cheese to the egg mix. Gently stir in the cooled spinach and mushroom mixture until everything is well combined. - Pouring the filling into the crust: Take your pre-made pie crust and pour the filling into it. Spread the mixture evenly to ensure even cooking. - Baking time and temperature: Place the quiche in the preheated oven. Bake for 30-35 minutes, or until the quiche is set and lightly golden on top. - Tips for checking doneness: To check if the quiche is done, gently shake it. If the center wobbles a little but is mostly firm, it’s ready. Let it cool for 5-10 minutes before slicing. Enjoy your delicious quiche! For the full recipe, check the provided details above. - Choosing the right pie crust: A pre-made pie crust saves time. Look for one that is flaky and sturdy. This helps hold your filling without breaking. You can also use a homemade crust for a personal touch. - Avoiding a soggy bottom: To prevent a soggy crust, pre-bake it for about 10 minutes. This helps it firm up before you add the filling. Make sure to weigh it down with pie weights or beans while baking. - Allowing the quiche to rest: Let your quiche sit for 5 to 10 minutes after baking. This helps it set and makes slicing easier. It also allows the flavors to blend. - Alternatives for heavy cream: If you want a lighter version, use half-and-half or whole milk. You can also mix yogurt with some milk for a creamy texture. - Using different cheeses: While mozzarella and Parmesan work great, feel free to swap for cheddar or feta. Each cheese brings a unique flavor to the quiche. - Options for a gluten-free crust: If you need a gluten-free option, use almond flour or a store-bought gluten-free crust. You can also make a crust from mashed potatoes. - Accompaniments to enjoy with quiche: A fresh salad pairs nicely with quiche. Try a simple green salad with a light vinaigrette. You can also serve it with a side of fruit for a sweet touch. - Ideal side dishes: Roasted vegetables or a light soup work well too. They add color and nutrition to your meal. For a heartier option, consider serving with a side of crispy bacon or sausage. {{image_2}} You can make your quiche more filling by adding proteins. Bacon or ham works great. Just cook the meat first, then mix it into the spinach and mushroom filling. If you want to add more veggies, try peppers or leeks. They add sweetness and flavor. Just chop them fine and sauté with the onions and mushrooms. Herbs and spices can make your quiche shine. Consider adding thyme or basil for a fresh taste. A bit of nutmeg can also bring out the flavors in the eggs. For cheese, mix mozzarella with feta or goat cheese. Each cheese adds its own twist to the dish. You can enjoy a vegan version too. Replace eggs with silken tofu and use plant-based cream. For a low-carb option, skip the crust and bake the filling in a greased dish. This keeps all the flavor without the carbs. These variations make the quiche fit different diets while keeping it tasty. For the full recipe, check out the detailed cooking steps above. To store leftover quiche, let it cool first. Then, cover it tightly with plastic wrap or foil. You can also place it in an airtight container. This keeps the quiche fresh for later meals. I suggest using glass or plastic containers that seal well. For freezing quiche, slice it into pieces. Wrap each slice in plastic wrap, then in aluminum foil. This adds another layer of protection. You can also place the slices in a freezer-safe bag. To thaw, move the quiche to the fridge overnight. When ready to eat, reheat it in the oven or microwave until warm. In the fridge, the quiche lasts about 3 to 4 days. If you freeze it, it can last up to 2 months. Check for signs of spoilage, like a sour smell or mold growth. If you see any of these signs, it’s best to discard the quiche. Enjoy your savory spinach mushroom quiche fresh or reheated! For the full recipe, see the earlier section. The best way to reheat quiche is in the oven. Preheat your oven to 350°F (175°C). Place the quiche on a baking sheet. Heat for about 15-20 minutes. This method keeps the crust crispy and warm. If you’re short on time, you can use the microwave. Heat a slice for 1-2 minutes. However, the crust may get a bit soft. Yes, you can make Spinach Mushroom Quiche ahead of time. It’s a great dish for meal prep. You can bake it and store it in the fridge for up to three days. Let it cool completely before wrapping it tightly. If you want to freeze it, bake it first, then freeze. Just remember to thaw it overnight in the fridge before reheating. Quiche is perfect for breakfast, brunch, or even dinner. It’s versatile and can be served warm or at room temperature. You can pair it with a salad for lunch or a light dinner. The flavors mix well with many sides, making it a great choice for any meal. You can tell when the quiche is done by checking the center. It should be set and not jiggly. You can also insert a knife into the center. If it comes out clean, the quiche is ready. The top should be golden brown. For the best results, follow the instructions in the Full Recipe. In this article, we explored how to make a delicious spinach mushroom quiche. We covered ingredients, step-by-step instructions, and helpful tips for creating the perfect dish. Remember, you can customize your quiche with different ingredients or variations to suit your tastes. Whether it's for breakfast or brunch, this quiche is a crowd-pleaser. Enjoy your cooking adventure, and don't hesitate to experiment with flavors! Your kitchen creations can impress family and friends. Happy cooking!

Savory Spinach Mushroom Quiche Perfect for Meal Prep

Looking for a tasty meal prep idea? This Savory Spinach Mushroom Quiche is your answer! Packed with fresh ingredients, it’s

To make this dish, you need: - 2 cups cooked rice (white or brown) - 2 cups fresh broccoli florets - 1 cup shredded cheddar cheese - 1 cup cream of mushroom soup (or homemade) - ½ cup milk - ½ cup diced onion - 2 cloves garlic, minced - 1 teaspoon Dijon mustard - 1 teaspoon salt - ½ teaspoon black pepper - ½ teaspoon paprika - ½ cup breadcrumbs (for topping) - 2 tablespoons olive oil This list gives you everything you need for a creamy and cheesy delight. Using fresh ingredients often gives the best flavor and texture. Fresh broccoli adds a nice crunch. However, frozen broccoli can work well too. It’s quick and easy. If you go for frozen, just make sure to thaw it first. This helps avoid extra water in the casserole. Fresh rice is key for a great base. Cook it the day before for the best results. If you have dietary needs, there are easy swaps. For a dairy-free option, use plant-based cheese and milk. You can replace cream of mushroom soup with a vegan cream soup. If you want a gluten-free dish, use gluten-free breadcrumbs and check the soup label. These swaps help everyone enjoy this tasty casserole without worry. To start, you need to gather your ingredients. Here's what you need: - 2 cups cooked rice - 2 cups fresh broccoli florets - 1 cup shredded cheddar cheese - 1 cup cream of mushroom soup - ½ cup milk - ½ cup diced onion - 2 cloves garlic, minced - 1 teaspoon Dijon mustard - 1 teaspoon salt - ½ teaspoon black pepper - ½ teaspoon paprika - ½ cup breadcrumbs - 2 tablespoons olive oil First, preheat your oven to 350°F. This step is key for even cooking. Now, bring a pot of salted water to a boil. Add your broccoli florets and blanch them for 2-3 minutes. This keeps them bright and fresh. Drain the broccoli and set it aside. Next, heat the olive oil in a skillet over medium heat. Add the diced onion and sauté it until soft, about 3-4 minutes. Then, add the minced garlic for just one more minute. This will fill your kitchen with a nice aroma. In a large mixing bowl, combine the cooked rice, blanched broccoli, sautéed onion, and garlic. Then, mix in the cream of mushroom soup, milk, Dijon mustard, salt, black pepper, and paprika. Stir until everything blends well. Finally, fold in ¾ cup of the shredded cheddar cheese. Now it’s time to bake! Transfer the mixture to a greased 9x13 inch casserole dish. Spread it out evenly. Sprinkle the remaining cheddar cheese on top, then add the breadcrumbs for that crunchy texture. Place the casserole in your preheated oven and bake it for 25-30 minutes. Look for it to be bubbly and golden brown on top. For a great texture, don’t overcook the broccoli; it should be tender but still crisp. Mixing in the cheese evenly helps with the creaminess. Letting the casserole cool for a few minutes before serving helps it hold its shape. For more details on the full recipe, check out the [Full Recipe]. Cooking rice can be simple if you follow a few steps. I suggest using a ratio of 2 cups of water for every 1 cup of rice. Rinse the rice first to remove extra starch. This helps the rice stay fluffy. Bring the water to a boil, add the rice, and then reduce to low heat. Cover it and let it simmer for about 18 minutes. Check it after cooking; it should be tender but not mushy. Perfect rice makes your casserole shine. Spices can elevate your casserole's taste. I love adding a teaspoon of Dijon mustard for depth. It gives a subtle tang that pairs well with cheese. Black pepper adds warmth, while paprika gives a mild smokiness. You can also use garlic powder if you want an extra kick. Experimenting with spices will help you find your favorite flavor mix. Don't be afraid to adjust the amounts to suit your taste. You can prepare this dish ahead of time, which makes weeknight meals easier. Make the casserole up to the baking step and cover it tightly. Store it in the fridge for up to two days. When you're ready to bake, just add an extra 10 minutes to the cooking time. This way, you enjoy a warm, cheesy meal without the hassle. For the full recipe, refer to the recipe section. {{image_2}} You can easily add proteins to your cheesy broccoli rice casserole. Chicken is a great choice. Just cook it first, then shred it. Mix the chicken into your rice and broccoli blend. Tuna also works well. Use canned tuna, and add it right before you bake the casserole. Both options will make the dish more filling and add amazing flavor. If you want to keep it vegetarian, you can swap the cheese. Try using vegan cheese or a mix of nutritional yeast and almond milk for a cheesy taste. You can also add more veggies. Spinach, bell peppers, or zucchini can give more color and nutrients. These swaps keep the dish tasty and satisfying. Seasonal veggies can really boost your casserole. In spring, add asparagus or peas for freshness. In fall, consider butternut squash or pumpkin for warmth. Just make sure to cook the veggies a bit before mixing them in. This will help them blend well with the other flavors. Adding these seasonal items makes your casserole unique and fun. For more details, check out the Full Recipe. To keep your cheesy broccoli rice casserole fresh, store it in an airtight container. Make sure it cools down before sealing. Place it in the fridge. It can last for about 3-4 days. If you want to eat it later, freezing is a great option. When you're ready to enjoy leftovers, preheat your oven to 350°F (175°C). Place the casserole in a baking dish. Add a splash of milk to keep it moist. Cover it with foil to prevent drying out. Heat for about 20 minutes, or until it's warm throughout. You can also use a microwave, but the oven keeps the top crispy. To freeze your casserole, let it cool completely first. Cut it into single servings for easy thawing. Wrap each piece tightly in plastic wrap, then foil. This helps prevent freezer burn. Label each package with the date. You can freeze it for up to 3 months. When you’re ready to eat, thaw it overnight in the fridge before reheating. For the full recipe, check out the [Full Recipe]. You can use cream of chicken soup or a homemade white sauce. Both options add creaminess. If you want to skip the soup, try a mix of yogurt and broth. This keeps the dish moist and tasty. Yes! You can prepare the casserole a day before. Just mix all the ingredients and store it in the fridge. When you’re ready, bake it as directed. This saves time on busy nights and lets the flavors blend well. Absolutely! Use gluten-free breadcrumbs and check your soup label. Many brands offer gluten-free options. You can also make your own soup using cornstarch and broth. This way, you can enjoy this dish without worry. For the full recipe, check out the details above! In this blog post, we covered everything about Cheesy Broccoli Rice Casserole. We discussed the ingredients needed, including fresh and frozen options. You learned how to prepare, bake, and achieve the best texture. I shared tips for cooking rice and ways to enhance flavor. We explored variations like adding proteins and vegetarian options. Finally, we talked about storing leftovers and reheating for the best taste. This dish is versatile and perfect for any meal. Enjoy making it your own!

Cheesy Broccoli Rice Casserole Easy Weeknight Meal

Are you looking for an easy weeknight meal that’s cheesy, delicious, and quick to make? Look no further! My Cheesy

To make Taco Stuffed Zucchini Boats, you need these key ingredients: - 4 medium zucchini - 1 tablespoon olive oil - 1 pound ground turkey or beef - 1 small onion, diced - 2 cloves garlic, minced - 1 cup canned black beans, rinsed and drained - 1 cup corn (frozen or fresh) - 1 packet taco seasoning - 1 cup diced tomatoes (fresh or canned) - 1 cup shredded cheese (cheddar or Mexican blend) - Fresh cilantro, chopped, for garnish - Sour cream or Greek yogurt, for serving (optional) - Lime wedges, for serving These ingredients come together to create a delicious dish ideal for any meal. You can enhance your Taco Stuffed Zucchini Boats with these tasty toppings: - Sliced jalapeños for heat - Avocado slices for creaminess - Chopped green onions for crunch - Salsa for extra flavor Feel free to mix and match as you like! If you are missing some items, here are good substitutes: - Use ground chicken or pork instead of turkey or beef. - Swap black beans for pinto beans or lentils. - Try quinoa instead of corn for a different texture. - Use any cheese you prefer; feta or pepper jack work well. These swaps keep the dish fresh and fun while still tasty. For the complete cooking instructions, check the Full Recipe. First, gather your ingredients. You will need zucchini, ground turkey or beef, onion, garlic, beans, corn, taco seasoning, tomatoes, and cheese. Next, preheat the oven to 375°F (190°C). This ensures even cooking. Then, take each zucchini and slice it in half lengthwise. Use a spoon to scoop out the center flesh. Save this flesh for later; it's useful in the filling. In a large skillet, add olive oil and heat it over medium. Once hot, toss in the diced onion and minced garlic. Sauté them for about 3-4 minutes until they soften. Now, add the ground turkey or beef. Use a spatula to break it apart. Cook it until browned, around 5-7 minutes. After the meat cooks, stir in the reserved zucchini flesh, black beans, corn, taco seasoning, and diced tomatoes. Cook this mixture for 5 more minutes until everything is heated through. Finally, remove the skillet from heat and stir in half of the shredded cheese until it melts and combines well with the filling. Place the zucchini boats in a baking dish. Spoon the taco filling into each boat generously. Sprinkle the remaining cheese on top of the stuffed zucchini. Cover the dish with aluminum foil and bake in the hot oven for 25 minutes. After that time, take off the foil and bake for another 10-15 minutes. You want the zucchini tender and the cheese bubbly and golden. Once they are done, take them out of the oven and let them cool for a few minutes. Garnish with fresh cilantro before serving. Enjoy this tasty meal! For the complete details, check the Full Recipe. To make the filling just right, I suggest using a mix of meats. Ground turkey is lean but flavorful. Ground beef adds richness. You can even use a mix to match your taste. Always cook the meat until it’s browned. This step adds depth to your filling. Next, mix in the beans, corn, and diced tomatoes. This combo gives texture and taste. Don't forget the taco seasoning! It brings all the flavors together. Stir half the cheese into the filling while it’s hot. This melting cheese creates a creamy, delicious mix. Choose fresh zucchini for the best taste. Look for zucchini that is firm and smooth. The color should be bright green. Avoid any with soft spots or blemishes. Medium-sized zucchini works best for stuffing. They hold their shape and cook evenly. If your zucchini is too big, it may be watery. Smaller zucchini can be too thin for stuffing. Also, try to pick zucchini of similar size. This ensures even cooking in the oven. For the ultimate cheesy topping, use a blend of cheeses. Cheddar and Mexican blend work great together. Grate your cheese for faster melting. This helps the cheese melt completely over the filling. When baking, cover the dish with foil for the first half of the time. This keeps moisture in and helps the cheese melt evenly. Remove the foil for the last bit of baking. This lets the cheese get golden and bubbly. The perfect melted cheese adds a rich flavor to your taco stuffed zucchini boats. Enjoy every bite! {{image_2}} You can make these boats meat-free by using beans and veggies. Start with black beans, corn, and diced bell peppers. You can also add mushrooms for extra texture. Use the same taco seasoning for flavor. This way, you keep the taste and cut down on meat. It’s a fun and tasty way to enjoy veggies! If you like heat, spice it up! Add diced jalapeños or hot sauce to the filling. You can also use spicy taco seasoning for more kick. Top your zucchini boats with pepper jack cheese instead of cheddar. This version is great for those who love bold flavors. For a gluten-free meal, choose gluten-free taco seasoning. Most brands offer this option. You can also use quinoa or brown rice in the filling. This adds bulk and keeps it gluten-free. Always check labels to ensure all ingredients are safe. You can still enjoy a delicious meal without gluten! You can find the Full Recipe for Taco Stuffed Zucchini Boats above. After you enjoy your taco stuffed zucchini boats, store leftovers in an airtight container. Let them cool down first. This keeps them fresh longer. Place them in the fridge for up to three days. Make sure they are well sealed to avoid drying out. To reheat, place the zucchini boats on a baking sheet. Preheat your oven to 350°F (175°C). Cover them loosely with foil. Heat for about 15 minutes or until warm. You can also use the microwave. Heat in short bursts, about 1-2 minutes at a time. Check to avoid overheating. You can freeze these boats for later. First, let them cool completely. Wrap each boat in plastic wrap or foil. Place them in a freezer-safe bag. They can stay in the freezer for up to three months. When ready to eat, thaw in the fridge overnight. Then, reheat as mentioned above. Enjoy the fresh taste any time! Yes, you can use other types of meat. Ground chicken or pork works well. You might also try plant-based meats for a vegetarian option. Each choice gives a different flavor. Just make sure to cook the meat fully for safety. If you can’t find zucchini, try bell peppers or eggplant. Both will hold the filling well. You can even use large tomatoes. Just scoop them out like zucchini. These options add new flavors to your dish. To prep ahead, make the filling in advance. Store it in the fridge for up to two days. You can even stuff the zucchini and keep them covered before baking. Just bake them when you are ready to eat. For the full recipe, you can find it [here](Taco Stuffed Zucchini Boats 🥒). It gives all the details you need to create this tasty dish. Enjoy cooking! This blog post covered how to make Taco Stuffed Zucchini Boats. We explored the main ingredients and tasty toppings. I shared step-by-step instructions to ease your cooking. Next, I gave tips for perfecting the filling and selecting zucchini. We also looked at fun variations to try. Lastly, I explained how to store and reheat your leftovers. Embrace your cooking journey with this simple and tasty recipe! Enjoy every bite!

Taco Stuffed Zucchini Boats Savory Fresh Delight

Are you ready to take your taco night to the next level? Taco Stuffed Zucchini Boats offer a fresh twist

To make honey garlic chicken thighs, you need a few simple items: - 4 bone-in, skin-on chicken thighs - 1/4 cup honey - 1/4 cup soy sauce - 4 cloves garlic, minced - 1 teaspoon fresh ginger, grated - 1 tablespoon olive oil - 1 teaspoon sesame oil - Salt and pepper to taste If you don’t have bone-in thighs, you can use boneless ones. Just adjust the cooking time. For honey, you might try maple syrup as a sweet swap. Low-sodium soy sauce works if you want less salt in your dish. Garnishes can make your dish pop. I love using: - 2 green onions, sliced (for garnish) - Sesame seeds (for garnish) You can also add crushed peanuts, cilantro, or chili flakes for some heat. These add flavor and color to your plate, making it look more inviting. For the full recipe, check out the detailed instructions to bring this dish to life! Start by drying the chicken thighs. Use paper towels to remove moisture. This step helps the skin get crispy. Next, season both sides with salt and pepper. You can also use your favorite herbs. Try thyme or rosemary for a seasonal touch. This adds extra flavor to your dish. In a bowl, mix honey, soy sauce, minced garlic, ginger, olive oil, and sesame oil. Whisk these ingredients until they blend well. This will ensure even sauce distribution. Taste the sauce and adjust if needed. Add more honey for sweetness or soy sauce for saltiness. Make it your own! Heat an oven-safe skillet over medium-high heat. Once hot, place the chicken thighs in the skillet skin-side down. Sear them for about 5-7 minutes. This will make the skin crispy and golden brown. After searing, flip the thighs and pour the honey garlic sauce over them. Next, transfer the skillet to a preheated oven at 400°F (200°C). Bake for 25-30 minutes. The chicken is done when it reaches an internal temperature of 165°F (75°C). If you want a caramelized look, switch to broil for 3-5 minutes at the end. Just watch closely to prevent burning! Enjoy your honey garlic chicken thighs! For the full recipe, check out the details above. To get a nice glaze on your honey garlic chicken thighs, broiling is key. Broiling gives the chicken a crispy finish. After baking your chicken, set your oven to broil. Broil for just 3-5 minutes. Watch it closely to avoid burning the glaze. This step adds a nice caramelized look and flavor. Avoid common mistakes when broiling. First, don’t leave the chicken unattended. The sugar in the honey can burn quickly. Second, make sure to coat the chicken evenly with the sauce before broiling. This helps create that beautiful glaze. Pair your honey garlic chicken thighs with simple sides. Cooked rice or steamed vegetables work well. The rice absorbs the sweet sauce, making each bite tasty. You can also add some sautéed greens for color and health. For presentation, place the chicken on a large plate. Drizzle extra sauce over the top for a glossy look. Add a sprinkle of sesame seeds and sliced green onions. This makes your dish pop and look restaurant-worthy. For more details, check the Full Recipe. {{image_2}} You can switch out some ingredients for different flavors. For a healthier option, use low-sodium soy sauce. This change cuts down on salt while still giving you a nice umami taste. You can also try sweeteners like maple syrup instead of honey. Maple syrup adds a unique flavor and keeps the dish sweet. If you want to change how you cook your chicken thighs, there are great options. You can use a slow cooker for a hands-off meal. Just mix your sauce and chicken in the slow cooker, set it to low, and let it cook for 6-8 hours. Another quick option is the Instant Pot. This method cooks your chicken in about 10-15 minutes. Just add the chicken and sauce to the pot, seal it, and cook on high pressure. Both methods create juicy chicken with that great honey garlic taste. For more tips, check out the Full Recipe! To keep honey garlic chicken thighs fresh, store them in the fridge. Place the chicken in an airtight container. Make sure to cool the chicken to room temperature first. This helps avoid moisture buildup. The chicken will last 3 to 4 days in the fridge. When it's time to reheat, use your oven or microwave. For the oven, set it to 350°F (175°C). Heat the chicken for about 15-20 minutes. If using a microwave, cover the chicken with a damp paper towel. Heat in short bursts of 1-2 minutes until warm. This keeps the chicken juicy. Freezing is a great option if you want to save leftovers. To freeze, place the chicken in a freezer-safe bag or container. Remove as much air as possible. Label it with the date. Honey garlic chicken thighs can last up to 3 months in the freezer. When you're ready to eat, thaw the chicken safely. You can do this in the fridge overnight. If you're in a hurry, place the bag in cold water for quicker thawing. Once thawed, reheat using the oven or microwave. Follow the same reheating steps as before to keep it tasty. Yes, you can use boneless chicken thighs. They will cook faster than bone-in thighs. Reduce the baking time to about 20 minutes. Always check the internal temperature. It should reach 165°F (75°C) for safe eating. Honey garlic chicken pairs well with many sides. Here are some ideas: - Steamed rice for a filling meal. - Roasted vegetables for a healthy option. - A fresh salad for a light touch. - Noodles for an Asian-inspired twist. Check the internal temperature with a meat thermometer. The safe temperature is 165°F (75°C). Look for clear juices when you cut into the chicken. If the juices run clear, the chicken is done. Always ensure even cooking by checking multiple spots. This blog post gives you a complete guide to making honey garlic chicken thighs. We covered essential ingredients, cooking methods, and handy tips for the best glaze. You learned how to vary the recipe with different ingredients and methods. Proper storage techniques help you enjoy leftovers too. Cook the chicken carefully, and pair it with tasty sides for a great meal. With practice, you can make this dish delicious every time. Enjoy your cooking and impress your family and friends!

Honey Garlic Chicken Thighs Simple and Tasty Meal

Looking for a simple and tasty meal? Let me introduce you to Honey Garlic Chicken Thighs! This dish is packed

- 2 cups cooked chicken, shredded - 1 cup carrots, diced - 1 cup frozen peas - 1 cup potatoes, diced - 1/2 cup onion, chopped - 2 cloves garlic, minced - 3 tablespoons butter - 1/4 cup all-purpose flour - 2 cups chicken broth - 1/2 teaspoon dried thyme - 1/2 teaspoon dried rosemary - Salt and pepper to taste - 1 package (2 sheets) refrigerated pie crusts - 1 egg, beaten (for egg wash) When making chicken pot pie, these ingredients work magic together. Each item adds flavor and texture. I love using cooked chicken because it makes the dish hearty. The veggies—carrots, peas, and potatoes—bring a nice crunch and color. The butter and flour are my secret to a thick filling. They give the dish its creamy feel. Chicken broth adds warmth and depth. The herbs, thyme and rosemary, infuse a lovely aroma. I never skip the egg wash. It gives the crust a beautiful golden finish. Using refrigerated pie crusts saves time. You can find them in most stores. For the full recipe, check the complete guide. You'll see how easy it is to create this classic dish! - Start by melting butter in a large skillet over medium heat. - Sauté chopped onions and minced garlic until the onions turn soft, about 3-4 minutes. - Next, add diced carrots and potatoes to the skillet. Cook them for 5 minutes until they are slightly soft. - Now, stir in shredded chicken, frozen peas, thyme, rosemary, salt, and pepper. Cook this mixture for 2 more minutes. - Sprinkle flour over the chicken and vegetables. Stir it well to mix. Slowly add chicken broth while stirring until it thickens, about 3-5 minutes. Remove from heat. - Roll out one pie crust and lay it in a 9-inch pie plate. - Pour the chicken filling into the pie crust, spreading it evenly. - Roll out the second pie crust and cover the filling. Crimp the edges to seal. Cut slits in the top crust to let steam escape. - Brush the top with beaten egg for a nice golden color. - Preheat your oven to 425°F (220°C). - Bake the pot pie for 30-35 minutes or until the crust is golden brown and flaky. - Let the pot pie cool for 10 minutes before slicing. - Serve it directly in the dish, garnished with fresh herbs like parsley or thyme. A simple green salad pairs well with the pot pie. This step-by-step guide makes cooking classic chicken pot pie a breeze. For the full recipe, check the section above! A flaky crust makes the pot pie great. To ensure this, keep your butter cold. Use cold water when mixing the dough. This helps create layers that puff up when baked. If you want a shiny finish, use an egg wash. Brush a beaten egg on top before baking. This gives your crust a beautiful golden color. Herbs and spices add depth to your filling. I love using thyme and rosemary for a warm taste. You can also try adding a pinch of garlic powder or paprika. For the best flavor, use homemade chicken broth. It has more taste than store-bought options. This small change can make a big difference in your dish. Choose a sturdy pan for baking. A glass or ceramic pie dish works well. These pans help brown the crust evenly. To avoid a soggy crust, avoid overfilling the pie. Make sure to cut slits in the top crust for steam to escape. This keeps the filling from getting too wet. Follow these tips for a perfect chicken pot pie. You can find the full recipe [here](#). {{image_2}} You can switch up the chicken in your pot pie. Use turkey if you have leftovers. It tastes great and saves food. For a veggie option, try using mushrooms or lentils. These add a nice texture and flavor. You can make a filling meal without meat. Just add your favorite herbs to boost the taste. Change the veggies to match the season. In spring, use fresh peas and asparagus. In fall, add squash and carrots for warmth. You can use frozen vegetables too. They save time and are easy to keep. Just make sure to thaw them before cooking. This keeps the filling from getting too watery. Want to try something new with the crust? You can use biscuits instead of pie dough. They create a fluffy, soft top. Puff pastry is another option. It gives a flaky and airy finish. If you need a gluten-free option, there are many great mixes. You can find them at most stores. Just follow the directions on the package for best results. For more details on making the perfect pot pie, check out the Full Recipe. - Refrigeration guidelines: Let your chicken pot pie cool completely. Cover it with plastic wrap or foil. Store it in the fridge for up to 3 days. - Freezing tips: For longer storage, wrap the cooled pie tightly in plastic wrap and then in foil. You can freeze it for up to 3 months. To reheat, thaw it in the fridge overnight. - Oven vs. microwave reheating: The oven works best for reheating. Preheat your oven to 350°F (175°C). Bake the pie for 20-30 minutes until hot. The microwave is quicker but may make the crust soggy. - Keeping the crust crispy: If you use the microwave, place a paper towel under the pie. This helps absorb moisture. For best results, stick with the oven to keep that crust flaky and crispy. Classic chicken pot pie lasts about 3 to 4 days in the fridge. Store it in an airtight container. This keeps it fresh and safe to eat. Be sure to let it cool first. If it smells off or looks bad, throw it away. Yes, you can make this pot pie ahead of time. Prepare the filling and assemble the pie. Cover it well and store it in the fridge for up to 24 hours. When ready, just bake it as usual. For longer storage, freeze it before baking. It can last up to 2 months in the freezer. Chicken pot pie pairs well with many sides. Here are some ideas: - A simple green salad - Steamed vegetables like broccoli or green beans - Mashed potatoes for extra comfort - A light soup to start your meal You can tell the pot pie is done when the crust is golden brown. The filling should bubble slightly at the edges. Use a knife to check the center; it should be hot. Let it cool for about 10 minutes before slicing. This helps the filling set. Enjoy the comforting flavors! This blog post covered how to make a delicious chicken pot pie. You learned about the main and additional ingredients needed. We discussed easy steps for preparing the filling and assembling the pot pie. I shared tips to perfect the crust and enhance the flavor. You also saw variations, storage info, and common questions. Making your own pot pie is fun and rewarding. It’s a comforting dish that you can enjoy with loved ones. Now you have the tools to create a great meal! Enjoy your cooking!

Classic Chicken Pot Pie Comfort Food for Any Meal

Comfort food doesn’t get better than a Classic Chicken Pot Pie! This dish warms the soul with creamy chicken, fresh

Older posts
Newer posts
← Previous Page1 … Page28 Page29 Page30 … Page77 Next →

dsad

© 2025 So Yum Recipes • Built with GeneratePress

Our Policies

  • Copyright Policy
  • Cookie Policy
  • GDPR Policy
  • Privacy Policy
  • Disclaimer
  • Terms Of Use

More Information

  • Home
  • About
  • Contact
  • Appetizers
  • Dessert
  • Dinner
  • Drinks
©2025, So Yum Recipes About Back To Top