
Green Apple Kiwi Cooler Refreshing Fruit Drink Recipe
Looking for a cool drink that’s bursting with flavor? The Green Apple Kiwi Cooler is your answer! This refreshing fruit
Looking for a cool drink that’s bursting with flavor? The Green Apple Kiwi Cooler is your answer! This refreshing fruit

Looking for a fun and refreshing summer drink? Try my Cherry Limeade Sparkle! This drink is bursting with sweet cherry
![- 1 cup fresh lemon juice - 1 cup granulated sugar - 4 cups sparkling water - 2 tablespoons dried culinary lavender - 1 cup water - Ice cubes - Lemon slices - Fresh lavender sprigs When I make Lemon Lavender Fizzy Lemonade, I love to start with fresh ingredients. Fresh lemon juice gives the drink a bright flavor. I squeeze about 4 to 6 lemons to get one cup of juice. The sugar adds sweetness to balance the tartness of the lemons. Next, I use sparkling water. It adds fizz and makes the drink feel special. The bubbles dance in the glass, making it fun to sip. For flavor, dried culinary lavender is key. It brings a lovely floral note. I use two tablespoons to infuse the drink with its unique taste. To help the lavender bloom, I combine it with one cup of water and sugar. This mix creates a sweet lavender syrup. I always add ice cubes to keep the drink cold. Finally, garnishing with lemon slices and fresh lavender sprigs makes it look pretty. You can find the full recipe to make this refreshing drink perfect for any summer day. First, you need to make the lavender syrup. Combine the sugar, dried lavender, and water in a saucepan. Heat it over medium flame until it simmers. Stir until the sugar dissolves completely. This part takes just a few minutes. Once the sugar is gone, remove it from the heat. Let it steep for about 15 to 20 minutes. This allows the lavender to infuse its lovely flavor into the syrup. Next, strain the syrup through a fine-mesh sieve into a bowl or jar. Discard the lavender buds. This step is important to keep the syrup smooth. After straining, let the syrup cool completely. You can speed this up by placing it in the fridge for a bit. Now, in a large pitcher, mix the fresh lemon juice with the lavender syrup. Stir it well to blend the flavors. Slowly add the sparkling water. This part is fun! You want to mix it gently to keep the fizz. If you stir too hard, you might lose the bubbles. To serve, fill your glasses with ice cubes. Pour the fizzy lemonade over the ice. This keeps your drink refreshingly cold. Finally, garnish each glass with a lemon slice and a sprig of fresh lavender. This adds a nice touch and makes the drink look pretty. For the full recipe, check out the details above. Enjoy your delicious Lemon Lavender Fizzy Lemonade! To make your Lemon Lavender Fizzy Lemonade shine, use fresh lemons. Fresh lemons give a bright, zesty taste that dried lemons can't match. Adjust the sugar to fit your taste. If you prefer a sweeter drink, add more sugar. If you like it tart, add less. This gives you control over the flavor. Serve your lemonade in clear glasses. This way, you can show off its beautiful color. Consider adding lavender buds or a sprinkle of lemon zest on top. These small touches add elegance and make your drink look fancy. When adding sparkling water, pour it slowly. This helps keep the bubbles intact. Serve the drink right after making it to enjoy the fizz at its best. There's nothing like that refreshing sparkle on a hot day! For the complete recipe, check out the [Full Recipe]. {{image_2}} You can play with flavors by adding herbs. Mint gives a fresh twist to your drink. Thyme adds a subtle earthy note that pairs well with lemon. Just add a few sprigs when mixing the lemonade. This will infuse the drink with new flavors. Feel free to try out different herbs to find your favorite. Want to make your fizzy lemonade even better? Add berries like strawberries or blueberries. They add color and a sweet burst of flavor. You can also try slices of peaches or oranges for a fruity twist. Adding fruits makes this drink more fun for summer parties. If you prefer a simpler drink, skip the fizz. Just replace the sparkling water with still water. This makes a refreshing lemonade that’s still tasty. You can enjoy it any time, even if you don’t want bubbles. This version is easy to make and nice for kids. For the full recipe, check out the details above. Keep leftover fizzy lemonade in the refrigerator. Use a sealed container to keep it fresh. This drink tastes best cold, so always chill it before serving again. For the best taste, consume your fizzy lemonade within 2 days. After that, the fizz may fade, and flavors can change. Enjoy it while it's fresh for the brightest flavor. You can store lavender syrup longer than the lemonade. Keep it in the fridge for up to a month. This syrup is great in other drinks, like iced tea or cocktails. Kids love it mixed with lemonade too! No, dried lemons do not work well in this recipe. Fresh lemons provide juice and brightness. Dried lemons lack moisture. They also do not have the same zing or tartness. If you want a strong lemon flavor, always choose fresh lemons. You can make this recipe vegan by replacing granulated sugar. Use agave syrup or maple syrup instead. Both are great sweeteners. They mix well with the lemon and lavender flavors. This simple swap ensures a tasty vegan drink. Lavender syrup adds a lovely touch to many drinks. Try it in cocktails like gin and tonic. It also works in lemonade or iced tea. For a fun twist, mix it with sparkling water for a refreshing mocktail. The possibilities are endless! For more ideas, check out the Full Recipe. This blog explored an easy fizzy lemonade recipe with delightful lavender notes. You learned how fresh ingredients and simple steps create a refreshing drink. We also discussed tips for flavor, presentation, and fun variations. Whether you enjoy it as is or with fruit, you can customize it to your taste. Don't forget to try the lavender syrup in other drinks. This fizzy lemonade offers a unique twist on a classic beverage. Enjoy your creation and share it with friends!](https://soyumrecipes.com/wp-content/uploads/2025/06/83896f1e-41f4-4c4b-9920-1da4be288d02.webp)
Looking for a refreshing drink to beat the summer heat? Let me introduce you to Lemon Lavender Fizzy Lemonade! This
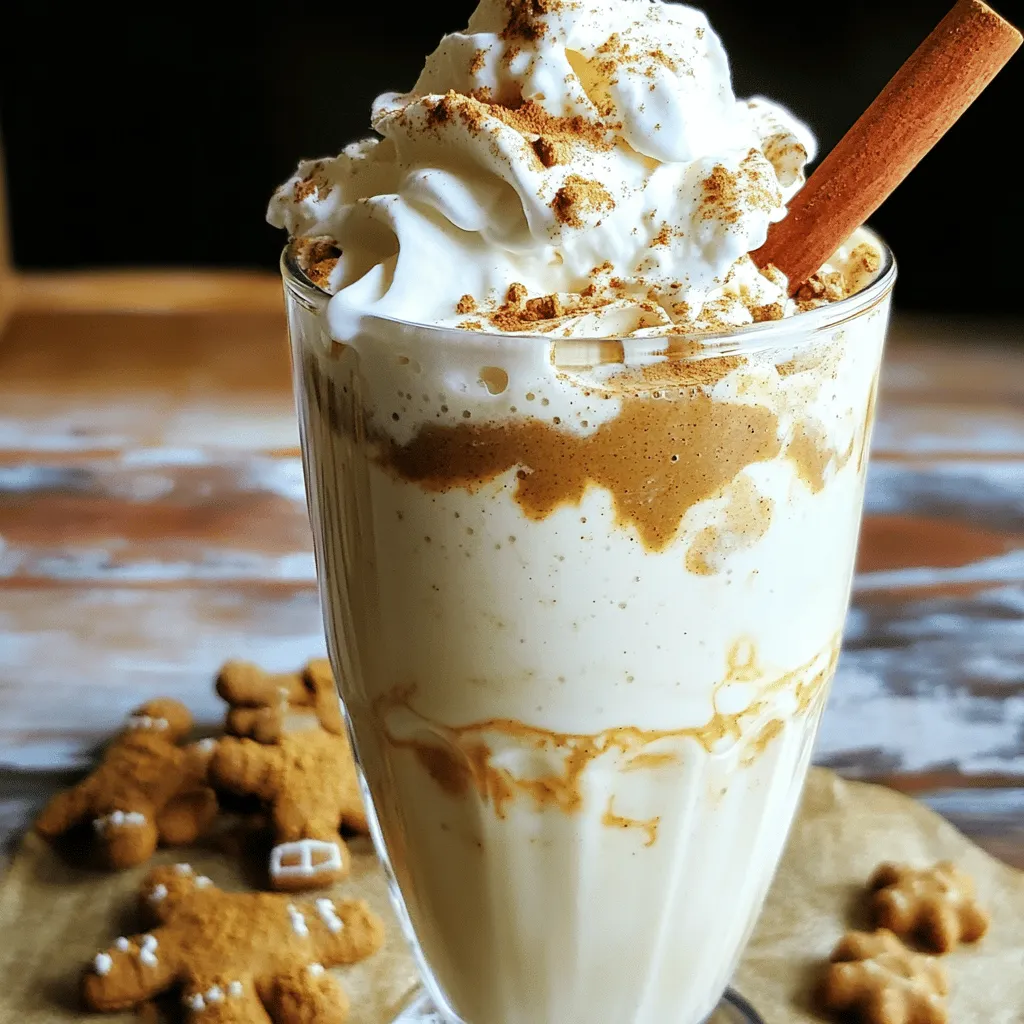
Get ready to dive into the festive spirit with my Gingerbread Cookie Butter Shake! This fun treat combines creamy cookie
![- 2 cups chocolate ice cream - 1 cup milk (dairy or non-dairy) - 1 tablespoon instant coffee granules The base of our Mocha Peppermint Frost Shake starts with chocolate ice cream. It gives a rich, creamy texture. You can choose your milk, too! Dairy milk provides a classic taste, while non-dairy milk like almond or oat gives a nice twist. Instant coffee granules add that lovely mocha flavor. Just a tablespoon packs a punch! - 1 teaspoon peppermint extract - 2 tablespoons chocolate syrup (plus extra for drizzling) To make this shake special, we need peppermint extract. It adds a bold minty taste. The chocolate syrup is a must for extra sweetness. Drizzle some on top for a beautiful finish. - Whipped cream, for topping - Crushed peppermint candies, for garnish - Dark chocolate shavings, for garnish Now comes the fun part—garnishing! Whipped cream makes each shake look fancy. Crushed peppermint candies give a crunch and extra mint flavor. Dark chocolate shavings add a rich touch and make it more appealing. You can find the full recipe [here]. Blending the base ingredients Start by gathering your ingredients. You need chocolate ice cream, milk, instant coffee granules, peppermint extract, and chocolate syrup. Place all these ingredients into a blender. Blend on high speed for about 30 to 45 seconds. You want a smooth and creamy mixture. If it feels too thick, add a little more milk. Blend again until you reach the right consistency. Adjusting the consistency If you want a thicker shake, use less milk. For a thinner shake, add more milk a little at a time. This way, you can control how you like it best. Dividing into glasses Once your shake is ready, it’s time to serve. Take two tall glasses and divide the shake evenly between them. This makes it look nice and fancy! Adding toppings and garnishes Now comes the fun part! Top each shake with a big swirl of whipped cream. Next, drizzle some extra chocolate syrup over the cream. It adds a sweet touch. Finally, sprinkle crushed peppermint candies and dark chocolate shavings on top. This makes the shake look festive and delicious. Best practices for serving Serve your Mocha Peppermint Frost Shake right away. This keeps it cold and fresh. If you let it sit, it may melt and lose its great taste. Ideal drinking utensils (straws vs. spoons) You can serve this shake with a straw or a long spoon. A straw works well if you like to sip it. A spoon is great for scooping up the whipped cream and toppings. Enjoy your creation! For the full recipe, check out the details above. To get the best shake, start with the right thickness. If your shake is too thick, add more milk. This will help you reach a smooth texture. If it's too thin, add a bit more ice cream. You can also use chilled glasses. Cold glasses keep your shake colder longer, making each sip refreshing. Want to kick up the flavor? You can try adding other extracts like vanilla or almond. These can add depth to your shake. For a more intense peppermint flavor, use extra peppermint extract. This small tweak can bring your shake to life. Presentation matters! Serve your shake in tall glasses to show off those layers. You can drizzle extra chocolate syrup on top for a fun look. Add some crushed peppermint candies for color and crunch. Dark chocolate shavings can also make your shake pop. These small details make your shake look as good as it tastes. {{image_2}} You can easily change this shake to fit your diet. For a dairy-free option, use almond, soy, or oat milk instead of regular milk. These choices keep the shake creamy and tasty. You can also swap chocolate ice cream for a dairy-free alternative. This way, everyone can enjoy this treat! If you're looking to lower the sugar, try using unsweetened cocoa powder instead of chocolate syrup. You can also use a sugar substitute, like stevia or erythritol. These swaps keep the flavor while cutting sugar. You can get creative with flavors. Adding a splash of vanilla extract gives a warm touch. For chocolate mint lovers, mix in chocolate mint syrup. Both options add a nice twist to the shake. Switching it up for the seasons can be fun too. During the holidays, add spices like nutmeg or cinnamon for a festive flair. This small change makes the shake perfect for special occasions. Want to make your shake more exciting? You can add crushed cookies or brownie chunks for a fun crunch. Just toss them in the blender for a few seconds to mix them in. Blending with frozen fruit is another great option. Try adding frozen banana or berries for a fruity twist. This not only changes the flavor but also adds a refreshing chill to the shake. For the full recipe, check out the details above. Enjoy experimenting! To keep your Mocha Peppermint Frost Shake fresh, store it in an airtight container. This helps prevent freezer burn. If you have a glass jar, that works great too. The shake will last about 1 to 2 days in the fridge. However, the texture may change as it sits. It might separate or become too thick. If that happens, just stir it well or add a splash of milk. You can freeze the leftover shake for later enjoyment. Pour it into a freezer-safe container, leaving some space at the top. This allows for expansion as it freezes. When you want to enjoy it again, take it out of the freezer and let it sit in the fridge for a few hours to thaw. You can also speed up thawing by running the container under warm water. Just be careful not to overheat it. If you have extra chocolate syrup or garnishes, don’t toss them! Use chocolate syrup on pancakes or waffles for a sweet treat. Crushed peppermint candies can add a festive touch to cookies or brownies. You can even mix some into yogurt for a fun snack. These ideas let you enjoy your ingredients in new ways, making your kitchen adventures even more exciting. A Mocha Peppermint Frost Shake is a rich blend of chocolate and coffee flavors, with a cool peppermint twist. You get a sweet and creamy drink that feels festive. The mix of chocolate ice cream, coffee, and peppermint extract creates a fun holiday vibe. Each sip brings together the warmth of coffee and the chill of mint, making it perfect for any time of year. Yes, you can make this shake ahead of time. Blend all the ingredients and store the shake in the fridge. It stays fresh for a few hours. Just stir it well before serving. If it gets too thick, add a splash of milk to get it smooth again. If you don't have peppermint extract, try using mint syrup or peppermint tea. You can also add crushed mint candies for flavor. Just remember that those options may change the taste a bit, but they still keep the minty theme. This shake can be enjoyed by kids, but keep an eye on the caffeine. Instant coffee does add some caffeine. If you want to make it kid-friendly, use decaf coffee or skip it entirely. The shake still tastes great without the coffee. Absolutely! Use dairy-free chocolate ice cream and non-dairy milk, like almond or coconut milk. Make sure your chocolate syrup is vegan too. These swaps keep all the flavor while making it plant-based. To make the shake less sweet, reduce the amount of chocolate syrup. You can also use unsweetened almond milk instead of regular milk. Taste as you go, so you can find the right balance for your liking. This article covered how to make a Mocha Peppermint Frost Shake. We explored the key ingredients like chocolate ice cream and milk choices. You learned about flavor enhancers and garnishes to elevate your shake. I shared tips for perfecting consistency and presentation. You now have ideas for variations and ways to store any leftovers. Making this shake can be fun and tasty. With simple steps, you can enjoy a delicious treat anytime. Get ready to impress your friends and family with this delicious drink!](https://soyumrecipes.com/wp-content/uploads/2025/06/451615f9-183c-4df9-9f86-dadd3370023d.webp)
Are you ready to chill out with a delicious Mocha Peppermint Frost Shake? This tasty treat blends rich chocolate and

Looking for a tasty vegetarian dish that satisfies your cravings? Sweet Potato Black Bean Tacos are here for you! Packed

Are you ready to enjoy a tasty Chicken Gyro Wrap? This easy and flavorful recipe makes a perfect meal for
![To make these tasty bites, you will need: - 1 cup graham cracker crumbs - 3 tablespoons unsalted butter, melted - 1 cup cream cheese, softened - 1/2 cup powdered sugar - 1 teaspoon vanilla extract - 1/4 cup sour cream - 1 cup fresh strawberries, diced These ingredients create a creamy, sweet treat that is hard to resist. The graham cracker crumbs form a crunchy base. Cream cheese provides a rich texture. Fresh strawberries add a burst of flavor. You can also add some fun toppings: - 1/4 cup strawberry jam - Fresh mint leaves Strawberry jam gives extra sweetness and flavor. Fresh mint leaves add a pop of color and a refreshing taste. To make these bites, gather these tools: - Mini muffin tin - Mixing bowls - Measuring cups and spoons The mini muffin tin is key for shaping the bites. Mixing bowls help combine all the ingredients. Measuring tools ensure precise amounts for the best results. For the full recipe, check the detailed instructions. Happy baking! To start, mix the graham cracker crumbs and melted butter. I like to use my hands for this part. You want it to feel like wet sand. Next, line a mini muffin tin with paper liners. Now, take the crumb mixture and press it firmly into each liner. This helps form a nice crust. In another bowl, beat the softened cream cheese until it’s smooth. This step is key for a creamy filling. Gradually add the powdered sugar and vanilla extract. Keep mixing until everything blends well. Finally, stir in the sour cream. This adds a nice tanginess to our filling. Now, gently fold the diced strawberries into the cream cheese mixture. This step adds fresh flavor to your bites. Then, spoon the mixture over the prepared crusts. Fill each liner to the top for a nice finish. Top each cheesecake bite with a small dollop of strawberry jam. It gives extra sweetness and flavor. Let the mini muffin tin chill in the refrigerator for at least two hours. This helps the bites set properly. Once set, carefully remove them from the muffin tin and place them on a serving platter. Garnish with fresh mint leaves for a nice touch. For the full recipe, check out the detailed instructions earlier. Softened cream cheese is key. It mixes well and gets creamy. Cold cream cheese makes lumps. Take it out of the fridge an hour before mixing. This gives a smooth texture. Chilling time is important too. Let the cheesecake bites chill for at least 2 hours. This helps them firm up. If you skip this step, they may fall apart. Want to add extra flavor? Try adding lemon zest or almond extract. Just a little can make a big difference. You can also mix in some vanilla bean seeds for depth. Balancing sweetness is important. The cream cheese can be rich. Taste the mixture before you fill the crusts. You might want to add more strawberries or a pinch of salt. This helps round out the flavors. Avoid overmixing the cream cheese. Mix just until smooth. Overmixing can add air, which can cause cracks. Check the crust consistency. It should feel like wet sand. If it’s too dry, the bites won't hold together. If it’s too wet, they will be soggy. Adjust the butter or crumbs as needed. For the complete recipe, check out the [Full Recipe]. {{image_2}} You can use other fruits to change the flavor. Blueberries and raspberries work great! They add a nice twist. Mixed berry cheesecake bites are also a fun choice. Just use equal parts of your favorite berries. The mix gives a colorful and tasty treat. Want something unique? Try chocolate strawberry cheesecake bites. Just fold in some melted chocolate with the cream cheese. The rich flavor pairs well with strawberries. Lemon-infused cheesecake bites are another option. Add lemon zest and juice for a fresh zing. The bright taste makes these bites extra special. If you need gluten-free bites, it's easy! Substitute gluten-free graham crackers for the crust. Many brands offer this option. Always check ingredient labels for gluten-free assurance. This way, you can enjoy these bites without worry. To keep your cheesecake bites fresh, store them in the fridge. Place them in an airtight container. This will prevent moisture from getting in. Covering the bites with plastic wrap helps too. Make sure the wrap touches the surface of the bites. This keeps them from drying out. If you want to save some for later, freezing works well. First, let the bites cool completely in the fridge. Next, place them in a single layer on a baking tray. Freeze them for about two hours. Once frozen, transfer them to a freezer-safe container. Use parchment paper between layers to prevent sticking. When you're ready to eat, thaw them in the fridge overnight. These delightful bites stay fresh for about a week in the fridge. Check for any off smells or changes in texture. If they look dry or grainy, it's time to toss them. Keeping an eye on these signs helps you enjoy your treats at their best. Yes, you can make Strawberry Cheesecake Bites a day or two in advance. Store them in the fridge. Keep them in an airtight container to keep them fresh. This way, you can enjoy them at your next gathering without stress. The cheesecake bites are set when they feel firm to the touch. They should not jiggle when you move the tray. You can also look for a slight sheen on the surface. This shows they are ready to serve. Yes, you can use low-fat cream cheese. However, it may change the taste and texture. Low-fat cream cheese tends to be softer and less creamy. It might not hold its shape as well. If you want a richer flavor, stick with regular cream cheese. For the full recipe, check out the details above! Strawberry Cheesecake Bites are easy and fun to make. We covered the key ingredients like graham cracker crumbs, cream cheese, and fresh strawberries. I also shared tips for perfect texture and common mistakes to avoid. You can customize them with different fruits or flavors too. Remember to store leftovers properly. Enjoy these treats as a delicious dessert or snack. With a little practice, you’ll impress everyone with your tasty cheesecake bites. Now, let’s get baking and enjoy this simple, sweet delight!](https://soyumrecipes.com/wp-content/uploads/2025/06/2c3431fa-1970-4692-989f-3b62dbc93996.webp)
Looking for a sweet treat to impress? These Strawberry Cheesecake Bites are the answer! With their creamy filling, crunchy crust,
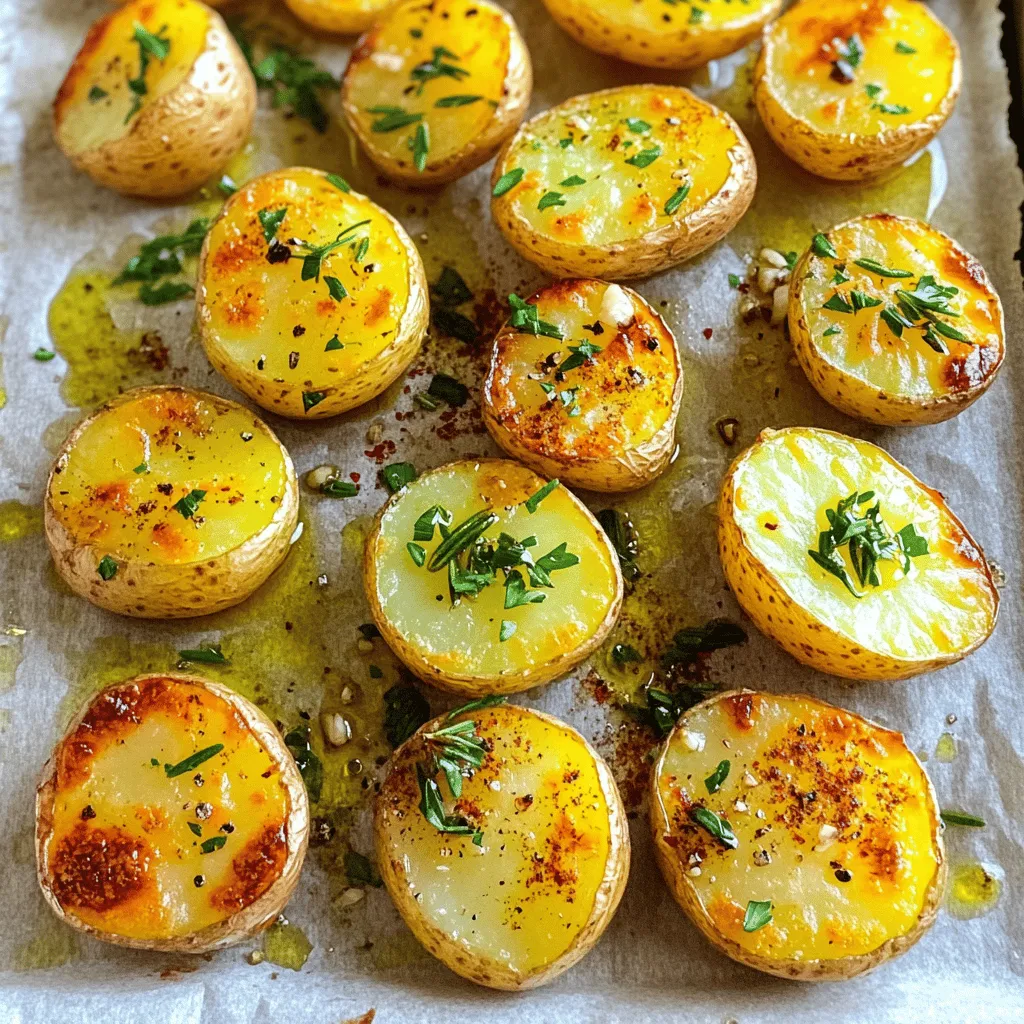
Are you ready to enjoy crispy, flavorful Garlic Herb Roasted Potatoes? This simple guide will walk you through each step,
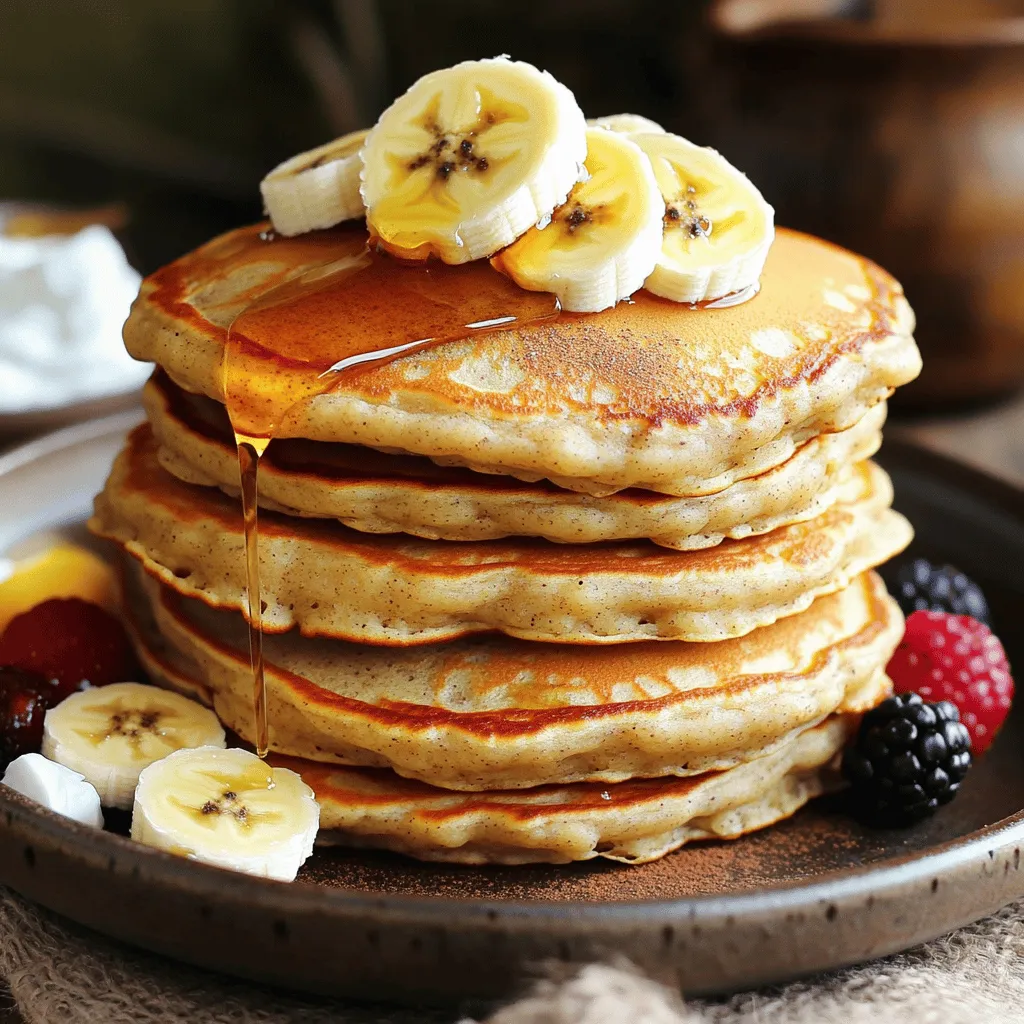
Looking for a quick and healthy breakfast? You’ve come to the right place! These Healthy Banana Oat Pancakes are not
