Skip to content
DisclaimerTerms Of UseGDPR PolicyCookie Policy

So Yum Recipes

  • Home
  • Drinks
  • Appetizers
  • Dinner
  • Dessert
  • About
  • Contact
  • Privacy Policy
DisclaimerTerms Of UseGDPR PolicyCookie Policy

Chloe

- 1 lb (450g) large shrimp, peeled and deveined - 1 cup jasmine rice - 4 tablespoons unsalted butter Large shrimp form the heart of this dish. They cook quickly and soak up flavor well. I love using jasmine rice because it has a nice aroma. Unsalted butter adds richness without overpowering the dish. - 4 cloves garlic, minced - 1 small onion, finely chopped - 1 cup chicken broth - 1 teaspoon paprika - Salt and pepper to taste Garlic and onion give a sweet and savory base. Chicken broth adds depth to the flavor. Paprika brings a hint of warmth, while salt and pepper balance everything out. - 2 green onions, sliced (for garnish) - Fresh parsley, chopped (for garnish) - 1 tablespoon lemon juice Green onions and parsley add a fresh touch. They also bring a nice crunch. A splash of lemon juice brightens the whole dish, making it taste even better. For the full recipe, check out the link. To cook the rice, start by boiling water. In a medium saucepan, bring 2 cups of water to a boil. Add a pinch of salt for flavor. Once the water bubbles, add 1 cup of jasmine rice. Reduce the heat to low and cover the pot. Let it simmer for about 15 minutes. After cooking, take it off the heat but keep it covered for 5 more minutes. Finally, fluff the rice with a fork to make it light and airy. While the rice cooks, it's time to prepare the shrimp. Take 1 pound of large shrimp, peeled and deveined. Season the shrimp with salt, pepper, and a sprinkle of paprika to add color. This simple seasoning makes a big impact. Cook the shrimp in a hot skillet for about 2-3 minutes on each side. They are done when they turn pink and opaque. Now, let’s make the garlic butter sauce. In a large skillet, melt 2 tablespoons of unsalted butter over medium heat. Once melted, add 4 cloves of minced garlic and 1 small chopped onion. Cook until the onion is soft and clear, which takes about 3-4 minutes. Next, add the cooked shrimp to the skillet. Pour in the remaining butter, 1 tablespoon of lemon juice, and 1 cup of chicken broth. Stir it well and let it simmer for 2-3 minutes. This melds all the flavors together. To combine, spoon the fluffy jasmine rice onto plates. Top it with the garlic butter shrimp and drizzle some sauce over the rice. For serving, use a large platter or individual bowls. This way, everyone can serve themselves or enjoy a more refined look. Add sliced green onions and freshly chopped parsley on top for a bright finish. A lemon wedge on the side adds a refreshing touch. For the full recipe, check the details above. Enjoy your cooking! To get the best shrimp, choose large, fresh shrimp. Look for shrimp that smell like the sea, not fishy. When you cook shrimp, avoid overcooking. Cook them until they turn pink and opaque. This usually takes about 2-3 minutes on each side. Overcooked shrimp can become tough and rubbery. Timing is key for perfect shrimp. You can boost the flavor of your garlic butter shrimp by adding herbs and spices. Try fresh parsley or basil for a nice touch. A pinch of red pepper flakes can add some heat. For side dishes, consider a simple salad or steamed veggies. These pair well with the shrimp and rice. They add freshness to your meal. Use a large skillet for even cooking. This helps the shrimp and onions cook nicely without crowding. Start on medium heat, then raise it to medium-high to sear the shrimp. Adjust the heat as needed to prevent burning. If you notice smoke, lower the heat. You want a nice golden color, not charred shrimp. These tips will help you create a delicious Garlic Butter Shrimp and Rice dish. For the full recipe, check out the [Full Recipe]. {{image_2}} You can easily switch up the rice in this dish. Jasmine rice works great, but you can try: - Basmati rice for a nuttier flavor - Brown rice for added fiber - Quinoa for a protein boost If you want to explore seafood options, shrimp is not your only choice. Consider using: - Scallops for a sweet taste - Salmon for a rich flavor - Lobster for a touch of luxury These changes can make your meal unique and fun. To make this dish gluten-free, simply use gluten-free chicken broth. This keeps the taste intact while ensuring everyone can enjoy it. For a low-carb version, swap the rice for cauliflower rice. This option still gives you a nice base but cuts down on carbs. You can sauté the cauliflower rice in a bit of butter for added flavor. If you like some heat, add spices like red pepper flakes or cayenne pepper. This will spice up your garlic butter shrimp and rice. You can also add vegetables or legumes to boost nutrition. Try: - Bell peppers for crunch - Spinach for added greens - Chickpeas for protein Mixing in veggies enhances the dish and makes it more colorful. You can find the full recipe to explore all these options! After cooking, let the Garlic Butter Shrimp and Rice cool. This helps keep the food safe. Store leftovers in airtight containers. Glass or plastic containers work well. They keep the shrimp and rice fresh longer. If you want to freeze them, make sure to use freezer-safe containers. This keeps them from getting freezer burn. You have two main options for reheating: microwave or stovetop. The microwave is fast. Just place the shrimp and rice in a bowl. Heat for 1-2 minutes, stirring halfway. The stovetop gives better results for texture. Heat a skillet on low and add a splash of broth or water. Stir often until warmed. This keeps the shrimp juicy and flavors intact. Garlic Butter Shrimp and Rice stays good for about 3-4 days in the fridge. Always check for freshness. If it smells off or looks strange, it's best to toss it. Signs of spoilage include a slimy texture or off-color. Always store your food safely to enjoy it later! Making Garlic Butter Shrimp and Rice takes about 30 minutes. You need 10 minutes for prep and 20 minutes for cooking. This quick time makes it a great weeknight meal. You can enjoy a delicious dish without spending hours in the kitchen. Yes, you can use frozen shrimp! Just thaw them first. Place them in cold water for about 15-20 minutes. This makes them easy to cook. Be sure to drain and pat them dry before seasoning. This step helps the shrimp cook evenly. This dish pairs well with many sides. You can serve a fresh salad or steamed veggies. Garlic bread is also a nice touch. For drinks, try a light white wine or sparkling water. These options balance the flavors of the shrimp well. To reduce the strong garlic flavor, use less garlic. You can also add a squeeze of lemon juice. This brightens the dish and balances flavors. Another tip is to add some cream or coconut milk to the sauce. This makes it rich and smooth. In this blog post, I covered how to make Garlic Butter Shrimp and Rice. We discussed the main ingredients, key seasonings, and how to prepare everything step by step. I shared helpful tips on cooking shrimp perfectly and even explored variations for different diets. Remember, the right storage keeps leftovers fresh. You can create a tasty dish that's easy to customize. Use your creativity to make it your own. Happy cooking!

Garlic Butter Shrimp and Rice Flavorful Weeknight Meal

Craving a tasty weeknight meal? Look no further! Garlic Butter Shrimp and Rice combines tender shrimp, fluffy jasmine rice, and

To make a Thai Peanut Noodle Salad, gather these fresh and colorful ingredients: - 8 oz rice noodles - 1 cup shredded carrots - 1 cup bell peppers, thinly sliced (preferably red and yellow) - ½ cup red cabbage, shredded - ½ cup cucumber, julienned - 1 cup edamame, shelled - ¼ cup green onions, sliced - ¼ cup fresh cilantro, chopped - ¼ cup creamy peanut butter - 3 tablespoons soy sauce - 2 tablespoons lime juice - 1 tablespoon maple syrup - 1 tablespoon sesame oil - 1 teaspoon sriracha (adjust based on heat preference) - Crushed peanuts for garnish Each ingredient plays a role in the dish. The rice noodles form the base, while the veggies add crunch and color. The creamy peanut butter brings richness, and the lime juice gives a fresh zing. This balance of flavors and textures makes the salad a treat. For the full recipe, you can check the section above. Enjoy making this vibrant dish! First, bring a large pot of water to a boil. Add 8 oz of rice noodles. Cook them based on the package instructions, usually around 4 to 6 minutes. Once they are done, drain them and rinse under cold water. This stops the cooking and keeps them from becoming mushy. Next, grab a large mixing bowl. Combine the following vegetables: - 1 cup shredded carrots - 1 cup thinly sliced bell peppers (red and yellow are best) - ½ cup shredded red cabbage - ½ cup julienned cucumber - 1 cup shelled edamame - ¼ cup sliced green onions - ¼ cup chopped fresh cilantro Make sure to cut and prep each ingredient so they mix well. Now, let’s make the peanut dressing. In a separate bowl, whisk together: - ¼ cup creamy peanut butter - 3 tablespoons soy sauce - 2 tablespoons lime juice - 1 tablespoon maple syrup - 1 tablespoon sesame oil - 1 teaspoon sriracha (add more for heat) Whisk until smooth and creamy. If the dressing is too thick, add a bit of warm water until it’s just right. Finally, it’s time to combine everything. Add the cooled noodles to the bowl with the vegetables. Pour the peanut dressing over the top. Toss everything together until the noodles and veggies are well-coated. Serve the salad in bowls. You can garnish with crushed peanuts for extra crunch. Enjoy your Thai Peanut Noodle Salad! For the full recipe, check out the complete instructions above. To keep your noodles from sticking, rinse them well after cooking. Use cold water to stop the cooking process. This quick rinse helps separate them and keeps them nice and firm. When chopping your veggies, aim for uniform sizes. This makes your salad look great and ensures each bite is balanced. Use a sharp knife for clean cuts. Try to slice carrots and bell peppers into thin strips to match the shape of the noodles. For a bright garnish, use crushed peanuts and fresh cilantro. These add crunch and a fresh taste. A lime wedge on the side gives a nice pop of color and flavor too. To make your salad stand out, serve it in a large, colorful bowl. Layer the veggies and noodles for a fun visual effect. You can also drizzle some of the dressing on top before serving for extra flavor. If you're out of peanut butter, try using almond butter or sunflower seed butter. Both offer a tasty twist. For soy sauce, you can use tamari for a gluten-free option. If you want a lighter dressing, mix some yogurt with lime juice and a bit of honey. This keeps the salad creamy while cutting down on calories. {{image_2}} You can boost the protein in your Thai Peanut Noodle Salad in fun ways. Grilled chicken adds a smoky flavor. Simply slice it thin and toss it in. Shrimp is another tasty option. Cook it until pink and mix it into the salad. If you prefer a plant-based choice, try tofu. Press and cube it, then pan-fry until golden. Each protein option offers a different taste to enjoy. Feel free to swap out vegetables based on what you have. Snap peas can replace cucumber for a crunchier bite. Broccoli or zucchini can add a fresh twist. If you love spice, add thinly sliced jalapeños. For a seasonal touch, consider using asparagus in spring. The key is to mix colors and textures for a vibrant dish. Making this salad gluten-free is simple. Just choose gluten-free soy sauce or tamari. For a vegetarian version, ensure your peanut butter is animal-free. You can also skip the shrimp and stick to veggies and tofu. This keeps the meal light and flavorful while meeting your dietary needs. Enjoy customizing it to fit your lifestyle! For the complete recipe, check out the Full Recipe. To keep your Thai Peanut Noodle Salad fresh, place it in an airtight container. Make sure to cool it to room temperature first. Refrigerate the salad for up to three days. If you leave the salad for too long, the noodles can get soggy. Keep the dressing separate if you plan to store leftovers. This helps maintain the crispness of the veggies. If you want to store the salad for a longer time, consider freezing the components. The rice noodles and veggies can freeze well. However, I recommend freezing them separately from the dressing. This way, when you thaw them, you avoid mushy noodles. To freeze the noodles, place them in a freezer bag. Squeeze out as much air as possible before sealing. For veggies, you can blanch them briefly before freezing to retain color and taste. When you’re ready to enjoy your salad again, you can reheat the noodles gently. Use the microwave or a pan on low heat. Add a splash of water to the pan to keep them moist. Stir often to avoid sticking. Do not reheat the veggies. They taste best when cold and fresh. Toss everything together with the dressing once warmed. This way, you keep the flavors bright and delicious. For the full recipe, visit the link provided. The salad stays fresh in the fridge for about 3 days. To keep it tasty, store it in an airtight container. This helps prevent it from drying out. Keep the dressing separate if you want it to last even longer. Adding the dressing right before serving keeps the veggies crisp. Yes, you can make the dressing a day before. Just mix all the dressing ingredients and store it in a jar. Keep it in the fridge until you need it. If the dressing thickens, add a bit of warm water to thin it out before use. This salad pairs well with grilled chicken or shrimp. You can also serve it with spring rolls or a light soup. For a more filling meal, add some crispy tofu. These options complement the salad's flavors well. Absolutely! You can swap rice noodles for whole wheat or udon noodles. If you're using other noodles, cook them as directed on the package. Adjust the cooking time to get the best texture. Just make sure they fit well with the salad's fresh vibe. This blog post outlined how to make a delicious Thai Peanut Noodle Salad. We covered the key ingredients and simple steps to prepare it. You learned about useful tips and variations to suit your taste and dietary needs. In conclusion, this recipe is fun and versatile. You can easily customize it to fit what you have on hand. Enjoy making and sharing this colorful dish with friends or family. It’s a tasty way to eat healthy!

Thai Peanut Noodle Salad Flavorful and Nutritious Treat

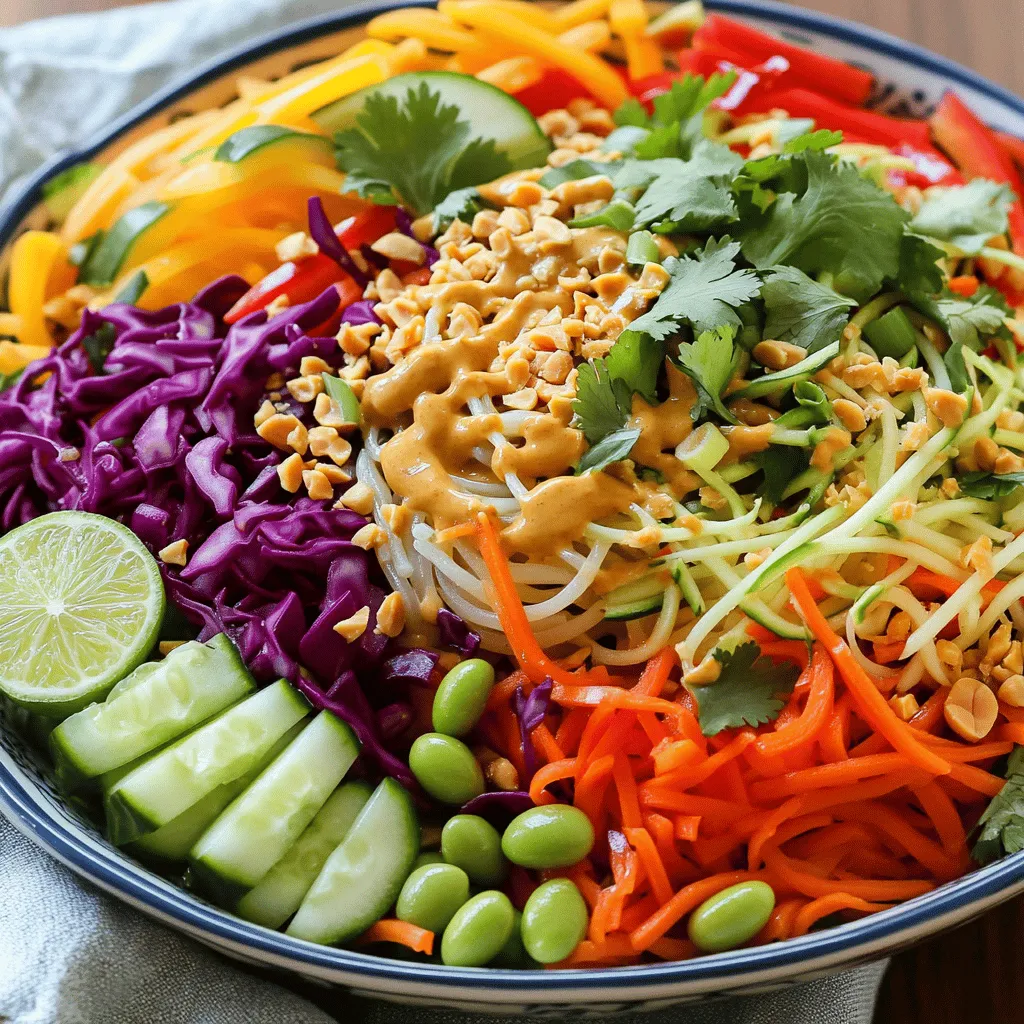
If you crave a dish that’s packed with flavor and nutrition, look no further! Thai Peanut Noodle Salad is a

For a quick and tasty Easy Vegetable Curry, gather these ingredients: - 1 tablespoon coconut oil - 1 medium onion, chopped - 2 garlic cloves, minced - 1 tablespoon fresh ginger, grated - 1 tablespoon curry powder - 1 teaspoon ground cumin - 1 can (14 oz) coconut milk - 1 cup vegetable broth - 1 large carrot, sliced - 1 bell pepper (any color), chopped - 1 zucchini, diced - 1 cup cauliflower florets - 1 cup green peas (fresh or frozen) - Salt and pepper to taste - Fresh cilantro for garnish You can swap some ingredients for your taste. Here are some ideas: - Use olive oil instead of coconut oil for a different flavor. - If you lack fresh ginger, use 1 teaspoon of ground ginger. - Instead of coconut milk, almond milk works well for a lighter curry. - You can use any vegetable broth or even chicken broth if you prefer. - If you don’t have a zucchini, try using yellow squash or mushrooms. - For added protein, toss in chickpeas or cooked lentils. Choose fresh vegetables for the best taste. Here’s how: - Look for firm, bright colors in carrots and bell peppers. - Check that zucchini is smooth and not wrinkled. - Choose cauliflower that is white and compact. - For peas, fresh ones should be plump and green. - Always smell the vegetables. They should have a fresh scent. These tips and substitutions will help you make a great Easy Vegetable Curry. For the full recipe, check out the details above. First, gather all your ingredients. You will need coconut oil, onion, garlic, ginger, curry powder, cumin, coconut milk, vegetable broth, and fresh veggies like carrots, bell peppers, zucchini, cauliflower, and green peas. Chop the onion, mince the garlic, and grate the ginger. Slice the carrot and dice the zucchini. This will save you time later. Heat the coconut oil in a large pot over medium heat. Add the chopped onion and cook for about five minutes until it turns clear. Next, mix in the minced garlic and grated ginger. Cook for one to two minutes until it smells great. Then, add the curry powder and cumin. Stir for one minute to blend the flavors. Pour in the coconut milk and vegetable broth. Mix well. Now, add the sliced carrot, chopped bell pepper, diced zucchini, and cauliflower florets to the pot. Bring the mix to a light simmer. Cover it and let it cook for 15 to 20 minutes. The veggies should become soft. Finally, stir in the green peas and season with salt and pepper. Cook for another five minutes. When serving your curry, I recommend a bed of fluffy basmati rice or warm naan bread. This adds a nice touch. Drizzle some lime juice over the curry for a zesty flavor. Finish with fresh cilantro on top for color and taste. Enjoy your meal! For the full recipe, refer to the earlier section. To make your vegetable curry shine, think about adding more spices. You can try turmeric for warmth or coriander for a fresh taste. A squeeze of lime juice adds brightness. Fresh herbs like cilantro elevate the dish. You can also add a pinch of sugar to balance the spices. Start by cooking your onions until soft. This builds a great base. Sauté garlic and ginger next to bring out their flavor. Don't rush this step; let them cook for 1-2 minutes. When adding spices, toast them briefly to unlock their full flavor. Always simmer your curry gently to keep the veggies tender. One common mistake is overcooking the vegetables. They should stay crisp and colorful. Another mistake is not seasoning enough. Taste your curry as it cooks and adjust salt and pepper. Lastly, avoid adding too many ingredients at once. Stick to the recipe for the best results, like the full recipe I shared. Each step builds flavor and texture, making your dish truly delicious. {{image_2}} You can boost your vegetable curry with protein. Tofu is a great choice. It soaks up flavors well. Cut firm tofu into cubes and sauté it until golden. Then, add it to the curry. Chickpeas are another option. They add a nice texture and taste. Just rinse canned chickpeas and toss them in near the end. Both options make the dish more filling and nutritious. Do you like spice? You can easily turn up the heat. Start with a pinch of cayenne pepper or chili flakes. Add them when you cook the onion. If you want more heat, use fresh chilies. Slice them thin and add to the pot. Taste as you go to find the right level for you. Just remember, it’s easier to add more spice than to take it out! Feel free to swap in your favorite veggies. Sweet potatoes or butternut squash work well. They add a creamy texture and sweetness. Broccoli and green beans are also great. They cook quickly and keep their crunch. You can mix and match based on what you have. This flexibility makes the dish fun and unique each time. For the full recipe, check back for the ingredient list and cooking steps! After you enjoy your easy vegetable curry, let it cool down. Transfer it to an airtight container. This helps keep the curry fresh. Store it in the fridge for up to four days. If you have a lot left, consider freezing some. To freeze your vegetable curry, use a freezer-safe container. Leave some space at the top. The curry will expand as it freezes. It can last for up to three months in the freezer. When you’re ready to eat it, just thaw it overnight in the fridge. To reheat your curry, you can use the microwave or stovetop. If using a microwave, put the curry in a bowl. Heat it for one to two minutes. Stir halfway through to warm it evenly. For stovetop, place it in a pot over low heat. Stir often until it’s hot. If it’s too thick, add a splash of water or broth. Enjoy it again with fresh rice or bread! I love serving Easy Vegetable Curry over fluffy basmati rice. It helps soak up all the flavors. You can also serve it with warm naan bread. A drizzle of lime juice adds great zest. Fresh cilantro on top makes it look nice and bright. Easy Vegetable Curry lasts about 3 to 4 days in the fridge. Make sure to store it in an airtight container. This keeps the curry fresh and tasty. Just heat it up on the stove or in the microwave before serving. Yes, you can make Easy Vegetable Curry ahead of time. It tastes even better the next day as the flavors meld. Just cool it down and store it in the fridge. This dish is perfect for meal prep or quick dinners. For the full recipe, check out the detailed instructions above. You learned about the key ingredients for a great vegetable curry and how to pick fresh veggies. I shared step-by-step instructions for preparing and cooking your dish. You now have tips to enhance flavor and avoid mistakes. We explored variations like adding protein or adjusting the heat. Lastly, I provided storage tips for leftovers and answered common questions. Enjoying this dish is simple, and it can be fun to make. Try different options to find your favorite version of easy vegetable curry. You will love it!

Easy Vegetable Curry Quick and Flavorful Recipe

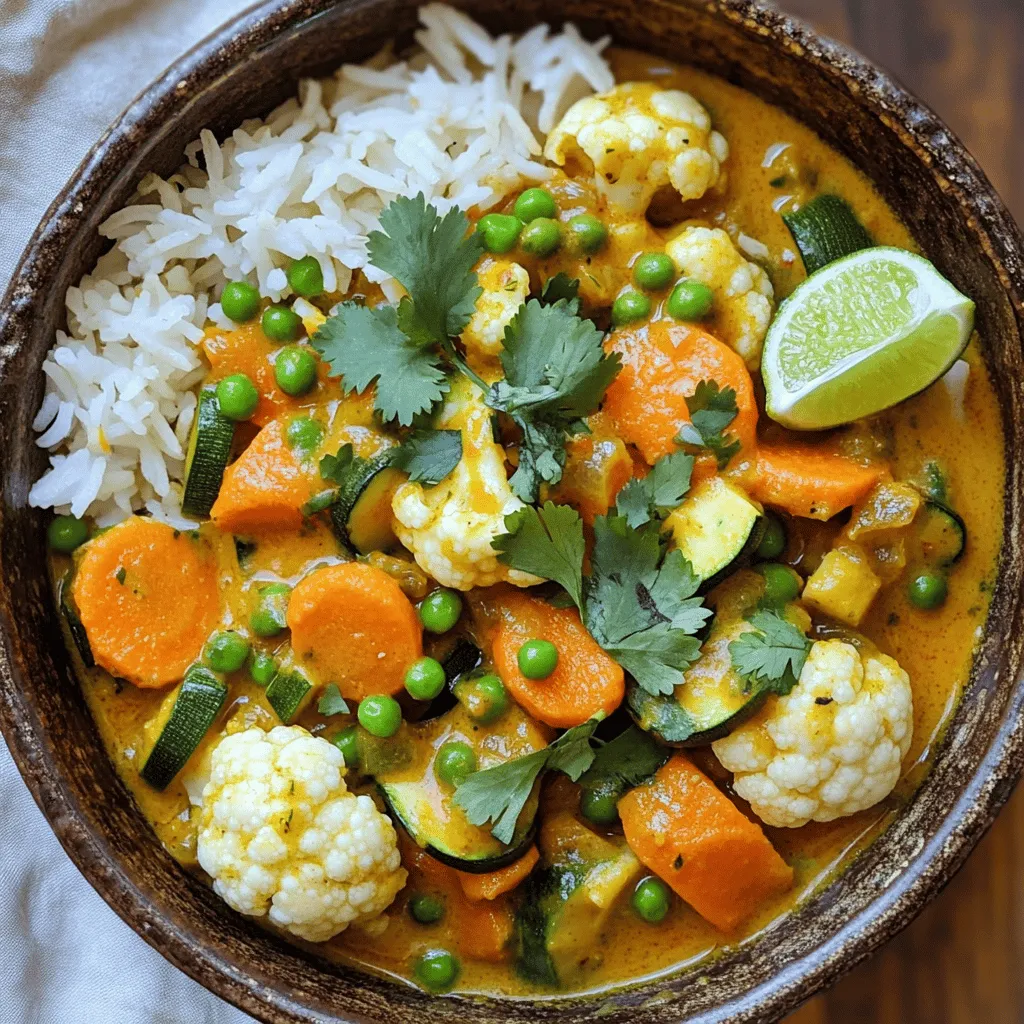
Craving a quick, tasty meal? You’re in the right place! This Easy Vegetable Curry recipe is simple to make and

For a delicious creamy avocado pasta, you need simple fresh items. Here’s what to gather: - 2 ripe avocados, pitted and flesh scooped out - 2 cloves garlic, minced - 1 tablespoon lemon juice - 1/4 cup fresh basil leaves, packed - 1/4 cup grated Parmesan cheese (or nutritional yeast for a vegan option) - 1/4 cup extra virgin olive oil - Salt and pepper to taste - 12 ounces pasta of choice (spaghetti, linguine, or penne) When you use ripe avocados, they blend into a smooth sauce. The garlic adds a nice kick. Lemon juice helps keep the sauce bright and fresh. To make your dish pop, consider these fun garnishes: - Cherry tomatoes, halved - Extra basil leaves These add color and flavor. The tomatoes bring sweetness, and the basil adds freshness. If you don’t have some ingredients, here are easy swaps: - Use lime juice instead of lemon juice for a twist. - Swap Parmesan with vegan cheese or leave it out. - Try any type of pasta you like; whole grain adds a nice texture. Feel free to mix and match based on what you have. Cooking should be fun and flexible! For the full recipe, check the link above. To start, fill a large pot with water. Add salt to the water for flavor. Bring it to a boil over high heat. Once boiling, add your choice of pasta, like spaghetti or penne. Cook the pasta according to the package directions until it is al dente. This usually takes about 8 to 10 minutes. Before draining, save 1/2 cup of the pasta water. This water helps to adjust the sauce later. Drain the pasta well and set it aside for now. Next, grab a food processor for the sauce. Add the flesh of the ripe avocados, minced garlic, and lemon juice. Toss in the fresh basil, Parmesan cheese, and olive oil. Blend everything until it is smooth and creamy. If the sauce feels too thick, add a little of that reserved pasta water. Blend again until you reach your perfect creamy texture. Taste the sauce and season with salt and pepper as needed. Now it’s time to bring it all together. In a large bowl, add the cooked pasta. Pour the creamy avocado sauce over the pasta. Toss everything gently until the pasta is well coated with the sauce. If you want, adjust the seasoning with more salt and pepper. Serve the dish warm. You can garnish it with halved cherry tomatoes and extra basil leaves. This adds a nice touch of color and flavor. For a final touch, drizzle some extra virgin olive oil on top. This enhances the richness and taste of your creamy avocado pasta. Enjoy your meal! For the full recipe, refer to the earlier section. To get that smooth, creamy texture, use ripe avocados. They should be soft but not brown. When blending, add the reserved pasta water slowly. This helps adjust the sauce's thickness. If it’s too thick, just add a bit more water. Blend until you see no lumps. A food processor works best for this job. To boost flavor, try adding fresh herbs. Chopped parsley or cilantro can work wonders. You can also mix in a pinch of red pepper flakes for heat. Don’t forget salt and pepper; they enhance all the tastes. For a zestier kick, add more lemon juice. Taste as you go to find your perfect mix. Serve the creamy avocado pasta right away for the best taste. Garnish with halved cherry tomatoes and fresh basil. This adds color and freshness to the dish. You can also serve it with crusty bread on the side. A light salad pairs well, too. For a fun twist, try adding grilled chicken or shrimp. Check out the Full Recipe for more details. {{image_2}} If you're vegan, you can easily swap out the cheese. Simply use nutritional yeast instead of Parmesan. It gives a cheesy flavor without dairy. I love using about 1/4 cup. This keeps the dish creamy and rich while staying plant-based. Want to make your pasta heartier? Add some protein! Grilled chicken or shrimp works great. You can also try chickpeas or lentils for a vegan option. Just toss them in with the pasta and sauce. This adds texture and keeps you full longer. To jazz up your creamy avocado pasta, think about spices or nuts. A pinch of red pepper flakes adds heat. Toasted pine nuts or walnuts give a nice crunch. Fresh herbs like parsley or cilantro can also brighten the dish. Experiment with these ideas to find your favorite combination! To keep your creamy avocado pasta fresh, store leftovers in an airtight container. Place it in the fridge within two hours of cooking. This will keep it tasty for up to three days. Make sure to cover the pasta well to avoid air exposure. This helps prevent browning of the avocado sauce. When you’re ready to enjoy leftovers, gently reheat the pasta. You can use a microwave or a stove. If using a microwave, warm it on medium heat for about one minute. Stir halfway through to heat evenly. On the stove, add a splash of water and warm it over low heat. This keeps the sauce creamy instead of dry. Freezing the avocado sauce is simple and smart. Place it in a freezer-safe bag or container. Leave some space for expansion. You can freeze the sauce for up to three months. When you want to use it, thaw it in the fridge overnight. Then, blend it again to restore its smooth texture. Enjoy it later with your favorite pasta! You can find the full recipe in the main article. Yes, you can use many types of pasta. Spaghetti, linguine, and penne all work well. You can even try whole wheat or gluten-free options. Each type adds a unique twist to the dish. Just make sure to cook it al dente for the best texture. To stop the avocado from browning, use lemon juice. It helps keep the color bright. You can also store the sauce in an airtight container. Press plastic wrap directly onto the surface of the sauce to limit air contact. Use it right away for the best color and flavor. You can add protein to make this dish more filling. Try cooked chicken, shrimp, or chickpeas. You can also mix in some veggies like spinach or peas. Nuts, like walnuts or pine nuts, add crunch and protein too. This way, you create a heartier meal that still tastes great. In this blog post, I shared how to make creamy avocado pasta. We covered the main ingredients, optional garnishes, and substitutions. I outlined easy steps to cook the pasta and prepare the sauce. I also offered tips for a perfect texture and flavor. Plus, I shared tasty variations and storage tips. Remember, you can customize this dish to fit your taste. Enjoy experimenting with flavors and enjoy your meal!

Creamy Avocado Pasta Simple and Flavorful Dish

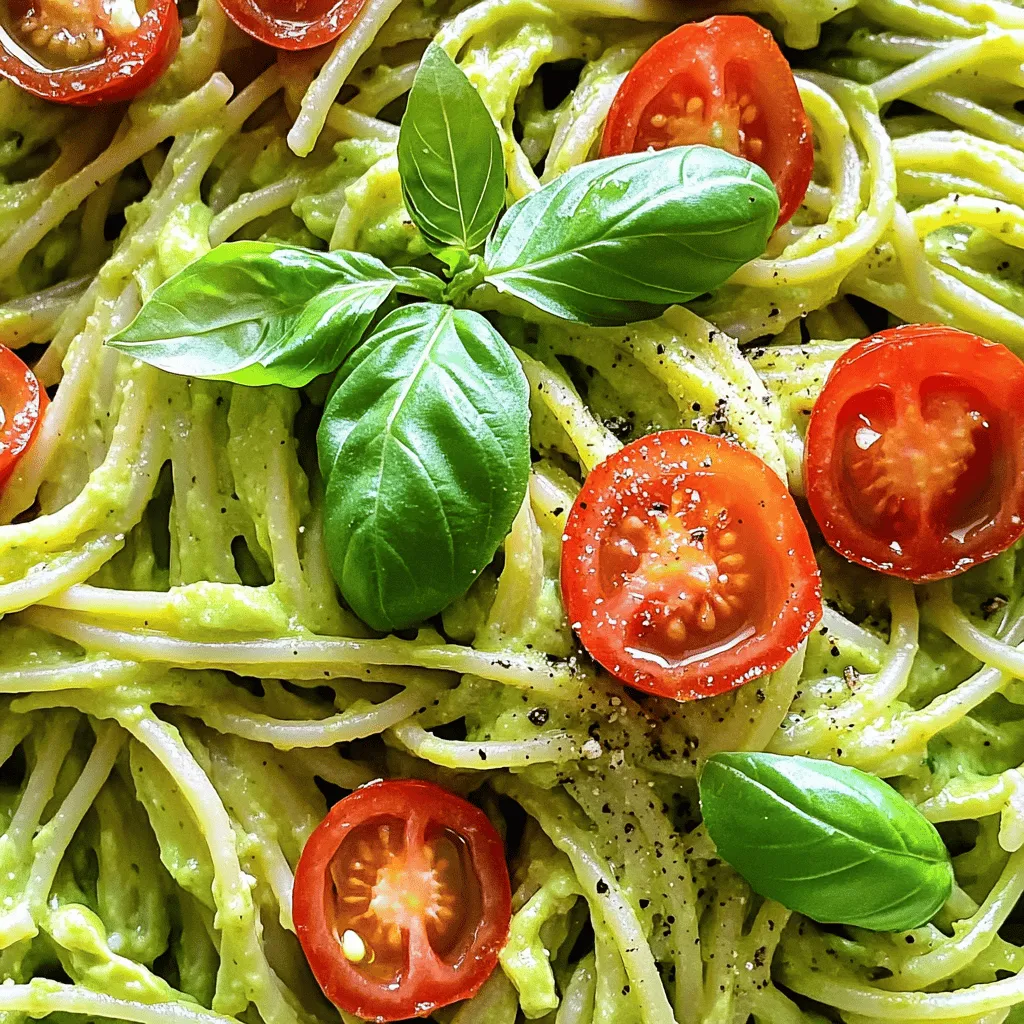
If you’re looking for a quick, healthy meal, I have just the thing for you: creamy avocado pasta. This dish

- 2 pounds chicken wings - 1/4 cup unsalted butter, melted - 4 cloves garlic, minced - 1 cup grated Parmesan cheese - 1 tablespoon dried Italian herbs (oregano, basil, thyme) - 1/2 teaspoon red pepper flakes (optional for heat) - Salt and black pepper to taste - Fresh parsley, chopped (for garnish) When making homemade garlic Parmesan wings, the quality of your ingredients matters. I always choose fresh chicken wings. They provide the best flavor and texture. Next, I use unsalted butter. This lets me control the saltiness. Fresh garlic brings a vibrant taste, while dried Italian herbs add depth. Parmesan cheese is crucial. I prefer using finely grated cheese, as it melts better and coats the wings evenly. If you like heat, add red pepper flakes. Just a bit can elevate the dish. Finally, salt and black pepper enhance all the flavors. Fresh parsley not only adds color but also freshness. For the full recipe, check out the detailed instructions. - Preheat the oven to 425°F (220°C). - Line a baking sheet with parchment paper. Start by preheating your oven. This step ensures that your wings cook evenly and get nice and crispy. While the oven warms, prepare your baking sheet. Parchment paper helps with easy cleanup and prevents the wings from sticking. - Combine melted butter, minced garlic, and seasonings. - Mix until well combined. In a large bowl, mix melted butter with minced garlic, Italian herbs, salt, and black pepper. If you like heat, add red pepper flakes. Stir until everything blends well. This garlic butter marinade is key to flavoring the wings. The butter makes them rich, while the garlic adds a punch. - Coat wings in the marinade. - Spread in a single layer on the baking sheet. - Bake for 35-40 minutes, flipping halfway. Now it’s time to coat the wings. Add the wings to the bowl with the marinade. Toss them well until they are fully covered. Next, lay the wings on the baking sheet in a single layer. This spacing helps them crisp up nicely. Bake the wings for 35 to 40 minutes. Flip them halfway for even cooking. They should turn golden brown and crispy. For the full recipe, check out the complete guide. To make your wings crispy, start by patting them dry. Use paper towels to remove moisture. This step is key because dry wings crisp better in the oven. Next, spacing on the baking sheet matters. Spread the wings out in a single layer. If they touch, they will steam instead of crisp. Keep at least an inch between each wing for best results. Choosing the right Parmesan cheese is crucial. Use fresh grated cheese for the best taste. Pre-grated cheese may not melt well and can lack flavor. Adjust the garlic amount to fit your taste. If you love garlic, add a bit more. If you prefer a milder flavor, cut back. Remember, the garlic gives wings their name, so find the right balance for you. Pair your wings with tasty dipping sauces. Ranch and blue cheese are popular choices. You can also try a spicy aioli for a twist. For side dishes, consider celery sticks and carrot sticks. They add a nice crunch and balance the rich wings. You can also serve them with a fresh salad for a light contrast. Enjoy your wings with friends and family! {{image_2}} You can spice things up with Spicy Garlic Parmesan Wings. Just add more red pepper flakes for extra heat. This change gives the wings a nice kick. If you want a fresh twist, try Herb-Infused Garlic Parmesan Wings. Use fresh herbs like thyme or basil. This will add a bright taste to the wings. For a quick option, use an air fryer. It cooks the wings faster. You will still get that crispy texture. Set it to 400°F and cook for about 25-30 minutes. Flip halfway for even cooking. If you prefer a smoky flavor, try grilling. Heat the grill to medium-high. Cook the wings for about 15-20 minutes. Turn them often to prevent burning. If you're gluten-free, use gluten-free chicken wings. Check the labels on your seasonings. Most should be fine, but it’s best to confirm. For a dairy-free option, you can swap out Parmesan cheese. Use nutritional yeast or a dairy-free cheese. This keeps the wings tasty without the dairy. For the Full Recipe, check the other sections of the article. Store your leftover wings in the fridge. Place them in an airtight container. They will stay fresh for up to three days. If you want to keep them longer, freeze the wings. Wrap them tightly in plastic wrap, then place them in a freezer bag. This method will keep them good for about three months. Reheating wings can be tricky. You want to keep them crispy. The best method is to use the oven. Preheat your oven to 375°F (190°C). Place the wings on a baking sheet and heat for about 10-15 minutes. Flip them halfway through to get even crispiness. The microwave is quicker but can make wings soggy. If you must use it, heat them for 30 seconds, then check and repeat if needed. In the fridge, garlic Parmesan wings last about three days. Check for freshness by smelling them. If they smell off or look strange, throw them away. For frozen wings, check for freezer burn. If you see ice crystals, they may not taste as good. Always trust your senses when it comes to food safety. Yes, you can use frozen chicken wings. Just make sure to defrost them first. You can do this in the fridge overnight or use the microwave for a quick thaw. Once thawed, follow the recipe as usual. Keep in mind that cooking times may change. Cook them for about 5-10 minutes longer to ensure they are fully cooked. To check if the wings are done, look for a golden brown color. The skin should be crispy. The best way to know for sure is to check the internal temperature. Use a meat thermometer to check if they reach 165°F (73.9°C). This ensures they are safe to eat. If you don’t have a thermometer, cut into one wing. The meat should be white, with no pink spots. Garlic parmesan wings pair well with many sauces. Here are some great options: - Ranch dressing: Creamy and cool, it complements the wings well. - Blue cheese dressing: A classic choice for wing lovers. - Hot sauce: For those who love heat, a splash adds zing. - Honey mustard: Sweet and tangy, it balances the garlic flavor. Feel free to mix and match! You can even create your own signature sauce. This blog post guides you through making delicious garlic Parmesan chicken wings. We covered ingredients, like chicken, butter, garlic, and spices. You learned step-by-step baking and tips for crispy wings. Variations help you explore new flavors, and storage tips keep leftovers fresh. Now you can enjoy tasty wings at home! Try different flavors and methods. Enjoy your cooking adventure and impress others with your skills.

Homemade Garlic Parmesan Wings Simple and Delicious Meal

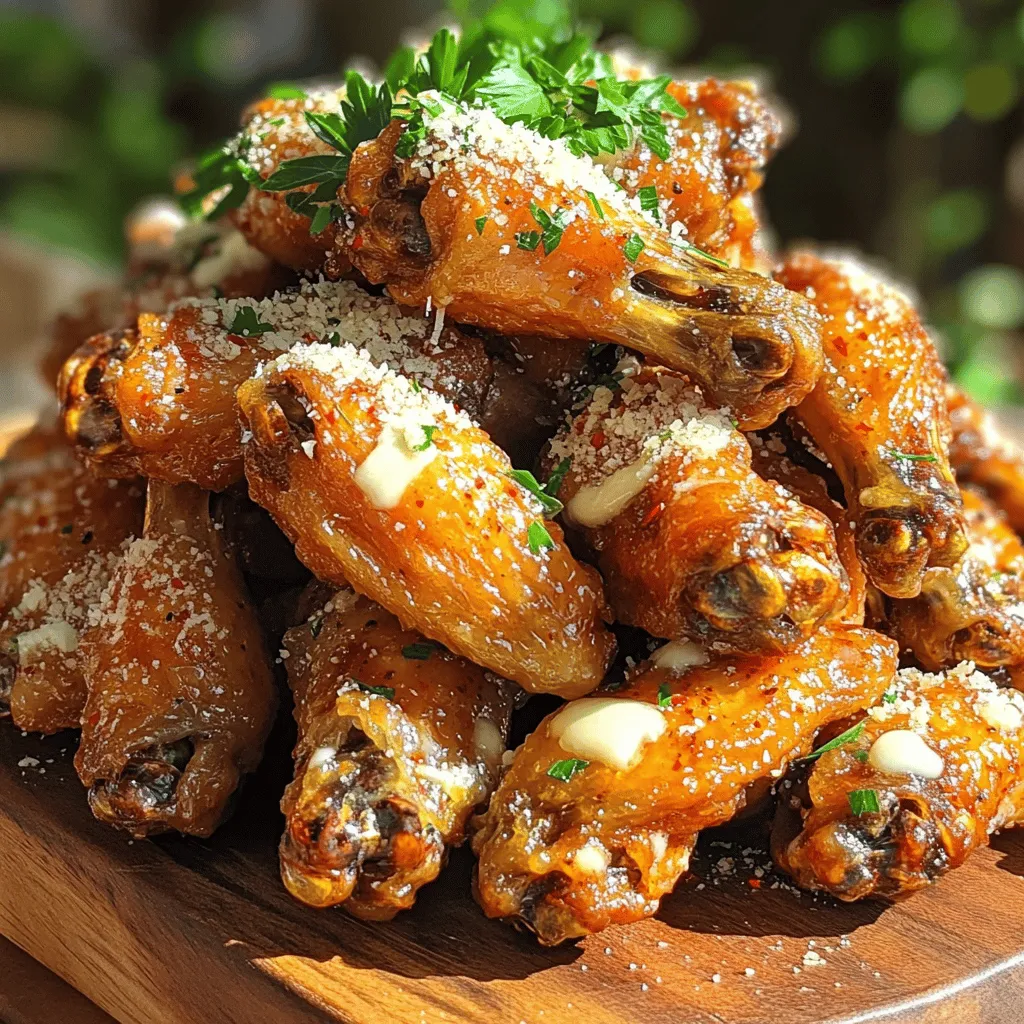
Craving a flavor-packed meal that’s easy to whip up? Look no further! Homemade Garlic Parmesan Wings are not only simple

To make these tasty Spinach & Feta Stuffed Peppers, you will need: - 4 large bell peppers (any color) - 2 cups fresh spinach, chopped - 1 cup feta cheese, crumbled - 1 cup cooked quinoa - 1/2 cup onion, finely chopped - 2 garlic cloves, minced - 1/4 cup sun-dried tomatoes, chopped - 1 teaspoon dried oregano - 1/2 teaspoon salt - 1/4 teaspoon black pepper - 2 tablespoons olive oil - 1/4 cup fresh parsley, chopped (for garnish) You can swap ingredients to suit your taste or what you have on hand. Here are some ideas: - Quinoa: Use rice or couscous instead. - Feta Cheese: Try goat cheese or mozzarella for a different flavor. - Spinach: Kale or Swiss chard work well too. - Sun-Dried Tomatoes: Fresh tomatoes could be an option, but they need to be cooked more. - Onion: Shallots or leeks can add a sweet touch. When picking your ingredients, freshness is key. Here are some tips: - Bell Peppers: Choose peppers that are firm and have smooth skin. Look for vibrant colors. - Spinach: Pick bright green leaves without spots or wilting. - Feta Cheese: Look for crumbly cheese with a clean smell. - Onions: Choose heavy onions with dry, papery skin. Avoid soft spots. Using fresh and high-quality ingredients makes your Spinach & Feta Stuffed Peppers truly shine. For the full recipe, check out the details above. To make Spinach & Feta Stuffed Peppers, you start by preheating your oven to 375°F (190°C). Cut the tops off the bell peppers and remove the seeds and membranes. This helps the peppers cook evenly. Brush the outside of each pepper with olive oil. Place them upright in a baking dish. Next, heat olive oil in a large skillet over medium heat. Add the chopped onion and sauté it for 3-4 minutes. You want the onion to be soft and translucent. Then, add minced garlic and cook it for one more minute. This is when the kitchen will start to smell amazing! Now, add the chopped spinach and sun-dried tomatoes to the skillet. Cook everything together until the spinach wilts, which takes about 2-3 minutes. After that, take the skillet off the heat. Mix in the cooked quinoa, crumbled feta cheese, oregano, salt, and black pepper. Stir well so everything combines nicely. Now comes the fun part! Carefully stuff each bell pepper with the spinach and feta mix. Press it down gently to pack it in. Cover the baking dish with aluminum foil. Bake for 25-30 minutes. After that, remove the foil and bake for another 10-15 minutes. The peppers should be tender and slightly golden on top. Once they are done, take them out of the oven. Let them sit for a few minutes before serving. Garnish with freshly chopped parsley for a pop of color. Enjoy your delicious stuffed peppers! Understanding how to sauté is key. Sautéing helps bring out the flavors in your onion and garlic. Use medium heat to avoid burning. When adding spinach, cook it just until it wilts. This keeps the color bright and the nutrients intact. Stuffing the peppers requires gentle pressure. You want them full but not overstuffed. Covering the dish with foil helps steam the peppers, making them tender. Removing the foil at the end allows the tops to brown nicely. For visual guidance, consider watching a video on how to prepare stuffed peppers. This can show you proper cutting techniques. You can also see how to pack the filling. A video on sautéing vegetables can enhance your skills. Cook along with the video for a hands-on experience! For more detailed instructions, check the Full Recipe. Start by picking fresh bell peppers. Look for ones that are firm and colorful. Wash them well before cutting. To stuff them, cut off the tops and remove the seeds. Brush the outside with olive oil for a nice finish. When cooking, preheat the oven to 375°F (190°C). This ensures even cooking. Stuff each pepper tightly with the spinach and feta mixture. This helps them hold their shape. Cover them while baking to keep moisture in. Uncover them for the last few minutes to get that golden top. One common mistake is not cooking the filling enough. Make sure to sauté the onion and garlic well before mixing in the spinach. This adds flavor and depth. Another mistake is overcooking the peppers. They should be tender but still crisp. If they are mushy, they won’t taste fresh. Don’t skip the olive oil on the peppers. It adds flavor and keeps them from drying out. Lastly, avoid using too much salt. Feta cheese is salty already, so use it wisely. You will need a few basic tools to make this dish. A large skillet works best for cooking the filling. Use a sharp knife to cut the peppers. A baking dish is essential for holding the stuffed peppers. For packing the filling in, a spoon or small scoop works great. If you have parchment paper, line your baking dish. This makes cleaning up easier. For the best results, use an oven mitt to handle the hot dish after baking. Feel free to check out the Full Recipe for more details! {{image_2}} You can get creative with your stuffing for spinach and feta stuffed peppers. Try adding cooked ground turkey or beef for extra protein. You can also mix in black beans for a hearty twist. Some people love adding corn for sweetness and crunch. If you want to change the flavor, use different cheeses like goat or mozzarella. Mix in herbs like basil or thyme to elevate the taste. Each variation brings its own flair to this tasty dish. Making spinach and feta stuffed peppers vegetarian is easy. Simply swap the feta cheese for a vegan cream cheese or tofu. You can also use nutritional yeast to give a cheesy flavor without dairy. For a protein boost, add lentils or chickpeas. If you want a little kick, toss in some chopped jalapeños or chili flakes. These adaptations keep the dish delicious while catering to different diets. These stuffed peppers shine on their own, but you can pair them with sides. A fresh garden salad with lemon vinaigrette complements the rich flavors. You can also serve them with a side of quinoa or brown rice for extra fiber. If you want a comforting touch, a warm bowl of tomato soup pairs perfectly. For a fun twist, serve with a dollop of yogurt or sour cream on top. These options enhance the meal and make it more enjoyable. For the full recipe, check out the Spinach & Feta Stuffed Peppers recipe. To keep your leftover stuffed peppers fresh, let them cool to room temperature. Then, place them in an airtight container. This method traps moisture and flavors. Store them in the fridge for up to three days. If you want to keep them longer, freezing is a great option. When reheating stuffed peppers, the oven works best. Preheat your oven to 350°F (175°C). Place the peppers in a baking dish and cover with foil. Heat for about 20 minutes or until warm. This keeps them juicy and helps the flavors blend nicely. You can also use a microwave, but they may not taste as good. If you want to freeze your stuffed peppers, wrap each one tightly in plastic wrap. Then, place them in a freezer bag. This keeps air out and prevents freezer burn. They can last up to three months in the freezer. When you're ready to eat them, thaw in the fridge overnight. Then, reheat as described above. For the full recipe, check the earlier section. Cooking Spinach & Feta Stuffed Peppers takes about 50 minutes. This includes 15 minutes of prep time and 35 minutes of cooking time. First, you preheat the oven to 375°F. Then, you bake the stuffed peppers for 25-30 minutes covered. After that, remove the foil and bake for another 10-15 minutes. This method makes the peppers tender and the tops golden. Yes, you can use other cheeses. Mozzarella, goat cheese, or ricotta work well too. Each cheese brings its own flavor and texture. If you want a creamier filling, try ricotta. For a sharper taste, use goat cheese. Feel free to mix and match cheeses for a unique twist on this dish. Spinach is rich in vitamins A, C, and K. It also has iron and antioxidants. Feta cheese adds protein and calcium to your meal. Together, they create a healthy and tasty dish. The quinoa in the recipe also boosts fiber and protein. This makes Spinach & Feta Stuffed Peppers a well-rounded meal. For more details, check the Full Recipe to see how you can enjoy this healthy dish! In this post, we explored how to make delicious Spinach & Feta Stuffed Peppers. We covered the best ingredients, cooking steps, and essential tips. I shared helpful advice on variations and storage. Remember to choose fresh produce and avoid common mistakes for perfect results. Cooking this dish can be fun and rewarding. With a few simple steps, you’ll create a meal that’s tasty and nutritious. Enjoy your time in the kitchen and impress your friends and family!

Spinach & Feta Stuffed Peppers Flavorful Health Boost

Looking for a delicious way to boost your health? Try my Spinach & Feta Stuffed Peppers! These vibrant, colorful peppers

- 6 large eggs - 1/2 cup milk - 1 cup bell peppers (mixed colors), diced - 1 cup zucchini, shredded - 1/2 cup red onion, finely chopped - 1 cup spinach, roughly chopped - 1/2 cup cherry tomatoes, halved - 1 cup shredded cheese (cheddar or feta) - 2 tablespoons olive oil - 1 teaspoon garlic powder - 1/2 teaspoon smoked paprika - Salt and pepper to taste - Fresh herbs for garnish (such as parsley or basil) Gather these ingredients to make a savory vegetable frittata that bursts with flavor. Each ingredient adds its own unique taste and texture. The eggs and milk provide a rich base. The bell peppers and zucchini add sweetness and crunch. Red onion brings depth, while spinach and tomatoes add freshness. Cheese gives a creamy finish that ties it all together. You can swap out ingredients based on what you have. For cheese, try goat cheese or nutritional yeast for a dairy-free option. Use any veggies you like; asparagus and mushrooms work well too. If you want a dairy-free milk, almond or oat milk are great choices. For added protein, consider adding cooked bacon or sausage. Chickpeas also work well for a plant-based protein. Feel free to experiment with spices! A pinch of chili flakes can add a nice kick. Making this frittata your own is easy and fun! For the full recipe, check out the details provided. - Preheat the oven to 375°F (190°C). This is key for a nice bake. - Gather your ingredients. You will need eggs, milk, and a mix of fresh veggies. - Use a large oven-safe skillet. This ensures even cooking and easy transfer to the oven. - In a large bowl, whisk together six eggs and half a cup of milk. - Add one teaspoon of garlic powder, half a teaspoon of smoked paprika, salt, and pepper. - Whisk until the mixture is smooth and well combined. - In your skillet, heat two tablespoons of olive oil over medium heat. - Add half a cup of red onion and one cup of diced bell peppers. - Sauté for about three to four minutes until softened. - Mix in one cup of shredded zucchini and cook for two more minutes. - Finally, stir in one cup of chopped spinach and half a cup of halved cherry tomatoes. - Cook until the spinach wilts. - Remove the skillet from heat. Pour the egg mixture over the sautéed veggies. - Stir gently to mix everything evenly. Top with one cup of shredded cheese. - Transfer the skillet to your preheated oven. - Bake for 20 to 25 minutes. The frittata should be set in the center and golden on top. - To check for doneness, insert a knife in the center. It should come out clean. For the full recipe, visit the main section of this article. To get the best frittata, follow these tips: - Perfect Consistency: Whisk the eggs and milk together well. This helps the frittata rise and stay fluffy. If you want a creamier texture, let it cool for a few minutes before reheating. - Oven-Safe Skillet: Always use an oven-safe skillet. This allows you to cook the frittata on the stove, then move it straight to the oven. It saves dishes and keeps your frittata intact. Pair your frittata with these tasty sides: - Best Sides: A fresh salad adds crunch. You can also serve it with crusty bread or fruit for balance. - Presentation Ideas: Slice the frittata into wedges. Place it on a beautiful platter. Garnish with fresh herbs, like parsley or basil, to make it pop. Reheating is easy: - How to Reheat: Use a microwave for quick warming. Heat individual slices for about 15-20 seconds. This keeps it moist and tasty. - Storing Leftovers: Keep leftovers in an airtight container. They can last in the fridge for up to three days. To maintain freshness, eat within this time. For the full recipe, check the detailed instructions and enjoy making your savory vegetable frittata! {{image_2}} You can change the vegetables in a frittata based on what is in season. In spring, use fresh asparagus and peas. In summer, add sweet corn and ripe tomatoes. For fall, think about adding spinach and roasted squash. Winter calls for hearty veggies like kale and root vegetables. Root vegetables like potatoes or sweet potatoes work great too. Just chop them small and cook them longer. Mushrooms add a nice umami flavor. Try using cremini or shiitake for a meaty bite. Mix and match to find your favorite combo! Cheese can really change the taste of your frittata. Cheddar adds a sharpness, while feta gives a tangy kick. You might try goat cheese for creaminess or blue cheese for bold flavor. Fresh herbs like basil or dill can brighten the dish. For extra heat, add chili flakes or jalapeños. Smoked paprika gives a warm flavor while garlic powder adds depth. The right spice can transform your frittata into a unique dish. If you're on a keto diet, swap the milk for heavy cream. You can add more cheese and use low-carb veggies. For a vegan frittata, replace eggs with a chickpea flour mix. Blend chickpea flour with water and spices to create a batter. Cook it like a regular frittata for a tasty, plant-based dish. These variations let you cater to different diets while keeping the frittata delicious. Explore these ideas to find what works best for you! Check out the Full Recipe for more details. To store leftovers, place the frittata in an airtight container. Let it cool before sealing. This helps keep it fresh. You can store it in the fridge for up to four days. If it smells off or looks strange, throw it out. To freeze leftover frittata, cut it into wedges. Wrap each slice in plastic wrap, then place them in a freezer-safe bag. Use it within two months for the best taste. When reheating, let it thaw overnight in the fridge. You can warm it in the oven at 350°F (175°C) for about 15-20 minutes. This keeps it fluffy and moist. Fresh frittata tastes best. The flavors are bright, and the texture is creamy. However, you can make leftovers delightful. Reheat them in the microwave for a quick meal. You can also add fresh herbs or a sprinkle of cheese to boost flavor. A drizzle of olive oil adds richness too. You can serve a savory vegetable frittata with many tasty sides. Here are some popular choices: - Mixed green salad - Toasted bread or bagels - Roasted potatoes - Fresh fruit For drinks, try pairing it with: - Freshly squeezed orange juice - Herbal tea - Sparkling water Each side adds flavor and makes your meal complete. Yes, you can make a frittata ahead of time. Here are a few best practices: - Cook it fully and let it cool. - Store it in an airtight container in the fridge. For reheating, use the oven or microwave: - In the oven, heat at 350°F (175°C) for about 10 minutes. - In the microwave, heat individual slices for 15-20 seconds. This keeps your frittata tasty and fresh. A frittata lasts about 3-4 days in the fridge. To stay safe: - Keep it in an airtight container. - Check for any signs of spoilage. Signs to look out for include: - Unpleasant smell - Changes in color - Mold If you see any of these, it's best to throw it away. Frittatas and omelets differ in how they are cooked. Here are the key differences: - A frittata cooks slowly and often bakes in the oven. - An omelet cooks quickly on the stove and is folded. Use frittatas for a larger meal and omelets for a quick breakfast. Both are delicious in their own way! This blog post covers how to make a tasty vegetable frittata. You gathered all the needed ingredients, explored fun substitutions, and learned step-by-step cooking instructions. I shared tips for perfecting your frittata and creative variations to try. Remember, fresh vegetables boost flavor and nutrition. Don't hesitate to customize it to fit your taste. Enjoy cooking, and know that a homemade frittata can impress anyone at your table. Now, you have all the tools to make a delicious dish that everyone will love!

Savory Vegetable Frittata Flavorful and Easy Recipe

Are you ready to whip up a dish that’s both tasty and simple? A savory vegetable frittata is the answer!

- 4 boneless, skinless chicken thighs - 1 bunch asparagus, trimmed - 4 cloves garlic, minced - 2 tablespoons olive oil - 1 tablespoon lemon juice - 1 teaspoon dried oregano - 1 teaspoon paprika - Salt and pepper, to taste - Lemon wedges - Fresh parsley This dish shines with simple, fresh ingredients. The chicken thighs bring rich flavor and tenderness. Asparagus adds a nice crunch and bright color. Garlic gives depth and aroma that will fill your kitchen. For the marinade, olive oil coats the chicken, helping the spices cling. Lemon juice brightens everything, making each bite fresh. Oregano and paprika add warmth and earthiness. You can adjust the salt and pepper to your liking. When garnishing, lemon wedges add a zesty pop. Fresh parsley not only looks good but also brings a hint of herbal flavor. You can find the full recipe in the previous section. Enjoy these ingredients as the base for a simple yet delicious meal! - Preheat your oven to 400°F (200°C). - In a large bowl, mix 2 tablespoons of olive oil, 4 minced garlic cloves, 1 tablespoon of lemon juice, 1 teaspoon of dried oregano, 1 teaspoon of paprika, salt, and pepper. This mix becomes your marinade. - Coat 4 boneless, skinless chicken thighs in the marinade. Let them sit for 15 minutes. If you have more time, marinate longer for deeper flavor. - Use a large oven-safe skillet and heat it on medium-high. - Add the chicken thighs and sear them for about 4-5 minutes on each side. You want them golden brown. - After searing, remove the chicken from the skillet. In the same skillet, add 1 bunch of trimmed asparagus. Sauté for about 2-3 minutes until slightly tender. - Place the chicken back in the skillet with the asparagus. Pour any marinade left over the top. - Transfer the skillet to your preheated oven. Bake for 15-20 minutes, or until the chicken reaches 165°F (74°C). - Once cooked, remove the skillet from the oven. Let it rest for a few minutes. Garnish with fresh parsley and serve with lemon wedges. For the full recipe, check out the details above. Enjoy your meal! To get great flavor, marinate your chicken well. Use a mix of olive oil, garlic, lemon juice, oregano, and paprika. This mix makes the chicken juicy and tasty. For best results, let the chicken sit in the marinade for at least 15 minutes. If you have the time, marinate for up to an hour in the fridge. This extra time helps the flavors soak in. To achieve that perfect golden-brown sear, heat your skillet over medium-high heat. When it’s hot, place the marinated chicken in the skillet. Sear each side for about 4-5 minutes. This locks in the juices and adds great color. For the asparagus, sauté it for just 2-3 minutes before baking. This keeps it crisp and tender. For a full meal, serve your One-Pan Garlic Chicken and Asparagus with rice or crusty bread. These pair well and soak up the yummy juices. For a beautiful dish, garnish with fresh parsley and lemon wedges. This adds a pop of color and freshness to your plate. {{image_2}} You can change up the veggies in this dish. Try using broccoli, bell peppers, or green beans. They add nice color and flavor. You can also swap garlic for shallots or use fresh herbs like thyme or rosemary. These herbs bring a different taste, making this dish your own. If you want a low-carb option, skip the chicken thighs and use chicken breast instead. This keeps the dish light and healthy. For a gluten-free meal, just ensure your spices do not contain gluten. Most dried herbs are safe, but check the labels. You can cook this dish on the stovetop. Just use a large skillet over medium heat. Sear the chicken like in the recipe, then add asparagus. Cook until the chicken is done. If you want a smoky flavor, try grilling the chicken and asparagus. This method gives a great char and a fun twist to the dish. For the full recipe, check out the detailed steps to make your cooking fun and easy. To store leftovers, place the chicken and asparagus in an airtight container. This keeps them fresh. Make sure to cool them to room temperature first. In the refrigerator, your dish will last for about 3 to 4 days. Always check for off smells or changes in texture before eating. You can freeze this dish if you have extra. Cut the chicken and asparagus into smaller pieces for faster freezing. Use a freezer-safe bag or container. It’s best to eat it within 2 to 3 months for the best taste. When you are ready to eat, thaw it overnight in the fridge. To reheat, you want to keep the chicken juicy. The best way is to use the oven. Preheat it to 350°F (175°C). Place the chicken and asparagus in an oven-safe dish. Cover with foil to keep moisture in. Heat for about 15-20 minutes or until warm. You can also use the microwave, but it may dry them out. Always check the internal temperature; it should reach 165°F (74°C). For chicken thighs, it usually takes 15-20 minutes at 400°F (200°C). Check them after 15 minutes. This helps avoid overcooking. The chicken should get a nice golden color. Yes, you can use veggies like green beans or broccoli. They cook well and add great flavor. Carrots and bell peppers are also good choices. Cut them small for even cooking. The safest way is to check the internal temperature. Chicken should reach 165°F (74°C). A meat thermometer is best for this. It gives you an accurate reading, ensuring it's safe to eat. You can prep this dish in advance. Marinate the chicken and store it in the fridge. You can also cut the asparagus ahead. Just cook everything when you're ready to eat. This dish pairs well with rice or quinoa. A side salad adds freshness too. You might also serve crusty bread to soak up the juices. For a nice touch, try roasted potatoes! For the full recipe, check out the detailed instructions above. You now know the key ingredients for a tasty one-pan chicken and asparagus dish. The marinade adds great flavor, while the cooking steps ensure a juicy meal. Remember, you can swap in veggies or adjust for different diets, making this recipe flexible. Store leftovers safely and reheat with care for best results. With these tips, you’re set to impress at dinner time. Enjoy your cooking and remember to experiment; this dish is just the start!

Satisfying One-Pan Garlic Chicken and Asparagus Dish

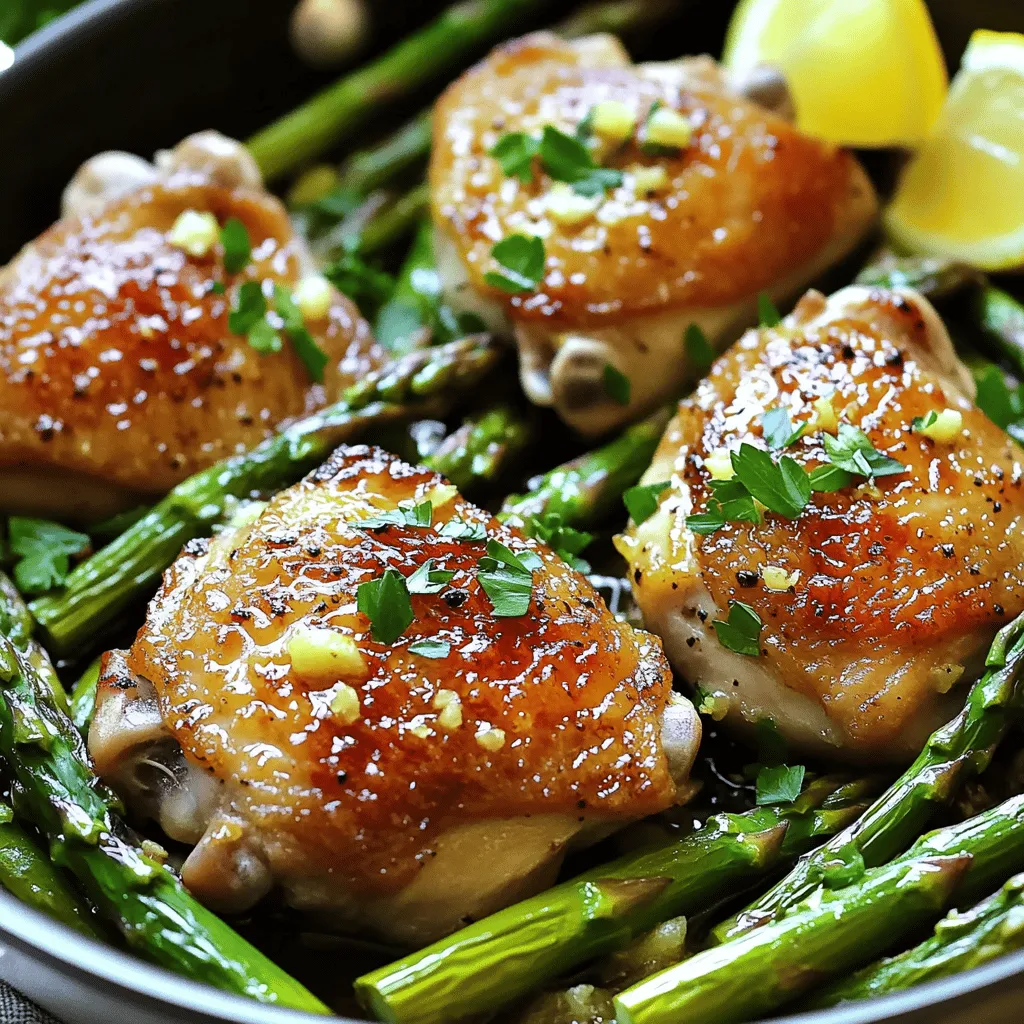
Ready for an easy dinner that packs flavor? This One-Pan Garlic Chicken and Asparagus dish is simple and satisfying. With

- 2 cups cooked rice (white or brown) - 2 cups fresh broccoli florets - 1 cup shredded sharp cheddar cheese - 1 cup shredded mozzarella cheese - 1 cup milk - 1 small onion, finely chopped - 2 cloves garlic, minced - 1/2 cup sour cream - 1 teaspoon Dijon mustard - 1 teaspoon salt - 1/2 teaspoon black pepper - 1/2 teaspoon paprika - 1/4 teaspoon cayenne pepper (optional) - 1/2 cup breadcrumbs - 2 tablespoons olive oil These ingredients create a warm and cheesy dish that everyone loves. You can use white or brown rice, depending on your preference. Fresh broccoli florets give the casserole a nice crunch and bright color. The sharp cheddar cheese adds a strong flavor, while the mozzarella makes it creamy and gooey. For a little kick, I often add cayenne pepper. If you are not a fan of spicy food, feel free to leave it out. The onion and garlic give a wonderful aroma and taste. Dijon mustard adds depth. Lastly, breadcrumbs on top create a crispy texture that contrasts with the soft rice and broccoli below. I always recommend using high-quality cheese and fresh ingredients. These choices elevate the dish and make it special. This recipe is easy to adapt, so feel free to experiment with your favorite flavors. You can find the full recipe for exact steps and cooking times. Start by preheating your oven to 350°F (175°C). This step is key for even cooking. A hot oven ensures that your casserole bakes properly, giving it a nice golden top. Next, get a large pot of salted water boiling. Once it’s boiling, add 2 cups of fresh broccoli florets and blanch them for 2 to 3 minutes. This quick cooking helps keep the broccoli bright and crisp. Drain the broccoli and set it aside. In the same pot, heat 2 tablespoons of olive oil over medium heat. Add 1 small finely chopped onion and 2 minced garlic cloves. Cook until the onion turns soft and clear, which takes about 5 minutes. Now, grab a large mixing bowl. Combine the cooked rice, blanched broccoli, sautéed onion and garlic, and 1 cup each of shredded cheddar and mozzarella cheese. Pour in 1 cup of milk and add 1/2 cup of sour cream. Don't forget to add 1 teaspoon of Dijon mustard, 1 teaspoon of salt, 1/2 teaspoon of black pepper, 1/2 teaspoon of paprika, and 1/4 teaspoon of cayenne pepper if you like heat. Mix everything well until it’s all combined. Transfer the mixture into a greased 9x13 inch casserole dish. Spread it out evenly. In a small bowl, mix 1/2 cup of breadcrumbs with a bit of olive oil. Sprinkle this mix over the casserole. Bake in your preheated oven for 25 to 30 minutes. You want the top to be golden brown and bubbling. Once done, take it out and let it cool for 5 minutes before serving. Enjoy your cheesy creation! For the full recipe, check the details above. To avoid mushy rice, cook it just right. Use 2 cups of cooked rice. If you overcook the rice, it will turn mushy in the casserole. Use a timer. Follow the package instructions for cooking time. Rinse the rice well before cooking to remove extra starch. This helps it stay fluffy. Cheese makes this dish special. For great flavor, use sharp cheddar and mozzarella. Sharp cheddar gives a nice bite. Mozzarella melts well, adding creaminess. You can mix these cheeses for a rich taste. Try adding some parmesan for a nice twist. It adds a salty flavor that works well with broccoli. Make your casserole pretty with garnishes. Fresh parsley adds color and brightness. You can also use chives for a mild onion flavor. Sprinkle them on right before serving. This makes the dish look appealing. A bright garnish invites everyone to dig in. Use a spatula to serve. Make sure each plate has broccoli and cheese. {{image_2}} For a veggie-packed casserole, I love adding more greens. You can swap in spinach, kale, or even bell peppers. These not only bring bright colors but also boost nutrients. Try adding some corn for sweetness or mushrooms for earthiness. If you want to add protein, chicken or beef works great. You can use leftover rotisserie chicken for ease. Simply shred it and mix it into the rice and cheese blend. For beef, ground beef or turkey can be browned and added. This makes the dish heartier and more filling. To make this casserole gluten-free, swap regular breadcrumbs for gluten-free ones. You can also use brown rice or quinoa instead of white rice. These swaps keep the dish tasty while meeting dietary needs. Enjoy the same cheesy goodness without worry! For the full recipe, check out the detailed instructions. To keep your Cheesy Broccoli Rice Casserole fresh, store it in an airtight container. Make sure it cools down before sealing it. This helps prevent moisture build-up, which can make the casserole soggy. It can last in the fridge for about 3 to 5 days. If you want to enjoy it later, freezing is a great option. When you want to enjoy leftovers, reheat them in the oven. Preheat your oven to 350°F (175°C). Place the casserole in a baking dish and cover it with foil. This prevents the top from burning while it heats. Bake for about 20 minutes or until it's hot all the way through. You can also use the microwave, but the oven keeps the texture better. Heat in short bursts and stir often to ensure even heating. Freezing the casserole is simple. Just make sure it’s completely cool before you freeze it. Use a freezer-safe container or wrap it tightly with plastic wrap and then foil. It can stay frozen for up to 3 months. When you’re ready to eat, let it thaw overnight in the fridge. Then, reheat it in the oven for best results. For the full recipe, check out the details above. You can store Cheesy Broccoli Rice Casserole in the fridge for up to five days. Just keep it in an airtight container. This helps keep it fresh and tasty. Yes, you can prepare this casserole a day ahead. Just mix all your ingredients and place them in a greased dish. Cover it with plastic wrap. When ready, bake it straight from the fridge. This saves time on busy days. This casserole pairs well with many dishes. You can serve it with a simple green salad. Roasted chicken or grilled fish makes a great addition too. For a heartier meal, try adding some crusty bread on the side. Absolutely! Frozen broccoli works well in this dish. Just make sure to thaw and drain it well before use. This prevents extra moisture in your casserole. This blog post covered making a Cheesy Broccoli Rice Casserole. We listed all the key ingredients and shared step-by-step instructions. You learned helpful tips for perfecting your dish, including cheese choices and garnishing. We explored variations for different diets and gave storage and reheating advice. This dish is not just tasty but also versatile. You can easily adapt it to fit your needs. I hope you enjoy making and sharing this comforting casserole with friends and family!

Cheesy Broccoli Rice Casserole Comforting Family Dish

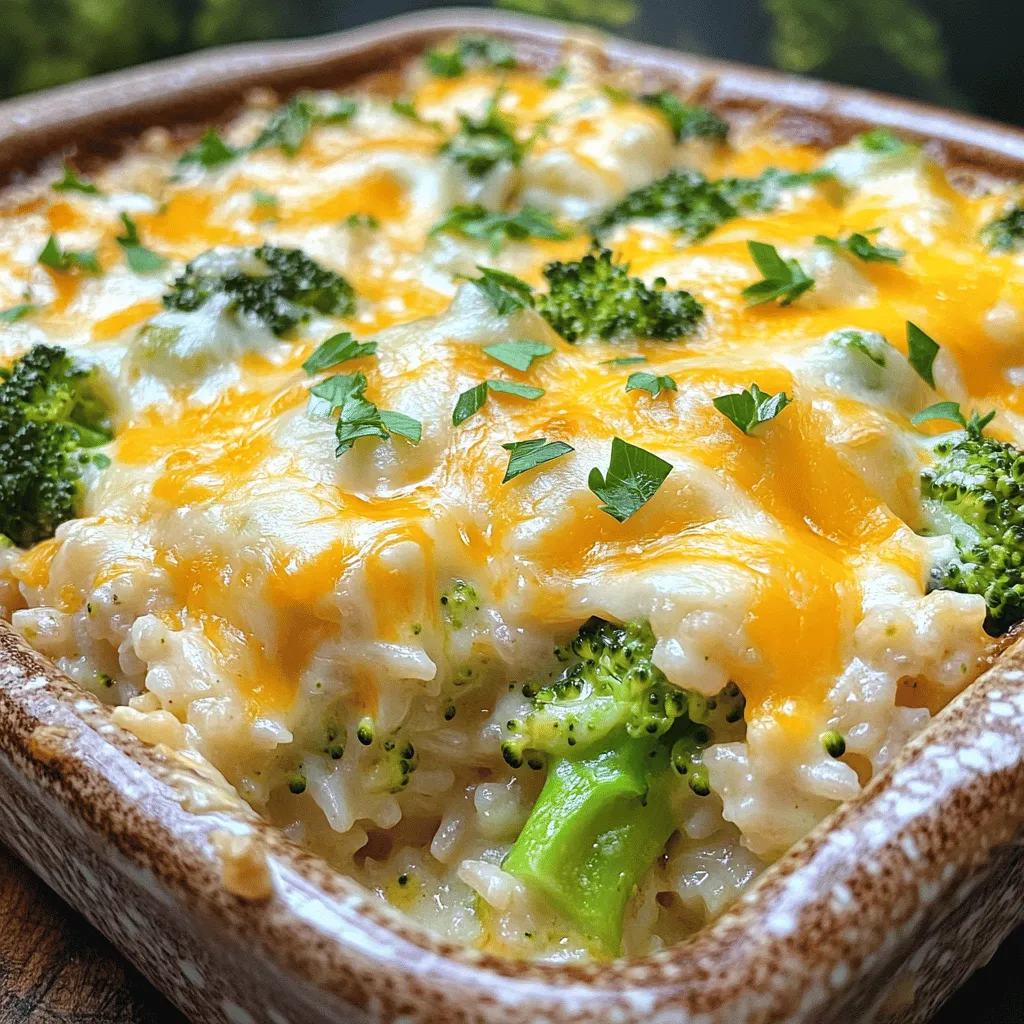
If you’re looking for a dish that brings the whole family together, you’ve found it! This Cheesy Broccoli Rice Casserole

To make a delicious Mango Avocado Quinoa Salad, gather these simple ingredients: - 1 cup quinoa, rinsed - 2 cups water - 1 ripe mango, diced - 2 ripe avocados, diced - 1 red bell pepper, finely chopped - 1/4 cup red onion, finely chopped - 1/4 cup fresh cilantro, chopped - 1 lime, juiced - 2 tablespoons olive oil - Salt and pepper to taste Each ingredient plays a key role in this fresh salad. Quinoa is a great base, providing protein and fiber. The mango adds a sweet touch, while avocados bring creaminess. The red bell pepper and onion add crunch and flavor. Fresh cilantro gives it a vibrant taste, and lime juice brightens everything up. Olive oil adds richness and helps all the flavors blend. Feel free to explore variations of this recipe, but stick to these core ingredients for the best results. For the complete recipe, you can refer to the Full Recipe section. First, take a medium saucepan and boil 2 cups of water. Once the water is boiling, add 1 cup of rinsed quinoa and a pinch of salt. Lower the heat and cover the saucepan. Let it simmer for about 15 minutes. The quinoa will absorb the water and become fluffy. After cooking, remove it from heat and let it cool down to room temperature. While your quinoa cools, you can prepare the vegetables. Start by dicing the ripe mango and avocados into bite-sized pieces. Then, chop the red bell pepper and red onion finely. Lastly, chop the fresh cilantro. Each ingredient adds a burst of flavor and color to your salad. In a large mixing bowl, combine the cooled quinoa with the diced mango and avocados. Next, add the chopped red bell pepper, red onion, and cilantro. Drizzle the juice of one lime and 2 tablespoons of olive oil over the salad. Toss everything gently to combine without mashing the avocados. Season with salt and pepper to taste, mixing gently once more to spread the seasoning. Let the salad rest for about 10 minutes. This wait helps the flavors blend beautifully. For the full recipe, check out the complete instructions above. To get the best texture, avoid mashing the avocados while mixing. Gently fold the ingredients together. This keeps the avocado creamy and intact. Letting the salad rest for about 10 minutes helps the flavors meld. The waiting time allows the quinoa to soak up the lime juice and olive oil. This salad tastes best served right away or chilled. If you chill it, the flavors deepen. For a great presentation, serve it in a large bowl or on individual plates. You can garnish it with lime wedges and a sprinkle of fresh cilantro. This little touch makes it look even more appetizing. Mango, avocado, and quinoa all pack a healthy punch. Quinoa is a great source of protein and fiber. It helps keep you full longer. Avocados provide healthy fats, which are good for your heart. They also contain vitamins and minerals. Mangos add sweetness and are high in vitamin C. Together, these ingredients create a salad that's not just tasty but also good for you. For the full recipe, check out the [Full Recipe]. {{image_2}} You can make your Mango Avocado Quinoa Salad even better by adding protein. Grilled chicken or black beans work great. They will add more flavor and keep you full. Try mixing in other veggies too. Corn or cucumber can add a nice crunch. Get creative with dressings! You can try a honey-lime vinaigrette or a spicy yogurt dressing. These will add a new taste to your salad. Don't forget about spices! A pinch of chili powder or cumin can boost the flavor. Fresh herbs like basil or mint can also make it pop. This salad is easy to adapt for different diets. It is already gluten-free thanks to quinoa. For a vegan option, just skip the grilled chicken. You can even add some nuts or seeds for extra protein. These small changes can make the salad fit your needs. Check out the Full Recipe for more ideas! To keep your Mango Avocado Quinoa Salad fresh, store it in an airtight container. This will stop air from making it soggy or dry. It’s best to keep it in the fridge. If you have leftovers, use them within two days for the best taste. In the fridge, this salad lasts about two to three days. After that, the quality may drop. Watch for signs of spoilage. If you see brown spots on the avocados or a funny smell, it’s time to toss it out. Can you freeze this salad? I don’t recommend it. The texture of the avocado and mango changes when frozen. If you must freeze it, do so without the avocados. To freeze, place the quinoa and veggies in a freezer-safe bag. To thaw, leave it in the fridge overnight before serving. For the best flavor, add fresh avocado only when ready to eat. For the full recipe, check out the detailed instructions above! Yes, you can make this salad ahead of time. I suggest prepping the quinoa and veggies in advance. Cook the quinoa and cool it before mixing. You can chop the mango, avocado, and other veggies and store them separately. This way, they stay fresh. Mix everything together just before serving. This keeps the avocado from browning and the salad crisp. If you want a change, you can use other grains. Some great options are brown rice, farro, or barley. Here are their cooking times: - Brown rice: about 45 minutes - Farro: about 30 minutes - Barley: about 30-40 minutes Make sure to rinse them before cooking. Each grain adds its own unique flavor and texture. Yes, this salad works well for meal prep. You can store it in airtight containers. Keep the dressing on the side until you are ready to eat. This helps keep the salad fresh and crunchy. It stays good in the fridge for about three days. Just check for any signs of spoilage before eating. Enjoy your tasty meal prep! For the full recipe, check out the complete instructions in the earlier section. This blog post shared a simple recipe for Mango Avocado Quinoa Salad. We covered the ingredients, step-by-step instructions, and helpful tips. You learned how to prepare tasty variations and how to store leftovers properly. This salad is not only delicious but also packed with nutrients. I hope you enjoy making this dish and share it with others. With a few simple tweaks, it can fit any diet or occasion. Enjoy your salad and explore all the flavors!

Mango Avocado Quinoa Salad Fresh and Flavorful Mix

Dive into the vibrant world of flavors with my Mango Avocado Quinoa Salad! This fresh mix combines sweet mango, creamy

Older posts
Newer posts
← Previous Page1 … Page23 Page24 Page25 … Page30 Next →

dsad

© 2025 So Yum Recipes • Built with GeneratePress

Our Policies

  • Copyright Policy
  • Cookie Policy
  • GDPR Policy
  • Privacy Policy
  • Disclaimer
  • Terms Of Use

More Information

  • Home
  • About
  • Contact
  • Appetizers
  • Dessert
  • Dinner
  • Drinks
©2025, So Yum Recipes About Back To Top