Skip to content
DisclaimerTerms Of UseGDPR PolicyCookie Policy

So Yum Recipes

  • Home
  • Drinks
  • Appetizers
  • Dinner
  • Dessert
  • About
  • Contact
  • Privacy Policy
DisclaimerTerms Of UseGDPR PolicyCookie Policy

Chloe

To make this delicious pudding, gather these simple ingredients: - 1 cup coconut milk (canned or boxed) - 1/2 cup almond milk (or any milk of choice) - 1/4 cup chia seeds - 2 tablespoons maple syrup (or honey) - 1 teaspoon vanilla extract - 1 ripe mango, diced - Toasted coconut flakes for garnish - Fresh mint leaves for garnish These ingredients work together to create a creamy and sweet pudding. Coconut milk gives it a rich flavor, while almond milk keeps it light. Chia seeds are the star here, making your pudding thick and satisfying. If you don’t have some ingredients, don’t worry! You can easily swap them out. - Instead of coconut milk, try oat milk or soy milk for a different flavor. - Use any milk you like in place of almond milk, such as cow’s milk or rice milk. - If you want to skip sweeteners, ripe bananas can add natural sweetness. - Chia seeds can be exchanged for flaxseeds, but the texture will differ. These substitutes can help you customize the pudding to fit your taste. Each serving of this mango coconut chia pudding offers: - Calories: 220 - Protein: 4g - Carbohydrates: 30g - Fat: 10g - Fiber: 10g - Sugars: 8g This dessert is not only tasty but also packed with nutrients. The chia seeds provide fiber, which helps with digestion. The healthy fats from coconut milk keep you full longer. Overall, this pudding is a smart choice for a healthy treat. For the full recipe, check the earlier section. To start, gather all your ingredients. You’ll need coconut milk, almond milk, chia seeds, maple syrup, vanilla extract, and a ripe mango. In a medium bowl, mix the coconut milk, almond milk, chia seeds, maple syrup, and vanilla extract. Whisk them together well. This step is key. Make sure the chia seeds don’t clump. Now, cover the bowl and place it in the fridge. Let it chill for at least four hours, or even overnight. This waiting time lets the chia seeds absorb the liquids. They will expand and create a thick, pudding-like texture. Once your pudding is ready, give it a quick stir. This breaks up any clumps. Next, divide the pudding into serving bowls or jars. Top each serving with diced mango. For a fun touch, sprinkle on some toasted coconut flakes and add fresh mint leaves. Serve in clear glasses to show off the layers. You can find the full recipe for this delicious treat to guide you. To get the best pudding, you need to balance the liquids. Use one cup of coconut milk and half a cup of almond milk. The chia seeds absorb the liquid and swell up, creating that nice, thick texture. Let your mix sit in the fridge for at least four hours, or overnight for the best results. If your pudding is too runny, add more chia seeds next time. If it’s too thick, add a splash of milk to adjust. One mistake is not whisking the chia seeds well. They can clump together if you don't mix well. Always stir your ingredients together until they blend smoothly. Another common error is not letting it chill long enough. Skipping the chilling time will leave you with a soupy mess. Lastly, don't forget to stir the pudding once it’s set. This helps break any clumps that may form. You can easily boost the flavor of your pudding. Adding a pinch of salt can bring out the sweetness. You can also mix in spices like cinnamon or nutmeg for warmth. Fresh lime or lemon juice adds a nice zing. To make it even better, top your pudding with fresh fruit or nuts. Toasted coconut flakes add a fun crunch, while mint leaves give a fresh touch. For more flavor ideas, check out the Full Recipe. {{image_2}} You can mix it up with different fruits. Try using berries like strawberries or blueberries for a pop of color and flavor. Bananas work well too; just slice them and layer them on top. Pineapple adds a tropical twist. You can even use peaches for a sweet touch. Each fruit brings its own taste and health benefits. This recipe is already vegan and dairy-free with coconut and almond milk. If you want a nut-free option, use oat milk instead. You can replace maple syrup with agave nectar for a different sweetener. All these options keep the pudding creamy and delicious while meeting different dietary needs. Want to boost nutrition? Add protein powder to the pudding mix. A scoop of vanilla protein blends well with the flavor. You can also mix in superfoods like spirulina or matcha. These add health benefits and color. Another great option is to sprinkle hemp seeds on top for an extra crunch. You can customize your pudding to fit your health goals easily. After making the Mango Coconut Chia Pudding, you may have leftovers. Store any extra pudding in an airtight container. Keep it in the fridge. This way, it stays fresh and tasty for later. You can freeze this pudding if you want to save it for later. Use ice cube trays or small containers. Once frozen, transfer them to a freezer bag. This helps you avoid freezer burn. When ready to eat, thaw it in the fridge overnight. The pudding lasts about 5 days in the fridge. If you freeze it, it lasts up to 3 months. However, the texture may change a bit after freezing. Still, it remains delicious. Enjoy your pudding whenever you want! For the full recipe, check out the earlier section. Yes, you can make this pudding in advance. In fact, I recommend it! Making it the night before saves time. Just mix your ingredients and let it chill overnight. This gives the chia seeds time to soak up the liquids. The longer it sits, the better the texture. You can enjoy it for breakfast or as a snack! You’ll know the pudding is ready when it thickens. After chilling, the chia seeds will expand. The pudding should look creamy and hold its shape. If you see any clumps, stir it gently. The mix should feel smooth and not runny. Trust your senses; it should look delicious! Chia seeds are very versatile. You can use them in smoothies, jams, or even salads. Try making chia seed pudding with different fruits. You can also add them to baked goods for extra nutrients. They are great for making energy bars too. Explore and have fun with them! Yes, you can use different types of milk. Almond milk, oat milk, or soy milk work well. Each milk will give a unique flavor. Just keep the ratios the same as in the Full Recipe. Feel free to experiment and see what you like best! Mango Coconut Chia Pudding is simple yet delightful. We covered the main ingredients, tips, and step-by-step ideas to make it. You learned how to improve your pudding’s texture and flavor. Remember, you can swap ingredients and try new fruits for fun variations. Store leftovers properly for fresh bites later. This pudding fits well in a meal plan and is easy to prep. Enjoy creating your own tasty versions, and don't hesitate to experiment. Happy pudding making!

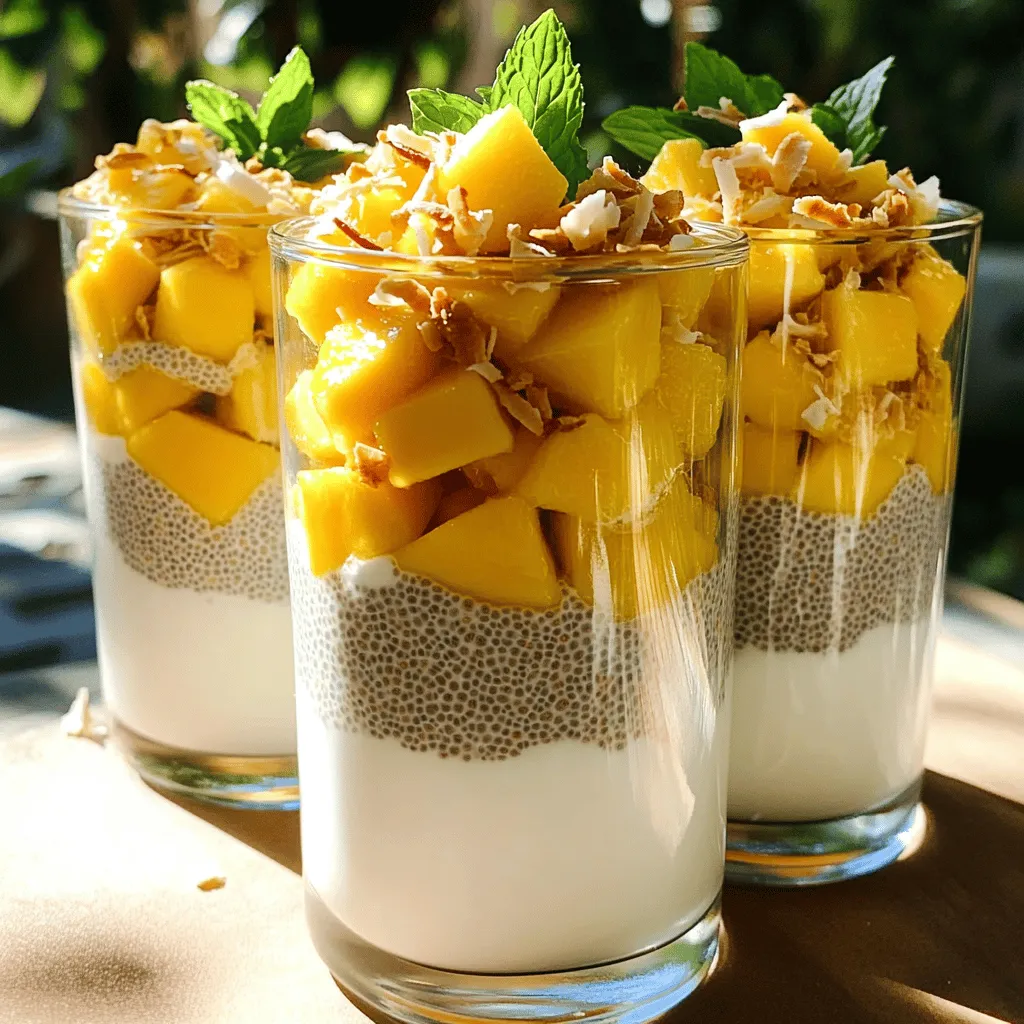
Mango Coconut Chia Pudding Nutritious and Easy Recipe

Looking for a tasty treat that’s both healthy and simple? You’re in the right place! My Mango Coconut Chia Pudding

To make a great chocolate lava cake, you need simple ingredients: - 1 cup semi-sweet chocolate chips - ½ cup unsalted butter - 1 cup powdered sugar - 2 large eggs - 2 large egg yolks - 1 teaspoon vanilla extract - ½ cup all-purpose flour - Pinch of salt - Butter and cocoa powder (for greasing ramekins) Each component plays a key role. The chocolate chips give a rich flavor. The butter adds a smooth texture. Eggs help the cake rise and stay soft. Measure your ingredients carefully. Use a kitchen scale for the best accuracy. When greasing ramekins, use butter and dust with cocoa powder to prevent sticking. Tap out any excess cocoa to avoid a bitter taste. In step three of the recipe, mix the eggs and sugar until smooth. This creates a light batter. When folding in the flour, do it gently. Overmixing can make the cake tough. If you need to make swaps, here are some ideas: - Use dark chocolate for a richer taste. - Replace butter with coconut oil for a dairy-free option. - Substitute eggs with flaxseed meal or unsweetened applesauce for a vegan version. These alternatives can still give you a delicious lava cake. Adjust baking times if needed, as different ingredients can change how the cake cooks. For the full recipe, check the sections above. Start by preheating your oven to 425°F (220°C). Grab four ramekins for your cakes. Grease each ramekin with butter. Dust them with cocoa powder. This keeps the cakes from sticking. Tap out any extra cocoa powder. This step is key for easy removal later. Next, take a microwave-safe bowl. Add 1 cup of semi-sweet chocolate chips and ½ cup of unsalted butter. Microwave this mix in 30-second bursts. Stir between each burst until it’s smooth. This usually takes about 1 to 2 minutes. Be patient! The goal is a glossy, melted mixture. Once your chocolate mix is ready, stir in 1 cup of powdered sugar. Mix it well until smooth. Then, add 2 large eggs, 2 large egg yolks, and 1 teaspoon of vanilla extract. Use a whisk to blend everything perfectly. Now, sift in ½ cup of all-purpose flour and a pinch of salt. Gently fold the dry ingredients in. Avoid overmixing to keep the batter light. Divide the batter evenly into your prepared ramekins. Fill each one about ¾ full. Place the ramekins on a baking sheet for easy handling. Bake them for 12 to 14 minutes. The edges should look firm, but the center should stay soft. After baking, let them cool for just 1 minute. Carefully run a knife around the edges to loosen each cake. Flip them onto plates and tap gently. Enjoy your warm, gooey chocolate lava cake right away! For the full recipe, check the earlier section. The key to a great lava center is timing. Bake your cakes for 12 to 14 minutes. You want the edges firm but the center soft. This gives you that gooey, melted chocolate surprise. Use a timer to keep track. Open the oven door only when the timer goes off. This helps avoid losing heat. If you prefer a runnier center, take it out a minute early. One big mistake is overmixing the batter. This can make the cake dense. Mix just until combined, and don’t worry about lumps. Another mistake is not greasing the ramekins well. If they stick, your cake won’t come out whole. Use butter and cocoa powder for best results. Also, don’t skip the cooling step. Let the cakes sit for one minute after baking. This helps them hold their shape when you flip them out. For a stunning presentation, serve the cakes warm. Dust with powdered sugar or top with vanilla ice cream. You can also add fresh berries for a pop of color. Place them on the side for a lovely contrast. Drizzling melted chocolate or caramel on the plate adds flair. This makes the dish look even more tempting. For the full recipe, check the steps above. Enjoy creating this delightful dessert! {{image_2}} You can change the flavor of your chocolate lava cake easily. Try using white chocolate for a sweet twist. Dark chocolate adds a deeper taste. For a fun surprise, add a spoonful of peanut butter or caramel in the center. You can even mix in a bit of espresso powder to enhance the chocolate flavor. Serving chocolate lava cake can be fun! You can serve it warm right out of the oven. Place it on a plate and let it flow. Another idea is to serve it with fresh berries like strawberries or raspberries. They add a nice contrast to the rich cake. You can also pair it with whipped cream for a light touch. Toppings can make your dessert even better. A scoop of vanilla ice cream on top adds creaminess. You can sprinkle crushed nuts, like almonds or hazelnuts, for crunch. Drizzling chocolate sauce or caramel sauce can make it look fancy. Don't forget a dusting of powdered sugar for a nice finish. Explore these ideas to make your dessert special! Check out the Full Recipe for more details on making this delightful treat. To store unbaked batter, cover it tightly. Use plastic wrap or a lid. Keep the batter in the fridge for up to 24 hours. This way, the batter stays fresh. When ready to bake, let it sit at room temperature for 20 minutes. This helps it bake evenly. If you have leftover baked lava cakes, let them cool first. Then, place them in an airtight container. You can store them in the fridge for up to three days. For longer storage, freeze them. Wrap each cake in plastic wrap, then foil. Frozen cakes can last for about a month. To reheat your lava cakes, use the oven for the best results. Preheat your oven to 350°F (175°C). Place the cakes on a baking sheet and cover them loosely with foil. Heat for about 10-12 minutes. If they are frozen, it may take 15-20 minutes. This way, your cake stays soft and gooey inside. Enjoy your delectable treat! For the full recipe, check the detailed instructions above. You will know your lava cake is done when the edges feel firm. The center will still be soft and jiggle slightly. It usually takes about 12 to 14 minutes in the oven. If you see the edges set but the middle is wobbly, it's just right. Remember, overbaking will make it too firm and lose that gooey center. Yes, you can prepare the batter ahead of time. Just fill the ramekins and cover them with plastic wrap. Store them in the fridge for up to 24 hours. When you are ready to bake, take them out and let them sit at room temperature for about 30 minutes. This helps them bake evenly. If you need an egg substitute, try using applesauce. Use 1/4 cup of unsweetened applesauce for each egg. You can also use flax eggs. To make one flax egg, mix 1 tablespoon of ground flaxseed with 2.5 tablespoons of water. Let it sit for a few minutes until it thickens. If your lava cake is not gooey, it may have baked too long. Keep a close eye on it during baking. If you find it’s firm, try reducing the baking time next time. You can also lower the oven temperature slightly to help it cook more evenly. If it still doesn’t work, check your oven's accuracy with an oven thermometer. In this post, we've explored how to make a perfect chocolate lava cake. You learned about key ingredients, preparation tips, and alternative options for various diets. We shared step-by-step instructions and vital tips for success. Don’t forget the fun variations and how to store your treats. Mastering this dessert proves you can bake with great results. Now, gather your ingredients and enjoy the joy of baking. Happy cooking!

Chocolate Lava Cake Delightful Dessert Recipe

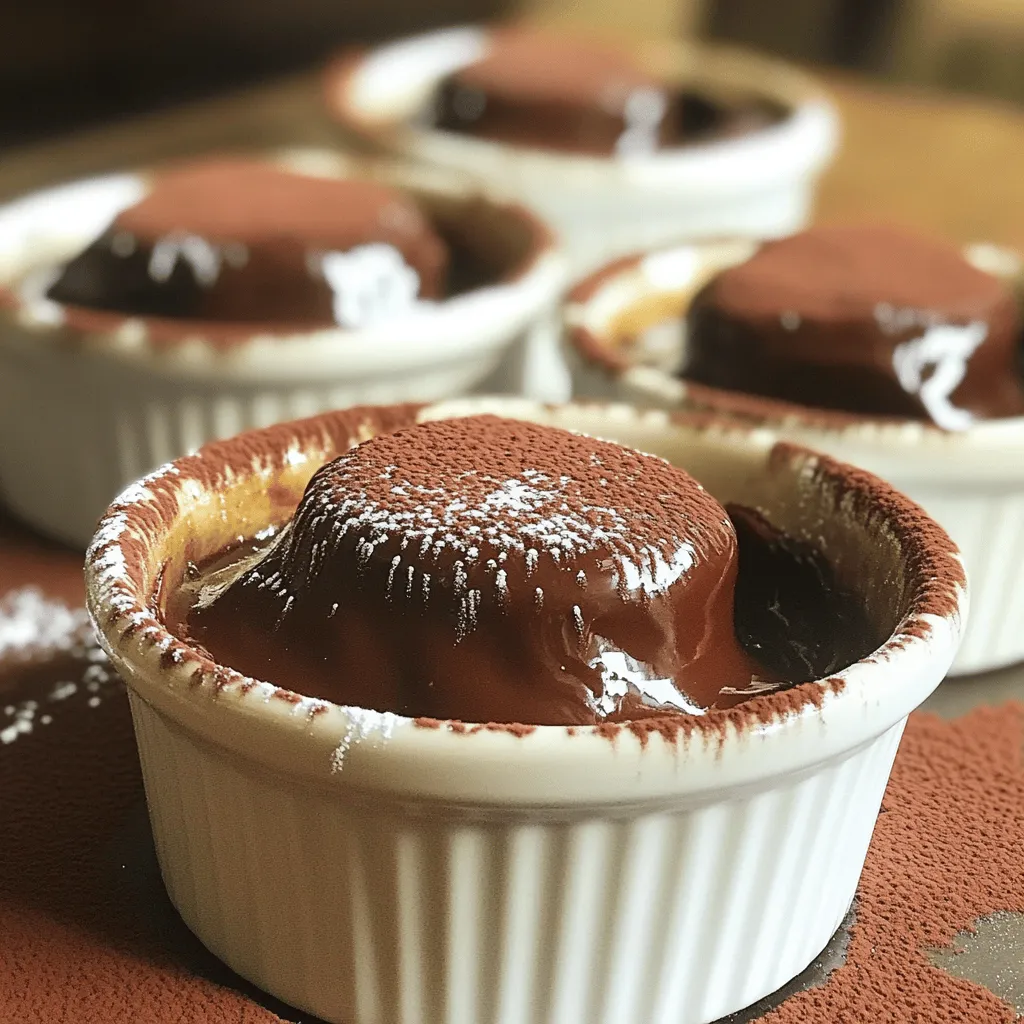
Indulging in a rich Chocolate Lava Cake is a delight you won’t forget. Picture a warm, gooey center that flows

- 1 lb Brussels sprouts - Olive oil, salt, and pepper Balsamic glazed Brussels sprouts shine with fresh, vibrant flavors. You start with 1 lb of Brussels sprouts, trimmed and cut in half. This size helps them cook evenly. Then, grab olive oil, salt, and pepper to coat the sprouts. This mix adds a nice touch and helps the sprouts roast perfectly. - Balsamic vinegar - Honey Next up are the key flavor components. Balsamic vinegar brings a tangy sweetness. It enhances the natural flavor of the Brussels sprouts. You also need honey. This sweet touch balances the vinegar's acidity, making the glaze rich and delicious. - Pecans and dried cranberries - Fresh parsley for garnish For a tasty twist, consider some optional add-ins. Pecans add crunch and depth. Dried cranberries bring a burst of sweetness. Both make the dish more exciting. Finally, don’t forget fresh parsley for garnish. It adds a lovely pop of color and freshness. For the complete recipe and instructions, check out the [Full Recipe]. Start by trimming the Brussels sprouts. Cut off the stem end and remove any yellow leaves. Next, slice each sprout in half. This helps them cook evenly and get crispy. In a large mixing bowl, add the halved Brussels sprouts. Pour in two tablespoons of olive oil. Sprinkle in a quarter teaspoon of salt and a quarter teaspoon of black pepper. Toss everything well until the sprouts are coated. This simple step adds great flavor. Preheat your oven to 400°F (200°C). This temperature is perfect for roasting. It helps the sprouts get crispy and caramelized. Line a baking sheet with parchment paper for easy cleanup. Spread the Brussels sprouts in a single layer on the sheet. This allows them to roast evenly. For the glaze, gather your ingredients. You need a quarter cup of balsamic vinegar and two tablespoons of honey. In a small saucepan, combine the balsamic vinegar and honey over medium heat. Bring the mixture to a gentle simmer. Then, reduce the heat to low. Let it simmer for about 5 to 7 minutes. Stir occasionally until it thickens slightly. This glaze adds a sweet and tangy flavor to the sprouts. Once the Brussels sprouts are roasted, take them out of the oven. Drizzle the balsamic glaze over them. Toss the sprouts to ensure they are well coated. Next, stir in a quarter cup of roughly chopped pecans and a quarter cup of dried cranberries. These add texture and sweetness. Return the Brussels sprouts to the oven for an extra 5 minutes. This allows the glaze to caramelize slightly. Serve the dish right away, garnished with fresh parsley. This adds a pop of color and freshness. For the full recipe, check out the details provided earlier. To roast Brussels sprouts well, you need to spread them out. Use a single-layer arrangement on your baking sheet. If they are crowded, they will steam instead of roast. For tenderness, roast them for 20-25 minutes. This time allows them to caramelize and develop deep flavors. Stir them halfway through to ensure even cooking. You can swap honey for other sweeteners. Maple syrup or agave nectar works well too. For an extra kick, try adding spices. A pinch of chili flakes or smoked paprika can give your dish a nice twist. These small changes can make a big difference in taste. Garnishing can elevate your dish's look. Fresh parsley adds a pop of color. Simply sprinkle it on top before serving. For meal pairing, serve these Brussels sprouts with roasted chicken or a grain salad. They complement a variety of dishes, making your meal more delightful. For the full recipe, refer to the [Full Recipe]. {{image_2}} You can easily make these Brussels sprouts vegan. Just swap honey for maple syrup. It adds a nice sweetness without any animal products. You can also top them with vegan cheese or toasted nuts for extra flavor. These changes keep the dish tasty and friendly for all diets. Want to spice things up? Add minced garlic or red pepper flakes to the glaze. These add a nice kick and can wake up the dish. If you love bright flavors, try adding some citrus zest. Lemon or orange zest can bring a fresh twist to your Brussels sprouts. Brussels sprouts pair well with many seasonal veggies. Try mixing in carrots, squash, or sweet potatoes. These add color and taste. You can also swap ingredients based on what's in season. For example, use local veggies for a fresh touch. This keeps your meal fun and new every time. Check out the [Full Recipe] for detailed steps and more tips! After cooking your Balsamic Glazed Brussels Sprouts, let them cool down. This step is key for keeping them fresh. Once cool, transfer the sprouts to an airtight container. Make sure to seal it well to keep out air and moisture. Store the container in the fridge. Leftovers can last for about 3 to 5 days. To enjoy your Brussels sprouts again, reheating is easy. The best way is to use the oven. Preheat it to 350°F (175°C). Spread the sprouts on a baking sheet and heat for about 10 to 15 minutes. This method helps keep the texture nice and crisp. You can also use a microwave, but be careful. Heat them in short bursts to avoid sogginess. If you have extra sprouts, freezing is a great option. First, let them cool completely. Then, place them in a single layer on a baking sheet and freeze for about 1 to 2 hours. Once frozen, transfer them to a freezer-safe bag or container. They will keep for about 3 months. You can use these frozen sprouts in stir-fries, soups, or even as a side dish. This way, you can enjoy your tasty Brussels sprouts later! Yes, you can use frozen Brussels sprouts. They are convenient and save time. However, fresh sprouts have a better texture and flavor. Frozen sprouts may become mushy when cooked. If you use frozen ones, follow the cooking instructions carefully. Thaw them first for best results. This way, they will roast better and absorb the glaze. Look for a golden-brown color on the outside. They should feel tender when pierced with a fork. If they are crispy on the outside and soft on the inside, they are perfect. You can also taste one to check if it has a rich flavor. Proper doneness makes them taste great. These Brussels sprouts pair well with many dishes. You can serve them with roasted chicken or pork. They also go well with quinoa or rice. For a vegetarian meal, serve with lentils or a hearty salad. The sweet and tangy glaze complements rich and savory flavors. Yes, you can prepare the balsamic glaze in advance. Store it in a jar in your fridge for up to a week. Just reheat it on low heat before using. The glaze will still taste great, and this saves time. Making the glaze ahead lets you enjoy this dish even more. For the full recipe, check out the details above. Balsamic glazed Brussels sprouts are a tasty dish that is easy to make. We covered the key ingredients like Brussels sprouts, balsamic vinegar, and honey, along with optional add-ins for extra flavor. You learned how to prepare, roast, and glaze the sprouts to perfection. Tips for storage and reheating will keep your meal fresh. Whether you choose vegan options or add seasonal vegetables, this recipe can fit all tastes. Enjoy creating and sharing this delightful dish with family and friends.

Balsamic Glazed Brussels Sprouts Simple and Tasty Dish

Looking for a quick way to turn Brussels sprouts into a tasty dish? I’ve got you covered with my simple

For a tasty meal, gather these main ingredients: - 4 medium zucchinis - 1 cup cooked quinoa - 1 cup cherry tomatoes, halved - 1 bell pepper, diced (red or yellow) - 1/2 cup corn kernels (fresh or frozen) - 1 cup black beans, rinsed and drained - 1 teaspoon cumin - 1 teaspoon smoked paprika - 1/2 teaspoon garlic powder - 1/2 teaspoon onion powder - Salt and pepper to taste - 1 cup shredded cheese (cheddar or mozzarella) - 2 tablespoons olive oil These ingredients form a delightful mix. The zucchinis serve as boats, holding a flavorful filling. Quinoa adds protein and texture. Black beans give extra fiber and nutrients. The spices provide a warm, smoky flavor. You can add these for more flavor and color: - Fresh cilantro or parsley for garnish - A squeeze of lime juice - Avocado slices - Sliced jalapeños for heat These garnishes enhance your dish. They add freshness and a pop of color. You can mix and match based on your taste. Each ingredient brings its own health perks: - Zucchini: Low in calories, high in water content. - Quinoa: A complete protein, rich in fiber. - Black beans: Packed with protein, iron, and antioxidants. - Cherry tomatoes: High in vitamins C and K, plus lycopene. - Bell peppers: Great source of vitamins A and C. This meal is not just delicious; it’s also nutritious. Enjoy a colorful plate filled with good-for-you ingredients. Try the Full Recipe for a step-by-step guide to making these tasty stuffed zucchini boats. To start, gather all your ingredients. You will need: - 4 medium zucchinis - 1 cup cooked quinoa - 1 cup cherry tomatoes, halved - 1 bell pepper, diced (red or yellow) - 1/2 cup corn kernels (fresh or frozen) - 1 cup black beans, rinsed and drained - 1 teaspoon cumin - 1 teaspoon smoked paprika - 1/2 teaspoon garlic powder - 1/2 teaspoon onion powder - Salt and pepper to taste - 1 cup shredded cheese (cheddar or mozzarella) - 2 tablespoons olive oil - Fresh cilantro or parsley for garnish (optional) Begin by preheating your oven to 375°F (190°C). Next, cut the zucchinis in half lengthwise. Scoop out the inner flesh to make a boat shape. Save this flesh for later. Place the zucchini halves on a baking sheet lined with parchment paper. Brush them with olive oil and sprinkle with salt. Bake them for about 15 minutes to soften. While the zucchinis bake, prepare your stuffing. In a large bowl, mix the cooked quinoa, halved cherry tomatoes, diced bell pepper, corn, and black beans. Now add the reserved zucchini flesh, which you chopped earlier. Season with cumin, smoked paprika, garlic powder, onion powder, salt, and pepper. Stir until everything is well combined. After 15 minutes, take the zucchini boats from the oven. Spoon the quinoa mixture into each half, pressing gently to pack it in. Top each stuffed zucchini with shredded cheese evenly. Return the stuffed zucchinis to the oven. Bake them for an additional 15 to 20 minutes. You want the cheese to melt and bubble nicely. Once they are done, take them out and let them cool for a few minutes. If you like, garnish with fresh cilantro or parsley before serving. For the full recipe, don’t forget to check the details above. Enjoy your tasty and healthy meal! When picking zucchini, look for ones that are firm and smooth. The skin should be shiny and bright. Avoid zucchinis with soft spots or blemishes. Smaller zucchinis taste better and have fewer seeds. Aim for zucchinis that are about 6 to 8 inches long. This size cooks evenly and makes great boats. If you have leftovers, store them in an airtight container. Place them in the fridge for up to three days. The boats stay tasty and can be reheated later. To reheat, place them on a baking sheet. Warm them in the oven at 350°F (175°C) for about ten minutes. This method keeps them crunchy. To save time, prepare the stuffing while the zucchinis bake. Use pre-cooked quinoa to cut down on prep time. You can also chop the veggies ahead of time. Store them in the fridge for easy access. Another tip is to use a melon baller to scoop out the zucchini. This tool makes the job quick and fun. For a quicker dish, try using other veggies like bell peppers or eggplants as boats. Check out the Full Recipe for more details! {{image_2}} You can get creative with the stuffing for your zucchini boats. Think of flavors and textures you love. Here are a few ideas: - Rice: Use brown rice or wild rice for a hearty option. - Lentils: Cooked lentils add protein and fiber. They also give a nice texture. - Mushrooms: Sautéed mushrooms bring umami flavors and make the dish rich. - Spinach: Fresh or sautéed spinach adds color and nutrients. Mix and match these ingredients to create your perfect filling. You can even add nuts or seeds for a crunch! If you want to make your dish vegan, you have great cheese alternatives. Consider these options: - Nutritional Yeast: This adds a cheesy flavor without any dairy. - Vegan Cheese: There are many store-bought brands that melt well. - Cashew Cream: Blend soaked cashews with lemon juice and garlic for a creamy topping. These options keep your zucchini boats tasty and help everyone enjoy them. Zucchini boats are just the start! You can use other vegetables as your base. Here are some fun ideas: - Bell Peppers: Cut them in half and stuff them. They add sweetness. - Eggplant: Halved eggplants work great. They have a rich flavor. - Tomatoes: Large tomatoes can be hollowed out and filled. They are juicy and delicious. Don't be afraid to experiment! The idea is to make a dish you love. Check out the Full Recipe for more inspiration. To store leftover stuffed zucchini, let them cool first. Then, place them in an airtight container. You can keep them in the fridge for up to three days. This way, your tasty meal stays fresh and ready to enjoy. If you want to freeze your stuffed zucchini, wrap each one tightly in plastic wrap. Place the wrapped zucchinis in a freezer bag. They will stay good for about three months. When you're ready to eat, just thaw them in the fridge overnight. When you want to reheat your stuffed zucchini, the oven works best. Preheat it to 350°F (175°C). Place the zucchinis on a baking sheet and cover them with foil. Bake for about 20 minutes. This will keep them moist and help the cheese melt nicely again. You can also microwave them, but the oven gives better flavor. Yes, you can prep stuffed zucchini boats ahead of time. To do this, follow the steps to prepare the filling. You can cut and scoop the zucchinis, then keep them in the fridge. Just don’t bake them yet. When you are ready to eat, fill and bake them. This makes for a quick meal. If you don't have quinoa, use rice or couscous. Both options work well and add a nice texture. You can even try lentils for a protein boost. Just make sure to adjust cooking times as needed. Yes, this recipe is easy to make gluten-free. Use gluten-free grains like quinoa or rice. Check that the cheese you pick is also gluten-free. This way, you can enjoy tasty zucchini boats without worry. These zucchini boats pair well with a fresh salad or crusty bread. A tangy vinaigrette can brighten up your meal. You can also serve them with a side of rice or quinoa. This complements the flavors and adds more nutrition. Stuffed zucchini boats last about 3 to 5 days in the fridge. Store them in an airtight container to keep them fresh. When reheating, add a splash of water to keep them moist. Enjoy them warm for a quick and tasty meal. You learned how to make vegetarian stuffed zucchini boats. We covered key ingredients, easy steps, and helpful tips. You now know how to choose the best zucchini and store leftovers. I shared variations for different diets and taste preferences. Embrace this tasty dish! It's healthy, fun to make, and great to share. Enjoy exploring new flavors with your future zucchini creations.

Vegetarian Stuffed Zucchini Boats Flavorful and Nutritious

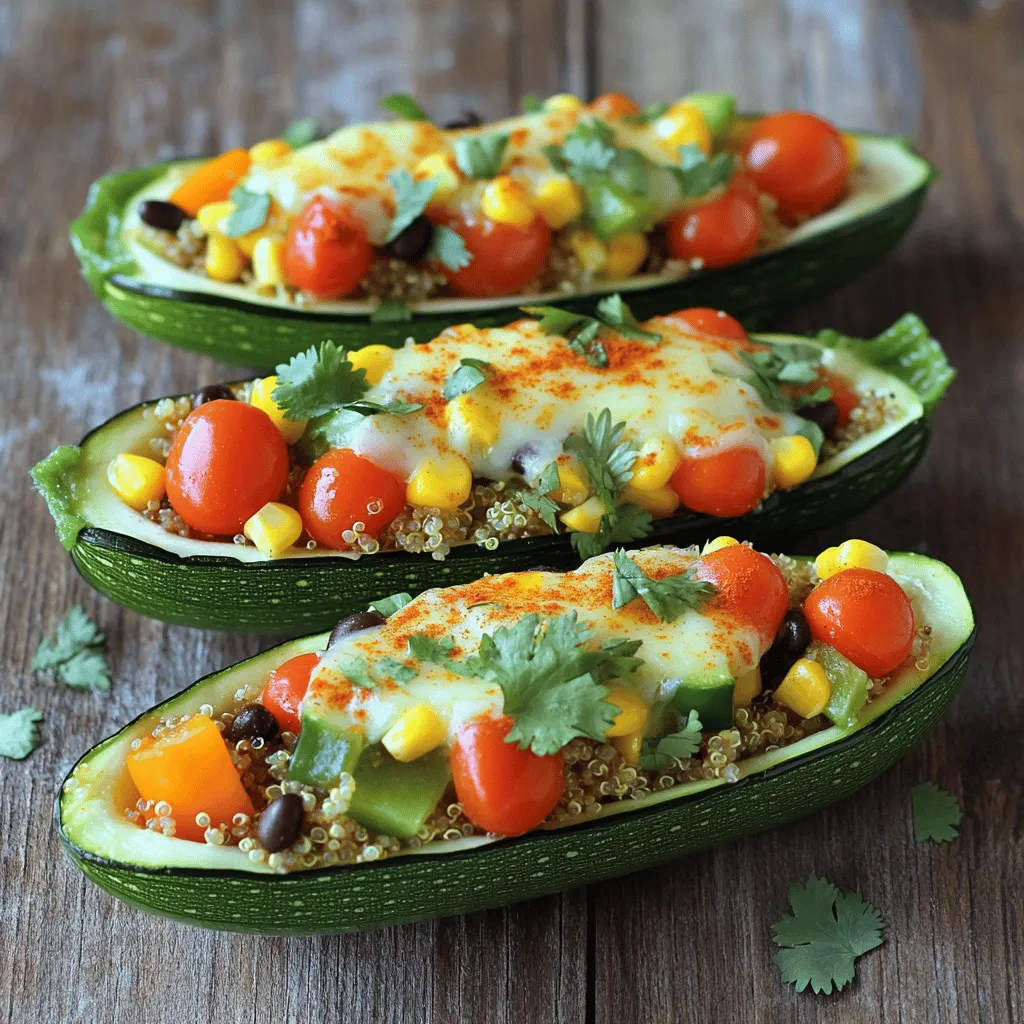
Looking for a tasty and healthy meal? Try my Vegetarian Stuffed Zucchini Boats! These boats are packed with flavor and

- 2 cups all-purpose flour - 1 tablespoon baking powder - 1/2 teaspoon baking soda - 1 teaspoon salt - 1/2 teaspoon ground black pepper - 1 cup shredded cheddar cheese - 1/2 cup cooked and crumbled breakfast sausage - 1/2 cup diced bell peppers (red and green) - 1/4 cup chopped green onions - 3 large eggs - 1 cup buttermilk - 1/4 cup olive oil To make savory breakfast muffins, gather all the ingredients first. This will make the process smooth. The flour, baking powder, and baking soda form the base of the muffins. Salt and black pepper add flavor. Cheddar cheese gives a rich taste. The breakfast sausage adds heartiness, while bell peppers and green onions bring freshness. Eggs bind everything together. Buttermilk makes them moist, and olive oil adds richness. - Various cheese options (e.g., feta, mozzarella) - Herbs and spices for additional flavor (e.g., parsley, garlic powder) - Different vegetables (e.g., spinach, zucchini) You can customize your muffins with optional add-ins. Use different cheeses for unique flavors. Fresh herbs and spices can enhance the taste. Adding vegetables like spinach or zucchini keeps them healthy. This way, you can create a breakfast muffin that suits your taste perfectly. For the full recipe, check out the details above. 1. Preheat the oven to 375°F (190°C) and prepare the muffin tin. Grease it or use paper liners. 2. In a large bowl, mix the dry ingredients: flour, baking powder, baking soda, salt, and black pepper. Make sure they blend well. 3. In another bowl, combine the wet ingredients: eggs, buttermilk, and olive oil. Whisk until smooth. 4. Pour the wet mix into the dry ingredients. Stir gently until just mixed; a few lumps are fine. Next, add the cheese, sausage, bell peppers, and green onions. Stir until evenly mixed. 5. Spoon the batter into the muffin tin, filling each cup about three-quarters full. This helps them rise properly. 6. Bake the muffins in the preheated oven for 18-20 minutes. They should be golden and a toothpick should come out clean. Let them cool in the pan for a few minutes before moving them to a wire rack. These savory breakfast muffins are simple and tasty. For the complete recipe, check out the Full Recipe section. - Avoid overmixing the batter for a fluffy texture. Mixing too much makes them dense. - Use room temperature ingredients for better incorporation. Cold ingredients can lead to lumps. - Experiment with different savory ingredients. Try adding spinach, mushrooms, or sun-dried tomatoes. - Consider adding spices for an extra kick. A pinch of paprika or cumin can elevate the flavor. - Present with sour cream or avocado slices for a tasty twist. Both add creaminess and flavor. - Serve warm for the best taste and texture. Warm muffins are soft and inviting. {{image_2}} You can switch up the flavors in your savory breakfast muffins. One option is Mediterranean muffins. Just add olives and feta cheese for a rich taste. The salty olives mix well with the creamy feta. This combination offers a burst of flavor in every bite. Another great choice is Southwest-style muffins. Add corn and jalapeño for a spicy kick. The corn gives a sweet crunch, while jalapeño adds heat. These muffins are perfect for those who crave bold flavors. If you need a gluten-free option, you can use alternative flours. Almond flour or oat flour works well in this recipe. Just keep the same measurements for the best results. You can still enjoy these muffins without gluten. For a vegetarian version, simply omit the sausage. You can add more veggies or extra cheese instead. Spinach or mushrooms can replace the meat nicely. This way, you can keep the muffins tasty and satisfying. For the full recipe, check out the complete section above. To keep your savory breakfast muffins fresh, store them in an airtight container at room temperature. This method keeps your muffins soft and tasty for a few days. If you want them to last longer, refrigerate them. The cold slows down spoilage and keeps the flavors intact. Just remember to let them cool completely before sealing them up. Freezing is a great way to save muffins for later. Wrap each muffin individually in plastic wrap. This makes it easy to grab one whenever you want. Place the wrapped muffins in a freezer bag. They can last up to three months in the freezer. When you're ready to eat, just take a muffin out and reheat it. You can warm it in the microwave for about 30 seconds or bake it in the oven at 350°F (175°C) for 10-15 minutes. This way, your muffins will taste fresh and delicious, just like when they were baked. Savory breakfast muffins last about three days at room temperature. Store them in an airtight container. If you refrigerate them, they can last up to a week. This keeps them moist and fresh. Yes, you can make these muffins ahead of time. Bake them the night before and store them in a sealed container. You can also freeze muffins for up to three months. Just reheat them in the oven or microwave when you’re ready to enjoy. If you don’t have buttermilk, use regular milk mixed with lemon juice or vinegar. Just add one tablespoon of lemon juice or vinegar to one cup of milk. Let it sit for about five minutes, and it will thicken slightly. You can replace eggs with applesauce or mashed banana. Use about 1/4 cup of either for each egg. This keeps the muffins moist and adds a hint of sweetness. You can also use flaxseed meal mixed with water as a binder. A non-stick muffin tin works best for these muffins. Silicone muffin tins are great too, as they help muffins pop out easily. Choose a standard size, which holds about 1/4 cup of batter per cup. This size gives you the perfect muffin. These savory breakfast muffins are easy to make and full of flavor. We covered the key ingredients and steps to prepare them, ensuring a tasty outcome. Remember, feel free to get creative with add-ins and flavors. Store leftovers properly to keep them fresh longer. Whether you're busy or just want a yummy snack, these muffins fit the bill. Try different versions to suit your taste. Enjoy baking and savor each bite!

Savory Breakfast Muffins Easy and Flavorful Recipe

Start your day right with these Savory Breakfast Muffins! They’re easy to make and bursting with flavor. Packed with cheese,

- 2 large apples (Granny Smith or Honeycrisp) - 1 cup granola or crushed graham crackers - 1/2 cup caramel sauce - 1/4 cup mini chocolate chips - 1/4 cup chopped pecans or walnuts (optional) - 1/4 cup whipped cream - Pinch of cinnamon (optional) Caramel Apple Nachos are tasty and fun to make. You start with apples, which are sweet and crisp. I recommend using Granny Smith or Honeycrisp apples. They add a nice tartness that pairs well with the sweet caramel. For the crunch factor, you can use granola or crushed graham crackers. Both add texture and flavor. Granola gives a hearty bite, while graham crackers offer a light crunch. The caramel sauce is the star of the show. You can use store-bought or make your own. Drizzle it over the apple slices for that gooey goodness. It melts into the apples, making each bite delicious. Mini chocolate chips add a touch of sweetness and extra fun. If you like, chopped pecans or walnuts will add a nutty crunch. They’re optional but highly recommended. For a creamy finish, use whipped cream. It makes the dessert look pretty and gives a nice contrast to the apples. A sprinkle of cinnamon can add warmth. It’s a small touch but makes a big difference. Gathering these ingredients is simple. You'll have everything ready in no time. Now that you know what you need, it’s time to start making your Caramel Apple Nachos. For the full recipe, check the earlier section. Start by washing and drying your apples. This step is key to getting rid of any dirt. Once clean, remove the cores. Then, slice the apples into thin wedges or rounds. Aim for pieces that look like nacho chips. Next, grab a large platter. Arrange the apple slices neatly on it. Make sure they cover the surface well. Now, sprinkle the granola or crushed graham crackers on top of the apples. This adds a nice crunch and gives texture to your nachos. Now it’s time to make them extra special. Drizzle caramel sauce over the apple and granola mix. Let the caramel seep into the apple slices for the best flavor. Scatter mini chocolate chips on top. They will stick to the caramel nicely. If you want more crunch, add chopped pecans or walnuts. For a warm touch, sprinkle a pinch of cinnamon over everything. Finally, drizzle whipped cream over the nachos. This will make your dessert look beautiful and inviting. Serve right away and enjoy the sweet, crunchy goodness! For more details, you can check the Full Recipe. When making caramel apple nachos, choose the right apples. My favorite types are Granny Smith and Honeycrisp. Both have a nice mix of sweet and tart flavors. This balance makes them perfect for nachos. They hold up well when sliced and topped. To slice apples, first wash and dry them. Use a sharp knife to cut them into thin wedges. Aim for about a quarter-inch thickness. This size allows for easy stacking and topping. You can also slice them into rounds for a fun look. For the caramel sauce, you can use store-bought or make your own. If you want a twist, try using chocolate or butterscotch sauce. These can add new flavors and excitement. When it comes to toppings, don't hold back! You can add mini marshmallows, shredded coconut, or even fresh berries. Each topping adds a unique flavor and texture. You can also sprinkle some sea salt for a sweet and salty mix. Serving your nachos well makes a big difference. Use a large platter or a wooden board for a rustic feel. Arrange the apple slices in a circular pattern. Layer the toppings for a fun look. Colorful toppings add visual appeal. Bright fruits like raspberries or blueberries can make the dish pop. A drizzle of whipped cream on top adds a creamy touch. Don't forget to add a sprinkle of cinnamon for a warm finish. For a fun twist, serve them with small cups for dipping. This way, everyone can enjoy their own style of nachos. For the full recipe, check out the details above! {{image_2}} You can switch up your caramel apple nachos in fun ways. Try using different fruits like pears or bananas. These fruits add new tastes and textures. Slice them thin, just like the apples. You can also add chocolate in many forms. Drizzle chocolate syrup over the top or use chocolate chips. Both options make the dessert more exciting. If you have dietary needs, don't worry. You can make vegan or gluten-free nachos. For a vegan version, use dairy-free caramel sauce. You can also use gluten-free granola instead of graham crackers. For those looking to cut sugar, use a low-sugar caramel sauce. You still get that sweet flavor without the extra calories. You can make your nachos fit the season. In the fall, add spices like nutmeg or ginger for warmth. This gives the dish a cozy vibe. During the holidays, try topping with cranberries or peppermint. These flavors can bring a festive touch to your dessert. Each variation keeps the essence of caramel apple nachos but adds its own flair. For the full recipe, check out the details above. To store your leftover Caramel Apple Nachos, you need an airtight container. This helps keep them fresh. You should layer the apple slices and toppings carefully. Place parchment paper between layers to avoid sogginess. For crunchiness, keep the granola separate. Add it just before serving. If you want to reheat your nachos, the microwave is a quick option. Use a low power setting to avoid making apples mushy. Heat them for short bursts, checking often. For better texture, use the oven. Preheat it to 350°F (175°C). Place the nachos on a baking sheet for 5 to 10 minutes. You can store Caramel Apple Nachos for 2 to 3 days in the fridge. After that, the apples may get soft. Watch for signs of spoilage. If the apples turn brown or smell off, it’s time to toss them. Always check for freshness before enjoying your sweet treat! Yes, you can prep some parts in advance. - Slice the apples a few hours before. - Keep them in lemon water to prevent browning. - Prepare granola and toppings ahead of time. - Drizzle the caramel sauce just before serving. This way, your nachos stay fresh and tasty! You can use store-bought or homemade caramel sauce. - Store-bought sauces are quick and easy. - Homemade sauces are rich and creamy. If you want to make homemade caramel, try this: - Cook sugar and water until it turns golden. - Slowly add cream and stir. This gives you a smooth sauce full of flavor! Making Caramel Apple Nachos healthier is simple. - Use less caramel sauce or a low-sugar version. - Swap granola for nuts or seeds. - Add more fruit slices like bananas or berries. These changes reduce calories and boost nutrition! You can enjoy a delicious treat without the guilt. Caramel Apple Nachos are easy and fun to make. You learned about the best ingredients, simple steps to prep, and ways to serve them. I shared tips for selecting apples and clever flavor ideas. Remember that you can modify them for any diet or season. Store the leftovers well to keep them crunchy. With these tips and tricks, you can enjoy great nachos anytime. Experiment with flavors and toppings to make them your own. Happy nacho making!

Caramel Apple Nachos Delightful and Simple Dessert

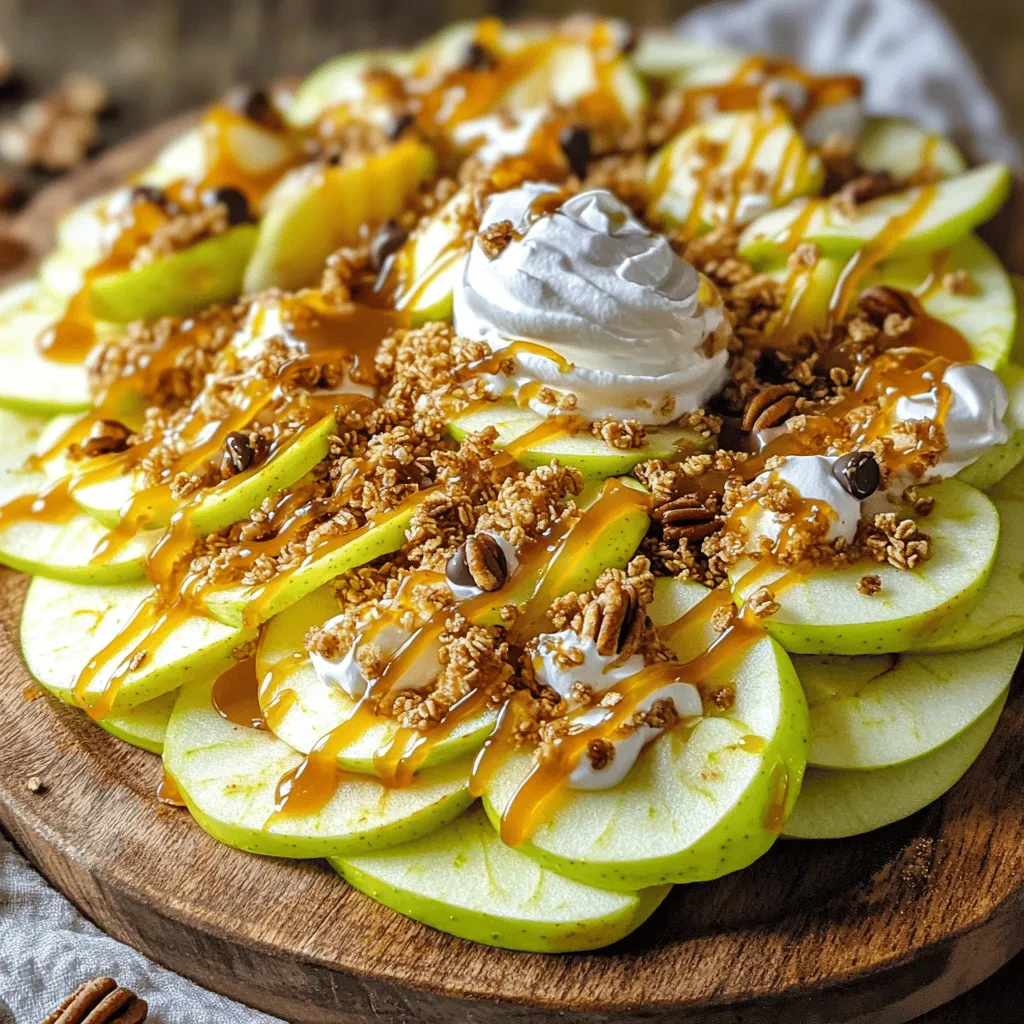
Are you ready for a fun twist on a classic treat? Caramel Apple Nachos are both delightful and super simple

This butternut squash risotto is creamy and rich. It uses simple ingredients to create deep flavors. You can find the full recipe above. To make this dish, gather these ingredients: - 1 medium butternut squash, peeled and cubed - 1 cup Arborio rice - 1 medium onion, finely chopped - 2 garlic cloves, minced - 4 cups vegetable broth - 1/2 cup grated Parmesan cheese - 2 tablespoons olive oil - 1 tablespoon butter - Salt and pepper to taste - 1 teaspoon fresh thyme leaves (or 1/2 teaspoon dried thyme) - 1 tablespoon lemon juice - Optional garnish: toasted pumpkin seeds and fresh parsley When choosing your butternut squash, look for one that feels heavy and firm. The skin should be smooth and free from blemishes. For the rice, always use Arborio. It has a high starch content that creates the creamy texture you want. Fresh herbs add a bright flavor, so opt for fresh thyme when possible. Grated Parmesan should be good quality. It enhances the dish's richness. Using homemade vegetable broth can elevate the flavor even more. If you can, make it from fresh vegetables for the best taste. Start by heating four cups of vegetable broth in a medium saucepan. Keep the heat low so it stays warm while you cook. This step is key. Warm broth helps the rice cook evenly and absorb flavors well. In a large skillet, add one tablespoon of olive oil over medium heat. Toss in the cubed butternut squash, seasoning it with salt and pepper. Sauté for about eight to ten minutes. The squash should be tender and slightly caramelized. Once done, remove it from the skillet and set it aside. Next, use the same skillet for your aromatics. Add the remaining tablespoon of olive oil and a tablespoon of butter. Once melted, add one finely chopped onion. Cook for about five minutes until it turns translucent. Then, stir in two minced garlic cloves. Cook for one more minute until fragrant. Now, it's time to toast the rice. Add one cup of Arborio rice to the skillet. Stir it constantly for about two minutes. You want the rice grains to look slightly translucent, which enhances their flavor. This is the heart of risotto. Begin adding the warm vegetable broth to the rice, one ladle at a time. Stir frequently. Allow the rice to absorb most of the broth before adding the next ladle. This process should take about 18 to 20 minutes. The rice should be creamy and al dente. When the rice is ready, fold in the cooked butternut squash, half a cup of grated Parmesan cheese, one teaspoon of fresh thyme leaves, and one tablespoon of lemon juice. Stir well to combine all the flavors. Heat through for a couple of minutes, then season with salt and pepper to taste. For the full recipe, refer to the earlier section. Enjoy making this creamy and flavorful dish! To get that creamy risotto texture, you must stir often. Stirring helps the rice release its starch. This creates a nice, creamy sauce. Use Arborio rice; it has the right starch content. You want your rice to be al dente, or firm to the bite. This helps keep the dish light and not too mushy. To boost the flavor of your butternut squash risotto, add fresh herbs. Thyme works well, but you can also try sage or rosemary. A squeeze of lemon juice brightens the dish. It adds a nice zing that balances the sweetness of the squash. For more depth, you can use vegetable broth instead of water. Use homemade broth if possible, as it tastes better. Here are some tools that will make your risotto cooking easier: - A large skillet for even cooking - A wooden spoon for stirring - A ladle for adding broth - A medium saucepan for warming broth - A sharp knife for chopping Having these tools handy will help you focus on making a great dish. Once you gather your ingredients and tools, you'll be ready to make a delicious butternut squash risotto. For the full recipe, check the previous section. {{image_2}} You can switch up the butternut squash. Try using pumpkin or sweet potato instead. Both give a nice flavor and texture. You can also add mushrooms for depth. They pair well with the creamy rice. For some heat, a pinch of red pepper flakes works wonders. To make this dish vegan, leave out the cheese. Use nutritional yeast instead for a cheesy flavor. Substitute the butter with more olive oil. You can also use coconut milk for an extra creamy texture. Just be careful with the amount, as it can change the flavor. In fall, add some roasted Brussels sprouts or kale. They bring a lovely crunch and color. In winter, try adding sautéed spinach or Swiss chard. For spring, fresh peas or asparagus can brighten the dish. Each season offers new flavors to explore in your butternut squash risotto. For the full recipe, check above! After enjoying your butternut squash risotto, store any leftovers in an airtight container. Make sure to cool the risotto down to room temperature first. This helps keep it fresh and safe. You can keep it in the fridge for up to three days. If you notice any changes in smell or texture, it’s best to toss it out. Reheat your risotto gently to keep it creamy. Place it in a saucepan over low heat. Add a splash of vegetable broth or water to help with moisture. Stir frequently to ensure even heating. This way, you keep that lovely texture. You can also microwave it in a bowl, but cover it with a damp paper towel to prevent it from drying out. If you want to save risotto for later, freezing is a good option. Portion it into freezer-safe bags or containers. Remove as much air as possible to avoid freezer burn. Butternut squash risotto can last up to three months in the freezer. When you’re ready to eat, thaw it overnight in the fridge before reheating. This helps keep the flavor intact. For the best results, add a bit of broth when reheating to revive the creaminess. For the full recipe, check out the details above. Butternut squash risotto stays fresh in the fridge for about three days. Store it in an airtight container to keep its creaminess. If you want to eat it later, you can freeze it. Frozen risotto can last up to three months. However, the texture may change once thawed. Yes, you can make risotto without wine. Use more broth instead. This keeps the dish flavorful. Some people use lemon juice or vinegar for acidity. It adds brightness without the wine. Just adjust the salt and seasoning to taste. Butternut squash risotto pairs well with many dishes. Here are some great options: - Grilled chicken or turkey - Sautéed greens like spinach or kale - A simple side salad with a light vinaigrette - Roasted vegetables for added texture - Crusty bread to soak up the creamy risotto These sides complement the rich flavors of the risotto. Enjoy your meal! For the complete cooking guide, check out the Full Recipe. You learned about making a delicious butternut squash risotto. We covered key ingredients, cooking steps, and valuable tips. Quality ingredients make a big difference. Perfect texture and flavors are key to risotto success. Don't shy away from trying different ingredients or dietary versions. Storing and reheating can keep your dish tasty for later. With these insights, you can create a perfect risotto every time. Enjoy your cooking journey ahead!

Butternut Squash Risotto Creamy and Flavorful Dish

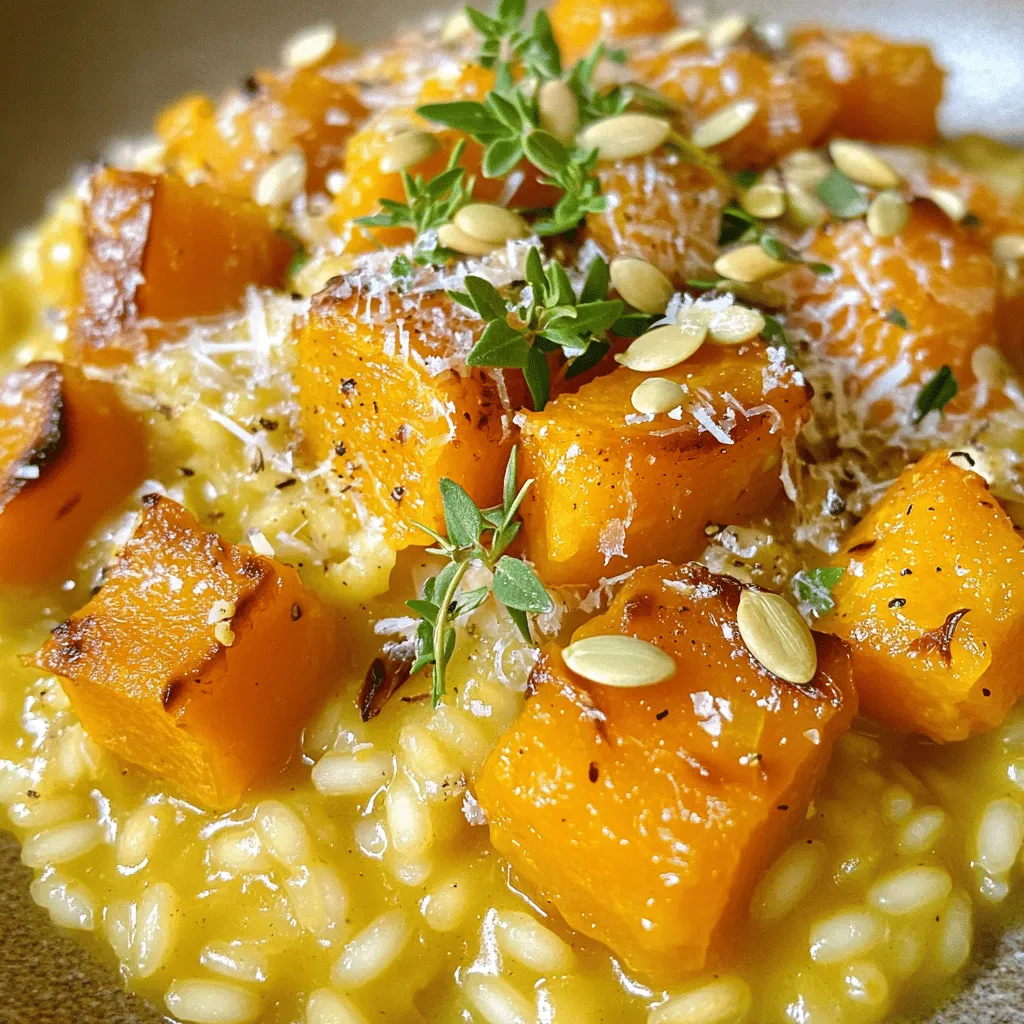
If you crave a cozy, creamy dish, Butternut Squash Risotto is your answer. This colorful meal brings warmth and flavor

- 2 ripe bananas, frozen - 1 cup unsweetened almond milk (or any milk of choice) - 2 tablespoons natural peanut butter - 2 tablespoons unsweetened cocoa powder - 1 tablespoon honey or maple syrup - 1 teaspoon vanilla extract The main ingredients create a rich and creamy base. Frozen bananas give a nice texture. Almond milk keeps it dairy-free, but you can use any milk. Peanut butter adds protein and flavor. Cocoa powder gives that delicious chocolate taste. Honey or maple syrup adds sweetness. Vanilla extract rounds out the flavor. - Sliced bananas - Granola - Chopped dark chocolate - Chia seeds - Crushed peanuts Toppings make your smoothie bowl fun and tasty. Sliced bananas add freshness. Granola gives a nice crunch. Chopped dark chocolate adds a rich bite. Chia seeds boost nutrition. Crushed peanuts offer extra crunch. Mix and match your favorites for a special touch! - Calories per serving: Around 300 - Macronutrient breakdown: - Fat: 14g - Carbs: 36g - Protein: 8g This smoothie bowl is both tasty and nutritious. It fuels you with energy and satisfies your sweet tooth. Key ingredients like bananas and peanut butter provide vitamins and minerals. Bananas offer potassium, while peanut butter gives healthy fats and protein. Enjoy this guilt-free treat! For the full recipe, check the section above. - First, grab a high-speed blender. - Add 2 ripe frozen bananas to the blender. - Pour in 1 cup of almond milk, or any milk you like. - Add 2 tablespoons of natural peanut butter for richness. - Next, mix in 2 tablespoons of unsweetened cocoa powder. - Sweeten with 1 tablespoon of honey or maple syrup. Adjust it to your taste. - Lastly, include 1 teaspoon of vanilla extract for extra flavor. To blend, start at a low speed. Gradually increase to high speed. Blend until the mixture is smooth and creamy. Stop to scrape down the sides as needed. If your smoothie is too thick, add more almond milk. Blend again until it reaches your desired consistency. Now, pour the smoothie into bowls. Make sure to serve it right away for the best taste. Get creative with your toppings! You can add sliced bananas, granola, or chopped dark chocolate. Chia seeds and crushed peanuts are great for extra crunch. Arrange them nicely on top to make it look pretty. You can prepare this smoothie in advance. Just blend everything as mentioned. If you have leftovers, store them in an airtight container. Keep it in the fridge for up to 24 hours. For longer storage, pour the smoothie into ice cube trays. Freeze them for later use. When you're ready, thaw the cubes and blend again. This way, you can enjoy your Chocolate Peanut Butter Smoothie Bowl anytime! For the full recipe, don't forget to check the earlier section. To get the right smoothness, you may face thick smoothies. If your mix is too thick, add more almond milk, a little at a time. This will help you reach a creamy texture. Use a high-speed blender for the best results. Blend on high and stop often to scrape the sides. This ensures all ingredients mix well. You can add spices or extracts to boost flavor. A pinch of cinnamon or a drop of almond extract can make a big difference. Want to switch the nut butter? Try almond or cashew butter instead of peanut butter. Each will give a unique taste to your bowl. Adding protein can make your smoothie bowl more filling. You can use protein powder or Greek yogurt. Both options work well. Want to sneak in some greens? Spinach or kale blends nicely without changing the taste much. This adds vitamins and minerals, making your bowl even healthier. For the full recipe, check out the Chocolate Peanut Butter Smoothie Bowl. {{image_2}} You can change the taste of your smoothie bowl easily. One fun option is the mint chocolate peanut butter version. Just add a few drops of mint extract to the mix. This gives it a refreshing taste that pairs well with chocolate and peanut butter. Another tasty choice is the banana strawberry chocolate smoothie bowl. Simply blend in fresh or frozen strawberries with the bananas. This adds a fruity twist that brightens up the flavors. You will love how tasty these combos are! If you want a vegan or dairy-free version, there are great swaps. Use plant-based milk like oat or coconut milk instead of almond milk. These milks add creaminess without dairy. For sweeteners, try maple syrup or agave nectar. Both options keep your bowl sweet while staying plant-based. You can also use date syrup for a unique flavor. To make this recipe low-carb or keto-friendly, swap bananas with ripe avocado. The avocado will give a creamy texture without the carbs. For sweeteners, use stevia or erythritol. These will sweeten your bowl without adding sugar. You can enjoy a delicious treat without the carbs! Explore these variations to find your favorite twist on the classic chocolate peanut butter smoothie bowl. For the full recipe, check out the Chocolate Peanut Butter Smoothie Bowl recipe delight! To store any leftover smoothie bowl, place it in an airtight container. This keeps it fresh. You can refrigerate it for up to two days. However, the best taste comes when you eat it right away. If the smoothie thickens in the fridge, just stir in a splash of milk before serving. If you want to save some for later, freezing is a great option. Pour the smoothie into freezer-safe containers. Make sure to leave some space at the top, as liquids expand when frozen. You can also use ice cube trays to freeze smaller portions. This way, you can blend a quick smoothie later. When you're ready to enjoy your frozen smoothie, take it out of the freezer. Let it thaw in the fridge overnight or at room temperature for a few hours. If it's still thick, blend it with a bit of milk for a smooth texture. Serve it topped with your favorite ingredients for a tasty treat. To make your smoothie bowl thicker, try these tips: - Adding frozen fruits or vegetables: Use frozen strawberries or spinach to boost thickness. Frozen bananas work great, too. They add creaminess and chill your bowl. - Adjusting liquid levels: Use less almond milk for a thicker base. Start with half a cup, then add more only if needed. This helps keep the smoothie nice and thick. Yes, you can make this recipe sugar-free with simple swaps: - Suggestions for sugar substitutes: Use stevia or erythritol instead of honey or maple syrup. Both sweeteners offer sweetness without the sugar spike. - Discussing natural sweeteners: You might also try ripe bananas. They add a natural sweetness without extra sugar. Just make sure your bananas are really ripe for the best flavor. If you have nut allergies, here are some great substitutes: - Alternatives for nut allergies: Try sunflower seed butter or soy nut butter. Both provide a similar texture and flavor without nuts. - Seed butter options: Pumpkin seed butter is another tasty choice. It has a unique flavor and works well in smoothies, too. This smoothie bowl recipe combines tasty ingredients with nutritional benefits. You learned about preparation, serving, and storing. Tips help you make it perfect every time. You can customize flavors or adapt it to dietary needs. Explore different combinations to keep things fun. Remember, healthy eating can be delicious and easy! Enjoy your smoothie bowl adventures and get creative with toppings.

Chocolate Peanut Butter Smoothie Bowl Recipe Delight

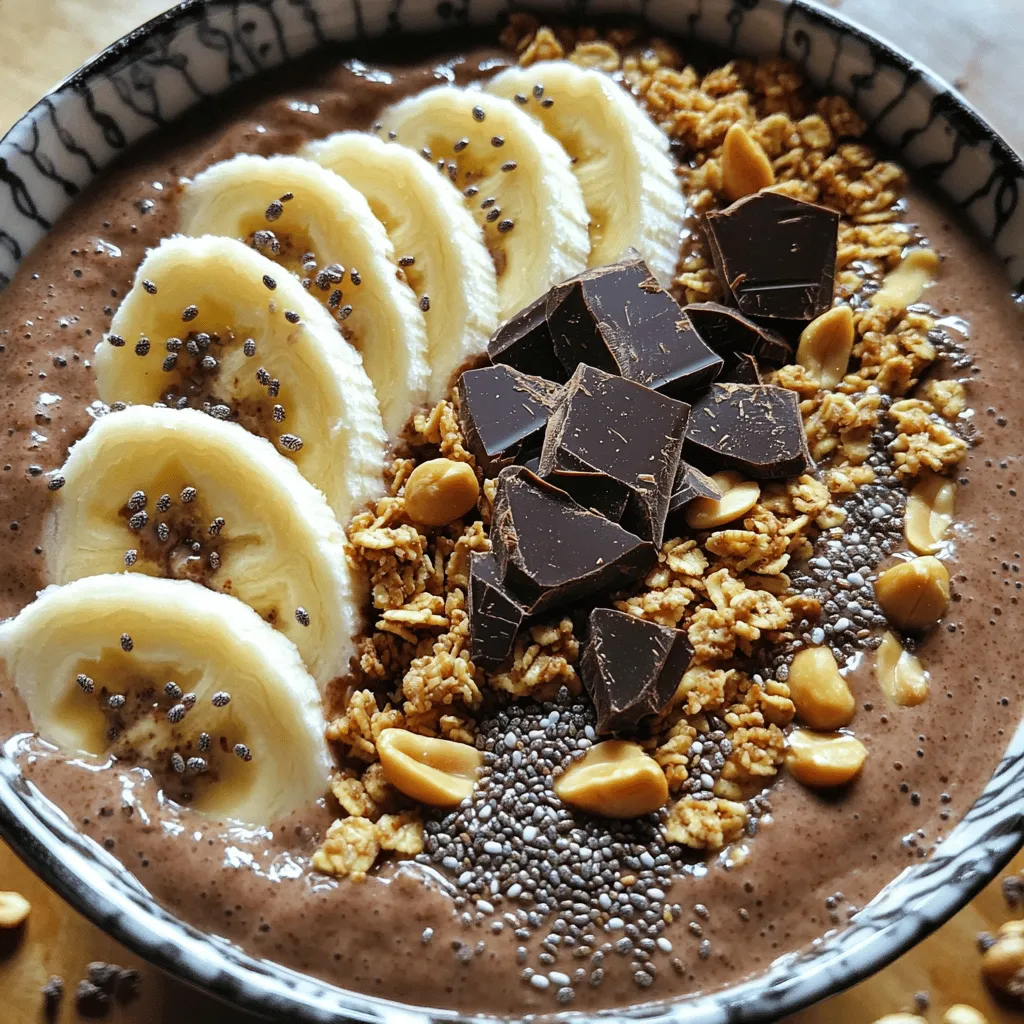
Looking for a delicious and healthy treat? Let me introduce you to the Chocolate Peanut Butter Smoothie Bowl! This recipe

To make lemon garlic roasted asparagus, start with fresh asparagus. Choose a pound of bright green, firm stalks. Look for tips that are tightly closed and vibrant. This ensures you get the best flavor and crispness. Trim the tough ends of the asparagus before cooking. This step is key for a tender bite. The magic of this dish lies in its simple seasonings. Here’s what you need: - 3 tablespoons olive oil - 4 cloves garlic, minced - Zest of 1 lemon - 2 tablespoons fresh lemon juice - 1 teaspoon sea salt - 1/2 teaspoon black pepper - 1/4 teaspoon red pepper flakes (optional) - 2 tablespoons grated Parmesan cheese (or a vegan alternative) - Fresh parsley, chopped (for garnish) These ingredients create a burst of flavor. The lemon adds brightness, while garlic brings depth. The olive oil helps everything roast beautifully. You can customize this recipe by adding a few optional ingredients. If you like a little heat, use red pepper flakes. For a cheesy touch, sprinkle more Parmesan before serving. You can also swap in nutritional yeast for a vegan option. Each change adds a unique flair to the dish. First, set your oven to 400°F (200°C). This heat helps the asparagus roast well. Next, take 1 pound of fresh asparagus. Trim the ends to remove any tough parts. You want only the tender stalks. Rinse the asparagus under cold water to clean it. Pat it dry with a towel. This step helps the marinade stick better. In a large mixing bowl, add 3 tablespoons of olive oil. Then, add 4 cloves of minced garlic. The garlic gives a strong flavor that pairs well with the asparagus. Next, add the zest of 1 lemon and 2 tablespoons of fresh lemon juice. These ingredients brighten up the dish. Now, sprinkle in 1 teaspoon of sea salt, 1/2 teaspoon of black pepper, and 1/4 teaspoon of red pepper flakes if you like a bit of heat. Mix everything well until combined. Now, add the trimmed asparagus to the bowl. Toss it gently to coat each piece with the lemon garlic mixture. Spread the asparagus onto a baking sheet lined with parchment paper. Make sure the stalks are in a single layer. This helps them roast evenly. Place the sheet in the preheated oven. Roast for 12-15 minutes, or until the asparagus is tender and slightly crispy. In the last 2 minutes, sprinkle 2 tablespoons of grated Parmesan cheese on top. This adds a creamy touch. Once done, take it out and let it cool for a minute. Finish by garnishing with fresh parsley. Enjoy this dish straight away! For the full recipe, check the details above. When choosing asparagus, look for firm, bright green stalks. The tips should be tightly closed and fresh. Avoid any that feel soft or limp. Thicker stalks provide a meatier bite, while thinner ones cook faster. I prefer medium-sized asparagus for balance in texture and flavor. To get the best results, start with a hot oven at 400°F (200°C). This high heat helps the asparagus caramelize and become crispy. Make sure the asparagus is in a single layer on the baking sheet. Overcrowding can lead to steaming, which makes them soggy. Toss them in the lemon garlic marinade well for even flavor. You can easily boost flavors in this dish. Add a splash of balsamic vinegar for a sweet touch. Try mixing in some herbs like thyme or rosemary for an earthy tone. If you want heat, sprinkle extra red pepper flakes. For a nutty flavor, consider toasted pine nuts or slivered almonds as a topping. Each addition brings a new twist to the classic lemon garlic taste. You can find the full recipe for lemon garlic roasted asparagus for more ideas. {{image_2}} You can easily make this dish vegan and dairy-free. Simply skip the Parmesan cheese or use a vegan cheese alternative. Nutritional yeast adds a cheesy flavor without dairy. It’s a great option to keep the taste rich and satisfying. Feel free to play with the seasonings. Try adding a bit of balsamic vinegar for a sweet touch. You can also use herbs like thyme or rosemary for added depth. If you enjoy spice, add more red pepper flakes. This gives a nice kick to the dish. You don’t have to stop at asparagus. Add other veggies like bell peppers, zucchini, or carrots. Cut them into similar sizes to ensure even cooking. Mix them with the asparagus in the marinade. This way, you get a colorful and tasty veggie medley. For the complete cooking experience, check out the Full Recipe. Enjoy experimenting with these variations! After you enjoy your lemon garlic roasted asparagus, store any leftovers in the fridge. Place the cooled asparagus in an airtight container. This keeps them fresh for up to three days. If you want to keep them longer, consider freezing them. To reheat your asparagus, use the oven or a skillet. Preheat your oven to 350°F (175°C). Spread the asparagus on a baking sheet and heat for about 10 minutes. If using a skillet, add a bit of olive oil and heat on medium for about five minutes. This keeps the flavor and texture nice. Freezing asparagus is simple but needs a few steps. First, blanch the asparagus in boiling water for two minutes. Then, immediately transfer them to ice water to stop the cooking. Drain and dry them well. Next, place the asparagus in a freezer bag and remove as much air as possible. They can stay good for up to six months in the freezer. When you’re ready to use them, just thaw in the fridge overnight before cooking. Roast asparagus for about 12-15 minutes at 400°F (200°C). Check for tenderness. It should be bright green and slightly crispy. The exact time can vary based on the thickness of the asparagus. Thinner stalks cook faster, while thicker ones may need more time. Yes, you can use frozen asparagus. However, I recommend thawing it first. This helps to keep the texture from becoming mushy. Pat it dry to remove excess moisture. Using fresh asparagus will give the best flavor and crunch. Lemon garlic roasted asparagus pairs well with many dishes. Try serving it with grilled chicken, fish, or steak. It also complements pasta dishes and grains like quinoa or rice. For a lighter meal, enjoy it with a fresh salad. Absolutely! Asparagus is low in calories and high in nutrients. It contains vitamins A, C, and K. The olive oil provides healthy fats, and garlic has many health benefits. This dish is a great way to add greens to your meals. For the full recipe, you will need: - 1 pound fresh asparagus, trimmed - 3 tablespoons olive oil - 4 cloves garlic, minced - Zest of 1 lemon - 2 tablespoons fresh lemon juice - 1 teaspoon sea salt - 1/2 teaspoon black pepper - 1/4 teaspoon red pepper flakes (optional) - 2 tablespoons grated Parmesan cheese (or a vegan alternative) - Fresh parsley, chopped (for garnish) Follow the steps in the recipe to create this tasty side dish! This blog post covered how to make lemon garlic roasted asparagus from start to finish. We explored fresh ingredients, seasoning suggestions, and step-by-step instructions. Tips for perfect roasting and flavor enhancement were included. We also talked about vegan options and proper storage methods. In summary, this dish is simple and versatile. It's healthy and tasty, making it a great choice for any meal. Use the information here to create your delicious lemon garlic roasted asparagus today!

Lemon Garlic Roasted Asparagus Tasty and Easy Recipe

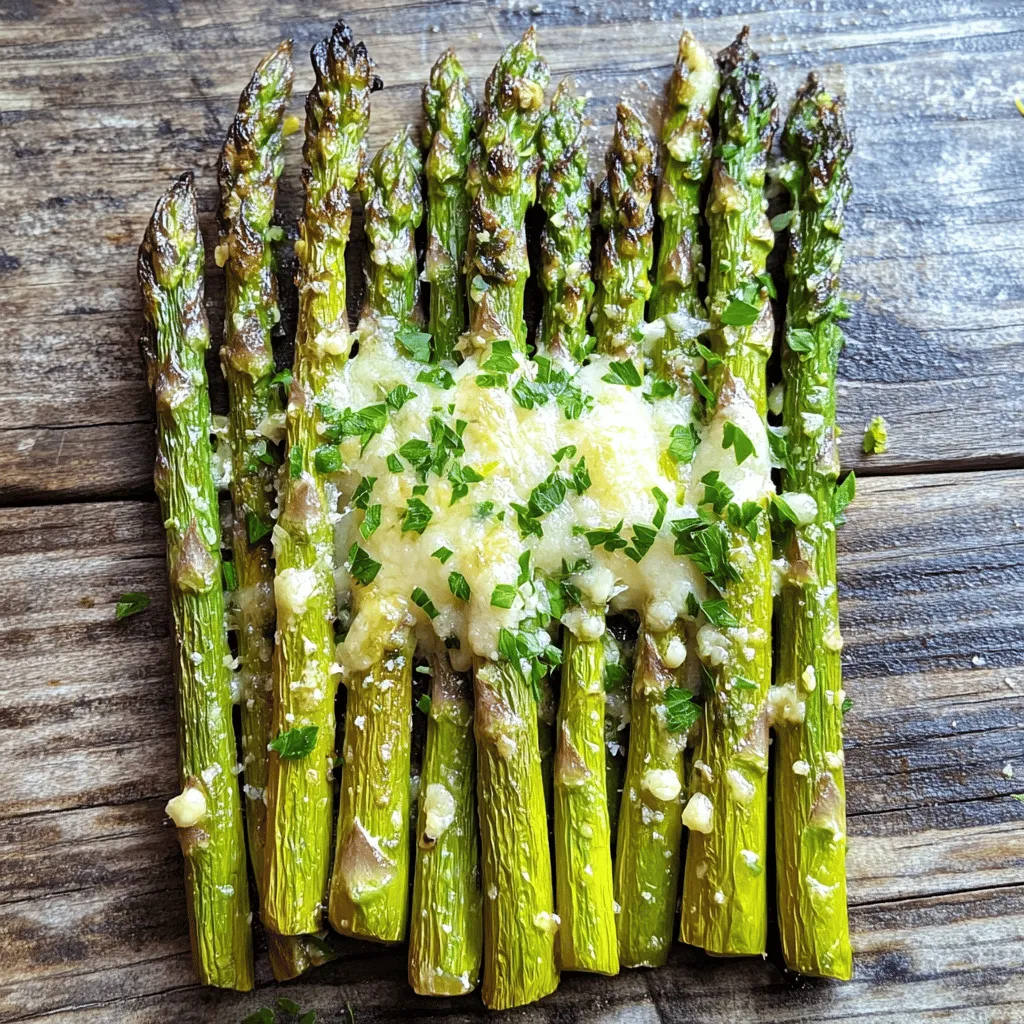
Looking for a simple side dish that bursts with flavor? This Lemon Garlic Roasted Asparagus recipe is your answer. I’ll

To create these amazing pumpkin spice pancakes, you need simple ingredients. Here’s what you’ll need: - 1 cup all-purpose flour - 1/2 cup canned pumpkin puree - 1 tablespoon baking powder - 1 tablespoon pumpkin pie spice - 1/4 teaspoon salt - 1 tablespoon brown sugar - 1 large egg - 1 cup milk (can substitute with almond or oat milk) - 2 tablespoons melted butter (plus extra for cooking) These ingredients come together to bring that warm, cozy taste of fall to your breakfast table. You can easily adjust these pancakes to fit your dietary needs. Here are some swaps: - Use gluten-free flour in place of all-purpose flour. - Swap the egg for 1/4 cup of applesauce for a vegan option. - Use almond or oat milk instead of cow's milk for a dairy-free choice. These substitutions keep the flavor intact while meeting your unique needs. While these pancakes taste great on their own, toppings can add extra delight. Here are some ideas: - A dollop of whipped cream for a creamy touch. - Drizzle maple syrup for sweetness. - Sprinkle chopped pecans or walnuts for crunch. - Add a dash of extra pumpkin pie spice for more flavor. These options make your pumpkin spice pancakes even more fun and tasty! Remember to check the [Full Recipe] for all the details. Start with a large mixing bowl. Add the following dry ingredients: - 1 cup all-purpose flour - 1 tablespoon baking powder - 1 tablespoon pumpkin pie spice - 1/4 teaspoon salt - 1 tablespoon brown sugar Whisk these dry ingredients together until they blend well. This mix gives the pancakes their great flavor and rise. In another bowl, mix the wet ingredients: - 1/2 cup canned pumpkin puree - 1 large egg - 1 cup milk (you can use almond or oat milk) - 2 tablespoons melted butter Stir these until the mixture is smooth. The pumpkin adds moisture and flavor, making the pancakes special. Now, heat a non-stick skillet or griddle over medium-low heat. Add a little melted butter to coat the surface. Pour about 1/4 cup of the batter onto the skillet for each pancake. Cook until bubbles form on the surface, about 2-3 minutes. When the edges look set, flip the pancake and cook for another 2 minutes until golden brown. Repeat with the rest of the batter, adding butter as needed. Serve the pancakes warm. Top with whipped cream and maple syrup for a true fall treat. For the full recipe, check the previous section. Enjoy your delicious pumpkin spice pancakes! To get the best pumpkin spice flavor, use fresh spices. Ground cinnamon, nutmeg, and ginger are key. Avoid using old spices; they lose their punch. You can also add a dash of vanilla extract for depth. Mix your spices well with the flour. This ensures even flavor in every bite. Cook your pancakes at medium-low heat. If the skillet is too hot, the outside burns while the inside stays raw. I recommend using a non-stick pan for easy flipping. Pour about 1/4 cup of batter per pancake. Wait until bubbles form on the surface before flipping. This usually takes about 2-3 minutes. Cook for another 2 minutes after flipping, until golden brown. One common mistake is over-mixing the batter. Stir until just combined; lumps are fine. Another mistake is not letting the skillet preheat enough. If it’s not hot enough, pancakes won’t rise well. Lastly, don’t skip the melted butter for cooking. It adds great flavor and keeps pancakes from sticking. For a complete guide, check the Full Recipe. {{image_2}} You can easily make gluten-free pumpkin spice pancakes by swapping flour. Use a gluten-free flour blend instead of all-purpose flour. Look for blends that include xanthan gum; they help with texture. Mix the dry ingredients as usual. Follow the rest of the recipe steps. These pancakes will be just as tasty. To make vegan pumpkin spice pancakes, replace the egg and milk. Use a flax egg instead of a chicken egg. To make a flax egg, mix one tablespoon of ground flaxseed with three tablespoons of water. Let it sit for five minutes until thick. For milk, use almond or oat milk. Your pancakes will still taste great! You can add fun flavors to your pancakes! Try mixing in chocolate chips or pecans for crunch. You can also add a splash of vanilla extract to the wet ingredients for extra flavor. If you want a spicier kick, add a pinch of cayenne pepper. These twists make each pancake a new treat! For the complete recipe, check out the Full Recipe section. After making these pumpkin spice pancakes, you may have some left. To store them, place the pancakes in an airtight container. Layer them with parchment paper to prevent sticking. Keep them in the fridge for up to three days. If you want to enjoy them later, this method keeps their flavor fresh. When you're ready to eat your leftover pancakes, reheating is easy. You can use a microwave, but I prefer a skillet for better texture. Heat a non-stick skillet over low heat. Add a small pat of butter. Place the pancakes in the skillet and warm them for about one minute on each side. This keeps them soft and adds a nice buttery flavor. Freezing is a great option for these pancakes. Start by letting them cool completely after cooking. Then, stack them with parchment paper in between each pancake. Place the stack in a freezer bag or airtight container. You can freeze them for up to three months. When you crave a tasty breakfast, just reheat them as mentioned. Enjoy your pumpkin spice pancakes anytime! Yes, you can use fresh pumpkin. First, cook the pumpkin until it's soft. Then, blend or mash it to a smooth puree. This fresh puree can add a more vibrant flavor. It may also change the texture slightly, so adjust your liquid as needed. To make fluffier pancakes, try these tips: - Use fresh baking powder; it should be active. - Don't over-mix the batter; leave some lumps. - Let the batter rest for a few minutes before cooking. This helps the pancakes rise better while cooking. Leftover pumpkin puree has many uses. You can: - Add it to smoothies for a healthy boost. - Stir it into oatmeal for extra flavor. - Use it in baked goods like muffins or bread. These options let you enjoy pumpkin in different ways! Find the full recipe for pumpkin spice pancakes to enjoy this fall treat. These pumpkin spice pancakes blend warm spices with simple steps for tasty treats. We explored key ingredients, options for dietary needs, and ways to top your pancakes. I shared tips to boost flavor and avoid common mistakes during cooking. We also discussed fun variations for gluten-free and vegan diets. Lastly, we looked at easy storage and reheating methods. Enjoy these pancakes at breakfast or any time! Happy cooking!

Pumpkin Spice Pancakes Irresistible Fall Breakfast Treat

Fall is here, and what better way to celebrate than with Pumpkin Spice Pancakes? These fluffy treats capture the season’s

Older posts
Newer posts
← Previous Page1 … Page19 Page20 Page21 … Page30 Next →

dsad

© 2025 So Yum Recipes • Built with GeneratePress

Our Policies

  • Copyright Policy
  • Cookie Policy
  • GDPR Policy
  • Privacy Policy
  • Disclaimer
  • Terms Of Use

More Information

  • Home
  • About
  • Contact
  • Appetizers
  • Dessert
  • Dinner
  • Drinks
©2025, So Yum Recipes About Back To Top