Chocolate Chip Banana Bread Tasty and Simple Recipe
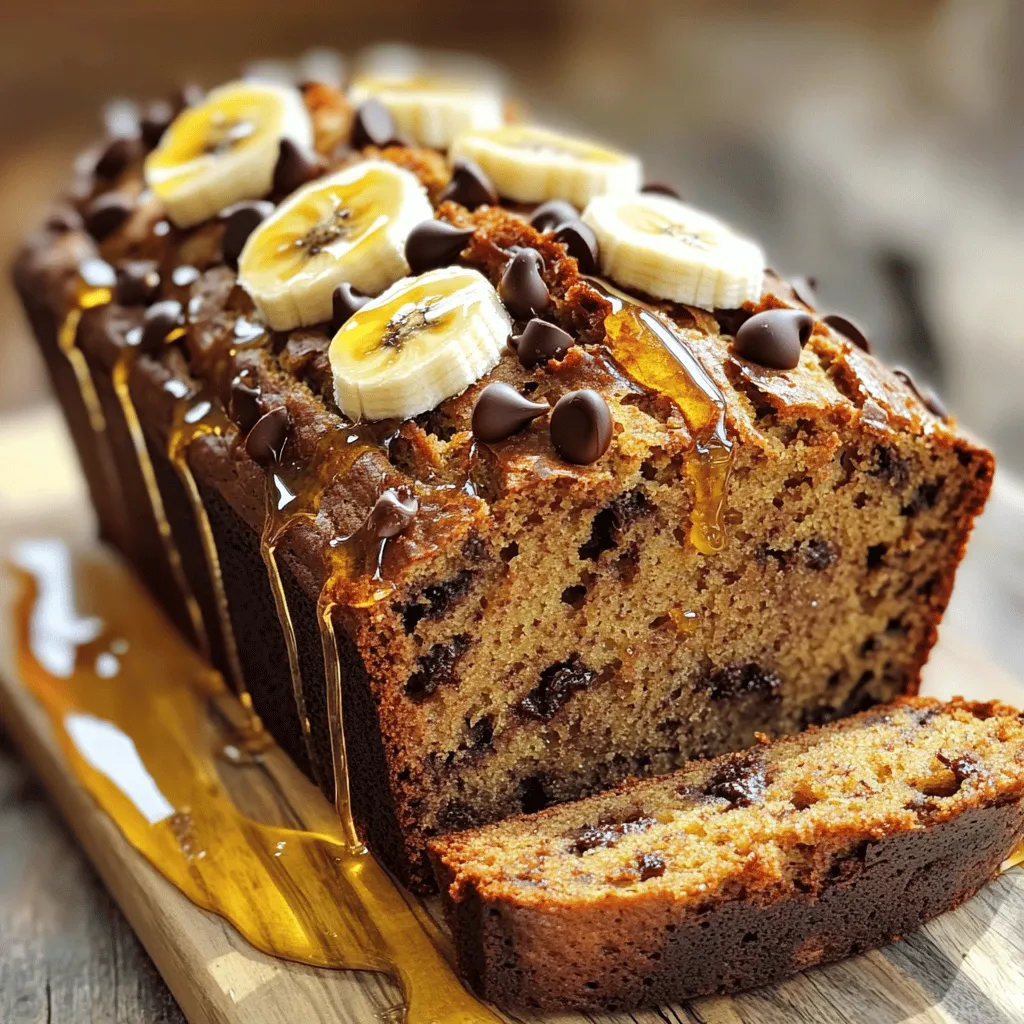
Are you craving something sweet and easy to bake? My Chocolate Chip Banana Bread recipe is your answer! With just
Are you craving something sweet and easy to bake? My Chocolate Chip Banana Bread recipe is your answer! With just
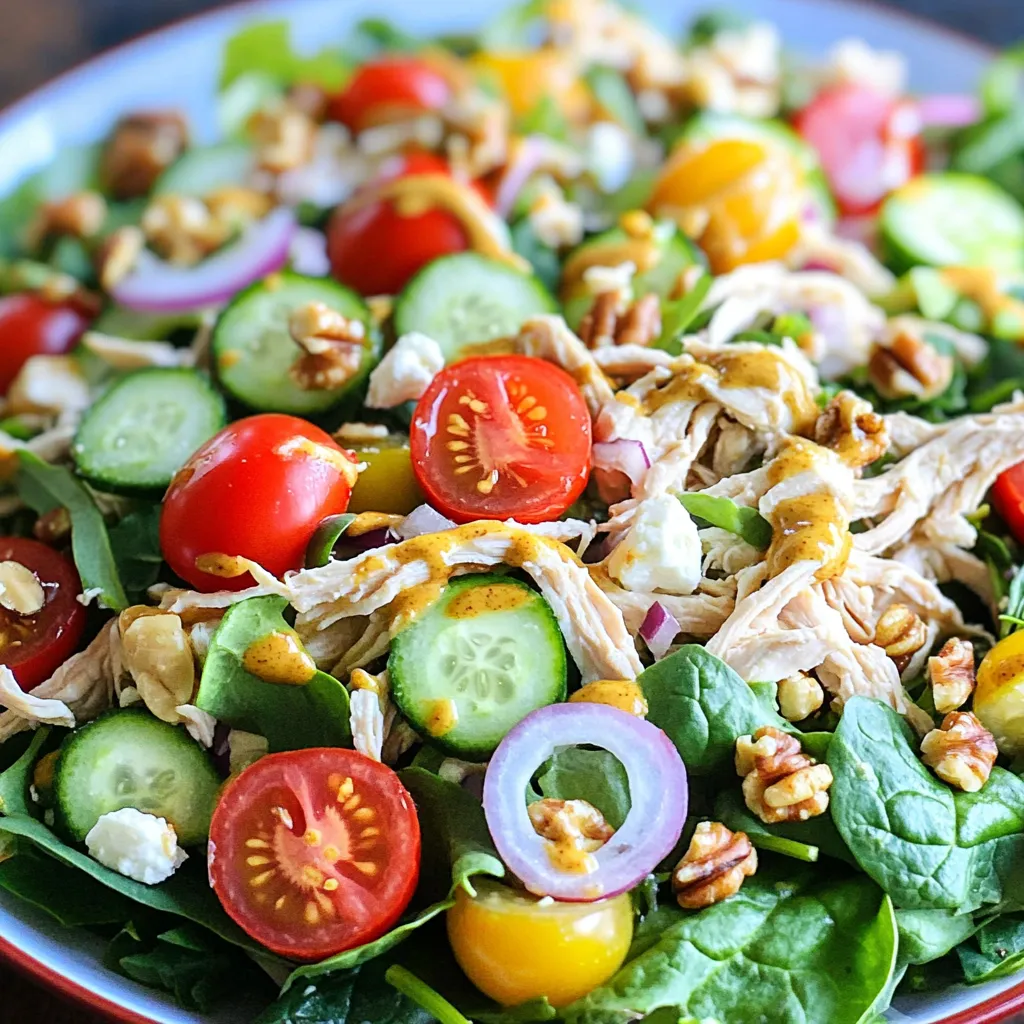
Looking for a fresh and tasty meal? Try my Honey Mustard Chicken Salad! This salad combines tender chicken, crisp greens,
![- 2 cups cooked chicken, shredded - 1 can (10 oz) red enchilada sauce - 1 can (15 oz) black beans, rinsed and drained - 1 cup corn (fresh, canned, or frozen) - 2 cups shredded cheddar cheese - 1 medium onion, diced - 1 teaspoon garlic powder - 1 teaspoon cumin - 1 teaspoon chili powder - 6 corn tortillas, cut into quarters - Salt and pepper to taste - Fresh cilantro, for garnish In this recipe, you will see lots of colors and flavors. The cooked chicken is the star, but it plays well with the enchilada sauce. The black beans add protein and a nice texture. The corn brings a touch of sweetness. You can use fresh corn, or canned, or frozen. Each choice works well. The spices like cumin and chili powder give warmth. Diced onion adds a crisp bite. Don't forget the tortillas; they are the glue that holds this dish together. I love cutting them into quarters for easy layering. The shredded cheddar cheese is the final touch. It melts beautifully, creating a gooey top. And for a fresh kick, we add cilantro at the end. This dish is not just tasty; it looks great too. For the full recipe, check out the details above. Feel free to mix and match these ingredients based on what you have. Cooking should be fun and flexible! - Preheat the oven to 350°F (175°C). - Gather your ingredients and tools. You will need a large bowl and a 9x13 inch baking dish. - Start by layering half of the quartered corn tortillas in the dish. - In a large bowl, mix the cooked chicken, enchilada sauce, black beans, corn, diced onion, garlic powder, cumin, and chili powder. Add salt and pepper. - Spread half of this chicken mixture on top of the tortillas. - Sprinkle 1 cup of shredded cheddar cheese over the chicken. - Now, repeat the layers with the rest of the tortillas, chicken mixture, and top it with the last cup of cheese. - Cover the baking dish with foil. Bake it in the oven for 25 minutes. - After 25 minutes, remove the foil. Bake for an additional 10-15 minutes until the cheese is bubbly and golden. - Let it cool for a few minutes before serving. Don't forget to garnish with fresh cilantro! You can find the Full Recipe for more details. To achieve the best cheese texture, I recommend using fresh shredded cheese. Pre-shredded cheese often has anti-caking agents that can affect melt quality. For a creamy and stretchy cheese layer, combine cheddar with a bit of Monterey Jack. Cutting tortillas can be tricky. To make it easy, stack a few tortillas and use a sharp knife. You can also use kitchen scissors for quick cuts. This saves time and gives you even pieces. If you don't have cooked chicken, rotisserie chicken works great. You can also use shredded turkey or even canned chicken in a pinch. For a vegetarian option, try adding sautéed mushrooms or zucchini. You can swap black beans for pinto beans or kidney beans. Different cheeses like pepper jack can add spice. Feel free to mix and match based on what you have at home. This casserole pairs well with a simple green salad. A side of rice or avocado slices also complements the dish. For garnishes, fresh cilantro adds color and flavor. You can also top it with sour cream or sliced jalapeños for a kick. For the full recipe, check out the Easy Chicken Enchilada Casserole. Enjoy the cooking experience! {{image_2}} You can change the protein in this dish. Ground beef or turkey works well. Just cook it first before adding it to the mix. If you prefer a meatless option, use beans or lentils. These ingredients give you a hearty meal without the meat. To spice things up, add jalapeños for heat. You can slice them and mix them in. If you want a unique flavor, try different spices. Smoked paprika or oregano can add depth. Feel free to experiment and find your favorite taste. If you need a gluten-free dish, look for gluten-free tortillas. Many brands offer great options that hold up well. Check the label to ensure they are safe for your diet. This way, everyone can enjoy the casserole without worry. For the full recipe, click here: [Full Recipe]. To refrigerate your leftovers, let the casserole cool down first. Cover the dish tightly with plastic wrap or aluminum foil. You can also transfer it to an airtight container. This helps keep it fresh. When you want to reheat it, preheat your oven to 350°F (175°C). Place the casserole in the oven for about 20-25 minutes. You can also reheat it in the microwave for about 5-7 minutes, stirring halfway through for even heating. If you want to freeze the casserole, follow these steps. First, let it cool completely. Then, cut it into portions. Use freezer-safe containers or heavy-duty freezer bags. Make sure to remove as much air as possible before sealing. This helps prevent freezer burn. The casserole will last for about 2-3 months in the freezer. In the fridge, your Easy Chicken Enchilada Casserole will last about 3-4 days. In the freezer, it can last for 2-3 months. Always check for signs of spoilage. Look for changes in color, texture, or smell. If it seems off, it's best to throw it away. Enjoy safe and tasty meals! For the full recipe, visit the recipe section. Yes, you can prepare this dish in advance. To do this, follow these steps: - Make the chicken mixture as directed. - Layer it in the baking dish. - Cover it tightly with plastic wrap or foil. - Store it in the fridge overnight. When you are ready to bake, just remove the wrap and bake as usual. This makes it easy for busy nights. There are many tasty sides to serve with enchilada casserole. Here are my top suggestions: - Mexican rice: This adds a nice texture. - Refried beans: They make a great pairing. - Guacamole: Fresh and creamy, it balances the dish. - Corn salad: A light and fresh option. These sides will enhance your meal. Absolutely! You can make this casserole as spicy or mild as you like. Here are some ideas: - For a mild version, use less chili powder and omit any hot peppers. - For a spicy kick, add jalapeños or more chili powder. You can even use spicy enchilada sauce for extra heat. Adjust to your taste! Feel free to check out the Full Recipe for more details on this delicious dish. In this blog post, we covered how to make an easy chicken enchilada casserole. You learned about the main and extra ingredients, like chicken, cheese, and spices. I walked you through each step from preparation to baking. I also shared tips, variations, and storage info. You can make this dish your own with different proteins or flavors. Enjoy making this meal; it's sure to please anyone you serve! Remember, cooking is fun and a great way to share time with loved ones.](https://soyumrecipes.com/wp-content/uploads/2025/06/18dd6e70-2719-4713-a963-881f83cff437.webp)
Looking for a quick and tasty dinner? This Easy Chicken Enchilada Casserole checks all the boxes. With tender chicken, savory

If you’re craving a dinner that’s both crispy and flavorful, look no further! Crispy Parmesan Crusted Chicken is your answer.
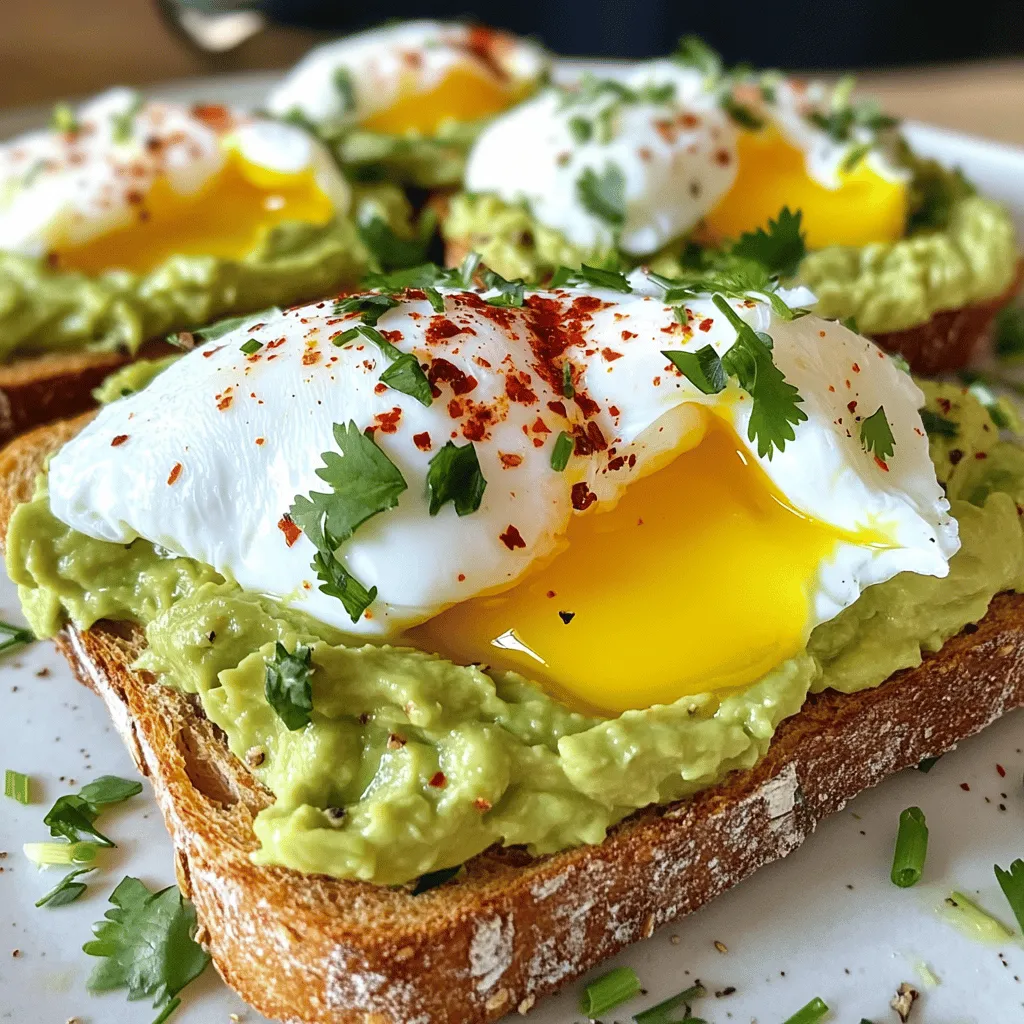
Looking for a delicious breakfast or brunch idea? Let me introduce you to Tasty Avocado Toast with Poached Egg Delight!
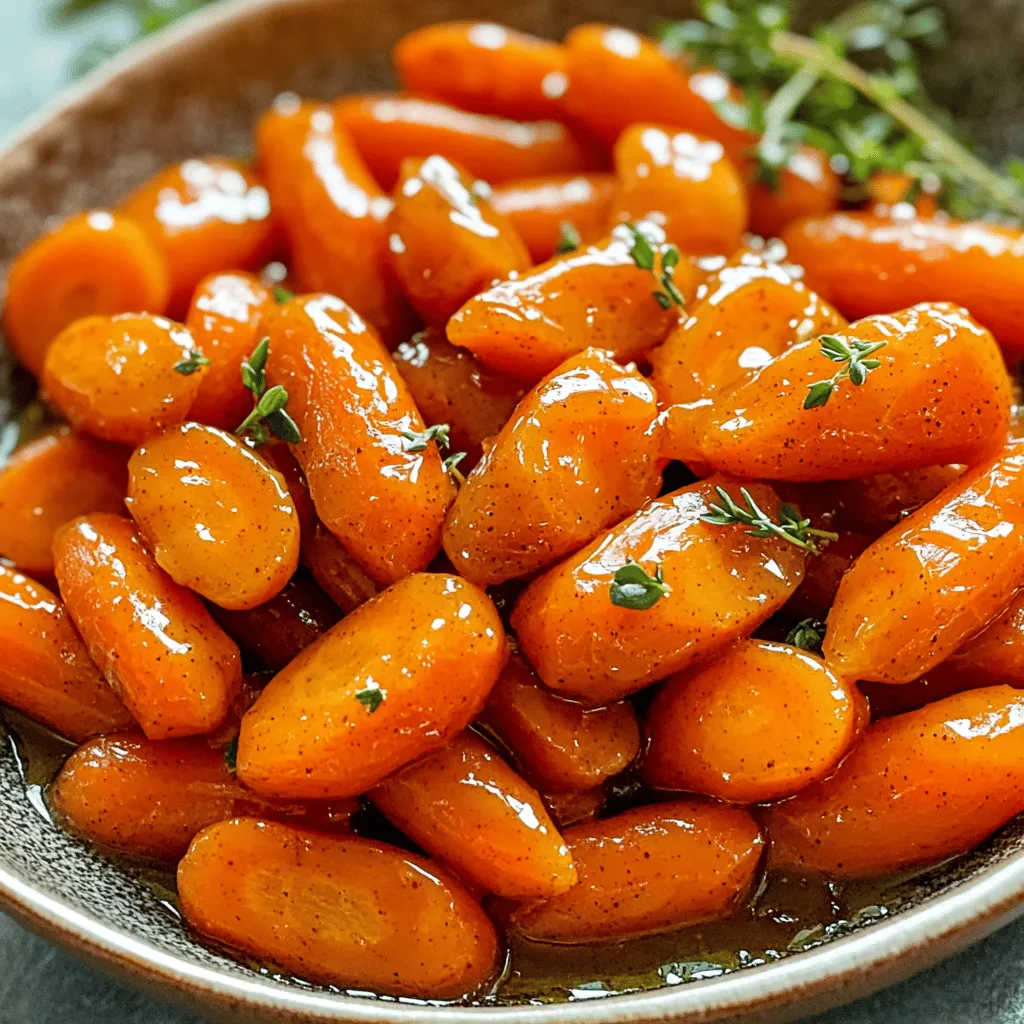
Are you ready to make the perfect side dish? Maple Glazed Carrots are both savory and sweet, adding a delicious
![- Shredded chicken - Sriracha sauce - Honey The main ingredients in these wraps make them special. First, you need shredded chicken. It gives the wrap a nice base. You can use leftover chicken or cook some fresh. Next, Sriracha sauce adds heat and flavor. This sauce is spicy but also tangy. A little goes a long way! Lastly, honey sweetens the mix. It balances the heat from the Sriracha. Just a tablespoon is enough to enhance the taste. - Additional vegetables - Cheese options You can customize your wraps with optional add-ins. Adding more vegetables boosts nutrition and taste. Think about bell peppers, carrots, or even avocado. Each adds a unique crunch. Cheese can also make a great addition. Feta or cheddar works well here. It melts beautifully and adds creaminess. Feel free to mix and match as you like. - Whole wheat tortillas - Gluten-free alternatives Tortillas are the best way to wrap all these goodies. Whole wheat tortillas are a healthy choice. They add fiber and a nutty taste. If gluten is a concern, try gluten-free tortillas. They come in various flavors and textures. Choose the one that suits your diet. The right tortilla can make each bite even better. For the full recipe, check out the recipe section. You’ll find all the steps you need to make these wraps delicious! Start by mixing the cooked chicken with sriracha sauce. Use about 1/4 cup of sriracha for two cups of chicken. Add one tablespoon of honey for a sweet touch. Season with salt and pepper to taste. Stir until the chicken is well-coated. This mixture brings heat and flavor to your wraps. For seasoning tips, remember that you can adjust the sriracha based on your spice level. If you like it milder, use less sriracha or add more honey. This way, you can fine-tune the taste to fit your palate. Next, let's sauté the vegetables. Heat one tablespoon of olive oil in a skillet over medium heat. Add the thinly sliced red bell pepper. Sauté for about 3-4 minutes until they soften. This keeps them crunchy yet tender. Remove them from the heat once they are bright and slightly tender. For best practices, always make sure the oil is hot before adding the veggies. This helps lock in their flavors and keeps them from getting soggy. Now, it’s time to assemble the wraps. Lay the large whole wheat tortillas flat on a clean surface. First, add an even layer of shredded lettuce on each tortilla. This adds a fresh crunch. Next, spoon the spicy chicken mixture over the lettuce. Follow this with the sautéed red bell peppers and thinly sliced cucumber. Finally, sprinkle chopped cilantro on top for extra flavor. When wrapping, fold in the sides of the tortilla. Then, roll it tightly from the bottom. This keeps all the yummy fillings secure. Repeat this for each tortilla. If you want a crispy finish, grill the wraps in a skillet for 2-3 minutes on each side. For the full recipe and more tips, check out the [Full Recipe]. To make your Spicy Sriracha Chicken Wraps just right, adjust the spice levels first. If you want less heat, use less sriracha sauce or mix in some yogurt. You can also add more honey for sweetness. Next, ensure even cooking. When sautéing the red bell pepper, stir regularly. This keeps them from burning and helps them cook evenly. For a tasty meal, pair your wraps with sauces. Try ranch dressing or a cool yogurt dip. These balance the heat from the sriracha. Best sides to serve include fresh fruit or a simple salad. They add freshness and color to your meal. Make your wraps look great on the plate. Slice each wrap in half diagonally. Arrange them neatly on a platter. For added flair, drizzle some extra sriracha on top. Garnish with chopped cilantro to make it pop. This makes your dish look as good as it tastes! {{image_2}} You can switch up the protein in these wraps. Try using grilled shrimp or tofu. These options add a new twist. If you want a vegetarian option, use chickpeas or black beans. They provide protein and a nice texture. If you want to change the sauce, try different spicy sauces. Gochujang or harissa can work well. You can also mix sweet and savory flavors. For example, add a dash of teriyaki sauce or a bit of barbecue sauce. These can balance the heat and make it exciting. Feel free to customize your wraps with different greens. Romaine or spinach can add a fresh taste. You can also add toppings like avocado or jalapeños. These extras can enhance the flavor and make every bite interesting. For the full recipe, check out the link above! To keep your spicy sriracha chicken wraps fresh, store leftovers in the fridge. Place each wrap in a single layer in an airtight container. This helps prevent them from getting soggy. You can also wrap them in plastic wrap for extra protection. Make sure to eat them within three days for the best taste. To reheat your wraps, use a skillet over medium heat. This keeps the texture nice and crispy. Heat each wrap for about 2-3 minutes on each side. You can also microwave them, but this may make the wraps a bit soft. For a fun twist, serve them cold with a side of extra sriracha or a yogurt dip. If you want to freeze your wraps, wrap each one tightly in foil or plastic wrap. Then, place them in a freezer-safe bag. This way, they won’t get freezer burn. When you’re ready to eat, thaw the wraps in the fridge overnight. Heat them in a skillet for the best results. Enjoy your spicy sriracha chicken wraps any time! For the full recipe, check out the earlier section. To tone down the heat, you can adjust a few ingredients. Use less sriracha sauce in your mix. You can also add more honey to balance the spice. Adding creamy ingredients, like sour cream or yogurt, helps cool the wraps too. If you use milder vegetables, like bell peppers or lettuce, they can also tone down the heat. Yes, you can prepare these wraps ahead of time! To meal prep, assemble the wraps but leave out the lettuce and sauce until you're ready to serve. This keeps the wraps fresh and crunchy. Store them in an airtight container in the fridge. They should stay good for about two days. Serve these wraps with some extra sriracha on the side for dipping. A fresh salad pairs well with them. You can also add some crunchy chips or a light soup. For a pop of color, add a garnish of cilantro on top. Make sure to slice the wraps in half for a nice presentation. Check out the Full Recipe for more serving ideas! You can create spicy Sriracha chicken wraps easily. We've covered the key ingredients like chicken, Sriracha, and honey. Adding vegetables or cheese helps personalize your wrap. Choosing the right tortilla is crucial for taste and texture. I shared step-by-step instructions to help you prepare, cook, and assemble these wraps. Remember the tips for spice levels and serving suggestions for the best experience. Don't hesitate to try different proteins and sauces to make them your own. Enjoy the process and make these wraps a regular meal in your home.](https://soyumrecipes.com/wp-content/uploads/2025/06/31b18f2f-e5ac-4f33-b04f-a347a44e03fd.webp)
If you crave a quick and tasty meal, Spicy Sriracha Chicken Wraps are here for you! This dish is full
![To make chewy oatmeal raisin cookies, gather these simple ingredients. Each one plays its part in making your cookies soft and tasty. - 1 cup old-fashioned rolled oats - 1 cup all-purpose flour - 1/2 teaspoon baking soda - 1/2 teaspoon cinnamon - 1/4 teaspoon salt - 1/2 cup unsalted butter, softened - 3/4 cup brown sugar, packed - 1/4 cup granulated sugar - 1 large egg - 1 teaspoon vanilla extract - 1 cup raisins - 1/2 cup chopped walnuts (optional) Old-fashioned rolled oats give the cookies their chewy texture. All-purpose flour helps hold the dough together. Baking soda makes the cookies rise, while cinnamon adds warmth. Salt enhances all the flavors. Butter adds richness and softness. The mix of brown and granulated sugar creates the right sweetness. The egg binds everything, and vanilla brings a lovely scent. Raisins add a sweet burst, while walnuts add crunch if you choose to use them. These ingredients come together to create delicious cookies. For the full recipe, check the complete cooking instructions. Start by preheating your oven to 350°F (175°C). This ensures even baking. While the oven heats, line your baking sheet with parchment paper. This helps cookies not stick, making cleanup easy. In a medium bowl, combine the following dry ingredients: - 1 cup old-fashioned rolled oats - 1 cup all-purpose flour - 1/2 teaspoon baking soda - 1/2 teaspoon cinnamon - 1/4 teaspoon salt Whisk these together until they mix well. Set this bowl aside for now. In a large mixing bowl, cream together: - 1/2 cup unsalted butter, softened - 3/4 cup brown sugar, packed - 1/4 cup granulated sugar Use a hand mixer or stand mixer for about 2-3 minutes. You want the mixture to be light and fluffy. Next, beat in: - 1 large egg - 1 teaspoon vanilla extract Mix until fully incorporated. Now, gradually add the dry oat mixture to your wet ingredients. Mix until just combined. Be careful—do not overmix! This keeps your cookies soft. Finally, gently fold in: - 1 cup raisins - 1/2 cup chopped walnuts (optional) Make sure they are spread evenly in the dough. Using a tablespoon, drop spoonfuls of cookie dough onto the prepared baking sheet. Leave enough space between each cookie, as they will spread while baking. Bake in the preheated oven for 10-12 minutes. The edges should be lightly golden. The centers may look a bit underbaked, but they will firm up as they cool. After baking, let the cookies cool on the baking sheet for 5 minutes. Then, transfer them to a wire rack to cool completely. Enjoy your chewy oatmeal raisin cookies! For the full recipe, check the previous section. To get that perfect chewy texture, focus on your ingredient ratios. Use more brown sugar than white sugar. Brown sugar adds moisture and chewiness. For baking time, watch your cookies closely. Bake them just until the edges turn golden. The centers should look soft. They will firm up as they cool. Proper spacing on the baking sheet is key. Leave at least two inches between each cookie. This helps them keep their shape. If you want to prevent spreading, chill your dough for about 30 minutes before baking. This firms up the butter and stops the cookies from spreading too much. Want to boost flavor? Try adding a pinch of nutmeg or ginger. You can also mix in chocolate chips for a sweet twist. Walnuts add crunch, but you can swap them for pecans or leave them out. These simple changes can make your cookies even more delicious. Want to see the full recipe? Check out the [Full Recipe]. {{image_2}} For a gluten-free version, you can substitute all-purpose flour with a gluten-free blend. Look for a blend that includes xanthan gum. This will help with texture and binding. You can also use almond flour or coconut flour, but you may need to adjust the amount. To make these cookies vegan, replace the egg with a flax egg. Mix 1 tablespoon of ground flaxseed with 2.5 tablespoons of water. Let it sit for five minutes until it thickens. For butter, use a dairy-free alternative like coconut oil or vegan butter. Feel free to get creative with mix-ins! Dried cranberries add a nice tartness. You can also use chocolate chunks for a sweet twist. Chopped pecans or almonds can add crunch. Experiment with your favorite flavors to make each batch unique. Check the Full Recipe for all the delicious details! You want your chewy cookies to stay soft and fresh. Store them in an airtight container. Keep them at room temperature, away from direct sunlight. A cool, dry place works best. If you want them to last longer, add a slice of bread in the container. The bread will help keep the cookies moist. Freezing cookies is a great option if you want to save some for later. To freeze, let the cookies cool completely. Then, place them in a single layer on a baking sheet. Freeze them for about an hour. After that, transfer the cookies to a freezer bag. Squeeze out the air and seal it tight. When you want to enjoy them, take out the cookies and let them thaw at room temperature. You can also warm them in the oven for a few minutes. These chewy oatmeal raisin cookies can stay fresh for about one week at room temperature. If you store them in the freezer, they can last for up to three months. Always check for any signs of spoilage before enjoying your cookies. Oatmeal raisin cookies last about one week at room temperature. Store them in an airtight container. This keeps them soft and chewy. If you want them to last longer, freeze them. In the freezer, they stay fresh for up to three months. Yes, you can use quick oats. They will make the cookies a bit softer. Rolled oats give a chewier texture, which many love. If you want that classic chewiness, stick with rolled oats for the best flavor. You can use chocolate chips, dried cranberries, or chopped dates. Each option gives a new taste. I like using dried cranberries for a tart twist. You can also mix in nuts or seeds for added crunch. Oatmeal cookies can be healthier than many other cookies. They have fiber from oats and can include nuts. This gives you energy and helps you feel full. However, watch the sugar and butter amounts if you're counting calories. To make cookies softer, do not overbake them. Take them out when the edges are golden but the center is soft. You can also add a bit more butter or use brown sugar. Brown sugar keeps cookies moist. You learned about making delicious oatmeal raisin cookies from this post. We covered key ingredients, step-by-step instructions, and tips to get the perfect texture. You can choose variations like gluten-free or vegan, too. For the best results, remember to measure correctly and watch your baking time. With the right techniques, you can create tasty cookies everyone will enjoy. Enjoy baking and sharing these cookies!](https://soyumrecipes.com/wp-content/uploads/2025/06/7dde2c4f-e8b5-47a5-b13f-0f788ff02c5d.webp)
If you crave a warm, chewy treat, you’re in the right place! I’m excited to share my easy and tasty
![To make this lemon blueberry pound cake, you will need the following: - 1 cup unsalted butter, softened - 2 cups granulated sugar - 4 large eggs - 3 cups all-purpose flour - 1 teaspoon baking powder - 1/2 teaspoon baking soda - 1/2 teaspoon salt - 1 cup sour cream - Zest of 2 lemons - 1/4 cup fresh lemon juice - 1 1/2 cups fresh blueberries (lightly dusted with flour) - Optional: Powdered sugar for dusting You can easily modify this recipe. Here are some alternatives: - Instead of butter, use coconut oil or margarine. - For sugar, try brown sugar or a sugar substitute. - For a dairy-free option, use almond yogurt instead of sour cream. Using fresh ingredients matters a lot in this recipe. - Fresh blueberries give the cake great flavor and moisture. - Lemon zest and juice add brightness and balance. They make the cake pop with flavor. Always use fresh lemons for the best result. For the full recipe, check out the detailed steps that follow this ingredient list. 1. First, preheat your oven to 350°F (175°C). Grease a 10-inch bundt pan or a loaf pan. This step helps the cake come out easily. 2. In a large bowl, cream together 1 cup of softened unsalted butter and 2 cups of granulated sugar. You want to mix until it is light and fluffy, which takes about 3-5 minutes. This step adds air to the batter, making your cake soft. 1. Next, add 4 large eggs to the butter and sugar mix. Add each egg one at a time. Mix well after each egg. This helps the egg blend in fully. 2. After that, add the zest of 2 lemons and 1/4 cup of fresh lemon juice. This gives your cake a bright flavor. 3. In a separate bowl, whisk together 3 cups of all-purpose flour, 1 teaspoon of baking powder, 1/2 teaspoon of baking soda, and 1/2 teaspoon of salt. Make sure there are no lumps. A good mix ensures the cake rises well. 4. Gradually add the dry mix to the butter mix. Start with some flour. Follow that with 1 cup of sour cream. Keep alternating until everything is just mixed. Be careful not to overmix. This keeps the cake light. 1. Gently fold in 1 1/2 cups of fresh blueberries that you lightly dusted with flour. This keeps them from sinking to the bottom. 2. Pour the batter into your prepared pan. Smooth the top with a spatula. 3. Bake in your preheated oven for 60-70 minutes. Check for doneness by inserting a toothpick into the center. It should come out clean. 4. Once done, take the cake out of the oven. Let it cool in the pan for about 15 minutes. After that, carefully move it to a wire rack for complete cooling. This method makes sure your Lemon Blueberry Pound Cake turns out perfect every time. For more details, check the Full Recipe. - Avoiding overmixing the batter: Overmixing can make the cake tough. Mix just until you see no dry flour. I like to use a spatula to fold ingredients together slowly. This keeps the cake soft and fluffy. - Best practices for folding in blueberries: When you add blueberries, do it gently. Use a spatula and fold them into the batter. This helps keep them whole and prevents the cake from turning purple. - Cooling time in the pan vs. on a rack: Let the cake cool in the pan for about 15 minutes. This helps it set. After that, move it to a wire rack. Cooling on the rack prevents sogginess. - Ideas for slicing and presentation: Use a sharp knife to slice the cake. For a pretty look, serve each slice on a plate with a few fresh blueberries and a lemon slice. It adds color and freshness. - Adding lemon glaze for extra zing: A lemon glaze can add a sweet and tangy flavor. Mix powdered sugar with lemon juice for a simple glaze. Drizzle it over the cake for a beautiful finish. - The role of sour cream in the texture: Sour cream makes the cake moist and tender. It adds a rich flavor, too. Don’t skip it! The balance of flavors is key to a perfect pound cake. For more detailed steps, check out the Full Recipe. {{image_2}} You can change the flavor of your Lemon Blueberry Pound Cake by adding nuts. Walnuts or pecans give a nice crunch. Chop them into small pieces and fold them in with the blueberries. This adds texture and richness. You can also use other berries. Raspberries or strawberries work well too. They bring a different taste and color. Just make sure to dust them lightly with flour. This keeps them from sinking to the bottom during baking. If you need a gluten-free option, you can swap all-purpose flour for gluten-free flour. Many blends work well for baking. Just be sure to check the package for the right measurements. For a vegan version, replace the eggs. You can use flax eggs instead. Mix 1 tablespoon of flaxseed meal with 2.5 tablespoons of water for each egg. Let this sit until it thickens. It works great in baked goods, giving moisture and binding. You can adapt this cake for the seasons. In fall, add spices like cinnamon or nutmeg. This gives a warm flavor perfect for autumn. For holidays, think of flavors like peppermint or ginger. You can add peppermint extract or crystallized ginger to the batter. These twists make the cake festive and fun for special occasions. For the full recipe, check out the [Full Recipe]. To keep your Lemon Blueberry Pound Cake fresh, store it at room temperature. Place the cake in an airtight container. This helps lock in moisture. If you don't have a container, wrap the cake tightly in plastic wrap. Make sure to cover all exposed parts. This way, the cake stays soft and tasty for a few days. If you need to store the cake for a longer time, freezing is a great option. First, let the cake cool completely. Then, slice it into portions for easier thawing later. Wrap each piece in plastic wrap, then place it in a freezer bag. Remove as much air as possible before sealing. When you're ready to enjoy it, thaw the cake overnight in the fridge. For the best taste, warm it in the oven for a few minutes. Lemon Blueberry Pound Cake can stay fresh for up to a week at room temperature. In the fridge, it lasts about two weeks. However, if you freeze it, the cake can last up to three months. Watch out for signs of spoilage. If you notice a dry texture, an off smell, or mold, it's best to toss it. Always trust your senses when it comes to food safety. Can I use frozen blueberries? Yes, you can use frozen blueberries. Just make sure to dust them lightly with flour. This helps them stay suspended in the batter. Frozen berries may add a bit of moisture, but they will still taste great. What if my cake sinks in the middle? If your cake sinks, it might be due to overmixing or too much moisture. Ensure you mix the batter gently. Also, check your oven temperature with an oven thermometer. An oven that is too hot can cause the cake to rise too quickly and then fall. How can I adjust sweetness levels? To adjust sweetness, you can reduce the sugar by a quarter cup. Taste the batter before baking. You can also add a bit of lemon zest to enhance the flavor without adding more sugar. Is there a gluten-free version of this Lemon Blueberry Pound Cake? Yes, you can make a gluten-free version. Substitute all-purpose flour with a gluten-free blend. Make sure it contains xanthan gum for proper structure. This will keep your cake moist and fluffy. What can I serve alongside this cake? This cake pairs well with whipped cream. You can also serve it with fresh fruit. A side of lemon curd adds a nice touch as well. Best drinks to pair with Lemon Blueberry Pound Cake I love serving this cake with herbal tea or sparkling water. A light lemonade also complements the flavors nicely. For a more indulgent option, consider a glass of white wine. For the full recipe, check out the Lemon Blueberry Bliss Pound Cake section above! This article covered everything you need for a delicious Lemon Blueberry Pound Cake. You learned about the key ingredients, their quality, and how to prepare them. We also discussed mixing, baking, and cooling tips, along with fun variations to try. Remember, fresh ingredients matter, and small tweaks can lead to big flavor changes. Enjoy making this cake your own. Keep these tips in mind for the best results and happy baking!](https://soyumrecipes.com/wp-content/uploads/2025/06/262d5a0d-20ef-4415-a970-5d04d21a0ed5.webp)
Welcome to the world of Lemon Blueberry Pound Cake! This delightfully simple recipe transforms fresh blueberries and zesty lemons into
![- 200g pasta (penne or fusilli) - 1 block (200g) feta cheese - 2 cups cherry tomatoes, halved - 1/4 cup extra-virgin olive oil - 4 cloves garlic, minced - 1 teaspoon dried oregano - 1/2 teaspoon red pepper flakes (optional) - Salt and black pepper to taste - Fresh basil leaves for garnish - Grated Parmesan cheese for serving (optional) - You can use any pasta you like, such as spaghetti or rotini. - For a dairy-free option, try using a plant-based feta cheese. - Feel free to add seasonal veggies like zucchini or spinach for more flavor. Using different ingredients can change the taste and make this dish your own. 1. Preheat the oven and prep the baking dish Start by setting your oven to 400°F (200°C). This ensures even baking for your meal. Grab a large baking dish. This is where you will mix all your ingredients. 2. Prepare the cherry tomatoes and garlic mixture Take 2 cups of cherry tomatoes and cut them in half. Place the halved tomatoes in the baking dish. Next, mince 4 cloves of garlic. Add the garlic to the tomatoes. Drizzle 1/4 cup of extra-virgin olive oil over the mix. Season it with salt and black pepper. Add 1 teaspoon of dried oregano and, if you like heat, 1/2 teaspoon of red pepper flakes. Mix everything gently to coat the tomatoes and garlic. 1. Baking time and temperatures explained Place a block of feta cheese in the center of the tomato mix. Bake this dish for 25-30 minutes. You want the tomatoes to burst, and the feta should turn golden and soft. Keep an eye on it, as oven times may vary. 2. How to identify when the dish is ready After 25 minutes, check your dish. The tomatoes should be soft and juicy. The feta should look melted and slightly browned. This is the perfect time to take it out. 1. Mixing the baked ingredients with pasta While the feta and tomatoes are baking, cook 200g of pasta in a pot of salted boiling water. Follow the package instructions for the best texture. Once cooked, drain the pasta. After taking the baking dish out of the oven, use a fork to mash the feta into the tomatoes. Mix them well until you get a creamy sauce. Add the drained pasta to the dish. Toss everything together, ensuring the pasta is well coated. 2. Adjusting seasonings before serving Taste your dish. If it needs more flavor, add extra salt, black pepper, or red pepper flakes. Serve hot, and finish with fresh basil leaves on top. You can also sprinkle grated Parmesan cheese if you wish. Enjoy this simple and tasty weeknight meal! For a full guide on this recipe, check out the Full Recipe. To make perfect pasta, cook it until it's al dente. This means it should be firm yet tender. Follow the package instructions for time. Remember to salt the water; it adds flavor. After draining, toss the pasta with a bit of olive oil to prevent sticking. Roasting tomatoes is easy. Preheat the oven to 400°F (200°C). Place halved cherry tomatoes in a baking dish. Drizzle them with olive oil and season with salt. Bake until they burst and soften. This brings out their natural sweetness and flavor. Choose high-quality feta cheese for the best taste. Look for feta made from sheep's milk or a blend. Avoid pre-crumbled feta; it lacks the creamy texture. A block of feta melts nicely with the tomatoes, creating a rich sauce. Olive oil is key to this dish. Use extra-virgin olive oil for its fruity flavor. It enhances both the feta and tomatoes. A good oil can elevate the entire meal. Don't skimp; it makes a big difference. Baked Feta Pasta pairs well with a simple green salad. This adds freshness and crunch. Garlic bread is another great side. It soaks up the tasty sauce and complements the dish. For plating, use a large bowl. Spoon the pasta into the center. Garnish with fresh basil and a sprinkle of Parmesan cheese. This makes the dish look even more inviting. {{image_2}} You can make Baked Feta Pasta even more tasty. Adding spices or fresh herbs can change the flavor. I love using fresh basil or thyme. You can also try adding a pinch of garlic powder or onion powder for extra taste. Want to boost protein? You can add chicken or shrimp. Cook the protein separately, then mix it in with the pasta. This makes the meal hearty and filling. If you want a vegan version, swap out the feta cheese. There are great dairy-free feta options made from nuts. You can also skip the cheese entirely. Just add more veggies and spices to keep it flavorful. For gluten-free pasta, use pasta made from rice or quinoa. These options work well and taste great. You won’t miss the regular pasta at all. Seasonal vegetables can change the dish's vibe. In summer, add zucchini or bell peppers. In fall, use butternut squash or spinach. Just toss in what you find fresh at the market. Adjusting flavors based on what you have is also fun. If you have lemon, add a squeeze for brightness. If you find fresh cherry tomatoes, use those instead of canned. Always feel free to mix it up! For the full recipe, check out [Full Recipe]. To keep your Baked Feta Pasta fresh, store it in an airtight container. Let the dish cool before sealing it. Place it in the fridge within two hours of cooking. This helps keep bacteria away. Eat the leftovers within three to four days for the best taste. When reheating, you want to keep that creamy texture. The oven works best for this. Preheat your oven to 350°F (175°C). Place the pasta in a baking dish and cover it with foil. Heat for about 15-20 minutes. If you’re short on time, you can use the microwave. Place a portion in a microwave-safe bowl. Heat for one to two minutes, stirring halfway. This method is quick but may dry out the pasta a bit. Always check that it's hot before serving. Enjoy your delicious Baked Feta Pasta over again! How do I store leftovers of Baked Feta Pasta? To store leftovers, put them in an airtight container. Keep the pasta in the fridge. It will stay fresh for up to three days. When you want to eat it, just reheat it. Can I use crumbled feta instead of a block? Yes, you can use crumbled feta. It will melt nicely. Just be sure to adjust the baking time. Crumbled feta may cook faster than a block. What’s the best way to serve Baked Feta Pasta? Serve Baked Feta Pasta hot, straight from the oven. Add fresh basil on top for color and taste. A sprinkle of grated Parmesan can also enhance the dish. How long does Baked Feta Pasta take to make? Baked Feta Pasta takes about 40 minutes total. This includes 10 minutes of prep time and 25-30 minutes of baking. Can I make Baked Feta Pasta ahead of time? You can prep the dish ahead of time. Mix the tomatoes, garlic, and feta in a baking dish. Cover it and store it in the fridge. Bake it when you’re ready to eat. Is Baked Feta Pasta suitable for meal prep? Yes, it is great for meal prep! You can make a big batch and divide it into portions. It reheats well and tastes great later. Baked Feta Pasta combines simple ingredients into a delicious dish. We covered essential items, clever swaps, and easy steps for preparation. You learned about tips for perfect cooking and creative variations. I hope you feel ready to try this recipe in your kitchen. Cooking can be fun and simple. Enjoy the flavors, and don’t forget to share your results!](https://soyumrecipes.com/wp-content/uploads/2025/06/d9ad6c35-3df6-49db-8309-8a9e2e0becd3.webp)
Craving a simple yet delicious weeknight meal? Look no further than Baked Feta Pasta! This dish combines creamy feta, fresh
