Skip to content
DisclaimerTerms Of UseGDPR PolicyCookie Policy

So Yum Recipes

  • Home
  • Drinks
  • Appetizers
  • Dinner
  • Dessert
  • About
  • Contact
  • Privacy Policy
DisclaimerTerms Of UseGDPR PolicyCookie Policy

Chloe

- Zucchini (4 medium, spiralized) - Heavy cream (1 cup, or coconut cream for dairy-free) - Parmesan cheese (1/2 cup, or nutritional yeast for dairy-free) - Unsalted butter (2 tablespoons) - Garlic (2 cloves, minced) - Nutmeg (1/4 teaspoon) - Salt and pepper to taste - Fresh parsley (for garnish) - Cherry tomatoes (optional, for garnish) The main part of this dish is the zucchini. I love using fresh zucchini because it gives a light and fresh taste. You can spiralize the zucchini into noodles. This makes a great low-carb option. You can find spiralizers at most stores. They are easy to use and fun! For the sauce, heavy cream adds a rich flavor. If you want a dairy-free version, coconut cream works well too. It gives a unique taste that blends perfectly with the zucchini. Parmesan cheese adds a salty kick. You can swap it for nutritional yeast if you're going dairy-free. Don't forget the flavor enhancers! Butter brings a nice richness. Garlic adds depth to the sauce. Just a bit of nutmeg gives a warm touch. Finally, season with salt and pepper to balance the flavors. Fresh parsley on top makes the dish look nice. Cherry tomatoes add a pop of color and sweetness if you like. This simple mix of ingredients creates a dish that feels fancy but is easy to make. For the complete recipe, check out the full recipe section! First, you need to spiralize the zucchinis. Use a spiralizer to make long, thin noodles. After spiralizing, place the noodles in a colander. Sprinkle a little salt on them and let them sit for 10 to 15 minutes. This step helps pull out extra moisture. Once the time is up, pat the noodles dry with a paper towel. Set them aside for sautéing later. In a large skillet, melt the butter or heat the olive oil over medium heat. Add the minced garlic and cook for about one minute. Watch closely so it doesn’t burn. Next, pour in the heavy cream or coconut cream. Stir often and bring it to a gentle simmer. Cook for 3 to 5 minutes until it thickens slightly. Now, slowly whisk in the grated Parmesan cheese or nutritional yeast. Add the nutmeg and keep stirring until smooth. If the sauce seems too thick, add a splash of water or more cream. After the zucchini noodles are dry, heat a separate pan. Lightly sauté the noodles in a bit of olive oil for 2 to 3 minutes. Aim for them to be just tender, not mushy. Remove the noodles from the heat. Then, add them to the skillet with the Alfredo sauce. Gently toss to coat the noodles well. Season with salt and pepper to taste. Serve your dish right away, garnished with fresh parsley and cherry tomatoes if you like. For the complete cooking details, check out the Full Recipe. To get the sauce just right, you may need to adjust its thickness. If your sauce is too thick, add a splash of water or more cream. This will help create a smooth and creamy texture. Stir well to combine everything. Remember, a little goes a long way! Salting and drying the zucchini noodles is key. After spiralizing, sprinkle salt on the noodles. Let them sit for 10-15 minutes. This draws out excess moisture. After that, pat them dry with a paper towel. This step keeps your dish from becoming watery. You can easily change the flavor of your Alfredo sauce. Adding herbs like basil or parsley can brighten the dish. A pinch of red pepper flakes adds a nice kick. You can even experiment with spices like garlic powder or Italian seasoning. These tweaks make your Zucchini Noodle Alfredo unique and exciting. For the complete details on making this dish, check out the Full Recipe. {{image_2}} To make a vegan version of zucchini noodle Alfredo, swap out key ingredients. Use coconut cream instead of heavy cream. Nutritional yeast replaces Parmesan cheese. For butter, try olive oil. This keeps the dish creamy without dairy. You still get a rich flavor. You can even add a splash of lemon juice for brightness. It’s so tasty and pure plant-based joy! Want to boost the protein in your meal? You can add grilled chicken, shrimp, or tofu. Each option brings its unique flavor to the dish. If using chicken, grill it and slice it thinly. For shrimp, sauté them for a few minutes until pink. If you prefer tofu, choose firm tofu and sauté until golden. These additions make the dish hearty and filling. Feel free to add more veggies to your Alfredo. Spinach is a great choice; it wilts down nicely. Bell peppers add color and crunch, too. You can toss in peas or broccoli for some green goodness. These vegetables not only make the dish more vibrant, but they also boost the nutrition. Mix and match your favorites for a fun twist! To store leftovers in the fridge, let the Zucchini Noodle Alfredo cool first. Place it in an airtight container. Make sure to seal it well to keep out moisture and air. It will stay fresh for about 3 days. When you are ready to eat, just reheat it gently on the stove or in the microwave. Freezing Zucchini Noodle Alfredo is easy but requires some care. First, store the sauce in a separate container. Zucchini noodles can become mushy when frozen. For best results, freeze only the sauce. When you want to eat it, thaw the sauce in the fridge overnight. Then, sauté fresh zucchini noodles and mix them with the reheated sauce. To know when it’s time to discard your Zucchini Noodle Alfredo, watch for signs of spoilage. If you see mold, a change in color, or an off smell, it’s best to toss it. Proper storage helps extend its shelf life, but always trust your senses. Yes, you can use them. They save time and effort. However, they may lack flavor. Store-bought noodles can also be softer. This can affect the texture of your dish. If you choose this option, look for fresh noodles. They often taste better than frozen ones. You can use several options. Coconut cream is a great dairy-free choice. Silken tofu blended until smooth also works well. For a lighter option, try Greek yogurt or cashew cream. Each will give your dish a unique taste and texture. You can spiralize zucchinis ahead of time. Keep them in the fridge for up to two days. Just remember to salt them lightly. This helps draw out moisture. After salting, pat them dry before cooking. This keeps your noodles from becoming soggy. Zucchini Noodle Alfredo is a simple and tasty dish. You learned about key ingredients, like zucchini, cream, and cheese. I shared steps to make creamy sauce and perfect noodles. Tips help you avoid sogginess and adjust flavors. You can also explore vegan options and add proteins or veggies. This meal is versatile and fun. Enjoy making it your own!

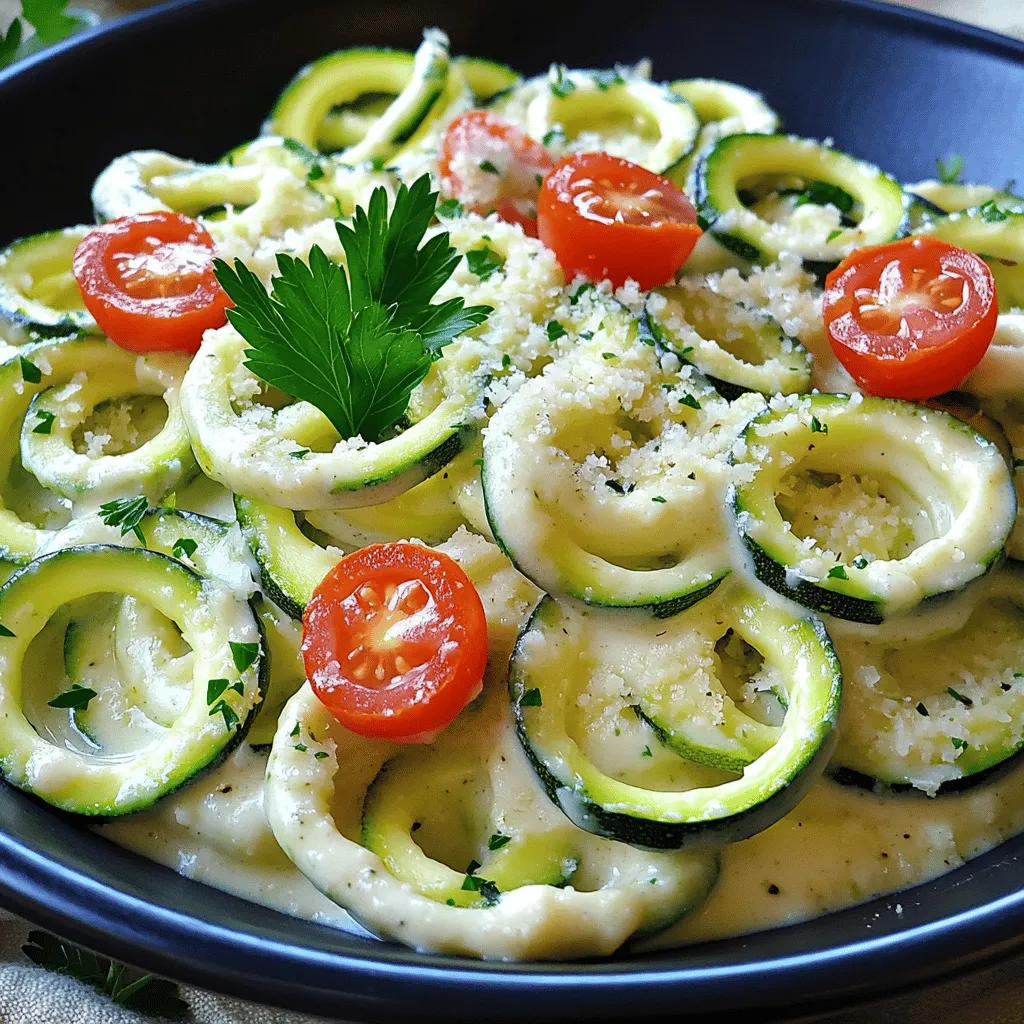
Zucchini Noodle Alfredo Simple and Creamy Dish

If you love creamy pasta but want a healthier twist, you’ve found the perfect recipe! Zucchini Noodle Alfredo is simple

To make these tasty energy balls, you need a few key ingredients. Here’s what you’ll need: - 1 cup rolled oats - 1/2 cup almond butter (or peanut butter) - 1/2 cup canned pumpkin puree - 1/4 cup honey or maple syrup - 1 tablespoon pumpkin spice blend (or a mix of cinnamon, nutmeg, and ginger) - 1/4 teaspoon salt - 1/2 cup ground flaxseed - 1/2 cup chocolate chips or dried cranberries (optional) - 1/4 cup chopped nuts (walnuts or pecans) These ingredients work together to create a delicious and nutritious snack. The oats give you fiber, while the pumpkin adds moisture and flavor. Almond butter provides healthy fats, making these energy balls filling. You can make these energy balls your own by adding extras. Here are some fun options: - Chia seeds for added fiber - Coconut flakes for a tropical twist - Protein powder for an extra boost - Dried fruits like raisins or apricots Mix and match these add-ins to suit your taste. The best part is that you can switch them up each time you make a batch! If you have dietary needs, don’t worry! You can easily swap out some ingredients. Here are a few simple substitutions: - Use sunflower seed butter instead of almond butter for nut-free options. - Maple syrup can replace honey for a vegan recipe. - Rolled oats can be substituted with gluten-free oats if needed. These swaps help you enjoy pumpkin spice energy balls no matter your diet. Just keep the ratios similar so that the texture stays right. For the full recipe, check out the instructions. Enjoy making these easy and tasty treats! To start, gather your ingredients for pumpkin spice energy balls. You need rolled oats, almond butter, pumpkin puree, honey, pumpkin spice, salt, ground flaxseed, chocolate chips (or dried cranberries), and nuts. In a large bowl, combine the rolled oats, almond butter, pumpkin puree, honey, pumpkin spice, and salt. Mix well. You want a smooth blend. Next, add ground flaxseed, chocolate chips, and nuts. Stir until everything is well mixed. Now, it's time to shape the mixture into balls. Use your hands to form small balls, about 1 inch in size. If the mixture feels sticky, dampen your hands with a little water. This will help you roll the balls more easily. Place each ball on a baking sheet lined with parchment paper. Keep them evenly spaced so they don't stick together. After forming the balls, put the baking sheet in the fridge. Let them chill for about 30 minutes. This helps the energy balls firm up. Once chilled, transfer them to an airtight container. You can enjoy them right away, or store them in the fridge for up to a week. They make a great snack anytime! For the full recipe, check out the details above. To stop your mixture from being too sticky, wet your hands. A little water helps you shape the balls easily. If the mix is still sticky, chill it for a bit in the fridge before rolling. This makes it firmer and easier to work with. You can boost the taste of your energy balls in simple ways. Consider adding a splash of vanilla extract for a rich flavor. You can also try mixing in dried fruits like raisins or apricots for a sweet touch. If you love crunch, add chopped nuts or seeds. These extras can really change the taste! Want a healthier snack? Swap out honey for mashed bananas to cut sugar. You can also replace almond butter with unsweetened applesauce for fewer calories. If you are looking to add protein, mix in a scoop of your favorite protein powder. Each change keeps it tasty while making it better for you. Check out the Full Recipe for more ideas! {{image_2}} Pumpkin spice energy balls offer a great mix of nutrients. They are packed with fiber, protein, and healthy fats. The oats and flaxseed provide energy and help digestion. Almond butter adds protein and good fats. Plus, pumpkin puree is low in calories and high in vitamins. These energy balls also make a good snack for busy days. Each energy ball has about 90 calories. This makes them a smart choice for a snack. If you eat two, you get around 180 calories. It’s easy to enjoy these without feeling guilty. You can keep your portions in check while enjoying their tasty flavor. - Rolled oats: Good for heart health and digestion. - Almond butter: Boosts energy and keeps you full longer. - Pumpkin puree: Rich in vitamins A and C, and low in calories. - Flaxseed: Contains omega-3 fats and fiber, great for the heart. - Honey or maple syrup: Natural sweeteners that provide quick energy. These ingredients combine to make a healthful and tasty treat. You can find the full recipe [here] and enjoy making these delicious energy balls at home. You can boost your energy balls by adding protein powder. This makes them ideal for workouts. Just mix in one scoop of your favorite protein powder into the main mix. It blends well with the other ingredients. You still get that great pumpkin flavor. The result is a filling snack that helps with muscle recovery. If you want a quick treat, skip the chilling step. You can enjoy them right after rolling! For flavor twists, try adding a splash of vanilla or almond extract. You can also swap pumpkin spice for chai spice. Each option gives a new taste to your energy balls. Feel free to use dried fruits or seeds for a fun crunch. These energy balls are great for every season. For Halloween, add some chocolate chips for a spooky touch. During Christmas, try a hint of peppermint extract. You can even add some festive sprinkles on top. For spring, mix in some lemon zest for a fresh twist. Each season brings a new flavor, making these energy balls fun all year round. For the full recipe, check out the earlier section. Pumpkin Spice Energy Balls stay fresh for up to one week in the fridge. Store them in an airtight container. If you keep them at room temperature, they may last only a few days. Always check for any signs of spoilage, like an off smell or changed texture. Yes, you can freeze Pumpkin Spice Energy Balls! Place them in a single layer on a baking sheet. Freeze them for about an hour, then transfer to an airtight container. They can last for up to three months in the freezer. Just thaw them in the fridge overnight before eating. Pumpkin spice offers several health benefits. It often contains cinnamon, ginger, and nutmeg. These spices can help with digestion and reduce inflammation. Cinnamon may also help control blood sugar. Plus, pumpkin puree is high in fiber and vitamins. It supports your immune system and keeps your skin healthy. Absolutely! You can use peanut butter, cashew butter, or sunflower seed butter. Each nut butter adds a unique flavor and texture. Just make sure the consistency is similar to almond butter. This ensures the energy balls hold their shape well. For those with nut allergies, sunflower seed butter is a great choice. In this blog post, we explored how to make delicious Pumpkin Spice Energy Balls. We discussed key ingredients and options to customize your recipe. I shared simple steps for mixing, shaping, and storing these treats. You also learned tips for flavor and how to avoid stickiness. We covered nutritional benefits and possible variations to try. Remember, these energy balls are easy to make and fun to enjoy. Experiment with flavors, and make them your own. Enjoy your healthy snack any time of the year!

Pumpkin Spice Energy Balls Tasty and Nutrient-Rich

Are you ready to fuel your day with a tasty treat? Pumpkin Spice Energy Balls are not just delicious; they’re

- 1 lb baby carrots, trimmed - 4 cloves garlic, minced - 3 tablespoons olive oil - 2 teaspoons dried thyme - 1 teaspoon dried rosemary - Salt and pepper to taste - Fresh parsley, chopped (for garnish) Carrots are rich in vitamins. They are a great source of vitamin A. This vitamin helps with eye health and skin. Carrots also have fiber. Fiber aids digestion and keeps you full longer. Garlic has many health perks too. It can boost your immune system. Studies show garlic may lower blood pressure. It also has antioxidants, which can help protect your cells. Herbs like thyme and rosemary add flavor and health benefits. Thyme has antibacterial properties. It can help fight infections. Rosemary may improve digestion and boost memory. Using these herbs adds health and taste to your meals. Using fresh parsley as a garnish adds color and taste. It is also rich in vitamins K and C. These vitamins are great for your bones and skin. For the full recipe, check out the Garlic Herb Roasted Carrots guide. - Preheat your oven to 425°F (220°C). - In a large mixing bowl, combine the trimmed baby carrots with: - 1 lb baby carrots, trimmed - 4 cloves garlic, minced - 3 tablespoons olive oil - 2 teaspoons dried thyme - 1 teaspoon dried rosemary - Salt and pepper to taste Toss the carrots well. Make sure all the carrots are coated in the oil and herbs. This step adds flavor to every bite. Next, arrange the carrots on a baking sheet. Place them in a single layer. This helps them roast evenly. Roast the carrots in the oven for 25-30 minutes. Stir them halfway through for even cooking. You want them to be tender and caramelized. The high heat brings out their natural sweetness. Once the carrots are ready, transfer them to a serving dish. Garnish with chopped fresh parsley for color. These roasted carrots go well with many dishes. They pair nicely with roasted chicken or grilled fish. You can also serve them with a light salad or grain dish. Enjoy this flavorful side dish delight with your favorite meals. To make your Garlic Herb Roasted Carrots shine, focus on caramelization. This sweet, rich flavor comes from the sugars in the carrots. To achieve this, roast at 425°F (220°C). This high heat helps the carrots brown nicely. Next, season your carrots well. Start with olive oil; it brings out their natural taste. Add minced garlic, thyme, and rosemary for depth. Use salt and pepper to enhance these flavors. Toss everything together in a bowl to coat each carrot evenly. One common mistake is overcrowding the baking sheet. When you crowd the carrots, they steam instead of roast. This prevents that lovely caramelization. Make sure to space them out in a single layer. Another mistake is skipping the tossing step. Tossing the carrots halfway through cooking helps them cook evenly. This way, all sides get that perfect golden color. Don’t rush this step; it’s key to great results. For the full recipe, just refer to the complete Garlic Herb Roasted Carrots recipe. {{image_2}} You can play with different types of carrots. Rainbow carrots add color and fun. Regular orange carrots work great too. Each type brings its taste. You can also swap herbs. Try fresh thyme instead of dried. Basil or dill can add new flavors. For spice, consider adding paprika or cumin. These changes can make your dish unique and exciting. Roasting is fantastic, but other methods shine too. Steaming keeps the carrots bright and tender. It is quick and easy. Sautéing with a little oil gives a nice sear. This method adds a different texture. You can also grill carrots for a smoky flavor. Grilling caramelizes the sugars and adds depth. Just toss them in olive oil and herbs before grilling. This will make your Garlic Herb Roasted Carrots even more delightful! To keep your Garlic Herb Roasted Carrots fresh, use airtight containers. Glass or plastic containers work well. Make sure they are sealed tight. Store them in the fridge. They will last for up to four days. If you want to keep them longer, consider freezing. Use freezer-safe bags or containers for best results. When reheating, you want to keep the carrots tasty. The oven is a great choice. Preheat it to 350°F (175°C). Place the carrots on a baking sheet. Heat for about 10 minutes or until warm. This keeps the texture nice and firm. If you prefer a quick method, use the microwave. Place the carrots in a microwave-safe dish. Add a splash of water to keep them moist. Cover the dish with a lid or wrap. Heat in short bursts of 30 seconds. Stir in between to avoid hot spots. To refresh your leftovers, try adding more seasoning. A pinch of salt or fresh herbs can bring them back to life. You can also drizzle a bit of olive oil for added flavor. Enjoy your flavorful side dish delight! Yes, you can make these carrots ahead of time. Roast them and cool fully. Store them in an airtight container in the fridge for up to three days. When you are ready to serve, reheat them in the oven. Just warm them at 350°F (175°C) until heated through. This helps keep their sweet flavor and soft texture. These carrots pair well with many dishes. Try serving them with grilled chicken or baked fish. They also complement quinoa or rice dishes nicely. For a full meal, add a fresh salad with a tangy dressing. The sweet and savory flavors of the carrots will balance well with these options. To make this recipe vegan, simply swap the olive oil with any vegetable oil. You can also use vegan butter instead of oil for a richer taste. All other ingredients are already vegan-friendly. This way, you keep the tasty flavor while catering to vegan diets. For the complete Garlic Herb Roasted Carrots recipe, click [here](#). Roasting baby carrots with garlic and herbs is simple and tasty. We reviewed key ingredients and their health benefits. Then, I shared steps to prepare and roast them perfectly. Use the tips to avoid common mistakes and explore fun variations. Store leftovers properly and reheat to keep their taste. Enjoy these flavorful carrots with various dishes, and don’t forget to try the vegan options. I hope this guide helps you create delicious meals with ease.

Garlic Herb Roasted Carrots Flavorful Side Dish Delight

Looking for a simple yet delicious side dish? Garlic Herb Roasted Carrots are a perfect choice! These vibrant veggies burst

To make these tasty sliders, you need these key ingredients: - 1 cup cooked spinach, squeezed dry and chopped - 1 cup canned artichoke hearts, drained and chopped - 1 cup cream cheese, softened - 1 cup sour cream - 1 cup shredded mozzarella cheese - 1/2 cup grated Parmesan cheese - 1 teaspoon garlic powder - 1 teaspoon onion powder - Salt and pepper to taste - 12 slider buns - Fresh parsley, chopped for garnish These ingredients blend to create a creamy and flavorful filling. The spinach and artichokes add nice texture and taste. The cream cheese and sour cream make it rich and smooth. You can add some fun touches to your sliders. Here are a few ideas: - 1/2 teaspoon red pepper flakes for heat - 1/4 cup diced bell peppers for crunch - 1/4 cup chopped sun-dried tomatoes for sweetness - Different cheeses like cheddar or gouda for extra flavor These options let you make the recipe your own. Feel free to mix and match based on what you like. Having the right tools makes cooking easy. Here’s what you need: - Large mixing bowl - Baking dish - Aluminum foil - Mixing spoon or spatula - Oven mitts Using these tools helps ensure your sliders come out great. They also keep your cooking area neat and tidy. For the best results, gather all your tools before you start. Check out the Full Recipe for more tips and details. Start by gathering all your ingredients. You will need: - 1 cup cooked spinach, squeezed dry and chopped - 1 cup canned artichoke hearts, drained and chopped - 1 cup cream cheese, softened - 1 cup sour cream - 1 cup shredded mozzarella cheese - 1/2 cup grated Parmesan cheese - 1 teaspoon garlic powder - 1 teaspoon onion powder - Salt and pepper to taste - 12 slider buns - Fresh parsley, chopped for garnish First, cook the spinach and let it cool. Drain the artichoke hearts well. In a large bowl, mix the spinach, artichokes, and all other ingredients until creamy and smooth. Make sure there are no lumps. This creamy mix is the heart of your sliders. Now, slice the slider buns in half. Place the bottom halves in a large baking dish. Spread the spinach artichoke mix over the buns. Use a generous amount to ensure every bite is full of flavor. Next, place the top halves of the buns over the mixture. Gently press them down to help the filling stick. If you want, brush a little olive oil on top. This gives the buns a nice color and flavor. Preheat your oven to 350°F (175°C). Cover the baking dish with aluminum foil. Bake for 15 minutes to warm the sliders through. After 15 minutes, remove the foil. Bake for another 10 to 15 minutes. Look for a golden brown color on the tops. Once they are crispy, take them out. Let them cool for a few minutes. Garnish with chopped fresh parsley before serving. This adds a bright touch to your sliders. For the full recipe, check the earlier section. Enjoy your tasty Spinach Artichoke Dip Sliders! To make the best spinach artichoke mixture, start with fresh ingredients. Use cooked spinach that is squeezed dry. This step removes excess water. Use canned artichoke hearts for ease, but drain them well. Mix these with cream cheese and sour cream for a creamy base. Add shredded mozzarella and grated Parmesan for rich flavor. Don't forget garlic powder and onion powder for that extra kick. Season with salt and pepper to taste. Mix until the texture is smooth and thick. This will create a great filling for your sliders. To keep slider buns crispy, choose fresh ones. Slice the buns in half, but don’t pull them apart completely. This keeps them together during baking. Place the bottom halves in a baking dish. Spread the spinach artichoke mix generously on each bun. Brush the tops with a little olive oil before baking. This adds flavor and helps them crisp. Cover the dish with foil while baking. Uncover it in the last part of baking to brown the tops. This method gives you delicious, crispy sliders. These sliders pair well with many sides. Serve them with a fresh salad for a light meal. Try adding crunchy veggies for a colorful plate. Dips like ranch or marinara can add flavor. For drinks, serve a light soda or iced tea. If you want more fun, try a fruity cocktail. These sliders shine at parties, so think about using a platter. Garnish with fresh parsley for color and flair. You can find the full recipe in the link above. {{image_2}} If you want to keep it vegetarian, use plant-based cream cheese. This swap keeps the creaminess but cuts out dairy. You can also add in more veggies like bell peppers or mushrooms. These add flavor and color. You can try using a mix of fresh herbs too. Fresh basil or cilantro can brighten the dish. To make this dish gluten-free, swap the slider buns for gluten-free ones. Many stores offer tasty gluten-free buns now. You could also use large lettuce leaves. They can hold the filling well for a low-carb option. Just make sure all other ingredients are gluten-free too. Want to jazz it up? Add diced jalapeños for spice. You can mix in sun-dried tomatoes for a sweet tang. If you love a smoky flavor, try adding smoked paprika. Changing the cheese is another option. Use sharp cheddar or pepper jack for a new twist. You can find the full recipe to explore all these ideas. After you enjoy your spinach artichoke dip sliders, store any extras right away. Place the sliders in an airtight container. This keeps them fresh and tasty. You can keep them in the fridge for up to three days. Make sure to cool them to room temperature before sealing. To reheat sliders, use your oven for the best taste. Preheat your oven to 350°F (175°C). Place the sliders on a baking sheet. Heat them for about 10 to 15 minutes. This helps the bread stay crispy and warms the filling. You can also use a microwave, but the texture may not be as good. If you use the microwave, heat them in short bursts to avoid sogginess. Want to save some sliders for later? You can freeze them! Wrap each slider in plastic wrap. Then, place them in a freezer bag. This keeps them fresh for up to three months. When you want to eat them, thaw in the fridge overnight. Reheat them in the oven for the best results. This way, you can enjoy your spinach artichoke dip sliders any time! You can use Greek yogurt. It adds creaminess and tang. Cottage cheese is another option. Just blend it until smooth. Both will keep the dip tasty and rich. Add crushed red pepper flakes to the mixture. A dash of hot sauce also works well. You can even mix in jalapeños for a kick. Adjust the spice to your taste. Yes, you can use fresh spinach. Just cook it down first to remove excess water. Squeeze it dry after cooking. This keeps the sliders from getting soggy. Leftovers can last about 3-4 days in the fridge. Store them in an airtight container. Make sure they are cool before sealing. This helps maintain freshness. Absolutely! You can prepare the mixture and store it in the fridge. Assemble the sliders just before baking. This saves time and keeps them fresh. Check out the Full Recipe for more details. We explored how to make tasty spinach artichoke dip sliders together. I shared key ingredients, step-by-step instructions, and helpful tips. You learned about cooking options like vegetarian and gluten-free variations. Remember, store leftovers properly to keep them fresh. Enjoy making these sliders for your next gathering. They’re sure to impress! Keep experimenting with flavors until you find your favorite mix. Happy cooking!

Spinach Artichoke Dip Sliders Savory and Simple Recipe

Are you ready to take your snack game to the next level? These Spinach Artichoke Dip Sliders combine rich, creamy

To make Parmesan Crusted Asparagus Fries, you will need these main ingredients: - 1 lb fresh asparagus, trimmed - 1 cup all-purpose flour - 1/2 cup grated Parmesan cheese - 1 cup breadcrumbs Next, gather these seasonings and other ingredients to enhance the flavor: - 1 teaspoon garlic powder - 2 large eggs - Olive oil spray or a drizzle of olive oil For added taste, consider these optional ingredients for dipping: - Marinara sauce - Creamy dipping sauce These ingredients create a crunchy and cheesy coating on the asparagus. You will enjoy the mix of flavors and textures. Trust me, the crispy fries will impress your family and friends! For the full recipe, explore the details that lead you to perfect these fries. 1. Preheat your oven to 425°F (220°C). This high heat helps make the fries crispy. 2. Line a baking sheet with parchment paper. This makes cleanup easy and helps the fries cook evenly. 3. Set up your ingredient stations. You need three bowls: one for flour, one for eggs, and one for breadcrumbs mixed with Parmesan and spices. 1. Take your fresh asparagus and dip each spear into the flour. Make sure to coat it lightly. 2. Shake off any excess flour. This step helps the egg stick better. 3. Next, dip the floured asparagus into the beaten eggs. Let any excess egg drip off. 4. Finally, roll the asparagus in the breadcrumb mixture. Press gently to ensure a good coat. 5. Place the coated asparagus fries on the prepared baking sheet in a single layer. This helps them cook evenly. 1. Bake the asparagus fries in the preheated oven for 12-15 minutes. Look for a golden brown color and crisp texture. 2. Turn them halfway through baking for even cooking. 3. For extra crispiness, lightly spray or drizzle the fries with olive oil before baking. 4. Once done, take them out of the oven and let them cool slightly. These steps will lead you to crispy and delicious Parmesan crusted asparagus fries! For a full recipe, you can check the complete details above. To make your Parmesan crusted asparagus fries crispy, oil is key. Use olive oil spray or drizzle olive oil over the fries. This helps the coating crisp up in the oven. Without oil, your fries may turn out soggy. Next, ensure you place the fries in a single layer on the baking sheet. Crowding them can trap steam, leading to sogginess. Turn the fries halfway through baking. This allows all sides to get that nice golden color. These fries taste amazing with dips. Marinara sauce is a classic choice. It adds a nice tangy flavor. You could also try a creamy dipping sauce for richness. Garnishing makes your dish look even better. Add extra grated Parmesan on top. A sprinkle of chopped parsley adds a pop of green and freshness. For baking, use a sturdy baking sheet. A heavy one helps distribute heat evenly. Line it with parchment paper. This makes cleanup easy and prevents sticking. You will need mixing bowls for the coating process. A shallow bowl for the flour works well. Have a separate bowl for the eggs and another for the breadcrumb mix. This setup keeps things organized and efficient. For the full recipe, refer to the earlier section. Enjoy crafting these crispy treats! {{image_2}} You can make Parmesan crusted asparagus fries exciting by changing the flavors. Adding spices like cayenne pepper gives a nice kick. Italian herbs like oregano and basil also work great. These spices can enhance the taste and make your fries more fun. You can also try using different cheeses. If you want a stronger flavor, use aged cheddar or Gruyère. Each cheese will bring its unique twist to the dish. If you need gluten-free options, substitute all-purpose flour with almond flour or a gluten-free blend. For the breadcrumbs, look for gluten-free versions or crush some gluten-free crackers. These small changes keep the recipe safe for everyone. To make a vegan version, replace eggs with flax eggs. Just mix one tablespoon of ground flaxseed with three tablespoons of water. Let it sit for a few minutes until it thickens. This will help your coating stick without using eggs. You can turn these fries into a salad topping. Just chop them into small pieces and sprinkle over fresh greens. They add crunch and flavor to your salad. Another fun idea is to use them in wraps. Just layer the fries with your favorite veggies and spreads. This makes for a tasty and healthy meal. For the full recipe, check out the detailed instructions above! To keep your Parmesan crusted asparagus fries fresh, use proper containers. Place the fries in an airtight container. Let them cool completely before sealing. This helps prevent sogginess. Store the container in the fridge. They will stay good for about 2 to 3 days. When you want to enjoy the leftovers, reheating is key. The best method is using the oven. Preheat your oven to 375°F (190°C). Spread the fries on a baking sheet. Bake for about 10 minutes. This helps restore the crispiness. Avoid using the microwave, as it makes them soft. If you want to save some fries for later, freezing works well. First, let the fries cool completely. Then, place them in a single layer on a baking sheet. Freeze them for about 1 to 2 hours. After that, transfer the frozen fries to a freezer-safe bag. This helps keep them fresh. When ready to eat, thaw them in the fridge overnight before reheating. To keep your asparagus crispy, oil is key. Use olive oil spray or a light drizzle. This helps create a crunchy texture. Place each asparagus fry in a single layer on the baking sheet. Avoid crowding them. This ensures hot air circulates around each fry. Bake at 425°F (220°C) for 12-15 minutes. Turn them halfway through to get an even crisp. Let them cool slightly before serving. This will help them stay crunchy. Yes, you can prep these asparagus fries ahead of time. Coat the asparagus in flour, eggs, and breadcrumbs. Then, place them on a baking sheet. Cover with plastic wrap and store in the fridge for up to two hours. When you are ready to bake, just pop them in the oven without thawing. This will save you time when guests arrive. These asparagus fries pair well with a few dips. Marinara sauce is a classic choice. Creamy ranch or garlic aioli also works great. You can add a sprinkle of extra Parmesan on top for flavor. Serve them with a fresh salad for a complete meal. You can find more ideas in the Full Recipe. This blog post guides you on making delicious Parmesan Crusted Asparagus Fries. It covers key ingredients like fresh asparagus, Parmesan cheese, and garlic powder. You learned how to coat and bake asparagus for the perfect crispiness. I shared tips for serving and variations you can try. Proper storage and reheating methods maintain their freshness. Remember, you can mix flavors and adapt recipes to fit your needs. Enjoy creating this tasty dish, and impress your friends and family with your skills!

Parmesan Crusted Asparagus Fries Crispy and Delicious

Are you ready for a snack that’s both tasty and healthy? Let’s make Parmesan Crusted Asparagus Fries! These crispy treats

To make S'mores Dessert Nachos, gather these ingredients: - 1 large flour tortilla: This acts as the base. You can use a whole wheat tortilla for a healthier option. - 1 tablespoon butter, melted: This helps the tortilla crisp up nicely in the oven. You can replace it with coconut oil for a dairy-free choice. - 1 cup mini marshmallows: These create that classic s'mores flavor. If you want a vegan option, choose vegan marshmallows. - 1/2 cup chocolate chips: Use semi-sweet or milk chocolate for rich flavor. Dark chocolate is also a great choice for a more intense taste. - 1/4 cup crushed graham crackers: This adds crunch and that s'mores vibe. You can swap this with crushed cookies for a twist. - 1/4 cup caramel sauce (optional): This gives a sweet, gooey touch. You can skip it if you prefer a lighter treat. - Fresh strawberries or banana slices: Use these for garnish. They add color and freshness. You can also use other fruits like raspberries or kiwi. With these ingredients, you're ready to whip up a fun and tasty treat! If you're curious about the full recipe, check out the section above. 1. Preheat the oven and prepare the tortilla First, set your oven to 350°F (175°C). While it heats, take one large flour tortilla and brush one side with melted butter. This helps the tortilla get nice and crispy. Place the tortilla on a baking sheet, butter side up. 2. Baking the tortilla for crispiness Bake the tortilla for about 5 minutes. You want it to start turning golden. This step makes it crunchy and ready for toppings. 1. Layering chocolate and marshmallows Once the tortilla is baked, sprinkle 1/2 cup of chocolate chips evenly over the surface. Then, add 1 cup of mini marshmallows on top of the chocolate. The heat will melt the chocolate and fluff up the marshmallows. 2. Final baking for the perfect finish Return the baking sheet to the oven. Bake for another 3-5 minutes. Watch the marshmallows closely. They should be fluffy and golden brown. Lastly, let the nachos cool a bit. If you like, drizzle with caramel sauce and sprinkle 1/4 cup of crushed graham crackers on top. Slice into wedges and serve warm. For the full recipe, check out the details above. Enjoy making these delicious S’mores Dessert Nachos! To make your tortilla crispy, brush it with melted butter. Bake it until golden, about five minutes. This step helps the tortilla stay crunchy under the toppings. If you want extra crispiness, bake it a bit longer. For golden, fluffy marshmallows, watch them closely. Once you add them, bake for three to five minutes. They should puff up and turn brown. Keep an eye on them to avoid burning. For a fun look, arrange the nachos in a bright bowl. Drizzle some extra caramel sauce on top. Add a side of whipped cream for dipping. Fresh fruits like strawberries or banana slices make a nice touch. You can also sprinkle more crushed graham crackers for added texture. For a festive feel, use colorful plates or napkins. Serve these tasty nachos at parties or family gatherings. They are sure to impress your guests! For the complete recipe, refer to the Full Recipe section. {{image_2}} You can switch up the flavors in your S’mores Dessert Nachos. Try different types of chocolate for unique twists. Dark chocolate offers a rich taste. White chocolate adds a sweet creaminess. You can even mix them for a fun flavor blend. Adding extra toppings makes each bite special. Nuts like walnuts or pecans give a nice crunch. Fresh fruits like bananas or raspberries add a fruity touch. You can get creative with toppings. Just remember to balance the sweet with the savory. For those who need gluten-free options, use a gluten-free tortilla. This way, everyone can enjoy the treat. Just check the labels to be sure. If you want vegan alternatives, switch out the butter for coconut oil. Use dairy-free chocolate chips and skip the caramel sauce. You can still have a delicious dessert that fits your diet. Feel free to explore these variations and make the recipe your own. Check out the Full Recipe for more details on making these tasty nachos! To store your S’mores Dessert Nachos, keep them in an airtight container. This helps keep the flavors fresh. You can place parchment paper between layers to stop sticking. They will stay good in the fridge for up to two days. After this time, they may lose texture and flavor. When reheating, use the oven for best results. Preheat it to 350°F (175°C). Place the nachos on a baking sheet for even heat. Heat for about 5 to 7 minutes. This keeps the tortilla crispy and the marshmallows fluffy. Avoid using the microwave, as it can make the nachos soggy. Always check the nachos to make sure they are warm throughout. Enjoy your tasty treat again! How do I make S’mores Dessert Nachos without an oven? You can make these nachos on a stovetop. Just heat a skillet over medium heat. Place the buttered tortilla in the skillet. Cook for about 2-3 minutes until it gets crispy. Then, add chocolate chips and mini marshmallows. Cover with a lid for a few minutes. This helps the marshmallows melt and get fluffy. Can I prep these nachos in advance? Yes, you can prep some parts ahead of time. You can slice fruits and crush graham crackers a few hours before serving. Keep them in separate containers in the fridge. Assemble the nachos right before serving for the best taste and texture. What can I use as a chocolate substitute? If you want to skip chocolate, try using peanut butter or Nutella. You can also use caramel sauce for a sweeter flavor. Just make sure to adjust the amount to keep the balance. What is the best way to serve these nachos? Serve the nachos warm. Place them in a colorful bowl for a fun look. Drizzle extra caramel on top for a sweet touch. You can add whipped cream on the side for dipping. It makes the dish even more fun! Can I customize toppings for different preferences? Absolutely! You can change the toppings to fit your taste. Add sliced bananas or berries for a fruity twist. You can even sprinkle nuts for crunch. Just make it your own and have fun with it! In this article, we explored how to create delicious S’mores Dessert Nachos. We covered the essential ingredients, step-by-step preparation, and assembly methods. You learned helpful tips to perfect your dish, as well as fun variations and storage tips. Making these nachos is easy, and you can tweak them to suit your tastes. Enjoy experimenting with different flavors. Whether for a party or a treat, these nachos will impress everyone. Get ready for a tasty dessert adventure everyone will love!

S’mores Dessert Nachos Tasty and Fun Treat Idea

Get ready for a treat like no other with my S’mores Dessert Nachos! This fun dessert combines crispy tortillas, melty

- 2 cups rolled oats - 1/2 cup chopped pecans - 1/4 cup maple syrup - 1/2 cup almond milk - 1/2 cup unsweetened applesauce The main ingredients create the base of this dish. Rolled oats give this baked oatmeal its hearty texture. Chopped pecans add a nice crunch and rich flavor. Maple syrup serves as a natural sweetener, making each bite delightful. Unsweetened applesauce keeps it moist and adds a hint of fruitiness. Almond milk adds creaminess without overpowering the taste. - 2 large eggs - 1 teaspoon vanilla extract - 1 teaspoon baking powder - 1/2 teaspoon cinnamon - 1/4 teaspoon salt The additional ingredients are key for texture and taste. Eggs act as a binder, helping the oatmeal hold together. Vanilla extract brings warmth and depth to the flavor. Baking powder gives the dish a fluffy rise. Cinnamon adds a comforting spice, while salt enhances all the flavors. - Fresh fruit (e.g., sliced bananas, berries) - Additional maple syrup Toppings can elevate your baked oatmeal. Fresh fruit adds color and freshness. Sliced bananas or berries pair well with the maple and pecans. A drizzle of maple syrup on top gives extra sweetness. You can get creative with your toppings based on what you enjoy. For the full recipe and all the steps to make this tasty morning delight, check out the [Full Recipe]. - Preheat your oven to 350°F (175°C). - Lightly grease an 8x8-inch baking dish. - In a large bowl, mix together the rolled oats, chopped pecans, baking powder, cinnamon, and salt. Stir until everything is well blended. - In another bowl, whisk together the almond milk, maple syrup, applesauce, eggs, and vanilla extract. Mix until smooth. - Pour the wet mix into the bowl with the dry mix. Stir until everything is nicely combined. - Transfer the mixture to your prepared baking dish. Spread it evenly across the dish. - Bake in the preheated oven for 25-30 minutes. You want the top to be golden and the oatmeal set. - Once done, take it out and let it cool for a few minutes. Cut into squares and serve warm. - Top with fresh fruit and a drizzle of more maple syrup if you'd like. To get your baked oatmeal just right, pay close attention to the baking time. If you like a softer texture, bake it for about 25 minutes. For a firmer texture, let it bake for up to 30 minutes. Keep an eye on it as it cooks. Mixing is key to great flavor. Combine the dry and wet ingredients well. You want every bite to be full of taste. If you skip this step, some parts may turn out bland. You can make this dish your own by swapping nuts or fruits. Try walnuts or almonds instead of pecans. You can also add dried fruits like cranberries or raisins for a chewy texture. Adjust the sweetness to your liking. If you prefer a sweeter taste, add more maple syrup. For a less sweet dish, cut back on the syrup. You can even add spices like nutmeg for a new flavor twist. This baked oatmeal pairs well with yogurt or milk. A dollop of yogurt adds creaminess. Pouring milk over it makes each bite more enjoyable. Serve it warm for breakfast or brunch. It’s great for gatherings, as everyone loves a tasty and healthy option. Top with fresh fruit or a drizzle of maple syrup for extra flair. Check out the Full Recipe for more ideas! {{image_2}} Dietary adjustments can make Maple Pecan Baked Oatmeal fit many diets. For a vegan option, swap eggs with flaxseed meal or chia seeds. Use 1 tablespoon of either mixed with 2.5 tablespoons of water per egg. This mix binds well and keeps the dish moist. For a gluten-free version, select certified gluten-free oats. This makes the dish safe for those with gluten allergies. Flavor variations can elevate your oatmeal experience. Try adding spices like nutmeg or ginger for a warm kick. Just a pinch can transform the taste. You might also want to mix in chocolate chips or dried fruits like raisins or cranberries. These additions bring sweetness and a fun texture. Creative serving suggestions make your oatmeal even more delightful. You can turn it into overnight oats by soaking the baked oatmeal in milk overnight. This gives it a creamy texture. Another idea is to layer it into a parfait. Alternate layers of baked oatmeal with yogurt and fresh fruit. This adds a beautiful touch and makes breakfast feel special. For the full recipe, check the original instructions above. After enjoying your Maple Pecan Baked Oatmeal, you may have some leftovers. To keep them fresh, store the oatmeal in an airtight container. Place it in the fridge, and it will last for about five days. When you are ready to enjoy it again, you can reheat it. Just scoop out a portion, place it in a microwave-safe bowl, and heat it for about one minute. Stir and check the temperature. If it’s not warm enough, heat it for another 30 seconds. If you want to save some for later, you can freeze the baked oatmeal. First, let it cool completely. Then, cut it into squares and wrap each piece tightly in plastic wrap. Place the wrapped squares in a freezer bag or container. This way, they will last up to three months in the freezer. When you want to eat it, take a square out and let it thaw in the fridge overnight. For a quick option, you can microwave it straight from the freezer. Heat for two to three minutes, checking often to avoid overcooking. For best taste, eat your Maple Pecan Baked Oatmeal within five days if stored in the fridge. If frozen, aim to eat it within three months. To spot spoilage, look for changes in smell or texture. If it smells sour or has a slimy feel, throw it out. Enjoy your oatmeal fresh for the best flavor! To check if your baked oatmeal is done, look for a golden top. The edges should be set, and the middle should not jiggle. A toothpick inserted in the center should come out clean. This means the oats have cooked through. Yes, you can prepare this dish ahead. Mix the dry and wet ingredients separately. Store them in the fridge overnight. In the morning, combine them and bake. You can also bake it in advance. Let it cool and store it in an airtight container. Just reheat it in the oven or microwave when you're ready to enjoy. Absolutely! To adjust the serving size, you can scale the ingredients. For half the recipe, use 1 cup of oats and 1/4 cup of syrup. For double, use 4 cups of oats and 1 cup of syrup. Make sure to keep the ratio of wet to dry ingredients the same for the best results. You can find the full recipe in the earlier sections. Maple pecan baked oatmeal is a tasty, easy dish to make. We covered key ingredients, like oats and maple syrup, and explored step-by-step instructions. You learned tips for perfect oatmeal and customization ideas to suit your taste. Plus, you now know how to store leftovers and modify the recipe for different sizes. Enjoy making this treat for breakfast or brunch. With simple steps and fun options, this dish can become a favorite staple in your home. Dive in and let your creativity shine!

Maple Pecan Baked Oatmeal Tasty Morning Delight

Are you ready for a sweet start to your day? Maple Pecan Baked Oatmeal is a tasty treat that combines

- 1 cup sushi rice - 1 1/4 cups water - 2 tablespoons rice vinegar - 1 tablespoon sugar - 1/2 teaspoon salt - 1 medium cucumber, julienned - 1 medium carrot, julienned - 1 ripe avocado, sliced - 1/2 cup edamame, shelled - 1 small radish, thinly sliced These ingredients form the base of your veggie sushi bowls. Sushi rice is key for that perfect sticky texture. Fresh vegetables bring bright colors and crunch. The rice vinegar, sugar, and salt balance the flavors beautifully. - 2 sheets nori, cut into strips - 2 tablespoons sesame seeds - Soy sauce, for drizzling - Pickled ginger (optional) Adding nori sheets gives a fun twist. Sesame seeds add a nice crunch and nutty flavor. Soy sauce and pickled ginger enhance the dish, making it more authentic. - Makes 2 servings - Tips for scaling the recipe This recipe makes two hearty bowls. If you want to serve more, just double the ingredients. You can mix and match veggies based on what you have. This flexibility makes it easy to enjoy sushi bowls anytime. For the full recipe, check out [Full Recipe]. To make sushi rice, start by rinsing it. Put the rice in a bowl and cover it with cold water. Swirl the rice gently and drain the water. Repeat this until the water runs clear. This step removes excess starch. Next, cook the rice. In a medium saucepan, combine the rinsed rice and 1 1/4 cups of water. Bring it to a boil over medium heat. After it boils, lower the heat, cover, and let it simmer for 20 minutes. The rice should absorb all the water. While the rice cooks, mix the seasoning. In a small saucepan, combine 2 tablespoons of rice vinegar, 1 tablespoon of sugar, and 1/2 teaspoon of salt. Heat it over low heat until the sugar and salt dissolve. Let this mixture cool. Once the rice is cooked, fluff it with a fork. Drizzle the vinegar mixture over the rice and gently fold it in. Be careful not to mash the rice. Allow it to cool to room temperature. Now, it's time to build your veggie sushi bowl. Start with a generous scoop of sushi rice as the base. Next, arrange your veggies on top. Add julienned cucumber, carrot, sliced avocado, shelled edamame, and thinly sliced radish. Make it colorful and appealing! For added texture, sprinkle 2 tablespoons of sesame seeds on top. Also, place strips of nori around the bowl. This adds flavor and makes it look great. To finish, add sauces and garnishes. Drizzle soy sauce over the bowl. If you like, you can add pickled ginger on the side for extra flavor. When serving, remember that these bowls are best fresh. Enjoy your easy veggie sushi bowls with friends or family! To make great sushi rice, avoid overcooking it. Use the right water ratio. Too much water makes it mushy. Too little makes it hard. So, always measure carefully. Rinse the rice well to remove excess starch. This step helps the rice stick together without being gummy. To fluff sushi rice, use a fork. Gently stir it after cooking. Be careful not to mash it. Drizzle the vinegar mix over the rice while fluffing. This adds flavor and gives it a nice shine. Julienning veggies is easy with a sharp knife. Cut your cucumber and carrot into thin strips. This makes them easy to eat and pretty to look at. You can also use a julienne peeler for quick work. For sushi bowls, choose fresh, colorful vegetables. Cucumber adds crunch. Avocado gives creaminess. Edamame adds protein. Radishes add a peppery taste. Mix textures and colors for a beautiful bowl. Toppings can make your sushi bowl pop. Try adding sesame seeds for crunch. You can also add sliced green onions for a fresh taste. Seaweed strips give a nice umami flavor. To balance flavors, think about sweet and salty. Use soy sauce to add saltiness. If you want sweetness, add a bit of sugar or pickled ginger. This will make every bite exciting! {{image_2}} You can change the vegetables based on what you have or what is fresh. Try adding bell peppers, zucchini, or radishes for a fun twist. Seasonal veggies like asparagus or snap peas can bring new flavors. If you want more protein, add tofu or tempeh. Just pan-fry them until they are golden. You can also try marinating them for extra taste. Soy sauce is classic, but you can explore other sauces too. Try a spicy mayo made from mayo and sriracha. A sesame dressing adds a nutty flavor. For something sweet, mix honey with rice vinegar. You can also try a tangy ponzu sauce for brightness. Each sauce can change the whole vibe of your bowl! Think outside the box for your sushi bowls. You might create a Mexican-inspired bowl with black beans and avocado. Or go Italian with basil, tomatoes, and mozzarella. You can even have a themed sushi night! Set up a bar with various toppings and let everyone build their own bowl. It’s fun and creative, making dinner a special event. Check out the Full Recipe for more ideas! To store leftover veggie sushi bowls, place them in an airtight container. Keep the rice and veggies separate if you can. This helps keep everything fresh. If you store them together, the rice can make the veggies soggy. Use the bowls within three days for the best taste. You do not need to reheat sushi rice. Serving it cold or room temperature is best. To keep your veggies fresh, eat them raw. If you need to warm them, use a quick steam method. This helps them stay crisp and bright. You can freeze sushi bowls, but it's best to freeze rice and veggies separately. Sushi rice can freeze well. Just make sure it's cooled first. For veggies, blanch them before freezing to keep their color and taste. Avoid freezing avocado, as it does not thaw well. To make sushi rice, first rinse one cup of sushi rice under cold water. Keep rinsing until the water runs clear. This step removes extra starch. Next, add the rinsed rice and 1 ¼ cups of water to a medium saucepan. Bring it to a boil over medium heat. Once boiling, reduce the heat to low, cover, and simmer for 20 minutes. Check that the water has absorbed fully. After cooking, fluff the rice with a fork. In a small saucepan, mix 2 tablespoons of rice vinegar, 1 tablespoon of sugar, and ½ teaspoon of salt. Heat this until dissolved, then let it cool. Drizzle the mixture over the rice and fold gently. Let it cool to room temperature before using it in your bowls. Yes, you can use brown rice, but the texture is different. Brown rice has a nutty flavor and chewy texture. It takes longer to cook than white sushi rice. This can change the cooking time and water ratio. Brown rice also has more fiber and nutrients. If you prefer a softer texture, stick with sushi rice for this recipe. If you don’t have nori, try using lettuce leaves or rice paper. They add a nice crunch and fresh flavor. You can also use thin slices of cucumber for a fun twist. For a unique option, try using seaweed snacks. They have a similar taste and can work well in veggie sushi bowls. Veggie sushi bowls last about 2 to 3 days in the fridge. Store them in an airtight container to keep them fresh. To avoid soggy veggies, store the rice and toppings separately if possible. Always check for freshness before eating. If anything looks or smells off, it’s best to throw it away. This blog post covered how to make delicious veggie sushi bowls. You learned about the main ingredients, like sushi rice and fresh veggies. We walked through step-by-step instructions for cooking rice and assembling bowls. Tips for perfect sushi rice and variations helped enhance your dish. Now, you can enjoy customizing your sushi bowls. Use seasonal veggies or creative sauces to make each meal unique. Remember to store leftovers properly so you can savor them later. Enjoy the fun of sushi-making!

Easy Veggie Sushi Bowls Quick and Healthy Recipe

Looking for a fun and healthy meal? My easy veggie sushi bowls are the perfect solution! Packed with fresh veggies

To make delicious Buffalo Chicken Stuffed Peppers, you will need the following items: - 4 large bell peppers (any color) - 2 cups cooked chicken, shredded - 1/2 cup buffalo sauce (adjust to taste) - 1/2 cup cream cheese, softened - 1 cup shredded cheddar cheese, divided - 1/2 cup Greek yogurt or sour cream - 1/4 cup chopped green onions - Celery salt, to taste - Pepper, to taste - Fresh parsley, for garnish These ingredients come together to create a tasty meal that everyone will love. If you have dietary needs, you can easily swap some ingredients. Here are a few ideas: - For a dairy-free option, use vegan cream cheese and cheese. - If you want to make it lighter, use shredded turkey instead of chicken. - You can replace Greek yogurt with dairy-free sour cream or omit it altogether. - For those who like less spice, use a mild sauce or barbecue sauce. These substitutions help you tailor the dish to your needs without losing flavor. Choosing the right bell peppers can enhance your dish. Here are some tips: - Look for firm peppers without soft spots or blemishes. - Choose peppers that feel heavy for their size; this means they are fresh. - Bright colors usually indicate better flavor, so pick red, yellow, or orange peppers. - If you can, smell the peppers; a fresh scent means they are ripe. Selecting the best bell peppers makes your stuffed peppers even more delicious. 1. First, preheat your oven to 375°F (190°C). 2. Take the bell peppers and slice the tops off. Remove the seeds and set the tops aside. 3. In a big bowl, mix shredded chicken, buffalo sauce, and softened cream cheese. 4. Add half of the shredded cheddar cheese, Greek yogurt, and green onions. Stir well. 5. Season the mix with celery salt and pepper to fit your taste. 6. Stuff each pepper with the buffalo chicken mix. Pack it tightly. 7. Place the stuffed peppers in a baking dish, standing upright. If needed, cut a little off the bottom. 8. Top each pepper with the other half of the cheddar cheese. 9. Cover the dish with foil and bake for 25 minutes. 10. Remove the foil and bake for 10-15 more minutes. Wait until the cheese is golden. 11. Let the peppers cool for a few minutes before adding fresh parsley on top. - Prep Time: 15 minutes - Total Time: 55 minutes Serve your stuffed peppers on a bright platter. Add extra green onions on top for color. You can also offer extra buffalo sauce or Greek yogurt on the side for dipping. For the full recipe, check out the details above. Enjoy your meal! To make the best stuffed peppers, start with fresh bell peppers. Choose firm ones without soft spots. Cut the tops off and remove the seeds. This step helps them cook evenly. When you stuff them, pack the filling tightly. This way, every bite is full of flavor. One common mistake is overcooking the peppers. Keep an eye on them while baking. If they get too soft, they may fall apart. Also, be sure to not skip seasoning. A little celery salt and pepper make a big difference. Make sure to taste the filling before stuffing. Adjust the buffalo sauce for your heat preference. To add more flavor, consider these tips. Mix in extra spices like garlic powder or onion powder. You can also add chopped jalapeños for heat. A splash of lime or lemon juice brightens the dish. Try drizzling extra buffalo sauce on top before serving. This adds a nice kick and looks great too. For the full recipe, check the detailed instructions. {{image_2}} You can easily make a vegetarian version of buffalo chicken stuffed peppers. Swap the chicken for chickpeas or cauliflower. Both options add great texture and flavor. Use the same buffalo sauce to keep the spicy kick. Cream cheese can be replaced with ricotta or a vegan cream cheese. This keeps the filling creamy and delicious. For a low-carb take, skip the peppers and use zucchini or eggplant instead. They have fewer carbs and soak up flavors well. You can still use the buffalo chicken mixture. Just hollow out the zucchini or eggplant and fill them up. This way, you enjoy the same great taste while staying on track with your diet. Don't be afraid to get creative with flavors! Try adding different cheeses like blue cheese or pepper jack for a twist. You can also mix in ingredients like black beans or corn for added texture. Experiment with spices, too. A little cumin or smoked paprika can change the whole dish. The beauty of stuffed peppers is their versatility. For the full recipe and cooking instructions, check out the [Full Recipe]. After you enjoy your buffalo chicken stuffed peppers, store any leftovers in a tight container. Place them in the fridge for up to three days. Make sure to let them cool down first. This keeps them fresh and tasty for your next meal. If you want to save stuffed peppers for later, freezing is a great option. Wrap each stuffed pepper in plastic wrap. Then, place them in a freezer-safe bag or container. Make sure to remove as much air as possible. You can freeze them for up to three months. When you're ready to eat, just thaw them in the fridge overnight. To reheat your stuffed peppers, preheat the oven to 350°F (175°C). Place the peppers in an oven-safe dish. Cover with foil to keep them moist. Heat for about 20-25 minutes until warm. You can also microwave them for faster results. Just place a pepper on a microwave-safe plate and heat for about 2-3 minutes. Enjoy your meal as if it was fresh from the oven! To make buffalo chicken stuffed peppers, first, gather your ingredients. You will need bell peppers, cooked chicken, buffalo sauce, cream cheese, cheddar cheese, Greek yogurt, and green onions. Preheat your oven to 375°F (190°C). Cut the tops off the bell peppers and clean out the seeds. In a bowl, mix shredded chicken, buffalo sauce, cream cheese, half the cheddar cheese, Greek yogurt, and green onions. Add celery salt and pepper to taste. Stuff the mixture into the peppers, top with cheese, and bake for 25 minutes covered, then 10-15 minutes uncovered. For the full recipe, check the earlier section. Yes, you can use various sauces. If you want a milder flavor, try barbecue sauce or ranch dressing. For a spicy kick, use a hot sauce like Sriracha or a spicy habanero sauce. You can also try teriyaki or sweet chili sauce for a unique twist. Just make sure the sauce complements the chicken well. If you need a substitute for cream cheese, try using Greek yogurt or cottage cheese. Both options add creaminess and a bit of tang. You can also use ricotta cheese for a lighter texture. Just remember that each option will change the flavor slightly, so pick one that fits your taste. This blog post covered ingredients, cooking steps, and variations for buffalo chicken stuffed peppers. We explored ingredient swaps for different diets and tips for picking the best peppers. I shared handy tips to avoid mistakes and enhance flavors. You can store leftovers well, freeze them, and reheat easily. Buffalo chicken stuffed peppers are fun to make and enjoy. With these insights, you can create tasty dishes your family will love. Happy cooking!

Buffalo Chicken Stuffed Peppers Tasty and Easy Recipe

Buffalo chicken stuffed peppers are a tasty and easy way to spice up your dinner. This dish combines hearty bell

To make this tasty dish, gather the following items: - 4 boneless, skinless chicken breasts - 1 cup cherry tomatoes, halved - 2 cups broccoli florets - 1 red bell pepper, sliced - 1 yellow bell pepper, sliced - 4 cloves garlic, minced - 1/3 cup balsamic vinegar - 2 tablespoons honey - 2 tablespoons olive oil - Salt and pepper to taste - 1 teaspoon dried Italian herbs (or Italian seasoning) - Fresh basil leaves, for garnish If you need to swap some ingredients, here are a few ideas: - Use chicken thighs instead of breasts for more flavor. - Any colorful bell pepper works well. Try green or orange. - Instead of broccoli, use green beans or asparagus. - Maple syrup can replace honey for a different taste. - If you don’t have Italian herbs, use a mix of oregano and thyme. When choosing veggies, freshness matters. Here’s how to pick the best: - Look for bright colors and firm textures. - Check cherry tomatoes for smooth skin and no bruises. - Choose broccoli with a deep green color and tight florets. - Bell peppers should feel heavy and have shiny skin. - Smell the produce; it should smell fresh and earthy. These tips help ensure your One-Pan Balsamic Chicken and Veggies turns out great! First, gather all your ingredients. This makes cooking easier and more fun. You need chicken, veggies, and a tasty marinade. Preheat your oven to 400°F (200°C) to get it ready for baking. While the oven heats, mix up the marinade. This step adds great flavor to your dish. 1. In a small bowl, whisk together balsamic vinegar, honey, olive oil, garlic, Italian herbs, salt, and pepper. This will be your marinade. 2. Put the chicken breasts in a big bowl and pour half of the marinade over them. Toss the chicken to coat it well. Let the chicken sit for about 15 minutes to soak up the flavors. 3. Line a large baking sheet with parchment paper or foil. This makes cleanup easier. 4. After marinating, place the chicken on one side of the baking sheet. 5. On the other side, add cherry tomatoes, broccoli, and sliced bell peppers. Drizzle the rest of the marinade over the veggies. 6. Sprinkle some salt and pepper on the veggies. Toss them gently to coat. Bake everything in the oven for 25-30 minutes. The chicken should reach 165°F (75°C) inside. The veggies need to be tender but not mushy. After baking, let the dish rest for 5 minutes. Then, slice the chicken and serve it with the roasted veggies. Drizzle any leftover juices from the tray over the meal for extra flavor. Enjoy this savory one-pan balsamic chicken and veggies! For the complete recipe, check the Full Recipe section. To make a great one-pan meal, choose the right pan. A large, rimmed baking sheet works best. This helps the heat circulate. Keep the chicken and veggies in a single layer. This allows even cooking and browning. You can boost the taste with fresh herbs. Try adding rosemary or thyme before baking. A splash of lemon juice also adds brightness. If you love spice, sprinkle some red pepper flakes. They will give your dish a fun kick. Don’t skip the marinating step! This helps the chicken soak up the flavors well. Avoid overcrowding the pan. If everything is too close together, the food will steam instead of roast. Finally, remember to check the chicken's temperature. It should reach 165°F for safe eating. For the full recipe, check the details above! {{image_2}} You can switch chicken for other proteins. Try pork tenderloin for a juicy taste. Salmon works well, too, adding a rich flavor. Tofu is a great choice for a vegan option. Just cut it into cubes and marinate it like chicken. Each protein brings a unique twist to the dish. Feel free to mix up the veggies. Zucchini, carrots, or asparagus can all shine in this recipe. Try adding green beans for a nice crunch. Sweet potatoes add sweetness and heartiness. Just make sure to cut them into even pieces. This way, they cook at the same time as the chicken. You can easily change this recipe to fit your diet. For gluten-free meals, ensure your balsamic vinegar is gluten-free. Use low-sodium soy sauce instead of honey for a lower sugar option. If you are vegetarian, skip the chicken and focus on the veggies. This dish is flexible and can meet many dietary needs. For the full recipe, check above. Storing leftovers is easy with this dish. Once it cools, place chicken and veggies in an airtight container. This keeps them fresh. Make sure to separate chicken from veggies if you want. Store in the fridge for up to three days. If you want to keep them longer, consider freezing. When you are ready to eat, reheating is simple. You can use the microwave or the oven. For the microwave, place the chicken and veggies on a plate. Heat for one to two minutes. Stir halfway through for even heat. If using the oven, preheat to 350°F (175°C). Bake for about 10-15 minutes until hot. This keeps the chicken juicy and the veggies tender. Freezing is perfect for meal prep. To freeze, let the dish cool completely. Place the chicken and veggies in freezer-safe bags. Remove as much air as possible before sealing. Label the bags with the date. You can freeze them for up to three months. When ready to eat, thaw in the fridge overnight. Reheat as mentioned above. This way, you enjoy a tasty meal anytime! Check the Full Recipe for more details. The total time to cook One-Pan Balsamic Chicken and Veggies is about 45 minutes. This includes 15 minutes of prep time and 25 to 30 minutes of cooking time. You want the chicken to reach 165°F (75°C) for safe eating. This dish cooks quickly and is perfect for busy nights. Yes, you can make this dish in advance. You can marinate the chicken up to a day ahead. Just keep it in the fridge until you are ready to cook. This lets the flavors mix well. For best results, cook the veggies fresh. You can also prepare it all and reheat when ready to eat. You can serve this dish with many sides. Here are some tasty options: - Rice or quinoa for a filling meal - A fresh green salad for crunch - Garlic bread to soak up the sauce - Mashed potatoes for comfort food These sides will complement the flavors of the chicken and veggies well. For the full recipe, check the detailed steps above. In this blog post, we explored all you need for making One-Pan Balsamic Chicken and Veggies. We covered every ingredient, including substitutions and fresh produce tips. I shared a step-by-step guide for cooking and perfect timing. You learned helpful tips for flavor and common mistakes. We discussed variations for proteins and veggies to fit your needs. Finally, we highlighted storage and reheating tips. Enjoy your cooking journey and make this dish your own!

Savory One-Pan Balsamic Chicken and Veggies Recipe

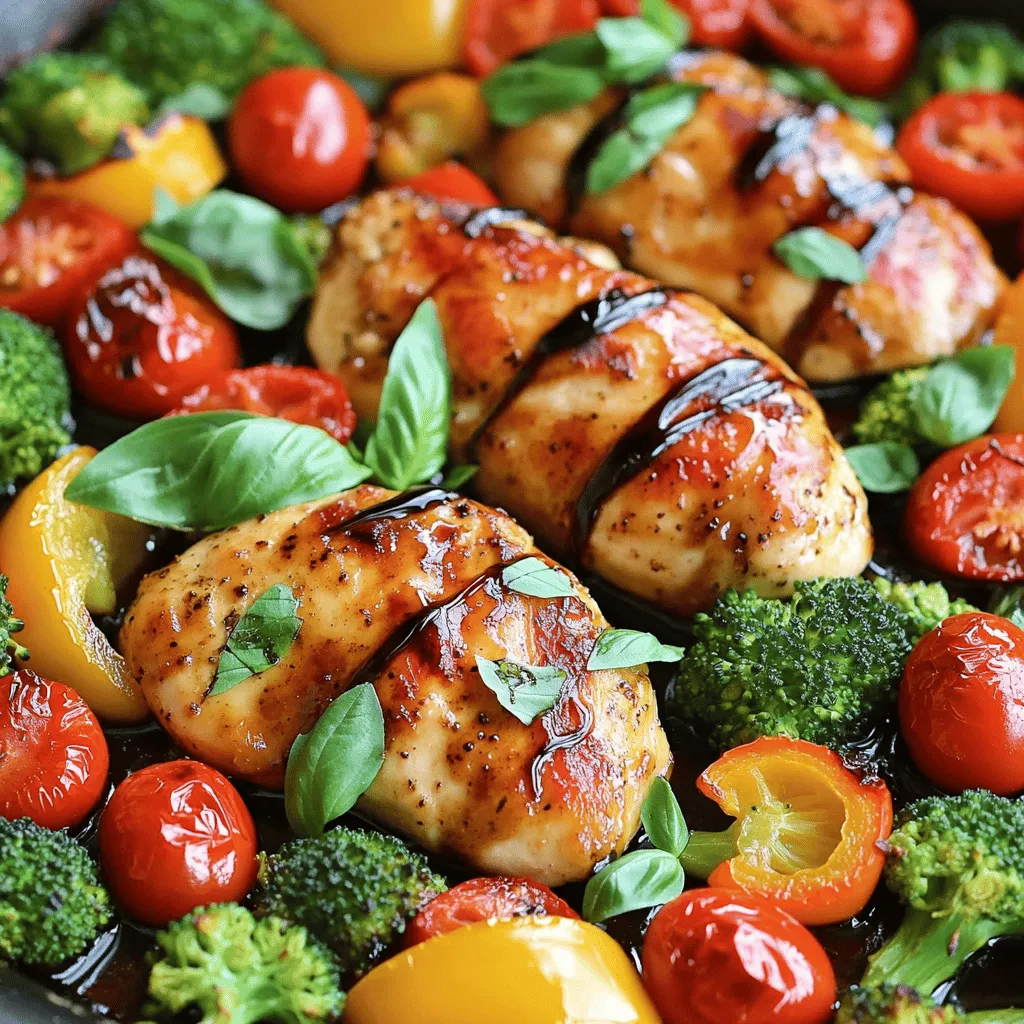
Are you ready to whip up a delicious dinner with just one pan? My Savory One-Pan Balsamic Chicken and Veggies

Older posts
Page1 Page2 … Page67 Next →

dsad

© 2025 So Yum Recipes • Built with GeneratePress

Our Policies

  • Copyright Policy
  • Cookie Policy
  • GDPR Policy
  • Privacy Policy
  • Disclaimer
  • Terms Of Use

More Information

  • Home
  • About
  • Contact
  • Appetizers
  • Dessert
  • Dinner
  • Drinks
©2025, So Yum Recipes About Back To Top