Skip to content
DisclaimerTerms Of UseGDPR PolicyCookie Policy

So Yum Recipes

  • Home
  • Drinks
  • Appetizers
  • Dinner
  • Dessert
  • About
  • Contact
  • Privacy Policy
DisclaimerTerms Of UseGDPR PolicyCookie Policy

Chloe

To create these tasty bars, gather these key ingredients: - 24 Oreo cookies, crushed - 1/2 cup unsalted butter, melted - 2 cups cream cheese, softened - 1 cup powdered sugar - 1 teaspoon peppermint extract - 1 cup semi-sweet chocolate chips - 1 teaspoon coconut oil (or vegetable oil) - 1/4 cup crushed peppermint candies (for topping) These ingredients blend to form a rich, creamy, and crunchy treat. You can switch some ingredients based on your taste. Here are a few ideas: - Use gluten-free Oreos for a gluten-free option. - Swap cream cheese with a dairy-free version for vegan bars. - Try white chocolate chips instead of semi-sweet chocolate for a sweeter taste. - Replace peppermint extract with vanilla extract for a different flavor. Toppings add fun and flair to your bars. Consider these options: - Drizzle extra melted chocolate over the top for a fancy look. - Use mini marshmallows or chocolate sprinkles for extra sweetness. - Garnish with small peppermint sticks for a festive touch. These toppings make your dessert even more appealing and tasty. To start, grab a mixing bowl. Add 24 crushed Oreo cookies and 1/2 cup of melted unsalted butter. Mix until every crumb is coated. This mix forms the base of your bars. Next, take a 9x9 inch square pan. Press the Oreo mixture firmly into the bottom. Make sure it is even. Refrigerate this base for about 15 minutes. This helps it set well. Now, in a separate bowl, beat 2 cups of softened cream cheese. Use a hand mixer for the best results. Mix until smooth. Gradually add 1 cup of powdered sugar and 1 teaspoon of peppermint extract. Keep beating until everything is well combined. This cream cheese layer gives the bars a rich flavor. Next, take a microwave-safe bowl. Combine 1 cup of semi-sweet chocolate chips with 1 teaspoon of coconut oil. Microwave this mix in 30-second intervals. Stir in between to avoid burning. Once melted and smooth, pour the chocolate over the cream cheese layer. Use a spatula to spread it evenly. Finally, sprinkle 1/4 cup of crushed peppermint candies on top of the chocolate. Press them down gently so they stick. Now, refrigerate the bars for at least 3 hours. This makes them firm enough to cut. Once set, lift the bars from the pan. Cut them into squares or rectangles. Enjoy your delicious creation! When mixing, always start with the right tools. A large bowl helps combine ingredients well. Use a sturdy spatula to mix the Oreo crumbs and melted butter. This mix should stick together. For melting chocolate, a microwave works best. Heat it in short bursts of 30 seconds. Stir in between to avoid burning. This keeps the chocolate nice and smooth. For a smooth cream cheese layer, make sure your cream cheese is very soft. Let it sit at room temperature for about 30 minutes. Use a hand mixer to beat it until creamy. Add the powdered sugar slowly. This helps combine the sugar well without lumps. Always scrape down the bowl to mix evenly. To make these bars even better, try adding some fun touches. You can mix in mini chocolate chips for extra texture. A pinch of sea salt can enhance the chocolate flavor. If you like a stronger mint taste, add a bit more peppermint extract. For a festive look, sprinkle some crushed nuts or colored sprinkles on top. {{image_2}} You can make a vegan version of these bars. Start with vegan Oreo cookies. Use coconut oil instead of butter. For the cream cheese, pick a dairy-free option. Many brands offer tasty vegan cream cheese now. Use powdered sugar as usual. The rest of the steps remain the same. You get a rich and creamy treat without any dairy. Feel free to swap out the Oreo cookies. Try chocolate sandwich cookies for a richer taste. Vanilla cookies can give a lighter flavor. If you want crunch, use graham crackers. Each type of cookie brings its own fun twist. The key is to keep the base firm and tasty. Peppermint is great, but you can change it up. Use vanilla extract for a classic touch. Almond extract gives a nutty flavor that many enjoy. You could even try orange or lemon for a zesty kick. Each change offers a new taste experience. Just remember to keep the amount the same for balance. To keep your No-Bake Chocolate Peppermint Oreo Bars fresh, store them in an airtight container. This prevents moisture and keeps them tasty. You can layer parchment paper between bars to avoid sticking. Make sure to refrigerate them right after cutting. This keeps the bars firm and ready to enjoy. These delicious bars can last in the fridge for about a week. Over time, they may lose some texture but will still taste great. Always check for any signs of spoilage before indulging. If you see any changes in color or smell, it’s best to toss them out. If you want to keep them longer, freezing is a great option. Wrap each bar in plastic wrap, then place them in a freezer-safe bag. They can stay in the freezer for up to three months. When you're ready to enjoy, let them thaw in the fridge overnight for the best taste and texture. Yes, you can use regular cream cheese. However, it is best to soften it first. Softening helps the cream cheese mix well with the sugar. You can soften it by leaving it out at room temperature for about 30 minutes or microwaving it for 10-15 seconds. If you lack peppermint extract, you can use mint extract as a substitute. Mint extract gives a similar flavor. You can also use crushed peppermint candies in the cream cheese mixture for a more intense taste. Adjust the amount to your liking. To make these bars gluten-free, use gluten-free Oreo cookies. Many brands offer gluten-free options that taste great. Check the labels to ensure they meet your needs. The other ingredients are naturally gluten-free. You can use other types of chocolate. Dark chocolate adds a rich flavor, while milk chocolate offers sweetness. White chocolate is another option, but it will change the flavor profile. Melt and pour the chocolate as you would with semi-sweet chocolate. In this blog post, we covered the essential ingredients for no-bake chocolate peppermint Oreo bars, along with optional ones. I shared step-by-step instructions, tips, and variations. You can customize this treat to fit your taste and needs. Remember to store them properly for the best flavor. Whether you make them vegan or play with flavors, these bars will impress. Enjoy making and sharing these fun, easy treats!

No-Bake Chocolate Peppermint Oreo Bars Delight

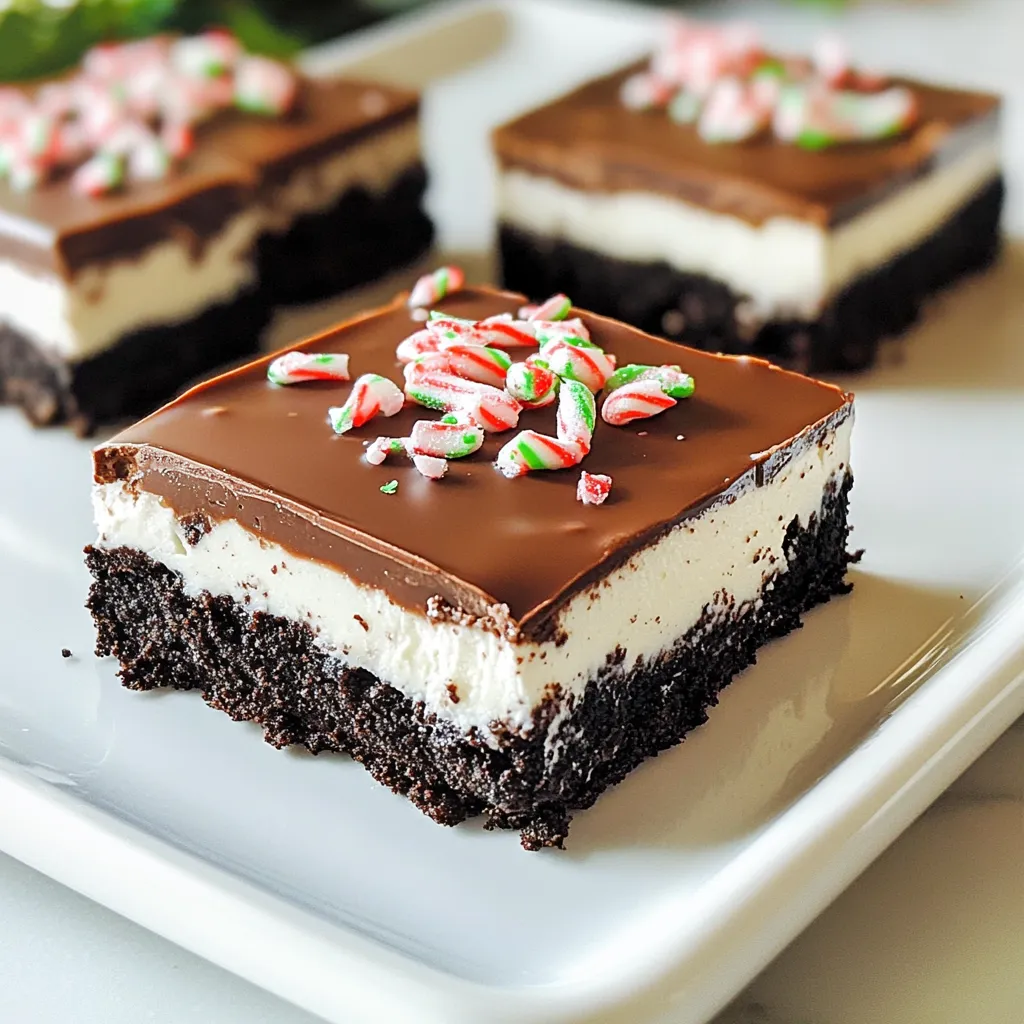
Get ready to indulge in a sweet treat that’s easy to make and oh-so-delicious! My No-Bake Chocolate Peppermint Oreo Bars

- 8 oz linguine pasta - 1 lb large shrimp, peeled and deveined - 6 tablespoons unsalted butter - 4 cloves garlic, minced For the main part of this dish, you need good quality linguine and fresh shrimp. The shrimp should be large, peeled, and deveined. This saves time and makes cooking easier. Garlic and butter are the stars of the show. They create a rich, savory sauce that coats the pasta and shrimp. - 1/2 teaspoon red pepper flakes (adjust to taste) - 1/4 cup chicken broth - 2 tablespoons fresh lemon juice - Salt and pepper to taste - 2 tablespoons fresh parsley, chopped (for garnish) - Grated Parmesan cheese (for serving, optional) To add flavor, I use red pepper flakes. They bring a nice kick that you can adjust. Chicken broth adds depth to the sauce. Fresh lemon juice brightens the dish and balances the butter. Finally, parsley adds color and freshness. Parmesan cheese is a great optional topping that enhances the dish. Bringing Water to a Boil Start by filling a large pot with water. Add a good amount of salt. Turn the heat to high and wait for it to boil. This step is key for great pasta flavor. Cooking Time for Al Dente Once the water boils, add the linguine. Cook it according to the package instructions. For al dente, aim for about 8 to 10 minutes. You want it firm yet tender. Reserve 1/2 cup of pasta water before you drain it. Melting Butter and Adding Garlic In a large skillet, melt 2 tablespoons of butter over medium heat. Add minced garlic and red pepper flakes. Sauté for about 30 seconds. This makes the kitchen smell amazing. Cooking the Shrimp to Perfection Now, increase the heat to medium-high. Add the shrimp to the skillet. Season them with salt and pepper. Cook the shrimp for about 2 to 3 minutes on each side. They are done when they turn pink and opaque. Adding Broth and Lemon Juice Once the shrimp are cooked, pour in the chicken broth and lemon juice. Stir this mixture and bring it to a simmer. This adds a nice, tangy flavor. Tossing in the Pasta Next, add the drained linguine to the skillet. Toss everything together well. If the pasta seems dry, add some of the reserved pasta water until it looks just right. Taste and adjust the seasoning with salt and pepper. Fresh vs. Frozen Shrimp I often use fresh shrimp for the best taste. Fresh shrimp has a sweet flavor and a firm texture. If fresh shrimp is not available, frozen shrimp works too. Just be sure to thaw it properly before cooking. Place it in the fridge overnight or run it under cold water. Avoiding Overcooking the Shrimp Keep a close eye on the shrimp while cooking. They cook quickly, in about 2-3 minutes per side. When they turn pink and opaque, they are done. Overcooking can make them tough and chewy. Additional Seasonings to Experiment With I love adding extra spices to boost flavor. Try a pinch of smoked paprika or a dash of lemon zest. You can also add a splash of white wine for depth. These tweaks can make your dish shine brighter. Using Fresh Ingredients Always use fresh ingredients when you can. Fresh garlic adds a bright flavor and aroma. Fresh parsley as a garnish brings color and freshness to the dish. Fresh lemon juice gives a zesty kick that balances the richness of the butter. Utilizing Reserved Pasta Water Don’t forget to save some pasta water! This starchy water helps to bind the sauce to the pasta. If the dish feels dry, add a bit of reserved water to loosen it up. It helps create a silky texture that clings to the linguine. Modifying Sauce Thickness You can easily change the sauce's thickness. If you want a thicker sauce, let it simmer longer to reduce it. For a thinner sauce, just add more chicken broth or reserved pasta water. Adjust it to your liking for the perfect bite. {{image_2}} You can boost the nutrition and flavor of your Minute Garlic Butter Shrimp Linguine by adding vegetables. Here are two great options: - Spinach or Kale: These leafy greens cook quickly. You can add them right before mixing in the pasta. They give a nice pop of color and health benefits. - Cherry Tomatoes: Halve these and toss them in with the shrimp. They add sweetness and a juicy texture to the dish. If you want to switch things up, consider these protein options: - Chicken or Tofu Substitutes: You can use bite-sized pieces of chicken or cubed tofu. Just cook them until they are done before adding the garlic and other ingredients. - Seafood Medley Option: Try a mix of seafood like scallops or mussels for a richer flavor. Just adjust the cooking time based on what you choose. Making this dish fit your dietary needs is easy. Here are some adjustments: - Gluten-Free Pasta Options: You can swap regular linguine for gluten-free pasta. Just check the package for cooking time. - Dairy-Free Substitutes: Instead of butter, try using olive oil or a dairy-free butter. This keeps the taste rich without using dairy. To keep your Minute Garlic Butter Shrimp Linguine fresh, use airtight containers. These are great for keeping the dish safe and tasty. Allow the dish to cool down before sealing it. Store it in the fridge for up to three days. If you want to keep it longer, consider freezing. When it’s time to enjoy leftovers, the best way is to reheat on the stove. Use a skillet over medium heat. Add a splash of chicken broth to help keep it moist. Stir gently to avoid burning. You can also microwave it in short bursts, but watch the time to keep the shrimp tender. To freeze your garlic butter shrimp linguine, let it cool completely. Place it in a freezer-safe container and seal tightly. It can stay in the freezer for up to three months. When you’re ready to eat, thaw it in the fridge overnight. Reheat on the stove or microwave until hot. Enjoy your quick meal! To make shrimp burst with flavor, try marinating them. A simple mix of olive oil, lemon juice, and garlic works great. Let them soak for 15-30 minutes before cooking. You can also add spices like paprika, cumin, or even a dash of soy sauce for a twist. Fresh herbs like cilantro or basil can also enhance the taste. Garlic butter shrimp linguine pairs well with many sides. Here are some ideas: - Garlic Bread: Perfect for soaking up the sauce. - Salad: A fresh green salad with a light vinaigrette adds crunch. - Steamed Vegetables: Broccoli or asparagus complement the dish nicely. - White Wine: A glass of crisp white wine enhances the meal. Yes, you can swap out linguine for other pasta types. Here are some options: - Spaghetti: A classic choice that works well. - Fettuccine: Offers a wider noodle for more sauce. - Penne: The tube shape holds sauce nicely. - Gluten-Free Pasta: If you're avoiding gluten, many brands offer great alternatives. You've learned how to make delicious garlic butter shrimp linguine. We covered key ingredients like shrimp, garlic, and lemon juice. The step-by-step instructions guide you from cooking pasta to mixing it all together. Tips help you perfect shrimp and enhance flavor. Variations allow you to customize the dish. Lastly, storage tips ensure your leftovers stay tasty. Enjoy this dish and share it with friends and family! It’s easy and brings joy to any meal.

Minute Garlic Butter Shrimp Linguine Quick and Easy Dish

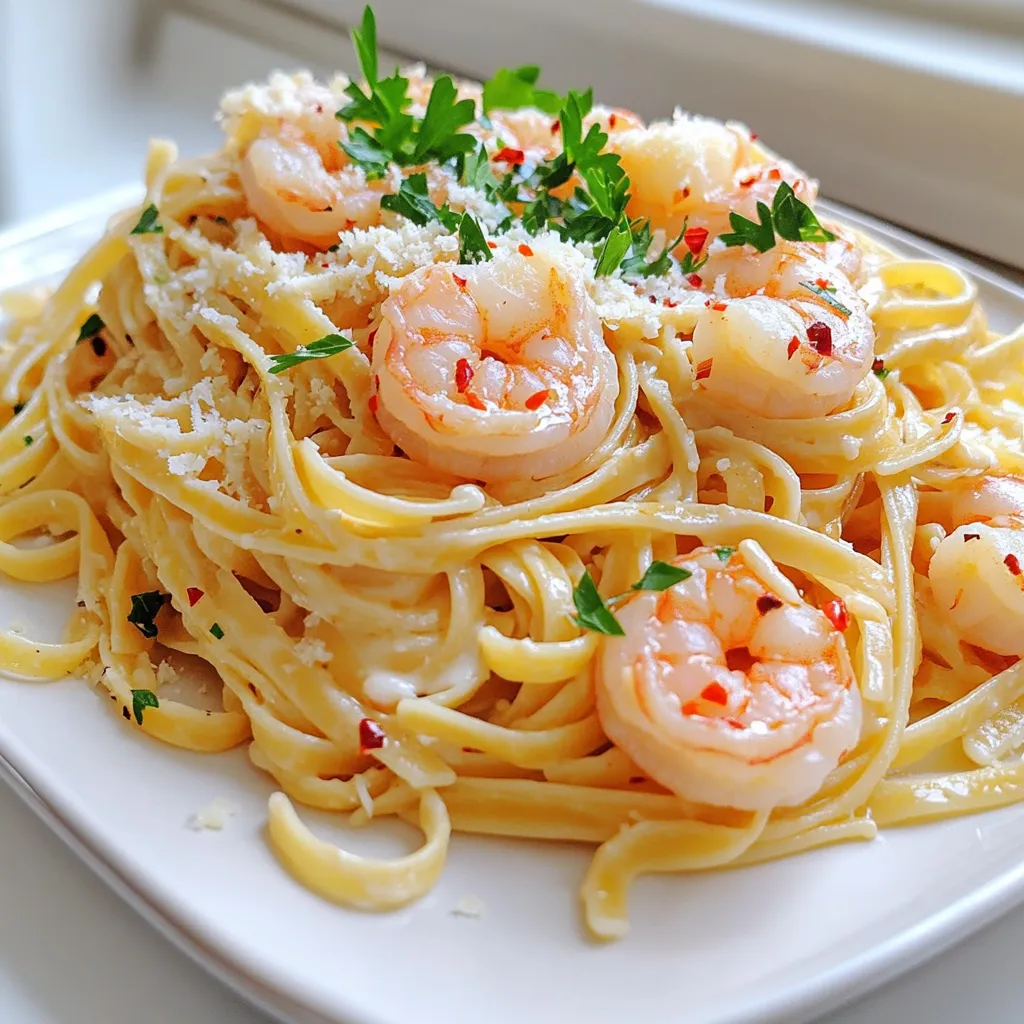
Are you craving a quick and tasty meal? Try my Minute Garlic Butter Shrimp Linguine! You’ll love how easy it

- 1 can (14 oz) artichoke hearts, drained and chopped - 4 cups fresh spinach, chopped - 1 medium onion, diced - 3 cloves garlic, minced - 4 cups vegetable broth - 1 cup heavy cream - 1 cup cream cheese, softened - 1 cup grated Parmesan cheese - 1 teaspoon dried oregano - 1 teaspoon dried thyme - Salt and pepper to taste - Croutons and extra Parmesan for garnish (optional) This recipe brings together fresh and rich flavors. First, we start with artichoke hearts, which add a lovely texture. Fresh spinach gives the soup a bright color and healthy benefits. The onion and garlic create a solid base, adding depth. For liquids, vegetable broth is perfect. It brings a savory note without overpowering the other tastes. Heavy cream and cream cheese make it extra smooth and creamy. This combination creates that comforting feel in every bite. Seasonings play a key role in this soup. Dried oregano and thyme add warmth and earthiness. Don't forget to season with salt and pepper to enhance the flavors. Croutons and extra Parmesan make great toppings. They add crunch and richness to each bowl. Gather these ingredients, and you're set for a delightful cooking experience. - Combine artichoke hearts, spinach, onion, and garlic in the slow cooker. - Pour in vegetable broth and stir the mixture. When you start, you want to layer in the flavors. First, take that can of artichoke hearts. Drain them and chop them up. Next, grab your fresh spinach. Chop it into smaller pieces. Then, dice one medium onion and mince three cloves of garlic. Toss all these ingredients into your slow cooker. Now, pour in four cups of vegetable broth. This adds a rich base to your soup. Stir well to mix everything together. This step is key for blending the flavors early on. - Add dried oregano, thyme, salt, and pepper, then cover the slow cooker. - Set the cooker on low for 4 hours or high for 2 hours. Next, it’s time to season your soup. Add one teaspoon of dried oregano and one teaspoon of dried thyme. Sprinkle in salt and pepper to taste. Stir again to combine. Cover your slow cooker and set it on low heat for four hours or high heat for two hours. The longer cooking time helps flavors develop beautifully. - Mix in cream cheese and heavy cream, then stir until combined. - Gradually add grated Parmesan cheese until melted and soup thickens. - Adjust seasoning to taste before serving. After the cooking time is up, it’s time to make your soup creamy. Add one cup of softened cream cheese and one cup of heavy cream. Stir until both ingredients blend smoothly into the soup. Now, for that cheesy goodness! Gradually stir in one cup of grated Parmesan cheese. Keep stirring until it melts and the soup thickens. This is where the magic happens! Before serving, taste your soup. Adjust the seasoning with more salt or pepper if needed. Your creamy spinach artichoke soup is now ready to enjoy! To make your Slow Cooker Creamy Spinach Artichoke Soup even better, try adding fresh herbs. Basil or parsley can add a nice touch. You can also use spices like paprika or cayenne for a kick. If you want to change the soup for dietary needs, swap heavy cream for coconut milk. For a vegan option, use cashew cream instead of cream cheese. These simple swaps can keep the flavor while meeting your needs. For a smoother soup, blend it with an immersion blender. This tool makes it easy to achieve that creamy texture. If you find the soup too thick, add more vegetable broth. Start with a half cup and mix well. Keep adding until you reach your desired thickness. Remember, the soup will thicken as it cools. So, adjust right before serving. This soup pairs well with crusty bread or a fresh salad. A nice baguette is perfect for dipping. Serve the soup hot for the best flavor. You can add croutons and extra Parmesan on top for a nice finish. For a lovely presentation, use a bowl that shows off the soup's creamy color. A sprinkle of fresh herbs on top can make it look even more inviting. {{image_2}} You can easily tweak this soup for different diets. For a vegan or dairy-free version, swap the cream cheese and heavy cream for coconut milk or cashew cream. These options give a nice creaminess without dairy. Use vegetable broth, which is already vegan. If you need gluten-free options, just check your broth brand. Many brands are gluten-free. This soup can be a great fit for those with gluten sensitivity. Get creative with the soup! You can add other veggies like carrots, celery, or bell peppers. These will add color and flavor. For protein, consider adding cooked chicken, shrimp, or white beans. Each option makes the soup heartier. To change up the flavors, try different cheeses. A bit of mozzarella or gouda can add a fun twist. You can also mix in spices like paprika or cayenne for a hint of heat. Garnishing makes your soup look special. Top it with fresh herbs like parsley or basil for a pop of color. A drizzle of olive oil can add a nice touch too. Instead of just croutons, consider crispy bacon bits or sautéed mushrooms. You can also add a dollop of sour cream or a sprinkle of chili flakes for extra flavor. Each choice can give a new look and taste to this creamy soup. Store leftovers in an airtight container. This keeps the soup fresh. You can enjoy it for up to four days in the fridge. Make sure to let it cool before sealing. This helps prevent excess moisture buildup. To freeze the soup, let it cool completely. Then, pour it into freezer-safe containers. Leave some space at the top for expansion. The soup can last for about three months in the freezer. When you're ready to eat, thaw it in the fridge overnight. You can also use the microwave for quicker thawing. Reheat the soup on the stove over low heat. Stir it often to keep it smooth. You can also use the microwave, but check it every minute. If the flavor seems dull, add a splash of cream or broth. This refreshes the taste nicely. Enjoy your warm bowl of creamy goodness! Yes, you can use frozen spinach. It offers convenience and saves prep time. Frozen spinach is often picked at peak freshness. However, it may have more water content, which can dilute the soup. To use frozen spinach, thaw and drain it well before adding it to the slow cooker. This keeps the soup creamy. To add some heat, try these options: - Add red pepper flakes for a subtle kick. - Stir in chopped jalapeños for more heat. - Use a spicy cheese instead of Parmesan. - Add a dash of hot sauce before serving. These changes can elevate the flavor and give it a nice punch. This soup pairs well with many sides. Here are some ideas: - Crispy garlic bread for dipping. - A fresh salad with a tangy vinaigrette. - Cheese quesadillas for a fun twist. - Crackers or breadsticks to complement the soup's creaminess. These pairings enhance the meal and make it satisfying. This blog post showed how to make a tasty Spinach Artichoke Soup. We covered the main ingredients, liquids, dairy, seasonings, and garnishes. The step-by-step instructions will help you through cooking it in a slow cooker. I shared tips for flavor, texture, and serving suggestions. You can also adjust the recipe for dietary needs or try new garnishes. Storing guidelines and FAQs help you manage leftovers well. Now, you can enjoy a rich, creamy soup that warms both body and soul. Dive in and make this delicious dish today!

Slow Cooker Creamy Spinach Artichoke Soup Delight

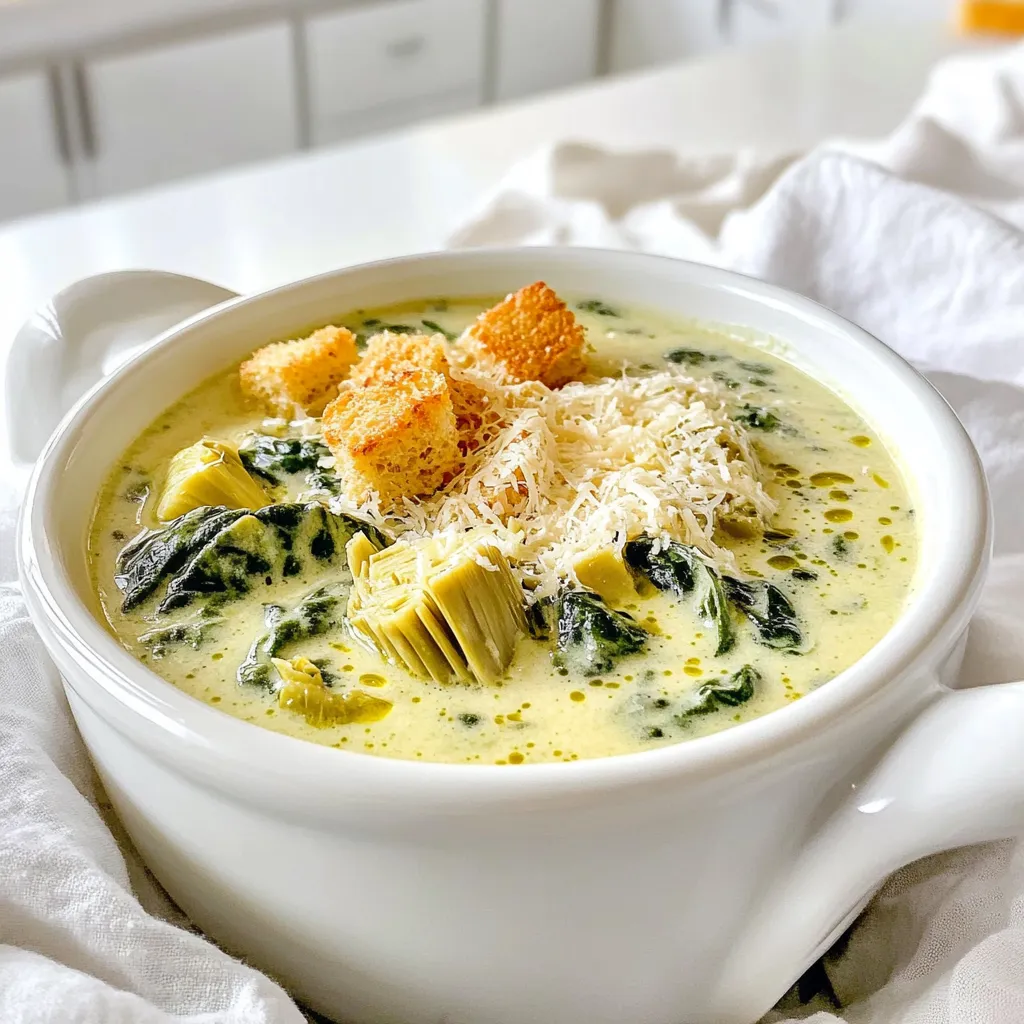
Are you ready to warm up with a bowl of delicious comfort? This Slow Cooker Creamy Spinach Artichoke Soup Delight

To create Creamy Spinach Parmesan Orzo, you need a few simple ingredients. Here’s the list: - Orzo pasta: This small pasta cooks quickly and absorbs flavors well. - Vegetable broth: Use this for a rich base. It adds depth to the dish. - Fresh spinach: It adds color and nutrition. Fresh is best for flavor. - Heavy cream: This gives the dish a rich, creamy texture. - Grated Parmesan cheese: It adds a salty, nutty flavor. Use fresh for best results. - Onion: A finely chopped onion adds sweetness and aroma. - Garlic: Minced garlic adds a lovely depth of flavor. - Olive oil: Use this to sauté the onion and garlic. - Dried Italian herbs: A mix of oregano, basil, and thyme enhances the flavor. - Salt and pepper: These seasonings help bring out all the other flavors. - Garnish options: Fresh black pepper and extra Parmesan can add a finishing touch. Gather these ingredients, and you are ready to start making this delightful dish! - Sautéing the onion Start by heating the olive oil in a large pot over medium heat. Add the finely chopped onion and cook it until it turns soft and clear, about 3 to 4 minutes. This step builds a great flavor base. - Cooking the garlic Next, add the minced garlic to the pot. Stir it in and let it cook for about 30 seconds. You want the garlic to be fragrant, not brown. The aroma will fill your kitchen! - Toasting the orzo Now, it's time to toast the orzo pasta. Stir in the orzo and dried Italian herbs. Cook for about 2 minutes while stirring often. This step adds a nice, nutty flavor to the dish. - Simmering with broth Pour in the vegetable broth and bring everything to a boil. Once it boils, lower the heat and cover the pot. Let it simmer for about 10 to 12 minutes. The orzo should be al dente and soak up most of the broth by the end. - Adding cream and Parmesan After the orzo is ready, stir in the heavy cream and grated Parmesan cheese. Mix until the cheese melts and the sauce becomes creamy. This makes the dish rich and delicious. - Folding in the spinach Gently fold in the chopped spinach. Cook for another 2 to 3 minutes. The spinach will wilt quickly, adding color and nutrition to your dish. - Adjusting seasoning Finally, season the dish with salt and pepper to taste. This step is key to enhancing all the flavors. Serve it right away and enjoy! - Ensuring the orzo cooks perfectly To cook orzo just right, use enough broth. The broth should cover the orzo well. Stir the pot often. This keeps the orzo from sticking. Cook until it is al dente, which means firm but not hard. - Tips for a creamier sauce For a creamier sauce, add the heavy cream slowly. This helps it blend well. Stir in the grated Parmesan cheese right after the cream. This makes the sauce rich and velvety. - Using fresh vs. dried herbs Fresh herbs bring a bright taste. Use them if you have them! If not, dried herbs work fine. Just remember, dried herbs are stronger. Use less of them, about one-third of what you'd use fresh. - Pairing ideas Creamy Spinach Parmesan Orzo goes well with grilled chicken or salmon. You can also serve it with a side salad. A fresh salad adds a nice crunch to the meal. - Presentation tips When serving, scoop the orzo into bowls. Top with extra Parmesan and freshly cracked black pepper. A sprinkle of fresh herbs adds color and flavor. This makes the dish look appealing and taste even better! {{image_2}} - Alternatives for orzo: You can use other pasta like ditalini or small shells. Quinoa or rice also work well for a gluten-free option. - Vegan options: Swap heavy cream for coconut cream or cashew cream. Use nutritional yeast instead of Parmesan for a cheesy flavor without dairy. - Adding protein: For a heartier dish, add cooked chicken, shrimp, or even chickpeas. These options boost protein and give more texture. - Incorporating other vegetables: You can mix in vegetables like bell peppers, peas, or mushrooms. This adds color and nutrition. - Using different cheese types: Try using feta or goat cheese for a tangy taste. Cheddar or mozzarella can add a different creaminess and flavor profile. To store leftovers, let the orzo cool down first. Then, transfer it to an airtight container. This keeps the flavors fresh. You can store it in the fridge for up to three days. If it sits longer, it may lose its creamy texture. For freezing, place the cooled orzo in a freezer-safe container. Make sure to leave some space at the top. The orzo expands as it freezes. It can last in the freezer for up to three months. When you are ready to eat, thaw it in the fridge overnight. To reheat, warm it gently in a pot over low heat. You might need to add a splash of broth or cream. This helps restore its creamy delight. Yes, you can use other types of pasta. Small shapes like farro or ditalini work well. Just keep an eye on the cooking time. Larger pasta will need more time to cook. To make this dish gluten-free, use gluten-free orzo. Many brands offer great options. Just check the package for cooking instructions, as they may differ. This orzo pairs nicely with a fresh salad or grilled chicken. You can also serve it with crusty bread for a complete meal. A light white wine can enhance your dining experience. Cooking orzo takes about 10 to 12 minutes. Keep stirring occasionally to prevent it from sticking. It should be al dente when done, meaning it has a slight bite. You can prepare the orzo ahead of time. Store it in the fridge for up to 3 days. When ready to eat, reheat it gently. Add a splash of cream to refresh the sauce. This blog post shared all about making Creamy Spinach Parmesan Orzo. We covered the key ingredients, from orzo pasta to fresh spinach. You learned how to prepare, cook, and finish the dish beautifully. I shared tips for perfect texture and flavor. You also discovered fun variations and how to store your meal. Overall, this dish is simple and full of flavor. Feel free to adjust the recipe to match your taste. Enjoy mixing and matching ingredients to make it your own!

Creamy Spinach Parmesan Orzo One Pot Delightful Dish

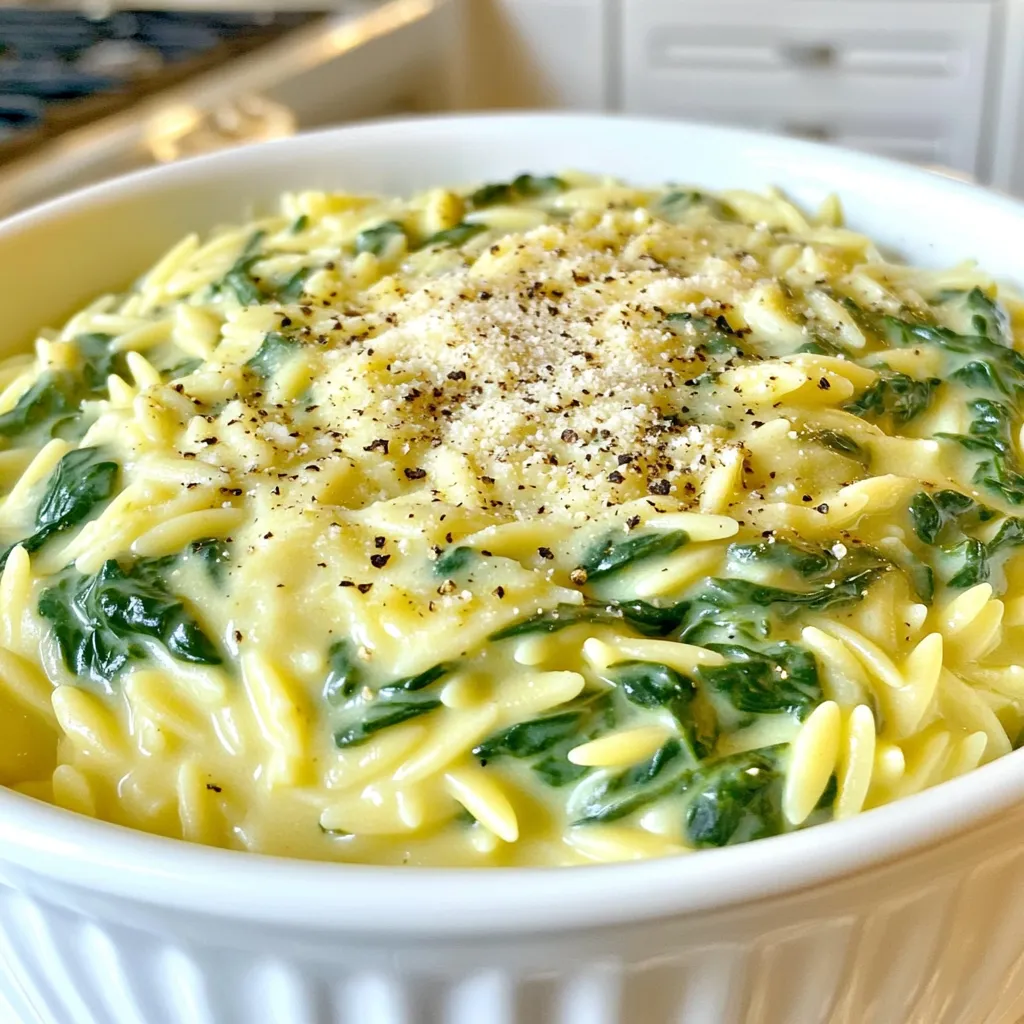
Welcome to my kitchen! Today, I’m excited to share a delightful dish: Creamy Spinach Parmesan Orzo. This one-pot wonder is

To make Garlic Herb Salmon Bites, you need these main items: - 1 lb salmon fillet, skinless and boneless, cut into bite-sized pieces - 3 cloves garlic, minced - 2 tablespoons fresh parsley, chopped - 1 tablespoon fresh dill, chopped - 1 teaspoon lemon zest - 1 tablespoon olive oil - 1 teaspoon salt - ½ teaspoon black pepper For an extra kick, you can add these optional ingredients: - ½ teaspoon crushed red pepper flakes (for spice) - Lemon wedges (for serving) Gather these tools to make cooking easy: - A large mixing bowl for marinating - An air fryer for cooking - A spatula for flipping the salmon - A cutting board for prep - A sharp knife for cutting the salmon Having everything ready helps the cooking process go smoothly. With these simple ingredients and tools, you will create a tasty dish that impresses everyone! First, gather your ingredients. You need garlic, parsley, dill, lemon zest, olive oil, salt, black pepper, and crushed red pepper flakes. In a large bowl, combine the minced garlic, chopped parsley, chopped dill, lemon zest, olive oil, salt, black pepper, and optional red pepper flakes. Stir these items well to make a flavorful marinade. This mix brings out the best taste in the salmon. Next, cut your salmon fillet into bite-sized pieces. Add these pieces to the bowl with the marinade. Gently toss the salmon to coat each piece evenly. Once coated, let the salmon sit for at least 15 minutes. This step allows the flavors to soak into the fish, making it more delicious. Now, preheat your air fryer to 400°F (200°C). This should take about 3 to 5 minutes. While it heats, arrange the marinated salmon bites in a single layer in the air fryer basket. Avoid crowding the pieces. If they are too close, they won't cook evenly. Cook the salmon bites for 8 to 10 minutes. Flip them halfway through for a nice, even crisp. When done, the salmon should be golden and reach an internal temperature of 145°F (63°C). Once cooked, carefully remove the salmon bites and let them rest for a minute. Serve them hot, garnished with fresh parsley and lemon wedges on the side. Enjoy your delightful dinner! Marinating salmon boosts its flavor. Use fresh ingredients like garlic, parsley, and dill. Start with a large bowl. Mix minced garlic, chopped parsley, dill, lemon zest, olive oil, salt, and black pepper. If you like spice, add crushed red pepper flakes. Toss the salmon pieces in this mixture. Make sure each piece is coated well. Let it sit for at least 15 minutes. This allows the salmon to soak up the flavors. To get golden salmon bites, preheat your air fryer to 400°F (200°C) for 3-5 minutes. Arrange the marinated salmon pieces in a single layer in the basket. Avoid stacking them. This helps them cook evenly. Air fry at 400°F for 8-10 minutes. Flip them halfway through. Check that they reach an internal temperature of 145°F (63°C). This means they are safe to eat and cooked perfectly. For a stunning presentation, use a wooden platter or a stylish plate. Garnish the salmon bites with fresh herbs. Arrange lemon wedges on the side for a pop of color. This not only looks nice but adds a zesty flavor when served. You can also serve these bites with a dipping sauce like garlic aioli or tzatziki for extra taste. Enjoy the meal with friends or family for a delightful dinner. {{image_2}} You can switch up the flavors in your garlic herb salmon bites. Try using thyme or oregano for a different taste. If you love spice, add cumin or smoked paprika. Fresh basil can give a sweet, fresh twist. You can also use dried herbs if fresh ones are not available. Just remember to use less, as dried herbs are stronger. Salmon is great, but you can also use other fish. Try using cod or halibut for a light meal. Tuna works well too, but it cooks faster. Adjust the cooking time based on the fish you use. Each fish has a unique flavor and texture, so experiment to find your favorite! Dipping sauces can take your salmon bites to the next level. A simple garlic aioli pairs well with the bites. For something zesty, try a lemon dill sauce. You can also serve them with a spicy sriracha mayo for a kick. Don’t forget classic options like tartar sauce or a sweet chili sauce. Each sauce adds its own flavor, making your meal even more fun! To store leftover salmon bites, let them cool to room temperature. Place them in an airtight container. Seal the container well to keep out air. Store it in the fridge. They can last for up to three days this way. If you want to keep them longer, freezing is an option. To reheat the salmon bites, you can use the air fryer again. Set it to 350°F (175°C). Place the salmon bites in a single layer. Heat them for about 4-5 minutes. This keeps them crispy. You can also use a microwave. Heat them on medium power for 30 seconds. Check if they are warm enough. If not, heat them in 15-second bursts until ready. For long-term storage, freeze the salmon bites. Wrap them tightly with plastic wrap. Then, place them in a freezer bag. Remove as much air as possible. Label the bag with the date. You can keep them in the freezer for up to three months. When ready to eat, thaw them in the fridge overnight before reheating. Yes, you can use frozen salmon. Just make sure it is fully thawed before cooking. Thaw the salmon in the fridge overnight or under cold water. This ensures even cooking and better flavor. The best temperature is 400°F (200°C). This high heat cooks the salmon quickly and gives it a lovely crisp. Preheat your air fryer for 3-5 minutes before adding the salmon bites for the best results. To make these bites healthier, reduce the olive oil to one teaspoon. You can also skip the crushed red pepper flakes if you prefer less spice. Serve with a side of fresh veggies instead of bread or heavy sides for a lighter meal. In this blog post, we explored how to make delicious Garlic Herb Salmon Bites. We covered the key ingredients, step-by-step cooking in an air fryer, and tips for perfect results. You learned about variations to customize the dish and how to store them for later. Now it's time to cook and enjoy these bites! With the right tools and techniques, you can create a tasty meal that impresses everyone. Dive into your kitchen and have fun experimenting with flavors.

Garlic Herb Salmon Bites Air Fryer Delightful Dinner

Craving a quick and tasty dinner? Try Garlic Herb Salmon Bites made in an air fryer! These bites are simple

- 2 lbs beef chuck, cut into thin strips - 1 medium onion, chopped - 3 cloves garlic, minced - 8 oz mushrooms, sliced - 4 cups beef broth The main ingredients create a rich base for our beef stroganoff. Beef chuck offers a nice, tender bite after slow cooking. The onion and garlic give depth and warmth, while mushrooms add a savory touch. Beef broth ties it all together, ensuring a moist and flavorful dish. - 1 cup sour cream - 3 tablespoons Worcestershire sauce - 2 tablespoons Dijon mustard - 2 tablespoons all-purpose flour These sauce components create the creamy texture that defines stroganoff. Sour cream adds a tangy flavor. Worcestershire sauce gives it a savory kick. Dijon mustard enhances the taste, while flour thickens the sauce, making it perfect for coating the beef. - 1 tablespoon olive oil - Salt and pepper to taste - Egg noodles or rice (for serving) - Fresh parsley, chopped (for garnish) Seasoning is key to bringing out flavors. Use olive oil for browning the beef. Salt and pepper should be added to taste. Serve your beef stroganoff over egg noodles or rice for a complete meal. Fresh parsley adds color and a hint of freshness when you garnish your dish. Start with 2 lbs of beef chuck. Cut it into thin strips. Heat 1 tablespoon of olive oil in a large skillet over medium-high heat. Season the beef with salt and pepper. Brown the beef in batches for 2-3 minutes on each side. This step adds great flavor. Once browned, transfer the beef to your slow cooker. In the same skillet, add the chopped onion, minced garlic, and sliced mushrooms. Cook these for about 5 minutes. You want the onions to turn translucent and the mushrooms to soften. This mix brings out deep flavors in your dish. Sprinkle 2 tablespoons of all-purpose flour over the sautéed mixture. Stir for one minute. This helps cook the flour slightly. Next, add 4 cups of beef broth, 3 tablespoons of Worcestershire sauce, and 2 tablespoons of Dijon mustard. Stir well and bring it to a simmer for 2-3 minutes. Pour this sauce over the beef in the slow cooker. Mix everything together until it is well combined. Cover the slow cooker. Cook on low for 6-8 hours or on high for 3-4 hours. Check for tenderness; the beef should be soft and easy to pull apart. About 30 minutes before serving, stir in 1 cup of sour cream. This will make your sauce creamy and rich. Serve the beef stroganoff over egg noodles or rice, and add fresh parsley on top for a pop of color. To get tender beef in your stroganoff, start with good cuts. I recommend beef chuck. Cut it into thin strips. Browning the beef first helps lock in juices. Make sure to season it well with salt and pepper. Brown it in batches to avoid overcrowding. This step is key for a rich flavor. Once browned, transfer it to the slow cooker without delay. Adding spices can elevate your dish. Consider using garlic powder, onion powder, or paprika. Fresh herbs like thyme or rosemary also work well. These will give your stroganoff depth. Use them in small amounts first, then adjust to taste. Worcestershire sauce is another great addition. It adds a savory note that complements the beef. For a creamier sauce, adjust the sour cream amount. If you like it richer, add more sour cream. For a lighter dish, use less. Stir it in about 30 minutes before serving. This gives it time to blend with the other flavors. Mixing well ensures a smooth sauce. Serve over egg noodles or rice. {{image_2}} You can swap out beef for chicken or turkey. Both options work great in slow cooker beef stroganoff. Use about 2 pounds of boneless, skinless chicken breasts or turkey thighs. Cook them like you would the beef. The chicken or turkey will soak up the yummy flavors, making a tasty meal. Just remember to adjust cooking times. Chicken cooks faster, so check it at 4 hours on low or 2 hours on high. Want a meatless stroganoff? You can easily make a vegetarian version. Replace the beef with hearty veggies like mushrooms and zucchini. Use 8 ounces of sliced mushrooms and 2 cups of diced zucchini. You’ll still use the same broth and sauce ingredients. The sour cream adds creaminess, making it rich and delicious. This version is perfect for anyone who loves veggies or wants a lighter dish. You can change the sauce base for unique flavors. Try using cream cheese instead of sour cream for a richer taste. Just add 8 ounces of cream cheese about 30 minutes before serving. This will give your stroganoff a creamy texture and deeper flavor. You could also use different broths. Vegetable or chicken broth can replace beef broth. These small changes can give your dish a fresh twist while keeping it comforting. To keep your beef stroganoff fresh, store it in an airtight container. Let it cool first. You can keep it in the fridge for up to three days. If you want to keep it longer, freeze it. Place it in a freezer-safe container or bag. Make sure to remove as much air as possible. This helps prevent freezer burn. When you're ready to enjoy your leftovers, reheat them gently. Use the stove on low heat for the best flavor. Stir often to avoid sticking. You can also use the microwave. Heat it in short bursts, stirring in between. This keeps the sauce creamy and delicious. Your beef stroganoff will last about three days in the fridge. If frozen, it can last up to three months. Just remember, the sooner you eat it, the better the taste! Always check for signs of spoilage before eating leftovers. Yes, you can. If you want a creamy texture without sour cream, try using Greek yogurt. It adds creaminess and tang. Another option is to use cream cheese. Just mix it in near the end of cooking for a rich feel. You can also substitute with heavy cream. This will give you a smooth sauce that tastes great. If your sauce is too runny, there are easy ways to thicken it. You can mix cornstarch with cold water to create a slurry. Stir this into your sauce and let it cook for a few more minutes. Another option is to add more flour. Just sprinkle it in and mix well. Let it cook longer, so the flour thickens the sauce. Beef stroganoff tastes amazing with several sides. Classic egg noodles are a great choice. They soak up the sauce well. You can also serve it over rice for a hearty meal. Other good options include mashed potatoes or roasted vegetables. A simple green salad can add freshness to your plate. In this article, we explored the basics of making beef stroganoff. We discussed key ingredients like beef chuck, onions, and mushrooms. The blog also covered methods for preparing, cooking, and storing your dish. Tips for enhancing flavors and variations for different diets were shared. Always remember, cooking is about being creative and having fun. With these steps and ideas, you're ready to make a great meal that everyone will enjoy. Enjoy cooking!

Beef Stroganoff Slow Cooker Hearty and Comforting Meal

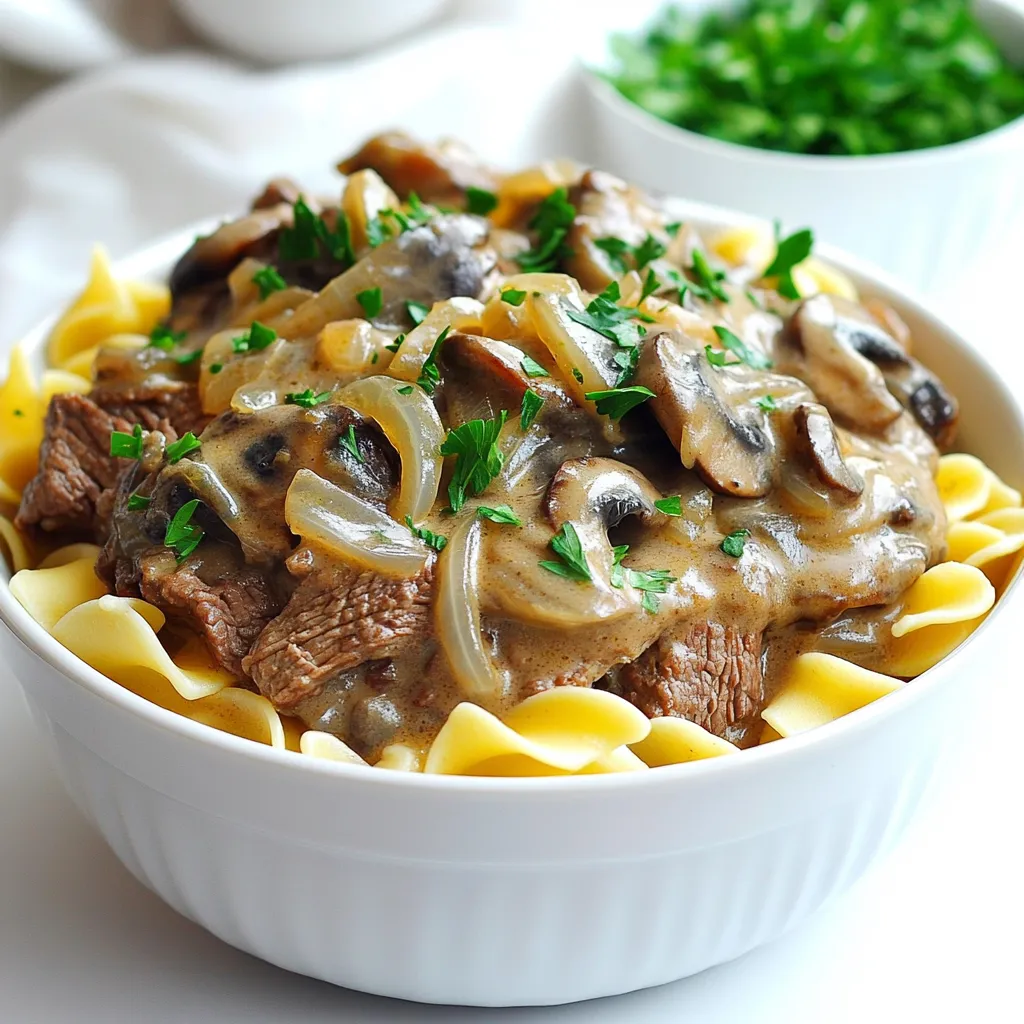
Looking for a warm, hearty meal that cooks itself while you go about your day? Beef Stroganoff in a slow

- 1 lb boneless, skinless chicken thighs, thinly sliced - 2 tablespoons vegetable oil - 4 cloves garlic, minced - 2-3 Thai bird's eye chilies, finely chopped - 2 tablespoons soy sauce - 1 tablespoon oyster sauce - 1 tablespoon fish sauce - 1 teaspoon sugar - 1 cup fresh Thai basil leaves - 1 bell pepper, sliced (red or green) - 1 small onion, thinly sliced - Cooked jasmine rice, for serving For this dish, I use chicken thighs because they stay juicy. The sauces add rich flavors. The garlic and chilies bring heat and aroma. Fresh Thai basil adds a unique taste. I love how bell peppers and onions add crunch and color. - Additional vegetables for variations: broccoli, snap peas, or carrots - Serving suggestions: lime wedges and extra basil for garnish You can mix in more veggies for fun. Broccoli or snap peas work great. Serve with lime wedges for a zesty twist. Extra basil on top makes it look fancy and fresh. - Marinate the chicken: First, take 1 pound of boneless, skinless chicken thighs and slice them thin. In a bowl, mix the chicken with 2 tablespoons of soy sauce, 1 tablespoon of oyster sauce, 1 tablespoon of fish sauce, and 1 teaspoon of sugar. Let the chicken sit for at least 15 minutes. This adds flavor and keeps the meat tender. - Prepare aromatics and vegetables: While the chicken marinates, chop 4 cloves of garlic and 2-3 Thai bird's eye chilies. Slice 1 bell pepper and 1 small onion. These will enhance the dish's taste and aroma. - Heat oil and sauté aromatics: In a large skillet or wok, heat 2 tablespoons of vegetable oil over medium-high heat until hot. Add the minced garlic and chopped chilies. Stir-fry for about 30 seconds until they smell great. This step builds the dish's flavor base. - Cook marinated chicken: Now, increase the heat to high. Add the marinated chicken to the skillet. Stir-fry for 5-7 minutes until the chicken is fully cooked and starts to brown nicely. This gives the dish a great texture. - Add vegetables and finish with basil: Toss in the sliced bell pepper and onion. Stir everything together and cook for another 2-3 minutes. The veggies should be tender but still crisp. Finally, take the skillet off the heat and fold in 1 cup of fresh Thai basil leaves. They add a fresh, fragrant finish to your dish. Serve this delicious Thai basil chicken over jasmine rice. Enjoy your meal! - Best practices for stir-frying: Use a hot skillet or wok. This helps your food cook fast. Keep stirring to avoid burning. Always add ingredients in the right order. Start with aromatics, then add protein, and finish with veggies. - Tips for achieving the perfect sauce consistency: The sauce should be thick but not sticky. You can mix corn starch with water to thicken it if needed. Let the sauce simmer briefly to combine flavors. - Secrets to replicate restaurant flavors: Use fresh Thai basil; it adds a unique taste. Adding fish sauce gives a salty depth. Adjust sugar to balance the flavors. This helps in getting that authentic taste. - Substitutions for ingredients: If you can't find Thai bird's eye chilies, try jalapeños or serranos for heat. Soy sauce can be swapped with tamari for a gluten-free option. You can use any bell pepper color for a pop of color. {{image_2}} You can adjust the heat in your Thai basil chicken. If you like it mild, use only one chili. For more heat, add more bird's eye chilies. You can also remove the seeds for less spice. A dash of chili flakes works well, too. Experiment until you find your perfect heat level. If you want a twist, try other proteins. Tofu is a great choice for a vegetarian meal. Just press and cube it before cooking. Shrimp can also work well and cooks faster than chicken. You can even mix proteins, like chicken and shrimp, for extra flavor. Feel free to mix in different vegetables. Seasonal veggies like zucchini or carrots add color and crunch. You can also use snap peas or bok choy for a fresh taste. Just remember to cut them thin for even cooking. Add them in the last few minutes for a nice, crisp bite. You can freeze Thai basil chicken for up to three months. First, cool the chicken completely. Then, place it in an airtight container or freezer bag. Seal it tightly to prevent freezer burn. Label the bag with the date. When you’re ready to enjoy it, simply thaw it in the fridge overnight. To reheat, use a skillet over medium heat. Add a splash of water or broth to keep it moist. Stir frequently until hot. You can also use the microwave. Place the chicken in a microwave-safe dish. Cover it with a damp paper towel. Heat in short bursts, stirring in between, until warmed through. This keeps the flavors bright and the texture tender. To make Thai basil chicken less spicy, leave out the chilies. You can also use fewer chilies or swap them for bell peppers. If you like, try adding a bit of sugar to balance the heat. This way, you keep the great taste without the burn. Yes, you can use regular basil if you can't find Thai basil. However, the flavor will change a bit. Thai basil has a sweet, anise-like taste, while regular basil is milder. The dish will still be tasty, but it won't have that unique Thai flavor. - Cooked jasmine rice is a great choice. - Serve with stir-fried vegetables. - Try a side of steamed broccoli or green beans. - You can also add a fresh cucumber salad. - For a twist, serve with fried rice or noodles. Pairing these sides makes your meal even better! In this article, we explored the key ingredients for Thai basil chicken, focusing on chicken, sauces, and vegetables. I shared detailed preparation steps and cooking techniques to achieve authentic flavors. We also discussed variations, like spice levels and protein swaps, plus storage tips for leftovers. In the end, making Thai basil chicken is simple, tasty, and versatile. You can enjoy it many ways. Now you have the knowledge to create a delightful dish at home. Don't hesitate to experiment!

Thai Basil Chicken Better Than Takeout Delight

Craving a takeout classic that’s bursting with flavor? You’re in for a treat! Thai Basil Chicken is easy to make

- 1 ½ cups all-purpose flour - 1 teaspoon baking powder - 1 teaspoon baking soda - ½ teaspoon salt - 2 teaspoons pumpkin pie spice For these cupcakes, I start with all-purpose flour. It gives the cupcakes a nice base. Baking powder and baking soda help them rise and stay fluffy. Salt adds flavor, while pumpkin pie spice gives that warm, cozy taste. - ½ cup granulated sugar - ½ cup brown sugar, packed - ½ cup vegetable oil - 1 cup canned pumpkin puree - 3 large eggs - 1 teaspoon vanilla extract Next, we mix our wet ingredients. The granulated and brown sugars add sweetness and depth. Vegetable oil keeps the cupcakes moist. Canned pumpkin puree brings in that essential fall flavor. Eggs help bind everything together, and vanilla extract gives a nice aroma. - 8 oz cream cheese, softened - ½ cup unsalted butter, softened - 2 cups powdered sugar - 1 teaspoon vanilla extract - A pinch of salt For the frosting, cream cheese and unsalted butter make it rich and creamy. Powdered sugar sweetens it up nicely. Adding vanilla extract enhances the flavor, while a pinch of salt balances the sweetness. This frosting will make your cupcakes shine. 1. Preheat the oven and prepare the muffin tin. Start by setting your oven to 350°F (175°C). Line a 12-cup muffin tin with cupcake liners. This helps keep cupcakes moist and makes cleanup easy. 2. Mix dry ingredients together. In a medium bowl, whisk together: - 1 ½ cups all-purpose flour - 1 teaspoon baking powder - 1 teaspoon baking soda - ½ teaspoon salt - 2 teaspoons pumpkin pie spice Set this bowl aside for later. 3. Combine wet ingredients and mixing techniques. In a large mixing bowl, combine: - ½ cup granulated sugar - ½ cup brown sugar, packed - ½ cup vegetable oil Mix these for about 1 minute. Next, add: - 1 cup canned pumpkin puree - 3 large eggs - 1 teaspoon vanilla extract Beat these together on medium speed for about 2 minutes. The mix should be smooth and creamy. 4. Combine dry and wet mixtures. Gradually add the dry mix into the wet mix. Use low speed to combine them. Mix just until you see no flour. Be careful not to overmix, as this can make the cupcakes tough. 1. Fill cupcake liners and baking process. Divide the batter evenly among the cupcake liners. Fill each one about 2/3 full to allow for rising. 2. Cooling instructions and timing. Bake the cupcakes for 18-20 minutes. To check if they are done, insert a toothpick. If it comes out clean, they are ready. Let them cool in the pan for 5 minutes. After that, transfer them to a wire rack. They need to cool completely before frosting. 1. Instructions for preparing frosting. While the cupcakes cool, prepare the cream cheese frosting. In a mixing bowl, beat together: - 8 oz cream cheese, softened - ½ cup unsalted butter, softened Mix these until creamy and well combined. 2. Mixing and achieving desired consistency. Gradually add in: - 2 cups powdered sugar Mix on low speed until fully incorporated. Then, add: - 1 teaspoon vanilla extract - A pinch of salt Increase the speed and beat until the frosting is smooth and fluffy. Now, your pumpkin spice cupcakes are ready to be frosted! Use a piping bag or spatula to add a generous amount of frosting on top. Enjoy the delightful flavors! To make the best pumpkin spice cupcakes, keep a few key tips in mind: - Avoid Overmixing: Mix the batter just until combined. Overmixing makes cupcakes tough. - Measure Flour Accurately: Use a spoon to fluff the flour, then scoop it into the measuring cup. Level it off with a knife. - Use Room Temperature Ingredients: Bring eggs and pumpkin puree to room temp. This helps the batter mix better. Frosting can make or break your cupcakes. Here are some tips: - Piping Bag vs. Spatula: Use a piping bag for neat, fun designs. A spatula works for a rustic look. - Achieve Smooth Frosting: Beat the cream cheese and butter well. Gradually add powdered sugar for a creamy finish. Making your cupcakes look good is part of the fun: - Creative Decorating Ideas: Top with a sprinkle of cinnamon or crushed walnuts. A small piece of candied pumpkin adds a festive touch. - Finishing Touches: Get creative! Use edible glitter or colorful sprinkles for extra flair. {{image_2}} You can mix things up with your pumpkin spice cupcakes. Adding chocolate chips gives a sweet twist. Nuts, like walnuts or pecans, add a crunchy texture. You can also try different spices. Cinnamon, nutmeg, or ginger can enhance the warm flavors. Just remember to keep the pumpkin flavor strong. If you need gluten-free cupcakes, use almond flour or gluten-free flour blends. For the frosting, vegan options are easy too. Swap cream cheese for a dairy-free version. Use vegan butter and powdered sugar to keep it light and sweet. These changes let everyone enjoy the treat. Decorating your cupcakes can reflect the season. For fall, use cinnamon sprinkles or candy pumpkins. In winter, add festive touches like red and green sprinkles. You can even top them with mini marshmallows for a cozy feel. Each season brings a new reason to enjoy these cupcakes! To keep your pumpkin spice cupcakes fresh, store them properly. If you plan to eat them within a few days, you can leave them at room temperature. Place them in an airtight container. This keeps them moist and tasty. If you want to keep them longer, store them in the fridge. Just make sure they are covered well. This will help them last a bit longer without drying out. You can freeze your cupcakes to enjoy later. If you freeze them unfrosted, let them cool completely. Wrap each cupcake in plastic wrap and then place them in a freezer bag. They can stay in the freezer for up to three months. If you want to freeze frosted cupcakes, wait until the frosting is firm. Then, cover each cupcake with plastic wrap and place them in a container. They can also freeze well for up to three months. Once made, pumpkin spice cupcakes are best eaten fresh. When stored at room temperature, they last about 2-3 days. In the fridge, they can stay fresh for about a week. If you freeze them, they remain tasty for about three months. Always check for any signs of spoilage before enjoying them. Yes, you can make the batter ahead of time. Mix all the wet ingredients and dry ingredients as directed. Then, cover the bowl with plastic wrap or a lid. You can store it in the fridge for up to 24 hours. When you're ready, just stir it gently before baking. This helps keep the cupcakes fresh and tasty. If your cupcakes turn out dry, don’t worry. Here are some tips to fix them: - Check your measurements: Too much flour can make them dry. Always measure carefully. - Add moisture: You can brush them with a simple syrup made of equal parts water and sugar. - Use oil: If you used butter, switch to oil next time. Oil keeps cupcakes moist longer. - Bake less: Make sure to check them a minute or two early. Overbaking can dry them out. If you don’t have cream cheese, here are some great substitutes for frosting: - Mascarpone cheese: It has a similar taste and texture. - Greek yogurt: Use plain, full-fat yogurt for a tangy flavor. - Buttercream: Just use more butter and powdered sugar. It will be sweeter but still delicious. - Silken tofu: Blend it smooth for a dairy-free option. Add a bit of lemon juice for flavor. You’ve learned how to create delicious cupcakes from scratch. We covered each ingredient, from dry to wet, and explored cream cheese frosting. You also gained tips for perfecting your baking and decorating skills. Variations allow you to customize cupcakes for any occasion. Finally, the storage tips help keep them fresh. With these steps, you can confidently bake cupcakes that impress. Enjoy the process, share with friends, and make sweet memories in your kitchen. Happy baking!

Pumpkin Spice Cupcakes Cream Cheese Frosting Delight

Get ready to savor fall with my Pumpkin Spice Cupcakes topped with cream cheese frosting! These treats blend warm spices

To make a delicious cinnamon apple pie with caramel, you need these main ingredients: - 3 large apples (Granny Smith or Honeycrisp), peeled and sliced - 1 cup brown sugar - 1 tablespoon lemon juice - 1 teaspoon ground cinnamon - 1/4 teaspoon nutmeg - 1 tablespoon cornstarch - 2 tablespoons unsalted butter, cut into small pieces - 1 pre-made pie crust (or homemade if preferred) - 1/2 cup store-bought caramel sauce (or homemade) - 1 egg (for egg wash) - Pinch of sea salt Each item plays a key role in flavor and texture. For apples, I prefer Granny Smith for their tartness or Honeycrisp for sweetness. Both options provide a great balance. Use fresh apples for the best taste. The brown sugar adds a rich sweetness. You can swap it with white sugar if needed, but it won’t taste as deep. The lemon juice keeps apples fresh and bright. If you don't have lemon, vinegar can work too, but use less. Spices like cinnamon and nutmeg create warmth and depth. Make sure they are fresh for the best flavor. Cornstarch helps thicken the filling. You can use flour if you want, but cornstarch gives a clearer filling. Unsalted butter adds richness. If you prefer, you can use a vegan butter substitute. I recommend using a pre-made pie crust for ease. If you want to make your own, it will taste even better! Store-bought caramel sauce saves time. You can easily make your own if you want a special touch. The egg wash gives a golden finish to the crust. If you want to skip the egg, use milk or cream instead. Finally, a pinch of sea salt enhances all the flavors. By using these ingredients, you create a cozy and warm dessert that everyone will love. Start by prepping your apples. I like to use Granny Smith or Honeycrisp for their flavor. Peel and slice the apples thinly. This helps them cook evenly. Aim for about 1/4 inch slices. You can use a knife or a mandoline for this. Add them to a large bowl. Next, mix in the brown sugar, lemon juice, ground cinnamon, nutmeg, cornstarch, and a pinch of sea salt. Toss the apples until they are fully coated. Let this sit for about 10 minutes. This allows the flavors to blend and the apples to release some juice. For the pie crust, if you use a pre-made one, roll it out carefully. Fit it into a 9-inch pie dish. Trim any excess dough hanging over the edge. If you make your own crust, ensure it is chilled before rolling. Keeping the dough cold helps create a flaky texture. Preheat your oven to 425°F (220°C). This high heat gives the pie a nice golden crust. Once your pie is assembled, bake it for about 45-50 minutes. Look for a golden brown crust and bubbling filling as signs of doneness. If the crust starts to brown too quickly, cover the edges with foil. This protects it from burning while the filling cooks. After baking, let the pie cool for 15-20 minutes. This cooling time is key. It helps the filling set up, making slicing easier. Once cooled, drizzle the remaining caramel sauce over each slice before serving. Enjoy your cozy treat! - Adjusting sweetness and spices I love to taste the filling before baking. If it seems too sweet, add a bit more lemon juice. A pinch of salt balances flavors well. Feel free to play with spices, too. Extra cinnamon or a dash of ginger can boost the warmth. - How to achieve a flaky crust To get a flaky crust, keep your butter cold. When you mix it into the flour, do not overwork the dough. Small butter pieces create those lovely layers. Chill the dough for 30 minutes before rolling it out. - Preventing a soggy bottom To avoid a soggy bottom crust, sprinkle a thin layer of cornstarch on the bottom before adding the filling. You can also pre-bake the crust for about 10 minutes. This sets the crust and helps it hold up well with the juicy filling. - Ideal accompaniments Serve your pie warm with a scoop of vanilla ice cream. The creaminess pairs perfectly with the warm, spiced apples. A dollop of whipped cream is also lovely if you want something lighter. - Presentation ideas for serving For a beautiful presentation, drizzle caramel sauce over each slice. A sprinkle of cinnamon on top adds a nice touch. You can also use a fresh mint leaf for a pop of color. - Best storage practices for leftovers Store leftover pie in the fridge, covered with plastic wrap. To keep the crust crisp, place a piece of parchment paper between the pie and the wrap. For longer storage, freeze slices and reheat them in the oven. This helps to keep the texture just right. {{image_2}} You can make your cinnamon apple pie even better with a few fun tweaks. - Adding nuts or raisins: Chopped walnuts or pecans add a nice crunch. You can also mix in some raisins for a sweet touch. Both options bring extra flavor and texture to the dish. - Experimenting with different spices: While cinnamon and nutmeg shine in this pie, try adding ginger or allspice. A pinch of cardamom can also bring a warm, inviting flavor. - Alternative caramel options: You can use homemade caramel for a richer taste. If you're short on time, store-bought caramel sauce works well too. For a twist, try a salted caramel version to balance the sweetness. If you have special dietary needs, don’t worry! You can still enjoy this pie. - Gluten-free crust options: Look for gluten-free pie crusts at the store. You can also make your own with almond flour or a gluten-free flour blend. This way, everyone can dig in without worry. - Low-sugar variations: Use less brown sugar or substitute with a sweetener like stevia or monk fruit. This keeps the pie sweet while cutting calories. - Vegan substitutions: Swap the butter for coconut oil or vegan butter. Use a flax egg instead of a regular egg for the wash. These simple changes make the pie vegan-friendly and still delicious! To keep your cinnamon apple pie fresh, store it in the fridge. Place it in an airtight container or cover it tightly with plastic wrap. This keeps moisture in and prevents the crust from getting soggy. If you have more pie than you can eat, freezing is a great option. Wrap the pie tightly in plastic wrap and then in aluminum foil. This way, it stays fresh for up to three months. When you’re ready to enjoy it, thaw it in the fridge overnight before reheating. For reheating, preheat your oven to 350°F (175°C). Place the pie on a baking sheet and heat for about 20-25 minutes. This helps keep the crust crisp while warming the filling. In the fridge, your cinnamon apple pie will last for about 3 to 4 days. After that, it may lose flavor and texture. Always check for signs of spoilage before eating. Signs of spoilage include a sour smell or a change in texture. If the pie looks dry or the crust feels sticky, it’s best to throw it away. Enjoy your pie while it’s fresh for the best taste! Can I use frozen apples for this pie? Yes, you can use frozen apples. Just let them thaw first. Drain any extra juice before mixing with other ingredients. This helps keep your pie from being too watery. How do I make homemade caramel sauce? To make caramel sauce, use sugar, butter, and cream. - Heat 1 cup of sugar in a pot over medium heat. - Stir until it melts and turns amber. - Add 6 tablespoons of butter and mix well. - Slowly stir in 1/2 cup of heavy cream until smooth. - Let it cool before using. What are the best apples to use for apple pie? Granny Smith and Honeycrisp are great choices. They hold their shape well and add a nice tartness. You can also mix different apples for depth of flavor. What to do if the pie crust cracks? If your crust cracks, patch it with extra dough. Use a bit of water to help it stick. Also, try not to overwork the dough when mixing. How to fix a runny filling? A runny filling can happen if there's too much juice. You can add more cornstarch to thicken it. Mix in a tablespoon more before baking. Tips if the pie is too sweet. If your pie is too sweet, add a little lemon juice. This will balance the sweetness. Serve with unsweetened whipped cream to help too. This blog post covered all the key steps to make the perfect apple pie. We discussed ingredients, preparation techniques, baking instructions, and tips for a great crust. You learned about variations, storage, and answers to common questions. Making apple pie is rewarding and fun. With practice, you can create a delicious pie that family and friends will love. Enjoy every bite you make, and don’t hesitate to try new ideas!

Cinnamon Apple Pie with Caramel Deliciously Cozy Treat

Nothing says comfort like a warm slice of Cinnamon Apple Pie with Caramel. I’m excited to share my tips and

- 1 ½ cups chocolate graham cracker crumbs - ½ cup unsalted butter, melted - 1 cup cream cheese, softened - 1 cup creamy peanut butter - ¾ cup powdered sugar - 1 teaspoon vanilla extract - 1 cup heavy whipping cream - ½ cup semi-sweet chocolate chips (for topping) - ¼ cup chopped peanuts (for garnish) Using fresh cream cheese is key. It helps create a smooth filling. Softened cream cheese blends better with peanut butter. Make sure to leave it at room temperature for about an hour before mixing. The chocolate graham crackers give a rich taste. If you can’t find them, regular graham crackers work too, but the flavor will change. Heavy whipping cream adds fluffiness. Whipping it until stiff peaks form makes the cheesecake light. Remember to fold the whipped cream gently into the filling. This keeps the texture airy. For a dairy-free option, try using vegan cream cheese and coconut cream. They work well in this recipe. If you prefer a lower sugar option, use a sugar substitute in place of powdered sugar. Just ensure it measures the same. For a gluten-free version, check that your graham crackers are gluten-free. Many brands now offer gluten-free options. You can also use crushed nuts or oats for the crust. This way, you can still enjoy the deliciousness without gluten. Feel free to mix and match based on your needs. Cooking should be fun and fit your style! 1. Start by mixing 1 ½ cups of chocolate graham cracker crumbs with ½ cup of melted unsalted butter in a medium bowl. This blend should look like wet sand. 2. Next, press this crumb mix firmly into the bottom of a 9-inch springform pan. This forms your cheesecake crust. Chill it in the freezer while you make the filling. 3. In a large bowl, beat together 1 cup of softened cream cheese and 1 cup of creamy peanut butter until smooth. This mix should be well combined. 4. Gradually add in ¾ cup of powdered sugar and 1 teaspoon of vanilla extract. Keep mixing until everything is creamy and smooth. 5. Now, whip 1 cup of heavy cream in a separate bowl until stiff peaks form. This gives your cheesecake a light texture. 6. Gently fold the whipped cream into the peanut butter mix until combined. Be careful not to deflate the whipped cream. 7. Pour this cheesecake filling onto the chilled crust. Use a spatula to smooth the top. 8. Sprinkle ½ cup of semi-sweet chocolate chips evenly over the filling. 9. Cover the cheesecake with plastic wrap and refrigerate it for at least 4 hours. For the best taste and texture, let it set overnight. After chilling, check if the cheesecake has set properly. It should feel firm to the touch. If not, give it more time in the fridge. The longer it sits, the better the flavor melds together. When serving, carefully remove the springform pan. Garnish with ¼ cup of chopped peanuts for a crunchy touch. For a fun presentation, drizzle melted chocolate over each slice. You can also add whipped cream and chocolate shavings on top for extra flair. Serve slices on individual plates for a nice look. Enjoy your treat! When making this cheesecake, avoid over-mixing the filling. This can make it too thin. Also, don't skip chilling the crust. It needs to be firm before adding the filling. Be sure to fold the whipped cream gently. If you mix too hard, the cream can lose its fluffiness. To keep your cheesecake creamy, use softened cream cheese. Cold cream cheese won’t blend well. Make sure to whip the heavy cream until it forms stiff peaks. This adds volume and lightness to the filling. Mixing the whipped cream in a few parts helps maintain that airy texture. For rich flavor, use high-quality peanut butter. Natural varieties work best. Adding vanilla extract enhances the taste, making it more complex. Letting the cheesecake chill overnight is key. This time allows the flavors to meld and deepen. You can also drizzle melted chocolate on top for extra sweetness. {{image_2}} You can take your cheesecake to the next level with fun toppings. Try adding: - Fresh strawberries or raspberries - Crushed Oreos for added crunch - A drizzle of caramel sauce - Shaved chocolate or chocolate curls - A sprinkle of sea salt for contrast These toppings not only add flavor but also make your dessert look amazing. Switching up nut butters can create new taste experiences. Use: - Almond butter for a nutty twist - Cashew butter for a creamy flavor - Sunflower seed butter for a nut-free option - Nutella for a chocolate-hazelnut blend Each choice brings a unique flavor to your cheesecake. If you need a gluten-free version, swap the chocolate graham cracker crumbs. Use: - Gluten-free cookie crumbs - Ground almonds or oats for the crust - Crushed gluten-free pretzels for a salty touch These options keep the dessert delicious while meeting dietary needs. To keep your chocolate peanut butter cheesecake fresh, wrap it tightly. Use plastic wrap or foil. You can also store it in an airtight container. This keeps out air and moisture, which helps maintain flavor. If you want to save slices, cut them first. Then, wrap each slice separately. This makes it easy to grab a piece later. You can freeze this cheesecake if you have leftovers. First, let it chill completely in the fridge. Once set, remove it from the springform pan. Wrap it well in plastic wrap, then foil. This protects it from freezer burn. You can freeze it for up to three months. When you are ready to eat it, thaw it in the fridge overnight. In the fridge, the cheesecake will stay fresh for about five days. Make sure to cover it well. The longer it sits, the more the flavors blend. It tastes great even on the last day! Just remember to check for any signs of spoilage before enjoying your treat. Yes, you can use a regular cheesecake crust. A classic graham cracker crust works well. If you prefer, you might try a cookie crust too. Just make sure to press it firmly. This helps keep the cheesecake from falling apart. If your crust is too crumbly, add more melted butter. Start with a tablespoon at a time. Mix it in well. The crust should feel moist and hold together when pressed. If it still crumbles, you may need to add a bit more crumbs. Absolutely! This cheesecake is perfect for making ahead. You can prepare it a day or two in advance. Just keep it covered in the fridge. It will taste even better after chilling, as flavors blend nicely. Yes, you can make this cheesecake without cream cheese. Try using silken tofu or a dairy-free cream cheese instead. Both options will give a creamy texture. Just blend them well with the peanut butter for a smooth filling. In this post, I covered the key ingredients and step-by-step instructions for making your cheesecake. I shared tips on achieving a creamy texture and avoiding common mistakes. You learned about fun variations, toppings, and storage methods to keep it fresh. Remember, a few simple changes can enhance flavor and texture. Now, it's your turn. Dive into your cheesecake adventure, and enjoy every bite you create!

Chocolate Peanut Butter Cheesecake No Bake Delight

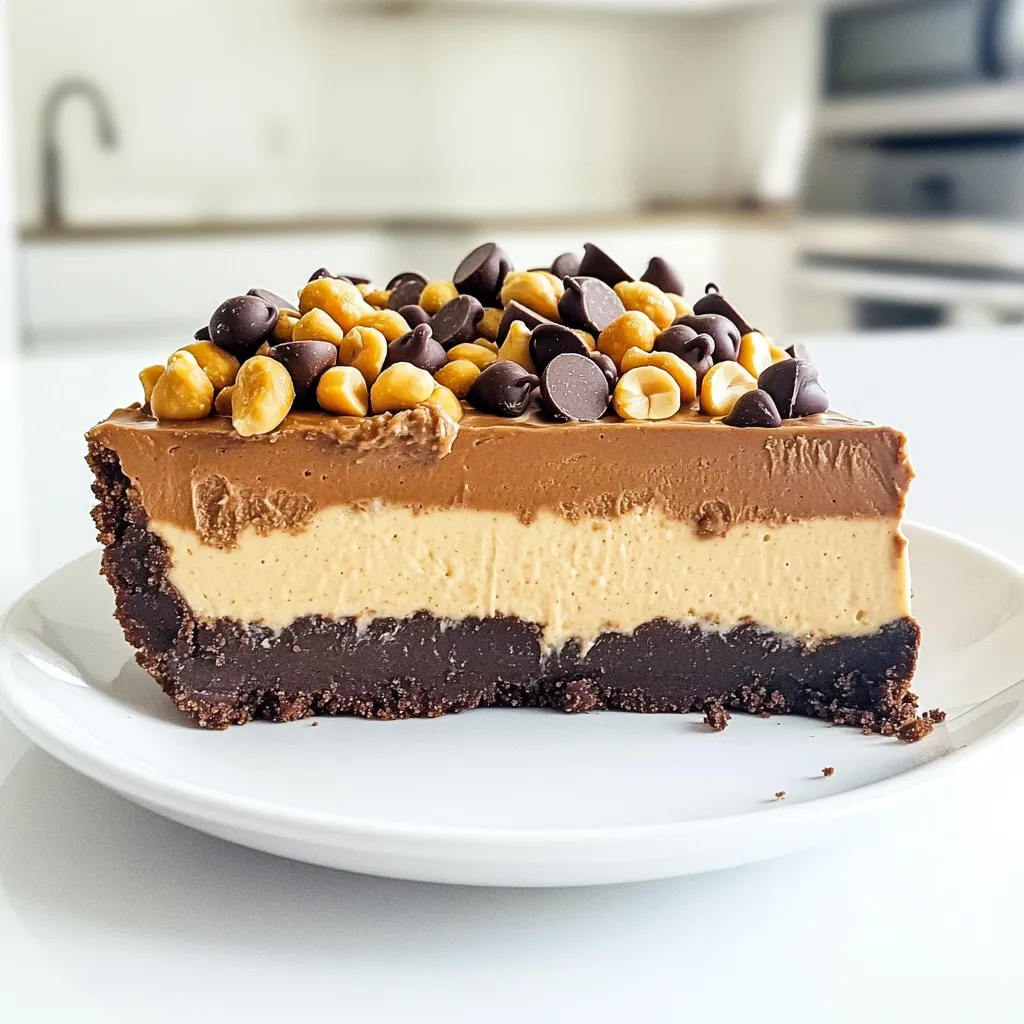
Are you ready to dive into a dessert that’s rich, creamy, and totally irresistible? My Chocolate Peanut Butter Cheesecake No

Older posts
Newer posts
← Previous Page1 … Page8 Page9 Page10 … Page144 Next →

dsad

© 2025 So Yum Recipes • Built with GeneratePress

Our Policies

  • Copyright Policy
  • Cookie Policy
  • GDPR Policy
  • Privacy Policy
  • Disclaimer
  • Terms Of Use

More Information

  • Home
  • About
  • Contact
  • Appetizers
  • Dessert
  • Dinner
  • Drinks
©2025, So Yum Recipes About Back To Top