Spicy Garlic Shrimp Tacos Flavorful and Easy Meal
Craving a meal that packs a punch? Spicy Garlic Shrimp Tacos bring bold flavor with ease. They are quick to
Craving a meal that packs a punch? Spicy Garlic Shrimp Tacos bring bold flavor with ease. They are quick to
![- 4 medium apples (Granny Smith or Fuji), cored and sliced - 1 cup brown sugar - 1/2 cup unsalted butter - 1/4 cup heavy cream - 1 teaspoon vanilla extract - 1/2 teaspoon sea salt - 1 cup chopped nuts (walnuts or pecans) for garnish - 1/2 teaspoon cinnamon (optional) To make caramel apple dip, you need simple ingredients. Start with fresh apples. I love using Granny Smith or Fuji apples. They give a nice tartness that pairs well with sweet caramel. You’ll need brown sugar and unsalted butter for a rich base. Heavy cream adds creaminess, while vanilla extract brings in a lovely flavor. Sea salt balances the sweetness, and chopped nuts add a nice crunch. - Alternative fruits for dipping: Try using pears or bananas for a twist. - Vegan substitutes: Use coconut oil instead of butter. Almond milk can replace heavy cream. - Different types of nuts or toppings: Experiment with almonds or chocolate sprinkles for more fun. These variations keep your dip exciting and cater to different tastes. Enjoy experimenting with what you have at home! You can find the full recipe in the earlier section. First, we need to make the caramel sauce. Start by melting the butter in a medium saucepan over medium heat. Watch it closely as it begins to foam. Once melted, add the brown sugar. Stir it well until the mixture is thick and smooth. Next, carefully pour in the heavy cream while stirring. This step is key to preventing lumps. Continue to stir as the mixture comes to a gentle simmer. Reduce the heat to low, and let it bubble for about five minutes. Keep stirring occasionally. This will help the sauce thicken nicely. Once it thickens, take it off the heat. Stir in the vanilla extract and sea salt. If you want a little warmth, add cinnamon now. Let the caramel cool for about ten minutes. It will continue to thicken as it cools. Now, let’s put it all together. While the caramel cools, slice the apples and arrange them on a serving platter. I prefer Granny Smith or Fuji apples for their crispness and flavor. Once the caramel sauce has cooled, pour it over the apple slices. Make sure to cover them evenly with the sauce. For a finishing touch, sprinkle chopped nuts on top. Walnuts or pecans work great for texture and flavor. For an extra special look, you can drizzle more caramel over the platter. This adds a nice touch and makes it more inviting. Enjoy your delicious caramel apple dip! For the complete recipe, see the [Full Recipe]. To get smooth caramel, watch for key signs. The mixture should bubble gently, not boil too hard. Look for a rich golden color. If your caramel turns grainy, it can be fixed. Heat it slowly while stirring. Add a splash of water to bring it back to life. Serve caramel apple dip in a big bowl. Use small forks or skewers for easy dipping. For a fun twist, add chocolate chips or colorful sprinkles on the side. Your guests can customize their dip! Arrange the apple slices in a circle around the dip bowl. You can drizzle some extra caramel over the apples for a beautiful look. To finish, sprinkle chopped nuts on top. This adds flavor and crunch! {{image_2}} You can change your caramel apple dip with fun flavors. Try adding spices like nutmeg or ginger. These spices give the dip a warm and cozy taste. It’s a nice twist for chilly days. Another great option is to create a chocolate caramel apple dip. Just mix melted chocolate with your caramel sauce. The rich chocolate adds a sweet touch that kids love. You can drizzle it over the apples for a fun look. Make your caramel apple dip fit the season. For a fall-inspired treat, use pumpkin spice. It gives a nice autumn flavor that pairs well with apples. You can even add some chopped pecans for crunch. During the holidays, think about adding peppermint or nutmeg. These flavors bring a festive touch to your dip. Just a little sprinkle of peppermint on top can make it feel like a holiday party. Not in the mood for apples? No problem! You can use other dippers too. Cookies or pretzels work great with caramel. They add a nice salty flavor that balances the sweetness. You can also try finger foods like marshmallows or biscotti. Marshmallows are fun and chewy. Biscotti adds a nice crunch. Both give you different textures, making your dip even more enjoyable. For the full recipe of this delightful caramel apple dip, check out the [Full Recipe]. To keep your caramel apple dip fresh, use a tight container. A glass or plastic container with a lid works best. Make sure it seals well to prevent air from getting in. Before storing, let the dip cool to room temperature. This step helps avoid condensation inside the container. In the fridge, caramel apple dip lasts about 5 to 7 days. Store it in the fridge right after your party. If you want to freeze it, pour the dip into a freezer-safe container. It can last up to 3 months in the freezer. Just remember to let it cool before freezing. To reheat your caramel sauce, warm it slowly on the stove. Use low heat to keep the texture smooth. Stir it often to avoid burning. If you prefer it cold, just take it out of the fridge and serve. It tastes great either way. If you want to serve it warm, check that it is not too hot before pouring it over the apples. For the complete recipe, visit the Full Recipe section. To make caramel apple dip from scratch, follow these steps: 1. Melt 1/2 cup of unsalted butter in a saucepan over medium heat. 2. Stir in 1 cup of brown sugar until blended. 3. Gradually add 1/4 cup of heavy cream while stirring. 4. Simmer the mix for about 5 minutes until it thickens. 5. Stir in 1 teaspoon of vanilla extract and 1/2 teaspoon of sea salt. 6. Let it cool for 10 minutes before serving. This simple process creates a rich, creamy dip. You can find the full recipe above for all details. Yes, you can use store-bought caramel. Look for brands like Kraft or Merckens. These caramels melt well and taste great. They save time if you prefer quick prep over making it from scratch. The best apples for this dip include: - Granny Smith: Tart and crisp, they balance the sweet caramel. - Fuji: Sweet and firm, they add a nice crunch. These apples hold up well and provide a great flavor contrast to the dip. Yes, caramel apple dip is gluten-free. The ingredients, like brown sugar and butter, do not contain gluten. Always check labels to ensure no gluten is present in pre-made products. This makes it a safe treat for those with gluten sensitivities. Caramel apple dip is a simple, fun treat made with fresh apples and rich caramel. You can customize it with different fruits and nuts for a unique twist. Remember to simmer the sauce just right for the best texture. Use your creativity in serving and presenting this tasty dish. It's perfect for gatherings and easy to store for later. Enjoy experimenting with flavors and enjoy each delicious bite. This dip is sure to impress everyone!](https://soyumrecipes.com/wp-content/uploads/2025/04/50e0a20d-fdb1-4424-8a1f-4f1c66c0c85d.webp)
Looking for the perfect sweet treat for your next party? I promise this Caramel Apple Dip will wow your guests!
![To make this chocolate avocado mousse, you will need: - 2 ripe avocados, peeled and pitted - 1/2 cup unsweetened cocoa powder - 1/4 cup pure maple syrup (or honey) - 1/4 cup almond milk (or coconut milk) - 1 teaspoon vanilla extract - Pinch of sea salt - Dark chocolate shavings (for garnish) - Fresh mint leaves (for garnish) If you can’t find ripe avocados, look for avocados that yield slightly when pressed. You can swap maple syrup with honey or agave nectar for sweetness. For a nut-free option, use oat milk instead of almond milk. If you want a richer flavor, try adding espresso powder. You can also experiment with flavored extracts, like almond or orange, to change the taste. Each serving of this mousse has about: - Calories: 250 - Protein: 3g - Carbohydrates: 30g - Fat: 15g - Fiber: 6g - Sugar: 10g This dessert is not only tasty but also packed with healthy fats from avocados. It is a great way to satisfy your sweet tooth while enjoying good nutrition. For the full recipe, check the earlier section. Start by picking ripe avocados. They should feel soft but not mushy. Cut the avocados in half, remove the pit, and scoop the flesh into your food processor. This creamy base is key to the mousse's texture. Once the avocados are in the processor, blend them until smooth. Add the unsweetened cocoa powder, maple syrup, almond milk, vanilla extract, and a pinch of sea salt. Blend until the mixture is glossy and creamy. Stop to scrape down the bowl if needed. Taste the mousse and adjust sweetness with more maple syrup if you like it sweeter. For the best texture, ensure your avocados are very ripe. If the mousse seems too thick, add a splash more almond milk. Chill the mousse for at least 30 minutes in the fridge. This helps it firm up and enhances the flavors. Top with dark chocolate shavings and fresh mint for a beautiful finish. Enjoy your rich and creamy dessert! For the full recipe, check out the details above. Choose avocados that feel slightly soft when you gently squeeze them. They should not be too mushy, as that means they are overripe. Look for avocados with a darker skin, but color can vary by type. If you find hard avocados, let them sit on your counter for a few days to ripen. You can speed up the process by placing them in a brown paper bag with an apple or banana. Taste your mousse after blending and see if it needs more sweetness. If you want it sweeter, add more maple syrup or honey a little at a time. You can also add a small pinch of salt to enhance the chocolate flavor. If you want a richer taste, try adding a splash of strong coffee or espresso. Just a little can make a big difference! To make your mousse look fancy, serve it in clear glasses or small bowls. This will show off its rich, creamy texture. Top each serving with dark chocolate shavings and a fresh mint leaf. You can also drizzle a bit of maple syrup on top for extra flair. Another idea is to add fresh berries for color and a bright flavor. These tips can turn a simple dessert into a showstopper! For the full recipe, check out the complete instructions and ingredients list. {{image_2}} You can make your chocolate avocado mousse even more exciting. Try adding a dash of cinnamon or a pinch of cayenne pepper. Both spices add a warm kick. If you love mint, add a few drops of peppermint extract. It gives your mousse a fresh twist. You can also swap in almond or orange extract for a unique flavor. Experimenting with these flavors can make your dessert special every time. Toppings can change the look and taste of your mousse. Instead of dark chocolate shavings, use crushed nuts like almonds or hazelnuts for a crunchy texture. You can also sprinkle some sea salt on top for a sweet-salty surprise. Fresh berries like raspberries or strawberries add color and a burst of flavor. For a creamy touch, add a dollop of coconut whipped cream. These toppings make your mousse look fancy and taste amazing. This chocolate avocado mousse is already dairy-free, making it great for many diets. If you want a vegan version, use maple syrup instead of honey. You can also replace almond milk with coconut milk for a richer taste. If you're looking for added protein, mix in some silken tofu. It blends well and keeps the mousse creamy. These small changes keep your dessert delicious while fitting different needs. To keep your chocolate avocado mousse fresh, store it in an airtight container. This helps to seal in moisture and flavor. If you use a bowl, cover it tightly with plastic wrap. Make sure the wrap touches the surface of the mousse. This prevents air from getting in and causing browning. Your mousse can last up to 3 days in the fridge. However, the sooner you eat it, the better it tastes. After a day or two, the mousse may start to lose its creamy texture. It's best to check for any changes in color or smell before serving. If the mousse looks brown or smells off, it’s time to toss it. You can freeze chocolate avocado mousse if you want to save some for later. Pour it into an airtight container, leaving some space for expansion. Freeze for up to 2 months. When you're ready to eat it, move it to the fridge overnight to thaw. Avoid microwaving it, as this can change the texture. Once thawed, stir gently to restore creaminess before serving. For the full recipe, check out the [Full Recipe]. Yes, you can use other sweeteners. Honey, agave, or stevia work well. Each sweetener gives a unique flavor. If you want a low-calorie option, try stevia. Adjust the amount based on your taste. Always blend the sweetener with the other ingredients. This helps mix the flavors well. Yes, it is safe to eat raw avocado. Avocados are healthy and packed with nutrients. They have good fats, vitamins, and minerals. Eating raw avocado in this mousse is common. Just make sure the avocado is ripe and fresh. Ripe avocados taste better and blend easier. To make the mousse more chocolatey, add more cocoa powder. Start with an extra tablespoon and blend well. You can also use darker chocolate. Melt dark chocolate and mix it in for depth. Taste the mousse after each addition to find your perfect balance. The more chocolate, the richer the flavor! For the full recipe, check the details above. This guide covered key points to make a delicious avocado mousse. We explored ingredients, substitutes, and even the right nutritional balance. I shared step-by-step instructions to help you get the perfect consistency. Tips on selecting ripe avocados and adjusting flavors were included. You can also try fun variations and learn safe storage options. Remember, with simple tweaks, you can create a mousse that fits your needs. Now, enjoy experimenting and tasting your creation!](https://soyumrecipes.com/wp-content/uploads/2025/04/4ca6b538-9802-4021-aaeb-67bde7c21d5b.webp)
If you love rich desserts but want something healthier, Chocolate Avocado Mousse is for you! This creamy treat uses ripe
![- 1 cup quinoa, rinsed - 2 cups vegetable broth - 1 cup chickpeas, rinsed and drained - 1 cup sweet potato, peeled and diced - 1 tablespoon olive oil - 1 teaspoon smoked paprika - 1 teaspoon cumin - Salt and pepper to taste - 1 cup kale, chopped - 1 avocado, sliced - 1/4 cup sunflower seeds - 1/4 cup tahini - Juice of 1 lemon - Water to thin tahini (if needed) - Fresh cilantro for garnish I love using quinoa as the base. It’s full of protein and fiber. Cooking it in vegetable broth adds extra flavor. Chickpeas give a nice texture. They also add more protein to your meal. Sweet potato adds a sweet touch. Roasting them makes them crispy and tasty. Olive oil brings richness and helps the spices stick. Smoked paprika and cumin add warmth. They create a lovely aroma as you cook. Kale adds vibrant green color and crunch. Avocado is creamy and balances the bowl. Sunflower seeds add a nice crunch. They also bring healthy fats. Tahini makes the dressing creamy. It pairs well with lemon juice for brightness. Fresh cilantro adds a pop of flavor and freshness. All these ingredients come together for a filling and nutritious meal. Check out the Full Recipe for details on how to make it! - Rinse quinoa and chickpeas in cold water. - Peel and dice sweet potatoes into small cubes. - Chop kale into bite-sized pieces and slice avocado. - Preheat your oven to 425°F (220°C) to roast sweet potatoes. - Toss diced sweet potatoes with olive oil, smoked paprika, cumin, salt, and pepper. - Spread sweet potatoes on a baking sheet and roast for 25-30 minutes. - In a medium saucepan, bring vegetable broth to a boil. - Add rinsed quinoa, reduce heat, cover, and simmer for 15 minutes. - Check if quinoa is fluffy and all liquid is absorbed. - In a large bowl, mix chickpeas, roasted sweet potatoes, and chopped kale. - Start with a layer of quinoa in your bowl. - Top with the chickpea and sweet potato mix. - Add sliced avocado and a sprinkle of sunflower seeds. - Drizzle tahini dressing over the top. - Garnish with fresh cilantro and serve. For more detailed cooking steps, check out the Full Recipe. A great vegan Buddha bowl needs a mix of protein, carbs, and veggies. This balance gives you energy and keeps you full. Quinoa acts as a strong base; it offers protein and fiber. Chickpeas add even more protein. Sweet potatoes give you healthy carbs and a sweet taste. To make your bowl fun to eat, use a variety of colors. Bright orange sweet potatoes, deep green kale, and creamy avocado make your dish pop. Mix textures too! Add crunchy sunflower seeds to contrast with soft avocado. Roasting and steaming are two great ways to cook veggies. Roasting brings out natural sweetness. It makes sweet potatoes crispy on the outside, soft on the inside. Simply toss your veggies in olive oil and spices, then roast them at 425°F for 25-30 minutes. Steaming, on the other hand, keeps veggies tender and bright. It’s great for greens like kale. Just steam them for a few minutes until they are vibrant and tender. Cooking quinoa is simple. Rinse it first to remove bitterness. Then, boil it in vegetable broth for flavor. Once boiling, reduce the heat, cover, and cook for about 15 minutes. When done, let it sit for five minutes before fluffing with a fork. Spices and dressings can elevate your bowl. Try smoked paprika and cumin for a warm, earthy taste. For a fresh kick, squeeze some lemon juice over your dish. Adding herbs like cilantro can brighten flavors too. They add a fresh twist without extra calories. You can mix tahini with lemon juice and water for a smooth dressing. Adjust the water until you reach your desired thickness. These tips will help you make a delicious and nutritious vegan Buddha bowl. For a full recipe, check out the [Full Recipe]. {{image_2}} You can switch quinoa for other grains. Brown rice or farro work well. These grains add their unique tastes. They also change the texture. Mixing grains is another fun choice. You can blend quinoa with wild rice or millet. This adds variety to your Buddha bowl. If you want different protein, try other legumes. Black beans or lentils are great options. You can also use tofu for a hearty bite. For a crunchy twist, add nuts or seeds. Almonds, walnuts, or pumpkin seeds can give you that perfect crunch. Using seasonal veggies makes your bowl fresh. In summer, add tomatoes and cucumbers. In fall, try roasted squash or Brussels sprouts. This way, your meal stays exciting and new. You can also adapt for dietary needs. If you're gluten-free, just swap out grains. Enjoy your personalized, healthy meal! For the full recipe, check out the section above. To keep your Vegan Buddha Bowl fresh, follow these tips: - Store leftovers in airtight containers. - Refrigerate within two hours of serving. - Use separate containers for each ingredient. This keeps flavors fresh. - Quinoa and roasted sweet potatoes can last up to four days. - Store kale and avocado separately to prevent browning. When it’s time to enjoy your leftovers, here’s how to reheat: - Use a microwave for quick reheating. Heat quinoa and veggies in 30-second bursts. - Stir between intervals for even heating. - For crispy sweet potatoes, use an oven or air fryer. Bake at 350°F for 10-15 minutes. - Keep components separate until serving for the best taste and texture. - Reheat tahini dressing gently in a bowl of warm water to thin it out. These tips help you enjoy your Vegan Buddha Bowl again, keeping it tasty and nutritious! For a complete recipe, check out the Full Recipe. You can use several alternatives for tahini. Here are a few ideas: - Almond butter - Cashew butter - Sunflower seed butter - Greek yogurt (not vegan) - Soy sauce for a different flavor These substitutes can work well. Each one adds its own twist to the dressing. Try them and see which you like best! A Vegan Buddha bowl can last up to four days in the fridge. To keep it fresh: - Store it in an airtight container. - Separate the dressing from the bowl. This helps maintain the crispness of the veggies and the flavor of the dressing. Yes, you can prepare a Vegan Buddha bowl in advance. Here’s how: - Cook the grains and veggies ahead of time. - Store each ingredient separately. - Assemble the bowl just before eating. This method keeps your meal fresh and tasty. You can also mix and match ingredients for variety. Enjoy your easy meal prep! A Vegan Buddha Bowl combines wholesome ingredients like quinoa, chickpeas, and roasted sweet potatoes. You prepare each element to boost flavor and nutrition. Balance protein, carbs, and veggies for the best results. Don’t shy away from experimenting with new grains or seasonal veggies, too. Storage and reheating are simple, keeping meals fresh and delicious. This bowl is more than just food; it’s a chance to customize meals to fit your taste and health needs. Enjoy the process, and share your favorite bowl creations!](https://soyumrecipes.com/wp-content/uploads/2025/04/77c66363-e316-47ff-b86e-4759994f0263.webp)
Are you ready to dive into a bowl of goodness? A Vegan Buddha Bowl is not just a meal; it’s
![- 1 lb large shrimp, peeled and deveined - 2 tablespoons olive oil - Spices: smoked paprika, cayenne pepper, garlic powder, chili powder - Salt and pepper to taste - 8 small corn or flour tortillas - Toppings: avocado slices - 1 ripe mango, diced - 1/2 red onion, finely chopped - 1/4 cup fresh cilantro, chopped - 1 jalapeño, seeded and minced - Juice of 1 lime I love the bright, fresh flavors in this recipe. The large shrimp really shine with the spices. The smoked paprika gives a nice depth, while the cayenne adds a kick. Garlic powder and chili powder round out the taste. Corn or flour tortillas work well. I prefer corn for their texture. Sliced avocado adds creaminess and balances the heat. The mango salsa is a highlight. It brings sweetness and a burst of color. Diced mango, red onion, cilantro, and jalapeño combine perfectly. A squeeze of lime juice adds zing. For those wanting to explore the full recipe, check out the [Full Recipe]. Enjoy crafting these delicious tacos! - Mix olive oil and spices in a bowl. - Add smoked paprika, cayenne pepper, garlic powder, chili powder, salt, and pepper. - Toss the shrimp in the spice mix. - Let the shrimp marinate for 15 minutes. Marinating the shrimp lets the flavors soak in. This makes each bite taste amazing. After 15 minutes, the shrimp will be ready to cook. - Combine diced mango, chopped onion, minced jalapeño, and chopped cilantro in a bowl. - Squeeze lime juice over the mix and toss gently. This fresh mango salsa adds a sweet and spicy kick to your tacos. The bright flavors balance the shrimp's heat. It’s easy and fun to make. - Heat a skillet over medium-high heat. - Cook the marinated shrimp in a single layer for 2-3 minutes on each side. - Warm tortillas in the same skillet for about 30 seconds on each side. Cooking shrimp this way keeps them juicy and tender. The tortillas will become soft and warm, perfect for holding all the tasty fillings. You can find the full recipe [Full Recipe] for more details. Enjoy the process and get ready for a delicious meal! Marinating shrimp is key for great flavor. Use the spice mix from the recipe. Let the shrimp soak in the mix for about 15 minutes. This helps the shrimp absorb all those spicy notes. To cook shrimp, heat your skillet until it’s hot. Place the shrimp in a single layer. Cook each side for 2-3 minutes. Remove the shrimp when they turn pink and opaque. Overcooked shrimp can get tough, so keep an eye on them. If you want to switch shrimp, try chicken or tofu. Both options work well with the same spices. For the mango salsa, you can use different fruits. Pineapple or peaches add a sweet twist. Experiment with what you have on hand for unique flavors. These tacos pair nicely with sides like rice or beans. Black beans boost protein and fiber. You can also serve chips with salsa for a fun crunch. For sauces, try a drizzle of lime crema or a tangy hot sauce. These toppings add more flavor and depth to your meal. Enjoy your spicy shrimp tacos with a refreshing drink for a complete meal. For the full recipe, check the details above! {{image_2}} You can easily adjust the spice in your tacos. If you like it mild, use less cayenne pepper. For a kick, add more cayenne or chili powder. You can also try different hot sauces for extra flavor. A dash of your favorite sauce can enhance the shrimp's taste. Feel free to get creative with toppings. You can add cheese, like crumbled feta or shredded cheddar. Sour cream adds creaminess, while fresh avocado slices bring smoothness. You can also include extra veggies in your mango salsa. Try diced bell peppers or tomatoes for added crunch and color. Presentation can make your tacos stand out. Serve them on a colorful platter with lime wedges. You can also use small baskets lined with parchment paper. For a taco party, set up a taco bar. Let guests build their own tacos with all the toppings and salsas. After enjoying your spicy shrimp tacos, store leftovers right away. Place shrimp and mango salsa in separate containers. I recommend using airtight glass containers. This keeps them fresh longer. Make sure to cool them down first. Don't let food sit out for too long. You can freeze shrimp before cooking. However, ensure they are fresh. They should not be previously frozen. If you do freeze shrimp, use a freezer-safe bag. Remove as much air as possible. For avocado, it's best to avoid freezing. It can turn brown and mushy. If you must freeze it, slice it and add lime juice to slow browning. Leftovers can last in the fridge for 2-3 days. Always check for signs of spoilage. If the shrimp smells off or looks slimy, discard it. The mango salsa should stay fresh, too. Look for changes in color or texture. If it smells sour, it's time to toss it out. Enjoy your spicy shrimp tacos with fresh ingredients for the best taste! For the full recipe, check the earlier section. The best way to cook shrimp for tacos is by pan-searing them. Start by marinating the shrimp in olive oil and spices. Heat a skillet over medium-high heat. Add the shrimp in a single layer. Cook them for 2-3 minutes on each side. They should turn pink and opaque when done. This method keeps them juicy and full of flavor. Yes, you can make mango salsa ahead of time. It tastes better after sitting for a while. Combine the diced mango, red onion, jalapeño, and cilantro. Squeeze lime juice over it, then mix well. Store it in the fridge in an airtight container. Use it within 1-2 days for the best taste. Great sides for spicy shrimp tacos include: - Mexican rice - Refried beans - Grilled corn on the cob - A simple green salad These sides balance the spice and add freshness to your meal. To make shrimp tacos gluten-free, use corn tortillas instead of flour tortillas. Always check the labels on your ingredients, especially sauces and spices. Most spices are gluten-free, but some blends might contain gluten. This way, you can enjoy the tacos without worry. Yes, you can use frozen shrimp for this recipe. Just make sure to thaw them first. Place the shrimp in cold water for about 15-20 minutes or leave them in the fridge overnight. Pat them dry before marinating. This helps the spices stick better. For the full recipe, check the details above. You’ve learned how to make tasty shrimp tacos with fresh mango salsa. Using the right ingredients, like shrimp, spices, and ripe mango, boosts flavor. Proper marinating and cooking techniques ensure juicy shrimp every time. Feel free to adjust spices or toppings to fit your taste. Whether you prepare these for yourself or a gathering, they are sure to please. Get ready to enjoy delicious tacos that are simple and fun to make!](https://soyumrecipes.com/wp-content/uploads/2025/04/0f21d880-be43-4994-9873-caad2d0f7b4e.webp)
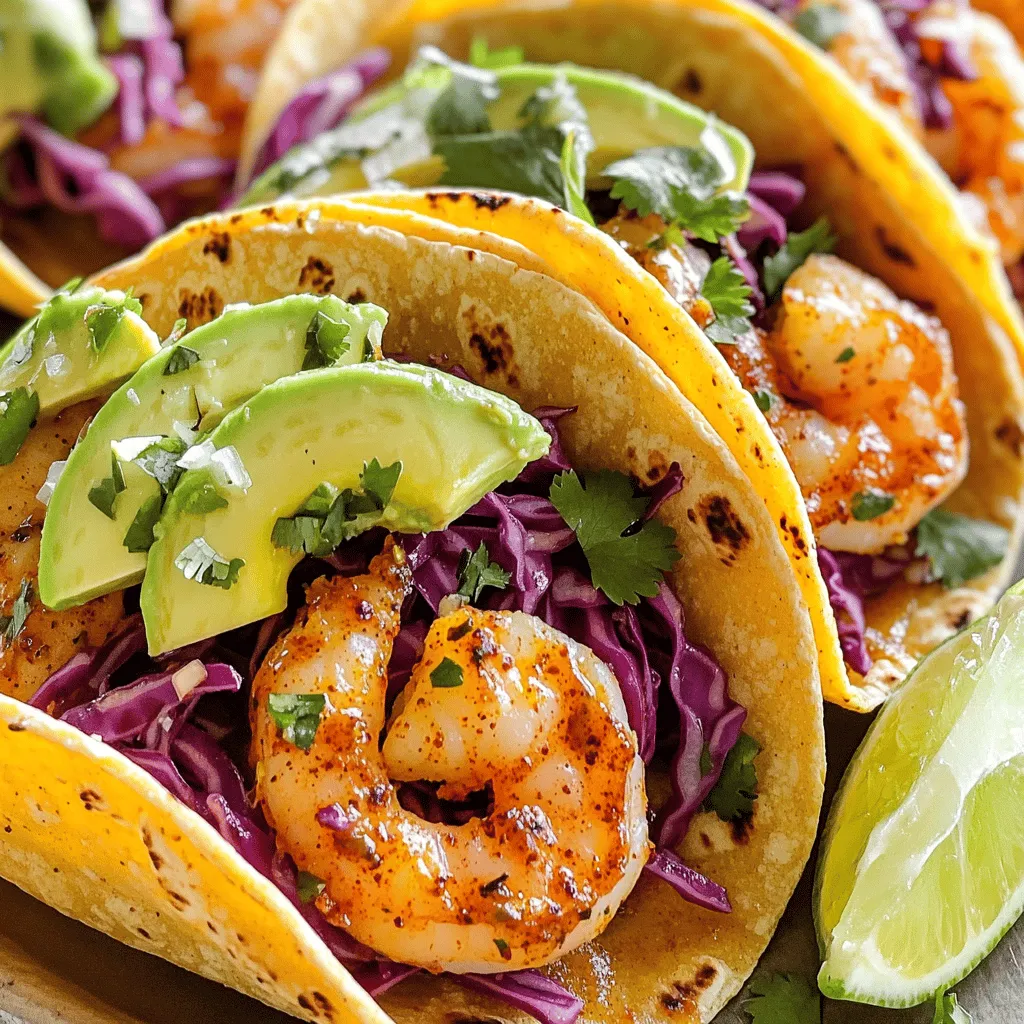
If you crave a burst of flavor, you’ll love my Spicy Shrimp Tacos with Mango Salsa Delight. These tacos combine
![- 1 cup fresh blueberries (or frozen, if preferred) - 1 ½ cups all-purpose flour - 1/2 cup sugar (plus extra for sprinkling) - 1 tablespoon baking powder - 1/2 teaspoon salt - Zest of 1 large lemon - 1/2 cup unsalted butter, melted - 2 large eggs - 1/2 cup milk (or almond milk for a twist) - 2 tablespoons fresh lemon juice - 1 teaspoon vanilla extract Each ingredient plays a key role in the flavor and texture of the muffins. The flour gives structure, while the sugar adds sweetness. Baking powder helps the muffins rise, giving a light and fluffy texture. The lemon zest and juice bring a fresh, bright taste. The blueberries add a juicy burst in every bite. - Flour: Use all-purpose flour for the best results. - Sugar: Granulated sugar works well. Adjust to taste if you prefer less sweetness. - Butter: Melted butter adds richness. Make sure it cools slightly before mixing. - Milk: Regular milk or almond milk both work fine. Choose what you like! - Eggs: Large eggs are ideal for binding the ingredients together. Each muffin contains roughly: - Calories: 180 - Protein: 3g - Carbohydrates: 25g - Fat: 8g - Fiber: 1g - Sugar: 8g These muffins are a great morning treat or snack. They give you energy without being too heavy. For more details, check the [Full Recipe] for specific nutrients and serving sizes. First, gather your ingredients. You need: - 1 cup fresh blueberries (or frozen, if preferred) - 1 ½ cups all-purpose flour - 1/2 cup sugar (plus extra for sprinkling) - 1 tablespoon baking powder - 1/2 teaspoon salt - Zest of 1 large lemon - 1/2 cup unsalted butter, melted - 2 large eggs - 1/2 cup milk (or almond milk for a twist) - 2 tablespoons fresh lemon juice - 1 teaspoon vanilla extract Next, preheat your oven to 375°F (190°C). Line a muffin tin with paper liners or grease it with non-stick spray. In a large bowl, mix the flour, sugar, baking powder, salt, and lemon zest. This helps the flavors blend well. In a separate bowl, whisk together the melted butter, eggs, milk, lemon juice, and vanilla extract. Aim for a smooth and creamy texture. Slowly add the wet mixture to the dry ingredients. Stir gently until just combined. You want it to be slightly lumpy, not smooth. Now, gently fold in the blueberries. Make sure they are evenly spread throughout the batter. Spoon the batter into the muffin tin, filling each cavity about 3/4 full. Sprinkle a little sugar on top of each muffin for added crunch. Bake in the preheated oven for 18-20 minutes. You’ll know they’re done when they turn golden brown and a toothpick comes out clean. After baking, let the muffins cool in the tin for 5 minutes. Then transfer them to a wire rack. This helps them cool evenly. Serve the muffins warm. You can dust them with powdered sugar and add a slice of lemon or a few fresh blueberries on top. This adds a nice touch and makes them look beautiful. For more details, check the Full Recipe. To make your lemon blueberry muffins moist, use room-temperature ingredients. Cold eggs and milk can affect how well the batter mixes. When mixing, stir just until combined. Overmixing can lead to tough muffins. Adding a bit of sour cream or yogurt also helps keep them soft. A common mistake is using old baking powder. Always check its freshness. If it’s not active, the muffins won’t rise. Another mistake is not measuring the flour correctly. Too much flour can make muffins dry. Use the spoon-and-level method to measure flour accurately. Store your muffins in an airtight container at room temperature for up to three days. If you want to keep them longer, freeze them. Wrap each muffin in plastic wrap and place them in a freezer bag. They will last up to three months. To enjoy them, just thaw and warm them up in the oven or microwave. For more detailed instructions, check the Full Recipe. {{image_2}} You can easily swap some ingredients in this recipe. If you don't have all-purpose flour, whole wheat flour works well. For a sweetener change, try using honey or maple syrup instead of sugar. If you need a dairy-free option, almond milk or oat milk is great in place of regular milk. For butter, use coconut oil or a vegan butter substitute. These small changes keep the muffins tasty. To make your muffins even better, think about adding spices. A pinch of cinnamon or nutmeg can add warmth. You can also mix in lemon extract for a stronger lemon flavor. Want more texture? Add chopped nuts like almonds or walnuts. A few tablespoons of poppy seeds can add a nice crunch too. These additions make your muffins unique and delightful. If you want gluten-free muffins, use a gluten-free flour blend. It usually works just like all-purpose flour. For a vegan version, replace the eggs with flax eggs. Mix one tablespoon of ground flaxseed with three tablespoons of water and let it sit until it thickens. You can swap the butter with a plant-based alternative. These adaptations let everyone enjoy your lemon blueberry muffins without worries. Check out the Full Recipe for all the details! To keep your lemon blueberry muffins fresh, store them in an airtight container. Place them at room temperature for up to three days. If your kitchen is warm, you can store them in the fridge. Just remember, cold can make them a bit dry. For longer storage, freeze muffins. Wrap each muffin tightly in plastic wrap. Then, place them in a freezer bag or container. They can last up to three months in the freezer. When you're ready to eat, just thaw them at room temperature. To reheat muffins, use the microwave. Heat for about 15-20 seconds for one muffin. If you prefer a crispy top, pop them in the oven at 350°F (175°C) for about 5-10 minutes. This makes them warm and delicious, just like fresh-baked. Enjoy these treats anytime! For the full recipe, check out the [Full Recipe]. To store leftover muffins, place them in an airtight container. Keep them at room temperature for up to three days. If you want them to last longer, store them in the fridge for a week. For extra freshness, you can freeze them. Wrap each muffin in plastic wrap, then place them in a freezer bag. They will stay good for up to three months. When you want to eat one, let it thaw at room temperature or warm it in the microwave. Yes, you can use frozen blueberries. They work well in this recipe. Just be sure to toss them in a bit of flour before adding them to the batter. This helps prevent them from sinking to the bottom. Frozen blueberries may make the batter a little purple, but they taste just as good and add a nice touch. These muffins rise well due to a few key factors. First, the baking powder creates bubbles of gas in the batter. This gas expands when heated, making the muffins rise. Second, the eggs add structure and stability. Finally, mixing the wet and dry ingredients gently helps keep the air in the batter. Avoid overmixing; a few lumps are okay. For the full recipe, check out the section above! In this blog post, we explored simple recipes for delicious muffins. We covered ingredients, measurement details, and nutritional facts. You learned step-by-step instructions for preparation, baking, and serving. I shared tips for keeping muffins moist and avoiding common mistakes. You also found variations for different diets and flavor boosts. Don’t forget to check storage tips for fresh muffins. With these insights, you can bake memorable treats that everyone will enjoy. Now, get baking and savor the results!](https://soyumrecipes.com/wp-content/uploads/2025/04/4a4e7eca-f466-43e9-b26b-67c9c50abf2e.webp)
Looking for a sweet and zesty treat? You’ve come to the right place! I’ll show you how to make delicious
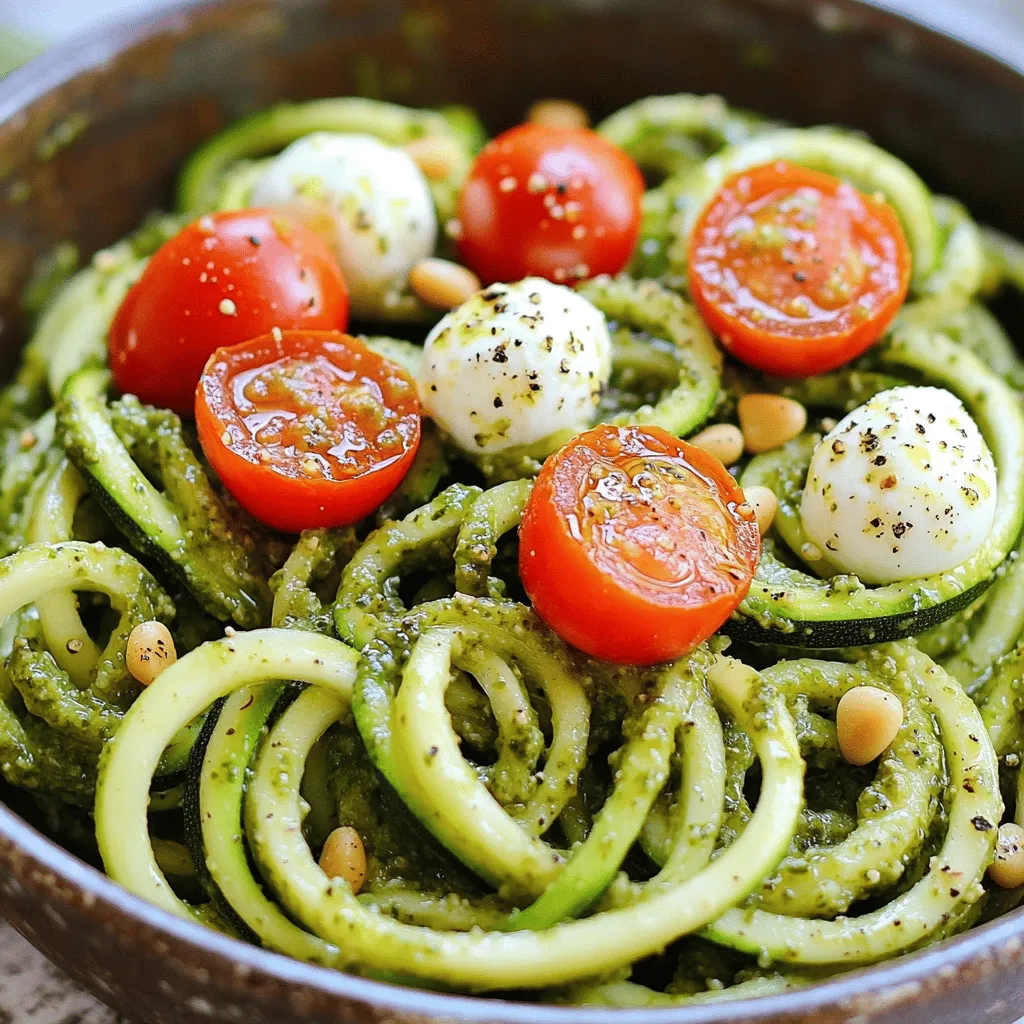
Looking for a fresh, flavorful dish that’s easy to whip up? Zucchini noodles with pesto are your answer! With just

Are you ready to elevate your dinner game? Pineapple Fried Rice is a colorful dish that bursts with flavor. This

Are you ready to elevate your dinner game? Pineapple Fried Rice is a colorful dish that bursts with flavor. This
![- 2 tablespoons olive oil - 1 medium onion, chopped - 3 cloves garlic, minced - 2 cans (14.5 oz each) crushed tomatoes - 1 cup vegetable broth The base of this soup starts with olive oil, onion, and garlic. I love how these flavors mix. The garlic adds a nice kick, while the onion brings sweetness. Next, we pour in crushed tomatoes. They give the soup its rich color and taste. Vegetable broth adds depth, making every spoonful comforting. - 1 teaspoon sugar - 1 teaspoon dried oregano - Salt and pepper to taste - 1 cup heavy cream (or coconut cream for dairy-free) Now, we move to seasoning. I add sugar to balance the acidity of the tomatoes. Dried oregano brings warmth, while salt and pepper enhance all the flavors. The cream is key to that velvety texture. You can use coconut cream if you want a dairy-free option. - Fresh basil leaves, chopped for garnish - Crusty bread, for serving Garnishing is where the soup shines! I love to sprinkle fresh basil on top. It adds a pop of color and a fresh taste. Serve this soup with crusty bread for dipping. It makes the meal complete and enjoyable. For the full recipe, check the section above. To start your creamy tomato basil soup, heat 2 tablespoons of olive oil in a large pot over medium heat. Once hot, add 1 medium chopped onion. Sauté it for about 5 minutes until it becomes soft and clear. This step builds a great flavor base. Next, add 3 cloves of minced garlic. Cook it for 1-2 minutes until you smell that wonderful aroma. Now it’s time to pour in 2 cans of crushed tomatoes and 1 cup of vegetable broth. Stir everything together for a nice mix. Add 1 teaspoon of sugar, 1 teaspoon of dried oregano, and salt and pepper to taste. Bring the mix to a soft simmer. Let it cook for about 15-20 minutes. This allows the flavors to blend well together. After simmering, it’s time to season the soup. Taste it and adjust the salt and pepper if needed. If you like a little sweetness, you can add more sugar. Next, blend the soup until it is smooth. You can use an immersion blender right in the pot. If you don’t have one, carefully pour the soup in batches into a regular blender. Make sure to cover the lid with a towel to prevent splatters. Once the soup is smooth, return it to the pot. Now, stir in 1 cup of heavy cream. If you want a dairy-free version, use coconut cream instead. Heat it gently for about 5 minutes but avoid boiling. Finally, taste again and adjust the seasoning. Add more salt or pepper as needed. Serve hot! You can garnish with fresh chopped basil leaves. Pair it with crusty bread for a delightful meal. For the full recipe, check the section above. To get the best creamy tomato basil soup, focus on two key areas: consistency and flavor balance. - Maintaining the right consistency: After blending, your soup should be smooth and thick. If it's too thick, add a splash of broth. If it’s too thin, let it simmer longer to cook off excess liquid. - Balancing flavors with seasoning: Taste as you cook! Start with salt and pepper. Add more sugar if your tomatoes taste too acidic. A little sugar can brighten the flavors. Serving your soup well makes it even more enjoyable. - Ideal serving dishes: Use rustic bowls for a cozy feel. The thicker the bowl, the better it holds heat. - Garnishing for visual appeal: Drizzle some cream on top before serving. Add fresh basil leaves for a pop of green. This makes your soup look inviting and fresh. You can save time without losing flavor. - Using store-bought ingredients: Canned crushed tomatoes and pre-chopped garlic can save you lots of time. - Meal prep suggestions: Make a big batch and freeze leftovers. This way, you always have a warm, tasty meal ready. When you need it, just heat and serve! For the complete recipe and more detailed steps, check out the Full Recipe. {{image_2}} If you want a vegan version, use coconut cream instead of heavy cream. Coconut cream makes the soup rich and creamy. It adds a hint of sweetness too. You can also use cashew cream for a nutty flavor. If you need a thick soup, try blending in some cooked potatoes or cauliflower. They blend well and add creaminess without dairy. For a gluten-free soup, choose a gluten-free vegetable broth. Many store brands are available, so check the labels. You can enjoy this soup without bread. Serve it with a side salad or roasted veggies instead. This way, you keep the meal light and healthy. To boost the flavor, add fresh herbs like thyme or parsley. You can also sprinkle in red pepper flakes for some heat. If you want, try adding chopped spinach or bell peppers. They add color and extra nutrients. Each option gives a new twist to this classic soup. Before you store your creamy tomato basil soup, let it cool down. This step is key. If you store hot soup, it can create moisture in the container. Use a large pot to cool the soup quickly. Stir it often to speed up the process. Once cooled, transfer the soup into suitable containers. I recommend using airtight containers. They keep the soup fresh and prevent spills. When reheating your soup, you want to keep its rich flavor. The best way is to use a stove. Pour the soup into a pot and heat it over low to medium heat. Stir often to avoid sticking. If you're in a hurry, a microwave is fine too. Use a microwave-safe bowl and cover it loosely. Heat in short bursts, stirring in between. This method helps keep the soup smooth and tasty. In the fridge, your creamy tomato basil soup lasts about 3 to 5 days. Store it in airtight containers to keep it fresh. If you want to keep it longer, consider freezing it. The soup can last up to 3 months in the freezer. Just remember to leave some space in the container, as soup expands when frozen. When ready to eat, thaw it overnight in the fridge before reheating. Enjoy your comforting soup whenever you crave it! Can I freeze creamy tomato basil soup? Yes, you can freeze creamy tomato basil soup. Allow it to cool first. Pour the soup into freezer-safe containers. Leave space at the top for expansion. It can last up to three months. How do I make the soup spicier? To spice up your soup, add red pepper flakes or cayenne pepper. Start with a small amount. You can always add more as you taste. You can also include a dash of hot sauce for extra heat. Can I substitute fresh basil for dried? Yes, you can use dried basil instead of fresh. Use one teaspoon of dried basil for every tablespoon of fresh. Dried herbs are more concentrated, so adjust based on your taste. Caloric content per serving Each serving of creamy tomato basil soup has about 300 calories. This value can change based on the cream used. Coconut cream will alter the calorie count slightly. Health benefits of key ingredients - Tomatoes: Rich in antioxidants and vitamins, especially vitamin C. - Basil: Good for digestion and has anti-inflammatory properties. - Olive oil: Contains healthy fats that support heart health. - Garlic: Boosts the immune system and adds flavor. What to serve with creamy tomato basil soup? Pair your soup with crusty bread, grilled cheese, or a fresh salad. These options add texture and flavors that complement the soup well. Croutons versus bread: what's better? Croutons add a nice crunch and flavor to the soup. However, crusty bread is great for dipping and soaking up the soup. It depends on your preference! For the full recipe, check out the [Full Recipe]. This article covered how to make creamy tomato basil soup. We looked at key ingredients like tomatoes, broth, and cream. You learned step-by-step instructions, cooking tips, and variations for dietary needs. We also discussed storage information and answered common questions. In summary, this soup is easy, tasty, and versatile. Enjoy making it your own with different flavors and ingredients. Give it a try—you won’t regret it!](https://soyumrecipes.com/wp-content/uploads/2025/04/1c8e55cc-8b58-4c99-8ba0-1746884d5fe2.webp)
Indulging in a bowl of creamy tomato basil soup is pure comfort. With its rich flavors and vibrant colors, this
